When you click on links to various merchants on this site and make a purchase, this can result in this site earning a commission. Affiliate programs and affiliations include, but are not limited to, the eBay Partner Network.
LTX and LSXPutting LT1s, LS1s, and their variants into Third Gens is becoming more popular. This board is for those who are doing and have done the swaps so they can discuss all of their technical aspects including repairs, swap info, and performance upgrades.
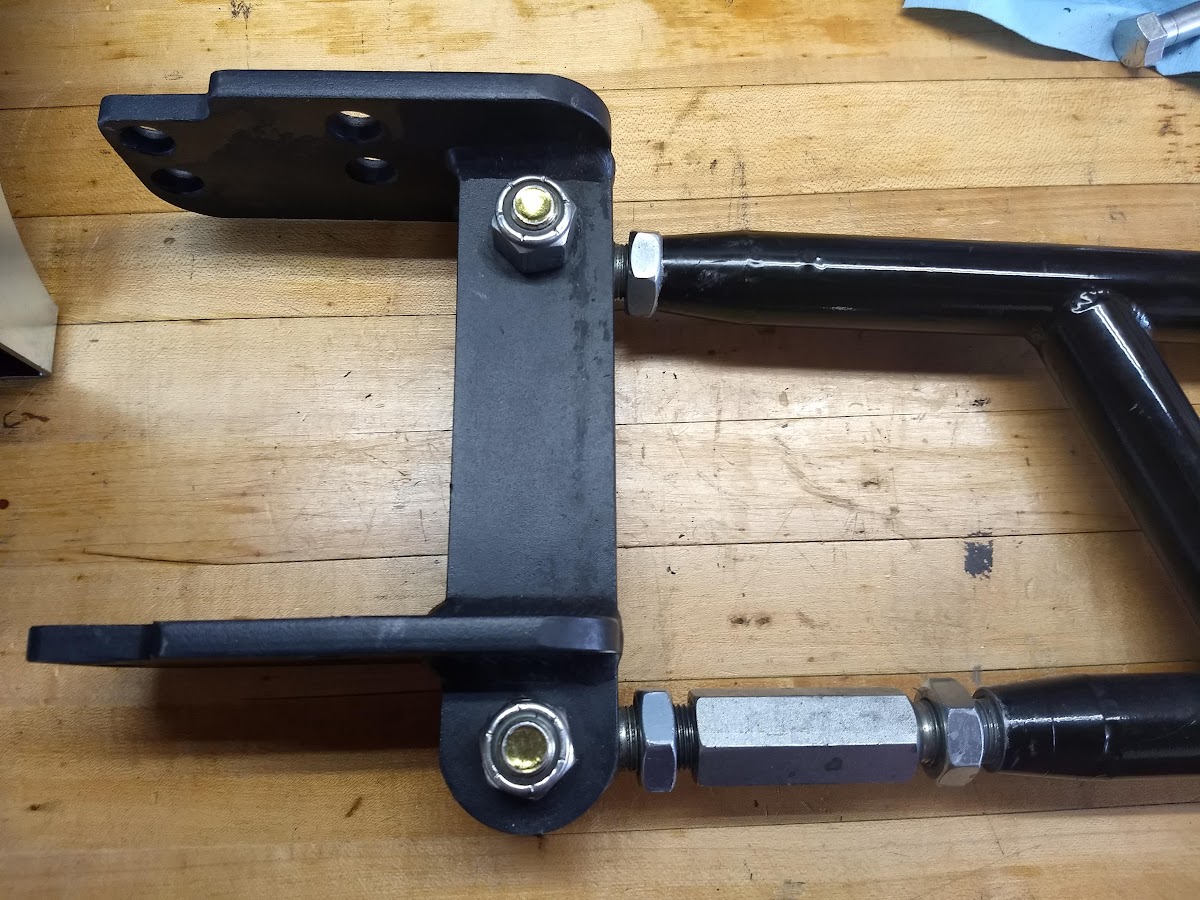
Torque arm mount, round #3: The quest to quiet down a shackle type torque arm
Made a set of adjustments to torque arm yet again. The torque arm has been clunking a lot ever since I freed up the movement with my last set of adjustments. These clunks are because of the bolts slapping around in the holes of the shackle plates. Torque the bolts and it binds up the pivot. Loosen the bolts and it clunks all day.
I've also had a peculiar singular LOUD clunk sometimes when I hit the brakes --- the kind of clunk that is worrisome. Never figured out exactly what is causing that noise, but pretty sure it's coming from the torque arm someway, somehow.
The arm is a little too long and goes over-center of the pivot. I suspect that has something to do with the loud clunk when braking. I shortened the rod ends as much as practically possible, about 6 turns. That brought the front of the arm closer to centerline of the pivot.
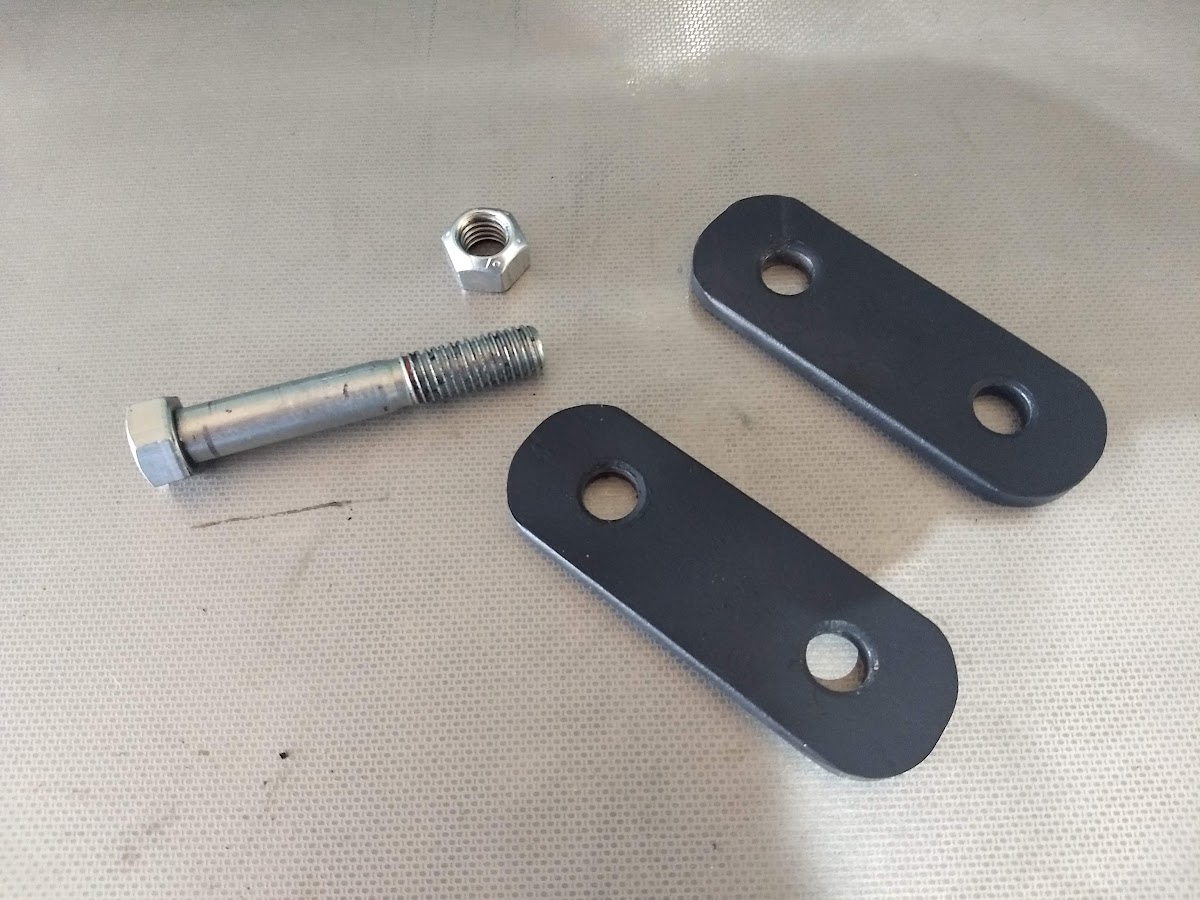
Next, I made another set of shackles. This time shorter, and 1/64" smaller diameter bolt holes with no slop whatsoever to the bolts but still free spinning. I'm hoping the shorter shackles help with stability and whatever is causing the loud clunk when braking. I also added a lead-in chamfer to ease assembly of the tight fitting bolts. (That made it much easier to drift the bolts through without needing perfect alignment.)
These are the shackles mocked up on torque arm. I'm using a 1/2-13 bolt and metal top lock nut that won't loosen and is good for multiple uses. Caterpillar p/n 8T-8920 (bolt) and 1K-6872 (top lock nut). Went for first test drive and there was no clunking and no drama. We might have a winner here. Update: This did work, no more clunking.
Well, what's a project car without a project! I decided to redo the brake lines since the car is all torn apart anyway.
First thing I am doing is removing the 4th gen LS1 F-body master cylinder and switching back to the stock 3rd gen master cylinder. I confirmed that the 4th gen master results in a significant gap between the master cylinder and the booster pin. This is the cause of the dead pedal near the top of travel. I also confirmed that the 3rd gen master sets closer to the booster pin, so that should get rid of the dead pedal.
bringing this back from the past, where you running a 3rd gen booster with the 4th gen master. i'm working on my brakes and was looking at switching to the 4th gen master and booster.
I used a 3ed gen booster and a 4th gen master, but I used the pin from the 4th gen booster which has a shoulder on it and those brass washers in the universal facet rebuild kits fit on it and those kids have several thicknesses. So I used that to fine tune the gap. Took some trial n error to get it right but it works well.
Sound padding is some pretty expensive stuff, not to mention adds a lot of weight to the car, so I'm taking baby steps to see how little I can get away with.
Did a weigh-in today. Between the Dynapad in the rear compartment, and the height-adjustable panhard bar, the car is at least 40 pounds heavier in the rear, although I recon more like 60 pounds when accounting for difference of fuel level compared to last weigh-in. And that's including the weight loss from swapping out 4th gen power leather seats to the Recaro's. Wow, that's a whole lot of weight gain for a teeny tiny noise reduction....
Pretty much dead nuts on at 55/45 weight ratio with 3/4 tank.
i'd think our cars are in the same ballpark weight wise.
mine is 3320 drag weight
3440 street weight (sound system, front sway bar on, street wheels)
-all this was early this year, prior to the 6 point roll bar install. I weight 190 pounds.
Does you "drag weight" or "street weight" include your 190 lbs?
In general, when referring to "race weight", it's as the car is on the starting line. Full of fuel and driver.
Your street weight would the same as mine and when I add my 200 pounds. with half a tank of gas, the Camaro is 3650. When I do my reverse HP calculations, that's the weight I use along with my trap speed and/or ET.
Other opinions may vary...
3380 lbs without driver. Stock body and only thing I'm missing is AC and spare tire. Tubular K-member and A-arms, but I've added many hundreds of extra pounds with all the other modifications.
I could EASILY get down to 3200 lbs without losing anything, just smarter choices on a few items. Just never been willing to spend the money.
Nah, I don't think the weight mattered. Increasing rear shock compression and raising the ride height has helped though. And rolling into throttle has helped too (less is more).
Does you "drag weight" or "street weight" include your 190 lbs?
In general, when referring to "race weight", it's as the car is on the starting line. Full of fuel and driver.
Your street weight would the same as mine and when I add my 200 pounds. with half a tank of gas, the Camaro is 3650. When I do my reverse HP calculations, that's the weight I use along with my trap speed and/or ET.
Other opinions may vary...
yea, my mistake. I should have been more clear on that. That is the car withOUT me. I remember clarifying that in my TGO build thread, and I should have clarified it here.
So:
3510 drag weight (with me)
3630 street weight (with me)
will get it re-weighed soon now that roll bar is installed.
This picture pretty much sums up my summer..... Just lots of driving, not fixing.
This is the year I finally got the car sorted. Makes for a boring build thread, but it's more fun for me!
You know, for as much 'fun' as the build is (and it can be fun and satisfying), putting miles on our cars is really the whole point. Build it to drive it in my opinion
Could use the driving pictures as a "results" section of the build.
Was hoping to capture the sound of this car but the video does not do it justice in any way. Quick stab to 80 mph from a slow 1st gear roll (had to straighten out after turning) on the Falken RT660 tires. Hit begins at 4 seconds. These tires continue to impress!
sounds like a monster ! I'm sure its killer sounding in person.
I agree with what everyone else liked above too, its great to get out there and drive em, shoot, I took mine out yesterday in the rain about 70 miles to/from a family bbq. Left the house in the rain, but didn't care, was just glad to drive it.
Qwk, yes, I fully agree, these tires are super awesome. I have been giving them hell with a few nitrous pulls on local roadways and the tires are grabbing and going. It is a phenomenal feeling to have this much trust and confidence in a set of street tires. Good stuff.
Was hoping to capture the sound of this car but the video does not do it justice in any way. Quick stab to 80 mph from a slow 1st gear roll (had to straighten out after turning) on the Falken RT660 tires. Hit begins at 4 seconds. These tires continue to impress!
What size tire. Looks like the biggest they go for 16” rims is 225/50/16?
I have 275/40-17 tires on some old 17x9 wheels. 17 inch tires are half the cost of 18 inch tires.
My car is a toy and my tire buying habits reflect that (lots of grip, short life, FUN!).
The 245/50-16 has gone the way of the dodo bird. I think it's down to just the BFG Comp 2, and something from General Tire. You're going to have to upsize to 17's if you want access to better rubber. And 18's have even more choices but are more costly.
Nitto, Falken, Toyo, BFG seem to be pretty good about making tires in the "American muscle car sizes" which are kind of short (26") but wider than a lot of imports.
Do the 275�s fit ok in the back? What do you run in the front?
Same size front and rear.
Rear fit with room to spare and could be fully tucked if you want. Front is a bit more tricky and wheel placement is important to avoid hitting the steering tie rod, fender pinch lip up top, and the plastic inner fender behind the tire (tight turns). The tire will appear to be nearly flush with the fender and then the top of the tire will pull in as you make the camber adjustment.
The width limit of a 17" up front is dictated by tie rod. You can go a bit wider to the inside with 18" because the tie rod will tuck inside the barrel of the wheel.
For 16", if you step up to 255/50-16, there are 3 brands available (at DiscountTire)
BFG G-Force Sport Comp 2
Mickey Thompson - ET Street S/S
Toyo - Proces R888R
Rear fit with room to spare and could be fully tucked if you want. Front is a bit more tricky and wheel placement is important to avoid hitting the steering tie rod, fender pinch lip up top, and the plastic inner fender behind the tire (tight turns). The tire will appear to be nearly flush with the fender and then the top of the tire will pull in as you make the camber adjustment.
The width limit of a 17" up front is dictated by tie rod. You can go a bit wider to the inside with 18" because the tie rod will tuck inside the barrel of the wheel.
If I�m understanding you right, in front you start by spacing so the outside of the tire is even with the outside of the fender. You then tweak the fender lip and inner fender for clearance?
It will bolt up no problem. I maybe made it sound too complicated. '91 Firehawk even came with 275/40-17 from factory. Just saying it will look a little goofy until the top tilts in when you set the camber.
My wheels are 17x9 with 5" backspacing (0 mm offset). I have Corvette brakes so my wheels stick out about 3/8" further than stock, so no concern about touching the steering tie rods. Wheels will tuck in further with stock brakes so just use some thin wheel spacers to keep the wheel off the steering tie rods.
If you're going to error then error on the side of a smidge extra backspacing because you can always use spacers to fix it, but you can't fit a wheel with too little backspacing that pokes out too far.
You've got so many general questions about things I don't have that I think you'd do better asking here where more people will see it, https://www.thirdgen.org/forums/wheels-tires/
In short, it's possible to fit a 295 but you've got to pay attention to actual tire dimensions, not just the writing on the sidewall. It's getting big enough that you need to put tape measure to car and make sure you know what works for YOUR CAR.
Also, buying some obscure size may make you a "tire orphan" sooner than you like. Any 295 on a factory car will be much taller than what you can fit, so you're going to end up with some obscure size with a teeny tiny sidewall. Personally, I avoid those situations and like to settle on common tire sizes that I know will be made a long time.
I have fit 315mm wide rear Tires (P315/ 35 ZR18 and P315/ 30 ZR18) on our Vehicles with the right Wheel dimensions, and spacing.
They stick-out a bit too much for some People...
However they do indeed fit just fine.
I personally had OEM reproduction 10.5" wide, C5 2000 Corvette rear Wheels with 315mm wide Tires...
On a 9-Bolt Differential, with the common 2.00" deep Wheel-Spacers.
The Wheels looked like this (in-case any of you are not familiar):
The C4 ZR1 Wheels (OEM and replica/ reproduction) also came in 9.5" and 10.5" wide versions.
I have a 295 rear tire, the Falken Azeni 660. It is on an 18'X10" Boze Forged wheel with 5.875" backspacing. The rear of the car is also lowered a bit too, everything is very tight, but everything clears. I can not go any wider, that is a certainty.
I have one of those ABS plastic boards sold through Hawks and the fabric has sagged since day one. The board wasn't coated well enough with glue so fabric didn't stick in an area above the passenger. The sagging has gotten a bit worse over the years so I decided it was time to fix it before the weather gets cold.
Disclaimer: I have no idea what I'm doing. I just did something. Might have to do it again. That's just where you are sometimes, ya know.
I put the headliner in before the days of the roll cage. Oops. It finally came out in a violent way and the board cracked at the rear. I end-drilled the crack and repaired with bumper epoxy (there's a much thicker glob of it on the back side). It's probably going to crack again on the way in, but hopefully the crack won't be able to run. If I can't get the board back in then I'll buy a soft board like stock and try again.
Took several hours to remove all the old foam. Lots of scraping, gentle wire brushing with a battery powered drill, and some finger nail picking. The whole board still felt a bit tacky but I was too scared to clean with a solvent in case it attacked the plastic. So this is as clean as it was going to get and we'll see what happens.
This is the glue I used. I sprayed the whole board and let it sit for about 15 minutes. The fabric won't stick until you spray the fabric too.... but when you do then that's it man, it ain't coming off. I set the fabric in place and folded it back on itself so half the board was exposed. Then I sprayed some of the fabric and slowly rubbed the cloth onto the board working from the middle to the outside. Spray, repeat, spray, repeat. Then I took a folded towel and rubbed the cloth pretty firm to make sure everything was in contact and followed contours of the board. Flipped the remaining dry cloth over to the other side and did the other half the same way. In retrospect, it probably would have been easier to work in quarters, not half.
I couldn't find the correct headliner material, and I wasn't about to pay $300 for another new saggy headliner, so I ordered some generic gray 1/8" foam backed headliner material from Hobby Lobby. It's darker than the original color, more blue in it. I think I like it better. Good enough, let's see what happens.
The fabric came with a lovely smell of rotten fish, like a plastics factory. And it showed up folded with wrinkles. I set it out flat and that didn't help. I put it in the dryer on wrinkle setting and that didn't help. In retrospect I should have steamed it, but didn't think about that. I proceeded on faith that I could work out the wrinkles when gluing it down.
Nope. Wrinkles did not work out. And I accidentally pinched the fabric into a bad wrinkle near the back-left corner in the photo. Man that looks amateur.
Wife suggested I try the clothes iron from the laundry. We both know she never uses it so it's like an NOS part. I'm not sure the glue likes to get hot but I figure what have I got to lose? And the glue is still wet so it's now or never....
After a bit of gentle ironing.... Wow, that's much better! Even that pinch in the corner is nearly invisible! I'm going to finish off the holes and let this puppy sit for a few days before putting back in. Then I will recover the speaker sail panels to match. Not sure yet what to do with the sun visors but it'll work out somehow.
I decided to experiment with Duplicolor fabric paint before I tear off perfectly good fabric from the speaker panels. Oh my gosh, what a crappy product! First, the color is nothing like the color on the cap, the greys come out much darker than advertised. Second, it leaves a crusty coating on the cloth.
The one on the right turned out black. I guess I shouldn't be surprised I wouldn't like it, but the cap wasn't near that dark (even though it appears to be in the picture). I was actually pretty happy with the color on the left, despite no similitude to the cap, but the crusty texture is a no go. And the black panel was far more crusty and couldn't be saved with a lighter grey re-paint.
I guess that settled my curiosity. Moving on to re-upholstering both panels.
It seems that most Fabric-Dyes (I only have experience with Automotive Dyes) will darken as multiple thin coats/ layers accumulate.
It always seems to take some practicing, in order to consistently spay-out a specific shade of the Dye Color.
This is just what I have experienced...
and I am by no means an expert in Automotive Interiors or Dyes.
Now this won't impress anybody but it's what I could do for now.
This is the trim piece that covers the back edge of the headliner (on the roof near the hatch). Nearly all the screw holes are cracking, but one hole in particular is so bad it's not salvageable. The center is gone, the plastic is raised up, and wide cracks are spidering off in many directions. So I did a backyard fix for now. After all, I can't make it any worse than it already is.
I put a prodigious amount of plastic bumper epoxy on the back side, and filled the cracks and hole entirely. Then I ground the top flat (sort of ) with a dremel, and finished with sand paper. I could have made it a bit nicer but honestly didn't care because this is pretty much out of sight for all practical purposes, and I want to come up with a better solution eventually (... but we all know I won't).
I drilled a screw hole and tried to counter sink the hole like stock, but the epoxy was too soft and wasn't going to tolerate that. So I oversized the hole and got a fender push pin sized just right for the screw head and clipped away the excess length.
Then I simply painted everything stock color again. The little button head isn't going to be noticeable behind the roll bar, and it gives me a solution for now.
Hmmm I had the same issues with mine years ago. working in the aircraft industry I have access to some really interesting hardware and so forth. I used thin, flat, countersunk skin washers like these:
They are un-obtrusive and painted to match are a ton better than the factory junk. Heck you could glue em in place. They aren't but about .020" thick.
Got the headliner and speaker panels installed and it looks goooooood! The darker grey with blue under tones looks way better than stock color combo. Just $16 per yard at Hobby Lobby.
Matching speaker panels. This time I ironed the wrinkles out BEFORE gluing in place! Hard to tell in this photo but there is a weave pattern and you need to pay attention to orientation during install.
I had to get really really mean with the headliner to install around the cage. Frankly, I only got it back in because I was willing to break it. I can't believe it didn't break. And I can't believe the fabric doesn't show a hint of rubbing or damage.
Also got one of those 1982 sill plates with the cleaner seat belt slots (since I don't have bottom retractors). Repaired, cleaned and painted to match.
No more bed sheets draped over the car for winter storage. Wife set me up with the fancy stuff. Covercraft Noah cover. Now I can look mysterious and snooty too.
Now if she could magically triple my garage space...
I've had a set of Speedhut gauges laying around for 5 years waiting for the right time when I need a project. The car miraculously still ain't broke, so I dug the gauges out of storage and began tinkering with ideas. I really like my stock gauges, so the goal here is to retain all the stock wiring and stock gauge pod, and make another Speedhut gauge pod that is also plug-and-play to the vehicle. If I can't achieve that goal then I'm going to keep the stock gauges because frankly they look better.
I am using the 4" Revolution gauges. These are closest diameter to stock for my '89 Firebird. Tach is seriously cool with a built-in shift light. Those double gauges are kind of an eye sore though. Not a fan of the baseball stitching.
First thing I did is buy a spare gauge pod for hacking up. My initial plan was to dig out the innards to make room for the Speedhut gauges and mount behind the stock bezel. And I would keep the stock "green screen" circuit board to run stock blinkers and brights indicators. Turns out the gauges are too deep and I couldn't remove enough material to fit behind the bezel. And even if it did fit, it seemed too difficult a task for me to make a mounting system that would perfectly center the gauges on the view holes.
Gauge pod hogged out. RIP.
Not even close. No chance of closing down the bezel over the gauges.
My next move was to try mounting the gauges to the bezel itself. I've seen this done with the early 3rd gens having larger bezels, but I ran into problems with my '89. Turns out not all the bezel holes are centered in the taper and that causes the gauge to shift off-center. Also, the back side of the bezel is not parallel with the front, so the gauge appears to get cocked at an angle when tightening up the lock ring. Even if I put up with that shizzle, the gauges stick out too far and crash into the dash cover. This is a no-go as well.
Non-uniform taper around the gauge opening.
Gauge cocked in hole when lock ring is tightened. Now I'm starting to understand why people put a flat ABS board on the dash and call it a day.
After those fails I ditched the gauge pod entirely and decided to try mounting the gauges to the dash cover. Turns out the gauges are a snug fit in the holes. I had to come up with a mounting system though.
I bought some lexan plate from Lowe's and an $8 adjustable hole saw from Harbor Freight. Spreading the cutters to 99 mm gave a real nice fit to the gauges.
Then I cut the sheet into squares, one for each gauge. The idea is to glue the plates to the dash and that will give the gauges something to mount on. I let each plate float with the gauge because the gauge is a snug fit and self-centers to the hole in the dash.
Now don't laugh.... I used RTV silicone gasket maker to attach the plates to the dash. That stuff actually holds strong, gave me a long working time, and it can be cut out if I make a mistake. Ignore the BBQ sauce, it just happened to be the right weight for holding parts together while curing.
Pop out the gauges and you're left with mounting plates attached to the dash. The plates are NOT perfectly centered on the hole. It is located wherever the gauge wanted to be when the gauge was centered in hole.
Gauges installed.
The money shot. I would have rather had the gauges recessed like stock but this is the only thing I could make work nicely. I hate the baseball stitching so I turned the double gauges to be oriented like stock. It's a little bit goofy but better nonetheless.
Ha! I've had a set of speedhut gauges in a box as well, probably going on 10 years I believe. In the meantime, I've also come to be fine with the stock gauges (haven't seen them used much, the nostalgia must be taking over).
Sounds like you're trying to avoid sunk cost syndrome, possibly continuing to use the stock guages that work fine and you like. Keep experimenting though, it's fun to read about
Hey Quik, I had Unleaded Designs (7thDarkAngel) make me some custom pieces that look original. Zack is very easy to work with and could possibly make a new bezel for the Speed Hut gauges and leave the original bezel for the stock gauges. Just a thought.
Hey Quik, I had Unleaded Designs (7thDarkAngel) make me some custom pieces that look original. Zack is very easy to work with and could possibly make a new bezel for the Speed Hut gauges and leave the original bezel for the stock gauges. Just a thought.
Wow! Thanks for the lead! When this first started I drove across town to a 3D imaging place to have my dash scanned, but they were out of business and I gave up on that path. It would be awesome if I could get a new bezel made!
Well, poo. I'm planning out circuits for the Speedhut gauges and ran into an ugly surprise. I had no idea the Revolution gauges were designed for modern cars with ECM driven gauges. I was working out a way to make these gauges plug-and-play with no modifications to the car whatsoever. This screws up my plans big time.
Thanks, bud! It always feels good to get a compliment like that.
If you're ever in Peoria then look me up and I'll buy you lunch, and we can go for a spin if the weather is good enough.


 ) with a dremel, and finished with sand paper. I could have made it a bit nicer but honestly didn't care because this is pretty much out of sight for all practical purposes, and I want to come up with a better solution eventually (... but we all know I won't).


 Hard to tell in this photo but there is a weave pattern and you need to pay attention to orientation during install.


