When you click on links to various merchants on this site and make a purchase, this can result in this site earning a commission. Affiliate programs and affiliations include, but are not limited to, the eBay Partner Network.
LTX and LSXPutting LT1s, LS1s, and their variants into Third Gens is becoming more popular. This board is for those who are doing and have done the swaps so they can discuss all of their technical aspects including repairs, swap info, and performance upgrades.
Pieces are coming back from the body shop & I started collecting the engine swap pieces.
Picked up a T56 from a 4th gen F-body... Including pedals, slave cyl, shifter, & some misc pieces Saturday.
My engine should ship this week... A 2011 Camaro LS3.
Looking at the Hawks exhaust... Like the stainless, dislike the cost, but at least it will not rust.
Considered the LS3 wiring, but not a big fan of fly by wire throttle. I think I will go with the LS1 wiring & a converter box.
Starting to collect the remaining wiring, mounts, brackets etc. I need to pull things together rather quickly, so I can enjoy the summer. Nothing like putting a self imposed deadline on a rather large project.
I' ll post some pictures as I start to make some progress.
Last edited by Lonnie P; Aug 11, 2012 at 11:01 PM.
Do note that the LS1 wiring and the Ls2/3 wiring for the cam sensor and knock sensors are different. I also think the Ls3 map sensor is located in the front and the ls1 in the rear on the manifold.
Killj0y is correct - knock sensors are no longer under intake, cam sensor's on the timing cover, map is directly behind TB.
if you do opt for drive by cable & ls1 type wiring, you may want to change the map out for an ls1 version; Frost noted there was some weird offset in the ls3 map readings when he did my tune. you'll also have to go aftermarket for the TB; there were no factory 4-bolt drive by cable ones offered. i nabbed an edelbrock version for pretty cheap on 'tech.
the hawk/sw headers are nice, but if you're looking to save a few dollars, the hustler mid length headers are a nice option (just got mine delivered last week, not yet installed).
I looked at the Hedman Huslers... definitely a better price, but I want stainless.
Had too many issues with coated headers rusting. Also due to my limited time, I did not want to spend days with a pile of tubing & the TIG welder making a y-pipe.
Yes, there are quite a few variations between the LS1,2,3.
Good info on the gen3 map sensor.... I'll keep that in mind.
I am leaning toward the cable throttle, 5 wire MAF & LS1 wiring with the 24/58Tooth converter. I just hate the fly-by-wire throttle. Tuning it is somewhat a mystery.
Currently trying to figure out the front accessories. I was trying to research an AC compressor that would work with the Vette brackets. Not sure that will be possible....
the hawk/sw headers are nice, but if you're looking to save a few dollars, the hustler mid length headers are a nice option (just got mine delivered last week, not yet installed).
Where did you get your Hustlers from and did you get the ceramic or uncoated?
Hawks headers & 3" y-pipe
Hawks 3.5" cat back
Hawks mounts
2001 Camaro T-56
PSI harness
Fast 92mm throttle body
Corvette accessories
4th gen plastic tank w/ Racetronix pump
Custom fuel system by Lonnies Performance
Planning on a future Procharger kit
Now it is a matter of getting it all together in a reasonable time frame.
Last edited by Lonnie P; May 16, 2012 at 10:37 PM.
Spent the weekend cleaning the bottom of the car & under the hood... the most dreaded part of the build. After a bunch of hours with rags & lacquer thinner, the underside is down to the factory grey primer. I'll try to post some pictures in the next few days.
Any opinions on the color to paint the underside? Dark green like the car, black, or grey like it already is. Car was never undercoated, so it was basically grey with a little green overspray on everything. The only factory undercoating is the wheel wells, so I guess I'll leave that part alone.
Been there done that. Definitely no fun at all. It's nice to have it all clean though.
It always looks good to have the underside match the color of the car, but it's also a ton of work to do that. Have you considered using the bed liner coating, that they use on trucks, kind of like an undercoating? I think it would be much easier. I'm pretty sure that's what I'm going to do on mine.
Yes I thought about undercoating or textured "bedliner", but it is so nice under there I have to show off the near flawless floor. My only issue is the $400/gal that the factory paint cost.
I have been real busy lately, slowing my progress on the car.
Finally started on the crossmember last week.
Sandblasted.
Started cutting to fit the AC in place.
Just to be more complicated, I used C6 Corvette accessories.
Took a little more cutting than the Camaro accessories, but it turned out OK.
Spent the afternoon cutting pieces & TIG welding things back together.
Here is after the initial welding.
After paint.
Now, time to get the pedals in & the shifter hole in the floor.
Last edited by Lonnie P; May 14, 2026 at 11:15 PM.
Mine did not have a lot of undercoating on the floor pans, so I only used about 1/2 gal of thinner & a huge box of rags (about 30 shop towels).
I left the factory undercoating in the rear wheel wells & will just lightly recoat them.
I figured this area will only get chipped anyway, so there is little use in stripping & painting it only to have it get chipped.
If the car was completely undercoated, it would have been a nightmare.
I did cars like that before.
It is better scrape as much as possible first. Then repeatedly spray the underside with kerosene (mixed with some dish washing liquid) to soften the undercoat over a few day period. Gasoline works faster than kero for the final application, but remember how easily it can burn. I used a garden sprayer to apply it. After this a strong pressure washer should take most of it off.
Be prepared to make a mess & ruin some clothes. You will want to do this outside where you do not mind killing the grass or getting tar everywhere... not something to do in your concrete driveway.
Last edited by Lonnie P; Jun 24, 2012 at 07:54 AM.
Here are some before paint pictures of the underside.
It actually looked pretty nice, but I had to do something since it was all apart.
It will never be this easy to paint again
Got the underside painted today.
Nothing like 4hrs of laying in paint overspray.
Will post some pictures after the paint is dry.
Last edited by Lonnie P; May 14, 2026 at 11:17 PM.
I wanted to be driving it by July, but workload has prevented me from working on it like I wanted to.
Got the engine & trans together.
Still debating on putting a cam in it before I install the engine.
It is easy to install now.... hence the reason I did not put the water pump & crank pulley on. Yes those are Corvette accessories with A/C.
Last edited by Lonnie P; May 14, 2026 at 11:20 PM.
Paint was very nice, but the clear was starting to come loose.
GM had some poor paint in the early base/clear coat days.
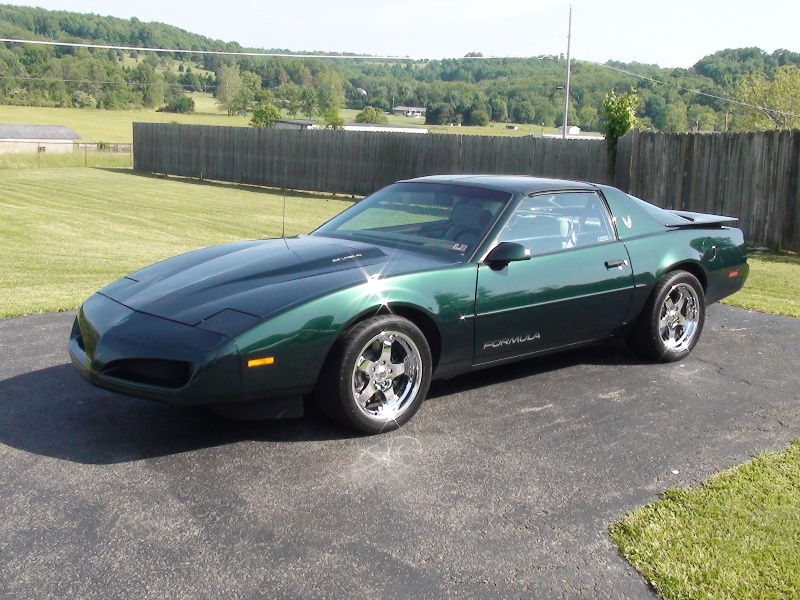
Contemplated the style of wheel quite a bit...
Didn't want bare aluminum that required polishing constantly as I drive this car, it isn't a garage queen. Also, most new style whels are not capable of clearing the front hubs without a spacer & I like the deeper dish look... So I was limited in choice & was not putting $3K of wheels on my daily driver. For the price I'm happy.
They are discontinued American Racing Rebels.
17" x 9" 5.95" BS. Will not fit without an approx 5/8" front spacer & hub modifications or a brake upgrade that spaces the wheel out some.
I used the C4HD Vette brakes & the factory rear wheel shim/spacer on the front.
Oh how I know about the clear pealing..
If its your driver, i'd say leave the paint for awhile because when you paint it you'll be more crazy about what you do with the car.
I have a painted one an a few factory paint cars and I have waay more fun in the cars that I'm not as worried about..
Just my .02 cents
Too late, already spent a few thousand on new paint.
I get aggravated if it doesn't look good.
Besides it looked good on original paint for 20yrs, so I expect it to look nice for quite a while with the new paint.
I'll have new underside pictures this weekend. The black paint was too dark to show up in the pictures, so I'll re-take a few this weekend with some better lighting.
Getting ready to install the frame connectors.
Last edited by Lonnie P; Jul 18, 2012 at 10:17 PM.
I like doing things myself & I worked at a body shop years ago, but no longer have the time to do it all on my own. I have a friend that owns a body shop so I do a lot of my own work there.
This way I get it done the way I want & it ends up taking me half the time & costs me half the regular amount.
I disassembled the car, stripped the entire car to bare metal & had it painted in pieces so the jambs, inside the doors etc. were all nicely painted. Everything was epoxy primed, block sanded & finished in base/clear PPG paint.


 Motor is super clean! Its gonna be an awesome finished project!