
Watch a Rookie Learn How To Swap a LS1 and T56 into a 1992 Z28

Senior Member


Joined: Jun 2001
Posts: 922
Likes: 33
From: Kansas
Car: 91 Z28
Engine: 6.0L LQ9
Transmission: T56
Axle/Gears: Dana 44 3.92
Re: Watch a Rookie Learn How To Swap a LS1 and T56 into a 1992 Z28
while harbor freight doesn't carry the name, don't be so quick to pass judgement on all of their tools. hot rod magazine tested a bunch of ratchets on how many lb/ft it took to break the mechanism, harbor freight's was one of the best tested, and for a price much less than anything that performed better.
Senior Member
Joined: Apr 2001
Posts: 798
Likes: 3
From: Powder Springs, Georgia, USA
Car: 1992 Black Z28 Hardtop
Axle/Gears: 2002 10 bolt w/3:23
Re: Watch a Rookie Learn How To Swap a LS1 and T56 into a 1992 Z28
while harbor freight doesn't carry the name, don't be so quick to pass judgement on all of their tools. hot rod magazine tested a bunch of ratchets on how many lb/ft it took to break the mechanism, harbor freight's was one of the best tested, and for a price much less than anything that performed better.

Thread Starter
Member

Joined: Aug 2007
Posts: 209
Likes: 6
From: Long Island, NY
Car: 1992 z28
Engine: LS1
Transmission: T-56
Re: Watch a Rookie Learn How To Swap a LS1 and T56 into a 1992 Z28
while harbor freight doesn't carry the name, don't be so quick to pass judgement on all of their tools. hot rod magazine tested a bunch of ratchets on how many lb/ft it took to break the mechanism, harbor freight's was one of the best tested, and for a price much less than anything that performed better.
Quote:
92BLKL98:
Ditto on this I spend a bit of time in my local Harbor Freight as do many of my AMT (aircraft mechanics) acquaintances at work, lots of decent stuff at good prices. These are guys who turn wrenches everyday for a living. Don't be fooled by the MAC/Snap-on brand they are getting cheaper by the minute (Chinese made) while tools and warranties are suffering.
Thread Starter
Member
Joined: Aug 2007
Posts: 209
Likes: 6
From: Long Island, NY
Car: 1992 z28
Engine: LS1
Transmission: T-56
Re: Watch a Rookie Learn How To Swap a LS1 and T56 into a 1992 Z28
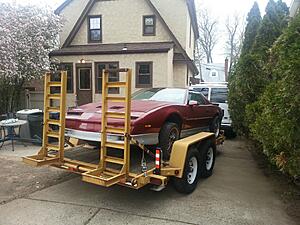
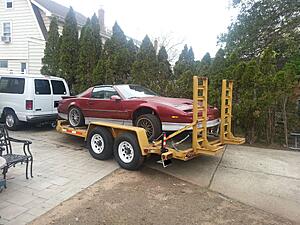
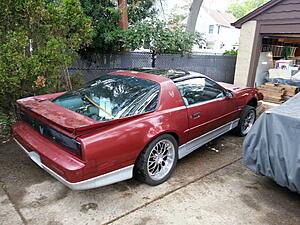
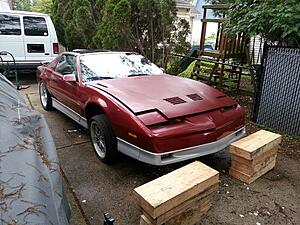
Well I promised some more pictures of the new car and finally got around to posting them. Not much of an update to report but I figured everyone likes to look at pics when they are bored lol
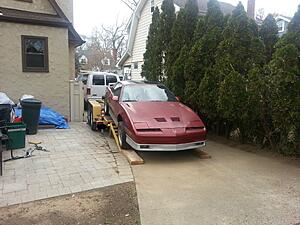
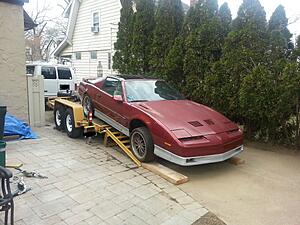
Here are some pics from the day after we returned with the car. On the trailer and unloading:
Here are a few after I got to give it a really quick clean:

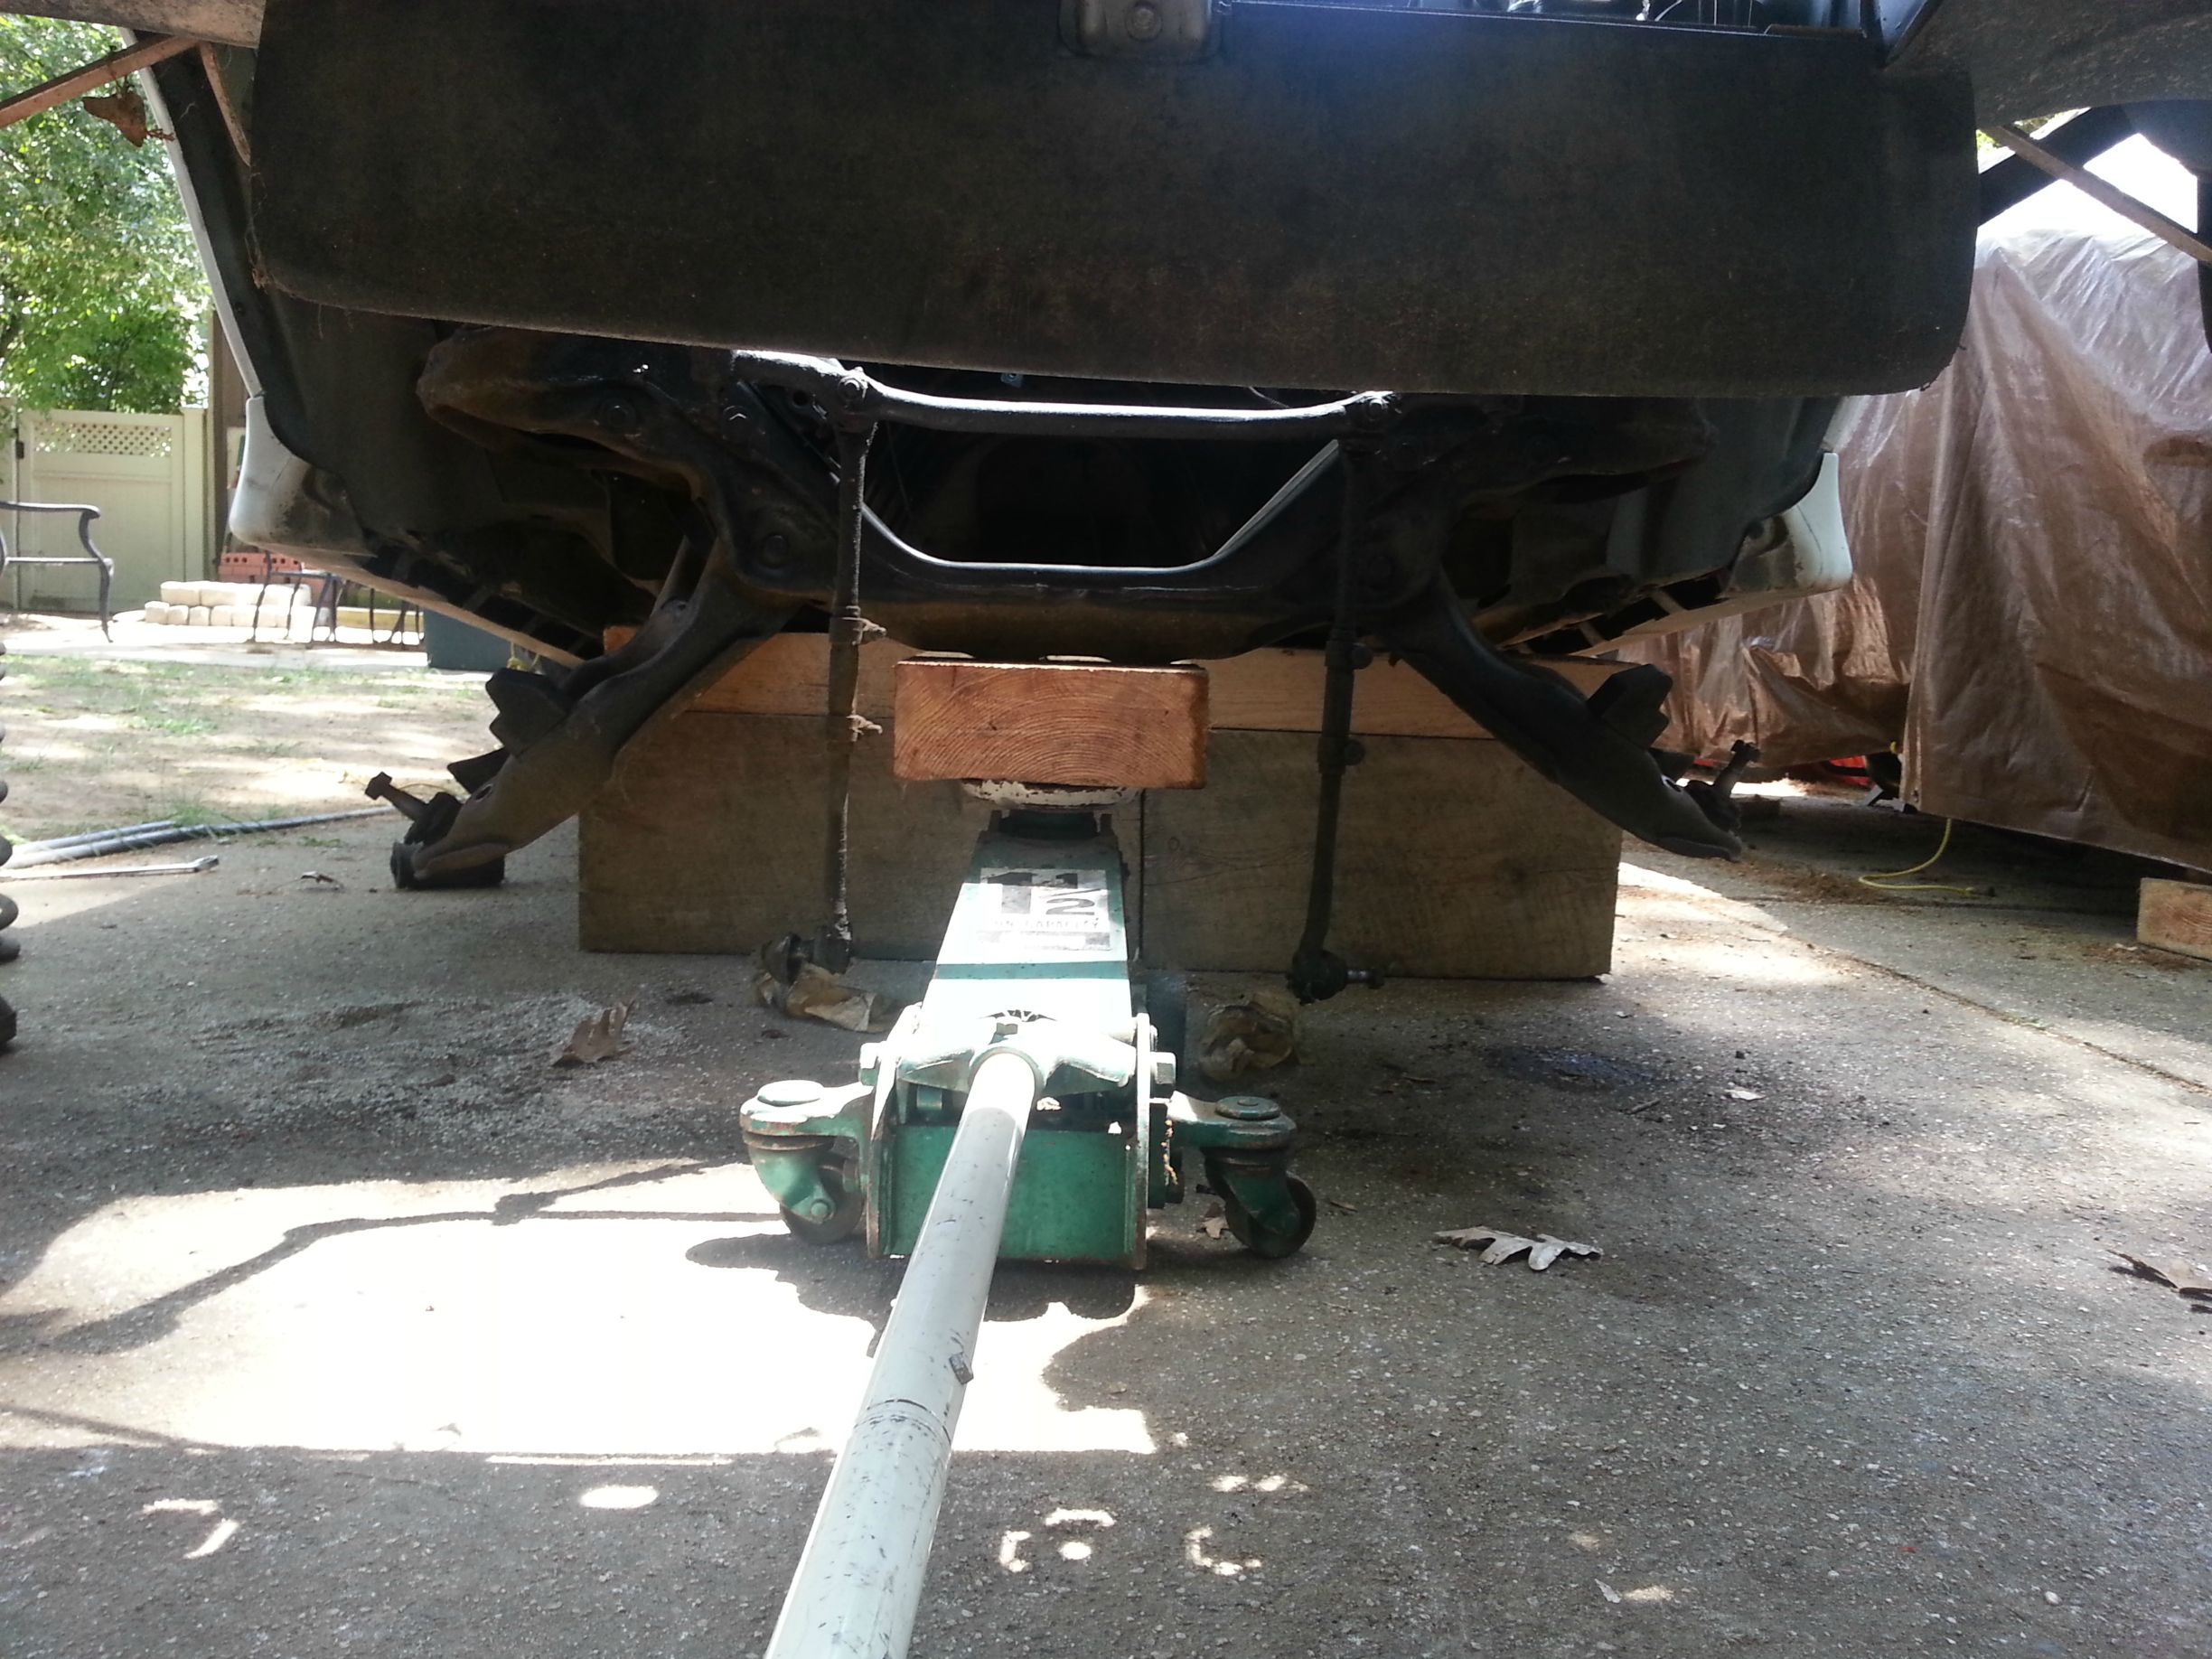
This is the wood that the front of the car is jacked up on. Pops got it from work...its the wood that they use to build docks and its really freakin heavy and strong. Give the front of the car a really stable place to rest while im under it.
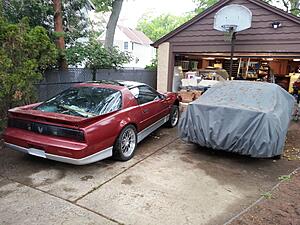
Two cars next to each other ready to swap parts:
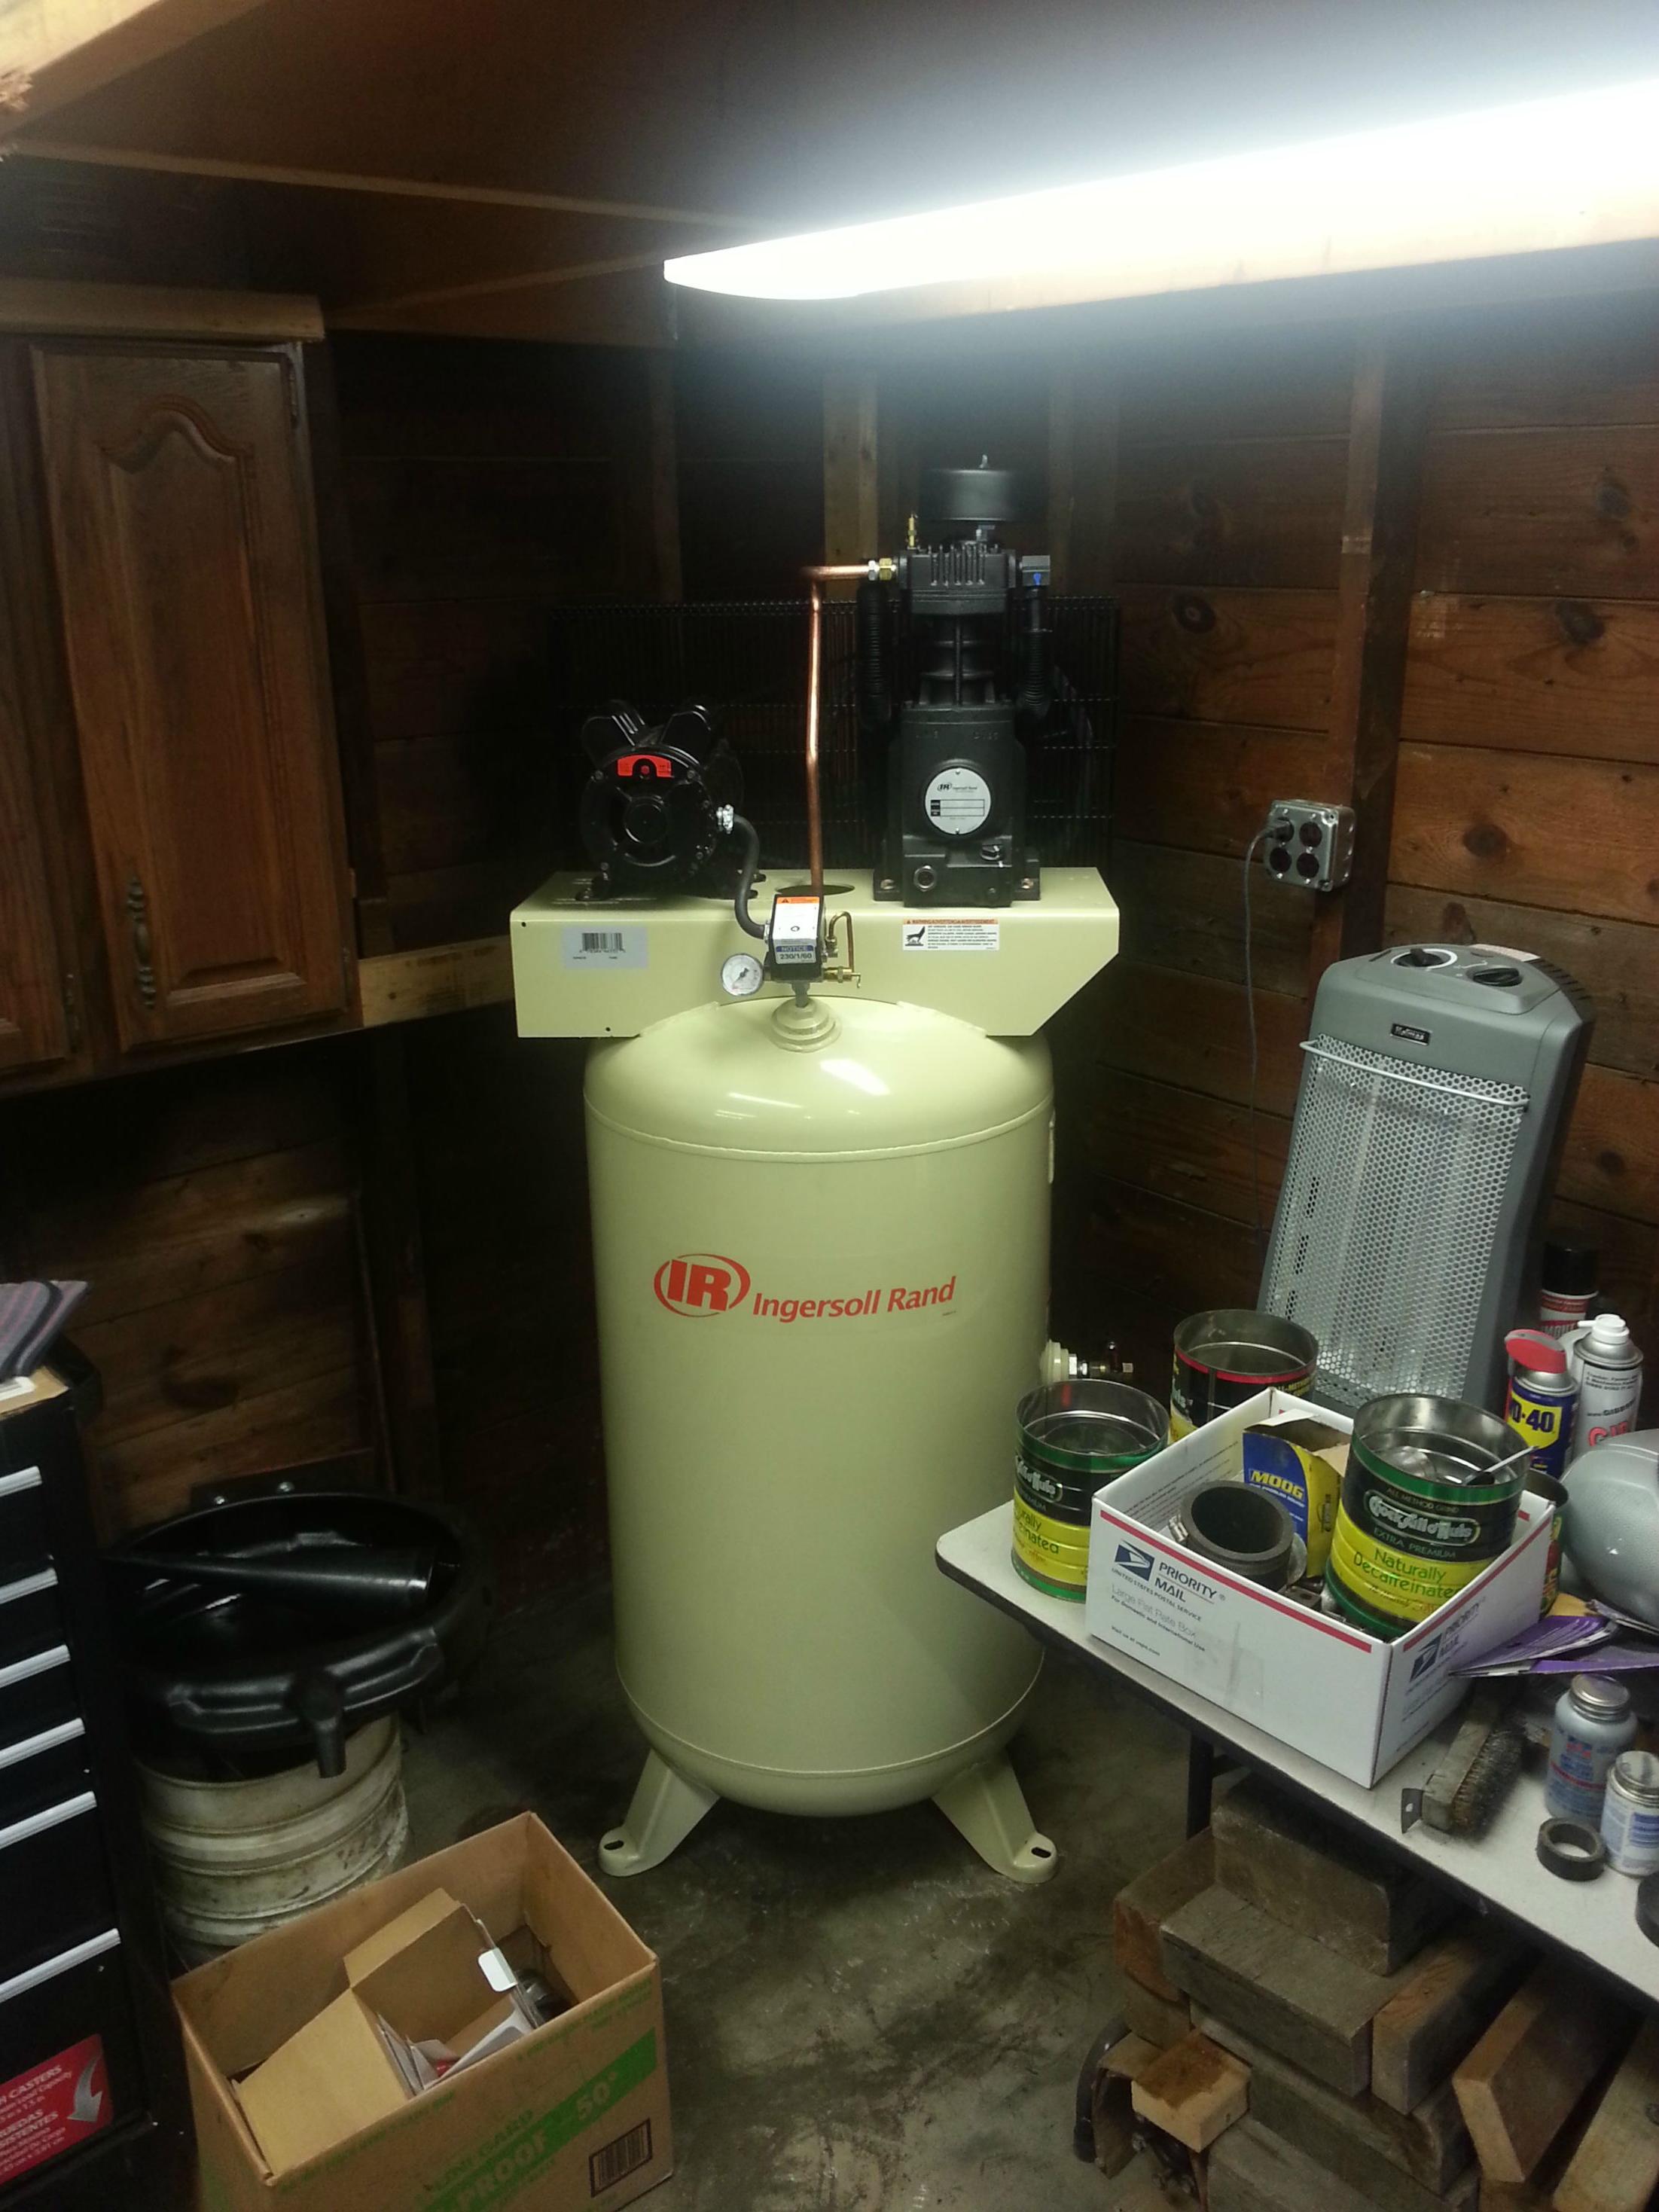
Bonus pic of a new compressor we just bought...cant wait to get someone over here to wire it up:
Here are some pics from the day after we returned with the car. On the trailer and unloading:


Here are a few after I got to give it a really quick clean:


This is the wood that the front of the car is jacked up on. Pops got it from work...its the wood that they use to build docks and its really freakin heavy and strong. Give the front of the car a really stable place to rest while im under it.

Two cars next to each other ready to swap parts:

Bonus pic of a new compressor we just bought...cant wait to get someone over here to wire it up:
Last edited by Warnd; May 23, 2014 at 10:59 PM.
Senior Member
Joined: Apr 2001
Posts: 798
Likes: 3
From: Powder Springs, Georgia, USA
Car: 1992 Black Z28 Hardtop
Axle/Gears: 2002 10 bolt w/3:23
Re: Watch a Rookie Learn How To Swap a LS1 and T56 into a 1992 Z28
Nice pics, that will be a nice looking Firebird when done.
Thread Starter
Member
Joined: Aug 2007
Posts: 209
Likes: 6
From: Long Island, NY
Car: 1992 z28
Engine: LS1
Transmission: T-56
Re: Watch a Rookie Learn How To Swap a LS1 and T56 into a 1992 Z28
Thanks man. It will be a long time before that one gets finished but it should be real nice when its done. Most likely has a worked 6.0 in its distant future.
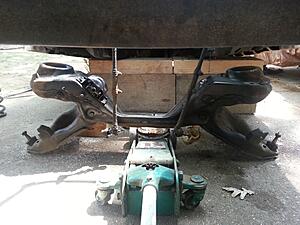
Well I got a free day this weekend with no work on Monday and had some times to work on the trans am. Pretty happy with the days work...managed to remove the k-member and the lowering springs without any trouble to speak of. Took me about 4 and a half hours by myself from start to finish in the upcoming pics im about to post. Made a few missteps and im sure I will be able to remove the k-member from the camaro in half the time. Anyways on to the pics...
Didn't really get too many pics of the preliminary steps to removing the k-member, but there a few things to take care of before moving on to the springs. First I unbolted all of the small brackets holding the brake lines to the k-member. I believe there are 4 of them total. Next, I unbolted the front sway bar (I think that's what it is lol). Also had to unbolt the steering from both spindles in order for the k-member to drop out freely. Last thing you have to do before worrying about the springs is disconnect the brake lines and bracket where they go into the calipers. Unfortunately I don't have pics of any of this, but its all very straight forward.
For the springs, I took khulsebus's advice and used the jack method to remove both lowering springs. I just placed my jack underneath the lower control arm and jacked it up until I was able to unbolt the strut at the top of the engine bay. After that I slowly lowered the jack until the lower control arm was able to swing all the way down freeing the lowering spring from the control arm. This went over much more smoothly than I anticipated. In the future, I will probably secure the lowering spring to the lower control arm so that it cant fly out.
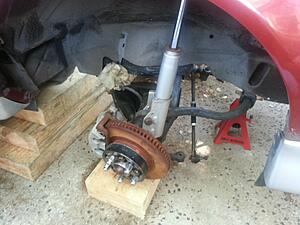
Here you can see the aftermath of using the jack method to remove the front lowering springs: (I know the ls1 rotors have a bit of surface rust on them...they will be getting removed this week to see if they can get cut within spec. Thoughts on this?)
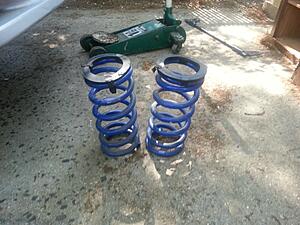
Here are the lowering springs that were removed from the trans-am. These will be going on the camaro also:
Here is a picture of where I disconnected the steering from the spindle. There is just a little pin that goes through the bolt that has to be removed before the nut can be taken off. Then I used a lump hammer to knock it through:

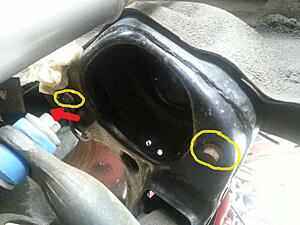
At this point I was ready to unbolt the k-member from the car. There are three bolts on each side of the k-member (passenger and driver side). Here is a very crappy picture of two out of the three bolts that have to be removed (circled in yellow). The third bolt is not in the picture but I drew a little red arrow pointing to where it is. If anyone needs it, I can scan the picture from the factory maintenance book that shows where all the bolts are in a diagram. It helped me figure it out
After I unbolted all 6 bolts (three on each side) the k-member just needed a little bump from the lump hammer and it fell right onto the jack. Then I just lowered it down and slid it out from under the car. I needed to recruit the help of three friends to pick it up and move it because the dollies I needed were not home at the time (they are now of course...). Wouldn't have been able to move this without their help. For future attempts, I will be picking the front of the car up with the engine crane. It was a real pain in the *** trying to pick that thing up and move it with the car so low to the ground.
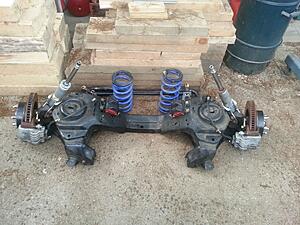
Here is a nice picture of everything out of the car and patiently waiting to go into the camaro. Rotors will be taken off and cut within spec and calipers will be taken off...cleaned...sanded...painted...and cleared. Would like to pick up some sort of chevy or z/28 decal to put under the clear coat, but thats just an idea....
Here is a picture of the notch that Dan's friend did, and part of the reason why Im using this k-member. Looks pretty good to me:
And lastly here is a shot of the trans am engine bay without the k-member installed:
Felt like a got a good amount of stuff done today. I plan to move to the rotors and calipers within the next few days. Then I will move to getting the engine bolted up to this k-member and ready for the camaro. **** load of work still ahead, but im feeling that drive to get this car running. Need it driveable before the end of the season.
Let me know what you guys think.
Well I got a free day this weekend with no work on Monday and had some times to work on the trans am. Pretty happy with the days work...managed to remove the k-member and the lowering springs without any trouble to speak of. Took me about 4 and a half hours by myself from start to finish in the upcoming pics im about to post. Made a few missteps and im sure I will be able to remove the k-member from the camaro in half the time. Anyways on to the pics...
Didn't really get too many pics of the preliminary steps to removing the k-member, but there a few things to take care of before moving on to the springs. First I unbolted all of the small brackets holding the brake lines to the k-member. I believe there are 4 of them total. Next, I unbolted the front sway bar (I think that's what it is lol). Also had to unbolt the steering from both spindles in order for the k-member to drop out freely. Last thing you have to do before worrying about the springs is disconnect the brake lines and bracket where they go into the calipers. Unfortunately I don't have pics of any of this, but its all very straight forward.
For the springs, I took khulsebus's advice and used the jack method to remove both lowering springs. I just placed my jack underneath the lower control arm and jacked it up until I was able to unbolt the strut at the top of the engine bay. After that I slowly lowered the jack until the lower control arm was able to swing all the way down freeing the lowering spring from the control arm. This went over much more smoothly than I anticipated. In the future, I will probably secure the lowering spring to the lower control arm so that it cant fly out.
Here you can see the aftermath of using the jack method to remove the front lowering springs: (I know the ls1 rotors have a bit of surface rust on them...they will be getting removed this week to see if they can get cut within spec. Thoughts on this?)

Here are the lowering springs that were removed from the trans-am. These will be going on the camaro also:

Here is a picture of where I disconnected the steering from the spindle. There is just a little pin that goes through the bolt that has to be removed before the nut can be taken off. Then I used a lump hammer to knock it through:

At this point I was ready to unbolt the k-member from the car. There are three bolts on each side of the k-member (passenger and driver side). Here is a very crappy picture of two out of the three bolts that have to be removed (circled in yellow). The third bolt is not in the picture but I drew a little red arrow pointing to where it is. If anyone needs it, I can scan the picture from the factory maintenance book that shows where all the bolts are in a diagram. It helped me figure it out

After I unbolted all 6 bolts (three on each side) the k-member just needed a little bump from the lump hammer and it fell right onto the jack. Then I just lowered it down and slid it out from under the car. I needed to recruit the help of three friends to pick it up and move it because the dollies I needed were not home at the time (they are now of course...). Wouldn't have been able to move this without their help. For future attempts, I will be picking the front of the car up with the engine crane. It was a real pain in the *** trying to pick that thing up and move it with the car so low to the ground.
Here is a nice picture of everything out of the car and patiently waiting to go into the camaro. Rotors will be taken off and cut within spec and calipers will be taken off...cleaned...sanded...painted...and cleared. Would like to pick up some sort of chevy or z/28 decal to put under the clear coat, but thats just an idea....

Here is a picture of the notch that Dan's friend did, and part of the reason why Im using this k-member. Looks pretty good to me:

And lastly here is a shot of the trans am engine bay without the k-member installed:

Felt like a got a good amount of stuff done today. I plan to move to the rotors and calipers within the next few days. Then I will move to getting the engine bolted up to this k-member and ready for the camaro. **** load of work still ahead, but im feeling that drive to get this car running. Need it driveable before the end of the season.
Let me know what you guys think.

Joined: Sep 1999
Posts: 1,496
Likes: 60
From: Danville, IN
Car: 1991 Camaro Z28
Engine: LS1
Transmission: 4L60E
Axle/Gears: Strange 12 Bolt, 3.42
Re: Watch a Rookie Learn How To Swap a LS1 and T56 into a 1992 Z28
Looks like you made good progress. I'm looking forward to seeing the new engine drop into your car soon.
I've seen several different methods for re-installing the engine/k-member...it goes back in pretty easy from under the car. The hardest part is getting the car high enough and finding the right combination of jacks and jackstands to lift and hold everything securely. I borrowed an extra jack and bought an extra set of jack stands to make it easier.
I've seen several different methods for re-installing the engine/k-member...it goes back in pretty easy from under the car. The hardest part is getting the car high enough and finding the right combination of jacks and jackstands to lift and hold everything securely. I borrowed an extra jack and bought an extra set of jack stands to make it easier.

Senior Member
Joined: Jun 2013
Posts: 746
Likes: 24
From: Atlantic Canada
Car: 87 Trans Am
Engine: LS1
Transmission: T56
Re: Watch a Rookie Learn How To Swap a LS1 and T56 into a 1992 Z28
Do you have 220 to the garage already?
If so, the wiring is super easy on that compressor... I just wired mine up last week.
White and Black are your "hot" wires, the green is ground. (this is for 220, 110 is different).
It should be pretty evident on your switch on the compressor, on mine they used the proper colours. Just wire it up to the plug that matches your outlet, they are colour coded. The brass and steel connectors are for your hots and the green is for the ground. Use 12 gauge wire, keep it a short run.
I always get a multimeter out to double check the socket itself is wired properly. One of the hots and a ground will give 120, the ground and the other hot will also be 120. The two hots together will give 240ish on the multimeter... Pretty simple really.
I could explain setting yourself up for 220 from the breaker panel, but that is something for a pro to do.
Senior Member
Joined: Apr 2001
Posts: 798
Likes: 3
From: Powder Springs, Georgia, USA
Car: 1992 Black Z28 Hardtop
Axle/Gears: 2002 10 bolt w/3:23
Re: Watch a Rookie Learn How To Swap a LS1 and T56 into a 1992 Z28
Great work, it's good to have friends to help out. It's like pulling eye teeth around my place to get decent help. Most of my work is on my own. But then when I do mine I plan to dis-assemble the K-member to refurbish everything. I already have the Bigbrake upgrade and all poly bushings but there are some improvements I want to make. You are making good progress, keep us posted.
Thread Starter
Member
Joined: Aug 2007
Posts: 209
Likes: 6
From: Long Island, NY
Car: 1992 z28
Engine: LS1
Transmission: T-56
Re: Watch a Rookie Learn How To Swap a LS1 and T56 into a 1992 Z28
Looks like you made good progress. I'm looking forward to seeing the new engine drop into your car soon.
I've seen several different methods for re-installing the engine/k-member...it goes back in pretty easy from under the car. The hardest part is getting the car high enough and finding the right combination of jacks and jackstands to lift and hold everything securely. I borrowed an extra jack and bought an extra set of jack stands to make it easier.
I've seen several different methods for re-installing the engine/k-member...it goes back in pretty easy from under the car. The hardest part is getting the car high enough and finding the right combination of jacks and jackstands to lift and hold everything securely. I borrowed an extra jack and bought an extra set of jack stands to make it easier.
I plan on using my engine crane to pick up the front of the camaro with some straps. Im pretty confident I will have the height to clear everything. As far as reinstalling the engine and k-member, I think I will need to do what you did and borrow another jack from a friend. Plenty of jack stands around besides that. Hopefully everything goes in as easy as it came out lol.
Do you have 220 to the garage already?
If so, the wiring is super easy on that compressor... I just wired mine up last week.
White and Black are your "hot" wires, the green is ground. (this is for 220, 110 is different).
It should be pretty evident on your switch on the compressor, on mine they used the proper colours. Just wire it up to the plug that matches your outlet, they are colour coded. The brass and steel connectors are for your hots and the green is for the ground. Use 12 gauge wire, keep it a short run.
I always get a multimeter out to double check the socket itself is wired properly. One of the hots and a ground will give 120, the ground and the other hot will also be 120. The two hots together will give 240ish on the multimeter... Pretty simple really.
I could explain setting yourself up for 220 from the breaker panel, but that is something for a pro to do.
If so, the wiring is super easy on that compressor... I just wired mine up last week.
White and Black are your "hot" wires, the green is ground. (this is for 220, 110 is different).
It should be pretty evident on your switch on the compressor, on mine they used the proper colours. Just wire it up to the plug that matches your outlet, they are colour coded. The brass and steel connectors are for your hots and the green is for the ground. Use 12 gauge wire, keep it a short run.
I always get a multimeter out to double check the socket itself is wired properly. One of the hots and a ground will give 120, the ground and the other hot will also be 120. The two hots together will give 240ish on the multimeter... Pretty simple really.
I could explain setting yourself up for 220 from the breaker panel, but that is something for a pro to do.
Great work, it's good to have friends to help out. It's like pulling eye teeth around my place to get decent help. Most of my work is on my own. But then when I do mine I plan to dis-assemble the K-member to refurbish everything. I already have the Bigbrake upgrade and all poly bushings but there are some improvements I want to make. You are making good progress, keep us posted.
Thanks for reading along with my build so far. Hopefully I can keep you guys interested with a lot of upcoming updates. Now that the weather is nice and school is out...the time to wrench on the car is more abundant.
Last edited by Warnd; May 27, 2014 at 04:40 PM.
Senior Member
Joined: Apr 2001
Posts: 798
Likes: 3
From: Powder Springs, Georgia, USA
Car: 1992 Black Z28 Hardtop
Axle/Gears: 2002 10 bolt w/3:23
Re: Watch a Rookie Learn How To Swap a LS1 and T56 into a 1992 Z28
Keeping the interest will not be hard, I'm planning my own swap and need all the ideas and motivation I can get.
Thread Starter
Member
Joined: Aug 2007
Posts: 209
Likes: 6
From: Long Island, NY
Car: 1992 z28
Engine: LS1
Transmission: T-56
Re: Watch a Rookie Learn How To Swap a LS1 and T56 into a 1992 Z28
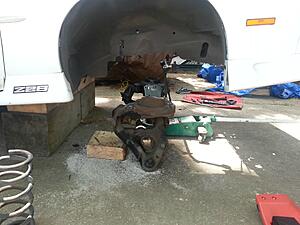
Got another quick update for you guys today. Just started to tear the brakes down to get the calipers prepped for paint. Going to paint them with a high temp krinkle black paint and then cover it with a high temp clear. Hopefully it turns out clean looking.
This was my first time dealing with brakes and I was surprised how simple everything is. Here are the pics of the little progress I made after work today:
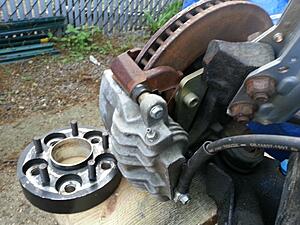
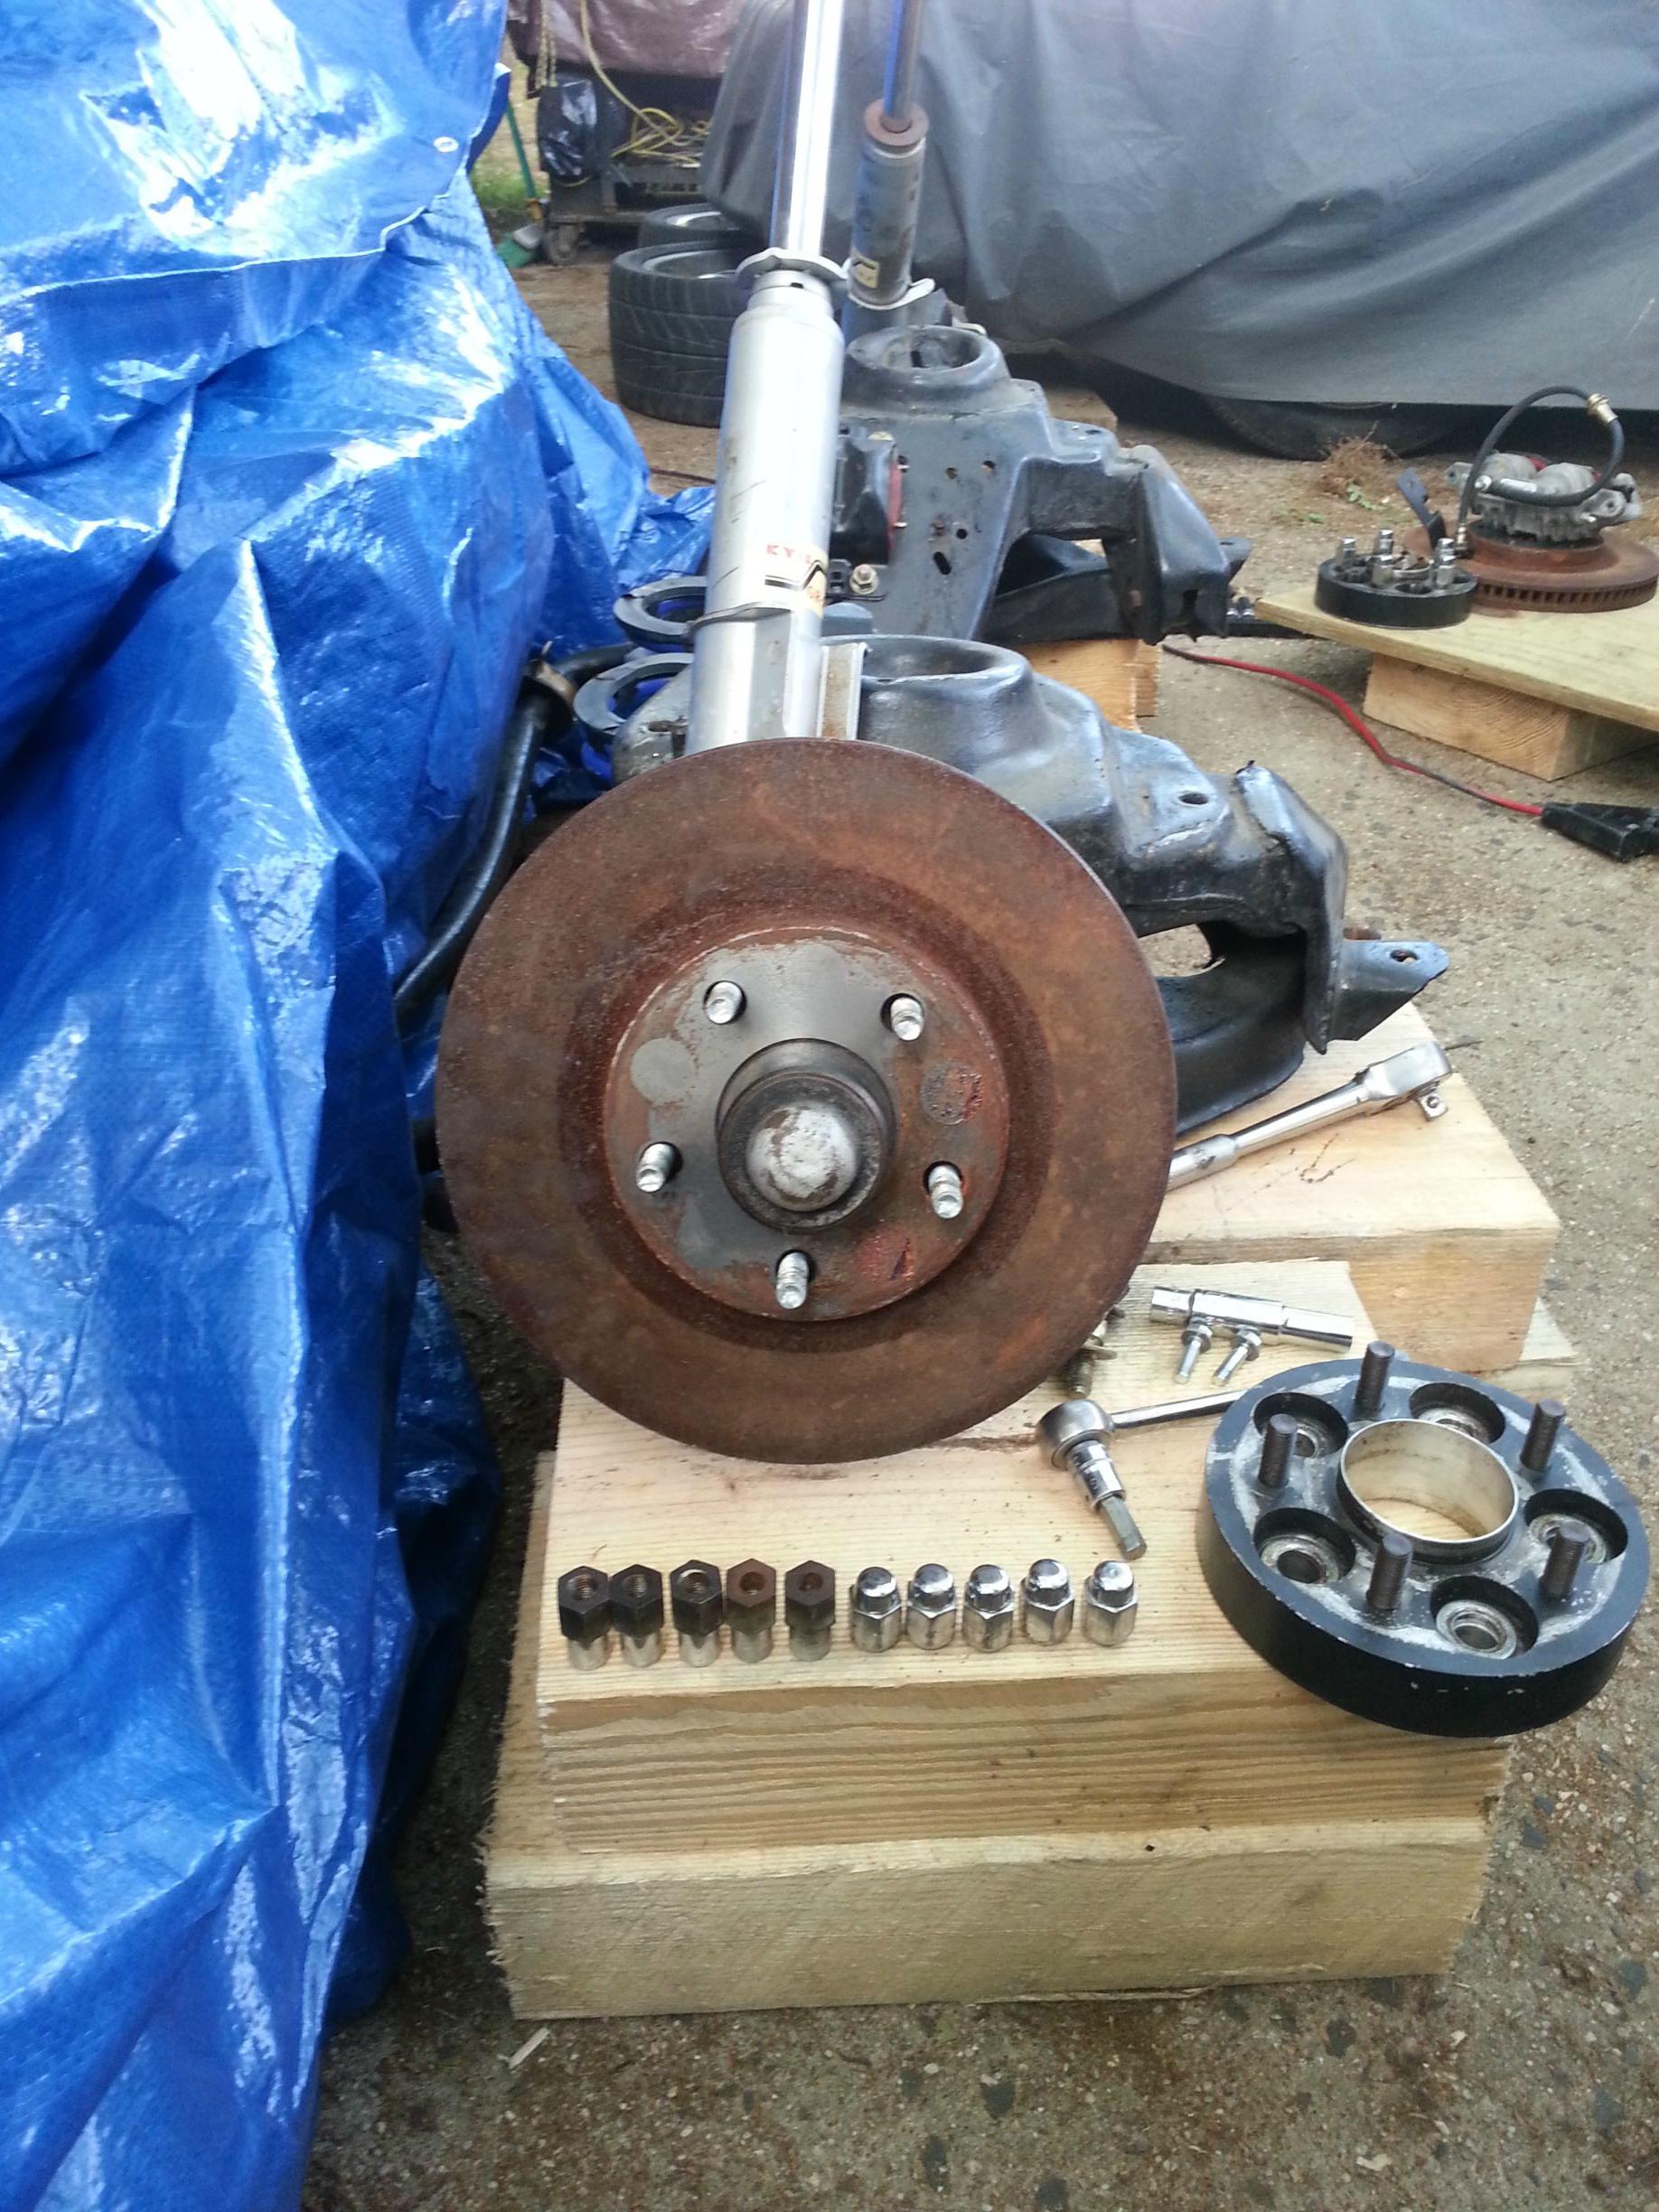
With wheel spacer still on:
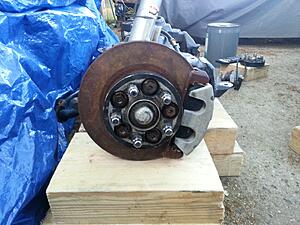
Wheel spacer off:
Just two bolts to get the caliper bracket off...this silver one at the top of the bracket and then an identical one at the bottom of the bracket:
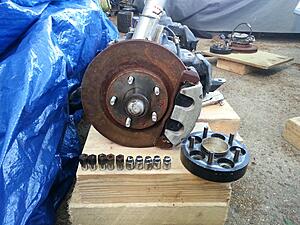
Then we are left with this brake pad bracket thing:

This bracket is held on by these two gold colored allen key bolts:

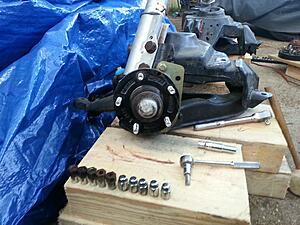
Then all thats left is the bare rotor:
To get the rotor off, I had to give it a few gentle taps with a rubber lump mallet. It was slightly stuck on there from the surface rust but it came off easy enough. Just had to rotate the rotor slowly as I tapped it:
Sorry if these pictures are too basic or uninteresting to most of the more experienced members on here. Im sure you are all well aware of how to change your brakes lol. I take pictures and explain everything because A. its fun for me and B. I remember reading these threads when I was much younger and soaking up all the information I could. I hope to provide some people with some more insight into how easy this stuff can be to do.
Taking the rotors to get cut tomorrow and should have enough time to clean up and paint the brake calipers. Stay tuned for pictures of how that turned out.
This was my first time dealing with brakes and I was surprised how simple everything is. Here are the pics of the little progress I made after work today:
With wheel spacer still on:

Wheel spacer off:

Just two bolts to get the caliper bracket off...this silver one at the top of the bracket and then an identical one at the bottom of the bracket:

Then we are left with this brake pad bracket thing:

This bracket is held on by these two gold colored allen key bolts:
Then all thats left is the bare rotor:
To get the rotor off, I had to give it a few gentle taps with a rubber lump mallet. It was slightly stuck on there from the surface rust but it came off easy enough. Just had to rotate the rotor slowly as I tapped it:

Sorry if these pictures are too basic or uninteresting to most of the more experienced members on here. Im sure you are all well aware of how to change your brakes lol. I take pictures and explain everything because A. its fun for me and B. I remember reading these threads when I was much younger and soaking up all the information I could. I hope to provide some people with some more insight into how easy this stuff can be to do.
Taking the rotors to get cut tomorrow and should have enough time to clean up and paint the brake calipers. Stay tuned for pictures of how that turned out.

Supreme Member
Joined: Mar 2000
Posts: 2,028
Likes: 0
From: St. Louis, MO
Car: 85' Firebird (Project), 92' RS
Engine: 2.8L, LS1
Transmission: 700R4, 4L60E
Axle/Gears: 3.42 Open , 10 Bolt (ukn)
Re: Watch a Rookie Learn How To Swap a LS1 and T56 into a 1992 Z28
Just out of curiosity, is that an LS1 brake setup on the front?
And personally, I like that you took so many pictures. As a guy who read this board 15 years ago, and has now forgotten more than he knew about the stat side of 3rd gens, it's always good to see someone document a process. I hope your swap goes well!
And personally, I like that you took so many pictures. As a guy who read this board 15 years ago, and has now forgotten more than he knew about the stat side of 3rd gens, it's always good to see someone document a process. I hope your swap goes well!
Thread Starter
Member
Joined: Aug 2007
Posts: 209
Likes: 6
From: Long Island, NY
Car: 1992 z28
Engine: LS1
Transmission: T-56
Re: Watch a Rookie Learn How To Swap a LS1 and T56 into a 1992 Z28
Just out of curiosity, is that an LS1 brake setup on the front?
And personally, I like that you took so many pictures. As a guy who read this board 15 years ago, and has now forgotten more than he knew about the stat side of 3rd gens, it's always good to see someone document a process. I hope your swap goes well!
And personally, I like that you took so many pictures. As a guy who read this board 15 years ago, and has now forgotten more than he knew about the stat side of 3rd gens, it's always good to see someone document a process. I hope your swap goes well!
Good to hear about the pictures. Look back tomorrow night for another update. Should have the rotors and calipers all cleaned up and reassembled.
Thread Starter
Member
Joined: Aug 2007
Posts: 209
Likes: 6
From: Long Island, NY
Car: 1992 z28
Engine: LS1
Transmission: T-56
Re: Watch a Rookie Learn How To Swap a LS1 and T56 into a 1992 Z28
Made a bit more progress on the build over the weekend. Nothing crazy interesting. Managed to clean the ls1 brake rotors up with some very fine emery cloth. All of the surface rust is now gone from the rotors...I think they should be good to go now. Other thing that I got done was removing the k-member from the camaro to get ready to lift the engine into the car. If you look a few posts up, you will see I made the stupid mistake of thinking that the camaro k-member was going to come out in half the time of the trans am. Man if I could have taken those words back I would have. It turned out the be a pretty big pain in the *** because the nut that secures the top of the strut in the engine bay would not freakin budge. We tried damn near everything....Short of heating the bolt (couldnt find our torch) and using air tools (compressor still isnt freakin hooked up  ). In the end we just gave in and decided to cut the nut off. I know this sounds like a ridiculous solution but we didnt want to waste a good day of work and I definitely didnt plan on reusing the stock struts from the 92 camaro (they were very shot). After we managed to drop the struts and springs, everything went really smooth. Got a bunch of pictures from the days work.
Here is a picture of one of the finished brake rotors next to an untouched one:
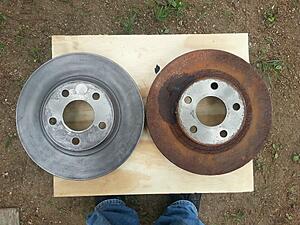
Here are both of the finished rotors...this took a long time with the emery cloth by hand, but I think it will be worth it in the end. This way I didnt lose any lifespan on the rotors by having them turned down:
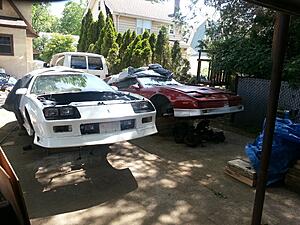
Camaro up in the air and ready to donate its k-member:
Both of the cars:

Decided to disconnect the strut/brake assembly from the k-member this time around. Made removing the k-member much easier/manageable: (sorry for blurry pic...
Action shot of unbolting k-member bolts:
Time to lower it on down:

Shot of both cars again:
Carnage from the days work:
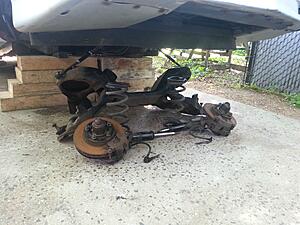
Happy with the days work. Hopefully I will be able to chip away at some stuff throughout the week but I dont know how much will get done. Have to focus my attention on getting the compressor finally setup for the electrician to come. Still gotta drill into the concrete to mount it on the rubber pads before the electrician can do his thing. Still have to take care of painting those brake calipers too. We will see what the week brings. Thanks for lookin
). In the end we just gave in and decided to cut the nut off. I know this sounds like a ridiculous solution but we didnt want to waste a good day of work and I definitely didnt plan on reusing the stock struts from the 92 camaro (they were very shot). After we managed to drop the struts and springs, everything went really smooth. Got a bunch of pictures from the days work.Here is a picture of one of the finished brake rotors next to an untouched one:

Here are both of the finished rotors...this took a long time with the emery cloth by hand, but I think it will be worth it in the end. This way I didnt lose any lifespan on the rotors by having them turned down:

Camaro up in the air and ready to donate its k-member:

Both of the cars:

Decided to disconnect the strut/brake assembly from the k-member this time around. Made removing the k-member much easier/manageable: (sorry for blurry pic...

Action shot of unbolting k-member bolts:

Time to lower it on down:


Shot of both cars again:

Carnage from the days work:

Happy with the days work. Hopefully I will be able to chip away at some stuff throughout the week but I dont know how much will get done. Have to focus my attention on getting the compressor finally setup for the electrician to come. Still gotta drill into the concrete to mount it on the rubber pads before the electrician can do his thing. Still have to take care of painting those brake calipers too. We will see what the week brings. Thanks for lookin
Last edited by Warnd; Jun 1, 2014 at 10:01 PM.
Senior Member
iTrader: (4)
Joined: Oct 2008
Posts: 857
Likes: 5
From: Niles, IL
Car: '91 LS6/T56/9"
Engine: LS6
Transmission: T56
Axle/Gears: Currie 9"/4.11, detroit truetrac
Re: Watch a Rookie Learn How To Swap a LS1 and T56 into a 1992 Z28
That electrical work is nothing! You can do it, hell you're building a car! Great compressor too.
Thread Starter
Member
Joined: Aug 2007
Posts: 209
Likes: 6
From: Long Island, NY
Car: 1992 z28
Engine: LS1
Transmission: T-56
Re: Watch a Rookie Learn How To Swap a LS1 and T56 into a 1992 Z28
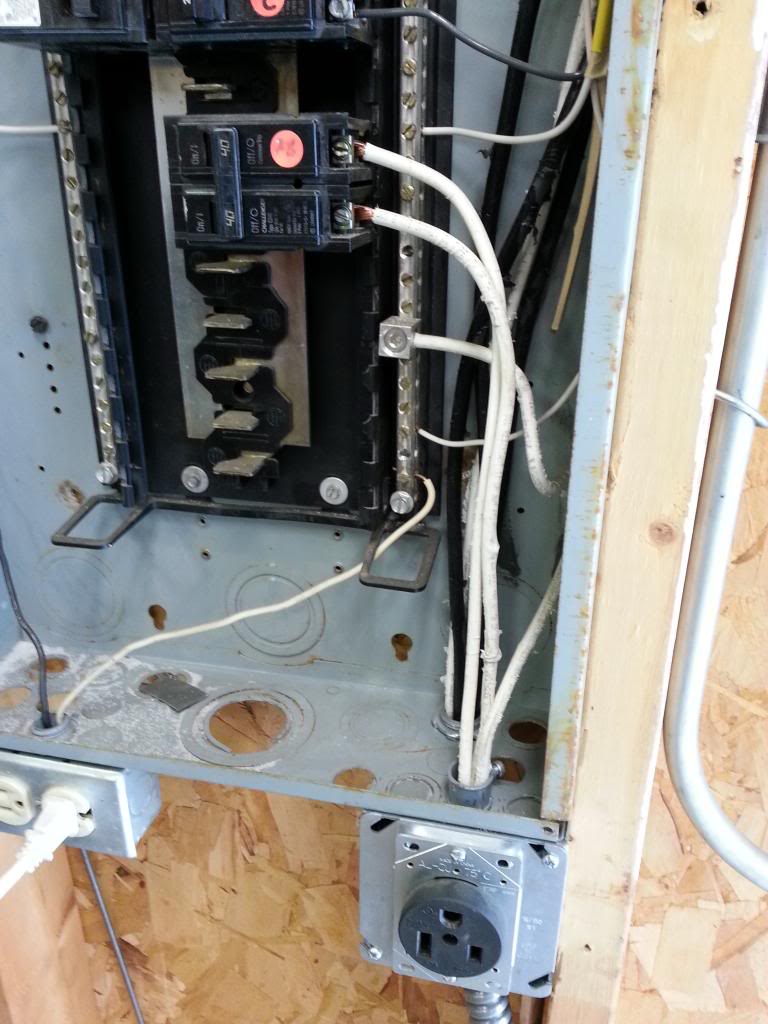
Thanks rob, the more I think about it, the more I want to wire this thing myself. The garage is already set up with a brand new breaker box and everything so it shouldnt be too hard. I watched a few youtube videos about it and it seems like cake. Only thing im not 100% on is which type of wire to and recepticle to buy, and I feel like getting the wrong stuff could lead to a big problem.
Senior Member
Joined: Jun 2013
Posts: 746
Likes: 24
From: Atlantic Canada
Car: 87 Trans Am
Engine: LS1
Transmission: T56
Re: Watch a Rookie Learn How To Swap a LS1 and T56 into a 1992 Z28
I believe what you want is 12-2 solid wire from the box to the recepticle. It will have 3 wires inside, white, green or bare copper, black.
Recepticle, choose what you want as long as it's rated over 240V and over the amperage of your twin breaker.
When you put the double breaker in the box, you'll connect your black and white wire to the posts on the breaker, the green/bare is ground and ties in to the rest of the grounds in the panel.
At the recepticle, it will have 3 posts for connecting your wiring. one will be green for ground, one will appear to be brass and one will have a clear finish to it, those are for your black and white wires which are now hot from the box.
Get out the multimeter, when you connect to white and black you get 240, and black or white to green gives you 120.
I used a twist lock recepticle for my connection.
Seriously, you're wiring a car, you can do this... I figured it out myself and I'm dumb!
Senior Member
iTrader: (4)
Joined: Oct 2008
Posts: 857
Likes: 5
From: Niles, IL
Car: '91 LS6/T56/9"
Engine: LS6
Transmission: T56
Axle/Gears: Currie 9"/4.11, detroit truetrac
Re: Watch a Rookie Learn How To Swap a LS1 and T56 into a 1992 Z28
On page 2 of this thread I posted a picture of the trench I dug to run gas/electrical in. Here's a picture of how my 220VAC outlets are wired. First is my garages electrical panel. The outlet is used to run my tig and mig welders.
From the outlet you have 3 wires. 2 hot (electrically energized), 1 ground. Buy a double breaker (mine in the pic is 40A) and connect the 2 hot wires to it in any orientation. Then connect the 3rd to the ground bus. The wire I used in mine is 6 gauge.....WAYY larger than needed, but I had it so I used it.
This pic is of my houses electrical panel. you can see my garages subpanel feed on the right (these are the black wires that run through the trench I dug) and my AC's breaker on the lower left. The AC's feed is using 10 gauge wire, and a 30A breaker. The red and black wires are hot, and the green is ground. Hope this helps.
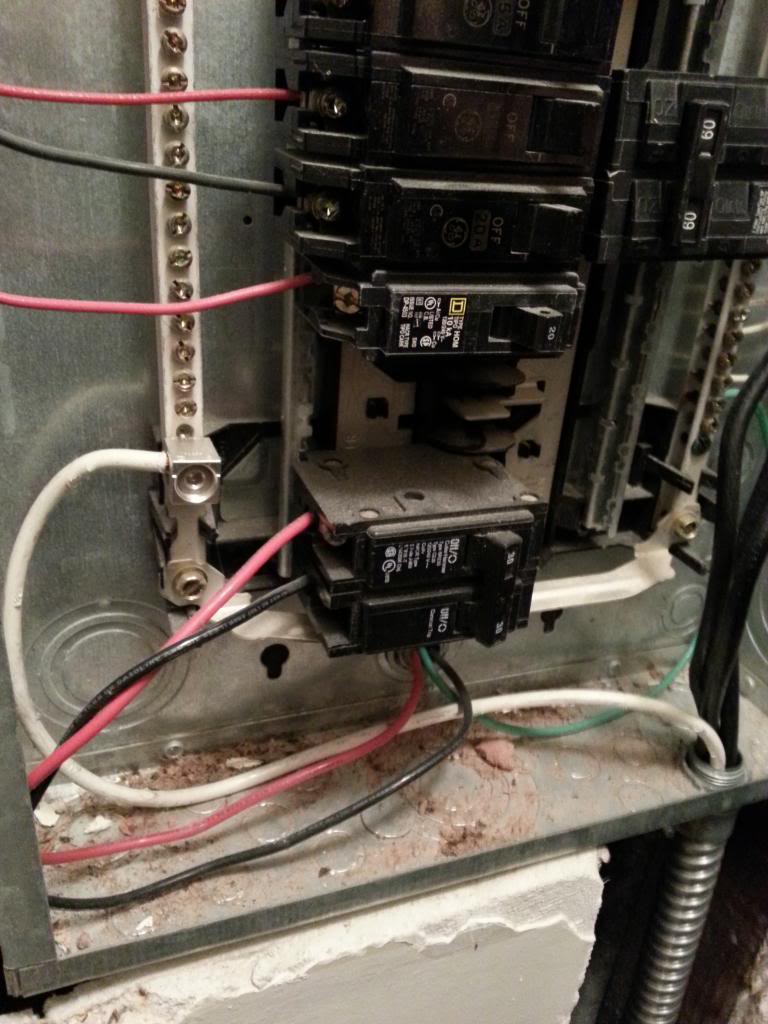
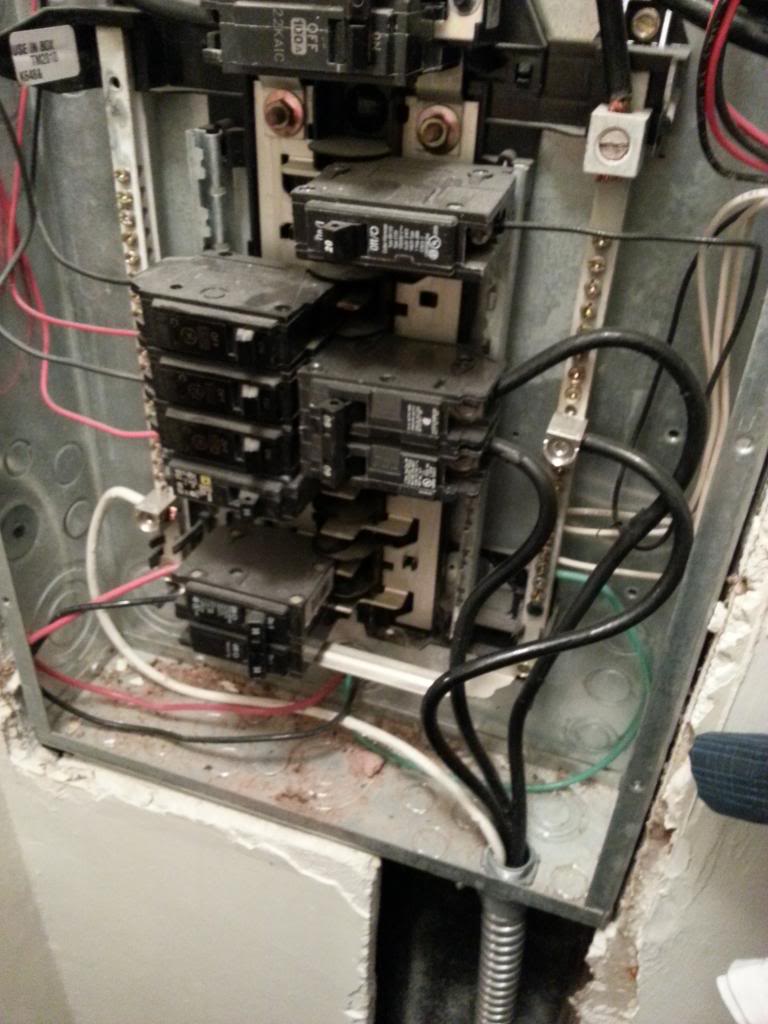


Senior Member
iTrader: (4)
Joined: Oct 2008
Posts: 857
Likes: 5
From: Niles, IL
Car: '91 LS6/T56/9"
Engine: LS6
Transmission: T56
Axle/Gears: Currie 9"/4.11, detroit truetrac
Re: Watch a Rookie Learn How To Swap a LS1 and T56 into a 1992 Z28
Couple things to remember.
Always test something before touching it.
Use your meter and remember to set it to AC voltage
Copper is copper. All copper wire is the same no matter what color the insulation is. Of course the larger the wire, the more current it can handle.
Now get to the hardware store and get that compressor running!
Senior Member
Joined: Apr 2001
Posts: 798
Likes: 3
From: Powder Springs, Georgia, USA
Car: 1992 Black Z28 Hardtop
Axle/Gears: 2002 10 bolt w/3:23
Re: Watch a Rookie Learn How To Swap a LS1 and T56 into a 1992 Z28
From the outlet you have 3 wires. 2 hot (electrically energized), 1 ground. Buy a double breaker (mine in the pic is 40A) and connect the 2 hot wires to it in any orientation. Then connect the 3rd to the ground bus. The wire I used in mine is 6 gauge.....WAYY larger than needed, but I had it so I used it.
This pic is of my houses electrical panel. you can see my garages subpanel feed on the right (these are the black wires that run through the trench I dug) and my AC's breaker on the lower left. The AC's feed is using 10 gauge wire, and a 30A breaker. The red and black wires are hot, and the green is ground. Hope this helps.
This pic is of my houses electrical panel. you can see my garages subpanel feed on the right (these are the black wires that run through the trench I dug) and my AC's breaker on the lower left. The AC's feed is using 10 gauge wire, and a 30A breaker. The red and black wires are hot, and the green is ground. Hope this helps.
Senior Member
iTrader: (4)
Joined: Oct 2008
Posts: 857
Likes: 5
From: Niles, IL
Car: '91 LS6/T56/9"
Engine: LS6
Transmission: T56
Axle/Gears: Currie 9"/4.11, detroit truetrac
Re: Watch a Rookie Learn How To Swap a LS1 and T56 into a 1992 Z28
What you're referring to as Neutral, I'm referring to as Ground because it's connected to the ground bus. The ground you're taking about is a chassis/earth ground and because my receptacle is connected directly to my grounded panel, it's not needed. All the same we're just using different terminology.

Junior Member
Joined: May 2013
Posts: 30
Likes: 0
From: Worcester, Ma
Car: 1983 Sport Coupe
Engine: 2.8
Transmission: M5
Axle/Gears: 3.42
Re: Watch a Rookie Learn How To Swap a LS1 and T56 into a 1992 Z28
Honestly wiring up the receptical would be an absolute cake walk. I went to a tech school for electrical and actually know first hand how to hard wire houses. This is a rather easy job, the only thing you would really have to be careful of is wiring the wires to the actual panel. Remember theres 240 volts in there and its LIVE. Its pretty easy to get electrocuted. Although the job is rather simple, the risk alone would not be worth it. Have the electrician do it, your efforts are very motivating keep at it!
Senior Member
Joined: Apr 2001
Posts: 798
Likes: 3
From: Powder Springs, Georgia, USA
Car: 1992 Black Z28 Hardtop
Axle/Gears: 2002 10 bolt w/3:23
Re: Watch a Rookie Learn How To Swap a LS1 and T56 into a 1992 Z28
Yes I've worked with electricity for 40 years it is very dangerous if not respected.
Senior Member
Joined: Apr 2001
Posts: 798
Likes: 3
From: Powder Springs, Georgia, USA
Car: 1992 Black Z28 Hardtop
Axle/Gears: 2002 10 bolt w/3:23
Re: Watch a Rookie Learn How To Swap a LS1 and T56 into a 1992 Z28
What you're referring to as Neutral, I'm referring to as Ground because it's connected to the ground bus. The ground you're taking about is a chassis/earth ground and because my receptacle is connected directly to my grounded panel, it's not needed. All the same we're just using different terminology.

Thread Starter
Member
Joined: Aug 2007
Posts: 209
Likes: 6
From: Long Island, NY
Car: 1992 z28
Engine: LS1
Transmission: T-56
Re: Watch a Rookie Learn How To Swap a LS1 and T56 into a 1992 Z28
Well I got another small update for you guys. First good news of the day, the compressor is now wired up! I ended up taking everyone's advice and decided to tackle this project without the help of an electrician. Well that is until I came home from work one day to find my day about 85 percent done with the whole job haha. He really came through big for me here and did an absolutely amazing clean job. It really looks like a professional did the install and I couldnt be happier and more appreciative.
Next up on the list for the compressor is to pipe up the garage the way I want it. Been doing a lot of research on this front and have come to the conclusion that 1/2 inch black pipe will be used inside the garage to go through the filter/regulator and then the dryer before splitting off to the hose real and other air outlets. If anyone could take a look at this website and let me know what you think about these kits I would really appreciate it:
http://www.tptools.com/Metal-Piping-Kits.html
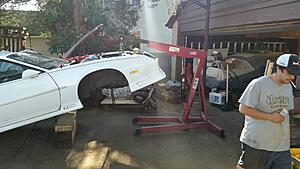
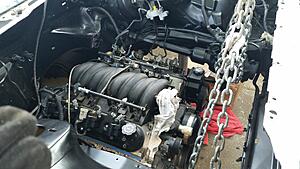
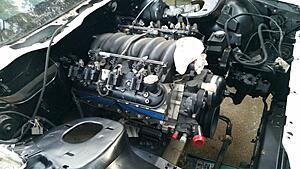
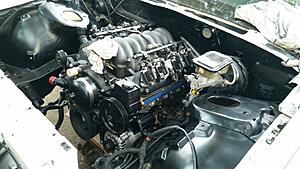
I also have a small car update to share with you guys tonight as well. Managed to get some time to work on the car this afternoon and was able to get the engine completely bolted and torqued to the K-member. Was worried I might have some issues with everything lining up with the adapter plates but everything worked out really nicely and the day went pretty smooth. Anyway onto the pictures from today.
So before I started this project, I was tossing around a bunch of different ideas for how I was going to move the K-member and mount the engine before it was installed in the car. Then my dad came home with this behemoth:
This thing is ridiculous...really freakin solid construction dolly that they use for transporting all sorts of **** Ended up being the perfect tool for the job.
Just put two strong planks of wood running long-ways and then a sheet of plywood on top of those two pieces of wood to make a really strong base:

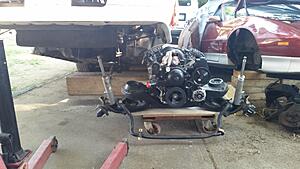
Next we picked up the k-member and plopped it on the dolly. Here is a shot of my friend Steve helping me to install the engine mounts to the k-member:
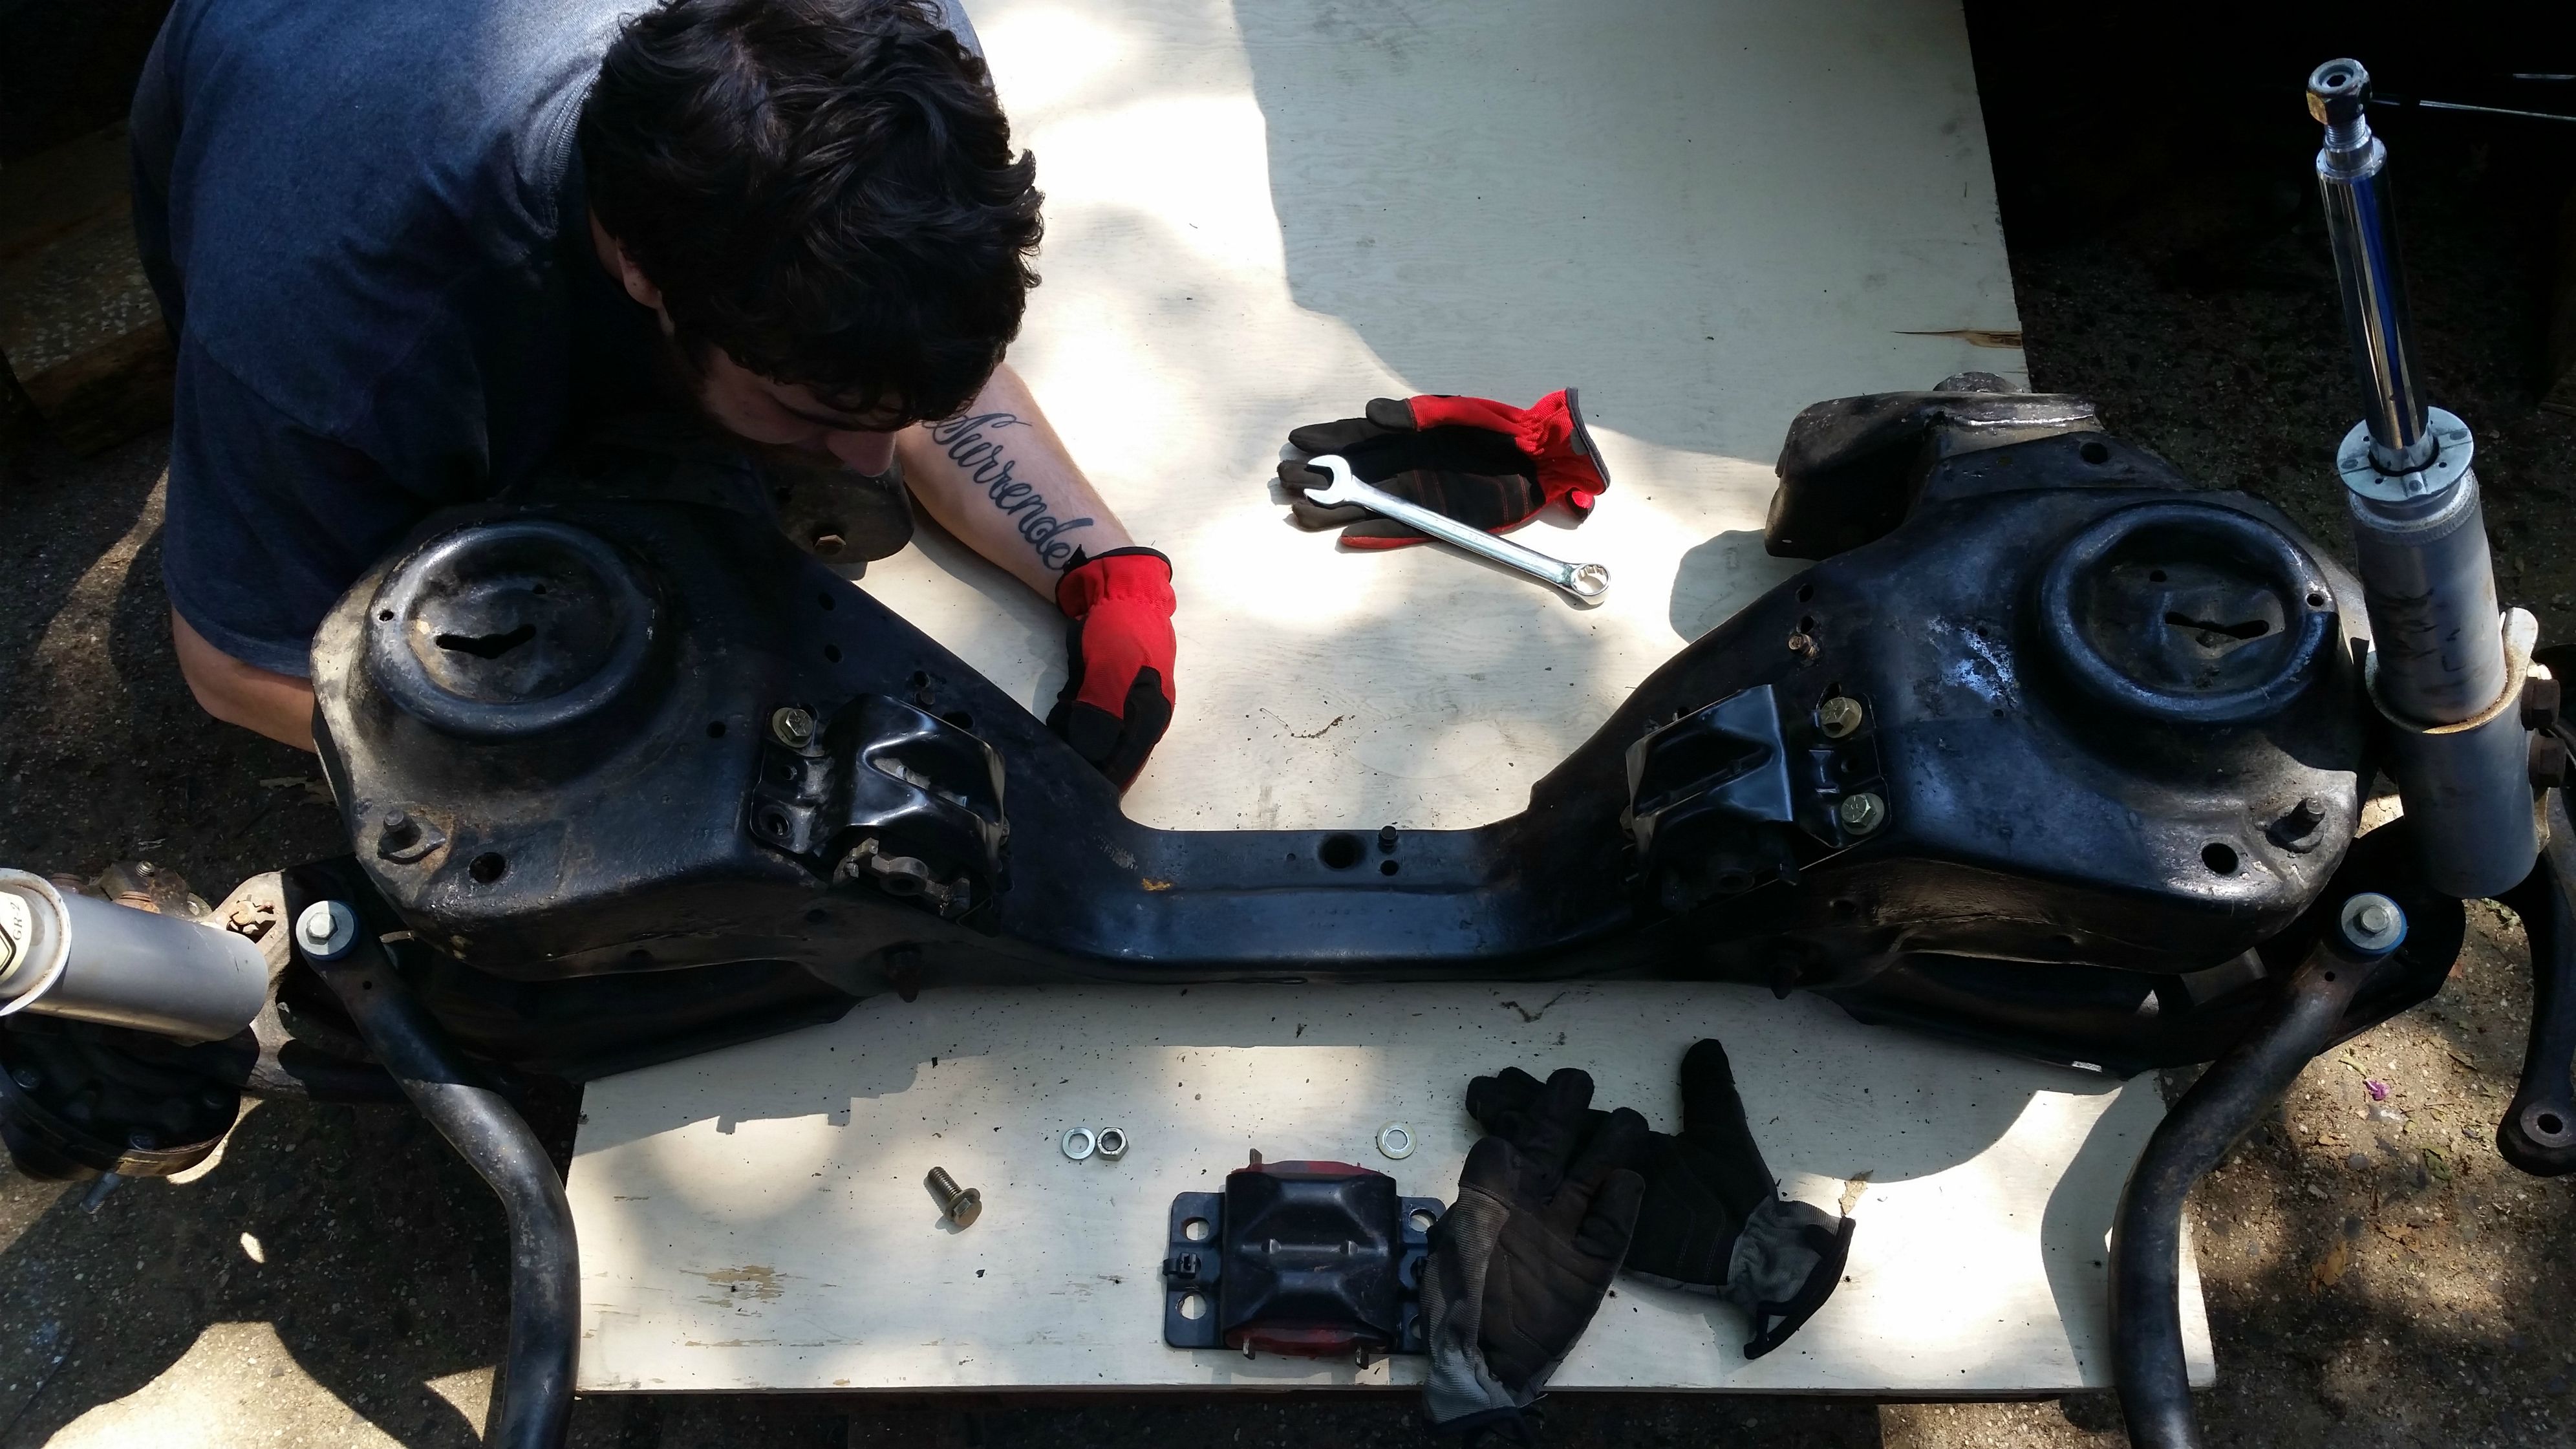
Here is a shot of the engine mount bolted to the k-member. I really didnt think this was the proper way to bolt up the engine mounts, but after triple checking the gm service manual, I torqued them down. Just seems silly to me to have an engine mount with four holes and you only have to use three of them.....Can someone else confirm that I did this right for my sanity?
Drivers side:

Passanger side:

Another thing that I found weird about this in the gm service manual was the torque spec for the mounts. It only listed 38 for the mount to crossmember spec. Seems low to me for such an important bolt, but again...who am I to argue with whats in the service manual.
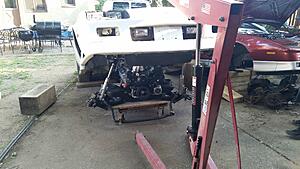
Ready for the engine:

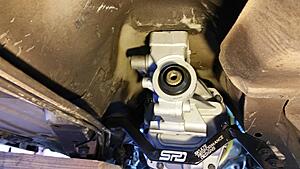
Before I could drop the engine in, I had to install the conversion plates and clamshell mounts. It was kind of a bitch to get the clamshell to fit due to the plastic backing on the alternator, but it eventually fell into place with a little bit of finagling:

Can I also get a confirmation that these are installed correctly?
After the conversion plates were on everything just slid right into place. Lowered the engine and tranny with my engine crane and everything lined up perfect for the through bolts to pass through the clamshell mounts: (sorry for this blurry shot...there always has to be one)

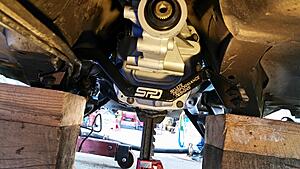
Great clearance between the oil pan and k-member: (thanks for notching your k-member dan!)

Last shot is just a picture of how it looked while it was being lowered into place:

The engine and k-member were repositioned after this to be in a better place on the dolly, but we only had so much reach with the crane so we had to do it in two different stages.
Well thats it for today....hope to install coil packs, headers, and at least begin with the wiring harness so that I can get this installed in the car once and for all.
Let me know what you guys think...always appreciate your comments!
Last edited by Warnd; Jun 24, 2014 at 08:59 PM.
Supreme Member
iTrader: (1)
Joined: Mar 2007
Posts: 1,237
Likes: 7
From: Apopka, Florida
Car: 1989 Pontiac Trans Am GTA
Engine: cammed LS1
Transmission: Monster SS 4L65E
Axle/Gears: 9 bolt posi w/ 3.70 gears
Re: Watch a Rookie Learn How To Swap a LS1 and T56 into a 1992 Z28
Nice progress Warnd! I can't believe they were just going to toss that dolly!
That metal piping kit looks nice, but you could probably build your own for less. Hardware stores usually carry most of those items.
I installed a plastic cap on the end of the "hot" terminal on my alternator since it is so close to everything under the car. I kept accidentally grounding it out. Just something to keep in mind once you get power to it.
Thread Starter
Member
Joined: Aug 2007
Posts: 209
Likes: 6
From: Long Island, NY
Car: 1992 z28
Engine: LS1
Transmission: T-56
Re: Watch a Rookie Learn How To Swap a LS1 and T56 into a 1992 Z28
Nice progress Warnd! I can't believe they were just going to toss that dolly!
That metal piping kit looks nice, but you could probably build your own for less. Hardware stores usually carry most of those items.
I installed a plastic cap on the end of the "hot" terminal on my alternator since it is so close to everything under the car. I kept accidentally grounding it out. Just something to keep in mind once you get power to it.
That metal piping kit looks nice, but you could probably build your own for less. Hardware stores usually carry most of those items.
I installed a plastic cap on the end of the "hot" terminal on my alternator since it is so close to everything under the car. I kept accidentally grounding it out. Just something to keep in mind once you get power to it.
I would have to agree with you about the piping kits and am definitely leaning towards peicing it together myself. I was just worried about getting the filter/regulator and the dryer for the air lines but im sure I could find that in the hardware store too.
Thanks for the tip on the alternator...I will definitely put that cap there when I get it all wired up.
Would you mind throwing an eye at my engine mounts? Im about 90 percent sure I have them correct but the fact that only three of the four bolt holes are being used is troubling to me.
Thanks again for looking!
Last edited by Warnd; Jun 24, 2014 at 09:00 PM.
Supreme Member
iTrader: (1)
Joined: Mar 2007
Posts: 1,237
Likes: 7
From: Apopka, Florida
Car: 1989 Pontiac Trans Am GTA
Engine: cammed LS1
Transmission: Monster SS 4L65E
Axle/Gears: 9 bolt posi w/ 3.70 gears
Re: Watch a Rookie Learn How To Swap a LS1 and T56 into a 1992 Z28
Yeah, I know how wasteful they can be. I work in the construction industry.
There are plenty of places online that have filters & regulators. I found a desiccant drier & regulator for my compressor at Harbor Freight.
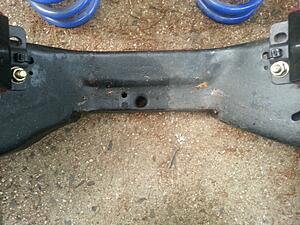
I found a picture in my collection of my stock k-member. It looks like what you were talking about. I think you're good to go.
There are plenty of places online that have filters & regulators. I found a desiccant drier & regulator for my compressor at Harbor Freight.
I found a picture in my collection of my stock k-member. It looks like what you were talking about. I think you're good to go.
Thread Starter
Member
Joined: Aug 2007
Posts: 209
Likes: 6
From: Long Island, NY
Car: 1992 z28
Engine: LS1
Transmission: T-56
Re: Watch a Rookie Learn How To Swap a LS1 and T56 into a 1992 Z28
Yeah, I know how wasteful they can be. I work in the construction industry.
There are plenty of places online that have filters & regulators. I found a desiccant drier & regulator for my compressor at Harbor Freight.
I found a picture in my collection of my stock k-member. It looks like what you were talking about. I think you're good to go.
There are plenty of places online that have filters & regulators. I found a desiccant drier & regulator for my compressor at Harbor Freight.
I found a picture in my collection of my stock k-member. It looks like what you were talking about. I think you're good to go.
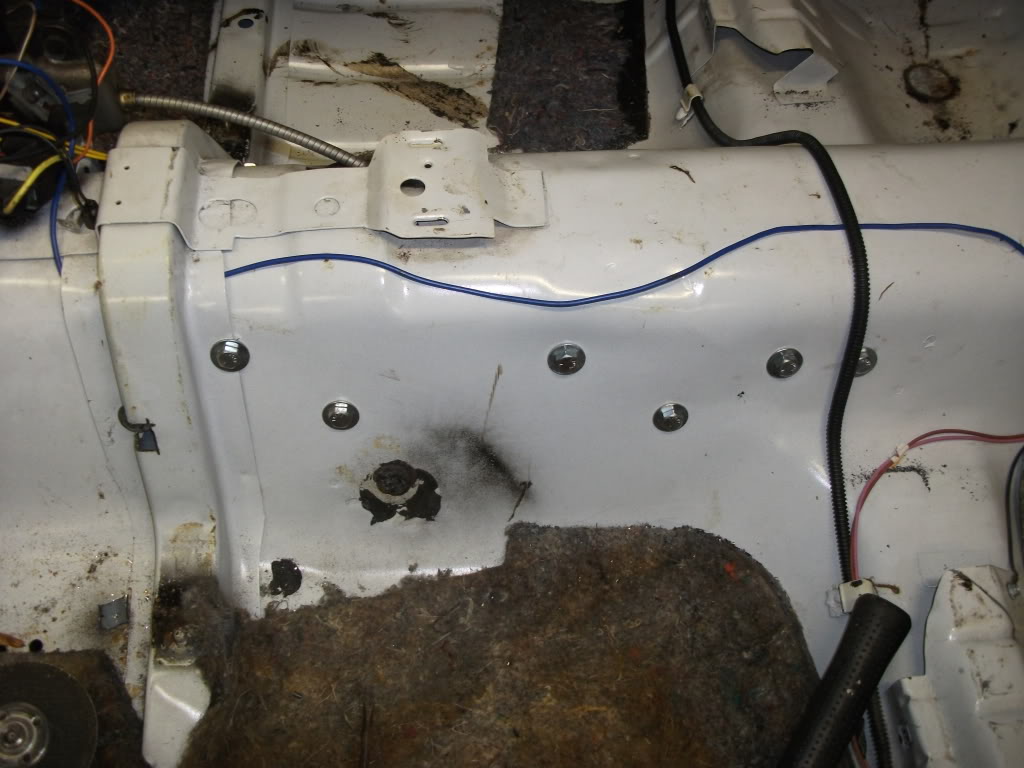
Well im pretty excited today because I have what I think is a big update/milestone to share. Over the weekend I managed to get the entire Sunday cleared for getting some work done on the car. To make the day even better, I was going to have my pops help for the first half of the day and my friend Steve help for the second half of the day. With this in mind, I set out with two main objectives for the day. For the first half of the day with my pops we would get the hole cut for the clutch hydraulics, and for the second half of the day my friend Steve would help me drop the engine in the car (or car over the engine). The day turned out to be a huge success, but I was definitely happy to have my dad there to help with cutting the hole for the clutch hydraulics. It was a pretty big pain in the *** to get everything centered properly and lined up with the clutch pedal. With his help though the job went pretty smoothly. The second half of the day went equally as smooth when it came time to drop the car over the engine. This part really went off without a hitch. Even lined everything up on the first try!
Well enough of my rambling....pics are always more fun. I will try to explain how we tackled everything with the corresponding pics. Tried to grab as many pics as I could, but due to the nature of both jobs, there isnt much for the clutch pedal.
To make the hole for the clutch hydraulics, we first made a crude template to ensure that the holes on the firewall were the correct distance apart. Good thing that we did this, because we had to bend the rods coming down from the pedal bracket in order to make the holes be the proper distance apart.

The next issue with the clutch hydraulics is the bushing in the end of the master cylinder rod. This bushing does not fit over the 3rd gen manual pedals (we knew this going in). Some people suggest to just remove the busing and slip it over the pin like that. We tried this, and although it did work, there was sooooo much play when the rod was over the pin. Way too much to warrant on a part that is going to be moving constantly. What we did here was take a dremel to the inside of the bushing and widened it out until the bushing and rod could slip over the pin snuggly.
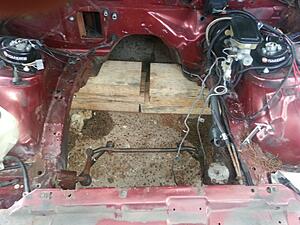
After that all we had to do was take out the hole saw bits and make the proper size hole in the firewall for the master cylinder...we had to use the dremel to widen this hole a little because the cylinder is not a perfect circle:

Here is the master cylinder all hooked up and installed...this picture is kind of on an angle, but the rod and pedal line up perfectly straight. Again, I owe all this to my pops for having the patience to make sure it came out right:

Here is a crappy shot of what the clutch hydraulics look like from the engine bay:

Thats all the info and pics for the clutch hydraulics...going to put the engine stuff in another post bec I have lots of pics.
Thread Starter
Member
Joined: Aug 2007
Posts: 209
Likes: 6
From: Long Island, NY
Car: 1992 z28
Engine: LS1
Transmission: T-56
Re: Watch a Rookie Learn How To Swap a LS1 and T56 into a 1992 Z28
Now onto the more exciting pics...
So the second half of the day was all about getting this engine into the car. It went very smoothly and quickly. Dont know why I was making it out to be something much harder than it was.
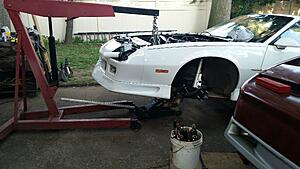
First I rolled the drivetrain next to its new home for a horrible picture...sorry about the crappy light here:
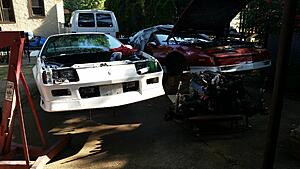
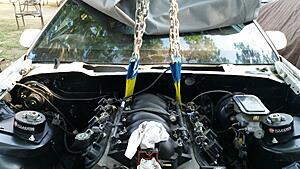
Then it was time to hook the front of the car up to the engine crane so we could maneuver the drivetrain underneath. I decided to put one of the chains through the bracket that bolts to the frame and holds the steering components. The other chain went to the same spot on the opposite (drivers) side of the engine bay:
Oh my god its working!
Steve trying to get out of the way of the pic....smoking is bad mmmmkay:
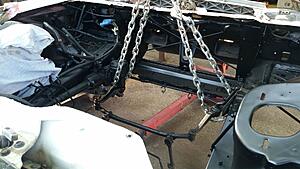
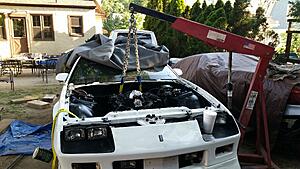
Lifted the car all the way up until the rear bumper started getting reallll close to the ground. The volkswagen crowd would be proud hahaha:

Got enough room to slide it under:
Starting to lower it on down....
Almost all the way in its home:
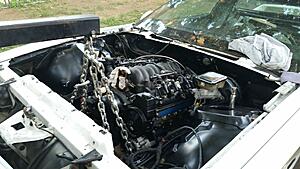
At this point the body would not drop any lower onto the engine because the transmission was hitting the tunnel....the dolly we had was a little too tall for the job. This meant we were going to have to jack the front of the dolly up in order to get the bolt holes to line up perfectly. And they did line up perfect on the first try. Dowel pins slid right in by the grace of God lol.
At this point the kmember was completely bolted in and torqued to 118 lb ft as per the gm service manual...starting to get a real big grin on my face at this point:
So the second half of the day was all about getting this engine into the car. It went very smoothly and quickly. Dont know why I was making it out to be something much harder than it was.
First I rolled the drivetrain next to its new home for a horrible picture...sorry about the crappy light here:

Then it was time to hook the front of the car up to the engine crane so we could maneuver the drivetrain underneath. I decided to put one of the chains through the bracket that bolts to the frame and holds the steering components. The other chain went to the same spot on the opposite (drivers) side of the engine bay:

Oh my god its working!

Steve trying to get out of the way of the pic....smoking is bad mmmmkay:

Lifted the car all the way up until the rear bumper started getting reallll close to the ground. The volkswagen crowd would be proud hahaha:


Got enough room to slide it under:


Starting to lower it on down....

Almost all the way in its home:

At this point the body would not drop any lower onto the engine because the transmission was hitting the tunnel....the dolly we had was a little too tall for the job. This meant we were going to have to jack the front of the dolly up in order to get the bolt holes to line up perfectly. And they did line up perfect on the first try. Dowel pins slid right in by the grace of God lol.

At this point the kmember was completely bolted in and torqued to 118 lb ft as per the gm service manual...starting to get a real big grin on my face at this point:

Thread Starter
Member
Joined: Aug 2007
Posts: 209
Likes: 6
From: Long Island, NY
Car: 1992 z28
Engine: LS1
Transmission: T-56
Re: Watch a Rookie Learn How To Swap a LS1 and T56 into a 1992 Z28
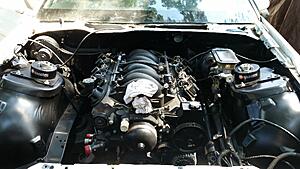
Here are some pictures of the engine in its new home:
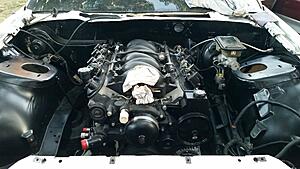
Overall very happy with the progress for the day. Very happy to get the clutch hydraulics out of the way. Now the last major cutting job is to make the hole for the shifter, but I know how im going to tackle that already.
There is still a TON of work to be done in order to get this thing running, but this feels like a huge victory. Now i feel like I can piece things together little by little after work.
Major things left to do:
-Reassemble/paint brakes
-Get fuel lines/tank/regulator/filter swapped over from the transam to the camaro
-Drop the 9 inch out of the trans am and install it in the camaro
-Cut the hole for the shifter
-Install BP wiring harness
-Install headers/figure out magnaflow exhaust.
-Get cooling/radiator stuff figured out
-Throttle cable? Not sure which one I need here.
There is definitely more stuff that I am forgetting but these are the things that jump to the front of my mind. This thing WILL be running by the end of the summer

Member
Joined: Mar 2013
Posts: 325
Likes: 0
From: gladstone
Car: 72 nova/ 90 camaro rs,04 suburban
Engine: blown 327/ 355/306/355/5.3
Transmission: muncie 4 speed/T5/powerglide,4l80e
Axle/Gears: 342/411/456/ moser axles
Re: Watch a Rookie Learn How To Swap a LS1 and T56 into a 1992 Z28
looking good!
Joined: Sep 1999
Posts: 1,496
Likes: 60
From: Danville, IN
Car: 1991 Camaro Z28
Engine: LS1
Transmission: 4L60E
Axle/Gears: Strange 12 Bolt, 3.42
Re: Watch a Rookie Learn How To Swap a LS1 and T56 into a 1992 Z28
Nice Progress! Feels good seeing the engine sitting in the car for the first time, makes you feel like you finally got something done.
As for the throttle cable I used a Lokar TC-1000LS1 36" cable. I knew that one would work based on other threads. You may want to read about how to take apart the original cable to use the part that goes through the firewall with your new cable to keep it at the correct angle.
As for the throttle cable I used a Lokar TC-1000LS1 36" cable. I knew that one would work based on other threads. You may want to read about how to take apart the original cable to use the part that goes through the firewall with your new cable to keep it at the correct angle.
Supreme Member
iTrader: (1)
Joined: Mar 2007
Posts: 1,237
Likes: 7
From: Apopka, Florida
Car: 1989 Pontiac Trans Am GTA
Engine: cammed LS1
Transmission: Monster SS 4L65E
Axle/Gears: 9 bolt posi w/ 3.70 gears
Re: Watch a Rookie Learn How To Swap a LS1 and T56 into a 1992 Z28
 I did exactly what Jbenge is talking about to my cable. I have all of the details on page 6 of my thread. See post 293 & 294. Nice progress by the way!
 Thread Starter
Member
Joined: Aug 2007
Posts: 209
Likes: 6
From: Long Island, NY
Car: 1992 z28
Engine: LS1
Transmission: T-56
Re: Watch a Rookie Learn How To Swap a LS1 and T56 into a 1992 Z28
Nice Progress! Feels good seeing the engine sitting in the car for the first time, makes you feel like you finally got something done.
As for the throttle cable I used a Lokar TC-1000LS1 36" cable. I knew that one would work based on other threads. You may want to read about how to take apart the original cable to use the part that goes through the firewall with your new cable to keep it at the correct angle.
As for the throttle cable I used a Lokar TC-1000LS1 36" cable. I knew that one would work based on other threads. You may want to read about how to take apart the original cable to use the part that goes through the firewall with your new cable to keep it at the correct angle.
Thread Starter
Member
Joined: Aug 2007
Posts: 209
Likes: 6
From: Long Island, NY
Car: 1992 z28
Engine: LS1
Transmission: T-56
Re: Watch a Rookie Learn How To Swap a LS1 and T56 into a 1992 Z28
Thanks dprest...im most definitely a visual learner so it will help me big time to see the pics in your thread. I will have to check it out after work today.
Supreme Member
iTrader: (1)
Joined: Mar 2007
Posts: 1,237
Likes: 7
From: Apopka, Florida
Car: 1989 Pontiac Trans Am GTA
Engine: cammed LS1
Transmission: Monster SS 4L65E
Axle/Gears: 9 bolt posi w/ 3.70 gears
Re: Watch a Rookie Learn How To Swap a LS1 and T56 into a 1992 Z28
Member
iTrader: (2)
Joined: Feb 2010
Posts: 460
Likes: 3
Car: '89 Camaro
Engine: LS1
Transmission: 4L65/70E
Axle/Gears: 9 Inch, 3.70 gears
Re: Watch a Rookie Learn How To Swap a LS1 and T56 into a 1992 Z28
What you should do with that 9" is sell it to me instead of swapping cars.
Thread Starter
Member
Joined: Aug 2007
Posts: 209
Likes: 6
From: Long Island, NY
Car: 1992 z28
Engine: LS1
Transmission: T-56
Re: Watch a Rookie Learn How To Swap a LS1 and T56 into a 1992 Z28
Thread Starter
Member
Joined: Aug 2007
Posts: 209
Likes: 6
From: Long Island, NY
Car: 1992 z28
Engine: LS1
Transmission: T-56
Re: Watch a Rookie Learn How To Swap a LS1 and T56 into a 1992 Z28
Whats up everyone, got another little update to share with you guys tonight. Two different things that I have been working on over the past few days. The first was getting those brake calipers all cleaned up and painted the way I wanted them to look. The second thing was working on getting the dolly out from under the transmission so that we could work on getting getting the old torque arm out as well as getting the new skulte transmission crossmember installed.
Nothing too crazy exciting, but I did have a couple of questions for you guys so I figured I would post up some pics anyways.
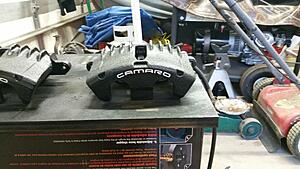
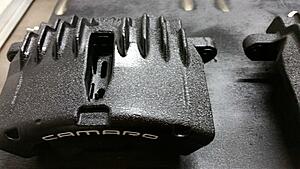
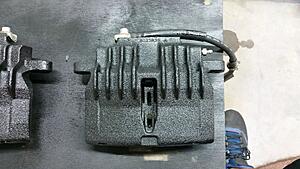
First up are some pictures of the brake calipers. I decided that I wanted to try painting these with that vht wrinkle finish paint that I always see people using because I like the way that finish looks compared to glossy or a normal flat finish. Went through the same painting process that I covered early in this thread for my front accessories. Both calipers were cleaned thoroughly in my parts cleaner, sanded, wiped down with solvent, and taped off before applying any paint. All the paint that I used for this application was high temp paint rated at 500 degrees, if I remember the outside of the can correctly. First I hit the cleaned calipers with a self etching primer. Then I hit them with the vht wrinkle black, applied some vinyl stickers, and then went over everything with a high temp clear coat to make sure that the wrinkle finish and vinyl sticker were preserved as best as they could be. The clear coat kind of messed with the wrinkle finish, but in the end I was very happy with the end result. Enough blabbering...onto the pics:
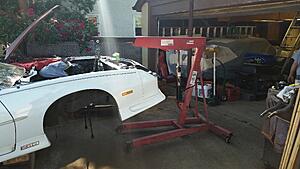
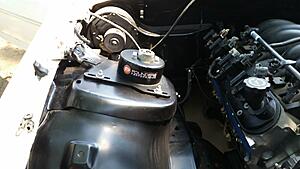
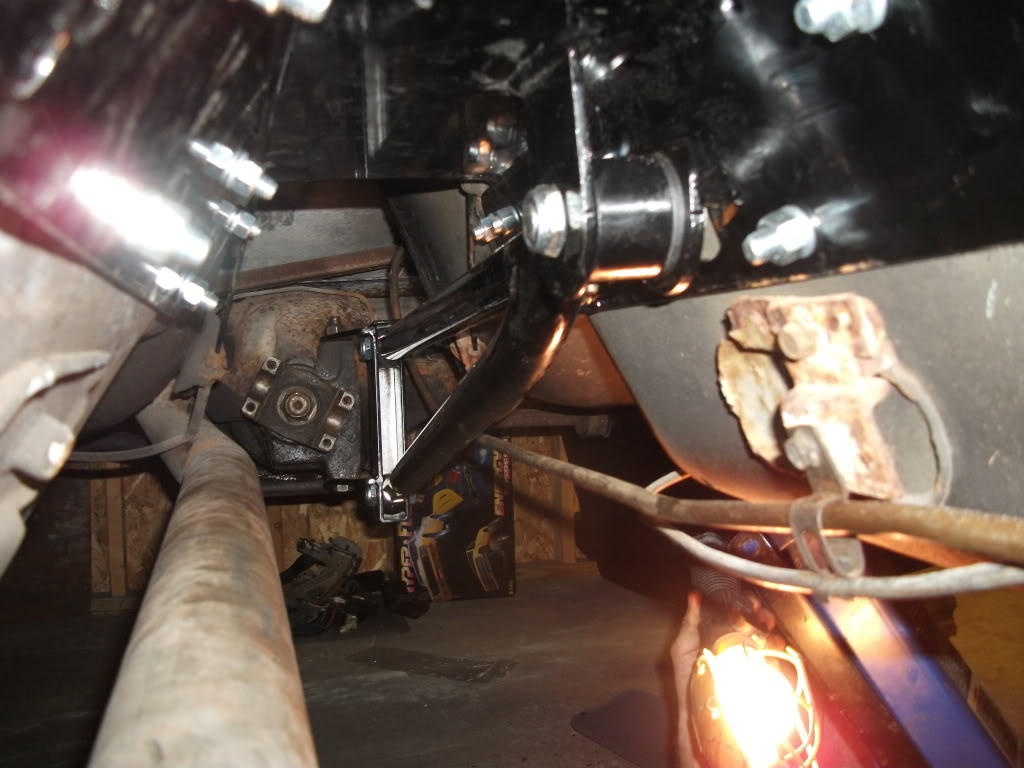
Next part of this post is where the questions for you guys start to come in. I guess first Ill start with what we did to get the dolly out of there. We used some straps attached to the engine crane to wrap around the bottom of the bellhousing so we could support it while we figured out the transmission crossmember and torque arm:
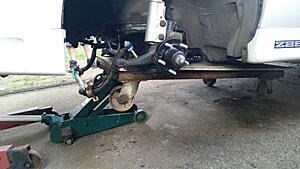
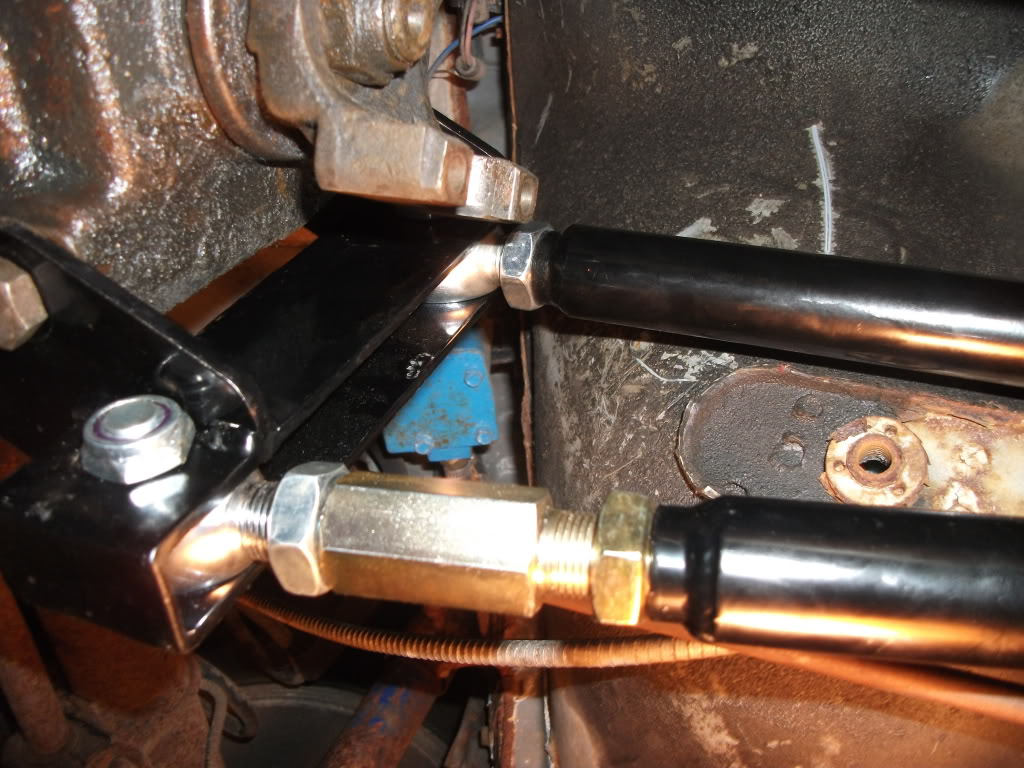
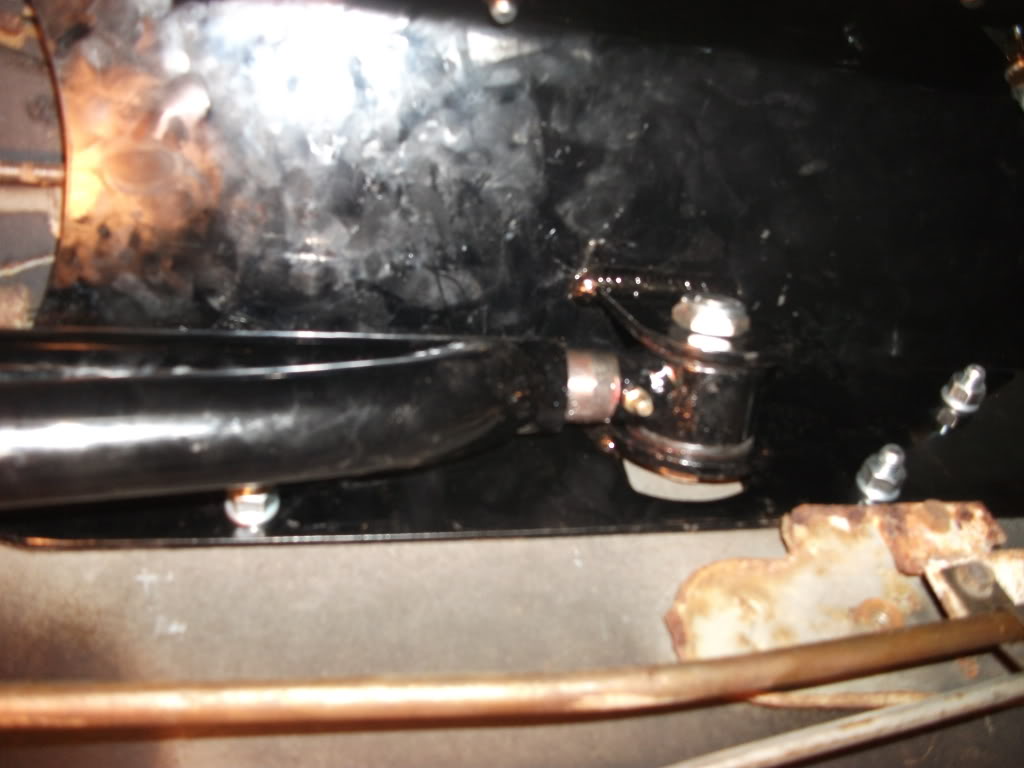
After realizing we should probably put the rear of the car in the air we were able to get the torque arm out. My question here is, can I use the stock torque arm with this setup? I dont think I have all the necessary pieces to make it work even if it is possible. Should I look into an aftermarket solution?
Next question is about getting the transmission centered before cutting the hole for the shifter. It seems like it can move a little one way or another left or right so im not sure if I should just try to center it in the middle of the tunnel or go off of something else. I think because the engine mounts are rubber it allows a little play.
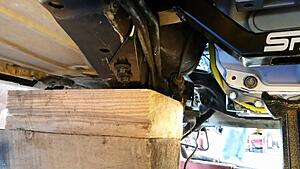
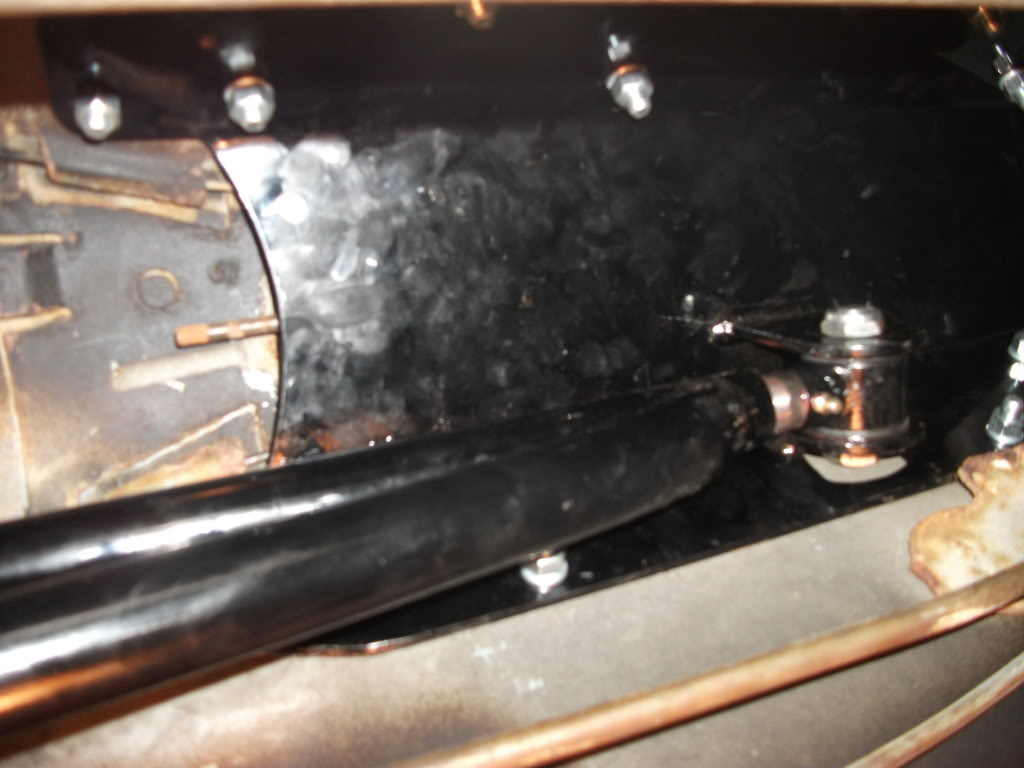
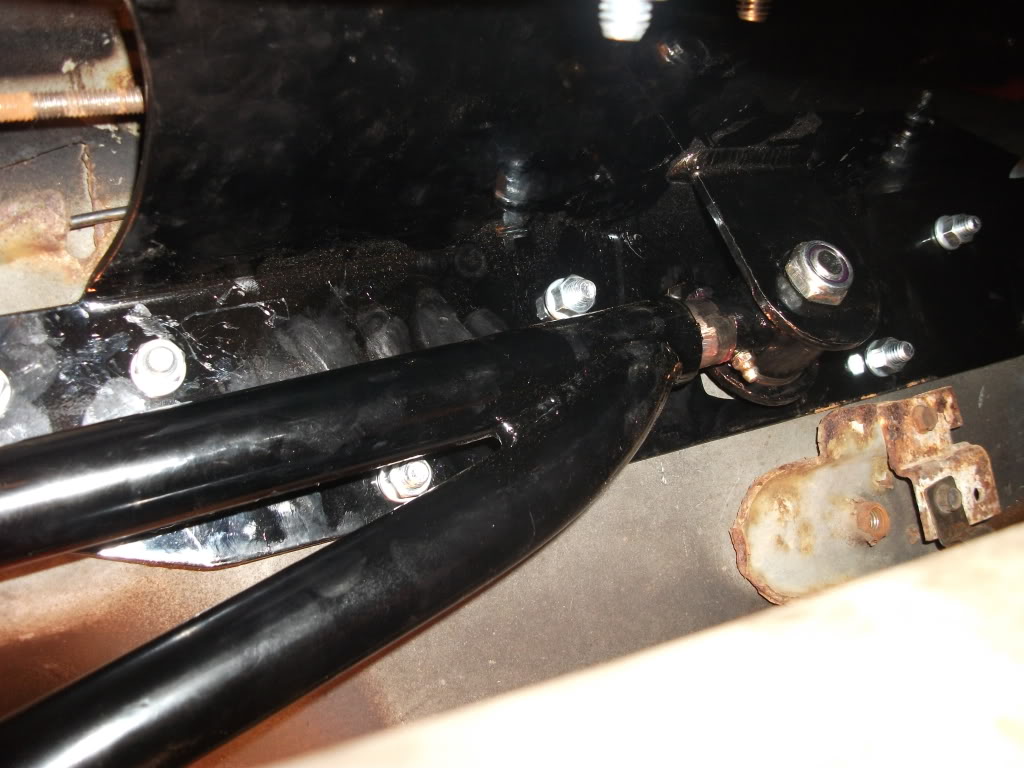
Here are some pictures of the skulte transmission crossmember. It fit very nicely after we figured out that we had to unbolt the brake/gaslines and put the crossmember behind them:
Here is where the crossmember has to be put behind the brake lines/fuel lines.
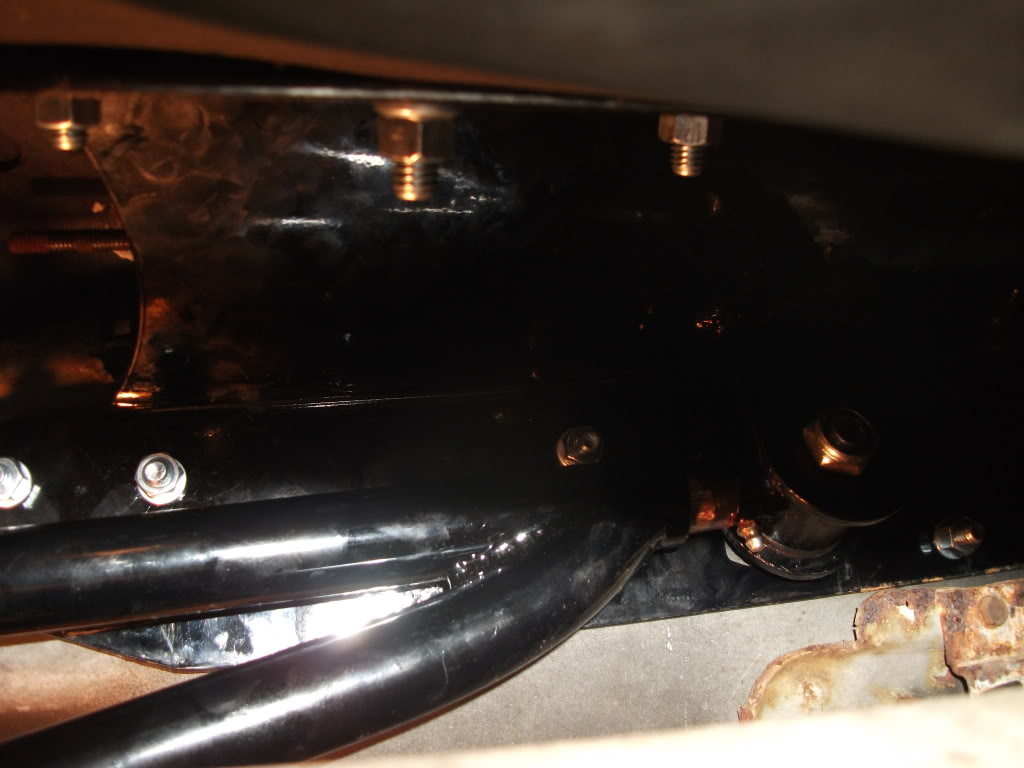
Here is where the shifter is in relation to the transmission tunnel right now. I think this is where the hole will be cut but wanted to check with you guys first before I made the cuts:
I know that the trasmission mount is not installed yet in these pics. This is not permanent and was just a mock up. I dont think the transmission mount will fit until the hole is cut for the shifter and the transmission can be pushed up the extra half inch I need to make the mount fit.
Let me know what you guys think...any help with some of these questions would be greatly appreciated. Probably going to try to get some more work done tomorrow. Hopefully the hole for the shifter and front suspension can be finished by the end of tomorrow.
Nothing too crazy exciting, but I did have a couple of questions for you guys so I figured I would post up some pics anyways.
First up are some pictures of the brake calipers. I decided that I wanted to try painting these with that vht wrinkle finish paint that I always see people using because I like the way that finish looks compared to glossy or a normal flat finish. Went through the same painting process that I covered early in this thread for my front accessories. Both calipers were cleaned thoroughly in my parts cleaner, sanded, wiped down with solvent, and taped off before applying any paint. All the paint that I used for this application was high temp paint rated at 500 degrees, if I remember the outside of the can correctly. First I hit the cleaned calipers with a self etching primer. Then I hit them with the vht wrinkle black, applied some vinyl stickers, and then went over everything with a high temp clear coat to make sure that the wrinkle finish and vinyl sticker were preserved as best as they could be. The clear coat kind of messed with the wrinkle finish, but in the end I was very happy with the end result. Enough blabbering...onto the pics:


Next part of this post is where the questions for you guys start to come in. I guess first Ill start with what we did to get the dolly out of there. We used some straps attached to the engine crane to wrap around the bottom of the bellhousing so we could support it while we figured out the transmission crossmember and torque arm:


After realizing we should probably put the rear of the car in the air we were able to get the torque arm out. My question here is, can I use the stock torque arm with this setup? I dont think I have all the necessary pieces to make it work even if it is possible. Should I look into an aftermarket solution?
Next question is about getting the transmission centered before cutting the hole for the shifter. It seems like it can move a little one way or another left or right so im not sure if I should just try to center it in the middle of the tunnel or go off of something else. I think because the engine mounts are rubber it allows a little play.
Here are some pictures of the skulte transmission crossmember. It fit very nicely after we figured out that we had to unbolt the brake/gaslines and put the crossmember behind them:

Here is where the crossmember has to be put behind the brake lines/fuel lines.

Here is where the shifter is in relation to the transmission tunnel right now. I think this is where the hole will be cut but wanted to check with you guys first before I made the cuts:

I know that the trasmission mount is not installed yet in these pics. This is not permanent and was just a mock up. I dont think the transmission mount will fit until the hole is cut for the shifter and the transmission can be pushed up the extra half inch I need to make the mount fit.
Let me know what you guys think...any help with some of these questions would be greatly appreciated. Probably going to try to get some more work done tomorrow. Hopefully the hole for the shifter and front suspension can be finished by the end of tomorrow.
Thread Starter
Member
Joined: Aug 2007
Posts: 209
Likes: 6
From: Long Island, NY
Car: 1992 z28
Engine: LS1
Transmission: T-56
Re: Watch a Rookie Learn How To Swap a LS1 and T56 into a 1992 Z28
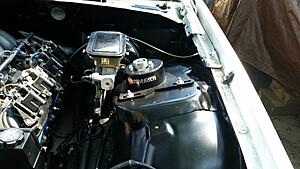
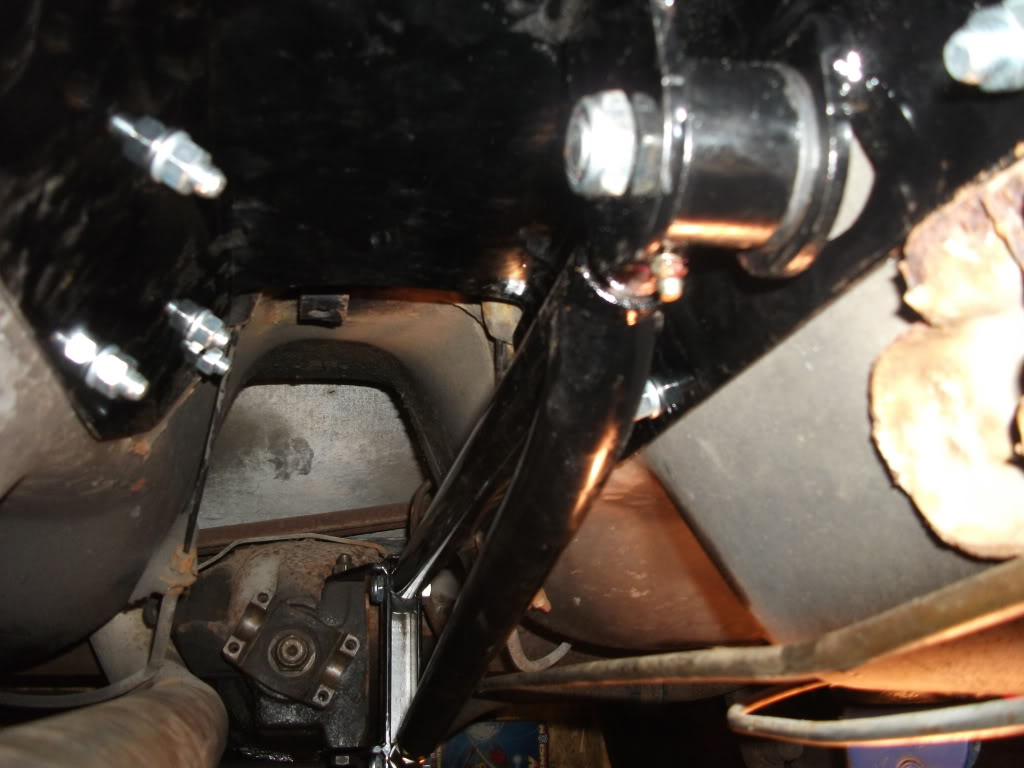
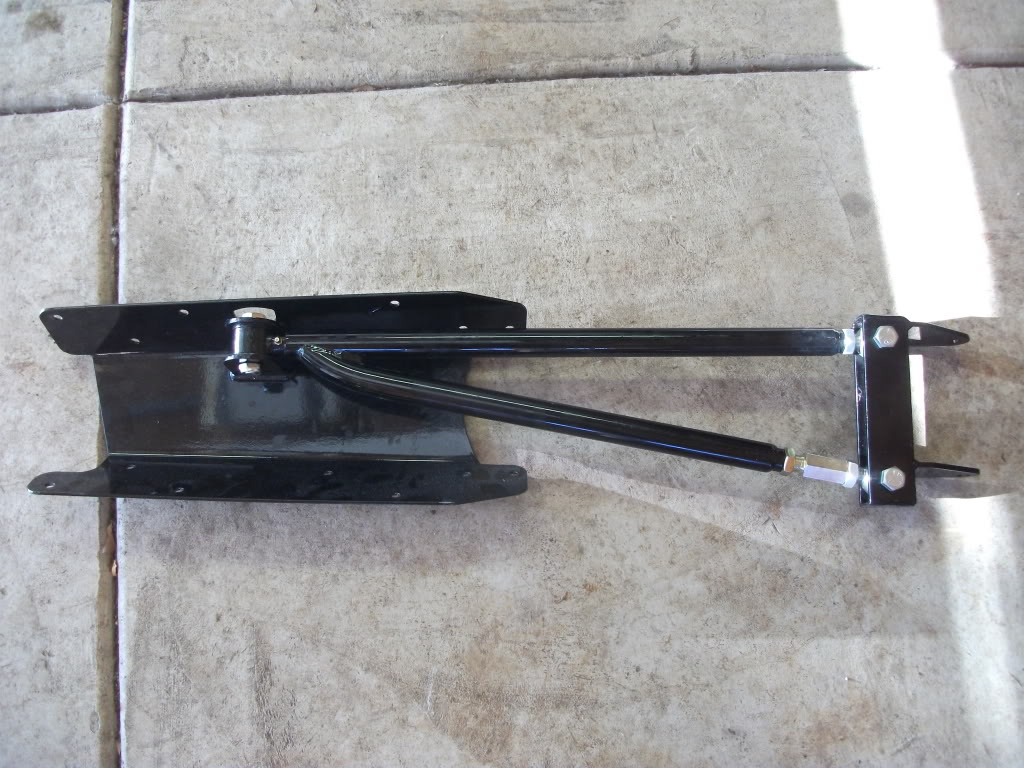
Almost forgot to post one of my questions/updates. I also managed to swap over the founders performance caster camber plates. They look really nice in there but my question is how do you know they are in the right spot? Since all three holes where they mount into the engine bay are slotted, and the plates themselves are slotted....it makes for an absurd amount of adjustment. Probably a good thing, but how am I supposed to know when its right. I tried to go by where the stock plates were installed just to get it somewhat close for now. Anyone have any knowledge on this?
Here are the pics:
Lemme know what you think.
Here are the pics:


Lemme know what you think.
Member
iTrader: (2)
Joined: Feb 2010
Posts: 460
Likes: 3
Car: '89 Camaro
Engine: LS1
Transmission: 4L65/70E
Axle/Gears: 9 Inch, 3.70 gears
Re: Watch a Rookie Learn How To Swap a LS1 and T56 into a 1992 Z28
I used the same caster/camber plates, I eyeballed it and then drove it over to the alignment shop.
For the torque arm, although I understand budget concerns, it should really be replaced by an aftermarket piece. The biggest reason why is to get the torque from the rear off of the tailshaft housing. Second reason is the stock piece flexes a lot, all three of the cars that I've had, when the arm was removed it was twisted. I'm running the BMR Trak Pak, but any of the aftermarket arms that mount to a crossmember should work for you just fine.
For the torque arm, although I understand budget concerns, it should really be replaced by an aftermarket piece. The biggest reason why is to get the torque from the rear off of the tailshaft housing. Second reason is the stock piece flexes a lot, all three of the cars that I've had, when the arm was removed it was twisted. I'm running the BMR Trak Pak, but any of the aftermarket arms that mount to a crossmember should work for you just fine.
Thread Starter
Member
Joined: Aug 2007
Posts: 209
Likes: 6
From: Long Island, NY
Car: 1992 z28
Engine: LS1
Transmission: T-56
Re: Watch a Rookie Learn How To Swap a LS1 and T56 into a 1992 Z28
I used the same caster/camber plates, I eyeballed it and then drove it over to the alignment shop.
For the torque arm, although I understand budget concerns, it should really be replaced by an aftermarket piece. The biggest reason why is to get the torque from the rear off of the tailshaft housing. Second reason is the stock piece flexes a lot, all three of the cars that I've had, when the arm was removed it was twisted. I'm running the BMR Trak Pak, but any of the aftermarket arms that mount to a crossmember should work for you just fine.
For the torque arm, although I understand budget concerns, it should really be replaced by an aftermarket piece. The biggest reason why is to get the torque from the rear off of the tailshaft housing. Second reason is the stock piece flexes a lot, all three of the cars that I've had, when the arm was removed it was twisted. I'm running the BMR Trak Pak, but any of the aftermarket arms that mount to a crossmember should work for you just fine.
Trak pack from BMR looks like a nice piece, but i already have the skulte crossmember and dont really feel like buying the BMR crossmember and losing exhaust clearance space while spending more money for a part I already have. What are your thoughts on the jegster TA? It doesnt look like it would be as stable as a crossmember mounted unit but I dont really know. This car isnt exactly going to have a ton of horse power so I think I should be able to get away with that.
Member
iTrader: (2)
Joined: Feb 2010
Posts: 460
Likes: 3
Car: '89 Camaro
Engine: LS1
Transmission: 4L65/70E
Axle/Gears: 9 Inch, 3.70 gears
Re: Watch a Rookie Learn How To Swap a LS1 and T56 into a 1992 Z28
MW66 is running a Jegster torque arm, probably easier to install than the Trak Pak. If I can remember to crawl under my car tomorrow, I'll try and get some pics for you of the install. It uses it's own crossmember, and there really isn't any lost space for exhaust clearance. The only thing is that both are short arms, and there is some talk about the handling that they give. I'm not entirely convinced, but under hard braking it is a little different than before. The biggest advantage of both is they hit the tires pretty hard.
Thread Starter
Member
Joined: Aug 2007
Posts: 209
Likes: 6
From: Long Island, NY
Car: 1992 z28
Engine: LS1
Transmission: T-56
Re: Watch a Rookie Learn How To Swap a LS1 and T56 into a 1992 Z28
Nvm now i see how the BMR kit gets welded in. Definitely leaning more towards the jegster TA, if i can sufficiently reinforce the tunnel where it bolts up.
Senior Member
Joined: Jun 2001
Posts: 922
Likes: 33
From: Kansas
Car: 91 Z28
Engine: 6.0L LQ9
Transmission: T56
Axle/Gears: Dana 44 3.92
Re: Watch a Rookie Learn How To Swap a LS1 and T56 into a 1992 Z28
i run a jegster adjustable. don't worry about the tunnel, matt(mw66nova) is pulling his left front and leaving at 7800rpm with slicks.
its a pretty quick install once the interior is out of the car. they are well made, and jegs is a great company to deal with. i looked at the BMR as well but didn't want to lose the clearance like you. it definitely plants the tires hard, i definitely wouldn't go back to a stocker.
its a pretty quick install once the interior is out of the car. they are well made, and jegs is a great company to deal with. i looked at the BMR as well but didn't want to lose the clearance like you. it definitely plants the tires hard, i definitely wouldn't go back to a stocker.
Senior Member
iTrader: (4)
Joined: Oct 2008
Posts: 857
Likes: 5
From: Niles, IL
Car: '91 LS6/T56/9"
Engine: LS6
Transmission: T56
Axle/Gears: Currie 9"/4.11, detroit truetrac
Re: Watch a Rookie Learn How To Swap a LS1 and T56 into a 1992 Z28
I've had the Jegster adjustable in the past and I'll post some pics of it. It's defiantly loud. You'll hear some clinking on acceleration/deceleration, but nothing extreme.
I'll be going the BMR trak pak/Hawks Sinster route. Its crossmember is weld in, but you could very easily make the bolt in. I can't see any real reason to do that though.
I'll be going the BMR trak pak/Hawks Sinster route. Its crossmember is weld in, but you could very easily make the bolt in. I can't see any real reason to do that though.


