
LS7 Swap Into An '86 IROC Z28


Joined: Sep 1999
Posts: 4,353
Likes: 308
From: NJ
Car: 92 Firebird
Engine: 4.8 LR4
Transmission: T56
Axle/Gears: 3.45 9 Bolt
Thread Starter
Member

Joined: Apr 2015
Posts: 118
Likes: 6
From: San Angelo, TX
Car: 1986 Camaro IROC Z28
Engine: LS7
Transmission: Built 4L80e w/GearVendors overdrive
Axle/Gears: 2.73
Thread Starter
Member
Joined: Apr 2015
Posts: 118
Likes: 6
From: San Angelo, TX
Car: 1986 Camaro IROC Z28
Engine: LS7
Transmission: Built 4L80e w/GearVendors overdrive
Axle/Gears: 2.73
Re: LS7 Swap Into An '86 IROC Z28
Oops, just remembered that I bought a UMI Weld In Torque Arm http://umiperformance.com/catalog/in...roducts_id=754 so it doesn't mount to the transmission at all. Problem solved.
Supreme Member


Joined: Dec 2005
Posts: 9,920
Likes: 885
From: 53.0907� N, 113.4695� W
Re: LS7 Swap Into An '86 IROC Z28
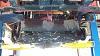
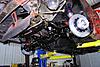
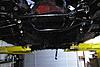
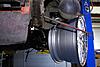
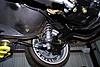
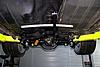
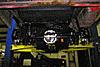
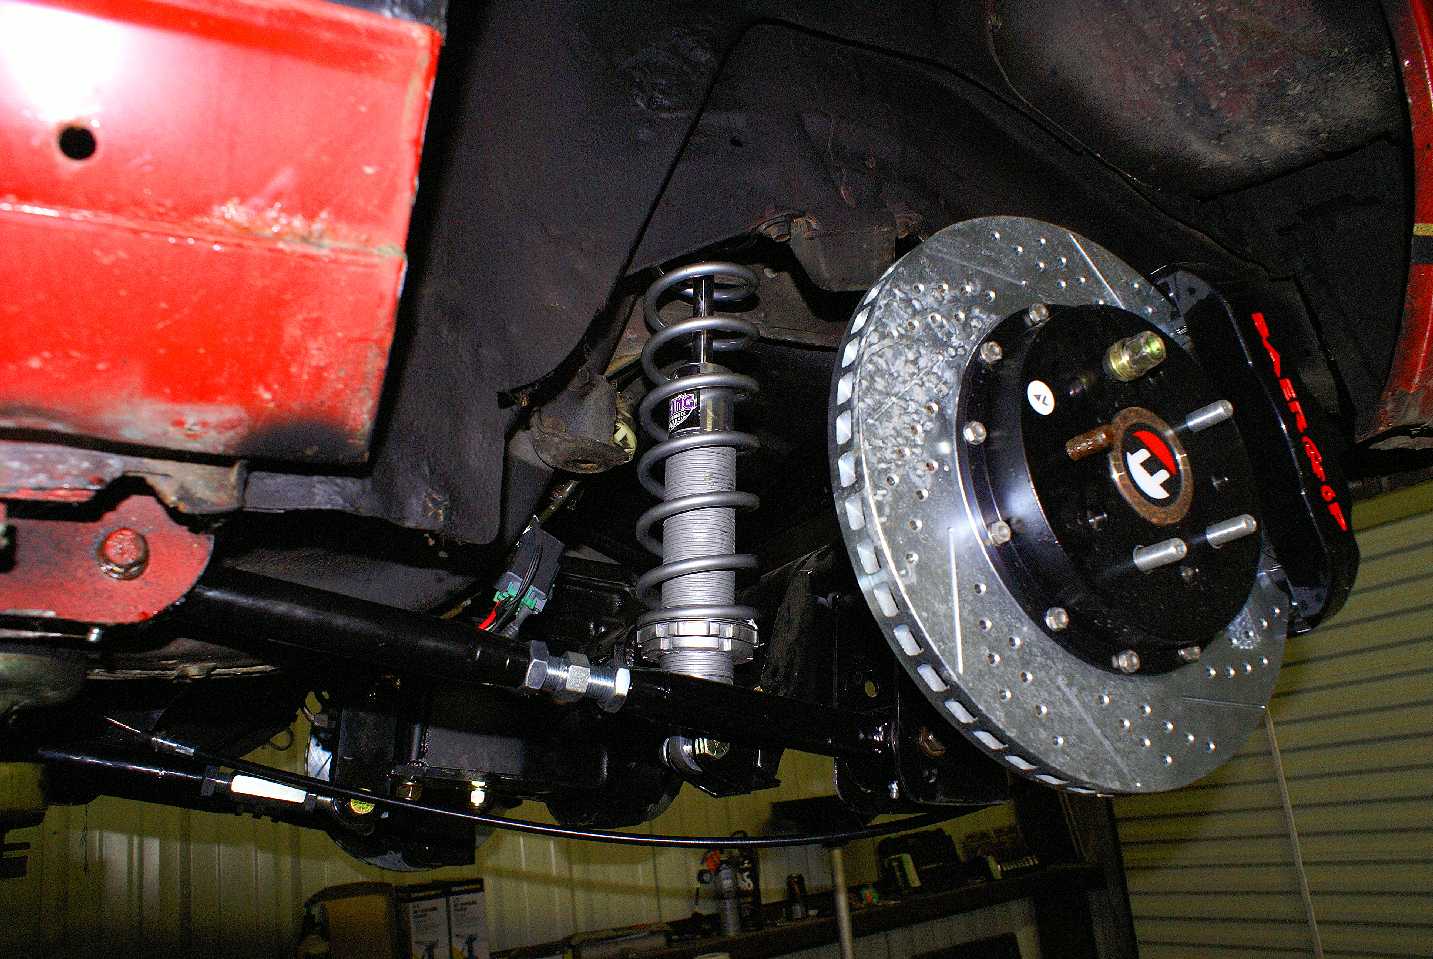
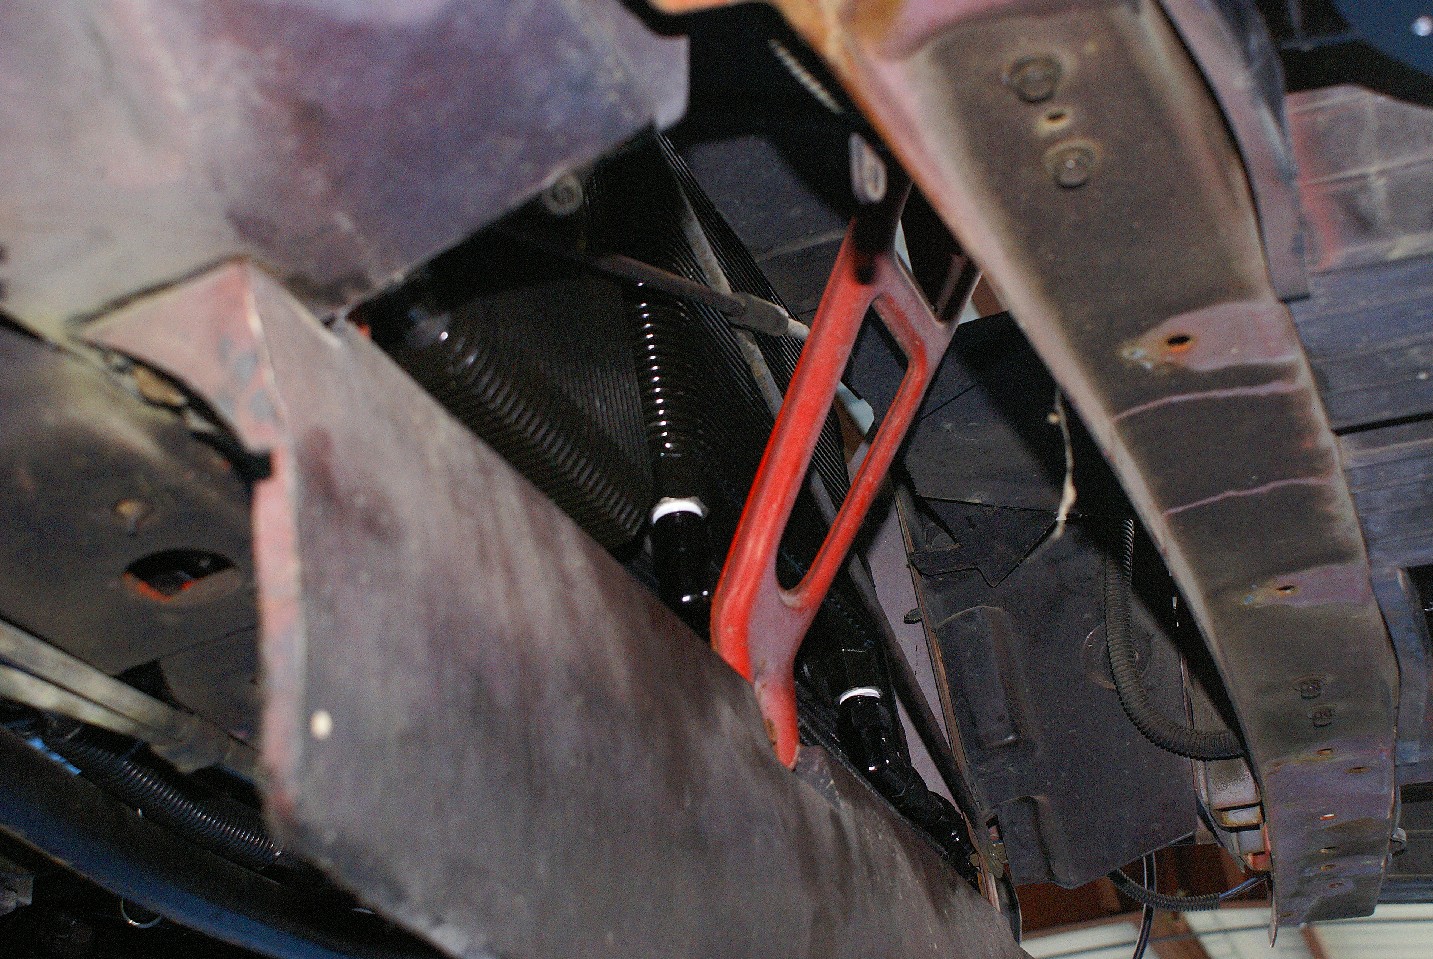
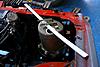
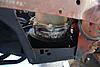
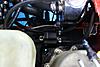
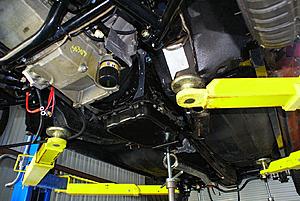
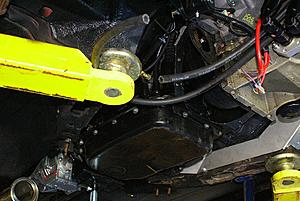
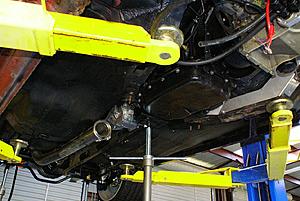
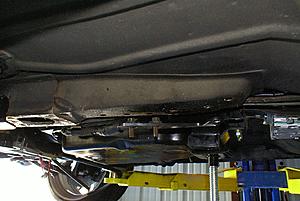
It'll be close. The unit is 6 1/2" across. Looking at the picture of the underside of my car, with a 3" driveshaft, you can see how much room you'll be working with.
That's with a 700R4 and a trans mounted torque arm. I had a crossmember mounted torque arm on my TA but I can't recall how it met up with the crossmember or if there was any difference in length between the two styles of torque arm.
As for the fitment of the 4L80, I believe it's direct replacement for the 700. No mods necessary. I upgraded to a billet servo (on the 700) and the housing was a little wider that the OEM unit. There was slight contact with the floor at that point.
Thread Starter
Member
Joined: Apr 2015
Posts: 118
Likes: 6
From: San Angelo, TX
Car: 1986 Camaro IROC Z28
Engine: LS7
Transmission: Built 4L80e w/GearVendors overdrive
Axle/Gears: 2.73
Re: LS7 Swap Into An '86 IROC Z28
It'll be close. The unit is 6 1/2" across. Looking at the picture of the underside of my car, with a 3" driveshaft, you can see how much room you'll be working with.
Attachment 294682
Attachment 294683
That's with a 700R4 and a trans mounted torque arm. I had a crossmember mounted torque arm on my TA but I can't recall how it met up with the crossmember or if there was any difference in length between the two styles of torque arm.
As for the fitment of the 4L80, I believe it's direct replacement for the 700. No mods necessary. I upgraded to a billet servo (on the 700) and the housing was a little wider that the OEM unit. There was slight contact with the floor at that point.
Thread Starter
Member
Joined: Apr 2015
Posts: 118
Likes: 6
From: San Angelo, TX
Car: 1986 Camaro IROC Z28
Engine: LS7
Transmission: Built 4L80e w/GearVendors overdrive
Axle/Gears: 2.73
Thread Starter
Member
Joined: Apr 2015
Posts: 118
Likes: 6
From: San Angelo, TX
Car: 1986 Camaro IROC Z28
Engine: LS7
Transmission: Built 4L80e w/GearVendors overdrive
Axle/Gears: 2.73
Re: LS7 Swap Into An '86 IROC Z28
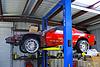
Finally found an ASE Certified Master Tech to complete the required inspection to get Custom Car plates in TX (which means it's exempt from the annual safety inspection), so now I can get started. Made a lot of progress last weekend.
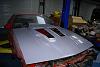
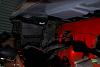
First, the hood, front fenders and front bumper came off.
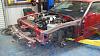
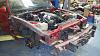
Then we removed the entire drivetrain.
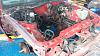

Sent the LS7 wire harness, Camaro wire harness, and LS7 PCM to Hawk's, and in the meantime I've removed the rest of the exhaust system, front suspension, and steering. Also, removed all the A/C equipment and replaced the evaporator and blower motor. Most of this car will be brand new when I'm done.
Now I wait for the wire harness to come back and the weather to warm up a little. 82F yesterday, 29F today.
Joined: Mar 2001
Posts: 10,435
Likes: 2,093
Car: '89 Firebird
Engine: 7.0L
Transmission: T56
Re: LS7 Swap Into An '86 IROC Z28
Finally! Somebody doing an LS7! 
Always wanted one of those but I did the stroker with LS3 heads. Still might upgrade to LS7 platform eventually.
Always wanted one of those but I did the stroker with LS3 heads. Still might upgrade to LS7 platform eventually.


Thread Starter
Member
Joined: Apr 2015
Posts: 118
Likes: 6
From: San Angelo, TX
Car: 1986 Camaro IROC Z28
Engine: LS7
Transmission: Built 4L80e w/GearVendors overdrive
Axle/Gears: 2.73
Re: LS7 Swap Into An '86 IROC Z28
I will cut out a hole in the battery tray for the oil tank to sit in, and am using these adapters http://www.mtiracing.com/ls7-12-dry-...l-adapter.html on the tank and engine to convert to -12 AN lines. Will post photos when I get that far.
Thread Starter
Member
Joined: Apr 2015
Posts: 118
Likes: 6
From: San Angelo, TX
Car: 1986 Camaro IROC Z28
Engine: LS7
Transmission: Built 4L80e w/GearVendors overdrive
Axle/Gears: 2.73
Re: LS7 Swap Into An '86 IROC Z28
A little more progress on the project.
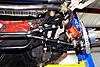
Since the stock oil hoses aren't going to be the right length I installed AN adapters to both the oil tank and the oil pan.
Also installed an oil cooler thermostat.
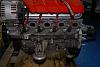
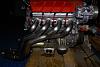
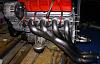
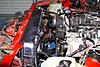
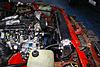
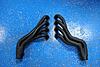
Next came the stainless steel headers.
Also test fit the hood and checked how much room there is to modify the stock air box to flow more air. Good news is there is a lot of room between the hood and the top of the stock box. I can probably make it at least an inch taller. I'll be gutting the air boxes and using K&N E-2996 filters attached to 6" x 6" pieces of PVC sheet to hold them in the stock location in the air box. The LS7 @7,000 rpm requires 865 cfm, and each of those filters will flow 480 cfm for a total of 960 cfm, so even when they are a little dirty I should be good to go.
Don't have a cow about the turbo hood, it's getting modified to look like the hood on my original car that had the Product Guild IMSA kit hood on it (see avatar pic).
Since the stock oil hoses aren't going to be the right length I installed AN adapters to both the oil tank and the oil pan.


Also installed an oil cooler thermostat.


Next came the stainless steel headers.


Also test fit the hood and checked how much room there is to modify the stock air box to flow more air. Good news is there is a lot of room between the hood and the top of the stock box. I can probably make it at least an inch taller. I'll be gutting the air boxes and using K&N E-2996 filters attached to 6" x 6" pieces of PVC sheet to hold them in the stock location in the air box. The LS7 @7,000 rpm requires 865 cfm, and each of those filters will flow 480 cfm for a total of 960 cfm, so even when they are a little dirty I should be good to go.
Don't have a cow about the turbo hood, it's getting modified to look like the hood on my original car that had the Product Guild IMSA kit hood on it (see avatar pic).


Joined: Mar 2001
Posts: 10,435
Likes: 2,093
Car: '89 Firebird
Engine: 7.0L
Transmission: T56
Re: LS7 Swap Into An '86 IROC Z28
Thread Starter
Member
Joined: Apr 2015
Posts: 118
Likes: 6
From: San Angelo, TX
Car: 1986 Camaro IROC Z28
Engine: LS7
Transmission: Built 4L80e w/GearVendors overdrive
Axle/Gears: 2.73
Re: LS7 Swap Into An '86 IROC Z28
Thread Starter
Member
Joined: Apr 2015
Posts: 118
Likes: 6
From: San Angelo, TX
Car: 1986 Camaro IROC Z28
Engine: LS7
Transmission: Built 4L80e w/GearVendors overdrive
Axle/Gears: 2.73
Re: LS7 Swap Into An '86 IROC Z28
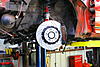
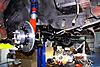
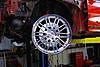
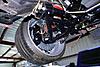
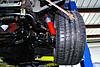
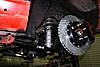
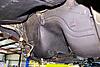
The wire harness should be done this week, so while I wait on that I took the opportunity to get the new high capacity fuel pump installed, and replace the front suspension, steering and brakes. Went with UMI tubular K-member and A-arms, upgraded to polyurethane sway bar bushings, new Pitman Arm, Idler Arm, Intermediate Bar, and Tie Rods, Racetronix Fuel Pump with hot wire kit, and 14" disc brakes with 6 piston calipers from Baer Brakes. Test fit the new 20" x 10" Cray Hawks and spacers. Will be tight, but I don't think anything is going to rub. BTW, the Racetronix doesn't come with any instructions, so this post is really helpful https://www.thirdgen.org/forums/tpi/...p-install.html Made for a long weekend.


Thread Starter
Member
Joined: Apr 2015
Posts: 118
Likes: 6
From: San Angelo, TX
Car: 1986 Camaro IROC Z28
Engine: LS7
Transmission: Built 4L80e w/GearVendors overdrive
Axle/Gears: 2.73
Re: LS7 Swap Into An '86 IROC Z28
I got the wire harness back from Hawk's, but Bruce forgot to send back the computer. Oops! In the meantime I got the rearend and suspension installed as well as the tires/wheels.


Thread Starter
Member
Joined: Apr 2015
Posts: 118
Likes: 6
From: San Angelo, TX
Car: 1986 Camaro IROC Z28
Engine: LS7
Transmission: Built 4L80e w/GearVendors overdrive
Axle/Gears: 2.73
Re: LS7 Swap Into An '86 IROC Z28
I know it's been awhile since I posted, but it hasn't been because I haven't been working on the car. Mostly it's been 1 step forward, 2 back though.
Had to send the wire harness back because they deleted some connectors I actually need. Then lost several weeks waiting on my friend who has a transmission lift to come over and help me install that. He's never shown up, but I discovered a defect in my torque converter, so it had to go back anyway.
Then I started reading the documentation for the transmission controller and discovered the EZ-TCU shift logic table cannot be edited, which is necessary to make my transmission and external overdrive operate how I want them to, so back that went. Now I'm waiting on a TCM 2800 that can be fully programmed to do exactly what I want it to do.
In the meantime I finally got around to measuring and ordering hoses, so was able to get the radiator, oil cooler, transmission cooler, and evaporator put back in the car.
The new radiator is a Champion CC951DP which is an aluminum dual pass 3-core radiator with a fan shroud and two 12" fans. Don't even think about using the stock radiator for a 7.0 L engine, they were barely adequate for the stock 5.0 L engines.
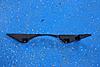
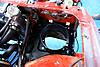
The Champion radiator fits but does require minor mods to the car. You have to take a razor blade to the rubber mounts since the radiator is slightly wider than the stock one and has welds that make it wider yet where the rubber mounts go. I'm attaching photos of how I cut them. Only takes a few minutes with a sharp razor blade.
You also have to cut part of the stock shroud if you want to use it to keep the top of the radiator from flopping around. I cut mine like this, and it works perfectly. This is the part I cut off.
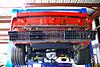
Photos below are of everything installed back on the car.

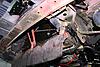
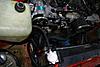
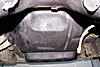
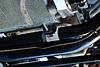
I also got the passenger side battery tray prepped for the dry sump tank. The battery used to be there, so it had some surface rust. I cut a roughly 6.5" diameter hole with my grinder. Wasted $50 on a hole saw only to discover the metal there is too thick and hard for a hole saw to cut, but my grinder made quick work of it. Please note the rectangular cutout on one side that is necessary for the mounting pad to clear. The spot where the oil lines connects is low enough that they will clear if you just tilt the tank over at a 45 degree angle with them on the low side as you insert the tank through the hole.
Will be working on installing the tank tomorrow, and will post more then.
After I installed the engine I noticed there were a lot of items that were too close to the headers and were likely to suffer heat damage including the starter, oil cooler thermostat, fuel and brake lines, several spark plug wires, etc. Rather than wrapping the headers, I just sent them in to have them ceramic coated. $175 for the pair seemed like a bargain compared to replacing all that other stuff on a regular basis and undoubtedly being stranded somewhere. I have the 2" Hawks headers from Stainless Works, and they can be installed/uninstalled from underneath the car with the engine installed, which was a huge relief.
Had to send the wire harness back because they deleted some connectors I actually need. Then lost several weeks waiting on my friend who has a transmission lift to come over and help me install that. He's never shown up, but I discovered a defect in my torque converter, so it had to go back anyway.
Then I started reading the documentation for the transmission controller and discovered the EZ-TCU shift logic table cannot be edited, which is necessary to make my transmission and external overdrive operate how I want them to, so back that went. Now I'm waiting on a TCM 2800 that can be fully programmed to do exactly what I want it to do.
In the meantime I finally got around to measuring and ordering hoses, so was able to get the radiator, oil cooler, transmission cooler, and evaporator put back in the car.
The new radiator is a Champion CC951DP which is an aluminum dual pass 3-core radiator with a fan shroud and two 12" fans. Don't even think about using the stock radiator for a 7.0 L engine, they were barely adequate for the stock 5.0 L engines.
The Champion radiator fits but does require minor mods to the car. You have to take a razor blade to the rubber mounts since the radiator is slightly wider than the stock one and has welds that make it wider yet where the rubber mounts go. I'm attaching photos of how I cut them. Only takes a few minutes with a sharp razor blade.


You also have to cut part of the stock shroud if you want to use it to keep the top of the radiator from flopping around. I cut mine like this, and it works perfectly. This is the part I cut off.

Photos below are of everything installed back on the car.


I also got the passenger side battery tray prepped for the dry sump tank. The battery used to be there, so it had some surface rust. I cut a roughly 6.5" diameter hole with my grinder. Wasted $50 on a hole saw only to discover the metal there is too thick and hard for a hole saw to cut, but my grinder made quick work of it. Please note the rectangular cutout on one side that is necessary for the mounting pad to clear. The spot where the oil lines connects is low enough that they will clear if you just tilt the tank over at a 45 degree angle with them on the low side as you insert the tank through the hole.


Will be working on installing the tank tomorrow, and will post more then.
After I installed the engine I noticed there were a lot of items that were too close to the headers and were likely to suffer heat damage including the starter, oil cooler thermostat, fuel and brake lines, several spark plug wires, etc. Rather than wrapping the headers, I just sent them in to have them ceramic coated. $175 for the pair seemed like a bargain compared to replacing all that other stuff on a regular basis and undoubtedly being stranded somewhere. I have the 2" Hawks headers from Stainless Works, and they can be installed/uninstalled from underneath the car with the engine installed, which was a huge relief.

Last edited by 82IMSA; May 28, 2017 at 08:15 PM.
Thread Starter
Member
Joined: Apr 2015
Posts: 118
Likes: 6
From: San Angelo, TX
Car: 1986 Camaro IROC Z28
Engine: LS7
Transmission: Built 4L80e w/GearVendors overdrive
Axle/Gears: 2.73
Re: LS7 Swap Into An '86 IROC Z28
When I get a chance this week I will post a list of all the hoses/fittings I used. Figuring out what to use for all those has been one of the worst parts of this project. No need for others to suffer. LOL!

Re: LS7 Swap Into An '86 IROC Z28
With 335/25ZR20 tires and a 2.73 final gear ratio my shift points @7,000 rpm are 68 mph, 88 mph, 129 mph, 166 mph, 260 mph, and 347 mph. The car doesn't have enough HP to hit those last 2 obviously, but it's peak 505 HP is at 6300 rpm which coincides perfectly with the speed it would be going in 5th gear at 235 mph at which point it should require 505 HP to overcome air and rolling resistance.
I should be able to zip through the 1/4 mile with only 2 shifts keeping the engine in the 4,700 - 7,000 rpm range once it gets going. I sent the dyno charts to my transmission builder, so the shift points may be at a lower rpm range since the HP/torque really start tailing off above 6,500 rpm. You use torque to accelerate, not HP, so it's possible the car may be faster off the line operating between 4,000 and 6,000 rpm which it can do very nicely with this gear combo. It would still get to 60 mph in 1st gear and the 1/4 mile with only 2 shifts.
I should be able to zip through the 1/4 mile with only 2 shifts keeping the engine in the 4,700 - 7,000 rpm range once it gets going. I sent the dyno charts to my transmission builder, so the shift points may be at a lower rpm range since the HP/torque really start tailing off above 6,500 rpm. You use torque to accelerate, not HP, so it's possible the car may be faster off the line operating between 4,000 and 6,000 rpm which it can do very nicely with this gear combo. It would still get to 60 mph in 1st gear and the 1/4 mile with only 2 shifts.
Thread Starter
Member
Joined: Apr 2015
Posts: 118
Likes: 6
From: San Angelo, TX
Car: 1986 Camaro IROC Z28
Engine: LS7
Transmission: Built 4L80e w/GearVendors overdrive
Axle/Gears: 2.73
Re: LS7 Swap Into An '86 IROC Z28
A 4L80E with a GV is going to kill that LS7. Not only is the car going to be a pig but that driveline is going to eat a ton of power. What you are trying to do is foolish. Stick the 4L80E in with a 3.27 rear gear and you'll accomplish most of your goals without all the bullshit. Your 235 MPH goal is laughable. You'll need more than double the output of a stock LS7 to accomplish that with a 3rd gen Camaro.
As for the rest, perhaps educating yourself before commenting might make you look less a fool. You might start here. 6 -7 second cars use GV, they must be real pigs. http://www.superchevy.com/how-to/add...w-to-save-gas/
Joined: Mar 2001
Posts: 10,435
Likes: 2,093
Car: '89 Firebird
Engine: 7.0L
Transmission: T56
Re: LS7 Swap Into An '86 IROC Z28

I swear, every time I ever tried to end an argument on the internet with my credentials it was inevitable that I was wrong and it completely backfired in my face. I quit doing it years ago because it was too damn humiliating.

This really is a side show topic though and doesn't matter. Everyone should just let it go and keep enjoying this really nice build.
Thread Starter
Member
Joined: Apr 2015
Posts: 118
Likes: 6
From: San Angelo, TX
Car: 1986 Camaro IROC Z28
Engine: LS7
Transmission: Built 4L80e w/GearVendors overdrive
Axle/Gears: 2.73
Re: LS7 Swap Into An '86 IROC Z28
Impressive credentials, but I'm pretty sure you made a mistake in your calculations regardless.
I swear, every time I ever tried to end an argument on the internet with my credentials it was inevitable that I was wrong and it completely backfired in my face. I quit doing it years ago because it was too damn humiliating.
This really is a side show topic though and doesn't matter. Everyone should just let it go and keep enjoying this really nice build.
Now the real question, WTH happened to my posts about the actual install of the engine???? They seem to have vanished, and there are some quirks anybody else doing this shouldn't have to learn the hard way. Guess I'll repost that info and the pics when I have time this week.
Last edited by 82IMSA; May 29, 2017 at 09:45 PM.
Senior Member
Joined: Apr 2001
Posts: 798
Likes: 3
From: Powder Springs, Georgia, USA
Car: 1992 Black Z28 Hardtop
Axle/Gears: 2002 10 bolt w/3:23
Re: LS7 Swap Into An '86 IROC Z28
I seem to remember in 1989 Car Craft doing an article on what it would take to get a stock body Mustang GT to do 200+. They got it to do it with 700+ rwhp. Fast forward to about 5-10 years ago Hot Rod did an article with other cars including an early 70's Chevelle and a few other cars including an 89 IROC. They said theoretically the 3rd gen. Camaro could do it with about 437 rwhp. I don't know, anyone with that rwhp ever try to see what these cars will do with those numbers. I believe our Camaros are a bit better in the aerodynamics department. I know for a fact I've run mine over 150 mph on the original 5.7 TPI. Double the rwhp and theoretically you should be capable of a lot more top end. I'd love to see some real world numbers.
Thread Starter
Member
Joined: Apr 2015
Posts: 118
Likes: 6
From: San Angelo, TX
Car: 1986 Camaro IROC Z28
Engine: LS7
Transmission: Built 4L80e w/GearVendors overdrive
Axle/Gears: 2.73
Re: LS7 Swap Into An '86 IROC Z28
I seem to remember in 1989 Car Craft doing an article on what it would take to get a stock body Mustang GT to do 200+. They got it to do it with 700+ rwhp. Fast forward to about 5-10 years ago Hot Rod did an article with other cars including an early 70's Chevelle and a few other cars including an 89 IROC. They said theoretically the 3rd gen. Camaro could do it with about 437 rwhp. I don't know, anyone with that rwhp ever try to see what these cars will do with those numbers. I believe our Camaros are a bit better in the aerodynamics department. I know for a fact I've run mine over 150 mph on the original 5.7 TPI. Double the rwhp and theoretically you should be capable of a lot more top end. I'd love to see some real world numbers.
Joined: Mar 2001
Posts: 10,435
Likes: 2,093
Car: '89 Firebird
Engine: 7.0L
Transmission: T56
Re: LS7 Swap Into An '86 IROC Z28
Joined: Mar 2001
Posts: 10,435
Likes: 2,093
Car: '89 Firebird
Engine: 7.0L
Transmission: T56
Re: LS7 Swap Into An '86 IROC Z28
Cars that slip through the air only go fast on paper. In real life they can't stay on the road. Fixing aerodynamics for high speed handling tends to add more drag.
Senior Member
Joined: Apr 2001
Posts: 798
Likes: 3
From: Powder Springs, Georgia, USA
Car: 1992 Black Z28 Hardtop
Axle/Gears: 2002 10 bolt w/3:23
Re: LS7 Swap Into An '86 IROC Z28
With Car Craft's GT they cut the front springs to lower the front end. That was it.
Thread Starter
Member
Joined: Apr 2015
Posts: 118
Likes: 6
From: San Angelo, TX
Car: 1986 Camaro IROC Z28
Engine: LS7
Transmission: Built 4L80e w/GearVendors overdrive
Axle/Gears: 2.73
Re: LS7 Swap Into An '86 IROC Z28
If I ever get it back on the road, I will be posting 0-60 and 1/4 mile times for it. I suspect both will be a lot better than my '89 GMC S-15. LOL!
Re: LS7 Swap Into An '86 IROC Z28
As for the rest, perhaps educating yourself before commenting might make you look less a fool. You might start here. 6 -7 second cars use GV, they must be real pigs. http://www.superchevy.com/how-to/add...w-to-save-gas/
That aside, I wish you luck. I would love to see a 505 HP LS7 that struggles to push a C6 Z06 to 200 MPH, get your brick to 235 MPH. Real world results don't lie, but your "math" does.
Thread Starter
Member
Joined: Apr 2015
Posts: 118
Likes: 6
From: San Angelo, TX
Car: 1986 Camaro IROC Z28
Engine: LS7
Transmission: Built 4L80e w/GearVendors overdrive
Axle/Gears: 2.73
Re: LS7 Swap Into An '86 IROC Z28
No need to throw around your degree. It is painfully obvious that you're an engineer without a clue how the real world works.
I have real world experience. You have some numbers on a piece of paper that were calculated incorrectly due to missing variables, and a lack of common sense.
That aside, I wish you luck. I would love to see a 505 HP LS7 that struggles to push a C6 Z06 to 200 MPH, get your brick to 235 MPH. Real world results don't lie, but your "math" does.

Thread Starter
Member
Joined: Apr 2015
Posts: 118
Likes: 6
From: San Angelo, TX
Car: 1986 Camaro IROC Z28
Engine: LS7
Transmission: Built 4L80e w/GearVendors overdrive
Axle/Gears: 2.73
Re: LS7 Swap Into An '86 IROC Z28
It of course depends on how you program the transmission controller, but it is much easier to keep it in it's power band with 6 gears instead of 3 or 4. At speeds you'd see in a quarter mile run, if it is programmed to shift at 6,000 RPM's the next gear has an engine speed of 4,600 to 4,000 RPM's. If I were using just a 4L80e it would be dropping to around 3,000 RPM's after shifts.
Thread Starter
Member
Joined: Apr 2015
Posts: 118
Likes: 6
From: San Angelo, TX
Car: 1986 Camaro IROC Z28
Engine: LS7
Transmission: Built 4L80e w/GearVendors overdrive
Axle/Gears: 2.73
Re: LS7 Swap Into An '86 IROC Z28
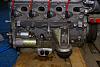
I could have sworn I made this post back in February, but I guess I 'm just losing my mind. Anyway, installing the LS7 in the car is a very easy 1 man job if you remember a couple of small items.
For the following keep in mind I'm using the UMI K-member and A-Arms. The engine goes in really easy if you don't install the brackets for the motor mounts to the K-member until after you have the engine in the car. Otherwise, the headers, oil filter, and a few other parts will try to hang on them.
Also, the brackets are not symmetrical, there is a "top" and "bottom," but they are not marked. Don't fight with them. If the bolt holes in the mounts don't line up easily with the holes in the brackets, flip the brackets over, which requires swapping sides, and it should go together really easy. Also don't tighten the bolts holding the brackets to the K-member until you have them bolted to the motor mounts. I used solid aluminum motor mounts, which are really unforgiving, and the install was still really easy once I flipped the brackets over.
With the brackets not installed the engine slides in easily even with the headers already installed. Be careful when you slide it to the rear that it is all the way down in the bay or you will damage your washer pump outlets. Ask me how I know this.
You will want the engine slid as far forward as possible with the UMI K-member and mounts. There is plenty of room in front of the engine, not much to the rear, so slide it as far forward as you can. Your life will be much easier when you try to connect heater hoses, wire harness, etc., and with it to the rear it will hit the windshield washer pump/motor.
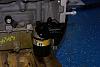
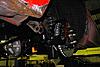
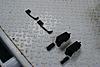
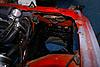
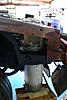
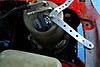
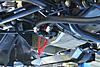
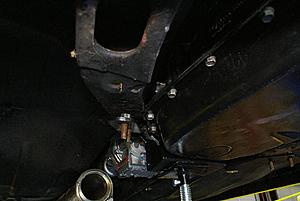
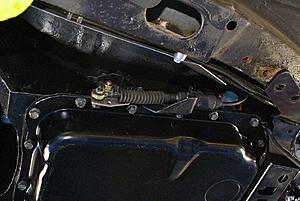
If your LS7 has a Corvette oil pan with 2 oil drains, one in the front and one on the side, you will soon notice a big problem. The front drain plug is going to be resting on the rear tube of the K-member, meaning there is no way you are going to remove it to drain the pan, which is necessary.
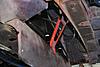
Really simple solution. According to UMI the K-member is much beefier than necessary, so you can cut a notch in the rear tube so the plug can be removed. All that is required is a grinder with a steel cutting disk. You're going to need a brand new one to cut all the way through. Just mark the position of the plug, raise the engine, and cut a 1.5" section out. See photos.
I bought the shortest drain plug I could find with the proper threads Dorman MTM 65378 http://www.oreillyauto.com/site/c/de...5378/02330.oap then still had to cut off the portion before the threads start with the grinder to get it short enough that it could be removed and reinstalled. Works great now. UMI says they are coming out with a single tube version of the K-member. Of course, if the single tube is to the rear you will really be screwed, so might want to stick with the 2 tube version and notch the rear one.
For the following keep in mind I'm using the UMI K-member and A-Arms. The engine goes in really easy if you don't install the brackets for the motor mounts to the K-member until after you have the engine in the car. Otherwise, the headers, oil filter, and a few other parts will try to hang on them.
Also, the brackets are not symmetrical, there is a "top" and "bottom," but they are not marked. Don't fight with them. If the bolt holes in the mounts don't line up easily with the holes in the brackets, flip the brackets over, which requires swapping sides, and it should go together really easy. Also don't tighten the bolts holding the brackets to the K-member until you have them bolted to the motor mounts. I used solid aluminum motor mounts, which are really unforgiving, and the install was still really easy once I flipped the brackets over.
With the brackets not installed the engine slides in easily even with the headers already installed. Be careful when you slide it to the rear that it is all the way down in the bay or you will damage your washer pump outlets. Ask me how I know this.
You will want the engine slid as far forward as possible with the UMI K-member and mounts. There is plenty of room in front of the engine, not much to the rear, so slide it as far forward as you can. Your life will be much easier when you try to connect heater hoses, wire harness, etc., and with it to the rear it will hit the windshield washer pump/motor.
If your LS7 has a Corvette oil pan with 2 oil drains, one in the front and one on the side, you will soon notice a big problem. The front drain plug is going to be resting on the rear tube of the K-member, meaning there is no way you are going to remove it to drain the pan, which is necessary.
Really simple solution. According to UMI the K-member is much beefier than necessary, so you can cut a notch in the rear tube so the plug can be removed. All that is required is a grinder with a steel cutting disk. You're going to need a brand new one to cut all the way through. Just mark the position of the plug, raise the engine, and cut a 1.5" section out. See photos.


I bought the shortest drain plug I could find with the proper threads Dorman MTM 65378 http://www.oreillyauto.com/site/c/de...5378/02330.oap then still had to cut off the portion before the threads start with the grinder to get it short enough that it could be removed and reinstalled. Works great now. UMI says they are coming out with a single tube version of the K-member. Of course, if the single tube is to the rear you will really be screwed, so might want to stick with the 2 tube version and notch the rear one.
Last edited by 82IMSA; Jun 3, 2017 at 10:01 PM.
Thread Starter
Member
Joined: Apr 2015
Posts: 118
Likes: 6
From: San Angelo, TX
Car: 1986 Camaro IROC Z28
Engine: LS7
Transmission: Built 4L80e w/GearVendors overdrive
Axle/Gears: 2.73
Re: LS7 Swap Into An '86 IROC Z28
A couple of other caveats.
Even with the engine as far forward as possible you will not be able to remove/install the A/C Compressor since the outboard bolt hits the strut tower when you try to remove it. To service it you will have to remove the entire bracket. It isn't that big of a deal, but thought you should be aware of it. As mentioned earlier I'm using the Holley relocation kit that moves it to the top on the passenger side. Not sure it would have worked at all had I tried leaving the compressor in the stock Corvette location. I have too many hoses and other items running through that location, and connecting/routing the A/C hoses would probably be a nightmare.
The power steering pressure line proved to be a challenge too, until I ordered a stock 2007 Corvette Z06 hose. It fits perfectly, and the fittings are the same as on the LS7 power steering pump and the Camaro steering box. The stock power steering cooler and return lines were retained.
Clearances between the headers and other parts is minimal so plan on ceramic coating the headers to help with the heat.
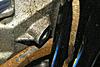
Also, I'm using the Hawks Stainless Works exhaust system with 2" headers. Nice system, but they can't seem to angle the O2 sensor bungs correctly. On mine they were rubbing the tunnel. Again this is an easy fix. The steel there is very soft, so if you place the end of a 2x4 against the spots they rub, and hit it a couple of times with a sledge hammer your clearance problem will be solved.
If you're using a 4L80e transmission with the Hawks exhaust system, plan on having another y-pipe built. The one that comes with the system locates the "y" right where the transmission mount has to go for the 4L80e.
The good news is Holley finally came out with a transmission cross-member that works with a 4L80e, and it does appear to work with the UMI K-member if you push the engine all the way forward.
Even with the engine as far forward as possible you will not be able to remove/install the A/C Compressor since the outboard bolt hits the strut tower when you try to remove it. To service it you will have to remove the entire bracket. It isn't that big of a deal, but thought you should be aware of it. As mentioned earlier I'm using the Holley relocation kit that moves it to the top on the passenger side. Not sure it would have worked at all had I tried leaving the compressor in the stock Corvette location. I have too many hoses and other items running through that location, and connecting/routing the A/C hoses would probably be a nightmare.
The power steering pressure line proved to be a challenge too, until I ordered a stock 2007 Corvette Z06 hose. It fits perfectly, and the fittings are the same as on the LS7 power steering pump and the Camaro steering box. The stock power steering cooler and return lines were retained.
Clearances between the headers and other parts is minimal so plan on ceramic coating the headers to help with the heat.
Also, I'm using the Hawks Stainless Works exhaust system with 2" headers. Nice system, but they can't seem to angle the O2 sensor bungs correctly. On mine they were rubbing the tunnel. Again this is an easy fix. The steel there is very soft, so if you place the end of a 2x4 against the spots they rub, and hit it a couple of times with a sledge hammer your clearance problem will be solved.
If you're using a 4L80e transmission with the Hawks exhaust system, plan on having another y-pipe built. The one that comes with the system locates the "y" right where the transmission mount has to go for the 4L80e.
The good news is Holley finally came out with a transmission cross-member that works with a 4L80e, and it does appear to work with the UMI K-member if you push the engine all the way forward.
Joined: Mar 2001
Posts: 10,435
Likes: 2,093
Car: '89 Firebird
Engine: 7.0L
Transmission: T56
Re: LS7 Swap Into An '86 IROC Z28
Same here, specifically on passenger side. Tons of space for an O2 sensor and they chose to run it into the body. Couldn't believe it.
Thread Starter
Member
Joined: Apr 2015
Posts: 118
Likes: 6
From: San Angelo, TX
Car: 1986 Camaro IROC Z28
Engine: LS7
Transmission: Built 4L80e w/GearVendors overdrive
Axle/Gears: 2.73
Re: LS7 Swap Into An '86 IROC Z28
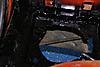
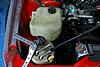
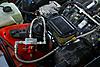
Somebody wanted to see how I was going to mount the dry sump tank. I decided I didn't like the idea of it rubbing on the sharp edges of the hole in the battery tray, so I settled on pouring a two-part rubber around it, then using brackets to prevent the top from flopping around. I showed the hole I cut with a grinder for it in my post on 5/28/17, so picking up there.
The first step is to prep a piece of 8" vent coupler to use as a form for the rubber. The coupler will be 6" long, but you really want it to be more like 3", so I used some shears to cut it in half.
I then prepped the tank by wrapping it in wax paper so any drips/runs could be easily removed.
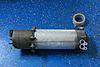
At that point the tank can be installed by tipping it to the side so the inlet/outlet go through, then stood straight up and lowered through the hole. I temporarily supported it with a piece of screen molding, but ultimately lowered the car onto a box to support the tank at the desired height. I placed mine about 1/2" below the bottom of the hood. Check this before you do it because it will really suck if you can't close your hood...
Once you get the tank positioned properly, check height and plumb side-to-side and front-to-back, then you will want to tape around the bottom of the opening and the seam between the bottom of the duct and the battery tray.
The material is so thick that you will need to put it in a ziplock bag, cut off a corner and squeeze the mixture into the gap between the duct and the tank, but as it sits liquid will ooze out if you don't tape it really well. I used duct tape, and that seemed to work, but make sure you take it up the sides of the bottom of the tray, not just across the bottom or it will not stick once the rubber mixture starts leaking.
I used Pro Guard Proflex F1519/2 with cork to do this. You just mix about 1.5 pints of Part A, 1.5 pints of Part B, and 1.5 pints of Cork, then squeeze it into the space you are trying to fill. Be forewarned, this stuff does not harden quickly. It was roughly 8 hours with temps in the 80's here before it really started to set, and I left it 24 hours before I removed the box supporting the tank from below. https://proguardcoatings.com/product...-roll-roofing/
After it hardened the tank now sits in a rubber bushing that allows it to move a little and protects it from the sharp edges of the battery tray. To keep it from moving too much I installed a couple of straps using the M6 threaded hole in the top of the tank, the stock fender hole to it's side, and a Tek screw in the front.
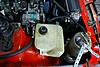
There is still room for the stock coolant tank to fit between the dry sump tank and the A/C lines. I did have to drill new holes for the coolant tank about 3/4" outboard, and a little further down from the stock location. Tek screws work great for that too.
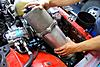
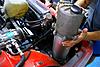
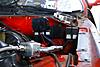
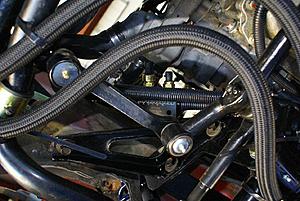
With the tank in I was able to connect the hoses. I used AN adapters from MTI Racing. They make some that fit on both the oil pan and the dry sump tank. I used 60 degree fittings coming off both, and they rubbed each other, so I added a sensor fitting on the outside fittings to gain a little more clearance.
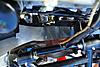
Also, installed the fuel lines and regulator.
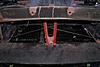
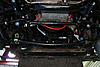
Not a big fan of cooking my brake lines and fuel lines with the headers running very close too them even with them ceramic coated, so I installed shields over them. The lower one is a Holley LS swap shield made specifically for our cars, the upper one I cut out of a piece of SS I bought at Lowes that is normally used as a SS backsplash made by Broan.
Finally, I also installed a thermostat for my transmission cooler. Fit very nicely between the dry sump tank and the edge of the frame. Mounted with Tek screws. Yes, I use Tek screws like most people use duct tape. LOL!
The first step is to prep a piece of 8" vent coupler to use as a form for the rubber. The coupler will be 6" long, but you really want it to be more like 3", so I used some shears to cut it in half.


I then prepped the tank by wrapping it in wax paper so any drips/runs could be easily removed.

At that point the tank can be installed by tipping it to the side so the inlet/outlet go through, then stood straight up and lowered through the hole. I temporarily supported it with a piece of screen molding, but ultimately lowered the car onto a box to support the tank at the desired height. I placed mine about 1/2" below the bottom of the hood. Check this before you do it because it will really suck if you can't close your hood...


Once you get the tank positioned properly, check height and plumb side-to-side and front-to-back, then you will want to tape around the bottom of the opening and the seam between the bottom of the duct and the battery tray.
The material is so thick that you will need to put it in a ziplock bag, cut off a corner and squeeze the mixture into the gap between the duct and the tank, but as it sits liquid will ooze out if you don't tape it really well. I used duct tape, and that seemed to work, but make sure you take it up the sides of the bottom of the tray, not just across the bottom or it will not stick once the rubber mixture starts leaking.
I used Pro Guard Proflex F1519/2 with cork to do this. You just mix about 1.5 pints of Part A, 1.5 pints of Part B, and 1.5 pints of Cork, then squeeze it into the space you are trying to fill. Be forewarned, this stuff does not harden quickly. It was roughly 8 hours with temps in the 80's here before it really started to set, and I left it 24 hours before I removed the box supporting the tank from below. https://proguardcoatings.com/product...-roll-roofing/


After it hardened the tank now sits in a rubber bushing that allows it to move a little and protects it from the sharp edges of the battery tray. To keep it from moving too much I installed a couple of straps using the M6 threaded hole in the top of the tank, the stock fender hole to it's side, and a Tek screw in the front.


There is still room for the stock coolant tank to fit between the dry sump tank and the A/C lines. I did have to drill new holes for the coolant tank about 3/4" outboard, and a little further down from the stock location. Tek screws work great for that too.

With the tank in I was able to connect the hoses. I used AN adapters from MTI Racing. They make some that fit on both the oil pan and the dry sump tank. I used 60 degree fittings coming off both, and they rubbed each other, so I added a sensor fitting on the outside fittings to gain a little more clearance.


Also, installed the fuel lines and regulator.


Not a big fan of cooking my brake lines and fuel lines with the headers running very close too them even with them ceramic coated, so I installed shields over them. The lower one is a Holley LS swap shield made specifically for our cars, the upper one I cut out of a piece of SS I bought at Lowes that is normally used as a SS backsplash made by Broan.

Finally, I also installed a thermostat for my transmission cooler. Fit very nicely between the dry sump tank and the edge of the frame. Mounted with Tek screws. Yes, I use Tek screws like most people use duct tape. LOL!

Last edited by 82IMSA; Jun 3, 2017 at 11:29 PM.
Thread Starter
Member
Joined: Apr 2015
Posts: 118
Likes: 6
From: San Angelo, TX
Car: 1986 Camaro IROC Z28
Engine: LS7
Transmission: Built 4L80e w/GearVendors overdrive
Axle/Gears: 2.73
Re: LS7 Swap Into An '86 IROC Z28
Yup, hit hard on the passenger side and too close for comfort on the driver's side. Dimpled both with a 2x4, problem solved. I was shocked how soft the steel is down there. Seriously, if you do this on yours, hit it softly at first, then harder if needed or you will make a serious dent.
Joined: Mar 2001
Posts: 10,435
Likes: 2,093
Car: '89 Firebird
Engine: 7.0L
Transmission: T56
Re: LS7 Swap Into An '86 IROC Z28
How freakin' immature.
82IMSA, pay no attention to this guy, he's done the same thing to me in the past too. It's just his hobby.
82IMSA, pay no attention to this guy, he's done the same thing to me in the past too. It's just his hobby.
Thread Starter
Member
Joined: Apr 2015
Posts: 118
Likes: 6
From: San Angelo, TX
Car: 1986 Camaro IROC Z28
Engine: LS7
Transmission: Built 4L80e w/GearVendors overdrive
Axle/Gears: 2.73
Re: LS7 Swap Into An '86 IROC Z28
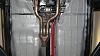
After a couple of month long delay waiting on R&R Torque Converters to modify my Torque Converter with a tapered shoulder so it would compress the O-ring on the transmission input shaft instead of just shearing it off, I finally have the transmission in the car.
At this point the number one suggestion I can make to anybody doing this swap is to select a K-member and engine mounts that allow you to move the engine forward in the bay. I see a bunch of them bragging about how far back from stock you can mount the engine, but that seems to be more theory than reality, because even with this engine shoved as far forward as the mounts will go, space is at a premium between the engine and firewall, while a small child could easily ride between the front of the engine and radiator, so not sure what the purpose in shifting the engine back (which is impossible) is?
Keep in mind that if you are using an LS7 with a Corvette oil pan, you are going to need provisions to remove the front drain plug. I wish I could tell you which vendor to go with, but I have no idea.
Even with the engine where I have it, which is supposed to be the stock location, installing the transmission dipstick, heater hoses, vacuum lines, etc. is no fun to say the least, and I'm going to have to modify the slots on the transmission bracket so I can use it, since the transmission sits 1/2" too far back for the bracket to line up with the stock holes.
If the engine was even an 1 1/2" further forward there would be no issues at all, and it would be much easier to work on the car.
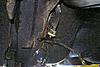
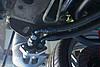
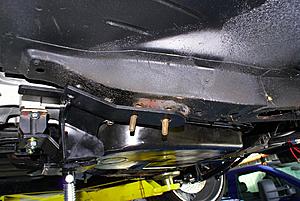
Second suggestion, when you get ready to install your 4L80e make sure you have a large sledge hammer and 2 x 4 on hand for tunnel mods. I "modded" my tunnel adjacent to the drivers side transmission mounting bolts, the cooling line fittings, the torque arm bracket, and above the rear of the transmission case and Gear Vendors overdrive. The tunnel is made of very soft metal, so getting additional clearance that will make your life much more pleasant is not difficult at all. All my transmission mounting bolts can be accessed with a 3/8" Impact Wrench now. That was not the case when I tried to tighten them the first time. If you can move the engine forward, you may not have these issues.
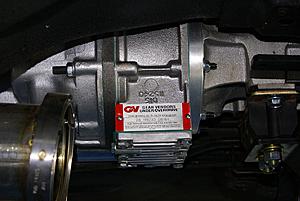
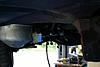
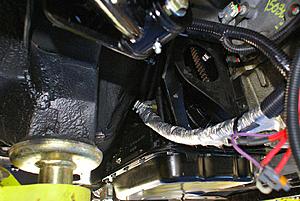
If you are going to use the Gear Vendors O/D like I am, forget about using a Torque Arm with a weld in crossmember. The end of it will be adjacent to where the speed sensor connects to the GV, making it impossible to attach the connector. The stock Torque Arm is slim enough and long enough to avoid any interference issues, and if you are using the Holley cross-member, the Torque Arm mount on it has several different holes that will allow you to adjust the pinion angle on the differential.
Don't final torque the bolts on your engine mount until you get the transmission in. I'm going to have to loosen mine now, since the drive line is angled a little towards the passenger rear causing the driveshaft to not lineup with the yoke on the differential, and the transmission pan to hit the frame. I also have a really tight clearance in a couple of spots at the top of the tunnel and on the passenger side header flange. Will be an easy fix once I get the bolts loose, but would be easier if I hadn't torqued them fully yet...
Not sure if this problem will go away once I straighten the drivetrain, but I suspect not. Even with the transmission and GV touching the top of the tunnel there is about 3/4" between the cross-member and frame. Not sure if this is a design issue with the Holley cross-member or something unique to my car, but worst case I'm going to put 1.5" diameter, .75" tall aluminum bushings around all 6 mounting bolts and call it good. Hopefully there won't be too great of an angle between the GV and driveshaft and/or driveshaft and differential. Need one more jack stand so I can get the car's weight on it's suspension high enough off the ground that I can take measurements. Harbor Freight is supposed to have more in stock tomorrow...
Amazingly the stock shift cable and brackets work with the new transmission. The bracket that holds the cable will work perfectly if you put the 2nd pan bolt through the front bracket hole and then use a Dremel with an abrasive bit to grind enough of the end of the bracket for the 3rd bolt to clear with it's washer preventing the bracket from moving.
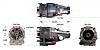
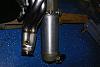
I have 90 degree rubber hose adapters on the cooler line inlet and outlet, and connecting the cooler to the transmission was a breeze. I added some heat shielding since the header will be right next to them. Of course, the headers are ceramic coated which should help with the heat too.
I also have an Improved Racing Sensor Block installed in the line from the transmission to the thermostat then the cooler with transmission fluid pressure and temperature sensors installed.

At this point the number one suggestion I can make to anybody doing this swap is to select a K-member and engine mounts that allow you to move the engine forward in the bay. I see a bunch of them bragging about how far back from stock you can mount the engine, but that seems to be more theory than reality, because even with this engine shoved as far forward as the mounts will go, space is at a premium between the engine and firewall, while a small child could easily ride between the front of the engine and radiator, so not sure what the purpose in shifting the engine back (which is impossible) is?
Keep in mind that if you are using an LS7 with a Corvette oil pan, you are going to need provisions to remove the front drain plug. I wish I could tell you which vendor to go with, but I have no idea.
Even with the engine where I have it, which is supposed to be the stock location, installing the transmission dipstick, heater hoses, vacuum lines, etc. is no fun to say the least, and I'm going to have to modify the slots on the transmission bracket so I can use it, since the transmission sits 1/2" too far back for the bracket to line up with the stock holes.
If the engine was even an 1 1/2" further forward there would be no issues at all, and it would be much easier to work on the car.
Second suggestion, when you get ready to install your 4L80e make sure you have a large sledge hammer and 2 x 4 on hand for tunnel mods. I "modded" my tunnel adjacent to the drivers side transmission mounting bolts, the cooling line fittings, the torque arm bracket, and above the rear of the transmission case and Gear Vendors overdrive. The tunnel is made of very soft metal, so getting additional clearance that will make your life much more pleasant is not difficult at all. All my transmission mounting bolts can be accessed with a 3/8" Impact Wrench now. That was not the case when I tried to tighten them the first time. If you can move the engine forward, you may not have these issues.

If you are going to use the Gear Vendors O/D like I am, forget about using a Torque Arm with a weld in crossmember. The end of it will be adjacent to where the speed sensor connects to the GV, making it impossible to attach the connector. The stock Torque Arm is slim enough and long enough to avoid any interference issues, and if you are using the Holley cross-member, the Torque Arm mount on it has several different holes that will allow you to adjust the pinion angle on the differential.


Don't final torque the bolts on your engine mount until you get the transmission in. I'm going to have to loosen mine now, since the drive line is angled a little towards the passenger rear causing the driveshaft to not lineup with the yoke on the differential, and the transmission pan to hit the frame. I also have a really tight clearance in a couple of spots at the top of the tunnel and on the passenger side header flange. Will be an easy fix once I get the bolts loose, but would be easier if I hadn't torqued them fully yet...


Not sure if this problem will go away once I straighten the drivetrain, but I suspect not. Even with the transmission and GV touching the top of the tunnel there is about 3/4" between the cross-member and frame. Not sure if this is a design issue with the Holley cross-member or something unique to my car, but worst case I'm going to put 1.5" diameter, .75" tall aluminum bushings around all 6 mounting bolts and call it good. Hopefully there won't be too great of an angle between the GV and driveshaft and/or driveshaft and differential. Need one more jack stand so I can get the car's weight on it's suspension high enough off the ground that I can take measurements. Harbor Freight is supposed to have more in stock tomorrow...

Amazingly the stock shift cable and brackets work with the new transmission. The bracket that holds the cable will work perfectly if you put the 2nd pan bolt through the front bracket hole and then use a Dremel with an abrasive bit to grind enough of the end of the bracket for the 3rd bolt to clear with it's washer preventing the bracket from moving.

I have 90 degree rubber hose adapters on the cooler line inlet and outlet, and connecting the cooler to the transmission was a breeze. I added some heat shielding since the header will be right next to them. Of course, the headers are ceramic coated which should help with the heat too.

I also have an Improved Racing Sensor Block installed in the line from the transmission to the thermostat then the cooler with transmission fluid pressure and temperature sensors installed.
Joined: Sep 1999
Posts: 4,353
Likes: 308
From: NJ
Car: 92 Firebird
Engine: 4.8 LR4
Transmission: T56
Axle/Gears: 3.45 9 Bolt
Re: LS7 Swap Into An '86 IROC Z28
At this point the number one suggestion I can make to anybody doing this swap is to select a K-member and engine mounts that allow you to move the engine forward in the bay. I see a bunch of them bragging about how far back from stock you can mount the engine, but that seems to be more theory than reality, because even with this engine shoved as far forward as the mounts will go, space is at a premium between the engine and firewall, while a small child could easily ride between the front of the engine and radiator, so not sure what the purpose in shifting the engine back (which is impossible) is?
Second suggestion, when you get ready to install your 4L80e make sure you have a large sledge hammer and 2 x 4 on hand for tunnel mods. I "modded" my tunnel adjacent to the drivers side transmission mounting bolts, the cooling line fittings, the torque arm bracket, and above the rear of the transmission case and Gear Vendors overdrive. The tunnel is made of very soft metal, so getting additional clearance that will make your life much more pleasant is not difficult at all. All my transmission mounting bolts can be accessed with a 3/8" Impact Wrench now. That was not the case when I tried to tighten them the first time. If you can move the engine forward, you may not have these issues.
Out of curiousity, why are you using a 4L80 AND a Gear Vendors? Are you looking to do Bonneville and set speed records? Or just want to split the lower gears?
You're doing something that Holley did not intend with their crossmember, I am guessing the GV mount has moved the position of the trans mount some, and why you, most likely, are having problems with the driveline and mounting.
Joined: Mar 2001
Posts: 10,435
Likes: 2,093
Car: '89 Firebird
Engine: 7.0L
Transmission: T56
Re: LS7 Swap Into An '86 IROC Z28
The floor pans are very thin. Not much metal there at all.
My engine ended up pretty close to the firewall as well (BMR K-member). Makes it a pain in the butt to install heater hose or electrical grounds behind the head. I had to remove the valve covers to do both tasks.
I also had the problem of the trans setting too far back, although for a different reason than you. In your case the Holley trans crossmember was made to be used with the Holley engine mounts that purposefully set the engine further forward than anybody else's mounts. I'm surprised you were able to get the trans to line up at all. I test fit one and it clashed with the transmission in the "stock" location.
Thread Starter
Member
Joined: Apr 2015
Posts: 118
Likes: 6
From: San Angelo, TX
Car: 1986 Camaro IROC Z28
Engine: LS7
Transmission: Built 4L80e w/GearVendors overdrive
Axle/Gears: 2.73
Re: LS7 Swap Into An '86 IROC Z28
Moving the engine back is a desirable trait for weight distribution. Moving the engine forward is not. In my Second Gen I moved my LS engine to within about 1/2" of the the firewall on the LH head. and if I ever get my 92 done, I plan on doing the same thing. If you need to move the engine forward I would recommend the Dirty Dingo Slider mounts
Just an FYI, yes, the sheet metal is soft, it is mild steel, the entire car sheet metal is soft. Also the 4L80 is the equivalent of a TH400, but larger I believe, anyone using a 4L80 is going to have to mod the transmission tunnel, pretty standard.
Out of curiousity, why are you using a 4L80 AND a Gear Vendors? Are you looking to do Bonneville and set speed records? Or just want to split the lower gears?
You're doing something that Holley did not intend with their crossmember, I am guessing the GV mount has moved the position of the trans mount some, and why you, most likely, are having problems with the driveline and mounting.
I once rebalanced a semi loaded with two huge Chilean Wine Palms that was overweight on the drive axles merely by moving the block (the point at which the weight transferred to the bed/frame) under the trunk of the larger tree back thus transferring more weight to the rear even though the trees itself had not moved. Given the weights of the trees, where everything was currently positioned, and how much weight had to move I was even able to tell them exactly how far to move the block.
You can get the 4L80e in there without modding the tunnel, but it will be a lot easier to tighten the mounting bolts if you mod the tunnel.
The transmission controller I'm using is programmed to operate it as a 6-speed automatic, albeit one that will fit in the car and handle the HP/torque of an LS7. I had the 4L80e built with the optional 1st and 2nd gears, and am running it as 1st, 1st/GV, 2nd, 2nd/GV, OD, OD/GV which combined with the gearing in my differential yields almost exactly the same gearing as the 2007 Z06 with a manual the engine came out of through the lower gears, and about 700 RPM lower engine speed at W TX highway speeds (80 mph) in 6th gear which is where the car will spend most of it's time anyway.
The GV does not move the cross-member mounting location. It is designed to be installed using the stock cross-member. The problem is just that the engine needs to move forward a little bit. Not a big deal, I'll just lengthen the slots they already provided for the mounting bolts another 1/2".
Bigger problem is the height issue. I'm not sure if they have tried to use their mount with a 4L80e in our cars, but with the polyurethane mount they recommend there is no way the cross-member is going to mount to the frame. There just isn't enough room to push the transmission up that high, and even if it could my engine mounts don't support that angle. With it positioned where I have it now the GV yoke and harmonic balancer are at the same angle, 3 degrees down with the car level.
Either need a polyurethane transmission mount that is 3/4" thinner or the bracket from the cross-member to the mount to have a shorter step in it. Or you can put spacers between the frame and cross-member like I'm going to. I suppose you could also mount the bracket to the bottom of the cross-member instead of the top, but they've removed a lot of metal from the bottom so the nuts that go on the bolts that hold the bracket can recess into it, so not sure that would be a great idea. My son is a welder, so we could also cut it apart and rebuild it, but that sounds like too much work.
Thread Starter
Member
Joined: Apr 2015
Posts: 118
Likes: 6
From: San Angelo, TX
Car: 1986 Camaro IROC Z28
Engine: LS7
Transmission: Built 4L80e w/GearVendors overdrive
Axle/Gears: 2.73
Re: LS7 Swap Into An '86 IROC Z28
The floor pans are very thin. Not much metal there at all.
My engine ended up pretty close to the firewall as well (BMR K-member). Makes it a pain in the butt to install heater hose or electrical grounds behind the head. I had to remove the valve covers to do both tasks.
I also had the problem of the trans setting too far back, although for a different reason than you. In your case the Holley trans crossmember was made to be used with the Holley engine mounts that purposefully set the engine further forward than anybody else's mounts. I'm surprised you were able to get the trans to line up at all. I test fit one and it clashed with the transmission in the "stock" location.
My engine ended up pretty close to the firewall as well (BMR K-member). Makes it a pain in the butt to install heater hose or electrical grounds behind the head. I had to remove the valve covers to do both tasks.
I also had the problem of the trans setting too far back, although for a different reason than you. In your case the Holley trans crossmember was made to be used with the Holley engine mounts that purposefully set the engine further forward than anybody else's mounts. I'm surprised you were able to get the trans to line up at all. I test fit one and it clashed with the transmission in the "stock" location.
If my engine was 1/2" forward the Holley cross-member would work fine other than the fact that it wants to push the transmission about 3/4" higher up than it can actually go.
Joined: Mar 2001
Posts: 10,435
Likes: 2,093
Car: '89 Firebird
Engine: 7.0L
Transmission: T56
Re: LS7 Swap Into An '86 IROC Z28
No, I have standard LS3 valve covers. I might have just removed the coils, sometimes my memory is not trustworthy.
Joined: Sep 1999
Posts: 4,353
Likes: 308
From: NJ
Car: 92 Firebird
Engine: 4.8 LR4
Transmission: T56
Axle/Gears: 3.45 9 Bolt
Re: LS7 Swap Into An '86 IROC Z28
Unfortunately I can't slide the motor any further forward even with different mounts because the front drain plug would be hitting the k-member. I really doubt sliding it an inch either way is going to make a serious difference in the weight distribution. The weight is being transferred to the frame at the points the K-member attaches to it regardless of how far forward or back you slide it on the mounts. Sliding it back just increases the rotational force on the k-member, not the weigh distribution of the car.
The transmission controller I'm using is programmed to operate it as a 6-speed automatic, albeit one that will fit in the car and handle the HP/torque of an LS7. I had the 4L80e built with the optional 1st and 2nd gears, and am running it as 1st, 1st/GV, 2nd, 2nd/GV, OD, OD/GV which combined with the gearing in my differential yields almost exactly the same gearing as the 2007 Z06 with a manual the engine came out of through the lower gears, and about 700 RPM lower engine speed at W TX highway speeds (80 mph) in 6th gear which is where the car will spend most of it's time anyway.
Last edited by scooter; Aug 14, 2017 at 12:58 PM.