
LS7 Swap Into An '86 IROC Z28


Banned
Joined: Aug 2015
Posts: 173
Likes: 15
Re: LS7 Swap Into An '86 IROC Z28
I just came across your thread and commend you for your effort on your project. The issue you're having with the Hooker transmission crossmember is due to the fact that is was designed to function as an integral part of the Hooker 3rd-gen LS swap system only (no LS7 oil pan compatibility unfortunately) and any cherry-picked usage of it outside of that scenario is known to usually result in fitment issues that are hard to overcome. I can tell you that Energy Suspension does make a low-profile GM trans mount, but it's no more than 1/2" shorter than their standard height mount.

Thread Starter
Member

Joined: Apr 2015
Posts: 118
Likes: 6
From: San Angelo, TX
Car: 1986 Camaro IROC Z28
Engine: LS7
Transmission: Built 4L80e w/GearVendors overdrive
Axle/Gears: 2.73
Re: LS7 Swap Into An '86 IROC Z28
Never saw a notification about this post, so sorry for the slow response. If I recall correctly I originally ordered my radiator with a 1.25" fitting for the upper hose and 1.5" for the lower hose. The upper hose I used is Dayco 71695. The lower hose is Dayco 71982, but I had to change the fitting on the radiator to 1.25" since that hose is 1.5" on the water pump end and 1.25" on the radiator end. With 1.25" fittings on the radiator for both upper and lower hoses those part #'s work perfectly.
Thread Starter
Member
Joined: Apr 2015
Posts: 118
Likes: 6
From: San Angelo, TX
Car: 1986 Camaro IROC Z28
Engine: LS7
Transmission: Built 4L80e w/GearVendors overdrive
Axle/Gears: 2.73
Re: LS7 Swap Into An '86 IROC Z28
It seems impossible that it has been 5 months since I posted an update about this. Since then I've torn out and replaced the interior, done all the wiring and made a new air lid. The car runs, though with open headers since I need to make a new y-pipe, it roars more like a pride of lions rather than purring like a kitten.
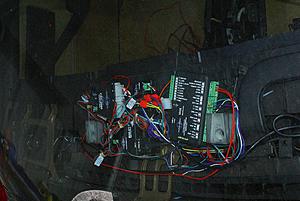
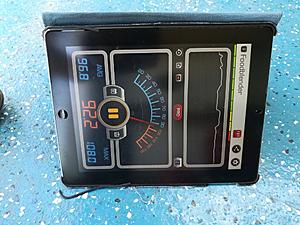
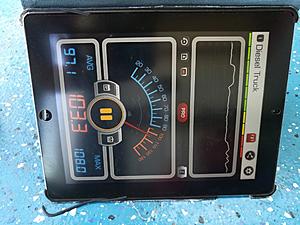
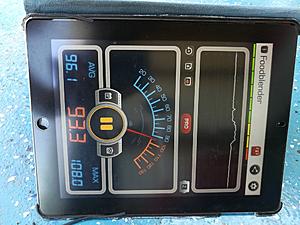
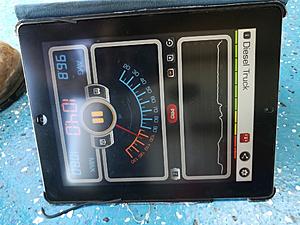
Here's a photo of the control units for the Dakota Digital VHX instrument cluster and cruise control. These fit really nicely under the dashboard. Allows me to have all the standard readings available from the ECM (RPM, coolant temperature, oil pressure, etc), and with the additional modules I added I also have oil temperature, transmission temperature, outside air temperature, compass, transmission pressure and fuel pressure.
Was frustrated when I first tried to get it to run that it would fire up then immediately die. I couldn't hear the fuel pump running, and sure enough when I tested the fuel pump circuit there was no voltage on the trigger wire for the relay. If I jumpered the relay terminals to bypass the relay, the fuel pump ran fine, so made a call to Rich over at Hawks who made my wire harness. After testing a few things it turned out that GM changed the location of the wire from the ECM to the fuel pump that year. On earlier cars the wire went from the computer to the bulkhead connector in the engine bay then back into the car. On my car and after the fuel pump circuit is Terminal D on the connector next to the ECM under the dash. Easy enough to fix. Just had him make me a wire with an ECM pin on one end and terminal for the connector under the dash and in minutes after getting that I was in business. Also had him make me a MIL circuit since I'm using an after-market instrument cluster that doesn't use regular bulbs, so when the ECM tests the circuit it thinks their is a problem with the circuit and sets a code. Annoying to say the least.
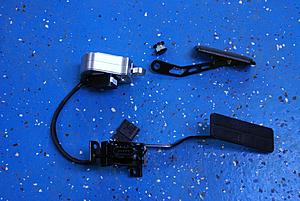
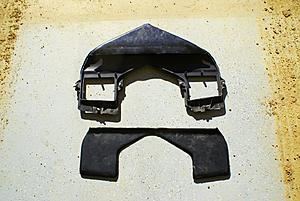
Tried to install the electronic gas pedal (aka drive-by-wire throttle control pedal) and discovered that the stock Corvette pedal can't be used unless you want to remove/modify the convenience center. The convenience center sits right above the electrical connector for the pedal which mounts from the top making it impossible to use it. Since the pedal also hits my nice new fluffy carpet when you mash it to the floor and that's without the floor mats in yet, I decided to get a different pedal.
Lokar makes a really nice pedal that works, but mounting it to the bracket requires a few "mods." What doesn't, so here we go. Not hard if you have a grinder.
First, here is a photo of the Lokar pedal (top) notice that the pedal angle is adjustable, and stock pedal (bottom) notice how the connector comes out the top.
First thing you need to do is detach the bracket from a stock pedal by cutting the left side of the bracket off with a grinder.
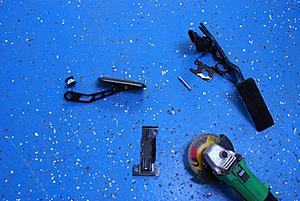
Then you are going to want to drill 2 holes through the bracket to mount the Lokar to it.
Next you are going to bolt the Lokar to the bracket using lock washers.
The bolts on the back of the bracket are going to keep it from mounting to the bracket in the car without rocking, so you are going to need to install 5 washers around each mounting bolt between the pedal assembly and bracket in the car. I also had to use socket cap screws since clearance is too tight to use hex cap bolts.
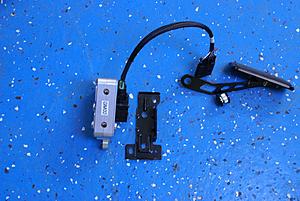
Works really great and no clearance issues.
Here's a photo of the control units for the Dakota Digital VHX instrument cluster and cruise control. These fit really nicely under the dashboard. Allows me to have all the standard readings available from the ECM (RPM, coolant temperature, oil pressure, etc), and with the additional modules I added I also have oil temperature, transmission temperature, outside air temperature, compass, transmission pressure and fuel pressure.

Was frustrated when I first tried to get it to run that it would fire up then immediately die. I couldn't hear the fuel pump running, and sure enough when I tested the fuel pump circuit there was no voltage on the trigger wire for the relay. If I jumpered the relay terminals to bypass the relay, the fuel pump ran fine, so made a call to Rich over at Hawks who made my wire harness. After testing a few things it turned out that GM changed the location of the wire from the ECM to the fuel pump that year. On earlier cars the wire went from the computer to the bulkhead connector in the engine bay then back into the car. On my car and after the fuel pump circuit is Terminal D on the connector next to the ECM under the dash. Easy enough to fix. Just had him make me a wire with an ECM pin on one end and terminal for the connector under the dash and in minutes after getting that I was in business. Also had him make me a MIL circuit since I'm using an after-market instrument cluster that doesn't use regular bulbs, so when the ECM tests the circuit it thinks their is a problem with the circuit and sets a code. Annoying to say the least.
Tried to install the electronic gas pedal (aka drive-by-wire throttle control pedal) and discovered that the stock Corvette pedal can't be used unless you want to remove/modify the convenience center. The convenience center sits right above the electrical connector for the pedal which mounts from the top making it impossible to use it. Since the pedal also hits my nice new fluffy carpet when you mash it to the floor and that's without the floor mats in yet, I decided to get a different pedal.
Lokar makes a really nice pedal that works, but mounting it to the bracket requires a few "mods." What doesn't, so here we go. Not hard if you have a grinder.
First, here is a photo of the Lokar pedal (top) notice that the pedal angle is adjustable, and stock pedal (bottom) notice how the connector comes out the top.

First thing you need to do is detach the bracket from a stock pedal by cutting the left side of the bracket off with a grinder.

Then you are going to want to drill 2 holes through the bracket to mount the Lokar to it.

Next you are going to bolt the Lokar to the bracket using lock washers.

The bolts on the back of the bracket are going to keep it from mounting to the bracket in the car without rocking, so you are going to need to install 5 washers around each mounting bolt between the pedal assembly and bracket in the car. I also had to use socket cap screws since clearance is too tight to use hex cap bolts.
Works really great and no clearance issues.
Last edited by 82IMSA; Jan 16, 2018 at 03:23 PM.
Thread Starter
Member
Joined: Apr 2015
Posts: 118
Likes: 6
From: San Angelo, TX
Car: 1986 Camaro IROC Z28
Engine: LS7
Transmission: Built 4L80e w/GearVendors overdrive
Axle/Gears: 2.73
Re: LS7 Swap Into An '86 IROC Z28
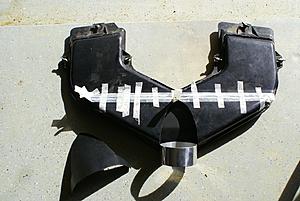
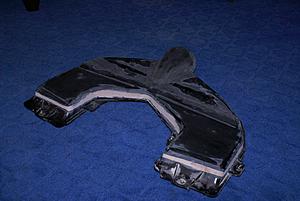
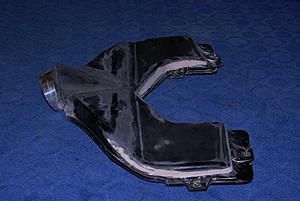
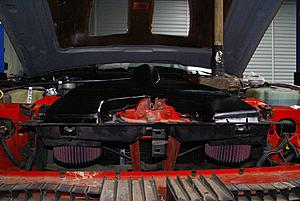
I'll do the air lid in two posts. First the bottom half that holds the air filters. The stock air filters are barely adequate for the stock 5.0L engine at 5,000 RPM. If you want to rev a 7.0L to 7,000 RPM you need quite a bit more air flow which requires upgrading the filters and opening up the air lid to flow a lot more air.
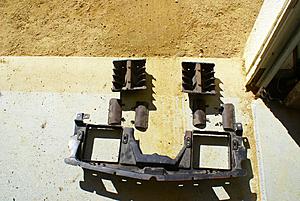
After checking with K&N they stated that 2 of their E-2996 filters would flow enough air, and it appeared to me that they would fit in the space available. A few measurements confirmed my hopes, so I got to work with the grinder on the stock parts.
First, step was to gut the lower portion that holds the stock filters. This is pretty easy with a grinder and a cutting disc. You need to remove the baffles which are held in with screws, then cut off the portion that is underneath the stock filters.
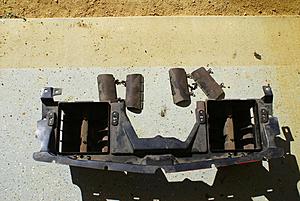
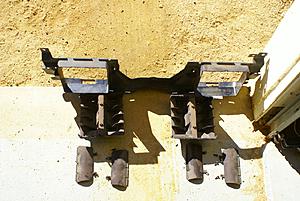
Next you need to get some 1/4" thick black PVC sheet and cut out 2 pieces the same size and shape as the stock filters.
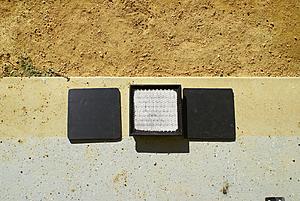
Next you are going to cut a hole in the center of each piece the same diameter or just a hair smaller than the OD of the rubber sleeve on the back of the filters. You want the sleeve to fit pretty snugly inside to form a good seal and force the air to come through the filter. Then you are going to screw through the PVC into the top of the filters to attach them.
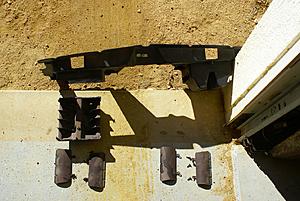
Now you can reinstall the bottom part into the car. The filter on the driver's side may hit the radiator cross-brace lightly, so you may want to bend it back a little being careful not to damage any of the heat exchangers behind it. I also trimmed some of the plastic panel below to increase the amount of area available for air to flow to the filters since adding an oil cooler and transmission fluid cooler blocked some of the area available for that previously.
After checking with K&N they stated that 2 of their E-2996 filters would flow enough air, and it appeared to me that they would fit in the space available. A few measurements confirmed my hopes, so I got to work with the grinder on the stock parts.
First, step was to gut the lower portion that holds the stock filters. This is pretty easy with a grinder and a cutting disc. You need to remove the baffles which are held in with screws, then cut off the portion that is underneath the stock filters.


Next you need to get some 1/4" thick black PVC sheet and cut out 2 pieces the same size and shape as the stock filters.

Next you are going to cut a hole in the center of each piece the same diameter or just a hair smaller than the OD of the rubber sleeve on the back of the filters. You want the sleeve to fit pretty snugly inside to form a good seal and force the air to come through the filter. Then you are going to screw through the PVC into the top of the filters to attach them.


Now you can reinstall the bottom part into the car. The filter on the driver's side may hit the radiator cross-brace lightly, so you may want to bend it back a little being careful not to damage any of the heat exchangers behind it. I also trimmed some of the plastic panel below to increase the amount of area available for air to flow to the filters since adding an oil cooler and transmission fluid cooler blocked some of the area available for that previously.
Thread Starter
Member
Joined: Apr 2015
Posts: 118
Likes: 6
From: San Angelo, TX
Car: 1986 Camaro IROC Z28
Engine: LS7
Transmission: Built 4L80e w/GearVendors overdrive
Axle/Gears: 2.73
Re: LS7 Swap Into An '86 IROC Z28
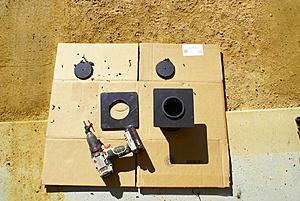
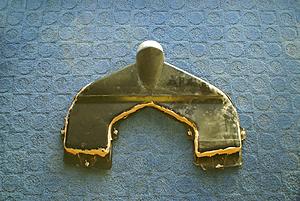
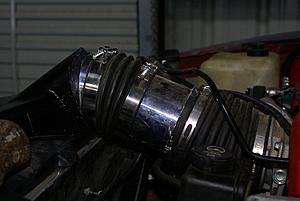
Modifying the upper part of the air lid is a lot more time consuming and takes some patience. I spread this out over several days mostly because I needed to let stuff dry and/or cure between steps. Be sure to check how much clearance you have between your hood and the stock air lid. Some aftermarket hoods have a lot more clearance, others don't. Would suck to put a lot of time into doing this only to have the hood hid it when you are done. I've got a whopping 1/16" of clearance between my hood and the air lid now.
First you want to cut the lid apart as shown. If I had to do this again I might try to do it without making the cut across the top, and just try to bend it to the proper shape using my heat gun and pliers.
I cut it about 1/2 way down the slope then used the heat gun to bend the sloped part so it stuck out straight instead of sloping down. I then reattached the part that I had cut off. Would be worth trying to just rebend it to the final shape because trying to reattach the piece you cut off is a PIA.
You also need to cut out a V shaped piece on the top so you can build a hood to blend into the 4" outlet. I used a piece of 1/8" PVC sheet to make the hood and attached it to the air lid and outlet with JB Plastic Weld. You need to be sure you get the angle correct for the height of the intake on your car. I also used some black polyurethane caulk to seal between the metal outlet and plastic air lid since there were some pretty healthy sized gaps around it and I wanted it to have a little flexibility.
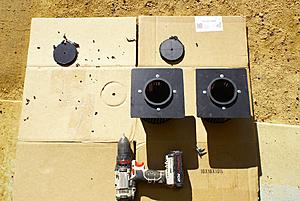
Next you are going to take some .079" thick Foam PVC sheet and cut it to shape to hold the lid in the position you want and provide something for the Bondo you will use later to stick to. I thought I took photos of this step, but I also had the flu when I was doing it, so... Long story short, no photos.
Next you are going to use Plastic Weld and/or Bondo to fill everything in. As you can see I was able to increase the volume of air that can flow through the air lid quite substantially.
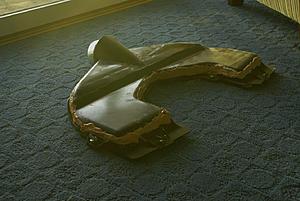
Next you are going to sand everything smooth. I started out using my grinder and Moto Tool, but wish I had tried my Mouse with 60 grit pads first. It did a lot nicer job. The grinder and Moto Tool tend to leave gouges and waves that you have to go back and fill in again, and I hate doing stuff twice.

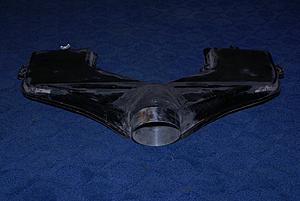
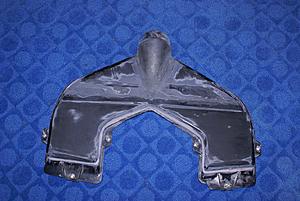
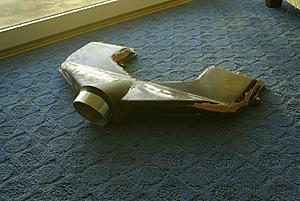
Finally paint it with a nice black satin spray paint if you want it to look like the stock color and reinstall.
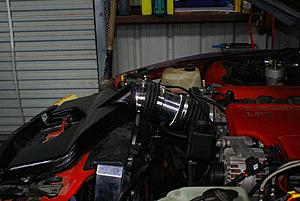
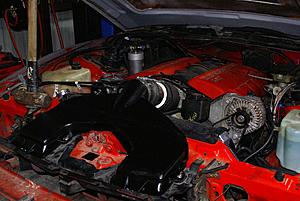
Needed this to flow about double the stock air lid, and I opened mine up so much that it would likely flow about 4x stock, so my LS7 shouldn't be having any difficulty breathing even at the redline.
First you want to cut the lid apart as shown. If I had to do this again I might try to do it without making the cut across the top, and just try to bend it to the proper shape using my heat gun and pliers.
I cut it about 1/2 way down the slope then used the heat gun to bend the sloped part so it stuck out straight instead of sloping down. I then reattached the part that I had cut off. Would be worth trying to just rebend it to the final shape because trying to reattach the piece you cut off is a PIA.
You also need to cut out a V shaped piece on the top so you can build a hood to blend into the 4" outlet. I used a piece of 1/8" PVC sheet to make the hood and attached it to the air lid and outlet with JB Plastic Weld. You need to be sure you get the angle correct for the height of the intake on your car. I also used some black polyurethane caulk to seal between the metal outlet and plastic air lid since there were some pretty healthy sized gaps around it and I wanted it to have a little flexibility.


Next you are going to take some .079" thick Foam PVC sheet and cut it to shape to hold the lid in the position you want and provide something for the Bondo you will use later to stick to. I thought I took photos of this step, but I also had the flu when I was doing it, so... Long story short, no photos.
Next you are going to use Plastic Weld and/or Bondo to fill everything in. As you can see I was able to increase the volume of air that can flow through the air lid quite substantially.


Next you are going to sand everything smooth. I started out using my grinder and Moto Tool, but wish I had tried my Mouse with 60 grit pads first. It did a lot nicer job. The grinder and Moto Tool tend to leave gouges and waves that you have to go back and fill in again, and I hate doing stuff twice.


Finally paint it with a nice black satin spray paint if you want it to look like the stock color and reinstall.


Needed this to flow about double the stock air lid, and I opened mine up so much that it would likely flow about 4x stock, so my LS7 shouldn't be having any difficulty breathing even at the redline.
Last edited by 82IMSA; Jan 17, 2018 at 01:03 PM.
Supreme Member


Joined: Dec 2005
Posts: 9,920
Likes: 885
From: 53.0907� N, 113.4695� W
Re: LS7 Swap Into An '86 IROC Z28
I was going to direct you to a similar air lid build
https://www.thirdgen.org/forums/tpi/...-camaro-5.html
but I see you and I have already had a discussion. In particular, regarding the air flow capacity of the OEM filter arrangement.
I like your approach to the filter dilemma. You've revived my interest in building a CAI going this route as opposed to adapting my cowl hood.
One word of concern though on your design and it may be from the pictures but the screws you use to fix the filters to the PVC plate appear to exposed to the incoming air stream. My fear would that one of them works it's way loose and gets ingested. Like I said, it may be from the angle of the pictures and not seeing how the entire assembly fits together but I thought I'd mention it. I've seen the results of a piece of hardware making it's way past the throttle blades and it isn't pretty.
Last edited by skinny z; Apr 22, 2018 at 09:27 AM. Reason: speeling is imortant
Thread Starter
Member
Joined: Apr 2015
Posts: 118
Likes: 6
From: San Angelo, TX
Car: 1986 Camaro IROC Z28
Engine: LS7
Transmission: Built 4L80e w/GearVendors overdrive
Axle/Gears: 2.73
Re: LS7 Swap Into An '86 IROC Z28
I was going to direct you to a similar air lid build
https://www.thirdgen.org/forums/tpi/...-camaro-5.html
but I see you and I have already had a discussion. In particular, regarding the air flow capacity of the OEM filter arrangement.
I like your approach to the filter dilemma. You've revived my interest in building a CAI going this route as opposed to adapting my cowl hood.
One word of concern though on your design and it may be from the pictures but the screws you use to fix the filters to the PVC plate appear to exposed to the incoming air stream. My fear would that one of them works it's way loose and gets ingested. Like I said, it may be from the angle of the pictures and not seeing how the entire assembly fits together but I though I'd mention it. I've seen the results of a piece of hardware making it's way past the throttle blades and it isn't pretty.
Last edited by 82IMSA; Jan 17, 2018 at 01:04 PM.
Supreme Member
Joined: Dec 2005
Posts: 9,920
Likes: 885
From: 53.0907� N, 113.4695� W
Re: LS7 Swap Into An '86 IROC Z28
I suppose you could fix the screws permanently via some epoxy (although the thin PVC sheet is good insurance too). Seeing as you don't have to replace the filters, it wouldn't represent a maintenance hassle. This is assuming the filter and PVC adapter are removable as an assembly.
Thread Starter
Member
Joined: Apr 2015
Posts: 118
Likes: 6
From: San Angelo, TX
Car: 1986 Camaro IROC Z28
Engine: LS7
Transmission: Built 4L80e w/GearVendors overdrive
Axle/Gears: 2.73
Re: LS7 Swap Into An '86 IROC Z28
I got to thinking about it, and that isn't 1/8" PVC sheet, it is actually .079" Foam PVC Sheet I got from Home Depot. Really easy to work with, but tough and flexible. You can cut it with scissors. I edited the posts above to correct it.
Supreme Member
Joined: Dec 2005
Posts: 9,920
Likes: 885
From: 53.0907� N, 113.4695� W
Re: LS7 Swap Into An '86 IROC Z28
I'm going to pursue this modification but the first thing I have to determine is whether it'll fit under the Glasstek hood. I know that the OEM fiberglass hood (82 Z28) has a substantial bulkhead in the latch area and the filter housing won't fit. The Glasstek seems somewhat more streamlined there, but again as you pointed out, you have to check first.
Thread Starter
Member
Joined: Apr 2015
Posts: 118
Likes: 6
From: San Angelo, TX
Car: 1986 Camaro IROC Z28
Engine: LS7
Transmission: Built 4L80e w/GearVendors overdrive
Axle/Gears: 2.73
Re: LS7 Swap Into An '86 IROC Z28
I'm going to pursue this modification but the first thing I have to determine is whether it'll fit under the Glasstek hood. I know that the OEM fiberglass hood (82 Z28) has a substantial bulkhead in the latch area and the filter housing won't fit. The Glasstek seems somewhat more streamlined there, but again as you pointed out, you have to check first.
Thread Starter
Member
Joined: Apr 2015
Posts: 118
Likes: 6
From: San Angelo, TX
Car: 1986 Camaro IROC Z28
Engine: LS7
Transmission: Built 4L80e w/GearVendors overdrive
Axle/Gears: 2.73
Thread Starter
Member
Joined: Apr 2015
Posts: 118
Likes: 6
From: San Angelo, TX
Car: 1986 Camaro IROC Z28
Engine: LS7
Transmission: Built 4L80e w/GearVendors overdrive
Axle/Gears: 2.73
Re: LS7 Swap Into An '86 IROC Z28
A 4L80E with a GV is going to kill that LS7. Not only is the car going to be a pig but that driveline is going to eat a ton of power. What you are trying to do is foolish. Stick the 4L80E in with a 3.27 rear gear and you'll accomplish most of your goals without all the bullshit. Your 235 MPH goal is laughable. You'll need more than double the output of a stock LS7 to accomplish that with a 3rd gen Camaro.
Thread Starter
Member
Joined: Apr 2015
Posts: 118
Likes: 6
From: San Angelo, TX
Car: 1986 Camaro IROC Z28
Engine: LS7
Transmission: Built 4L80e w/GearVendors overdrive
Axle/Gears: 2.73
Re: LS7 Swap Into An '86 IROC Z28
I bet my neighbors love this car. Even with the muffler on it's loud. I bought a quieter one that I can swap on/off with the one that came with the exhaust system for when I actually want to hear myself think or the car stereo. LOL! Would get very old listening to that deep throaty growl on long highway trips.
Thank God my son is a welder, we're going to have to add a 1.5" long section of 3.5" pipe so the quiet muffler doesn't rub the Panhard Rod, and build a new tailpipe for it since it's 3" wider and 4" longer than the one I already have.
Joined: Mar 2001
Posts: 10,437
Likes: 2,093
Car: '89 Firebird
Engine: 7.0L
Transmission: T56
Re: LS7 Swap Into An '86 IROC Z28
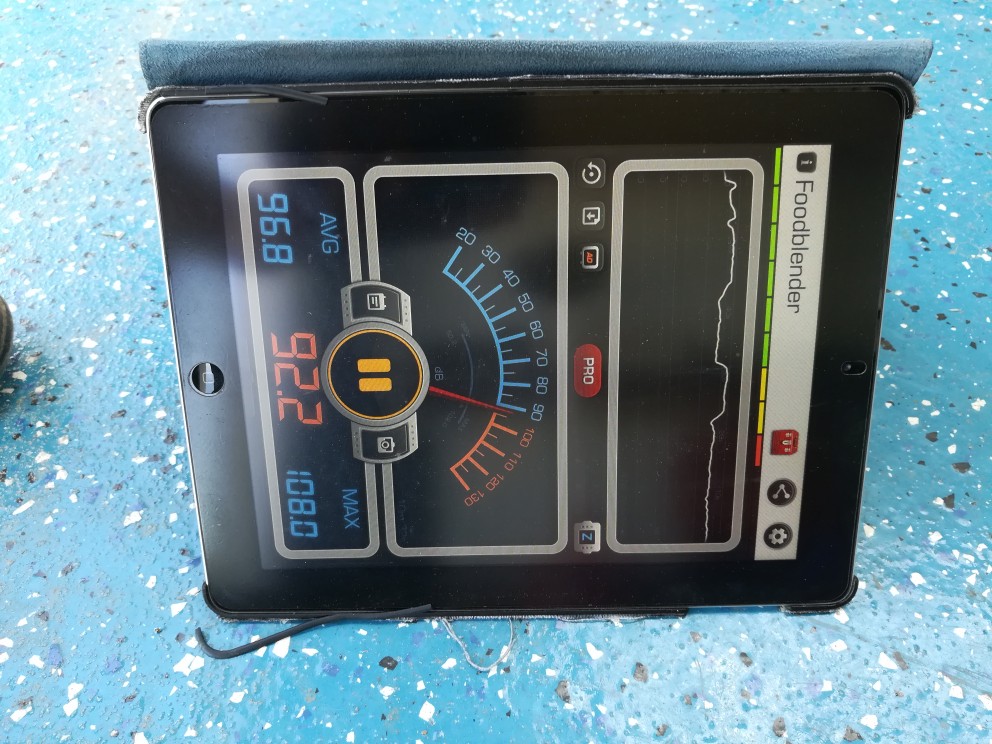
No, the Tesla P-series "Ludicrous" is barely under 3.0 seconds and will run 1/4 mile in the high 10's. You're thinking of the numbers advertised for the upcoming Tesla Roadster, which they state will break into 8 second 1/4 mile.
You've got tire spin screwing with your datalog. No doubt you've got a fast car, but you won't really know where you stand until you do a 1/4 mile run.
Is that a stock LS7 with ported heads? Cam swap?
You've got tire spin screwing with your datalog. No doubt you've got a fast car, but you won't really know where you stand until you do a 1/4 mile run.
Is that a stock LS7 with ported heads? Cam swap?
Thread Starter
Member
Joined: Apr 2015
Posts: 118
Likes: 6
From: San Angelo, TX
Car: 1986 Camaro IROC Z28
Engine: LS7
Transmission: Built 4L80e w/GearVendors overdrive
Axle/Gears: 2.73
Re: LS7 Swap Into An '86 IROC Z28
No, the Tesla P-series "Ludicrous" is barely under 3.0 seconds and will run 1/4 mile in the high 10's. You're thinking of the numbers advertised for the upcoming Tesla Roadster, which they state will break into 8 second 1/4 mile.
You've got tire spin screwing with your datalog. No doubt you've got a fast car, but you won't really know where you stand until you do a 1/4 mile run.
Is that a stock LS7 with ported heads? Cam swap?
You've got tire spin screwing with your datalog. No doubt you've got a fast car, but you won't really know where you stand until you do a 1/4 mile run.
Is that a stock LS7 with ported heads? Cam swap?
Joined: Mar 2001
Posts: 10,437
Likes: 2,093
Car: '89 Firebird
Engine: 7.0L
Transmission: T56
Re: LS7 Swap Into An '86 IROC Z28
I've got the same headers and exhaust you do from Hawks. It is awesome if you want to be rowdy around town but sometimes I just need a set of ear plugs.
What is the other muffler you got? I would like to know how that works out. I wouldn't mind the car being a little more quiet.
What is the other muffler you got? I would like to know how that works out. I wouldn't mind the car being a little more quiet.
Thread Starter
Member
Joined: Apr 2015
Posts: 118
Likes: 6
From: San Angelo, TX
Car: 1986 Camaro IROC Z28
Engine: LS7
Transmission: Built 4L80e w/GearVendors overdrive
Axle/Gears: 2.73
Re: LS7 Swap Into An '86 IROC Z28
I've got the same headers and exhaust you do from Hawks. It is awesome if you want to be rowdy around town but sometimes I just need a set of ear plugs.
What is the other muffler you got? I would like to know how that works out. I wouldn't mind the car being a little more quiet.
What is the other muffler you got? I would like to know how that works out. I wouldn't mind the car being a little more quiet.
On mine it's going to require extending the 3.5" straight section under the car about 1.5" or 2" since it's an offset inlet and right now the muffler sits a couple of inches forward of the heat shield in front of the trunk. After that I should be able to use both.
I'm also going to build a new tailpipe since the Hawks piece is flared and the outlet on the muffler is flared. Plus the hanger won't work on the existing one with the new muffler, so easier to build a new one to go with the new muffler, then I can just swap them in a matter of minutes by taking the inlet clamp off and the tailpipe hanger. The leg before the bend needs to be shorter on the new one too since the muffler is longer, and the leg after it longer since the outlet is offset too.
If you want to do it let me know and I'll send you a list of the parts I bought.
I'll let you know how it sounds, or hopefully doesn't sound. LOL!
Thread Starter
Member
Joined: Apr 2015
Posts: 118
Likes: 6
From: San Angelo, TX
Car: 1986 Camaro IROC Z28
Engine: LS7
Transmission: Built 4L80e w/GearVendors overdrive
Axle/Gears: 2.73
Re: LS7 Swap Into An '86 IROC Z28
My son is working 7 days a week right now, but had Sunday morning off, so we were able to test the new muffler. I honestly didn't notice a difference between the two which seems impossible given the new one is much larger. Going to try again using an app I installed on my iPad to measure the sound level for each, but right now it doesn't appear the Flowmaster is going to help at all. Good thing we tested it before cutting and welding...
Thread Starter
Member
Joined: Apr 2015
Posts: 118
Likes: 6
From: San Angelo, TX
Car: 1986 Camaro IROC Z28
Engine: LS7
Transmission: Built 4L80e w/GearVendors overdrive
Axle/Gears: 2.73
Re: LS7 Swap Into An '86 IROC Z28
Already did, and boxed all the parts I bought back up and am returning them. Not going to spend nearly $400 to reduce the sound by maybe 1 dB while reducing power/worsening mileage.
Thread Starter
Member
Joined: Apr 2015
Posts: 118
Likes: 6
From: San Angelo, TX
Car: 1986 Camaro IROC Z28
Engine: LS7
Transmission: Built 4L80e w/GearVendors overdrive
Axle/Gears: 2.73
Re: LS7 Swap Into An '86 IROC Z28


Anybody have any experience with the Varex Xforce mufflers? They work like the Corvette mufflers. At low rpm they route the exhaust through multiple chambers, but when you step on it everything goes straight through. Curious how quiet they are at low rpm.
Thread Starter
Member
Joined: Apr 2015
Posts: 118
Likes: 6
From: San Angelo, TX
Car: 1986 Camaro IROC Z28
Engine: LS7
Transmission: Built 4L80e w/GearVendors overdrive
Axle/Gears: 2.73
Re: LS7 Swap Into An '86 IROC Z28
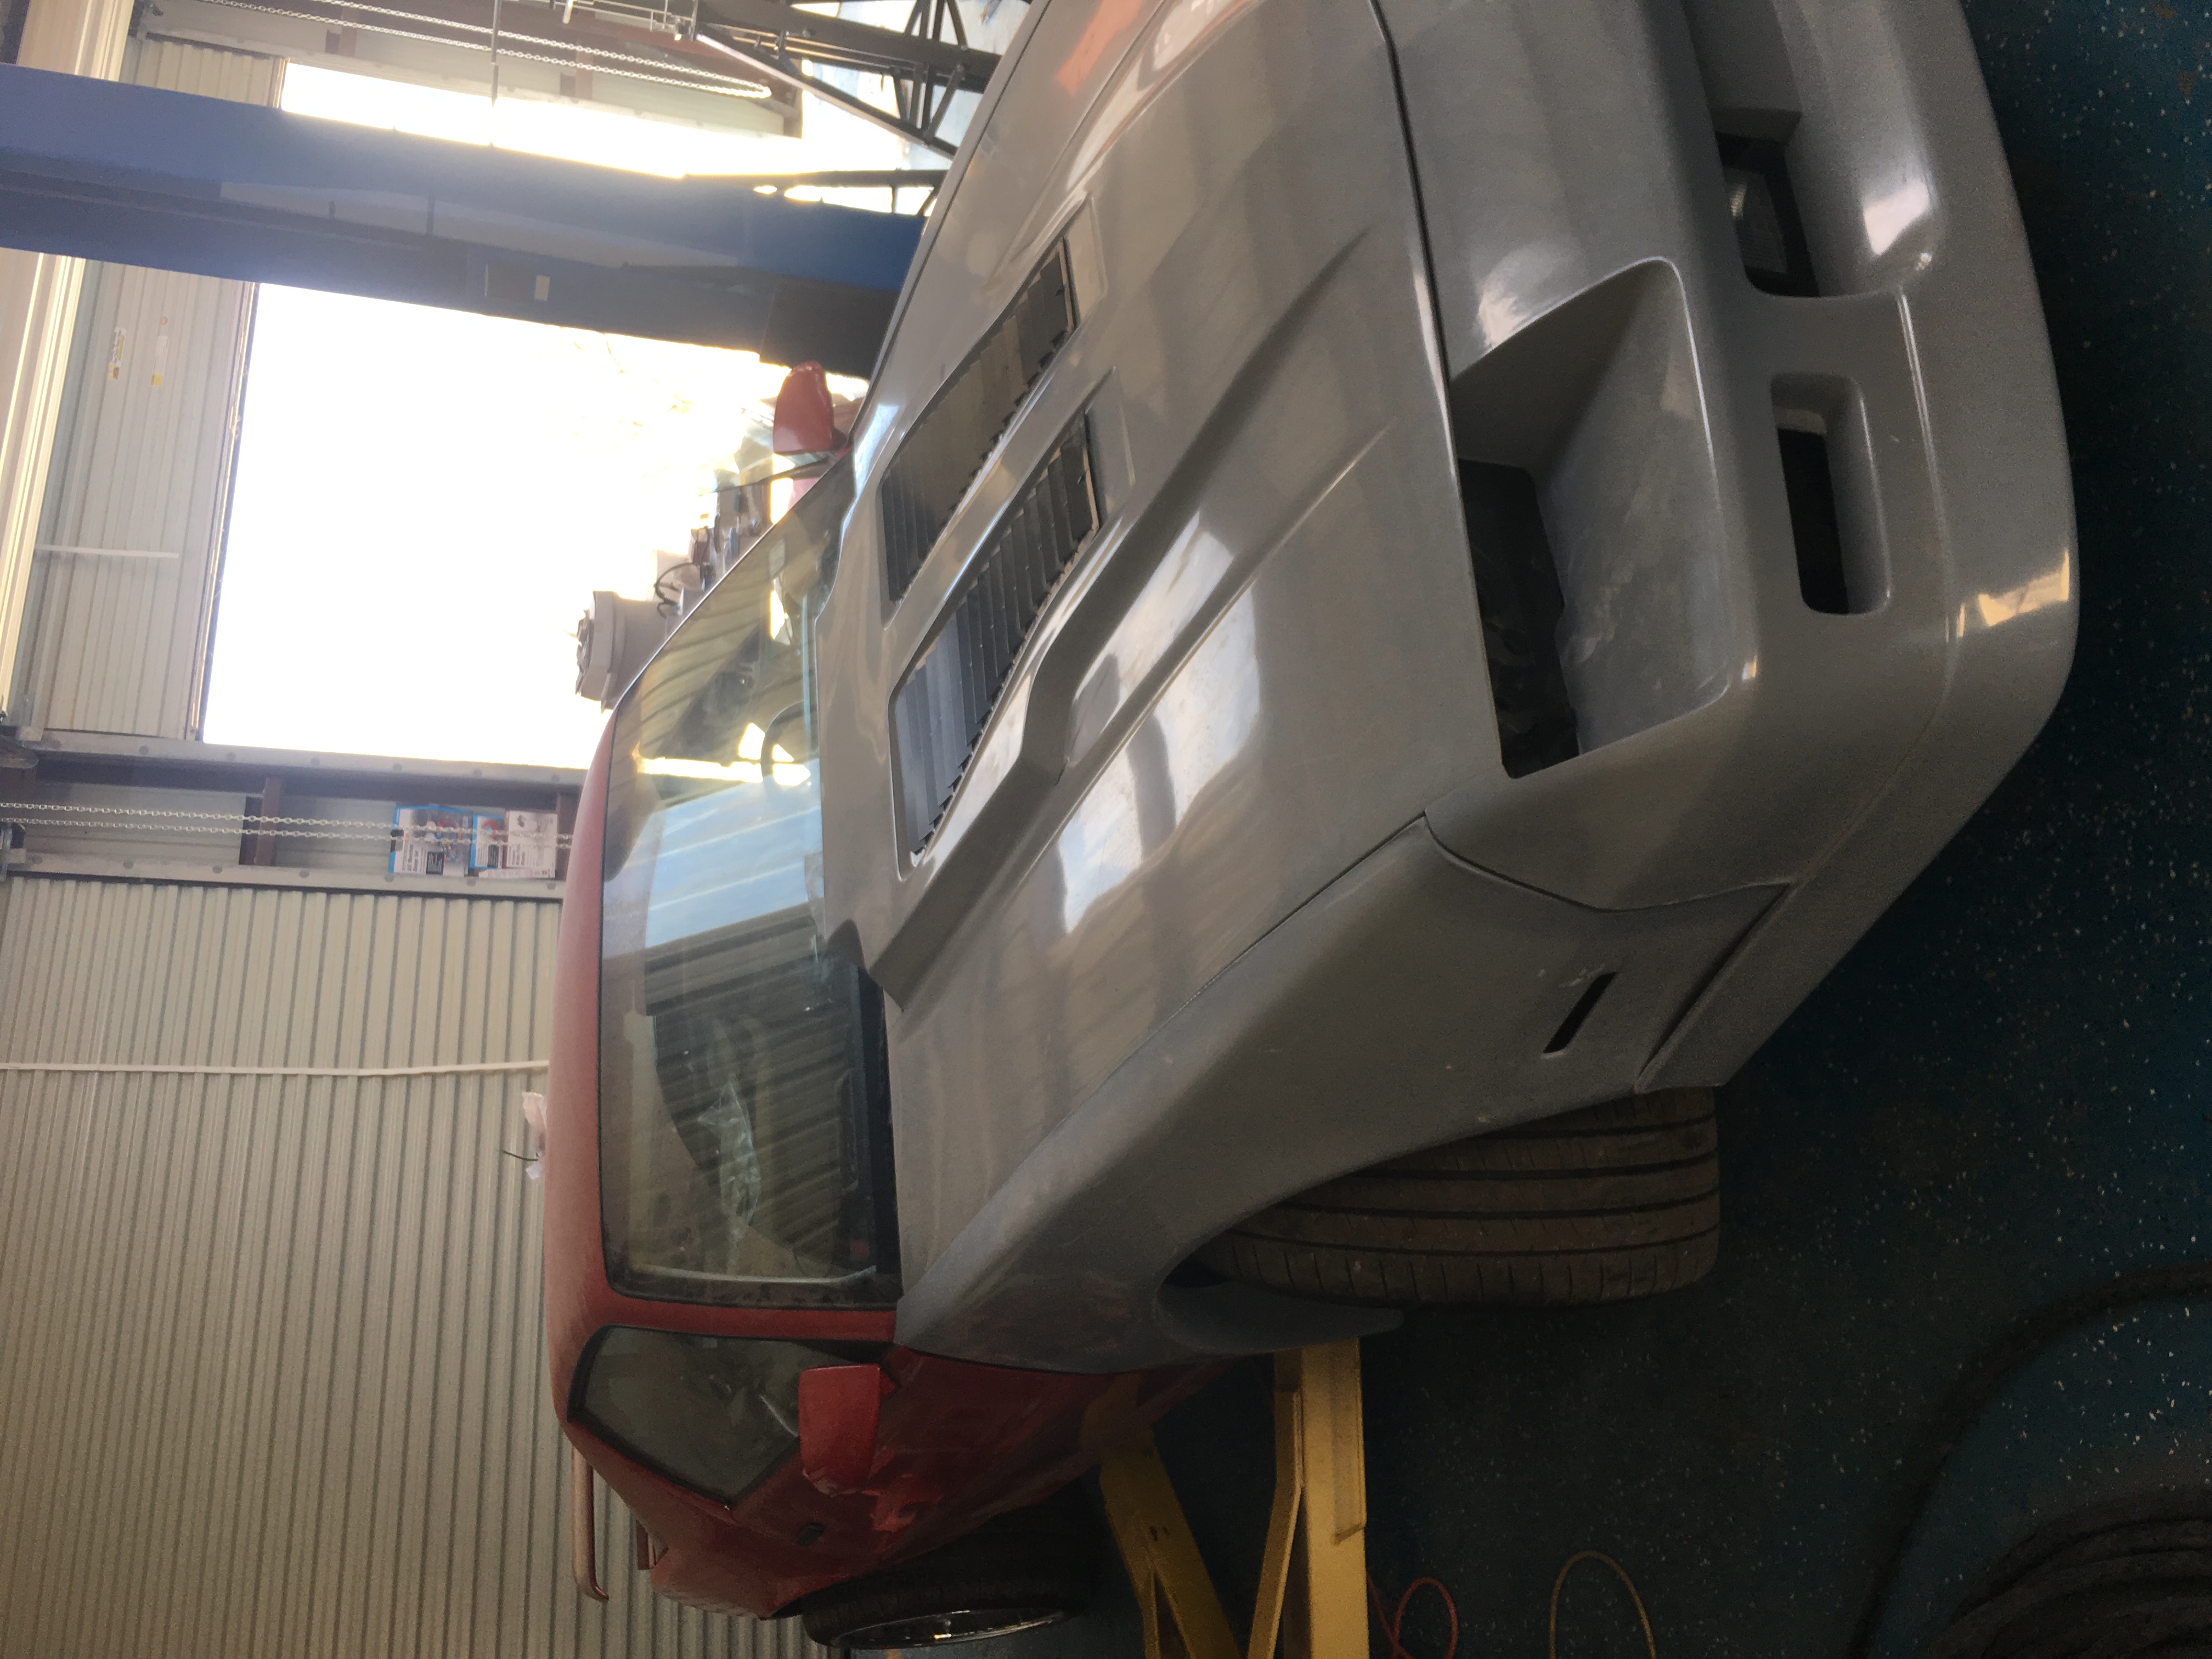
I'm not leaving the hood like that. We're going to mod it to look like the IMSA hood on my old Firebird in my avatar photo.
Thread Starter
Member
Joined: Apr 2015
Posts: 118
Likes: 6
From: San Angelo, TX
Car: 1986 Camaro IROC Z28
Engine: LS7
Transmission: Built 4L80e w/GearVendors overdrive
Axle/Gears: 2.73
Re: LS7 Swap Into An '86 IROC Z28
Hard to see, but I put a Fiero wing on 5" wing stands on the rear deck. Going to paint it Lemans Blue.
Joined: Mar 2001
Posts: 10,437
Likes: 2,093
Car: '89 Firebird
Engine: 7.0L
Transmission: T56
Re: LS7 Swap Into An '86 IROC Z28
Please share a story line how you modify the hood to IMSA style. One of the future mods to my car might be an IMSA hood. Just always liked it.
Thread Starter
Member
Joined: Apr 2015
Posts: 118
Likes: 6
From: San Angelo, TX
Car: 1986 Camaro IROC Z28
Engine: LS7
Transmission: Built 4L80e w/GearVendors overdrive
Axle/Gears: 2.73
Re: LS7 Swap Into An '86 IROC Z28
http://www.hawksmotorsports.com/pages/stormtrooper.html
Joined: Mar 2001
Posts: 10,437
Likes: 2,093
Car: '89 Firebird
Engine: 7.0L
Transmission: T56
Thread Starter
Member
Joined: Apr 2015
Posts: 118
Likes: 6
From: San Angelo, TX
Car: 1986 Camaro IROC Z28
Engine: LS7
Transmission: Built 4L80e w/GearVendors overdrive
Axle/Gears: 2.73
Joined: Mar 2001
Posts: 10,437
Likes: 2,093
Car: '89 Firebird
Engine: 7.0L
Transmission: T56
Re: LS7 Swap Into An '86 IROC Z28
https://www.thirdgen.org/forums/ltx-lsx/739752-87-formula-ls3-swap.html
There is a video of the car running. Same exhaust as you a me but much tamer sound with cats.
There is a video of the car running. Same exhaust as you a me but much tamer sound with cats.
Thread Starter
Member
Joined: Apr 2015
Posts: 118
Likes: 6
From: San Angelo, TX
Car: 1986 Camaro IROC Z28
Engine: LS7
Transmission: Built 4L80e w/GearVendors overdrive
Axle/Gears: 2.73
Re: LS7 Swap Into An '86 IROC Z28

Member
Joined: Mar 2004
Posts: 168
Likes: 3
From: Ashburn, VA
Car: 91 Camaro Z28
Engine: LS3
Transmission: 6 Speed
Axle/Gears: 3.71
Re: LS7 Swap Into An '86 IROC Z28
Thread Starter
Member
Joined: Apr 2015
Posts: 118
Likes: 6
From: San Angelo, TX
Car: 1986 Camaro IROC Z28
Engine: LS7
Transmission: Built 4L80e w/GearVendors overdrive
Axle/Gears: 2.73
Re: LS7 Swap Into An '86 IROC Z28
http://americansportscar.com/product...de-body-turbo/
Joined: Mar 2001
Posts: 10,437
Likes: 2,093
Car: '89 Firebird
Engine: 7.0L
Transmission: T56
Thread Starter
Member
Joined: Apr 2015
Posts: 118
Likes: 6
From: San Angelo, TX
Car: 1986 Camaro IROC Z28
Engine: LS7
Transmission: Built 4L80e w/GearVendors overdrive
Axle/Gears: 2.73
Re: LS7 Swap Into An '86 IROC Z28
I ordered that xforce muffler, and will let you know what it does. Much easier install since it is center to center inlet and outlet and roughly the same size as the current muffler. The inlet has a flange instead of a flared pipe fitting, but that's easily remedied. According to the company it should knock approx 12 dB off the exhaust level when fully closed. Should be similar fully open since it's basically the same muffler as what I have now with the valve open. We'll know soon enough.

Supreme Member
Joined: Oct 2004
Posts: 4,528
Likes: 240
From: Henrietta NY
Car: 1984 Trans Am L69
Engine: Sniper EFI Powered 355
Transmission: WC T5 w/ Steel Support Plate
Axle/Gears: 3.42 10 Bolt Posi
Re: LS7 Swap Into An '86 IROC Z28
I ordered that xforce muffler, and will let you know what it does. Much easier install since it is center to center inlet and outlet and roughly the same size as the current muffler. The inlet has a flange instead of a flared pipe fitting, but that's easily remedied. According to the company it should knock approx 12 dB off the exhaust level when fully closed. Should be similar fully open since it's basically the same muffler as what I have now with the valve open. We'll know soon enough.
Thread Starter
Member
Joined: Apr 2015
Posts: 118
Likes: 6
From: San Angelo, TX
Car: 1986 Camaro IROC Z28
Engine: LS7
Transmission: Built 4L80e w/GearVendors overdrive
Axle/Gears: 2.73
Re: LS7 Swap Into An '86 IROC Z28
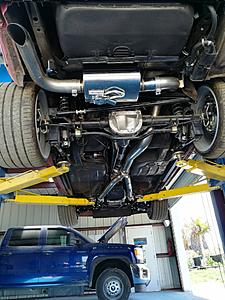
The problem is finding a place to put either cats or a resonator. With the 4L80e and Gear Vendors overdrive there is very little room under there until you get to the muffler. My driveshaft is only 27.563" long and there is only about .5" between the exhaust pipe and the side of the tunnel and driveshaft. The y-pipe is very tight to the frame and transmission/GV too. Putting a cat or resonator that is much wider than the exhaust is nearly impossible without reworking the entire exhaust system and winding up with unacceptably low ground clearance.
Thread Starter
Member
Joined: Apr 2015
Posts: 118
Likes: 6
From: San Angelo, TX
Car: 1986 Camaro IROC Z28
Engine: LS7
Transmission: Built 4L80e w/GearVendors overdrive
Axle/Gears: 2.73
Re: LS7 Swap Into An '86 IROC Z28
My son and I installed the Varex Xforce muffler today, and it quiets the car down pretty dramatically. Pretty easy install. Just had to remove the flange on the inlet and replace it with a 3.5" flared fitting, trim the outlet to length, and run the wires for the control box into the car and connect to power and ground.
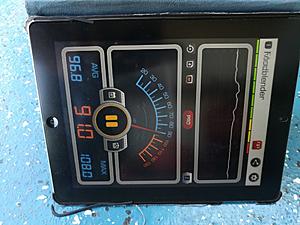
The Stainless Works muffler idles at about 100 db and at 2,000 rpm increases to 104 db. For reference using the same app on my iPad my stock 1989 GMC S-15 with a 4.3L engine idles at 86 db.
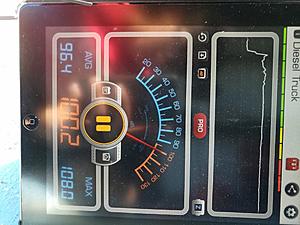
With the valve on the new muffler completely closed all the exhaust has to travel through the chambers. The passage for the diversion is only about 1.5" diameter giving you 1.767 sq in vs 9.621 sq in for the straight through muffler.
Assuming you need the entire open pipe at the 7,000 rpm redline, you're going to see some additional back pressure at about 1,300 rpm. Not sure that is the case though and I didn't really notice any change in engine performance even at 2,000 rpm. I'll have the car on a dyno soon to adjust the MAF table since my fuel trims usually run about 25%, so obviously it isn't setup for a 100 mm intake and keeps throwing codes about the lean condition, and can play with the muffler settings to see where having it closed starts to significantly impact power output.
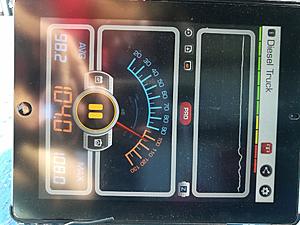
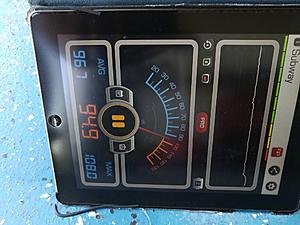
At idle with the valve closed it is only 91 db and at 2,000 rpm 94.9 db. Major improvement over the other muffler.
Open the valve to 25% with a press of a button on the key fob, and it get a little louder.
50%
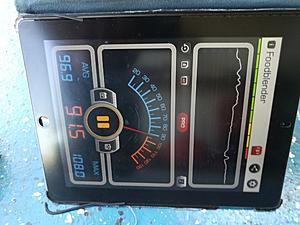
At 75% it is still much quieter at idle, but at 2,000 rpm it is basically the same as the Stainless Works muffler.
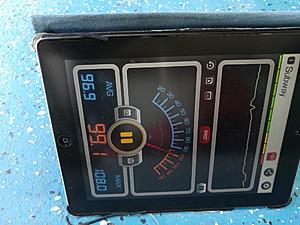
Completely open still much quieter at idle, but give it the gas and the throaty growl is back.


Overall pretty happy with it, and I can swap the SW muffler back on in a couple of minutes if I want to.

The Stainless Works muffler idles at about 100 db and at 2,000 rpm increases to 104 db. For reference using the same app on my iPad my stock 1989 GMC S-15 with a 4.3L engine idles at 86 db.


With the valve on the new muffler completely closed all the exhaust has to travel through the chambers. The passage for the diversion is only about 1.5" diameter giving you 1.767 sq in vs 9.621 sq in for the straight through muffler.
Assuming you need the entire open pipe at the 7,000 rpm redline, you're going to see some additional back pressure at about 1,300 rpm. Not sure that is the case though and I didn't really notice any change in engine performance even at 2,000 rpm. I'll have the car on a dyno soon to adjust the MAF table since my fuel trims usually run about 25%, so obviously it isn't setup for a 100 mm intake and keeps throwing codes about the lean condition, and can play with the muffler settings to see where having it closed starts to significantly impact power output.
At idle with the valve closed it is only 91 db and at 2,000 rpm 94.9 db. Major improvement over the other muffler.


Open the valve to 25% with a press of a button on the key fob, and it get a little louder.

50%
At 75% it is still much quieter at idle, but at 2,000 rpm it is basically the same as the Stainless Works muffler.

Completely open still much quieter at idle, but give it the gas and the throaty growl is back.


Overall pretty happy with it, and I can swap the SW muffler back on in a couple of minutes if I want to.
Thread Starter
Member
Joined: Apr 2015
Posts: 118
Likes: 6
From: San Angelo, TX
Car: 1986 Camaro IROC Z28
Engine: LS7
Transmission: Built 4L80e w/GearVendors overdrive
Axle/Gears: 2.73


Thread
Thread Starter
Forum
Replies
Last Post
mustangman65_79
Body
3
Aug 11, 2015 03:17 PM