
1989 Camaro - "The Project" Begins...


Supreme Member
Joined: Apr 2002
Posts: 3,552
Likes: 5
From: New Jersey
Car: 86 Corvette, 89 IROC, 1999 TA
Engine: 350, 350, LS1
Transmission: 700r4, 700r4, T-56
Axle/Gears: 3.07, 373, 4.10
Re: 1989 Camaro - "The Project" Begins...
Lookin really good! I think it would look even better if you had the front seats covered to match the backs. The blue just kinda looks out of place. The console cover doesn't really do it for me either, but to each his own. I wish my dashpad was that nice.. Now you need to clean up or replace the rubber on your pedals! 

Thread Starter
Joined: Oct 2006
Posts: 3,041
Likes: 8
From: West of Toronto
Car: 89 IROC
Engine: 305 TPI / ZZ4 cam
Transmission: Stage 2 700R4, LS1 driveshaft
Axle/Gears: Strange 3.42 w/ Auburn
Re: 1989 Camaro - "The Project" Begins...
Lookin really good! I think it would look even better if you had the front seats covered to match the backs. The blue just kinda looks out of place. The console cover doesn't really do it for me either, but to each his own. I wish my dashpad was that nice.. Now you need to clean up or replace the rubber on your pedals!
The dashpad is NOS as well
 I'll get new pedal rubber closer to the car getting on the road (or maybe some import style carbon fibre petals
  )
) 
Junior Member
Joined: Mar 2009
Posts: 48
Likes: 1
From: Texas
Car: 86 Camaro IROC-Z
Engine: 350
Transmission: 5-speed man
Re: 1989 Camaro - "The Project" Begins...
That is going to be really nice when you get it all completed. heck it looks great right now. What kind of seats are those? Mine are stock seats and really need new ones they just arnt very good. Also where do u get the dash at, the person who i got the car from moved some of the gauges to right above the climate control and just cut it out and looks bad because i plan on moving them from there.
Senior Member
iTrader: (1)
Joined: Jan 2009
Posts: 562
Likes: 0
From: Independence Mo
Car: 89 RS
Engine: 305 TBI (lo3)
Transmission: 700r4
Axle/Gears: Whatever is stock.
Re: 1989 Camaro - "The Project" Begins...
Your rear window tint falling out like mine? I just got mine done last week, & some wind blew a corner off the window. Does the heat gun make the tint not want to stick so good? I wonder if they put to much heat to my tint?
Thread Starter
Joined: Oct 2006
Posts: 3,041
Likes: 8
From: West of Toronto
Car: 89 IROC
Engine: 305 TPI / ZZ4 cam
Transmission: Stage 2 700R4, LS1 driveshaft
Axle/Gears: Strange 3.42 w/ Auburn
Re: 1989 Camaro - "The Project" Begins...
That is going to be really nice when you get it all completed. heck it looks great right now. What kind of seats are those? Mine are stock seats and really need new ones they just arnt very good. Also where do u get the dash at, the person who i got the car from moved some of the gauges to right above the climate control and just cut it out and looks bad because i plan on moving them from there.
 )
)The dash came from a Camaro parts dealer in Toronto (paradise alley). It's from an 88 IROC. I think I paid $125 CDN for it. It's in great shape. The dashpad is NOS (cost more than the dash
).A quick trick is to get a can of coke and put some coke on your finger and run it on the tint. As the coke dries it gets sticky (from the sugar), push the tint up onto the window and it will hold.
Senior Member
iTrader: (1)
Joined: Jan 2009
Posts: 562
Likes: 0
From: Independence Mo
Car: 89 RS
Engine: 305 TBI (lo3)
Transmission: 700r4
Axle/Gears: Whatever is stock.
Re: 1989 Camaro - "The Project" Begins...
The tint was done in 1994 when I bought the car. It held up pretty well (no bubbles).
A quick trick is to get a can of coke and put some coke on your finger and run it on the tint. As the coke dries it gets sticky (from the sugar), push the tint up onto the window and it will hold.[/quote]
I would try that for sure, but when the wind blew the tint off, it blew a lot of dirt right on the inside edge, where it was still sticky. Plus if for some reason if I did have to take it back to the shop they would trip.
A quick trick is to get a can of coke and put some coke on your finger and run it on the tint. As the coke dries it gets sticky (from the sugar), push the tint up onto the window and it will hold.
[/quote]I would try that for sure, but when the wind blew the tint off, it blew a lot of dirt right on the inside edge, where it was still sticky. Plus if for some reason if I did have to take it back to the shop they would trip.
Junior Member
Joined: Apr 2009
Posts: 83
Likes: 0
From: Thunder Bay, Ontario, Canada
Car: 1985 Camaro Z-28
Engine: LG4 305 c.i.d. (5.0L); 4 BBL.
Transmission: 700 R4 ; 4-spd. Auto. O.D.
Axle/Gears: 3:23 posi (CODE: GU5)
Re: 1989 Camaro - "The Project" Begins...
Nice build you got there... eh!.. (from Canada also). TINT THING: I noticed the same syndrome on my rear glass tint as well,...tint came off on the inner bends. So Coke you say?...really..I was just gonna spray it with warm soap water, card it and apply heat...
Thread Starter
Joined: Oct 2006
Posts: 3,041
Likes: 8
From: West of Toronto
Car: 89 IROC
Engine: 305 TPI / ZZ4 cam
Transmission: Stage 2 700R4, LS1 driveshaft
Axle/Gears: Strange 3.42 w/ Auburn
Re: 1989 Camaro - "The Project" Begins...
I haven't tried the coke thing yet. It was recommended to me by a fellow club member. In case it does not work...I have some tint spray remover ready to go
Dinmiller - Looks like the factory seat tracks won't work. I found a company that does custom seat track adapters. Gonna cost me $215 USD

Junior Member
Joined: Jan 2009
Posts: 48
Likes: 0
From: Porterville CA 559
Car: 1989 camaro Iroc-z
Engine: 5.7 Tpi
Transmission: 700-R4
Axle/Gears: dont know what this
Re: 1989 Camaro - "The Project" Begins...
Out comes the dash. We also took the opportunity to swap out the heater core and clean up the wiring (remove old electrical tape and retape the factory wires together) as well as a GOOD clean.
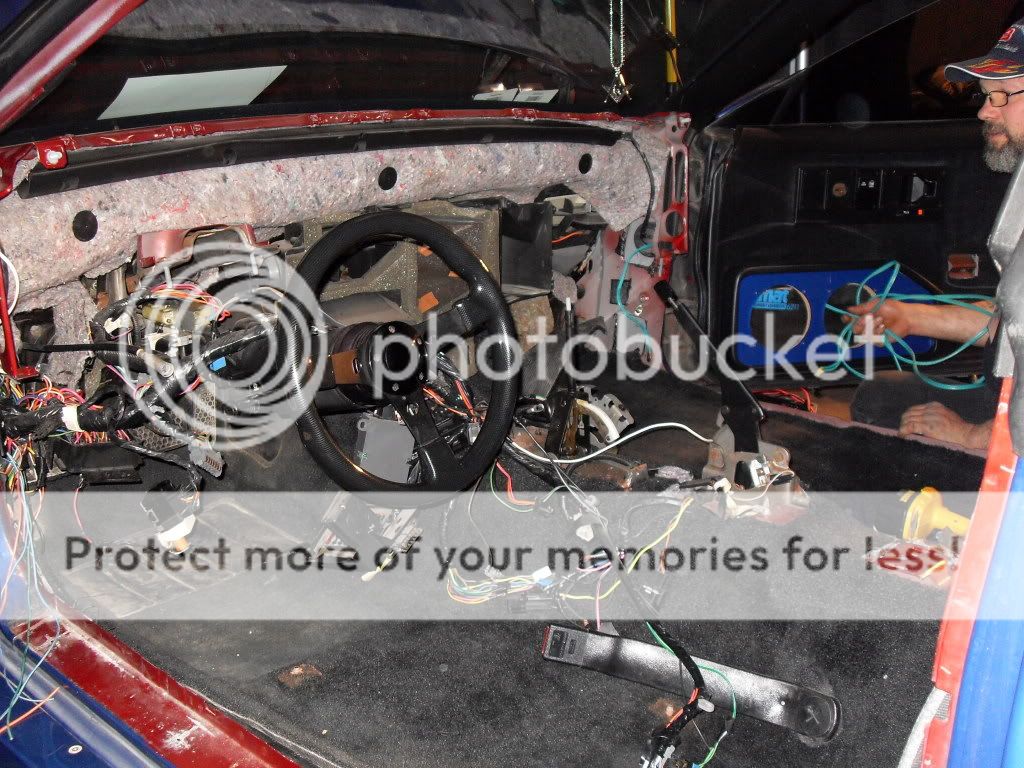
New dash is in. All the parts (upper console, shifter plate, power window and hatch stitches, bezel, console lid) are NOS (brand new). We also changed the delay wiper arm and hazard button with new ones. :shock:

New white gauges. I used some Mothers Plastic Polish to clean the clear gauge face and bring it back to new.
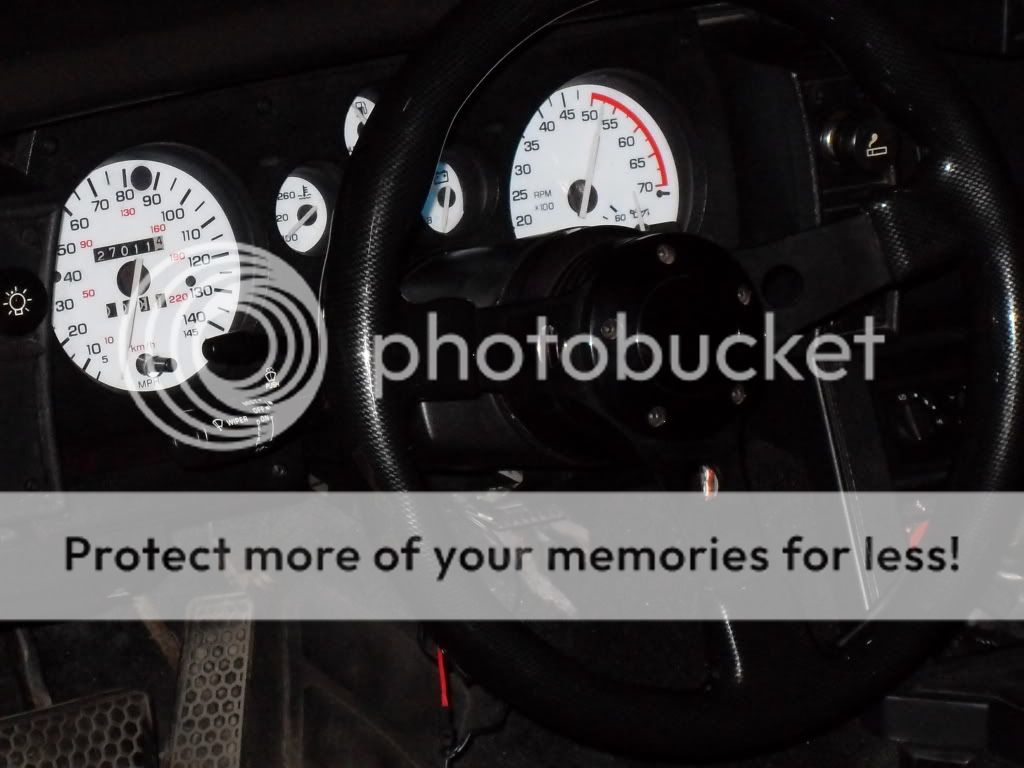
Powered up 8)

Will post more pics when we finish the interior today.
Would like to thank Dave (the white bandit) for helping with the Dynamat (it was very much appreciated) and Chris (Sunny) with the teardown. Also would like to thank Ross for helping the the heater core, wiring issues and electrical.
So far it is becoming a CCFBG team effort
New dash is in. All the parts (upper console, shifter plate, power window and hatch stitches, bezel, console lid) are NOS (brand new). We also changed the delay wiper arm and hazard button with new ones. :shock:
New white gauges. I used some Mothers Plastic Polish to clean the clear gauge face and bring it back to new.
Powered up 8)
Will post more pics when we finish the interior today.
Would like to thank Dave (the white bandit) for helping with the Dynamat (it was very much appreciated) and Chris (Sunny) with the teardown. Also would like to thank Ross for helping the the heater core, wiring issues and electrical.
So far it is becoming a CCFBG team effort

Thread Starter
Joined: Oct 2006
Posts: 3,041
Likes: 8
From: West of Toronto
Car: 89 IROC
Engine: 305 TPI / ZZ4 cam
Transmission: Stage 2 700R4, LS1 driveshaft
Axle/Gears: Strange 3.42 w/ Auburn
Re: 1989 Camaro - "The Project" Begins...
Decided to clean up and paint my new sway bars today.
I picked up a 36mm hollow front sway bar on ebay a while back. It cost me more to ship it than to buy :cry: I also got a 22mm rear bar from Jaygt for free...gotta love that word.
Anyway...the bars were a bit dirty so I packed them up and took them to the coin car wash. Hit the bars with some general degreaser/cleaner and $3.00 worth of powerwash. 8)
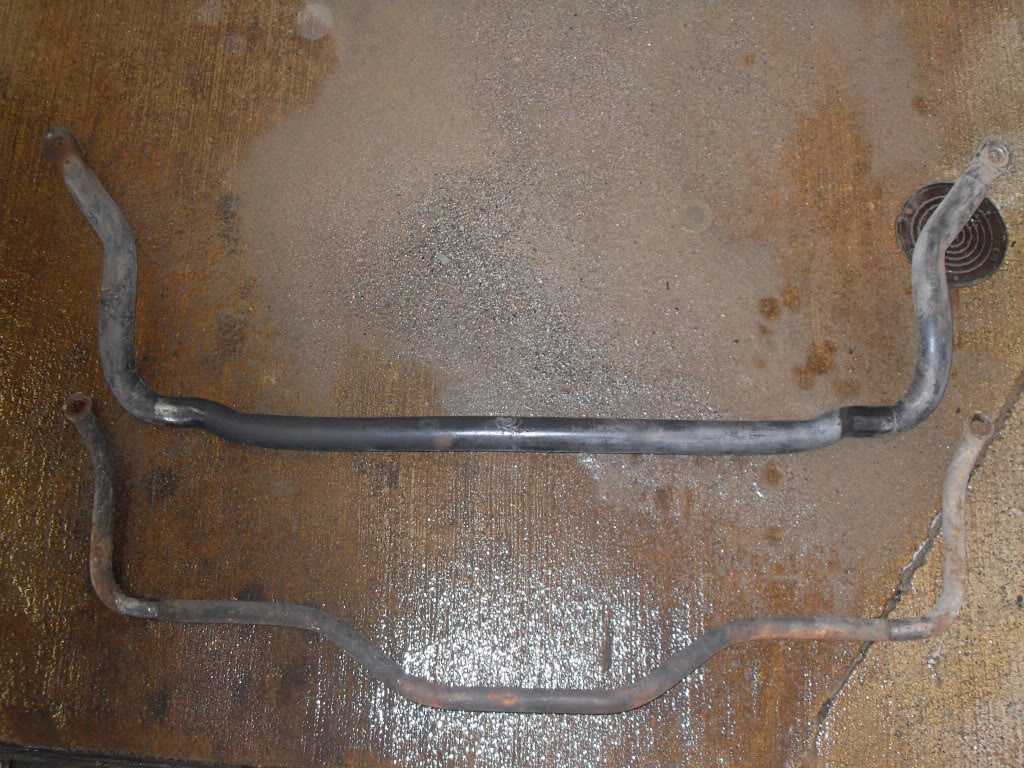
When I got them home I sprayed them with some Bright Red engine enamel spray paint I got for cheap ($5 each) at Waterdown Swap Meet in the spring.
They both turned out great. Can't wait to get them next spring. :twisted:

I picked up a 36mm hollow front sway bar on ebay a while back. It cost me more to ship it than to buy :cry: I also got a 22mm rear bar from Jaygt for free...gotta love that word.
Anyway...the bars were a bit dirty so I packed them up and took them to the coin car wash. Hit the bars with some general degreaser/cleaner and $3.00 worth of powerwash. 8)
When I got them home I sprayed them with some Bright Red engine enamel spray paint I got for cheap ($5 each) at Waterdown Swap Meet in the spring.
They both turned out great. Can't wait to get them next spring. :twisted:
Thread Starter
Joined: Oct 2006
Posts: 3,041
Likes: 8
From: West of Toronto
Car: 89 IROC
Engine: 305 TPI / ZZ4 cam
Transmission: Stage 2 700R4, LS1 driveshaft
Axle/Gears: Strange 3.42 w/ Auburn
Re: 1989 Camaro - "The Project" Begins...
Sorry for the delay.......
I got the dashpad from ebay. It is a NOS (new) piece a cost me a fair bit
. A dashcover is a cloth cover that sits on top of the vinyl dash pad to protect the vinyl from the sun (and cracking). They usually sell for $20 to $40.Hope that answers your question.

Junior Member
Joined: Aug 2009
Posts: 5
Likes: 0
Car: 1990 IROC Z-28 Convertible #563
Re: 1989 Camaro - "The Project" Begins...
Hi I really like the "Camaro" decal insert you got for the back break light.. I've been looking everywhere for it, where did you buy it from?
Senior Member
iTrader: (2)
Joined: Dec 2008
Posts: 990
Likes: 1
From: Peoria, IL
Car: 1988 Camaro Sport Coupe
Engine: 5.0 305 Carb'd
Transmission: 700R4
Axle/Gears: 3.23
Re: 1989 Camaro - "The Project" Begins...
the brake light sticker is on ebay. bout 10 bucks is all it is.
Thread Starter
Joined: Oct 2006
Posts: 3,041
Likes: 8
From: West of Toronto
Car: 89 IROC
Engine: 305 TPI / ZZ4 cam
Transmission: Stage 2 700R4, LS1 driveshaft
Axle/Gears: Strange 3.42 w/ Auburn
Re: 1989 Camaro - "The Project" Begins...
I picked the brake light decal from www.custombrakelights.com
about $10. I took my brake light out and cleaned it with some flitz (Mothers power plastic would work also) and a Mothers powerball to remove any oxidation buildup on the lens. Decal goes on it about 5 mintes (remember to clean the lens first!). The decal has holes precut to go over the lens screws.
http://custombrakelights.com/catalog...hp?cPath=27_79
Thread Starter
Joined: Oct 2006
Posts: 3,041
Likes: 8
From: West of Toronto
Car: 89 IROC
Engine: 305 TPI / ZZ4 cam
Transmission: Stage 2 700R4, LS1 driveshaft
Axle/Gears: Strange 3.42 w/ Auburn
Re: 1989 Camaro - "The Project" Begins...

Thread Starter
Joined: Oct 2006
Posts: 3,041
Likes: 8
From: West of Toronto
Car: 89 IROC
Engine: 305 TPI / ZZ4 cam
Transmission: Stage 2 700R4, LS1 driveshaft
Axle/Gears: Strange 3.42 w/ Auburn

Thread Starter
Joined: Oct 2006
Posts: 3,041
Likes: 8
From: West of Toronto
Car: 89 IROC
Engine: 305 TPI / ZZ4 cam
Transmission: Stage 2 700R4, LS1 driveshaft
Axle/Gears: Strange 3.42 w/ Auburn
Re: 1989 Camaro - "The Project" Begins...
Decided it was time to repaint the hood louvers.
I bought some 400 grit sandpaper to remove the oxidization and a can of SEM trim black spray paint.
Old louver on the top (with all the oxidization), while the one on the bottom has been prep sanded with 400 grit sandpaper.
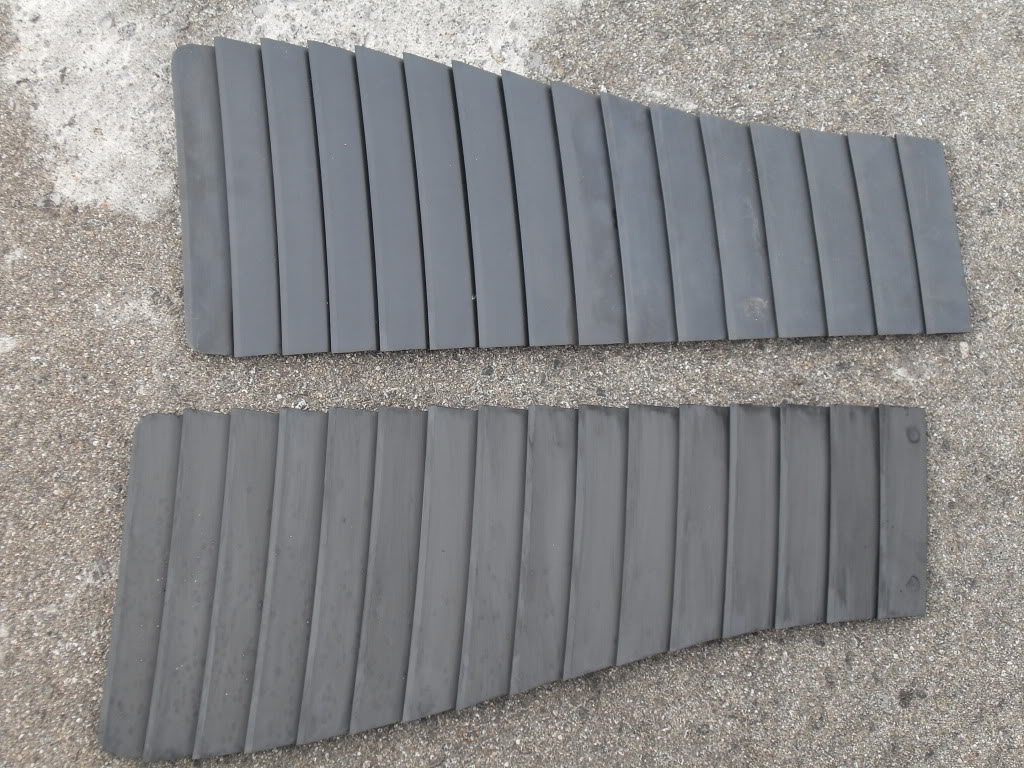
I made sure I sanded the edges and the underneath of the louvers so the paint would adhere properly. After I sanded each louver I washed them with some Mothers car wash and thoroughly rinsed them off and let stand to dry.
Paint wise, each louver was sprayed three times - top-to-bottom, bottom-to-top and top-to-bottom again. This way the underside of the louver receives the proper amount of paint.
The outcome.....pretty darn nice. Very happy with the result.
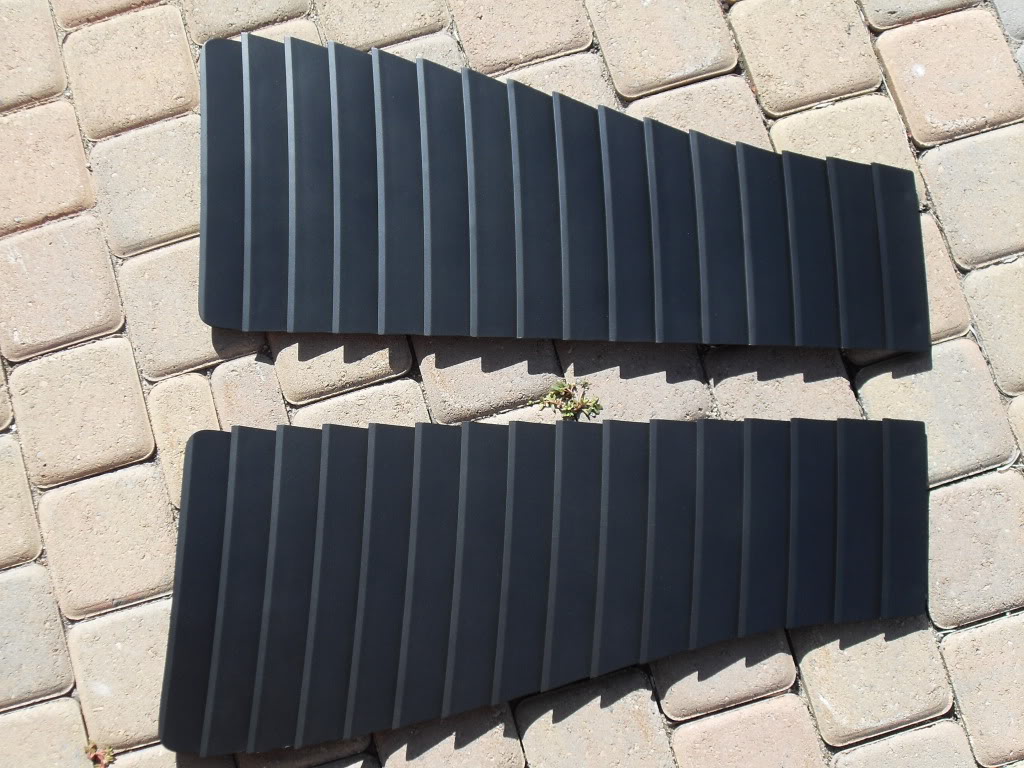
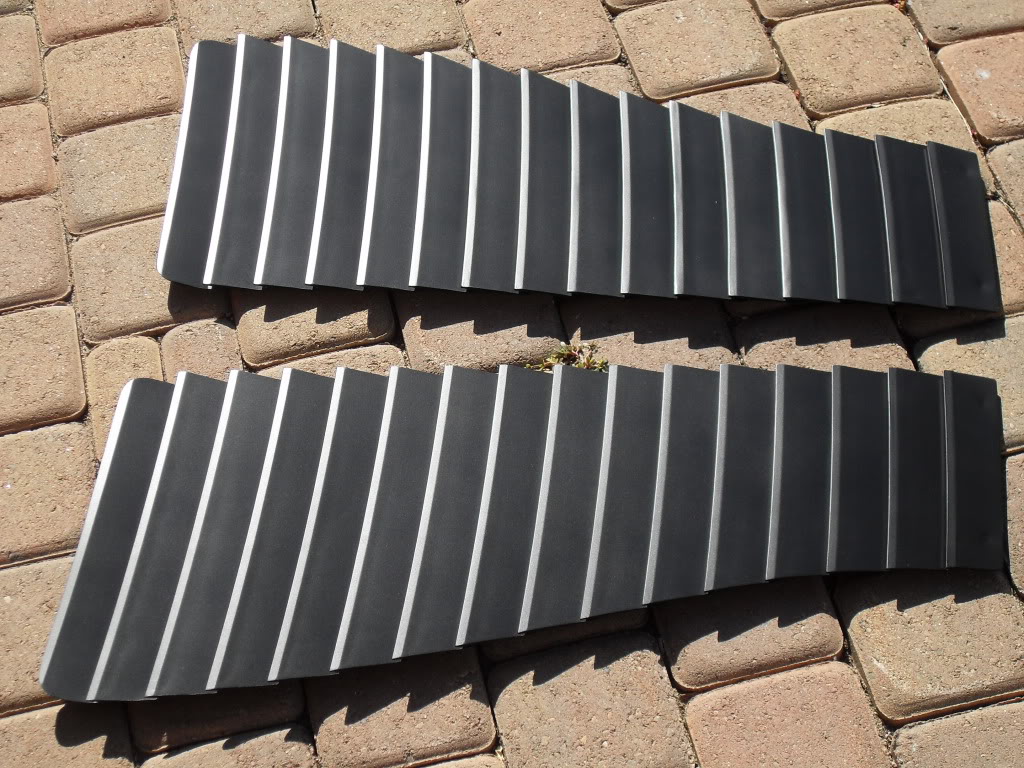
SEM Trim Black (satin finish) $15.00

I bought some 400 grit sandpaper to remove the oxidization and a can of SEM trim black spray paint.
Old louver on the top (with all the oxidization), while the one on the bottom has been prep sanded with 400 grit sandpaper.
I made sure I sanded the edges and the underneath of the louvers so the paint would adhere properly. After I sanded each louver I washed them with some Mothers car wash and thoroughly rinsed them off and let stand to dry.
Paint wise, each louver was sprayed three times - top-to-bottom, bottom-to-top and top-to-bottom again. This way the underside of the louver receives the proper amount of paint.
The outcome.....pretty darn nice.
Very happy with the result.SEM Trim Black (satin finish) $15.00
Thread Starter
Joined: Oct 2006
Posts: 3,041
Likes: 8
From: West of Toronto
Car: 89 IROC
Engine: 305 TPI / ZZ4 cam
Transmission: Stage 2 700R4, LS1 driveshaft
Axle/Gears: Strange 3.42 w/ Auburn
Re: 1989 Camaro - "The Project" Begins...
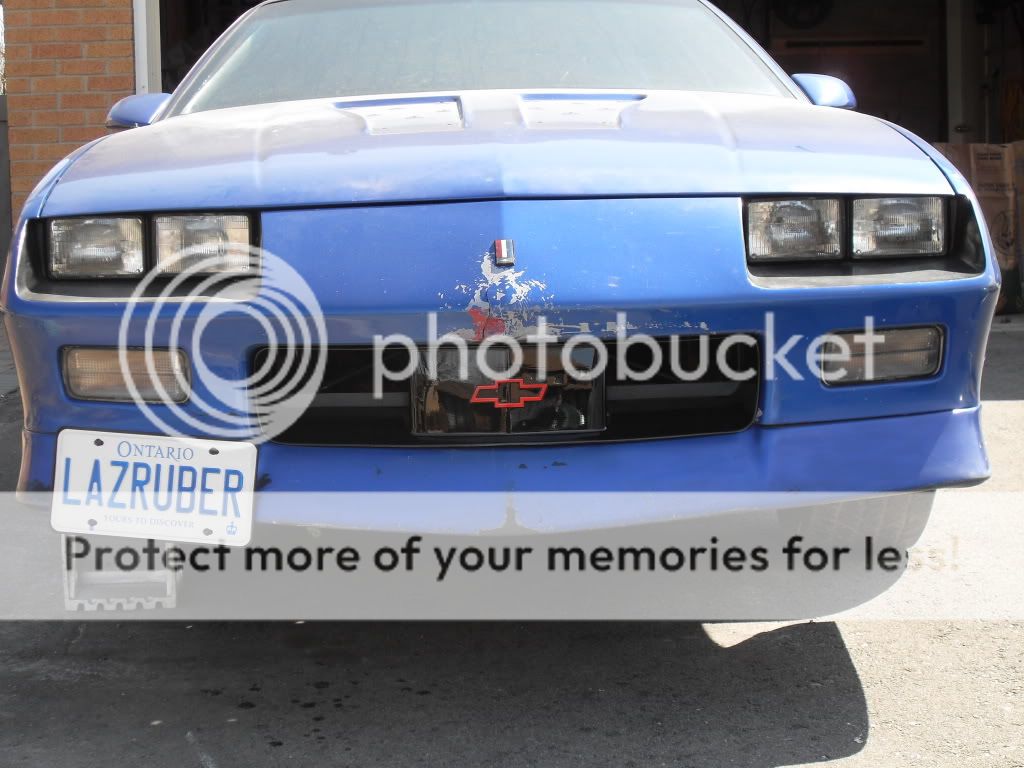
Well I decided it was time to give the front a face lift and make the engine bay nice and pretty.
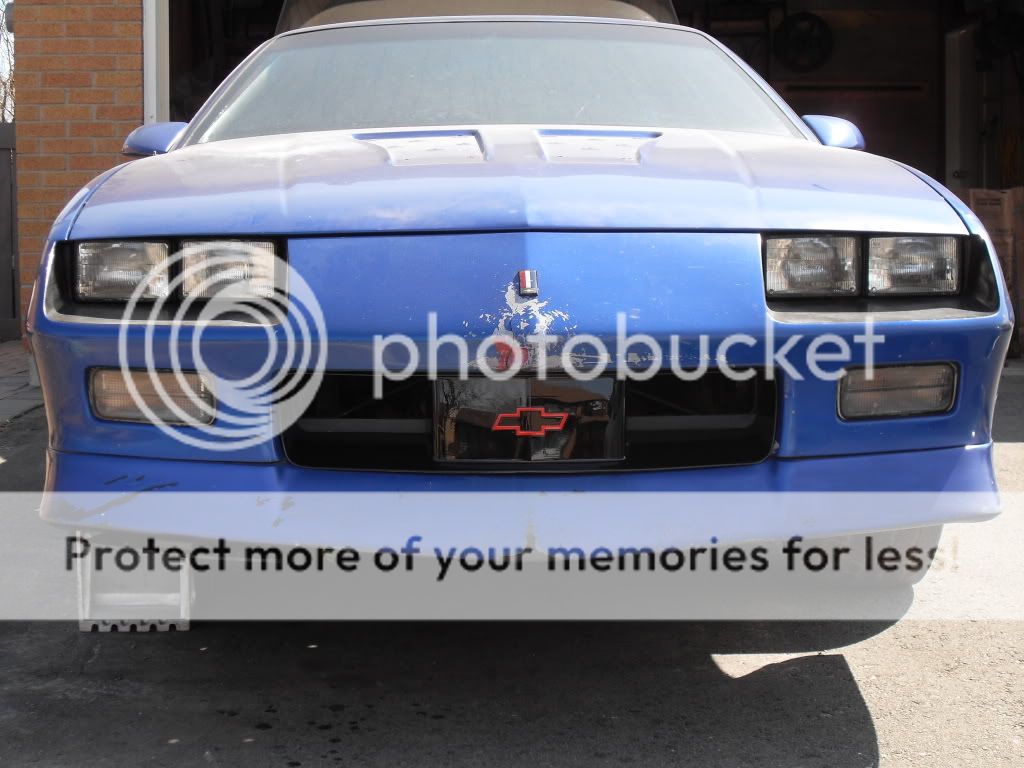
The old front end had a big crack in it...thanks to a hit and run. Decided it was better to install another cover than to repair the old one. I had the area for the emblem filled in for a smoother look
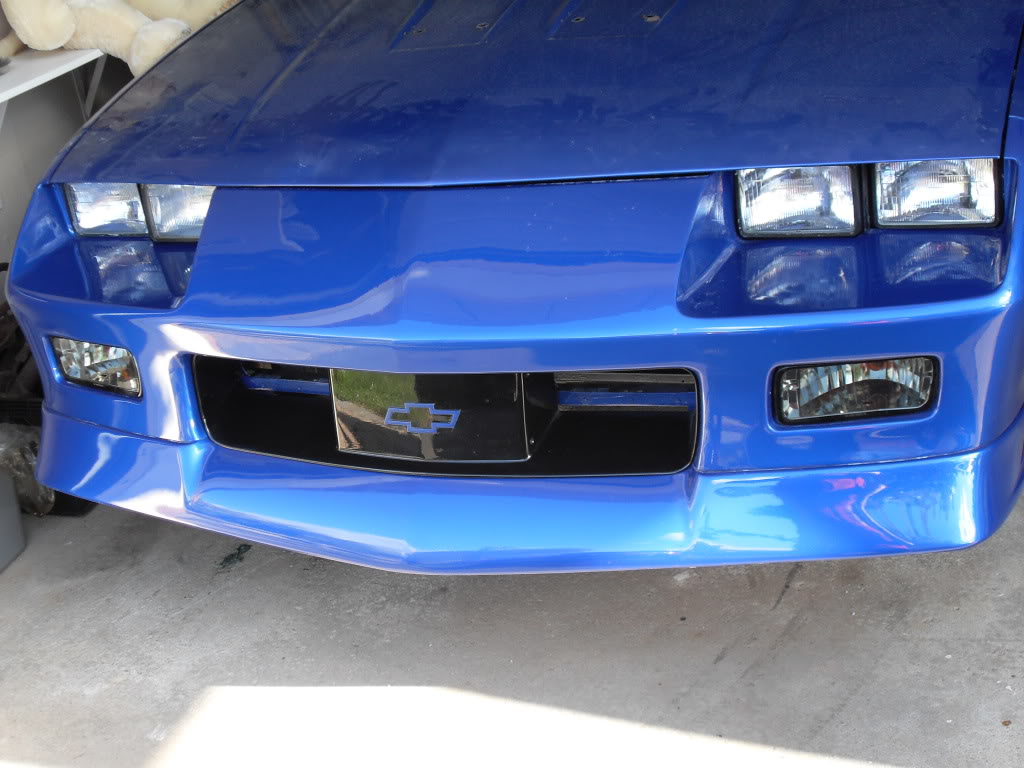
Added a NOS grille and clear marker lights but decide not to paint the headlight buckets this time.
Old front end

Donor cover
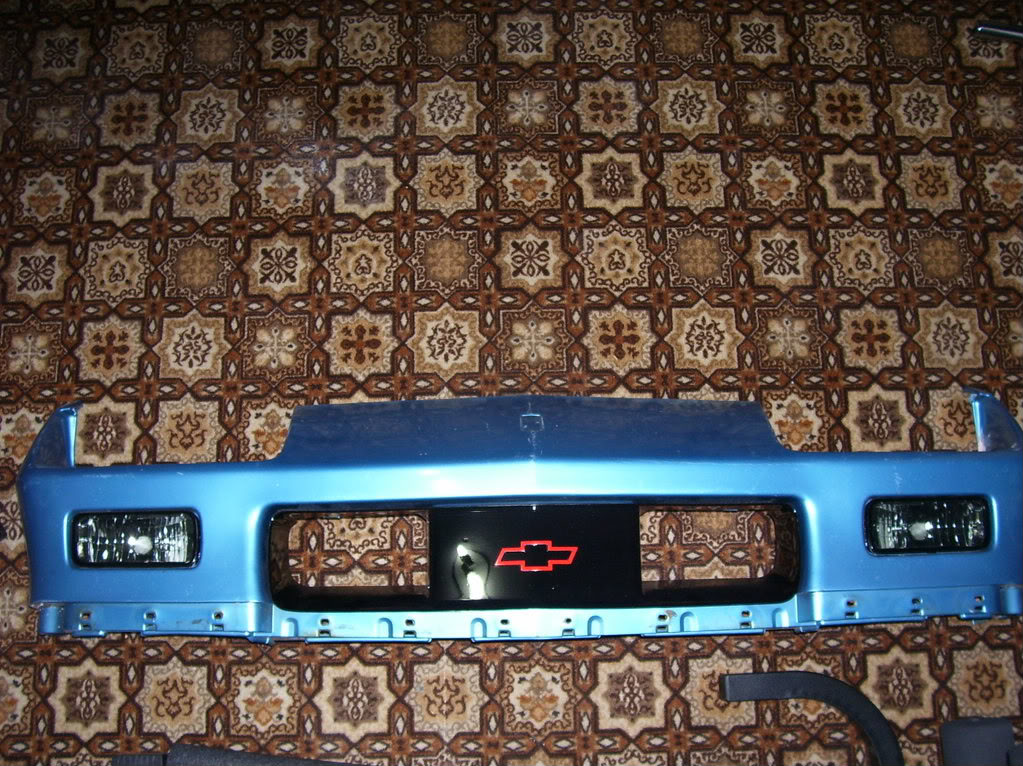
Fresh new look
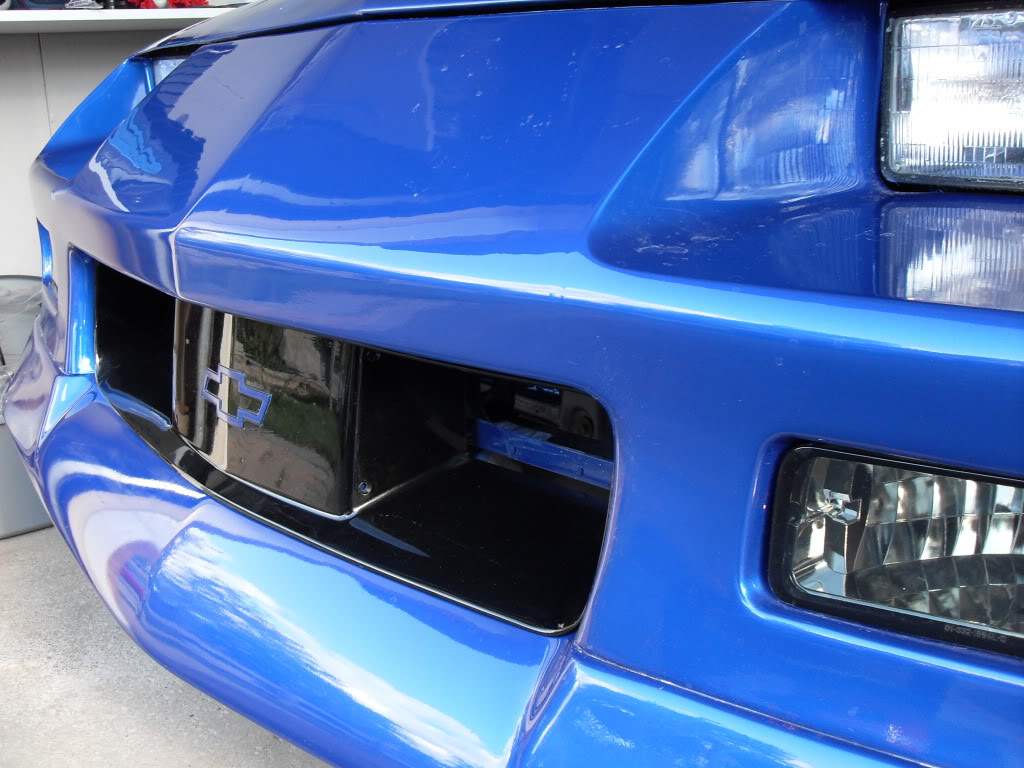
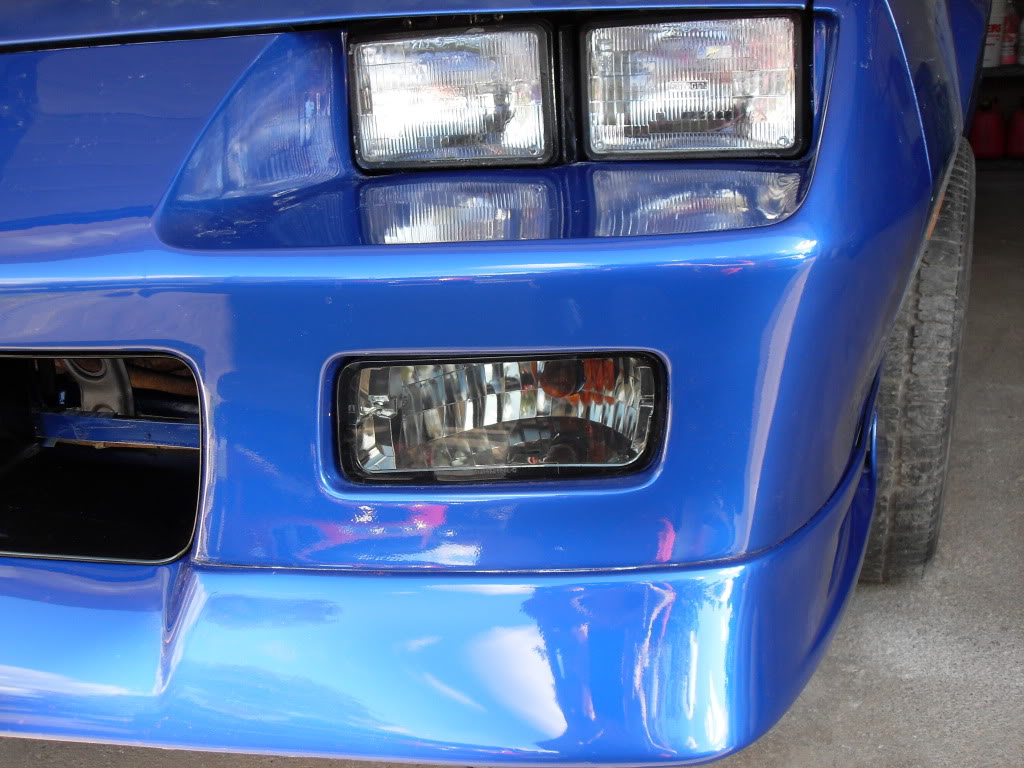
The old front end had a big crack in it...thanks to a hit and run. Decided it was better to install another cover than to repair the old one. I had the area for the emblem filled in for a smoother look
Added a NOS grille and clear marker lights but decide not to paint the headlight buckets this time.
Old front end
Donor cover
Fresh new look
Thread Starter
Joined: Oct 2006
Posts: 3,041
Likes: 8
From: West of Toronto
Car: 89 IROC
Engine: 305 TPI / ZZ4 cam
Transmission: Stage 2 700R4, LS1 driveshaft
Axle/Gears: Strange 3.42 w/ Auburn
Re: 1989 Camaro - "The Project" Begins...
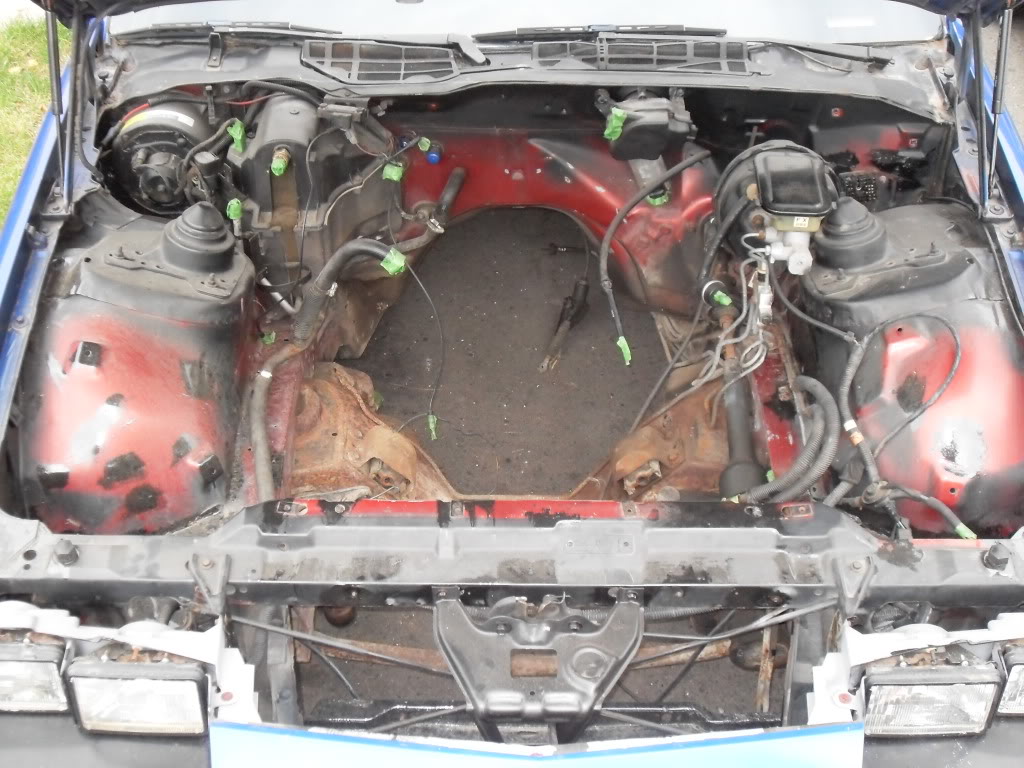
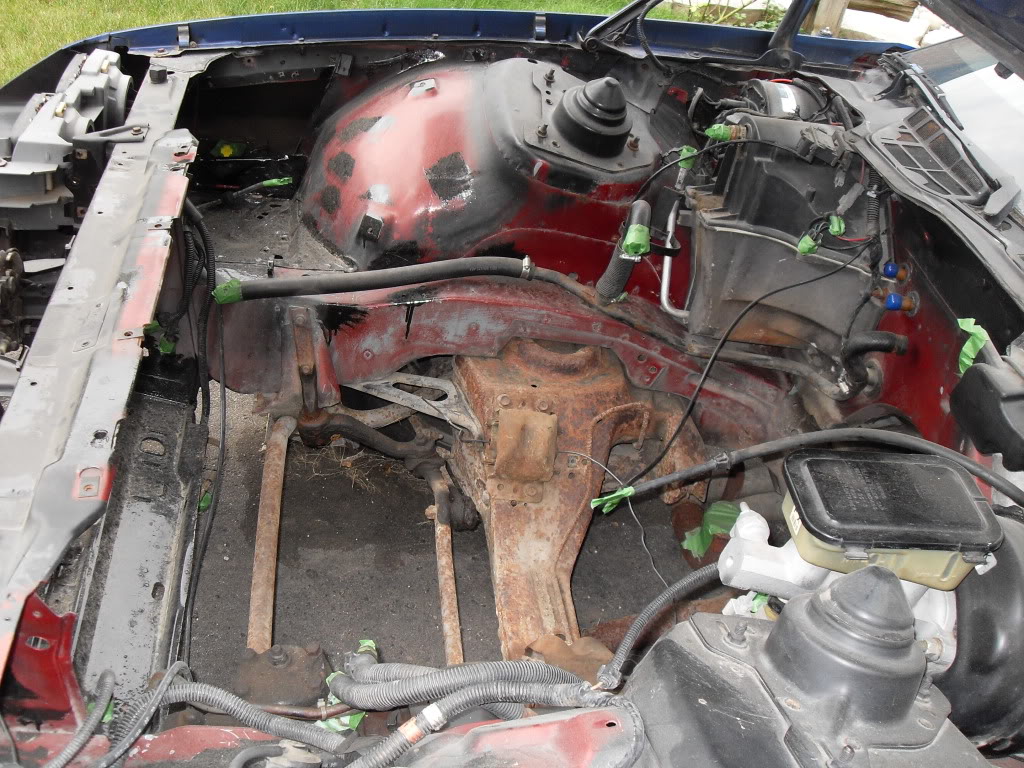
The old engine bay was a mess of colour. Figured it was time to paint the engine bay to match the outside for that OEM look.
Old engine bay...with a few dabs or POR15
Fresh paint
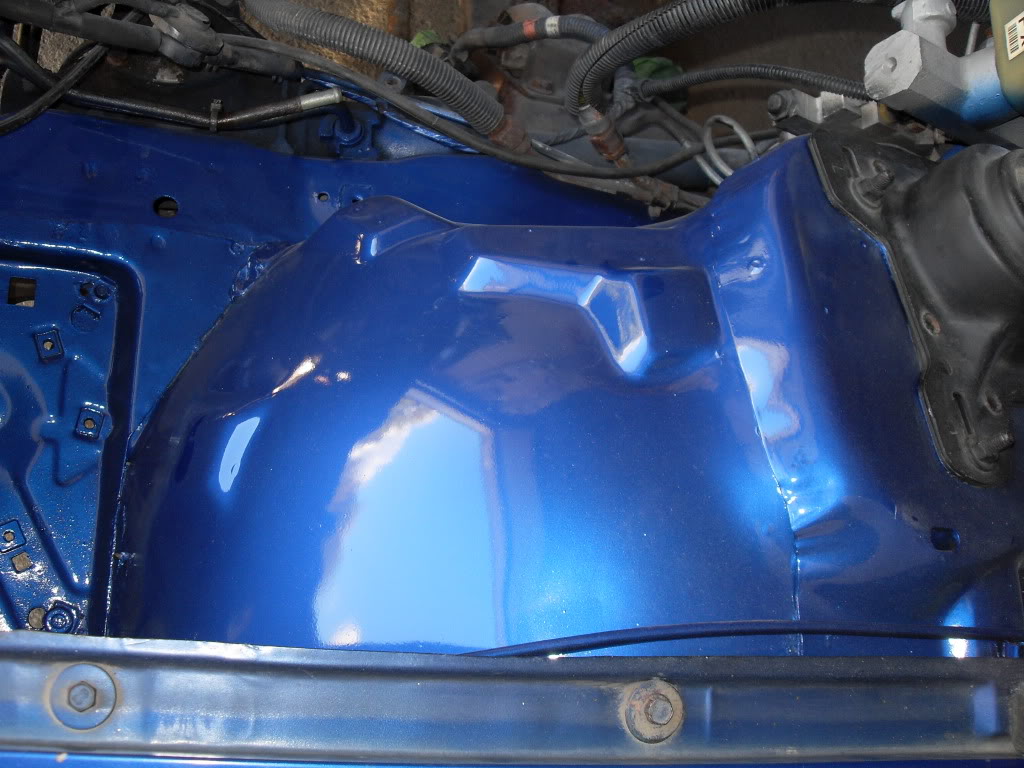
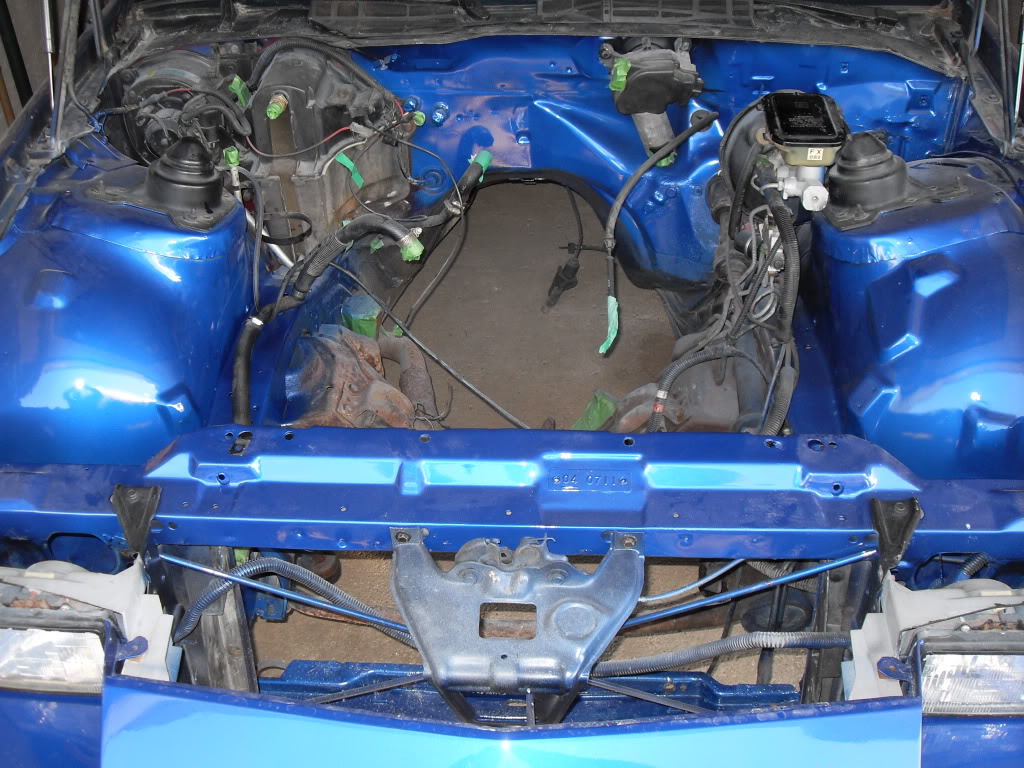
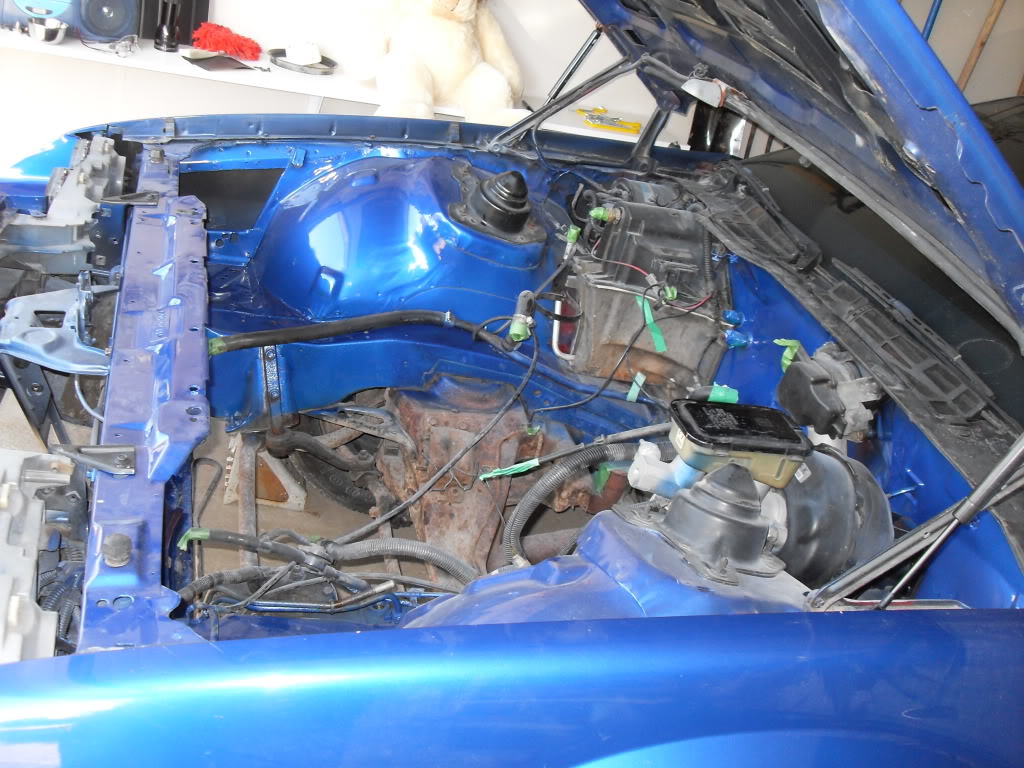
All in all, I'm pretty happy with the result. The engine bay was painted witha base clear for a little extra shine.
Old engine bay...with a few dabs or POR15
Fresh paint
All in all, I'm pretty happy with the result. The engine bay was painted witha base clear for a little extra shine.

Junior Member
Joined: Sep 2009
Posts: 22
Likes: 0
From: MO
Car: 1992 RS CAMARO 25TH ANNIVERSARY
Engine: 305 TBI
Transmission: 700R4
Re: 1989 Camaro - "The Project" Begins...
its in missouri. im from there sweet.wait i know a guy that does this stuff he is right down the road.he said a 100 bucks he will redo my interior
Member

Joined: Jun 2006
Posts: 451
Likes: 1
From: Toronto Ontario
Car: 1988 Iroc-Z 28 Camaro
Engine: LSX
Transmission: MN12
Axle/Gears: 3.42
Re: 1989 Camaro - "The Project" Begins...
wow looks great Bill, its coming together nicely, cant wait to see the motor in there 
Thread Starter
Joined: Oct 2006
Posts: 3,041
Likes: 8
From: West of Toronto
Car: 89 IROC
Engine: 305 TPI / ZZ4 cam
Transmission: Stage 2 700R4, LS1 driveshaft
Axle/Gears: Strange 3.42 w/ Auburn
Re: 1989 Camaro - "The Project" Begins...
Thanks guys....it feels good to get her painted and back in the garage for the winter.
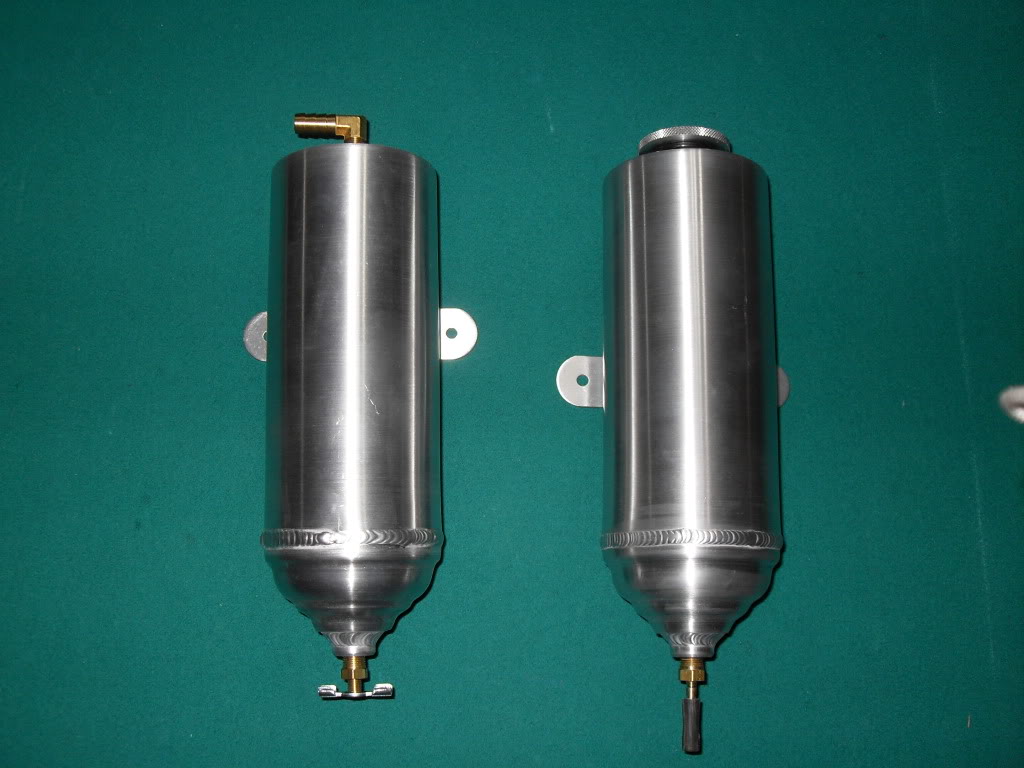
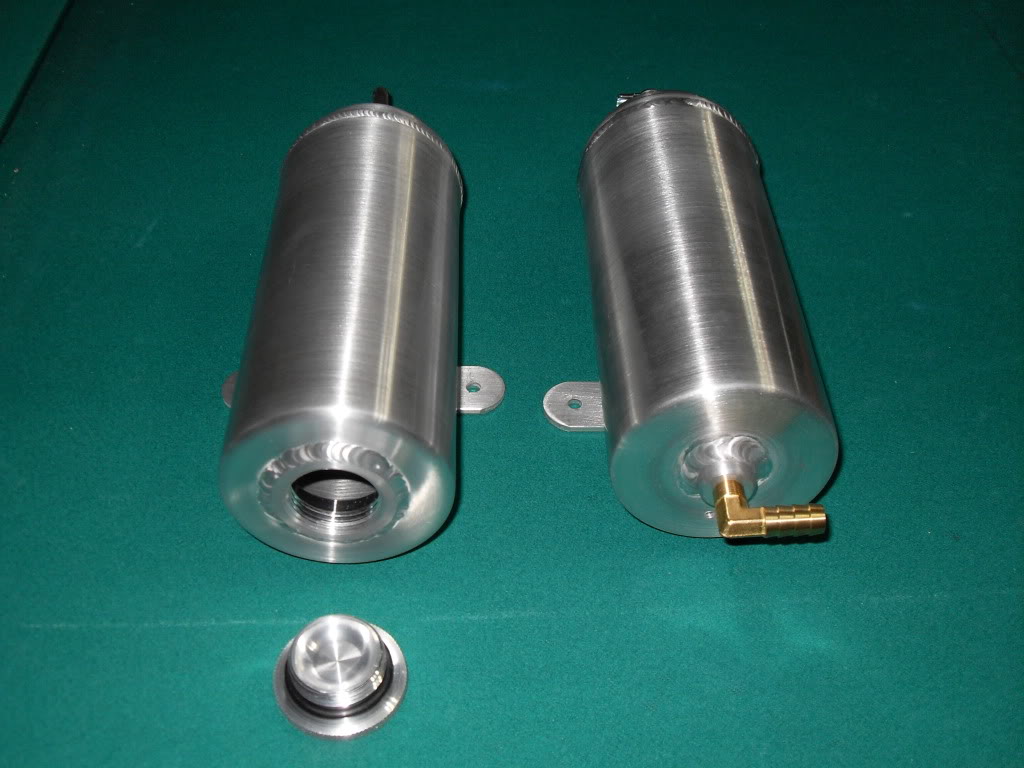
Thank you sir......now I have to get back to buying engine parts. First on my list is some aluminium catch cans for the rad overflow and wiper fluid. Gonna visit Universal Spinners and see what they have.
Thread Starter
Joined: Oct 2006
Posts: 3,041
Likes: 8
From: West of Toronto
Car: 89 IROC
Engine: 305 TPI / ZZ4 cam
Transmission: Stage 2 700R4, LS1 driveshaft
Axle/Gears: Strange 3.42 w/ Auburn
Re: 1989 Camaro - "The Project" Begins...
Since I welded the holes in the engine bay for the orginal plastic containers, I thought I would get some nice custom aluminum ones from Universal Spinners. They are 3" wide by 9" long. Light and strong. The wiper fluid can has a 1 1/2" Moroso top and cap on it to make pouring the fluid a little easier.
Here are a few shots......
Here are a few shots......

Thread Starter
Joined: Oct 2006
Posts: 3,041
Likes: 8
From: West of Toronto
Car: 89 IROC
Engine: 305 TPI / ZZ4 cam
Transmission: Stage 2 700R4, LS1 driveshaft
Axle/Gears: Strange 3.42 w/ Auburn
Re: 1989 Camaro - "The Project" Begins...
Time for an update.......
I've been collecting parts for the engine swap and getting things ready for the spring.
Decided to move the battery to the trunk area (where the spare battery used to go ). Picked up a battery relocation bracket/tray from BMR in nice glossy red.
I will also do the "Big 3" upgrade in 0 gauge replacing the small factory wiring. Also upgrading the starter wire to 0 gauge so the starter gets enough juice.
Equipment needed for the Big 3.....50' of 0 gauge wiring, 0 gauge ring terminals (for starter, alternator and block to chassis ground), Stinger 0 gauge ground terminal and two Stinger battery terminals.

I've been collecting parts for the engine swap and getting things ready for the spring.
Decided to move the battery to the trunk area (where the spare battery used to go
). Picked up a battery relocation bracket/tray from BMR in nice glossy red. I will also do the "Big 3" upgrade in 0 gauge replacing the small factory wiring. Also upgrading the starter wire to 0 gauge so the starter gets enough juice.
Equipment needed for the Big 3.....50' of 0 gauge wiring, 0 gauge ring terminals (for starter, alternator and block to chassis ground), Stinger 0 gauge ground terminal and two Stinger battery terminals.

Re: 1989 Camaro - "The Project" Begins...
Very nice, I like the engine compartment, Im assuming you didnt strip out any of the stuff that was in it before you painted it. Im in the process of doing this, but Im eliminating the A/C and as much stuff under the hood as I can.
Thread Starter
Joined: Oct 2006
Posts: 3,041
Likes: 8
From: West of Toronto
Car: 89 IROC
Engine: 305 TPI / ZZ4 cam
Transmission: Stage 2 700R4, LS1 driveshaft
Axle/Gears: Strange 3.42 w/ Auburn
Re: 1989 Camaro - "The Project" Begins...
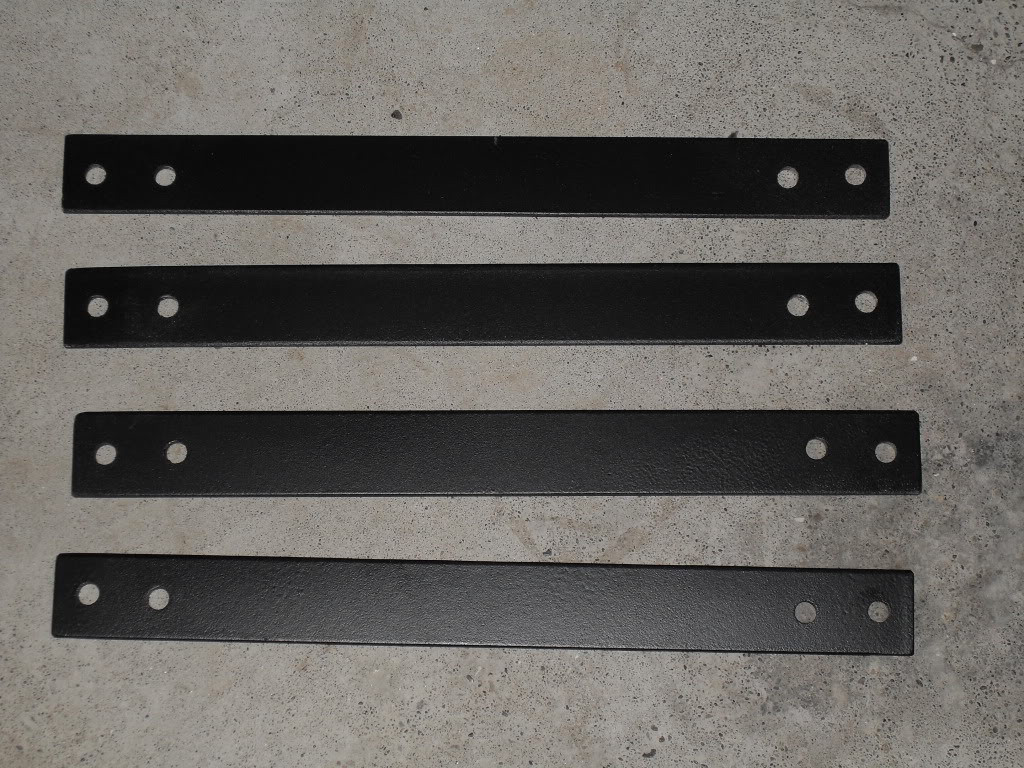
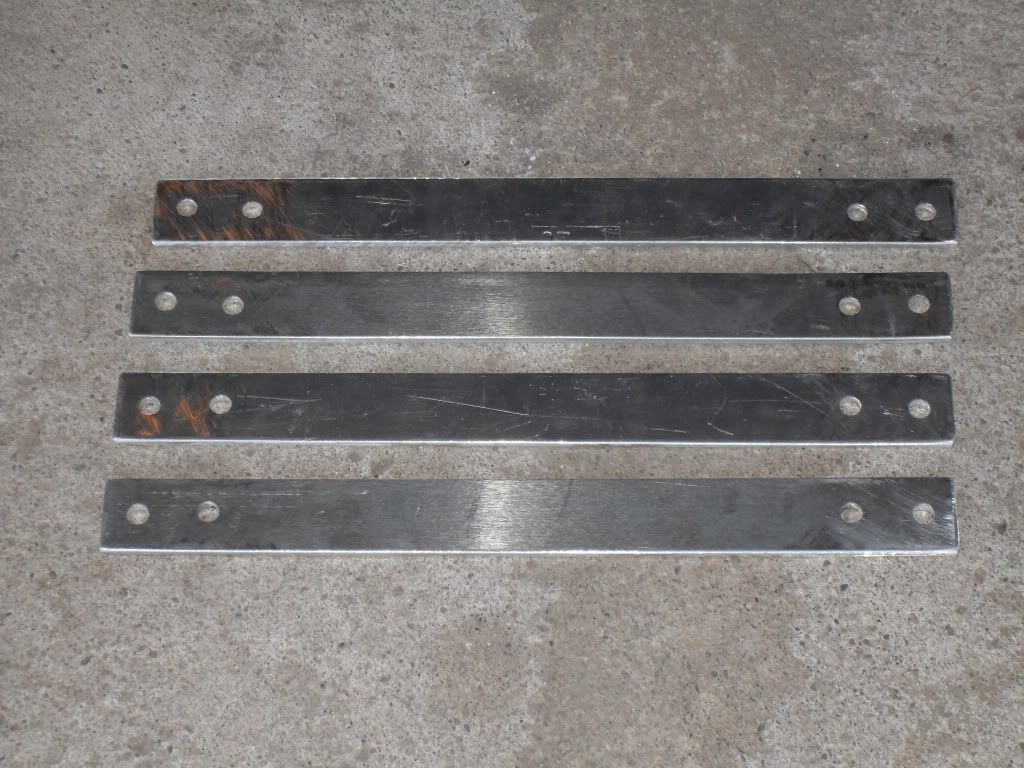
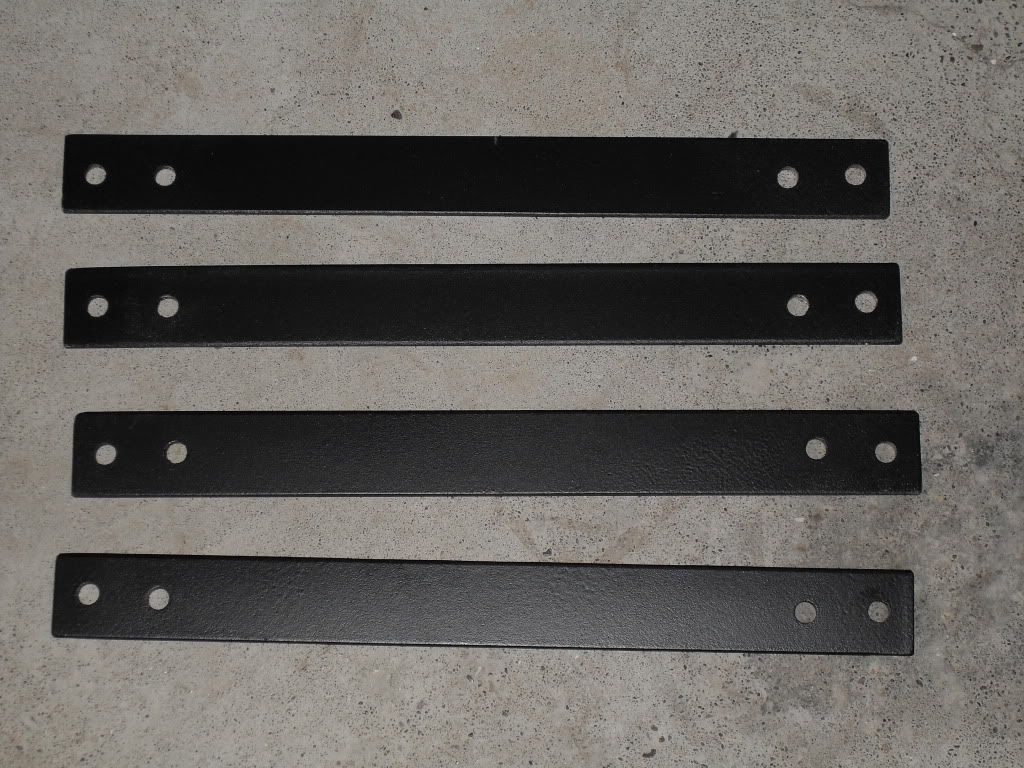
Had a few days off and decided it was time to get the new seats installed. Made a quick call to a friend and had some adapters made up. They are 1/4" aluminum plate 1 1/2" wide and 15" long (thanks again James).
Took a quick drive to the "centre of the universe" to get Mr. Bastard to drill a few holes in the plates to mount them up to the seats and factory sliders. Holes for the seats are 11 1/2" (on centre) and sliders holes are 14" (on centre).
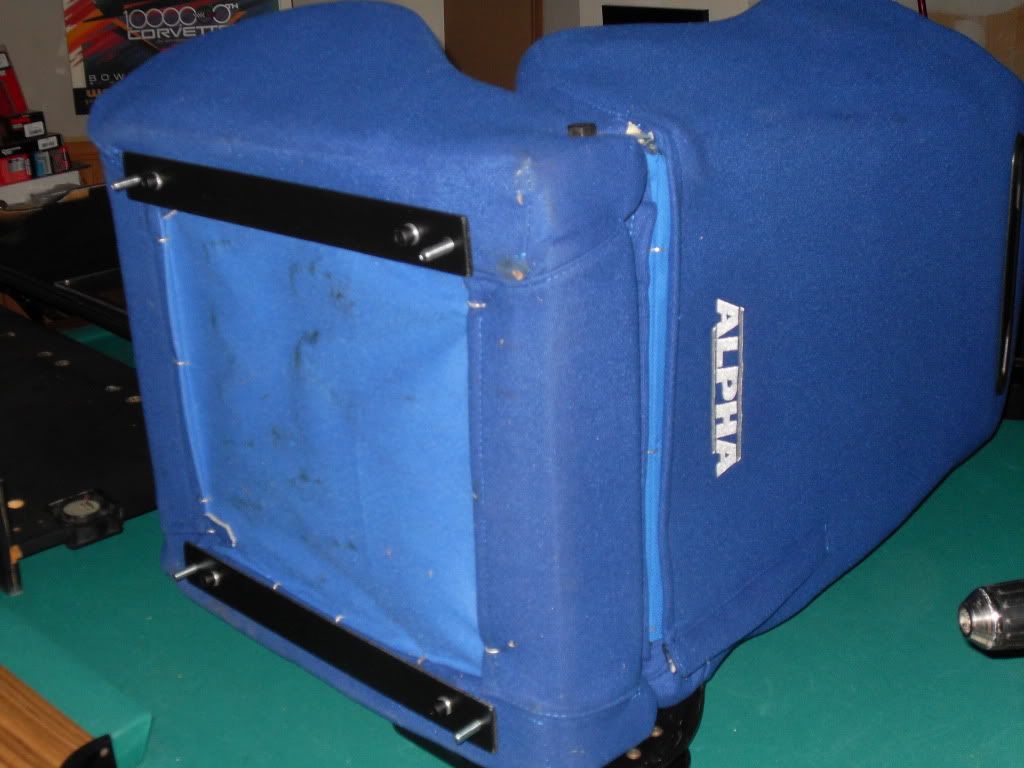
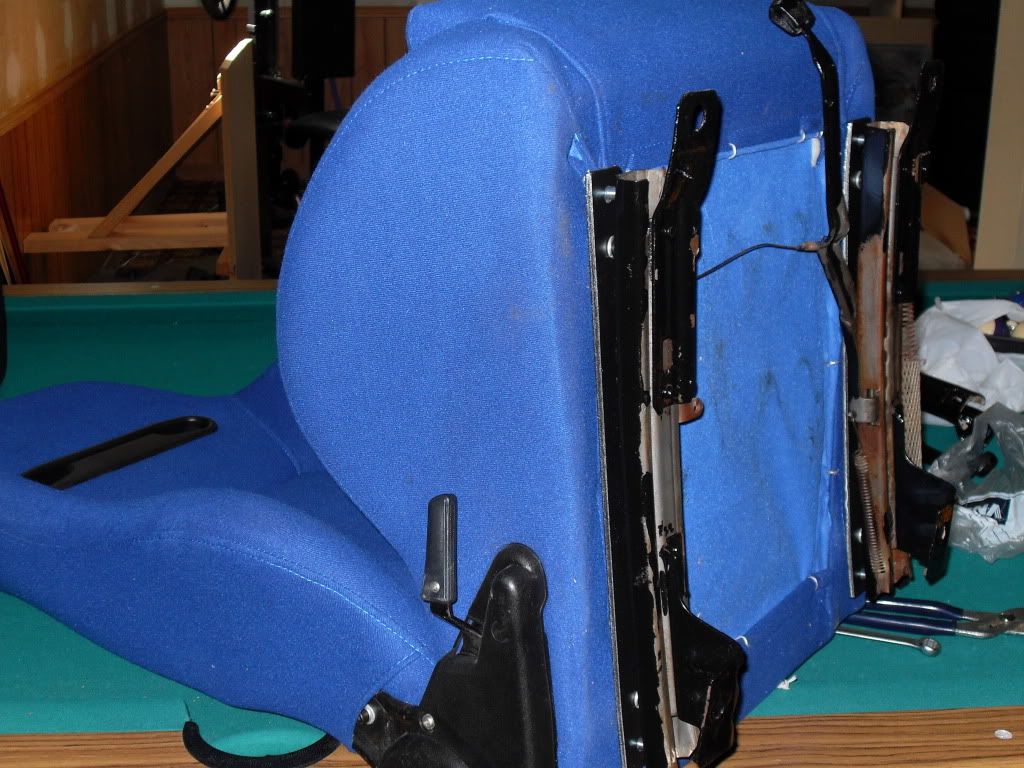
When I got them back I sprayed them with some black bed liner coating. I used the original bolts to mount the bracket to the seat. Picked up some 5/16" x 1" bolts to mount the bracket to the factory sliders and tighten everything up. I also cleaned up the sliders and applied some POR-15 I had left over.
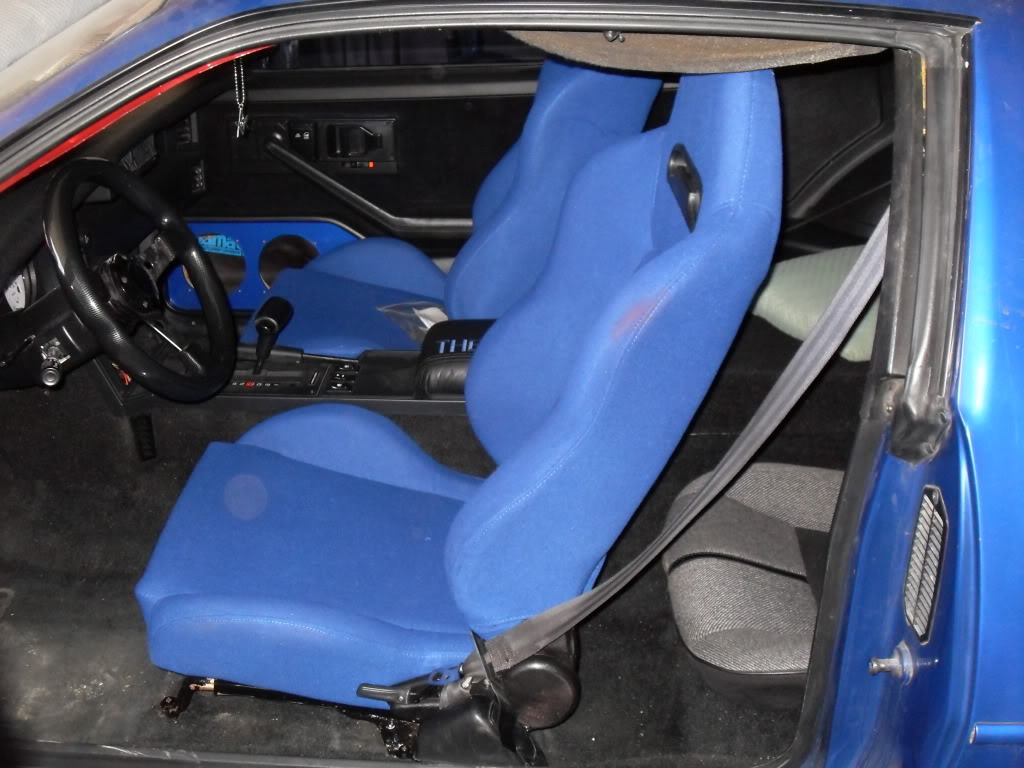
Got them mounted in the car and gave them a try. Everything works great. Seats sit a little higher than stock but they are super comfortable and suportive.
Bare bars with the holes drilled.

Sprayed Black
Adapters mounted to seats

Sliders mounted to bracket

Finally...in the car ready to go...
Took a quick drive to the "centre of the universe" to get Mr. Bastard to drill a few holes in the plates to mount them up to the seats and factory sliders. Holes for the seats are 11 1/2" (on centre) and sliders holes are 14" (on centre).
When I got them back I sprayed them with some black bed liner coating. I used the original bolts to mount the bracket to the seat. Picked up some 5/16" x 1" bolts to mount the bracket to the factory sliders and tighten everything up. I also cleaned up the sliders and applied some POR-15 I had left over.
Got them mounted in the car and gave them a try. Everything works great. Seats sit a little higher than stock but they are super comfortable and suportive.
Bare bars with the holes drilled.
Sprayed Black
Adapters mounted to seats
Sliders mounted to bracket
Finally...in the car ready to go...

Re: 1989 Camaro - "The Project" Begins...
your car looks great!
I got to say though that I don't care for the seat selection.
You said you bought a lot of nos interior plastic parts? I'm looking to redo my interior and cant seem to find any of these
I got to say though that I don't care for the seat selection.
You said you bought a lot of nos interior plastic parts? I'm looking to redo my interior and cant seem to find any of these
Thread Starter
Joined: Oct 2006
Posts: 3,041
Likes: 8
From: West of Toronto
Car: 89 IROC
Engine: 305 TPI / ZZ4 cam
Transmission: Stage 2 700R4, LS1 driveshaft
Axle/Gears: Strange 3.42 w/ Auburn
Re: 1989 Camaro - "The Project" Begins...
I spent over 18 months searching for all the panels, switches and parts I needed. Unfortunately, some of the parts are not made by GM or available from any NOS producing company. You have to do a lot of looking and a little luck helps.
Companies I used are - Modern Day Muscle, Classic Industries, Hawks Third Gen, ebay and Year One.
Supreme Member
Joined: Oct 2007
Posts: 1,078
Likes: 0
From: Ventura County, California
Car: 2002 GS300 Sport Design
Engine: 3.0L 2JZGE
Transmission: 5-Speed Shiftable Automatic
Re: 1989 Camaro - "The Project" Begins...
Thanks, Tony.
Thread Starter
Joined: Oct 2006
Posts: 3,041
Likes: 8
From: West of Toronto
Car: 89 IROC
Engine: 305 TPI / ZZ4 cam
Transmission: Stage 2 700R4, LS1 driveshaft
Axle/Gears: Strange 3.42 w/ Auburn
Re: 1989 Camaro - "The Project" Begins...
Here you go. The motorized version is Altec 400EU.
http://www.summitracing.com/parts/APR-400/
http://www.summitracing.com/parts/APR-400EU/
http://www.summitracing.com/parts/APR-400/
http://www.summitracing.com/parts/APR-400EU/
Thread Starter
Joined: Oct 2006
Posts: 3,041
Likes: 8
From: West of Toronto
Car: 89 IROC
Engine: 305 TPI / ZZ4 cam
Transmission: Stage 2 700R4, LS1 driveshaft
Axle/Gears: Strange 3.42 w/ Auburn
Re: 1989 Camaro - "The Project" Begins...
Kind of hard to work on the car in the winter so I've been working on collecting parts for a suspension upgrade. Need to reclaim the pool table soon
36/24mm sway bar combo, UMI wonderbar, UMI trans cross member, ES and Spohn poly endlinks with Spohn and TDS bushings.
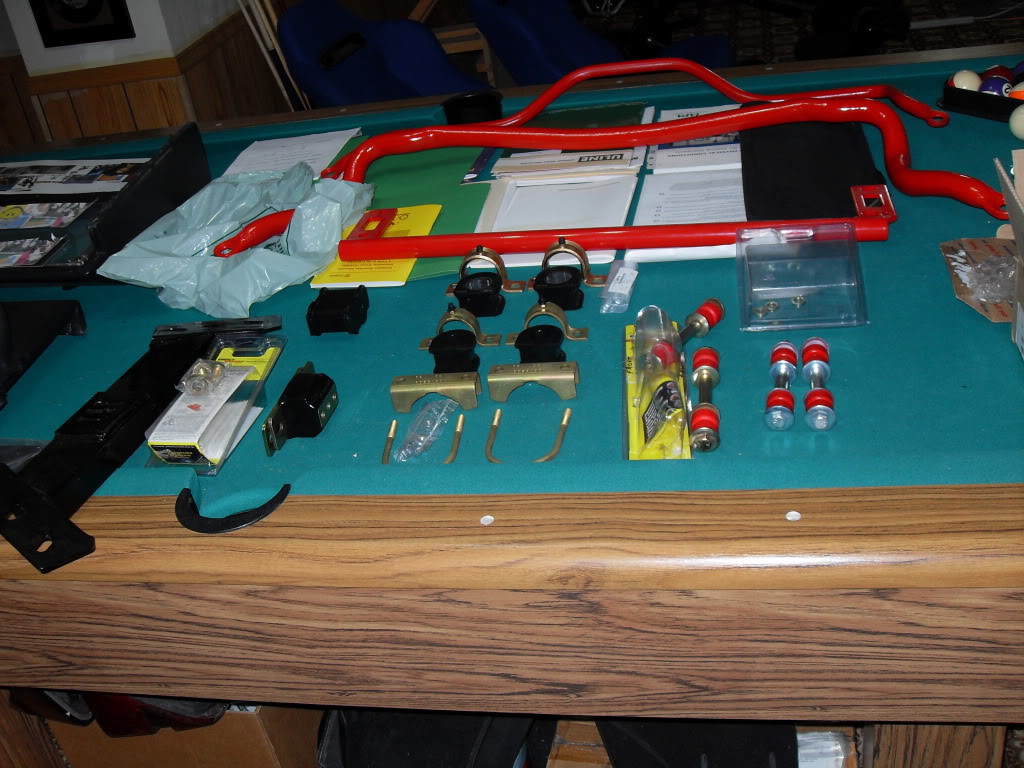
Also, adding new Stainless Steel brake lines (thanks to Inline Tube for a great product).
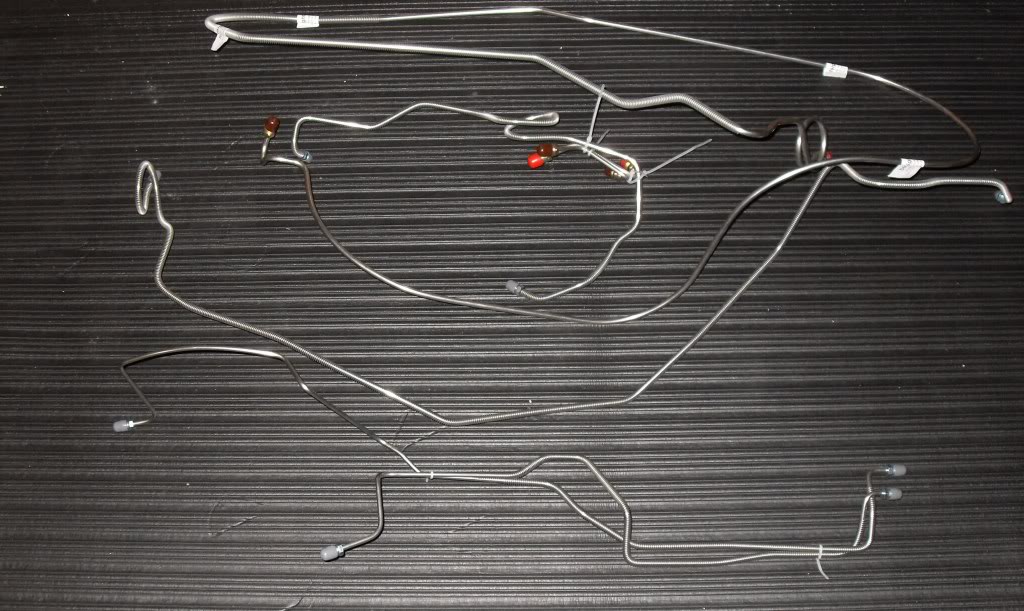
36/24mm sway bar combo, UMI wonderbar, UMI trans cross member, ES and Spohn poly endlinks with Spohn and TDS bushings.
Also, adding new Stainless Steel brake lines (thanks to Inline Tube for a great product).

Member
Joined: Sep 2009
Posts: 146
Likes: 0
From: winnipeg canada
Car: 1982 z28
Engine: 383
Transmission: 4l60e
Axle/Gears: 3.73 posi
Re: 1989 Camaro - "The Project" Begins...
Had a few days off and decided it was time to get the new seats installed. Made a quick call to a friend and had some adapters made up. They are 1/4" aluminum plate 1 1/2" wide and 15" long (thanks again James).
Took a quick drive to the "centre of the universe" to get Mr. Bastard to drill a few holes in the plates to mount them up to the seats and factory sliders. Holes for the seats are 11 1/2" (on centre) and sliders holes are 14" (on centre).
When I got them back I sprayed them with some black bed liner coating. I used the original bolts to mount the bracket to the seat. Picked up some 5/16" x 1" bolts to mount the bracket to the factory sliders and tighten everything up. I also cleaned up the sliders and applied some POR-15 I had left over.
Got them mounted in the car and gave them a try. Everything works great. Seats sit a little higher than stock but they are super comfortable and suportive.
Bare bars with the holes drilled.
Sprayed Black
Adapters mounted to seats
Sliders mounted to bracket
Finally...in the car ready to go...
Joined: Mar 2009
Posts: 2,036
Likes: 28
From: Florida
Car: 1989 Camaro RS
Engine: LH6
Transmission: T56
Axle/Gears: 3.42 Auburn Posi
Re: 1989 Camaro - "The Project" Begins...
I like the seats, but I personally would have painted the headlight buckets black again.
Thread Starter
Joined: Oct 2006
Posts: 3,041
Likes: 8
From: West of Toronto
Car: 89 IROC
Engine: 305 TPI / ZZ4 cam
Transmission: Stage 2 700R4, LS1 driveshaft
Axle/Gears: Strange 3.42 w/ Auburn
Re: 1989 Camaro - "The Project" Begins...
Keep 'em blue, black headlight buckets are less clean, and look a bit out of place/odd/funky. Black headlight buckets are a pretty random style decision of the '80s, IMO.

Joined: Dec 2008
Posts: 2,540
Likes: 0
From: Norwalk, CA
Car: 91Z28
Engine: 5.7 ls1
Transmission: 4l60e
Axle/Gears: 3.42
Re: 1989 Camaro - "The Project" Begins...
Wow its coming out great im subscribing im really liking that license plate thing how do you control that with a switch or what?
Member
Joined: Jul 2009
Posts: 158
Likes: 0
From: New Jersey
Car: 1986 Berlinetta, 1988 Iroc-Z
Engine: 305 carb, 305 TPI
Transmission: 700r4, 700r4
Axle/Gears: stock
Re: 1989 Camaro - "The Project" Begins...
i love the amount of detailing you do its just the way i would do it
Thread Starter
Joined: Oct 2006
Posts: 3,041
Likes: 8
From: West of Toronto
Car: 89 IROC
Engine: 305 TPI / ZZ4 cam
Transmission: Stage 2 700R4, LS1 driveshaft
Axle/Gears: Strange 3.42 w/ Auburn
Re: 1989 Camaro - "The Project" Begins...
Mine is the manual (hand) version....but it's cheaper
Senior Member
Joined: Feb 2010
Posts: 695
Likes: 11
From: Oregon
Car: 1991 Z28
Engine: L31-R 350 w/ EBL P4
Transmission: 700R4
Axle/Gears: 2.73
Re: 1989 Camaro - "The Project" Begins...
See for me, if a Camaro does not have black headlight buckets it looks odd. That is one of my favorite things about these cars is the black buckets.