Project Procrastination '91Z LS1/T56/currie 9" w/PICS
 04-02-2017, 09:36 PM
#351
Senior Member

Thread Starter
iTrader: (4)
Join Date: Oct 2008
Location: Niles, IL
Posts: 857
Likes: 0
Received 5 Likes
on
4 Posts
Car: '91 LS6/T56/9"
Engine: LS6
Transmission: T56
Axle/Gears: Currie 9"/4.11, detroit truetrac
Re: Project Procrastination '91Z LS1/T56/currie 9" w/PICS
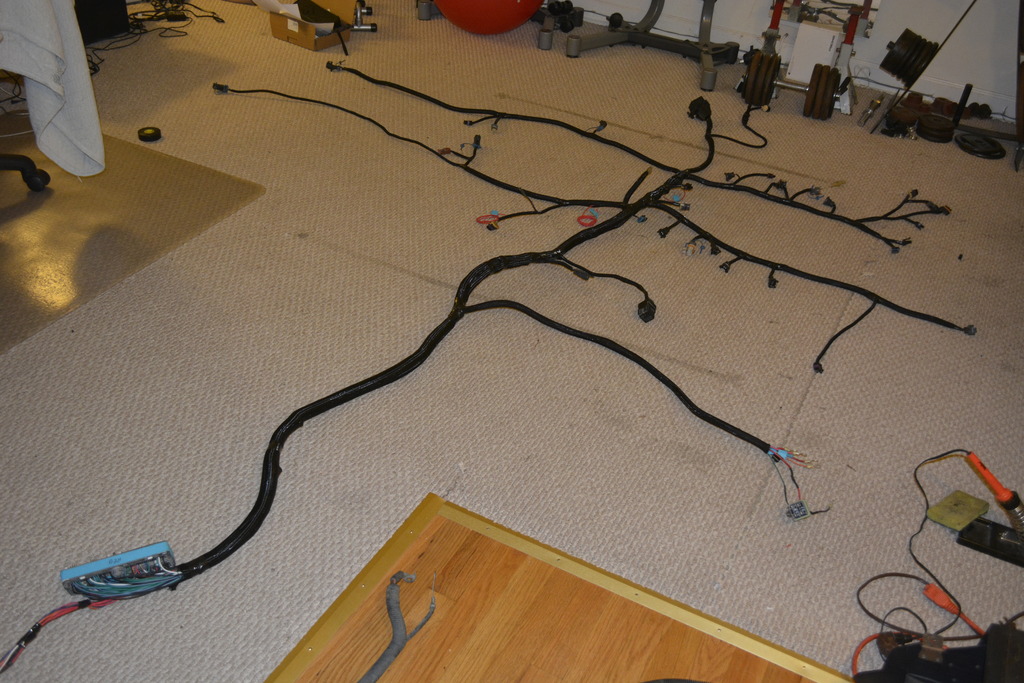
Started getting the wiring harness on the engine:


Last edited by robguitargod1; 07-24-2017 at 09:22 AM.
 04-02-2017, 09:52 PM
#352
Senior Member
Thread Starter
iTrader: (4)
Join Date: Oct 2008
Location: Niles, IL
Posts: 857
Likes: 0
Received 5 Likes
on
4 Posts
Car: '91 LS6/T56/9"
Engine: LS6
Transmission: T56
Axle/Gears: Currie 9"/4.11, detroit truetrac
Re: Project Procrastination '91Z LS1/T56/currie 9" w/PICS
I wanted to use the passenger side ECM wiring pass-through, so I soaked it in gasoline for about 36 hours. After that it cleaned up easily:


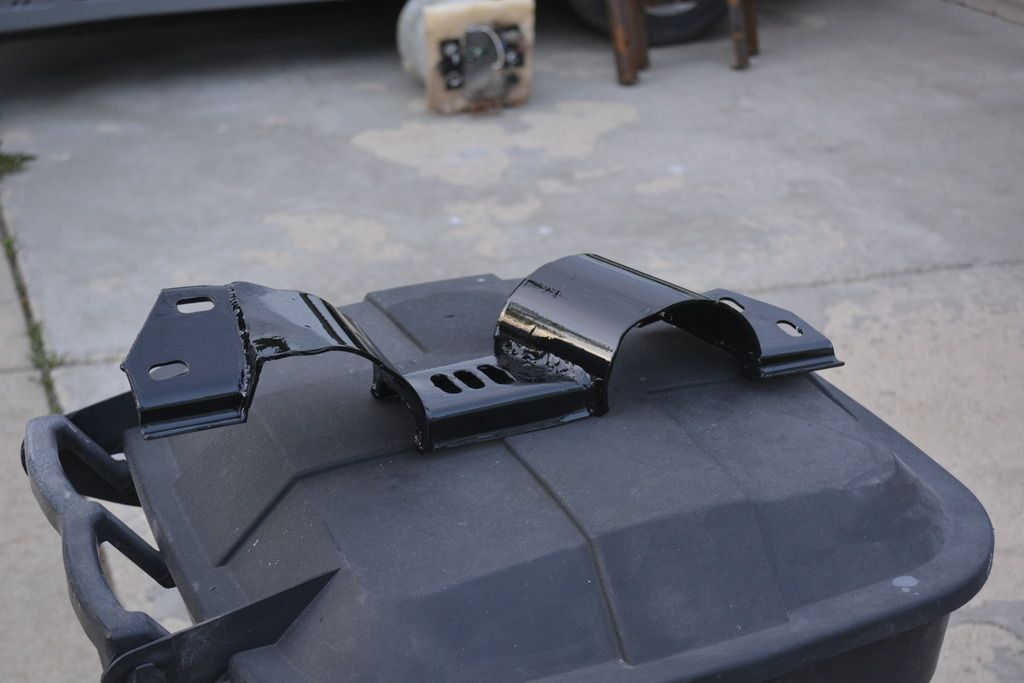
If you've ever tried to get to the k-member motor mount bolts, you know that they're impossible to get to unless you remove nearly all of the suspension. That's because the bolts attach to nuts that will just spin. So I decided to weld the nuts to the k-member. This is the way to go, very easy to remove now.

If you've ever tried to get to the k-member motor mount bolts, you know that they're impossible to get to unless you remove nearly all of the suspension. That's because the bolts attach to nuts that will just spin. So I decided to weld the nuts to the k-member. This is the way to go, very easy to remove now.
Last edited by robguitargod1; 07-24-2017 at 09:19 AM.
04-02-2017, 09:52 PM
#353
Senior Member
Thread Starter
iTrader: (4)
Join Date: Oct 2008
Location: Niles, IL
Posts: 857
Likes: 0
Received 5 Likes
on
4 Posts
Car: '91 LS6/T56/9"
Engine: LS6
Transmission: T56
Axle/Gears: Currie 9"/4.11, detroit truetrac
Re: Project Procrastination '91Z LS1/T56/currie 9" w/PICS
Then I started to work on notching the k-member for the AC compressor:


Made some templates:

And finished it with 1/8" plate:


Made some templates:
And finished it with 1/8" plate:
Last edited by robguitargod1; 07-24-2017 at 09:14 AM.
04-02-2017, 09:55 PM
#354
Senior Member
Thread Starter
iTrader: (4)
Join Date: Oct 2008
Location: Niles, IL
Posts: 857
Likes: 0
Received 5 Likes
on
4 Posts
Car: '91 LS6/T56/9"
Engine: LS6
Transmission: T56
Axle/Gears: Currie 9"/4.11, detroit truetrac
Re: Project Procrastination '91Z LS1/T56/currie 9" w/PICS
Then painted it and the motor mounts. Will paint the other side when it dries.


Last edited by robguitargod1; 07-24-2017 at 09:08 AM.
04-11-2017, 09:55 AM
#355
Senior Member
Thread Starter
iTrader: (4)
Join Date: Oct 2008
Location: Niles, IL
Posts: 857
Likes: 0
Received 5 Likes
on
4 Posts
Car: '91 LS6/T56/9"
Engine: LS6
Transmission: T56
Axle/Gears: Currie 9"/4.11, detroit truetrac
Re: Project Procrastination '91Z LS1/T56/currie 9" w/PICS
Built a mount for the PCM out of aluminum. I've gotten a lot better at tig welding aluminum so I'd like to use it more often. Nice that it doesn't rust either.


Then I mounted the engine/trans to continue wiring:

Then I chose a location for the relays. I like this spot because it's very close to the battery and tucked out of view:


Then I test fit the headers:


Then I mounted the engine/trans to continue wiring:
Then I chose a location for the relays. I like this spot because it's very close to the battery and tucked out of view:
Then I test fit the headers:
Last edited by robguitargod1; 07-24-2017 at 09:04 AM.
04-11-2017, 11:26 AM
#356
Supreme Member
iTrader: (2)
Join Date: Feb 2005
Location: West Warwick RI, postal code: 02893
Posts: 4,337
Received 55 Likes
on
41 Posts
Car: Building LS3, T56 Z28
Engine: LS3
Transmission: T-56
Axle/Gears: Moser/ 4.11
Re: Project Procrastination '91Z LS1/T56/currie 9" w/PICS
Looks like great progress.
What old pan is that?
What old pan is that?
04-11-2017, 11:31 AM
#357
04-11-2017, 12:54 PM
#358
Re: Project Procrastination '91Z LS1/T56/currie 9" w/PICS
If you haven't bought the wire loom, I think this is the stuff that I bought:
https://www.cableorganizer.com/f6-wrap-around/
If you don't already own a hot knife the best way to cut it is to have a small torch and just heat up a razor blade, worked perfect.
Great idea on the relay location BTW.
https://www.cableorganizer.com/f6-wrap-around/
If you don't already own a hot knife the best way to cut it is to have a small torch and just heat up a razor blade, worked perfect.
Great idea on the relay location BTW.
04-12-2017, 07:41 AM
#359
Senior Member
iTrader: (5)

Join Date: Jan 2009
Location: Golden, CO
Posts: 887
Likes: 0
Received 11 Likes
on
9 Posts
Car: 87 IROC
Engine: L31 350
Transmission: T56
Axle/Gears: 4.10 D44
Re: Project Procrastination '91Z LS1/T56/currie 9" w/PICS
If you haven't bought the wire loom, I think this is the stuff that I bought:
https://www.cableorganizer.com/f6-wrap-around/
https://www.cableorganizer.com/f6-wrap-around/
04-25-2017, 10:11 PM
#360
Senior Member
Thread Starter
iTrader: (4)
Join Date: Oct 2008
Location: Niles, IL
Posts: 857
Likes: 0
Received 5 Likes
on
4 Posts
Car: '91 LS6/T56/9"
Engine: LS6
Transmission: T56
Axle/Gears: Currie 9"/4.11, detroit truetrac
Re: Project Procrastination '91Z LS1/T56/currie 9" w/PICS
I finally fabricated the transmission crossmember. Started with the stock piece, and mount:


I used 4" round 1/8" thick pipe to add exhaust clearance:


I used 4" round 1/8" thick pipe to add exhaust clearance:
Last edited by robguitargod1; 07-24-2017 at 07:15 AM.
04-25-2017, 10:12 PM
#361
Senior Member
Thread Starter
iTrader: (4)
Join Date: Oct 2008
Location: Niles, IL
Posts: 857
Likes: 0
Received 5 Likes
on
4 Posts
Car: '91 LS6/T56/9"
Engine: LS6
Transmission: T56
Axle/Gears: Currie 9"/4.11, detroit truetrac
Re: Project Procrastination '91Z LS1/T56/currie 9" w/PICS
Sandblasted:

Painted:

Painted:
Last edited by robguitargod1; 07-24-2017 at 07:18 AM.
04-25-2017, 10:22 PM
#362
Senior Member
Thread Starter
iTrader: (4)
Join Date: Oct 2008
Location: Niles, IL
Posts: 857
Likes: 0
Received 5 Likes
on
4 Posts
Car: '91 LS6/T56/9"
Engine: LS6
Transmission: T56
Axle/Gears: Currie 9"/4.11, detroit truetrac
Re: Project Procrastination '91Z LS1/T56/currie 9" w/PICS
Cut the hole for the shifter, mocked up the engine for final touches on the harness, and added relays.


Then started tearing down the engine:


Harness done, loom ordered.

Then started tearing down the engine:
Harness done, loom ordered.
Last edited by robguitargod1; 07-24-2017 at 07:09 AM.
04-25-2017, 10:28 PM
#363
Senior Member
Thread Starter
iTrader: (4)
Join Date: Oct 2008
Location: Niles, IL
Posts: 857
Likes: 0
Received 5 Likes
on
4 Posts
Car: '91 LS6/T56/9"
Engine: LS6
Transmission: T56
Axle/Gears: Currie 9"/4.11, detroit truetrac
Re: Project Procrastination '91Z LS1/T56/currie 9" w/PICS
The front accessories are filthy, so I sandblasted and painted the oil pump and balancer. The other brackets will be raw aluminum.


Some stuff painted, and pistons waiting to be cleaned up.

Some stuff painted, and pistons waiting to be cleaned up.
Last edited by robguitargod1; 07-21-2017 at 08:31 AM.

 [/URL]
04-27-2017, 01:15 PM
[/URL]
04-27-2017, 01:15 PM
#365
Re: Project Procrastination '91Z LS1/T56/currie 9" w/PICS
It looks like you could use the pipe again to make a lower half that bolts up to/with the upper half. It would bolt in the center to the transmission and the sides to the transmission tunnel. I would think it would be strong enough then.
04-29-2017, 08:21 AM
#367
Senior Member
Thread Starter
iTrader: (4)
Join Date: Oct 2008
Location: Niles, IL
Posts: 857
Likes: 0
Received 5 Likes
on
4 Posts
Car: '91 LS6/T56/9"
Engine: LS6
Transmission: T56
Axle/Gears: Currie 9"/4.11, detroit truetrac
Re: Project Procrastination '91Z LS1/T56/currie 9" w/PICS
Once the fender is on, you just pull the splash guard back to get to the fuses.
05-30-2017, 06:53 AM
#368
Senior Member
Thread Starter
iTrader: (4)
Join Date: Oct 2008
Location: Niles, IL
Posts: 857
Likes: 0
Received 5 Likes
on
4 Posts
Car: '91 LS6/T56/9"
Engine: LS6
Transmission: T56
Axle/Gears: Currie 9"/4.11, detroit truetrac
Re: Project Procrastination '91Z LS1/T56/currie 9" w/PICS
Long overdue update. Been working more and posting less, but a lot has been done. De-greasing everything too forever....


I also bought the LS6 valley cover which puts the PCV system underneath it and cleans up a lot of hose routing:
I also bought the LS6 valley cover which puts the PCV system underneath it and cleans up a lot of hose routing:
Last edited by robguitargod1; 07-21-2017 at 07:50 AM.
05-30-2017, 06:55 AM
#369
Senior Member
Thread Starter
iTrader: (4)
Join Date: Oct 2008
Location: Niles, IL
Posts: 857
Likes: 0
Received 5 Likes
on
4 Posts
Car: '91 LS6/T56/9"
Engine: LS6
Transmission: T56
Axle/Gears: Currie 9"/4.11, detroit truetrac
Re: Project Procrastination '91Z LS1/T56/currie 9" w/PICS
The valve covers were ugly:


Last edited by robguitargod1; 07-21-2017 at 07:35 AM.
05-30-2017, 07:01 AM
#370
Senior Member
Thread Starter
iTrader: (4)
Join Date: Oct 2008
Location: Niles, IL
Posts: 857
Likes: 0
Received 5 Likes
on
4 Posts
Car: '91 LS6/T56/9"
Engine: LS6
Transmission: T56
Axle/Gears: Currie 9"/4.11, detroit truetrac
Re: Project Procrastination '91Z LS1/T56/currie 9" w/PICS
I took the block/oil pan/and crank to Opel Engineering in Streamwood, IL. Because I'm right next to Strange Engineering, I stopped in and asked them if they could recommend a machine shop. One guy recommended Opel, so that's where I went.
I had the block and pan cleaned, cam bearings installed, and the crank cleaned and polished. $400. Not cheap but they did great work:


Then I installed Comps rocker arm trunion kit:


I had the block and pan cleaned, cam bearings installed, and the crank cleaned and polished. $400. Not cheap but they did great work:
Then I installed Comps rocker arm trunion kit:
Last edited by robguitargod1; 07-21-2017 at 07:30 AM.
05-30-2017, 07:15 AM
#371
Senior Member
Thread Starter
iTrader: (4)
Join Date: Oct 2008
Location: Niles, IL
Posts: 857
Likes: 0
Received 5 Likes
on
4 Posts
Car: '91 LS6/T56/9"
Engine: LS6
Transmission: T56
Axle/Gears: Currie 9"/4.11, detroit truetrac
Re: Project Procrastination '91Z LS1/T56/currie 9" w/PICS
Then I ball honed the cylinders:


Measuring EVERYTHING took quite a bit of time

I measured the bores before and after honing, main and rod bearing clearances, ring gaps, thrust, and cam bearing clearances. Everything measured within spec with the exception of the ring gaps.
The top gap service limit is .015" but the ring manufactures all recommend .015" minimum. My stock rings top gap was .013" and the Sealed Power rings I bought measured .022"-.025"
I'm sure those rings would have worked but I sent them back and bought a file fit set from Mahle. I filed the top gap to .016" and the second ring to .023"-.025"

Measuring EVERYTHING took quite a bit of time
I measured the bores before and after honing, main and rod bearing clearances, ring gaps, thrust, and cam bearing clearances. Everything measured within spec with the exception of the ring gaps.
The top gap service limit is .015" but the ring manufactures all recommend .015" minimum. My stock rings top gap was .013" and the Sealed Power rings I bought measured .022"-.025"
I'm sure those rings would have worked but I sent them back and bought a file fit set from Mahle. I filed the top gap to .016" and the second ring to .023"-.025"
Last edited by robguitargod1; 07-19-2017 at 06:10 PM.
05-30-2017, 07:21 AM
#372
Senior Member
Thread Starter
iTrader: (4)
Join Date: Oct 2008
Location: Niles, IL
Posts: 857
Likes: 0
Received 5 Likes
on
4 Posts
Car: '91 LS6/T56/9"
Engine: LS6
Transmission: T56
Axle/Gears: Currie 9"/4.11, detroit truetrac
Re: Project Procrastination '91Z LS1/T56/currie 9" w/PICS
Actually the rings weren't the only thing that needs adjustment. My crank thrust was only measuring barely .001" I made sure I was right by measuring the bearing and crank off of the block and got the same .001"
So I sanded both sides of the thrust bearing with 1000 grit and WD40 until I got .0045"
I kept the old bearings and was able to measure .0045" on them is that's what I went with.

So I sanded both sides of the thrust bearing with 1000 grit and WD40 until I got .0045"
I kept the old bearings and was able to measure .0045" on them is that's what I went with.
Last edited by robguitargod1; 07-19-2017 at 06:07 PM.
05-30-2017, 07:26 AM
#373
Senior Member
Thread Starter
iTrader: (4)
Join Date: Oct 2008
Location: Niles, IL
Posts: 857
Likes: 0
Received 5 Likes
on
4 Posts
Car: '91 LS6/T56/9"
Engine: LS6
Transmission: T56
Axle/Gears: Currie 9"/4.11, detroit truetrac
Re: Project Procrastination '91Z LS1/T56/currie 9" w/PICS
Now the heads. This was a full 2 day project. I bought a pair of 799 heads for $200 so I got to work getting them ready. They were pretty dirty:


Soaked them in degreaser then pressure washed and sandblasted:


Soaked them in degreaser then pressure washed and sandblasted:
Last edited by robguitargod1; 07-22-2017 at 08:26 AM.
05-30-2017, 07:32 AM
#374
Senior Member
Thread Starter
iTrader: (4)
Join Date: Oct 2008
Location: Niles, IL
Posts: 857
Likes: 0
Received 5 Likes
on
4 Posts
Car: '91 LS6/T56/9"
Engine: LS6
Transmission: T56
Axle/Gears: Currie 9"/4.11, detroit truetrac
Re: Project Procrastination '91Z LS1/T56/currie 9" w/PICS
Valve lapping before:


After:


Then installed the new springs. My valve spring compressor worked for the stock springs, but not the new ones. Damn thing just bent.......so I had to find another way. Ended up using my press. Some patience was required, but it worked very well.


After:
Then installed the new springs. My valve spring compressor worked for the stock springs, but not the new ones. Damn thing just bent.......so I had to find another way. Ended up using my press. Some patience was required, but it worked very well.
Last edited by robguitargod1; 07-19-2017 at 06:01 PM.
05-30-2017, 07:39 AM
#375
Senior Member
Thread Starter
iTrader: (4)
Join Date: Oct 2008
Location: Niles, IL
Posts: 857
Likes: 0
Received 5 Likes
on
4 Posts
Car: '91 LS6/T56/9"
Engine: LS6
Transmission: T56
Axle/Gears: Currie 9"/4.11, detroit truetrac
Re: Project Procrastination '91Z LS1/T56/currie 9" w/PICS
I was looking for oil priming solutions, and ended up making my own. I liked the Xprime, but I've gotten a lot better a tig welding so I made my own out of the leftover 4" pipe that I used to build the transmission crossmember.


Then mounted an in-line oil filter. It holds 4.5 quarts and works perfectly.

Then mounted an in-line oil filter. It holds 4.5 quarts and works perfectly.
Last edited by robguitargod1; 07-18-2017 at 04:16 PM.
05-30-2017, 07:45 AM
#376
Senior Member
Thread Starter
iTrader: (4)
Join Date: Oct 2008
Location: Niles, IL
Posts: 857
Likes: 0
Received 5 Likes
on
4 Posts
Car: '91 LS6/T56/9"
Engine: LS6
Transmission: T56
Axle/Gears: Currie 9"/4.11, detroit truetrac
Re: Project Procrastination '91Z LS1/T56/currie 9" w/PICS

Last edited by robguitargod1; 07-18-2017 at 04:11 PM.
05-30-2017, 07:52 AM
#377
Senior Member
Thread Starter
iTrader: (4)
Join Date: Oct 2008
Location: Niles, IL
Posts: 857
Likes: 0
Received 5 Likes
on
4 Posts
Car: '91 LS6/T56/9"
Engine: LS6
Transmission: T56
Axle/Gears: Currie 9"/4.11, detroit truetrac
Re: Project Procrastination '91Z LS1/T56/currie 9" w/PICS
Now onto the transmission. I'm installing a stage 2 kit from the gearbox:
http://www.thegearbox.org/catalog/it...17/7824166.htm
Like everything else, it was dirty. So more degreaser and pressure washing.


I didn't want to drill a hole in my bench so I attached the bellhousing and stood it up on two 2X4's


http://www.thegearbox.org/catalog/it...17/7824166.htm
- Upgraded 1-6 carbon fiber/kevlar blocker / synchronizer rings
- Reverse synchronizer ring
- Bronze fork pads for the 1-2 & 3-4
- Billet keys for the 3-4 with upgraded springs
- Billet keys for the 1-2 with upgraded springs
- Bronze shifter bushing / isolator cup
- Tremec or Aftermarket 1-2 synchronizer assembly (your choice)
- Tremec or Aftermarket 3-4 synchronizer assembly (your choice)
- Snap ring kit
- Tremec 3-4 steel shift fork
- Stock 5-6 & reverse fork pads
- Stock 5-6 & reverse keys & springs
- front & rear seals
Like everything else, it was dirty. So more degreaser and pressure washing.
I didn't want to drill a hole in my bench so I attached the bellhousing and stood it up on two 2X4's
Last edited by robguitargod1; 07-14-2017 at 04:47 PM.
05-30-2017, 07:53 AM
#378
Senior Member
Thread Starter
iTrader: (4)
Join Date: Oct 2008
Location: Niles, IL
Posts: 857
Likes: 0
Received 5 Likes
on
4 Posts
Car: '91 LS6/T56/9"
Engine: LS6
Transmission: T56
Axle/Gears: Currie 9"/4.11, detroit truetrac
Re: Project Procrastination '91Z LS1/T56/currie 9" w/PICS


Last edited by robguitargod1; 07-14-2017 at 04:52 PM.
05-30-2017, 07:58 AM
#379
Senior Member
Thread Starter
iTrader: (4)
Join Date: Oct 2008
Location: Niles, IL
Posts: 857
Likes: 0
Received 5 Likes
on
4 Posts
Car: '91 LS6/T56/9"
Engine: LS6
Transmission: T56
Axle/Gears: Currie 9"/4.11, detroit truetrac
Re: Project Procrastination '91Z LS1/T56/currie 9" w/PICS
Once apart I sandblasted and painted the case:


Last edited by robguitargod1; 07-14-2017 at 04:43 PM.
05-30-2017, 08:01 AM
#380
Senior Member
Thread Starter
iTrader: (4)
Join Date: Oct 2008
Location: Niles, IL
Posts: 857
Likes: 0
Received 5 Likes
on
4 Posts
Car: '91 LS6/T56/9"
Engine: LS6
Transmission: T56
Axle/Gears: Currie 9"/4.11, detroit truetrac
Re: Project Procrastination '91Z LS1/T56/currie 9" w/PICS
So now everything is ready to go back together, but of course I'm waiting because I decided I wanted to us a viper 2nd gear and needed a shim kit to adjust main and countershaft preload.
I've also deleted the skip shift solenoid, and installed a new reverse light switch.
I've also deleted the skip shift solenoid, and installed a new reverse light switch.
Last edited by robguitargod1; 07-14-2017 at 04:44 PM.
05-30-2017, 08:06 AM
#381
Senior Member
Thread Starter
iTrader: (4)
Join Date: Oct 2008
Location: Niles, IL
Posts: 857
Likes: 0
Received 5 Likes
on
4 Posts
Car: '91 LS6/T56/9"
Engine: LS6
Transmission: T56
Axle/Gears: Currie 9"/4.11, detroit truetrac
Re: Project Procrastination '91Z LS1/T56/currie 9" w/PICS
As for the engine, it sitting partially assembled. I needed to replace the cam retention plate because its gasket was shot. This piece directs oil so it's not something you want to skimp on. I also bought a timing chain dampener, and am currently waiting on an oil pickup girdle


Last edited by robguitargod1; 07-14-2017 at 04:33 PM.
06-02-2017, 03:23 PM
#382
Senior Member
Thread Starter
iTrader: (4)
Join Date: Oct 2008
Location: Niles, IL
Posts: 857
Likes: 0
Received 5 Likes
on
4 Posts
Car: '91 LS6/T56/9"
Engine: LS6
Transmission: T56
Axle/Gears: Currie 9"/4.11, detroit truetrac
Re: Project Procrastination '91Z LS1/T56/currie 9" w/PICS
Got the oil pickup girdle installed:

And installed the front and rear covers along with the oil pan.
I aligned the covers by bolting on the oil pan minus its gasket, and aligned the oil pan by bolting on the bellhousing.


And installed the front and rear covers along with the oil pan.
I aligned the covers by bolting on the oil pan minus its gasket, and aligned the oil pan by bolting on the bellhousing.
Last edited by robguitargod1; 07-14-2017 at 04:31 PM.
06-04-2017, 01:47 PM
#383
Re: Project Procrastination '91Z LS1/T56/currie 9" w/PICS
What did you use for parts cleaner?
What paint did you use for the engine and transmission?
Supposedly my transmission has a stage 2 kit as well but I didn't open it up to verify. Is there any easy way to verify by just removing the case?
What paint did you use for the engine and transmission?
Supposedly my transmission has a stage 2 kit as well but I didn't open it up to verify. Is there any easy way to verify by just removing the case?
06-05-2017, 08:17 AM
#384
Senior Member
Thread Starter
iTrader: (4)
Join Date: Oct 2008
Location: Niles, IL
Posts: 857
Likes: 0
Received 5 Likes
on
4 Posts
Car: '91 LS6/T56/9"
Engine: LS6
Transmission: T56
Axle/Gears: Currie 9"/4.11, detroit truetrac
Re: Project Procrastination '91Z LS1/T56/currie 9" w/PICS
If you took the case apart I'd look for the steel 3/4 shift fork, bronze pads, and carbon fiber rings/cones.
I used basic hardware store degreaser to soak everything, but general cleanup I used prepall in a pressurized sprayer.
 06-05-2017, 08:21 AM
#385
Senior Member
Thread Starter
iTrader: (4)
Join Date: Oct 2008
Location: Niles, IL
Posts: 857
Likes: 0
Received 5 Likes
on
4 Posts
Car: '91 LS6/T56/9"
Engine: LS6
Transmission: T56
Axle/Gears: Currie 9"/4.11, detroit truetrac
Re: Project Procrastination '91Z LS1/T56/currie 9" w/PICS
Finally finished the harness too. Even added the low brake pressure and low brake fluid level sensors.
 06-05-2017, 08:28 AM
#386
Senior Member
Thread Starter
iTrader: (4)
Join Date: Oct 2008
Location: Niles, IL
Posts: 857
Likes: 0
Received 5 Likes
on
4 Posts
Car: '91 LS6/T56/9"
Engine: LS6
Transmission: T56
Axle/Gears: Currie 9"/4.11, detroit truetrac
Re: Project Procrastination '91Z LS1/T56/currie 9" w/PICS
New 2000-up Viper 2nd gear

Pressing on the new 1/2 and 3/4 syncros

Here's the countershaft extension end play tool I made.


Going back together


Done

Pressing on the new 1/2 and 3/4 syncros
Here's the countershaft extension end play tool I made.
Going back together
Done
Last edited by robguitargod1; 07-14-2017 at 09:01 AM.
06-05-2017, 09:00 AM
#387
Senior Member
Thread Starter
iTrader: (4)
Join Date: Oct 2008
Location: Niles, IL
Posts: 857
Likes: 0
Received 5 Likes
on
4 Posts
Car: '91 LS6/T56/9"
Engine: LS6
Transmission: T56
Axle/Gears: Currie 9"/4.11, detroit truetrac
Re: Project Procrastination '91Z LS1/T56/currie 9" w/PICS
The paint I've used on the engine and trans is Dupont engine paint DE1615. Basic stuff from your local parts store.
06-05-2017, 06:12 PM
#388
Senior Member
iTrader: (4)
Join Date: Apr 2004
Location: Houston, TX
Posts: 556
Received 0 Likes
on
0 Posts
Car: 1986 Z28
Engine: LT1
Transmission: T5 WC
Axle/Gears: 3.42 T2R
Re: Project Procrastination '91Z LS1/T56/currie 9" w/PICS
Wow, just read thru this whole thread. You give a whole new meaning to DIY.
What module did you use for the cruise control? You said it was smaller than the F-body.
What module did you use for the cruise control? You said it was smaller than the F-body.
06-06-2017, 07:33 AM
#389
Senior Member
Thread Starter
iTrader: (4)
Join Date: Oct 2008
Location: Niles, IL
Posts: 857
Likes: 0
Received 5 Likes
on
4 Posts
Car: '91 LS6/T56/9"
Engine: LS6
Transmission: T56
Axle/Gears: Currie 9"/4.11, detroit truetrac
Re: Project Procrastination '91Z LS1/T56/currie 9" w/PICS
Yes it was smaller, and came from a 2005 Monte Carlo. Almost every GM vehicle you'll find in the parts yards have this cruise module.
I've been fixing pictures on this thread that aren't working, so I'll let you know when they're working again.
I also modded my AC bracket just like yours. Found the right length 10mm bolt at Ace and simply widened the bolt hole so it could sit flush.
I've been fixing pictures on this thread that aren't working, so I'll let you know when they're working again.
I also modded my AC bracket just like yours. Found the right length 10mm bolt at Ace and simply widened the bolt hole so it could sit flush.
06-10-2017, 09:37 PM
#390
Senior Member
Thread Starter
iTrader: (4)
Join Date: Oct 2008
Location: Niles, IL
Posts: 857
Likes: 0
Received 5 Likes
on
4 Posts
Car: '91 LS6/T56/9"
Engine: LS6
Transmission: T56
Axle/Gears: Currie 9"/4.11, detroit truetrac
Re: Project Procrastination '91Z LS1/T56/currie 9" w/PICS
Pulled out the flywheel and pressure plate. Been sitting for 2 years.

After 5 mins with the wire wheel:

Got started installing the heads:


Heads on:

Then the rockers and pushrods:

Rockers and LS6 valley cover installed:

After 5 mins with the wire wheel:
Got started installing the heads:
Heads on:
Then the rockers and pushrods:
Rockers and LS6 valley cover installed:
Last edited by robguitargod1; 07-14-2017 at 08:52 AM.
06-10-2017, 09:38 PM
#391
Senior Member
Thread Starter
iTrader: (4)
Join Date: Oct 2008
Location: Niles, IL
Posts: 857
Likes: 0
Received 5 Likes
on
4 Posts
Car: '91 LS6/T56/9"
Engine: LS6
Transmission: T56
Axle/Gears: Currie 9"/4.11, detroit truetrac
Re: Project Procrastination '91Z LS1/T56/currie 9" w/PICS
Since I'm reusing the stock injectors I removed and replaced their filters:

Intake gaskets were shot:

Will get on the front accessories tomorrow:

Intake gaskets were shot:
Will get on the front accessories tomorrow:
Last edited by robguitargod1; 07-12-2017 at 08:00 PM.
06-11-2017, 10:01 AM
#392
Re: Project Procrastination '91Z LS1/T56/currie 9" w/PICS
I never knew you could do that at home, how do you do that? With just that flat blade screw driver lying there? Where did you get the new filters?

Last edited by Tibo; 06-11-2017 at 10:06 AM.
06-12-2017, 08:56 AM
#393
Senior Member
Thread Starter
iTrader: (4)
Join Date: Oct 2008
Location: Niles, IL
Posts: 857
Likes: 0
Received 5 Likes
on
4 Posts
Car: '91 LS6/T56/9"
Engine: LS6
Transmission: T56
Axle/Gears: Currie 9"/4.11, detroit truetrac
Re: Project Procrastination '91Z LS1/T56/currie 9" w/PICS
I got them on ebay
http://www.ebay.com/itm/PACK-OF-25-B...NXR0vw&vxp=mtr
They're supposed to come out with a #10 screw but not mine. I had to pry up one side very gently with that screwdriver. As soon as I saw it move it came out easily with a screw.
http://www.ebay.com/itm/PACK-OF-25-B...NXR0vw&vxp=mtr
They're supposed to come out with a #10 screw but not mine. I had to pry up one side very gently with that screwdriver. As soon as I saw it move it came out easily with a screw.
06-12-2017, 09:07 AM
#394
Senior Member
Thread Starter
iTrader: (4)
Join Date: Oct 2008
Location: Niles, IL
Posts: 857
Likes: 0
Received 5 Likes
on
4 Posts
Car: '91 LS6/T56/9"
Engine: LS6
Transmission: T56
Axle/Gears: Currie 9"/4.11, detroit truetrac
Re: Project Procrastination '91Z LS1/T56/currie 9" w/PICS
The autometer temp sending unit it getting on my nerves. Their metric adapter (which you have to buy separately) is too small for the sender to fit into. So you have to drill it out a little, but once you do it falls apart when you insert it into the head:

The oil press sender was less eventful but required some mods. Here's what I'll use with the mechanical gauge while priming the engine on the stand.

The electric gauge sender won't clear the intake so I'll use a 45* adapter I had:

Modified the AC bracket to clear the hoses:

Got the accessories mounted:

Of course the balancer requires a special installer tool so I'm in the process of making one,. Not hard but will pickup the M16 rod from Grainger tomorrow.
The HVAC housing needed some attention. I have to have it fully installed before the engine can go it since there's no room once it's in.
One big crack and 1 hole needed some fiberglass repair:

Still sanding and painting it but the top is done:

The oil press sender was less eventful but required some mods. Here's what I'll use with the mechanical gauge while priming the engine on the stand.
The electric gauge sender won't clear the intake so I'll use a 45* adapter I had:
Modified the AC bracket to clear the hoses:
Got the accessories mounted:
Of course the balancer requires a special installer tool so I'm in the process of making one,. Not hard but will pickup the M16 rod from Grainger tomorrow.
The HVAC housing needed some attention. I have to have it fully installed before the engine can go it since there's no room once it's in.
One big crack and 1 hole needed some fiberglass repair:
Still sanding and painting it but the top is done:
Last edited by robguitargod1; 07-12-2017 at 06:22 PM.
06-19-2017, 06:57 PM
#396
Senior Member
Thread Starter
iTrader: (4)
Join Date: Oct 2008
Location: Niles, IL
Posts: 857
Likes: 0
Received 5 Likes
on
4 Posts
Car: '91 LS6/T56/9"
Engine: LS6
Transmission: T56
Axle/Gears: Currie 9"/4.11, detroit truetrac
Re: Project Procrastination '91Z LS1/T56/currie 9" w/PICS
Got the balancer installed:


Made the tool out of M16 rod from Grainger:

Then I got the engine primed:


Spent a lot of time making sure the AC system will be in perfect condition, especially cleaning the housing and ducts. New evaporator and dryer.


Made the tool out of M16 rod from Grainger:
Then I got the engine primed:
Spent a lot of time making sure the AC system will be in perfect condition, especially cleaning the housing and ducts. New evaporator and dryer.
Last edited by robguitargod1; 07-11-2017 at 12:52 PM.
06-19-2017, 06:57 PM
#397
Senior Member
Thread Starter
iTrader: (4)
Join Date: Oct 2008
Location: Niles, IL
Posts: 857
Likes: 0
Received 5 Likes
on
4 Posts
Car: '91 LS6/T56/9"
Engine: LS6
Transmission: T56
Axle/Gears: Currie 9"/4.11, detroit truetrac
Re: Project Procrastination '91Z LS1/T56/currie 9" w/PICS
Installed the coils/plugs/wires:


Finally modified the #8 coil from this:

To this:


Finally modified the #8 coil from this:
To this:
Last edited by robguitargod1; 07-11-2017 at 08:40 AM.
06-30-2017, 05:29 PM
#399
Senior Member
Thread Starter
iTrader: (4)
Join Date: Oct 2008
Location: Niles, IL
Posts: 857
Likes: 0
Received 5 Likes
on
4 Posts
Car: '91 LS6/T56/9"
Engine: LS6
Transmission: T56
Axle/Gears: Currie 9"/4.11, detroit truetrac
Re: Project Procrastination '91Z LS1/T56/currie 9" w/PICS
Is photobucket really trying to strong arm us??
07-04-2017, 08:24 AM
#400
Senior Member
Thread Starter
iTrader: (4)
Join Date: Oct 2008
Location: Niles, IL
Posts: 857
Likes: 0
Received 5 Likes
on
4 Posts
Car: '91 LS6/T56/9"
Engine: LS6
Transmission: T56
Axle/Gears: Currie 9"/4.11, detroit truetrac
Re: Project Procrastination '91Z LS1/T56/currie 9" w/PICS
Photobucket can eat a dick. It'll take some time but I'll get the pics in this thread hosted somewhere else. Using Google photos now.
Been working on small tedious stuff. Mostly the front suspension. The A-arms and spindles were powder coated years ago so they're in good shape just needed to be cleaned up.


Been working on small tedious stuff. Mostly the front suspension. The A-arms and spindles were powder coated years ago so they're in good shape just needed to be cleaned up.