When you click on links to various merchants on this site and make a purchase, this can result in this site earning a commission. Affiliate programs and affiliations include, but are not limited to, the eBay Partner Network.
Re: Long time coming AKA My 91 Z28 Vert build thread
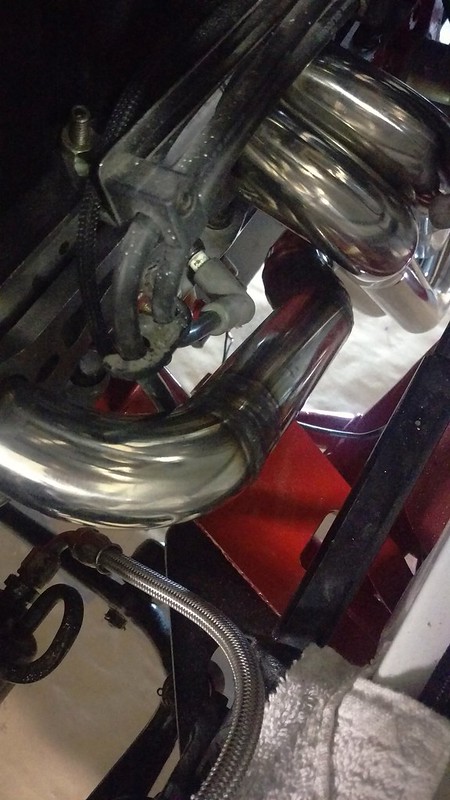
Finished welding up the tubes on the headers. The way I approached it was to fully weld the replacement length I had made and then weld that piece into place on the Header. I back purged the entire assembly. I started out welding them with no pulse but I ended up switching to some pulse settings I was able to find. Before switching to pulse I could only weld an inch length at a time before I could see my weld was getting too hot. Pulse it was much less of a problem. I used followed the "rule of 33" that I have head Jodie on welding tips and tricks mention numerous times. It worked well. I found that if there was a small gap or open root I could still weld it but if the gap was large enough to make me have to weave or increase the voltage the torch would open up the keyhole too much and blow a hole. For angles I used 7.5� cuts. two 7.5� cuts make a 15� angle so you can get some nice tight curves that still have a gentle contour. 10� cuts start to look a little choppy and it doesn't mate well to a 0� section.
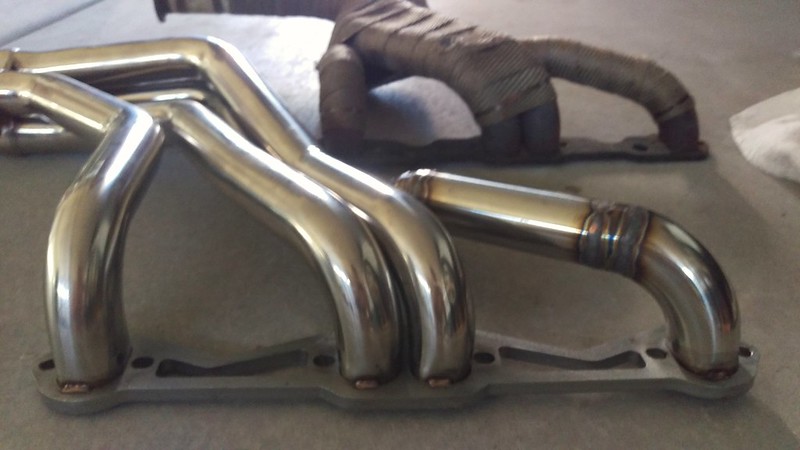
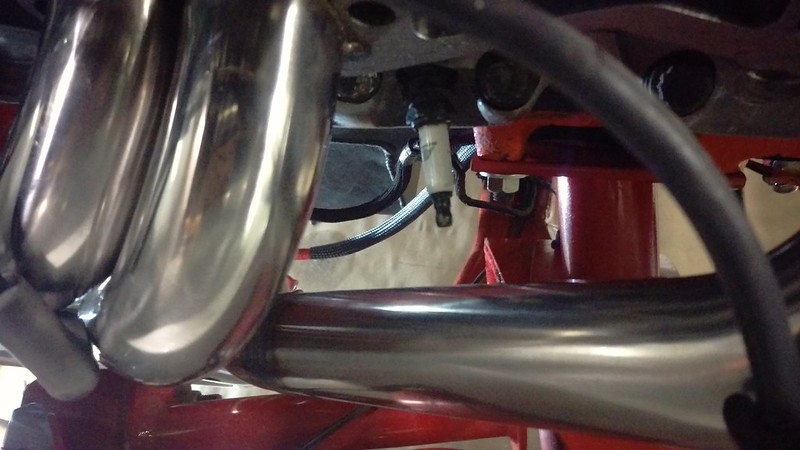
So these first two pictures are the driver's side headers, one is the Hooker super competition Long tubes and the other is my stainless set. You can see now the first primary tube of the stainless set follows the path of the first primary tube in the Hookers.
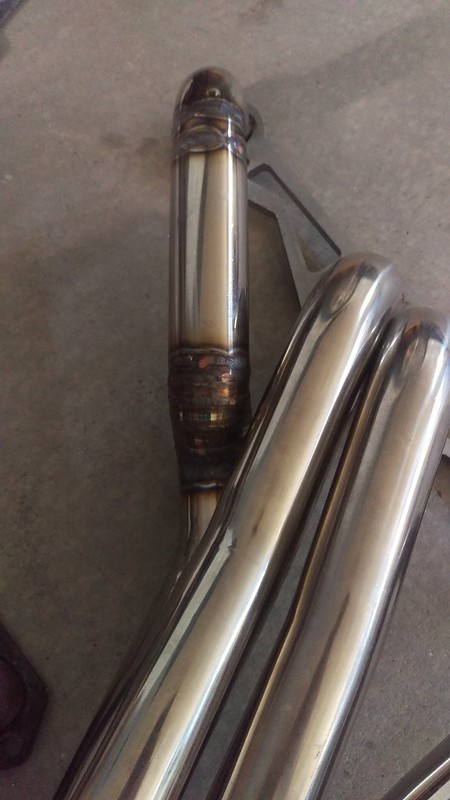
More of a close up shot of the Driver's side's set tube
Re: Long time coming AKA My 91 Z28 Vert build thread
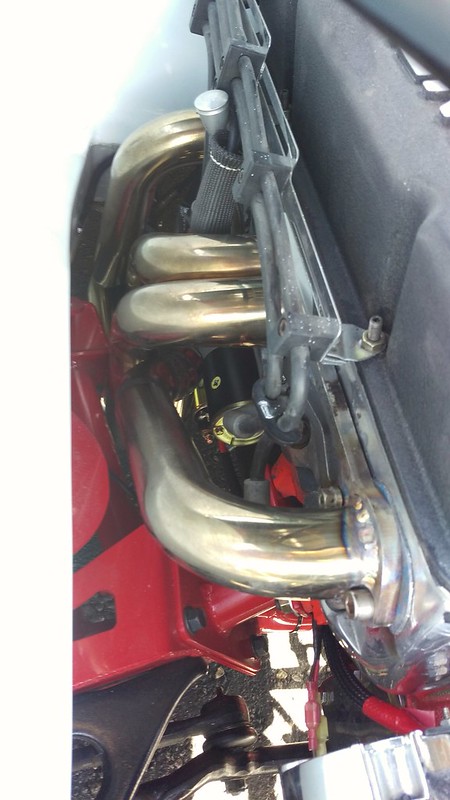
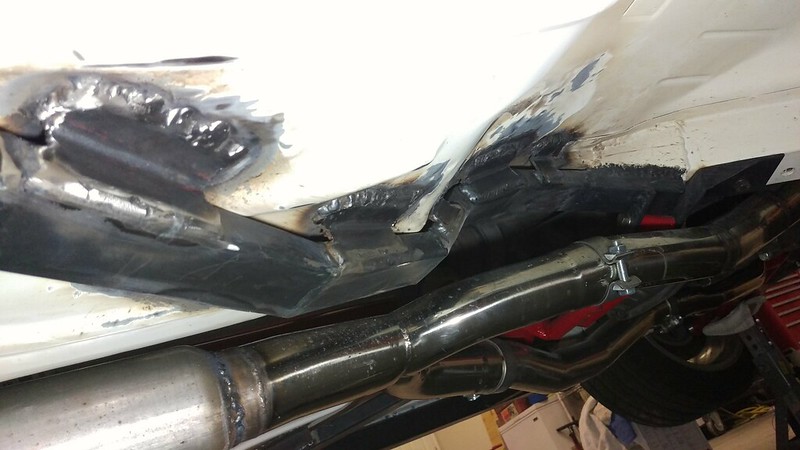
These headers came with the O2 sensor bung in the driver's side and although the sensor would have physically fit in that space, getting it in and out would have been a major PITA. So I ordered a new bung and installed it on the passenger side header maybe 30� from the vertical. That fat wire you see is a transmission ground I added. FYI I still have 0 problems starting this engine hot or cold with my battery relocated to the trunk.
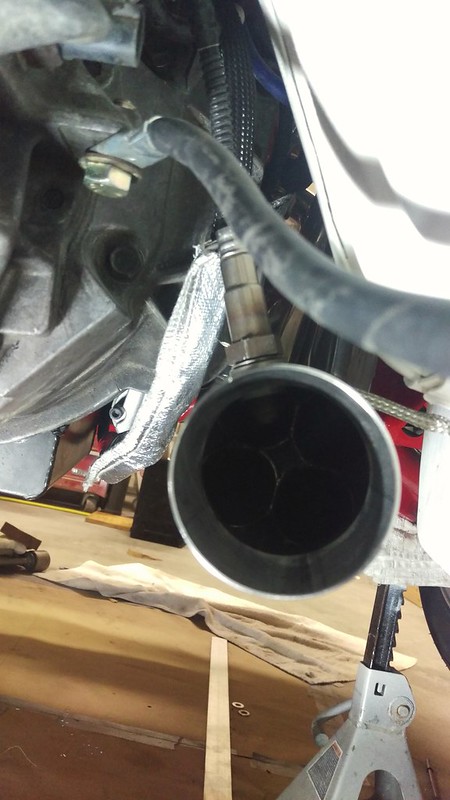
I also installed the stock Y pipe that these came with and although it fit it hangs down lower than I want so in the future I will cut and reweld it. I didn't take pictures of that process but I'll post a picture of how low it hangs later tonight...
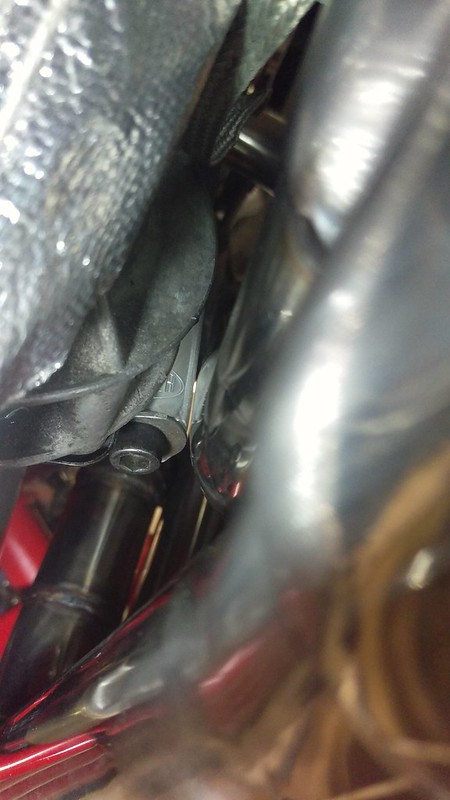
One of the primary tubes was also very close to the billet mounting block of the starter. In the picture you can see just a sliver of daylight between the two, maybe a millimeter. In the future I'll probably shave that spot on the mounting block a little.
Re: Long time coming AKA My 91 Z28 Vert build thread
With the exhaust installed the car was finally done to the point that I could drive it some and enter it in a show. I drove it to a car show that was 6 miles from my house and the clutch pedal bushing popped off three times on the way there. Each time I had to pull over (once along the parkway, a turn lane and a parking lot) or should I say coast over and pop it back on. I was using the stock part number for a clutch pedal bushing which looks exactly like this:
But I couldn't get it to stay on and keep the linkage attached to the clutch pedal. Luckily I foresaw this problem happening so I bought a few metal E clips and it has worked perfect for the drive back.
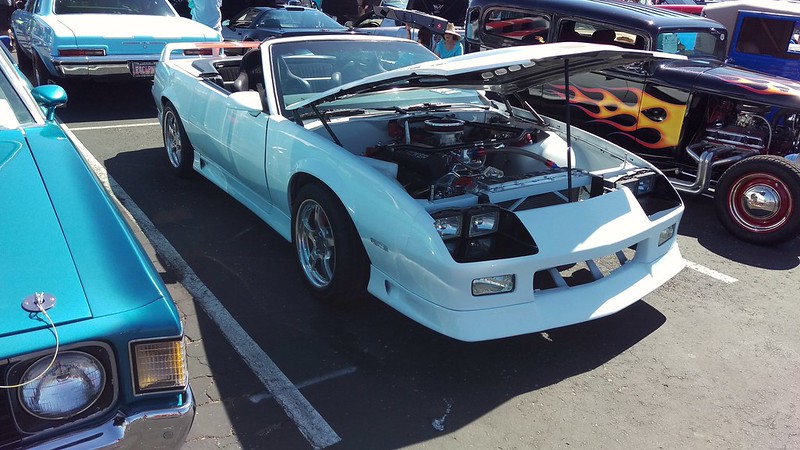
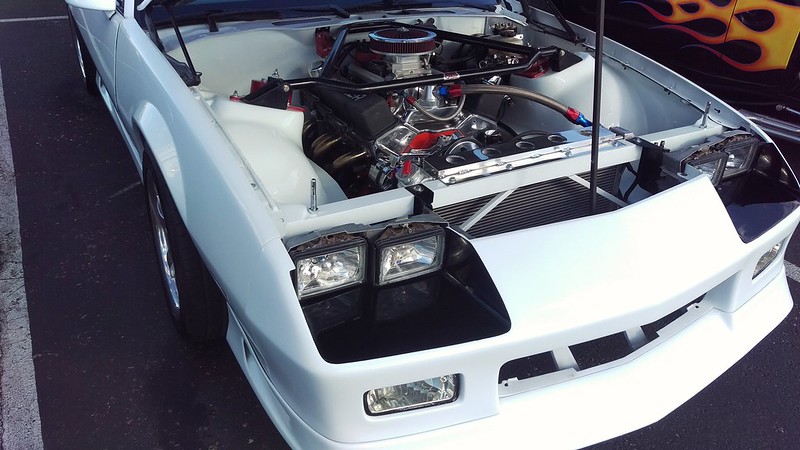
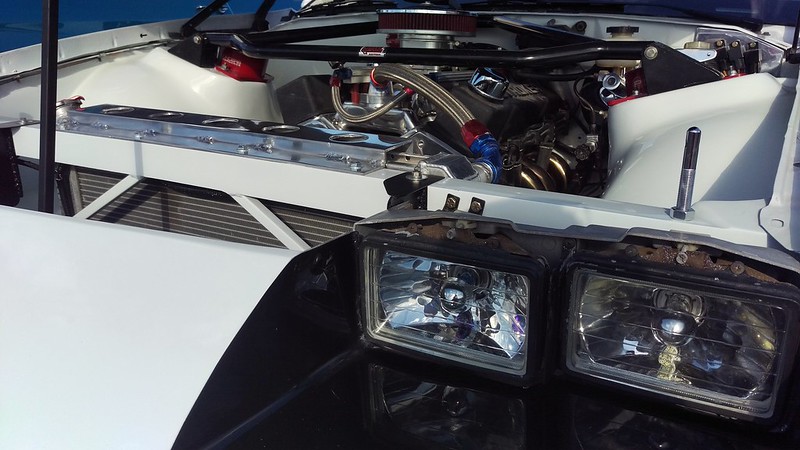
I made it to the show and took a few pictures
The car isn't fully finished but still looks great and many people were stopping to look at it. I didn't win a Judged award or a participation award and I found out why, both reasons are unfortunate. The car show was a three day car show and nearly all the participants had their judging slips in the day or two before I got there, even though the judging wasn't until Saturday at noon. It was readily evident when at the awards ceremony they handed out the judges award for best 80s car and then when they were giving out the award for participants choice 80's category they literally said "we had no entrants."
The judges for the judging category also treated the 90-99 and 2000-10 category as if it were a stock category so any modification had no weight to it and you can lose to a stock car because a certain trim item was loose or misadjusted. Since this is the main car club in the area and this is the main show in the area (200+ cars) I'm going to see about joining and sitting on the planning committee for next year.
Re: Long time coming AKA My 91 Z28 Vert build thread
Hey Tibo - This looks AMAZING! The finish of the build (so far) is just 100%!
Great seeing another white third gen Camaro being all buttoned up after being torn down.
I will have to go thru your build thread a again, and again to see if I can lean more from your build. Do you have any pics of the car with the hood down? Wondering what the hood pins look like on that car. Also, so save me a bit of searching, what paint is that? Where did you get it?
Thanks and look forward to seeing more of your final touches to the car. Too bad about the show. Hope you get to join the committee next year.
Re: Long time coming AKA My 91 Z28 Vert build thread
Originally Posted by dennisbernal91z
Hey Tibo - This looks AMAZING! The finish of the build (so far) is just 100%!
Thanks, I still have a litany of small things to do but it's good enough to drive and enjoy which makes this much more fun now.
1. I'll be welding tabs to connect the inner and outer subframe connectors to the floorpan--Maybe this winter
2. Still need to hook all the audio components up
3. I think my oil temp gauge wasn't reading.... not sure because the drive was short.
4. My son put a scratch in the headlight bucket that needs polished out and there is a run in the paint that I sanded down and polished but it's still evident in the right light at the right angle. Looks like a ripple effect when you walk by.
5. Install my super secret door popper button on the exterior
6. Make my frankenstein 8.8 rear end--Might start this in the Spring
7. Replace the window seals
8. Finish the door panels.
9. Think I need to replace the power mirror motors
10. Put new window tint on.
11. Make a new transmission crossmember and alter the exhaust-- Probably a project for next summer
Originally Posted by dennisbernal91z
Also, so save me a bit of searching, what paint is that? Where did you get it?
The paint and clear coat is DuPont ChromaPremier, that's the top of the line for DuPont as opposed to their Nason line which is more of a paint for daily driver cars. It is expensive but the DuPont ChromaPremier clear coat is generally regarded as one of the best clear coats available. It is a high solids clear, sprayed very well and laid down wonderfully. High solids take fewer coats to provide the needed thickness. Their UV protection is also supposed to be great. Not as hard as that ceramic clear though.
Originally Posted by dennisbernal91z
Do you have any pics of the car with the hood down? Wondering what the hood pins look like on that car.
Re: Long time coming AKA My 91 Z28 Vert build thread
Sounds great. Thanks for the quick response. I wonder how those DuPont paints/clears compare to what Eastwood sells. I plan to use the best stuff they sell. Don't think it is anything special. My car will be driven a lot and not really shown all that much. So I don't think the super high end stuff will really pay off for me in the long run. Just looking for cost effective robust paint/clear. I will read a bit more about options out there once I have the metal work done and the car is all in epoxy primer.
Looking forward to those images of the hood down. Pins would simplify my install since no hood latch would be needed. I already welded the hole for it shut, on the firewall.
Re: Long time coming AKA My 91 Z28 Vert build thread
The high end stuff has advantages. For instance, the color coat will have more pigment which will require less coats to cover. Ten years ago I painted my other Camaro with an Arctic White DuPont Nason Series for the base coat and color coat. I compared it to one of the items I had just painted for this car with DuPont ChromaPremier Arctic White and found that the other white had dulled from UV exposure. The Chroma Premier line is marketed as having more UV resistance so had I used the Premier instead of the Nason line ten years ago it probably would have made a difference but I have no idea how much.
Re: Long time coming AKA My 91 Z28 Vert build thread
Finished one of the door panels and installed it. For the backing I used corrugated plastic, the stuff commonly used for signs that you can buy cheaply from a sign shop or Lowe's/home Depot. It's waterproof of course so I can do away with the plastic sheeting. For the adhesive I used DAP weldwood contact cement. Their top and trim adhesive is supposedly what almost every upholstery shop uses but I've heard good feedback on this from the DIY community. I've grown to dislike the permatex products and the 3M spray products are grossly overpriced.
I'll finish up the passenger side next week. Before installing the pleats onto the panel and the panel into the car the pleats looked too big but once installed I think they look great.
Re: Long time coming AKA My 91 Z28 Vert build thread
Man, you did an awesome job fabricating. The bay looks so much cleaner and I bit she doesn't move an inch when you apply torque. Wish I had the skills to accomplish this...
Re: Long time coming AKA My 91 Z28 Vert build thread
Looks good. I like the front seats where did you get them ? I want to puts some like that in my Vert.
Originally Posted by Tibo
Finished one of the door panels and installed it. For the backing I used corrugated plastic, the stuff commonly used for signs that you can buy cheaply from a sign shop or Lowe's/home Depot. It's waterproof of course so I can do away with the plastic sheeting. For the adhesive I used DAP weldwood contact cement. Their top and trim adhesive is supposedly what almost every upholstery shop uses but I've heard good feedback on this from the DIY community. I've grown to dislike the permatex products and the 3M spray products are grossly overpriced.
I'll finish up the passenger side next week. Before installing the pleats onto the panel and the panel into the car the pleats looked too big but once installed I think they look great.
Re: Long time coming AKA My 91 Z28 Vert build thread
I was able to finish welding in the brackets to connect the inner subframe connectors to the floorpan. The floorpan is extremely thin, either 20 or 22 gauge, so I'm not entirely sure how beneficial this was but it makes since. I just used some 1" angle iron with a 1/8" thickness. Slathered some brushable seam sealer on the welds and will paint soon. Just a few pictures of the process.
Re: Long time coming AKA My 91 Z28 Vert build thread
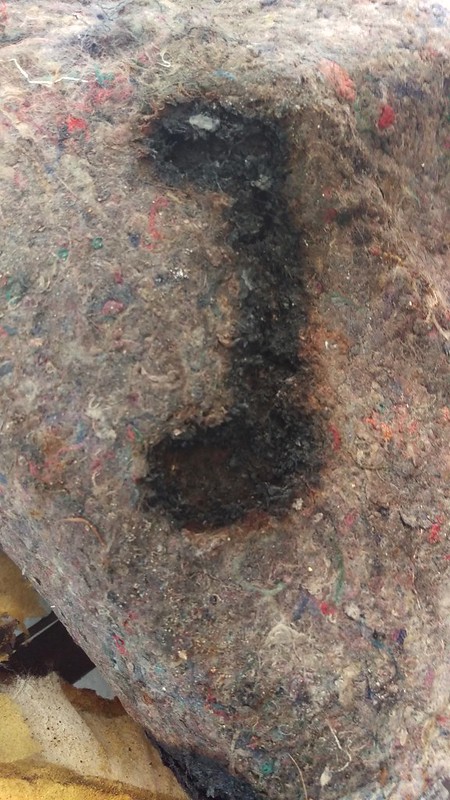
I am and even at the time I was aware of the debate of welding on the floorpan or substructure with the interior/carpet still in place. I began welding at the back of the car's passenger compartment/cabin area. I would do a short stitch weld and then look hor signs of smoke, frayed or burnt carpet or the carpet even being warm to the touch. Nothing could be seen, felt or smelled but I thought I would play it safe so I wet the carpet down or rather completly soaked the carpet to where there was almost standing water on the carpet.
Got back under the car and continued to weld the back area that is around the rear seats foot well. The idea worked well, for that area..... The carpet backs me up on this. You can see that the padding was only singed and wasn't even burnt halfway through.
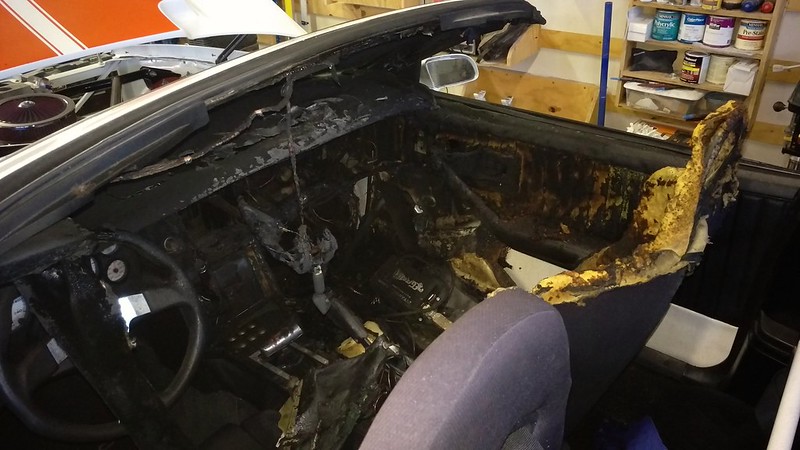
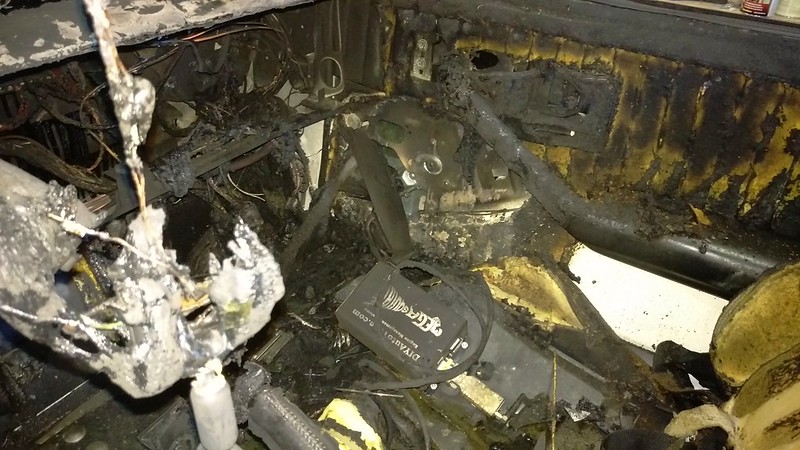
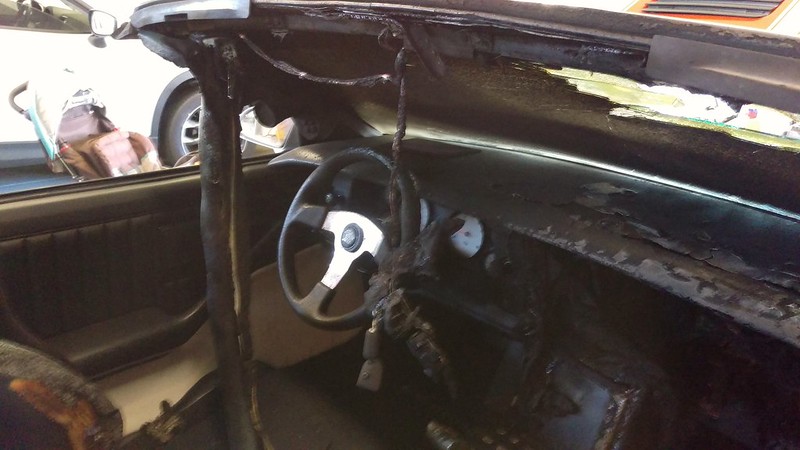
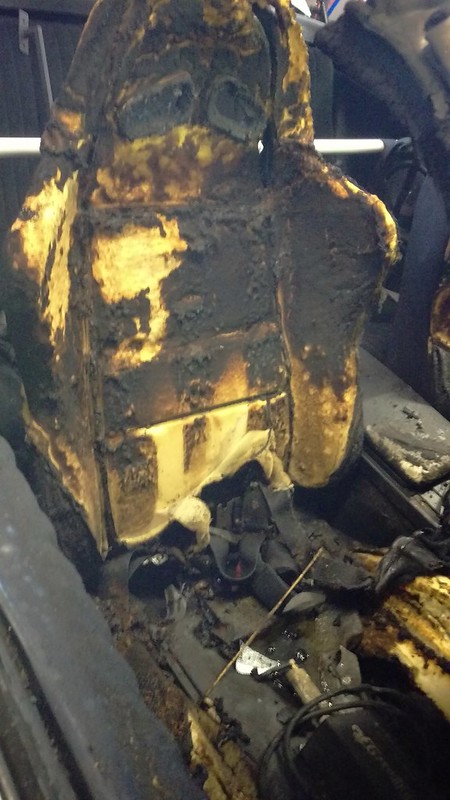
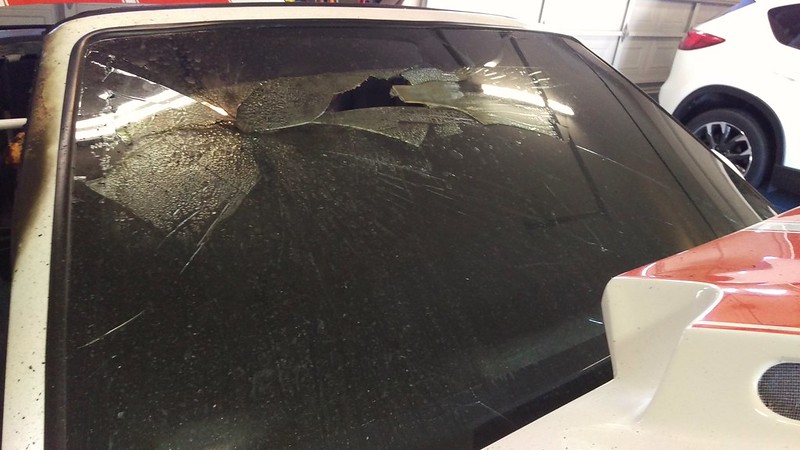
Things went awry when I stopped thinking critically and began welding underneath the passenger front seat. What happened is that the passenger seat sits higher than the rest of the carpet, think of it like an island elevated from the ocean. All the water slid off the carpet below the seat so it was only damp. The seat sits within an inch of the carpet with the mounts I made. Once the carpet directly beneath the seat burned it allowed the seat to catch fire and just melt everything surrounding it. The windshield also acted as a funnel and moved the heat across the windshield header and allowing it to melt/distort lots of the plastics.
I was welding underneath the car and it went so quickly. Couldn't have been an active fire for more than 2-3 mins. I keep a hose hooked up to a water outlet in the garage and that is what saved it from being worse. The rear seating area is untouched and the drivers side only has smoke damage (will still be replaced). That foam just turned into a Napalm and took a while to get out.
Re: Long time coming AKA My 91 Z28 Vert build thread
I called the fire department and had them come out to do an inspection and to file a fire report for insurance. I also called my insurance company, Geico. I had it insured with geico only because I hadn't begun to drive it so I thought there wasn't really any major harm that the car could suffer in the garage.
I posted a thread here (https://www.thirdgen.org/forums/tech...e-company.html) about my experience with Geico. I don't want to spend a ton of time going over the insurance debacle so I will keep it somewhat brief.
When I first spoke with an adjuster over the phone he immediately told me it would be considered a total loss. I rebuffed him and said that that was not an option. We continued our discussion and ended at a disagreement with him believing it was going to be a total loss (salvage title) and me continually saying the damage is not great enough. The conversation ended with him politely telling me to prove that it is not totaled by providing him with a list of everything that needed replaced, the cost and where it could be purchased for that price. Sure, no problem I said.
I made an itemized list in Excel of every part that needed replaced. The list had a description of the part, part number, price, vendor and website address where the part could be found. When the adjuster showed up to view the car in person I gave him a printed copy and went over everything on the list. He began entering the list in his laptop and stopped and said he reached the amount needed to consider this a total loss, 75% of $3,700 or $2,775. I told him his information was wrong and that you could not touch a convertible fit for highway use for less than 5K. I told him that he needed to do a reevaluation of the current market and that I would provide another spreadsheet showing the current market prices of these convertibles in good shape. His analysis would also need to be for convertibles in excellent shape with a mileage of less then 75K. I told him that it was nothing personal but if there was a large discrepancy is what Geico and I said the car was worth then I would have no problem contacting agencies such as the Arizona dept of insurance, BBB, or escalating it further.
The insurance agent called back a few days later and said that they had reevaluated it higher and could move the figure even higher if I could show that the engine and paint were new. The new evaluation was high enough so I told him there was no need for further argument since this was clearly less than 75% of the new figure. Geico then sent me a check for the amount that was proven on my parts spreadsheet.
So a couple take aways:
1. Anybody that has an older vehicle that they care about should always have it on collector insurance with an agreed value policy or a normal poilcy with an additional rider. Do not wait thinking it will be fine sitting in the garage.
2. Geico wanted to lowball me and total the vehicle.
A. The first adjuster I spoke with outright lied to me and said they totaled vehicles at 65% of their value.
B. Had I not made my own parts spreadsheet Geico would have made their own up using the most expensive parts, probably comprised of parts ordered from the GM parts counter. The first conversation I had with the first adjuster he even told me you the parts are too expensive.
B. The second adjuster, even while standing in front of the car in person(!), wanted to assume that the car was in average condition.
C. Geico uses an evaluation tool called CCC1 to ensure lower values and thus lower payouts. CCC1 currently has and had multiple lawsuits against it for ridiculously low evaluations.
3. Perhaps the best take home point: Don't weld with the interior in the car.
Re: Long time coming AKA My 91 Z28 Vert build thread
I had a car catch fire several years ago (engine bay). The biggest worry for me is that the paint burns off in the seams and it's impossible to recoat without doing surgery. I let my car sit up for a few years before I tried to save it and I ended up deciding it wasn't worth the hassle due to the rust in all the creases and seams plus the floor pans needed replaced.
Im not saying this cars a goner by any means, but you've got some work ahead of you. Sucks.
Re: Long time coming AKA My 91 Z28 Vert build thread
Interior is pulled, apart from the windshield all of the damage is easily replaceable items. There is some discoloration from smoke to the paint on the interior of the car but those parts are covered up by interior panels anyway. The worst part will be going to a junkyard to pull a dash and complete interior wiring harness. I will end up cannabilizing that harness to replace the wires in my car that ended up burnt. I ordered a new MegaSquirt harness from DIY autotune so that will just be a simple cut and solder in. The most time consuming part will be making new door panels.
Re: Long time coming AKA My 91 Z28 Vert build thread
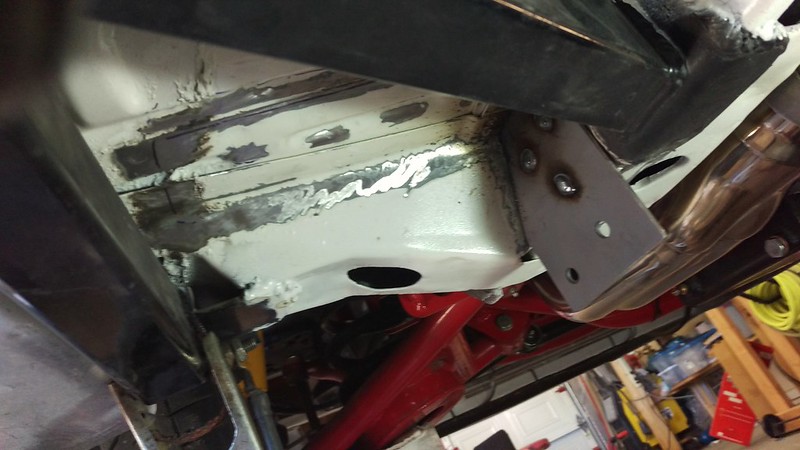
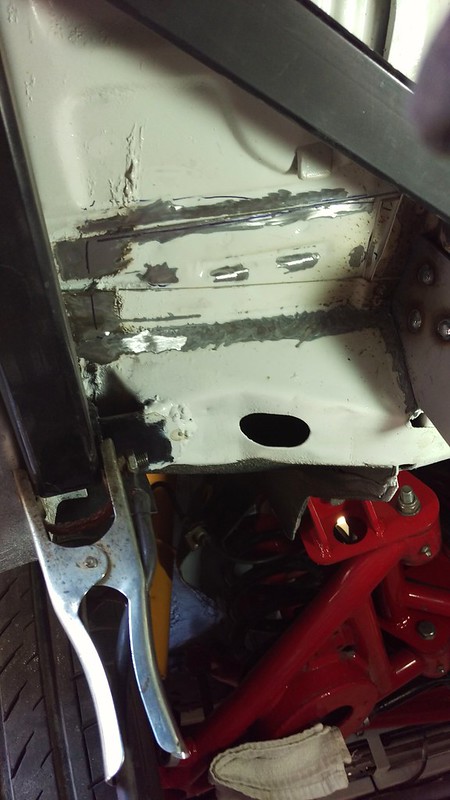
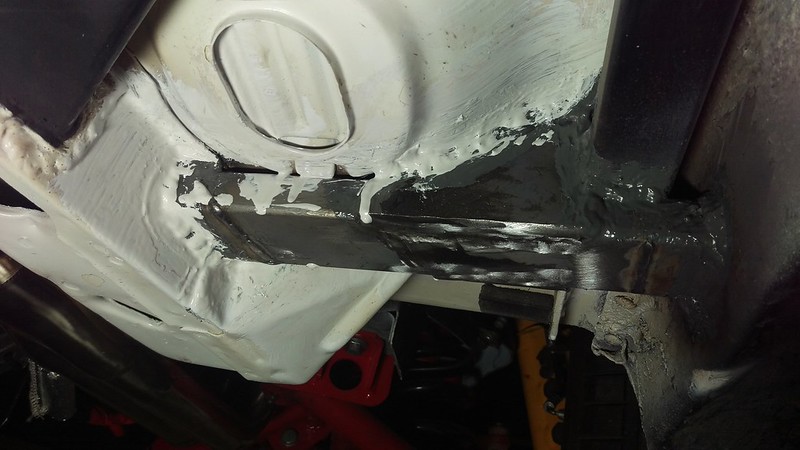
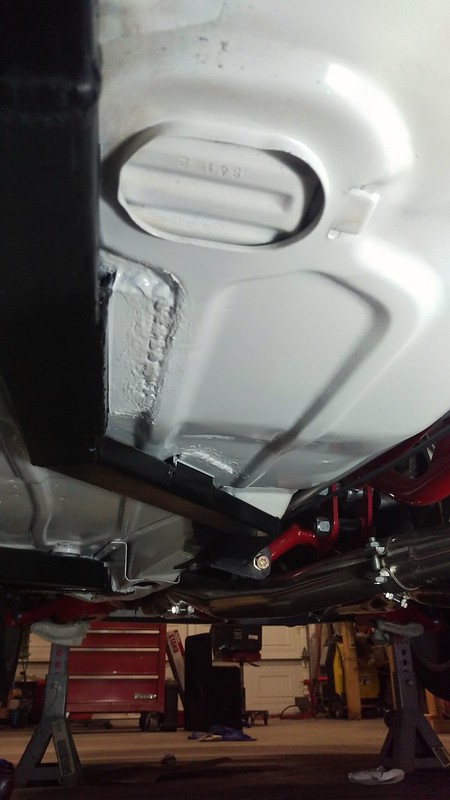
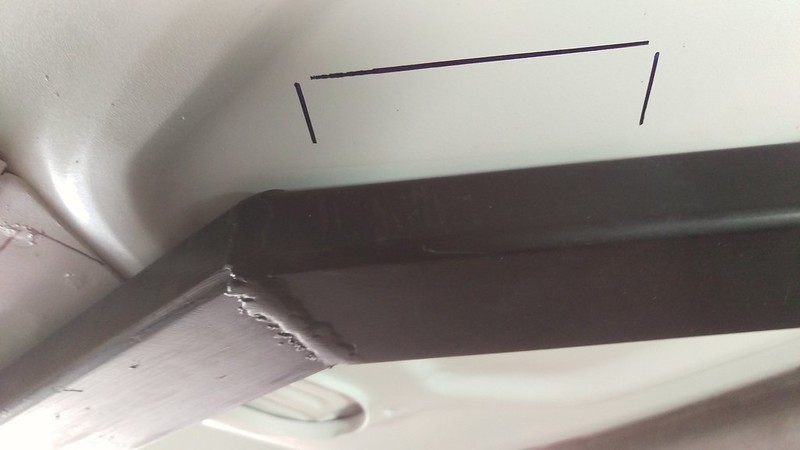
I also took the time since the interior was out to bolster up the area behind the front wheel wells. I did not like how the UMI subframe connectors attached to the vehicle-- They use ears and you weld them to the subframe. Problem with that is that there is not much weld area and the metal it's welded to is only 18 gauge. I don't think my application had a strong attachment. So I wanted to beef it up and provide a better point for jacking or a jack stand support. The first picture is off the drivers side floor pan looking towards the front of the car. You can see from the factory that there are multiple layers of sheet metal that only use spot welds. I ground off where my weld lines would be. I'm using 1/8" plate and 1/8" tube for this. You can also see in the first picture I have one bracket on with some plug welds in it. That piece got heated up and bent 90� like its neighbor there.
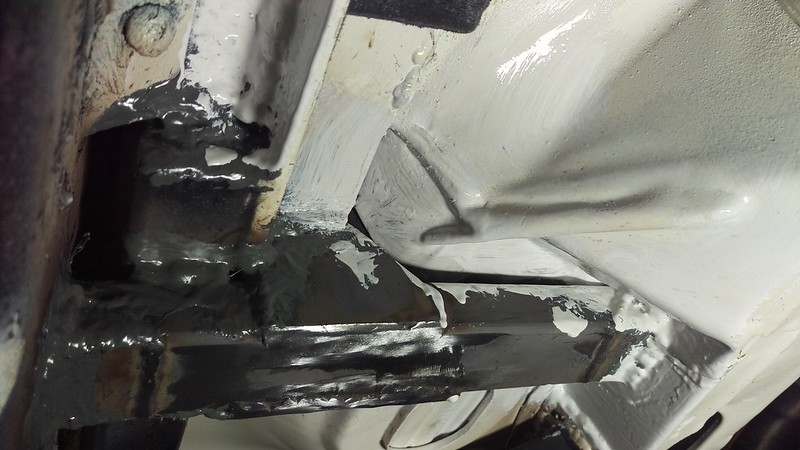
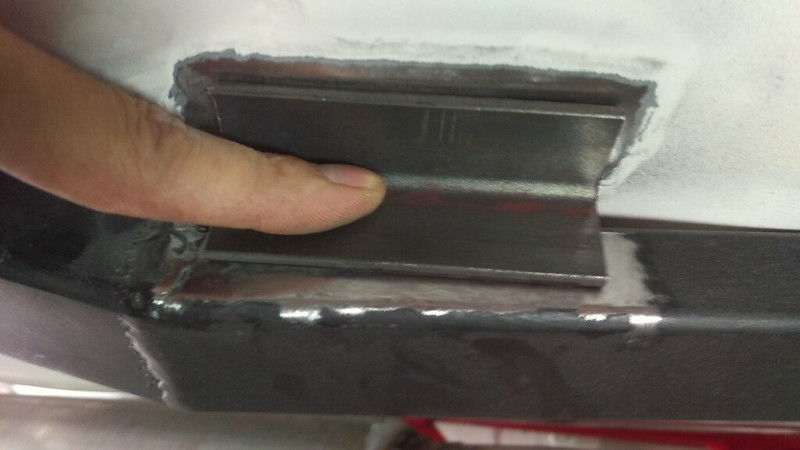
Next picture is a setup and spot weld of how it will look. The welds that touch the floorboard look like bird poop and it took me a long time to figure out that my "weld through" primer was not weld through. That stuff would be great if marketed as only an anti-splatter paint. I have a 1/8" plate that is welded to the side and bottom of one of the subframe rails and then in turn a 1 x 2 bar is welded to that and to the UMI SFC. The 1x2 bar also has 1" round tube that passes through it and will be welded to the bar. This will ensure that the 1x2 bar will not bend and pull the subframe and UMI SFC in towards each other from bending. The plates span all the spot welded sheet metal so it should be much stronger also.
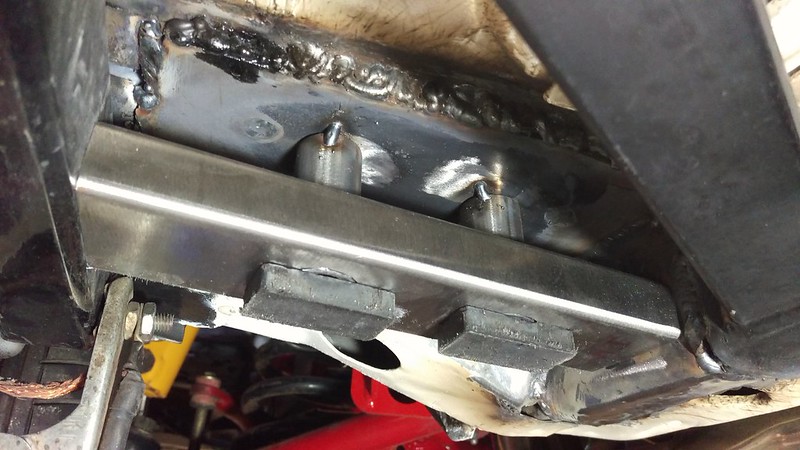
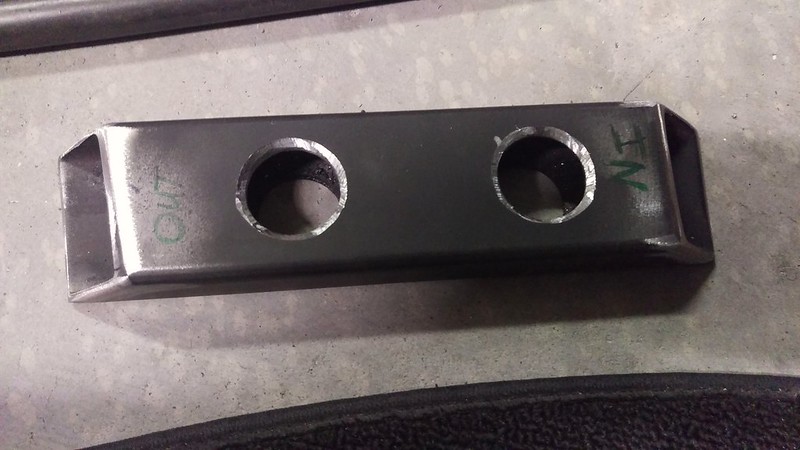
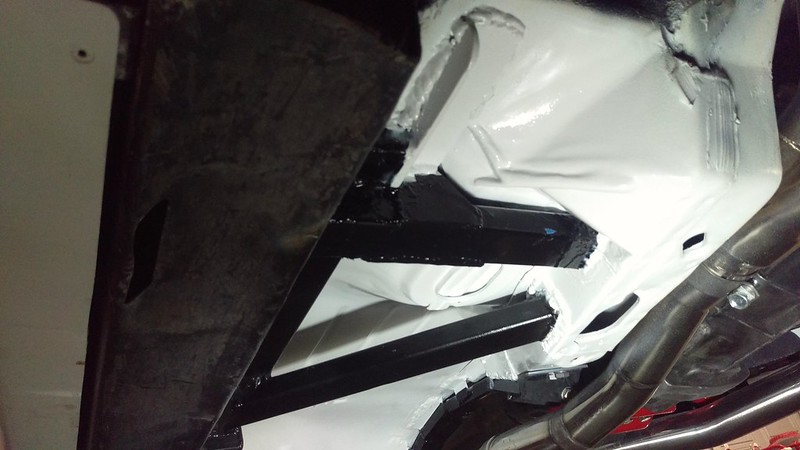
The way I wanted to weld the 1x2 bars on is a little different. Normally you can only weld 3 sides of a bar when welding it to the chassis, the sides and bottom. With this what I am doing is cutting a 45� triangle out of each of the bottom sides, welding that up and then putting the triangle piece in and welding it so it results in all four sides being welded. It is weaker than an uncut tube that is welded on all four sides but it will be stronger than a tube welded on only thee.
Re: Long time coming AKA My 91 Z28 Vert build thread
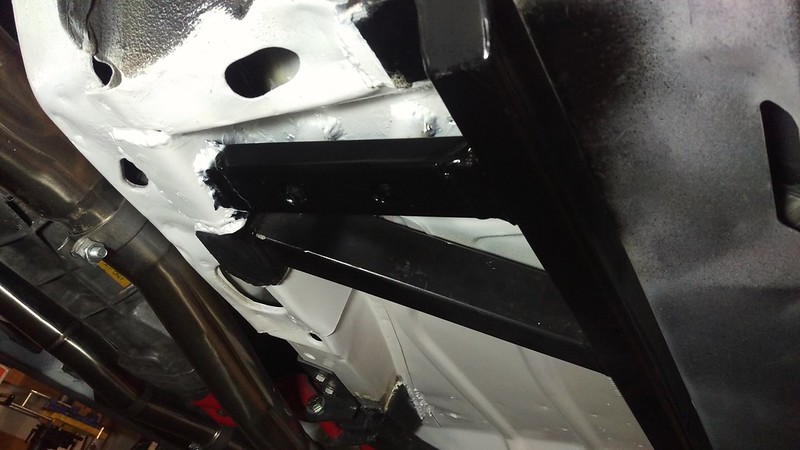
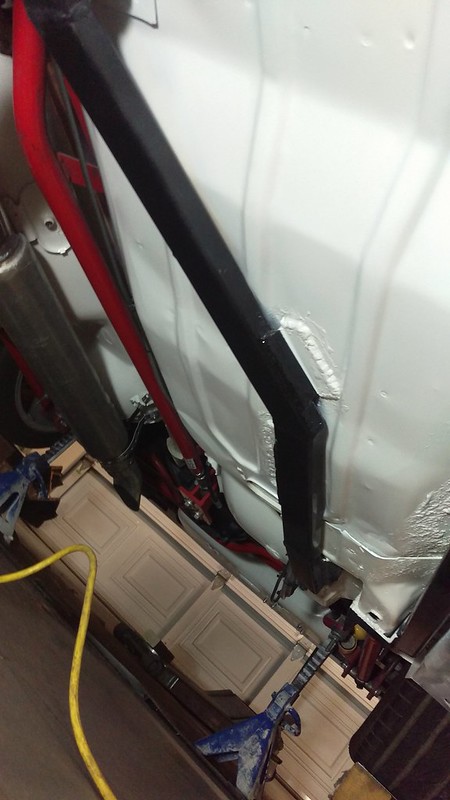
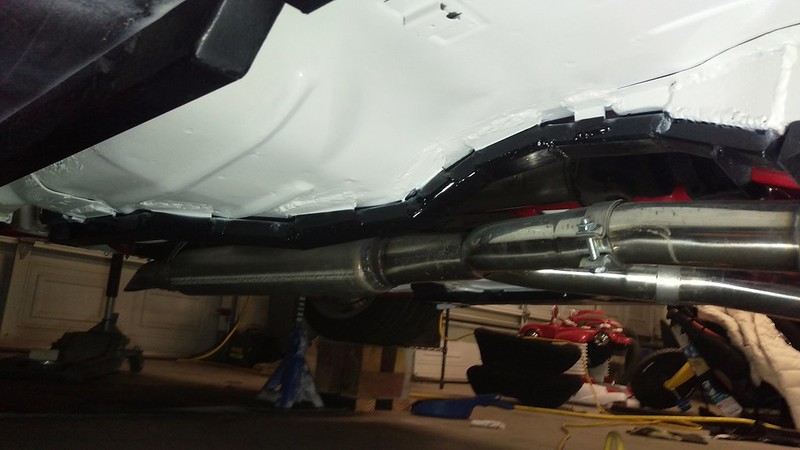
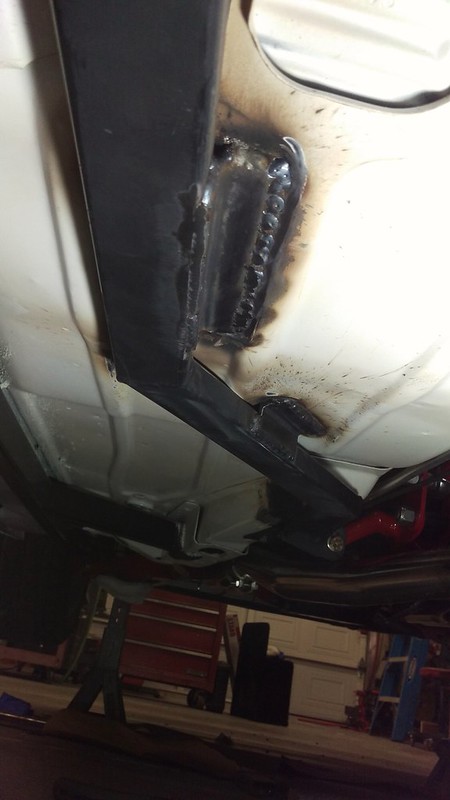
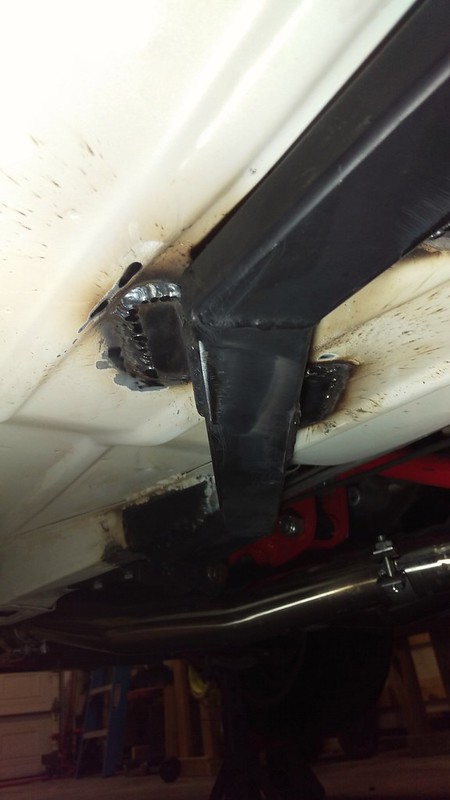
The passenger side was a little easier. I was able to run another 1x2 tube across and get away with using plate steel to connect the tube to the floor pan and UMI SFC. I put some brushable seam sealer on it and slathered some white paint on it until I can scuff it and spray all the areas at once. You can kinda see that I did the same welding process for welding the tubes on all four sides to the subframe.
Re: Long time coming AKA My 91 Z28 Vert build thread
Hey Tibo, so sorry for the fire. Very happy to see you are not missing a beat and your attention to detail when dealing with the insurance company is amazing.
I may have asked you this before, but what are your plan for paint under the car?
Are you painting the underside, just like the topside. Metal-Epoxy Primer-Base coat-Clear coat? Some sort of rubberized undercoat...?
I really like the way it looks painted white and I plan to tip my car on its side over the winter to paint the floors after welding in the SFC.
Re: Long time coming AKA My 91 Z28 Vert build thread
Originally Posted by dennisbernal91z
Hey Tibo, so sorry for the fire. Very happy to see you are not missing a beat and your attention to detail when dealing with the insurance company is amazing.
I may have asked you this before, but what are your plan for paint under the car?
Are you painting the underside, just like the topside. Metal-Epoxy Primer-Base coat-Clear coat? Some sort of rubberized undercoat...?
I really like the way it looks painted white and I plan to tip my car on its side over the winter to paint the floors after welding in the SFC.
Thanks. The fire was my fault though. Live and learn. I'm just glad it wasn't as bad as it could have been.
I painted the underside already. I went with Rustoleum professional thinned with Acetone and added a hardener then sprayed it from a cheap paint gun. I had originally planned to use single stage but a lot of the older guys I talked with just said "why?" In the end I agreed with them. The performance of rustoleum with the hardener is actually pretty good, it does not scratch the way normal rustoleum does and it at least seems more impervious to chemicals.
Re: Long time coming AKA My 91 Z28 Vert build thread
Nice. I think I will spray the entire car car in epoxy primer, then who knows. I just want it to be easy to clean and tough as nails. Do you think the Rustoleum is harder than base/clear?
Re: Long time coming AKA My 91 Z28 Vert build thread
Originally Posted by dennisbernal91z
Nice. I think I will spray the entire car car in epoxy primer, then who knows. I just want it to be easy to clean and tough as nails. Do you think the Rustoleum is harder than base/clear?
I think the rustoleum is works fine for vehicles that aren't hardcore show cars. I don't think it's as good as anything that requires an activator to chemically harden. I think if transmission fluid, brake fluid or fuel had enough contact time it would take the rustoleum off. It would also remove two part paints but it would take longer.
Re: Long time coming AKA My 91 Z28 Vert build thread
Got it. I think I will go with my plan to do metal-2K primer-then investigate what Eastwood sells. They have something called Heavy Duty Anti-rust as well as ruberized undercoating. I think those products can take the abuse of under a car. Not sure. More research needed.
Re: Long time coming AKA My 91 Z28 Vert build thread
Fuuuuuuuuu.....
Sorry to see the results of the fire. If anything, be glad you were able to limit the damage. A guy I raced with had his car 'spontaneously' combust, and it took out the entire detached garage.
Re: Long time coming AKA My 91 Z28 Vert build thread
Originally Posted by dennisbernal91z
Nice. I think I will spray the entire car car in epoxy primer, then who knows. I just want it to be easy to clean and tough as nails. Do you think the Rustoleum is harder than base/clear?
If you're just looking for a paint that's cheap and tough for the underbody I'd use majic tractor/implement paint. It requires a hardener and reducer to be sprayed but it looks good and is tough.
Re: Long time coming AKA My 91 Z28 Vert build thread
Originally Posted by Billgluckman
If you're just looking for a paint that's cheap and tough for the underbody I'd use majic tractor/implement paint. It requires a hardener and reducer to be sprayed but it looks good and is tough.
You can buy that stuff at a tractor supply store, it's the same stuff as Rustoleum-- Oil based Enamel. You add the hardener in a 16:1 ratio I believe. I add it to the Rustoleum I spray and indeed it seems to make the finish harder and more durable. It is much harder to scratch the enamel with the hardener added. https://www.tractorsupply.com/tsc/pr...t?cm_vc=-10005
Re: Long time coming AKA My 91 Z28 Vert build thread
Originally Posted by Tibo
You can buy that stuff at a tractor supply store, it's the same stuff as Rustoleum-- Oil based Enamel. You add the hardener in a 16:1 ratio I believe. I add it to the Rustoleum I spray and indeed it seems to make the finish harder and more durable. It is much harder to scratch the enamel with the hardener added. https://www.tractorsupply.com/tsc/pr...t?cm_vc=-10005
Thats the stuff. I didn't know it was the same as rustoleum. Majic is an alkyd enamel if I remember right. They have a gloss white I've sprayed and it's a very pure white.
I actually painted my k member and engine block with the stuff.
Re: Long time coming AKA My 91 Z28 Vert build thread
For anyone wanting to do small sections of their underbody or even for smaller suspension parts this detail spray gun from Harbor freight works great. I use this and an old fashioned suction spray gun for spraying Rustoleum (oil based enamels) and they both work great for that purpose. The little one with mid-twenties air pressure had very little overspray so I didn't have to tape off everything in sight. The other great aspect of the mini spray gun is that the cup will swivel allowing you to paint stright up or down and any angle in between. https://www.harborfreight.com/adjust...gun-92126.html
Re: Long time coming AKA My 91 Z28 Vert build thread
I've almost bought that gun many times. The swivel cup could be very useful.
I've got a cheapo mini gun that came with a 3 piece hvlp kit I bought at tractor supply for 30 bucks on sale. I've been using the crap out of it because like you said there's very little over spray. I definitely plan on buying another mini. The fan **** has already broke and it's leaking paint from the packing area and I can't get it to stop. Might give the hf a try.
Re: Long time coming AKA My 91 Z28 Vert build thread
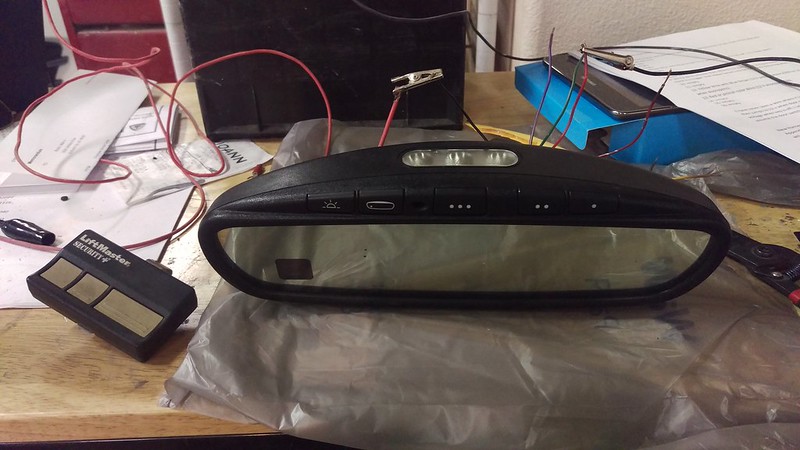
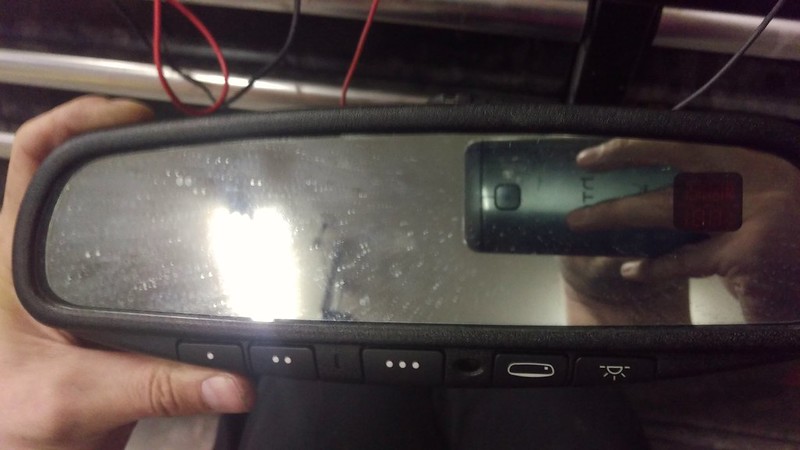
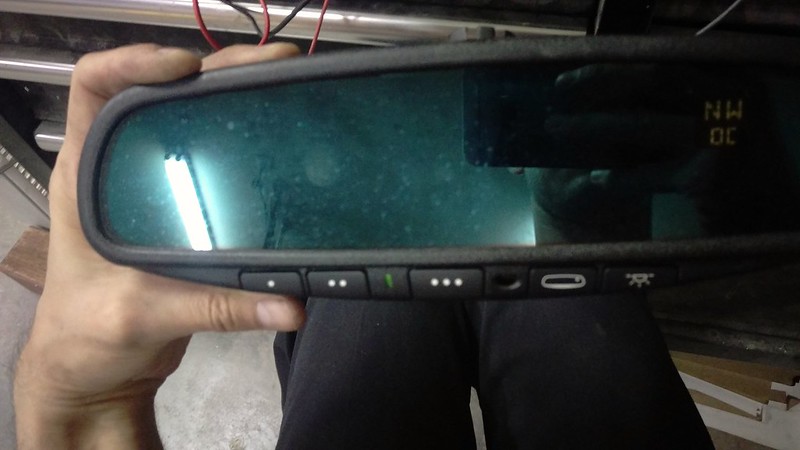
I've decided to do a number of things differently on the interior. One of my wants is to take the interior into the 21st century. Many newer cars have the option of coming with a rear view mirror that has an auto-dimming function as well as a home link function. The home link if you are not familiar with it just turns your mirror into a garage door opener. I went to a junk yard and was able to pull one (actually a couple) out of some donor vehicles. It has the auto-dimming feature, three homelink buttons, map lights, led compass and temperature. I spent some time fiddling with the wires and discovered which wire do what. One wire is the main power wire, another is the main ground wire. Past those two main wires there is one wire that turns the map lights on when the doors open (splice into the door-ajar circuit), another that turns on the auto-dimming feature (splice into the headlights circuit) another that powers the compass (ignition on) and then two other wires that are for a temperature sensor. I believe I found the correct temp sensor part number but we will see... So far the mirror works great! It also installs just as our stock mirror does so I just have to splice into a few wires and have a 21st century mirror.
Re: Long time coming AKA My 91 Z28 Vert build thread
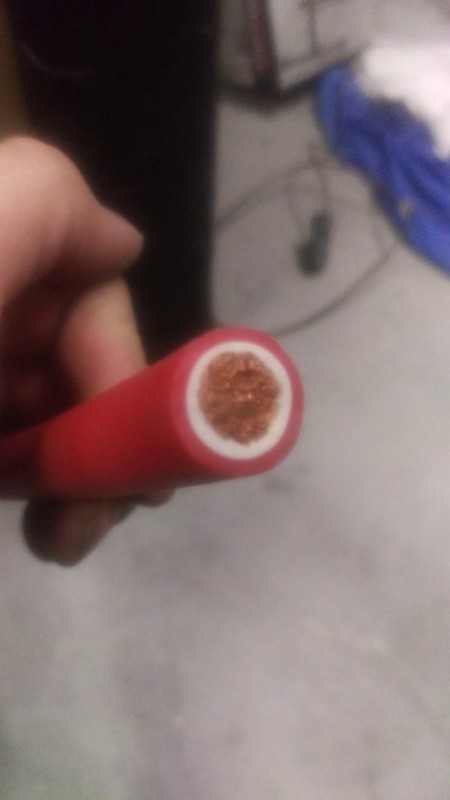
Along with the passenger side of the interior wiring harness the main power cable was burned. The prior power cable was a 1/0 CCA (copper clad aluminum) cable. I've heard/read varying figures but it's usually said that aluminum has 40% less amp carrying capacity and is 40% lighter. If you use it is recommended to go up a gauge size over copper and since I'm not running a big stereo went with the 1/0 CCA. I hadn't had any problems with starting but I figured why not just switch? I went with an abrasion resistant, marine grade, high strand count, 1/0 pure copper cable. Thick and heavy stuff!
Re: Long time coming AKA My 91 Z28 Vert build thread
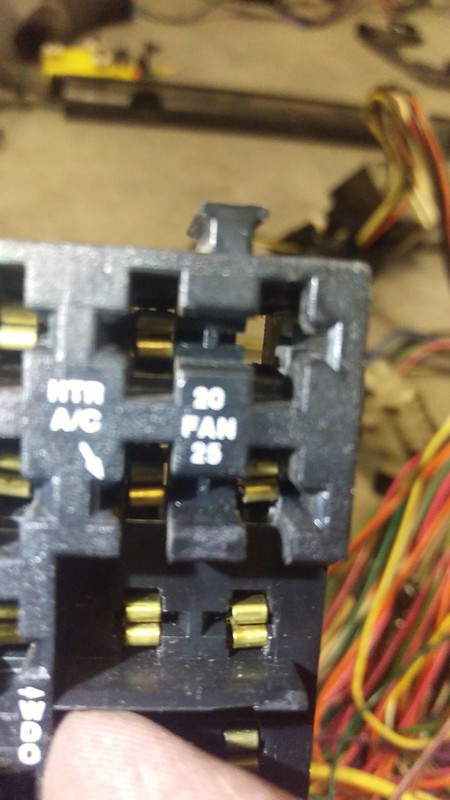
Small update. I'm working on wiring again. Since 1/2 of my interior wiring harness was burned I have to replace it. I went to several junkyards and found a good amount of 90-92 Camaros but nearly all of them had either the steering column pulled and the wiring that connected to the column cut or they had a door pulled and the wiring that goes to the door cut. I finally came across a Camaro that was a 91 V6 automatic that had a good interior harness. It's only downside is that it does not have power windows or power door locks so I am having to add in some circuits. Luckily I have found out that GM partially wired all of the cars for fog lights, power windows and power locks. So there is minimal work to do but I am going to add in some circuits on the stock fuse block. So I learned how to disassemble the fuse block. I can already unpin normal weather pack connectors, c100/107 connectors and ecm connectors no sweat but unwiring a fuse block is a bit harder!
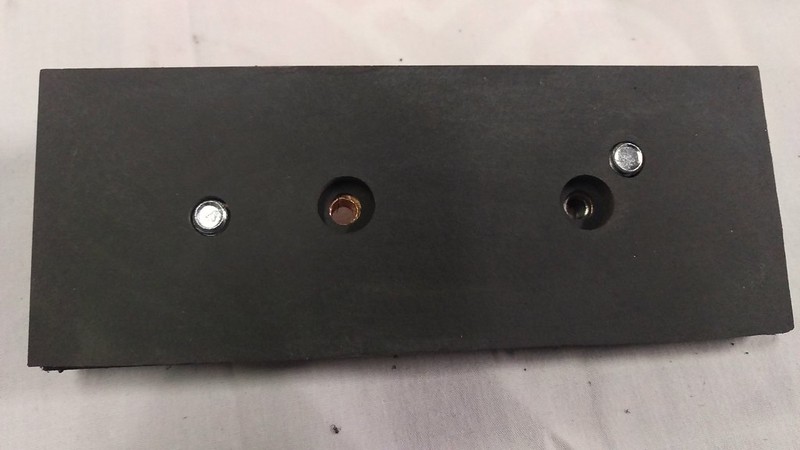
To start with, this is what a removed fuse terminal looks like once you remove it from the fuse block. You can see the little ears on BOTH sides that keep the terminal in place.
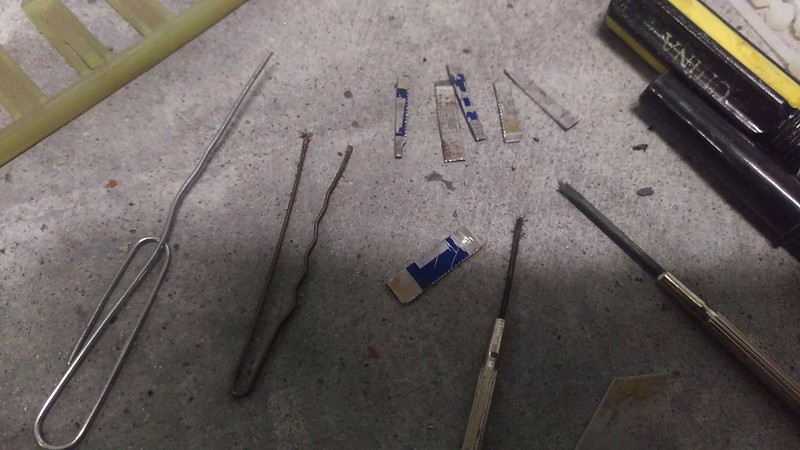
In order to pull the terminal out the backside without breaking the ears off you must press and hold the ears/tabs in and then pull the terminal out. To press the tabs in you can use a paper clip or really thin micro screwdriver which works when it's just a lone terminal or you can use some sort of slender metal tab. They make a special little $10 tool for this OR you can just cut up a razor blade into strips with a pair of tin snips. A bobby pin can also work. When one of the terminal is bussed to other terminals you are forced to use metal tabs. Here are the "tools" I use to pull out terminals
Its kinda hard to see but the fuse block has a small shoulder that the terminal's ears sit on. If the tabs are not fully depressed you will not get the terminal out. And a word to the wise, if you are pulling hard while trying to remove the terminal then the ears are not all the way in. Go slow and take breaks because it can get very frustrating.
Re: Long time coming AKA My 91 Z28 Vert build thread
Mouser has everything, and you don't have to buy sets of 100, tho they are slightly more per each one. They even have the 4-way bus bars. The only issue I had was I know I wasn't using the correct crimper, but they're holding.
Waytekwire has it cheaper as well as some other places, but they didn't have some of the other terminals I wanted. Mouser tended to be a little more across the board, but that was wiped out after you factor shipping from two places.
Re: Long time coming AKA My 91 Z28 Vert build thread
Progress has slowed with the holiday season. Lots of wiring work. I decided to reroute and rewire some of the electronics and wiring and that is taking some time. I have managed to finish a new power distribution block. Since I have a battery mounted in the trunk the bus bar has to handle a decent amount of amperage. I had been looking at some of the Power Bus Bars by Blue Sea Systems but the models I was interested in were far to expensive ($100+) and the math does not add up how they can rate this 1000A bus bar at 1000Amps
So I just decided to make another one. For my purposes I could have gotten away with a power post and then the less powerful 2nd distribution block I posted but I wanted to have as few and as direct electrical connections as a could which meant a single
busbar/distribution block.
The last one was made from Aluminum and according to chart below Aluminum has an electrical resistivity of 0.000027 Ohms/cm while Copper has 0.0000017 Ohms/cm
And according to this website (http://www.electricianmath.com/necca...arampacity.htm) my copper bus bar should be capable of 562.5 Amps. The equation is (length)x(width)x(ampacity sq/inch). Copper has a rating of 1000 so it my equation was 0.375 x 1.5 x 1000 = 562.5
The inline fuse that I have for the main feed line (1/0 copper) is 500 and never blew when starting the engine so this works out perfect. I made it that thick so I wouldn't have to worry about stripping out any threads when tightening a bolt.
Which me brings me to my complaint.... Has anybody ever worked with thick copper like this? The metal is very soft but it will easily break drill bits and taps if you are not slow and careful. I broke 2 drill bits and one tap while making this! The metal is so soft and it becomes easy for a drill bit to grab too much metal and snap or the copper just gums up the tap and causes it to just get stuck.
Re: Long time coming AKA My 91 Z28 Vert build thread
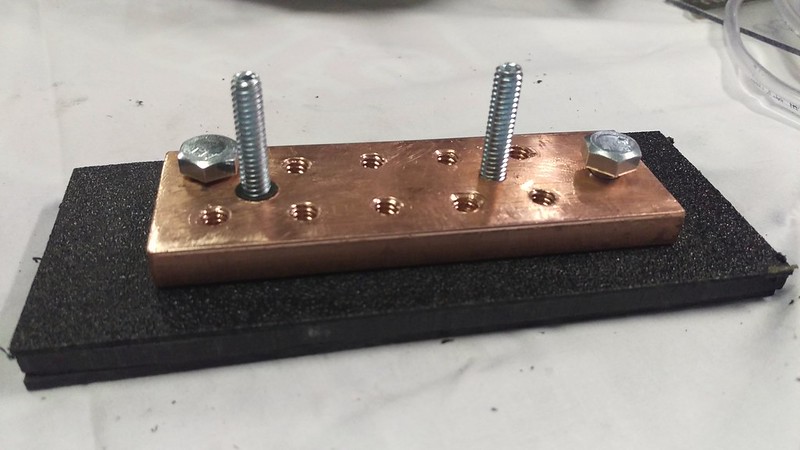
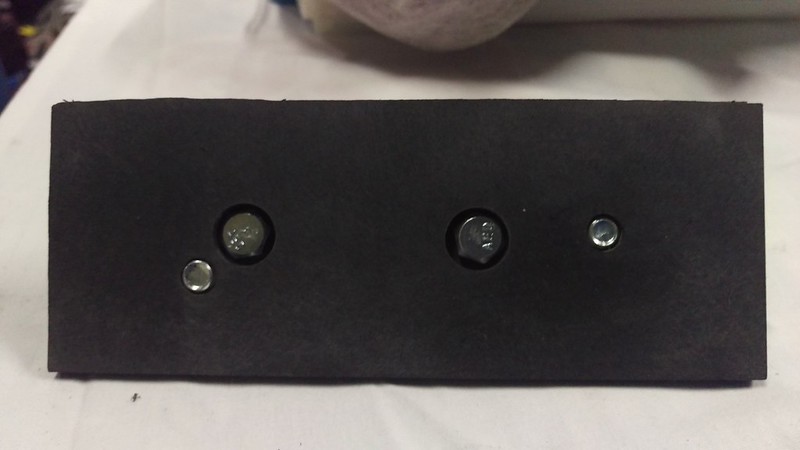
Here is the semi finished product:
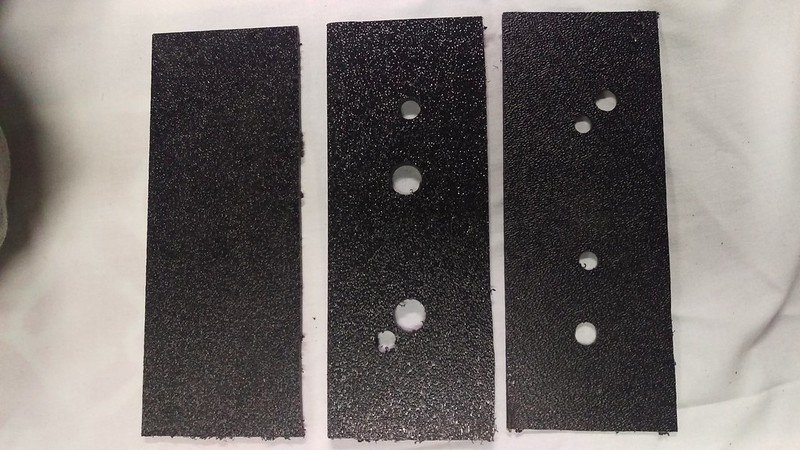
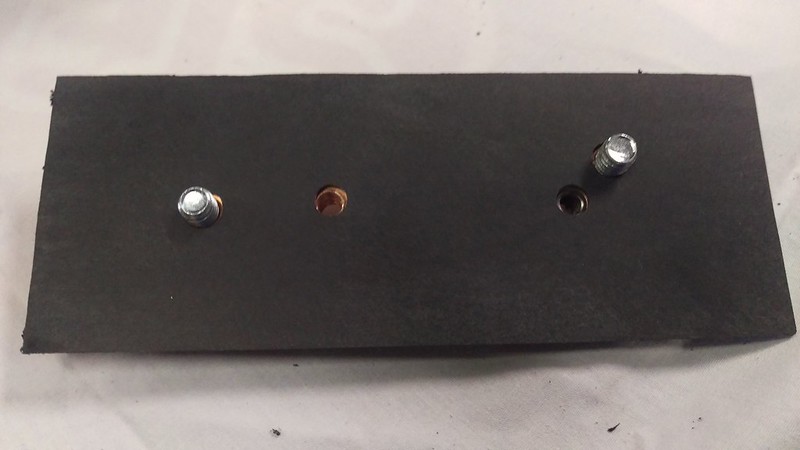
The long threads (1/4-20) that you see standing up will be to secure a plexi-glass cover and the other bolts that you see in the picture (5/16-18) are for the 1/0 main feed wire and the 2 gauge wire to the starter and then alternator. The other 9 holes are all 1/4-20 and for various electrical systems power. To insulate the bus bar I used a 1/16" inch plate of ABS, 1/8"ABS and 1/4" ABS. Here is how they went together:
The 1/16" ABS plate is directly below the bus bar and is firmly bolted to the bus bar with the long 1/4-20 bolts. then the 1/4" ABS and then the 1/8" BAS. I glued the ABS plates together with Plastic Epoxy.
 09-24-2017, 08:10 PM


")