When you click on links to various merchants on this site and make a purchase, this can result in this site earning a commission. Affiliate programs and affiliations include, but are not limited to, the eBay Partner Network.
been hoping to see an update from you, it helps motivate me. mine 90 is getting back burner because I had to buy another tilt column for my 69 Trans Am clone - a long time friend has gone silent and I cant get mine back , I just hope he's OK. anyway I tore a 78-81 column completely down for paint. I've never gone this far before so its challenging, thank god for YouTube and this very detailed thread : best tilt column tutorial
so far its been easier that the 92 column I did for my 90 I really dont care for this part of the car.
I was on the fence... I've got a set of NOS PBR backing plates, but I wasn't all that comfortable with cutting the mounts and not having the center bore of the stock backing plates supported. AndyZ28 stopped offering his conversion parts to do the job right. Kinda figured it'd probably be OK, but the FlyNBye brackets seemed like a good solution. So, that's the plan right now, but I could always change my mind later.
It's like one of those fun book puzzles where you find the difference between the before/after photo. Started out by removing the aftermarket shock mounting hardware, then moved on to removing the remaining brake shoe pivot bolt, and the wheel cylinder. At that point, I snapped the heads off the last two 10mm bolts retaining the drum backing plates. Pretty good, one of the four 10mm bolts came right out. Then I popped the cover and drained the old gear oil. Expended a can and a half of carb cleaner and started looking for the tell-tale stamp.
Never can tell for sure until the cover comes off. 41/12 = 3.416666666666667. That'll do, pig. Typical Auburn limited slip, everything as expected. Would have sucked if it were a 2.73 peg leg or a gov-lock after storing for years, busting loose shoes stuck to the drums, and breaking it down to this point. Glad it's what I thought it was.
All the photos are from after, hence the chalky appearance from the partial carb cleaner cleanup evaporating. Aside from a bit of dark oil, no chunks or grit, no visible damage. I give it a clean bill of health.
Not shown, but I pulled the cross bolt and pushed out the pin, pulled the C-clips and slid out the axle shafts. Tossed the drum backing plates in the refuse heap with the old drums. Gave the bearing surfaces a look-see, both are AOK. No grooves from the seals or issues to contend with. Since I'm not ready just yet to devote the time to the next steps of cleaning and rebuilding the axle, I put the axles back in, slipped the C clips back in, and replaced the pin. Capped it off with the stock cover and stepped away until the next round.
Happy that all checked out and stripped down fine. Never drove the donor car, so wasn't really sure what to expect. And of course, Chairman Meow didn't even offer to help at any point.
I found a rear on C/L to put in my 90 to pull the Dana and it had rotors and brackets, anyway it was only 50$ and had been sitting a long time and was already out of the car, when I pulled brakes it had 3.73s and a gov lock? never seen one in 3rd gen before but hey it rolls! I think 3.73 would be out of a 5 speed car? I'd like to find some 28 spl axles and a torsen for it I'm not a Auburn fan at all
The Chairman is there just for moral support, not gettin no diff fluid on her!
She could have at least run the camera, yaknowameen?
Just as a general rule, you'll see 3.23 autos, and 3.42 5spds, (substitute 9-bolt ratios where applicable) whether it's a higher end TPI car or V6. Usually any higher ratios were from earlier cars with 4bbl carbs and the lower ratio trans. I've heard of Gov-locks in earlier cars, and you see a lot of them on Craigslist or Ebay from S10s or whatever.
At some point, I might strip down a 10 bolt and rebuild it with more aggressive gears to take advantage of the T56's 6th gear ratio. If that ever happens, I'll probably look into a rebuildable differential just for the heck of it. Assuming of course I stick with the 10 bolt. Figured the 3.42s were about the minimum ratio I wanted to pair with the T56 since I'm not planning to hit the salt flats any time soon.
3.42 are in fourth gens with 6 gear, ain't bad- I say it depends on the cam you run. 3.73 or 410 work good too with the .50 OD the ratio I mentioned are common in S10 4x4s and even 4.33 and or 4.56 in some of the Isuzu's with 7.5 GM rear ends. alot of people say GM never made 7.5 with those low ratios trust me they did! Its a shame the D44 wern't more common
should of been std on mid-higher horse cars and 7.5 for the base 305s and smaller engines
the 75-78 Novas with 8 cyl got 8.5's the 6's got a 7.5. Did a 76 305 nova warrant a 8.5? hell no they didnt. Cant make sense of GM then.
Yeah, that's kinda what I was thinking. 3.42s and the T56 is OK in the LT1 cars, so should be fine behind a sort of L98. I just didn't want to go with anything less.
What got me when I pulled the cover off the 10-bolt is how dinky the the 7 5/8" ring gear looks after using a Mustang 8.8 2.73 ring gear as a paper weight around the shop. I haven't grenaded a 10-bolt yet, but I can definitely tell it's not as beefy as the F**d differential. It would have been nice if GM had standardized on a bit stronger parts in some cases. A better rear and a standard V8 that wasn't a 140-170hp 305cu slug would have been nice, but hey we got 5 lugs, a torque arm suspension, and styling that doesn't look like a K-car, so there's that.
Not much project progress to report. Had to deviate and dig into an evaporative emissions leak, check engine light on the family truckster.
They told me powder coating was forever. I guess not. So far I've replaced a busted gas cap, and cleaned packed gravel road dust out of the charcoal can inlet and solenoid. Got one more "purge solenoid" to clean and check, and then it'll be narrowed to a crusty fuel filler neck, rotted fuel neck hose, a faulty pressure sensor, or a hole in the tank. OBD2 is trash. But I gotta keep the Explorer going for the dirty jobs.
Yeah, I've been kinda leaning that way too. Paint or powder, seems like once you've got a chip or an edge where water can get at the steel, it'll just work it's way under the coating anyway. Ferd went a but nuts with the powder coat under the Explorer. At one time, the entire frame and most of the suspension components were all coated. It's a 97 that my dad bought in roughly 99. It did daily driver duties for him until he retired, and when he took over my sister's old mini-van for hauling the grand kids, it got pushed back to spare car duties. Aside from the rust it works pretty well for hauling car parts and all season use. Over the years we've had to replace quite a few suspension parts solely due to the rust that we never figured would be a problem.
This time the Explorer is being pulled back to road-worthy so I can go check out a thirdgen with a buddy. So my babbling about the beater is on-topic in the sense that I'm enabling and indoctrinating a buddy back into the thirdgen hobby <Mad Scientist Laugh>. Anyway, I scraped most of the rust off the tray, checked the structural integrity banging it on the edge of the garbage dumpster to knock off the debris... Seems OK. I would have cleaned it up just a little more, but the weather literally was 80* two days ago, and yesterday we had 30* and snow flurries, so I was pressed for time. Got it all back together after cleaning out the solenoid's filter and the inlet side of the charcoal can, cleared the code and drove it while running errands last night. It can't possibly have been that easy but cleaning the packed in gravel dust appears to have fixed the issue.
I read your post for several hours,thanks for all the pics/info btw.You sir have really put together one nice car and the work involved and detail is no less than impressive.The 90-92 has the upgraded seam sealer thats just a bear to remove,ive worked for several hours on the firewall gutter alone,and im not done,and yes im sure there are a lot of trailer queens out there with hidden issues.I cant see anyway around it.@ Very Impressed.
if you decide to go through the rear adding a 99 and up F-body Torsen unit is a good addition I dont care for Auburns because when cones are worn they're good for scrap metal the 3.73 would be what most people install.
if you haven't tore up a 7.5 you need to put some sticky tires on one it does give one some level of accomplishment LOL
Mini-Update! Wrapped up the check engine light repair on the Explorer the other day, turned out the fuel filler neck was rusted out, specifically the vent tube was rotted off where the hose was clamped on. Anyway, with that out of the way, I was able to refocus back on the Firebird project.
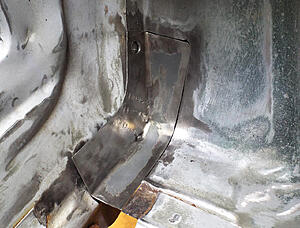
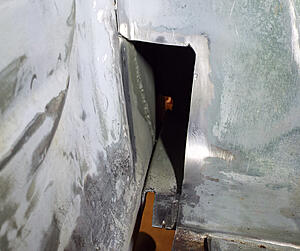
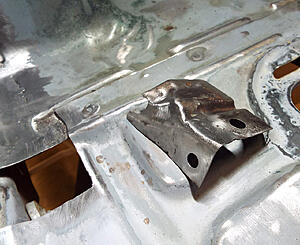
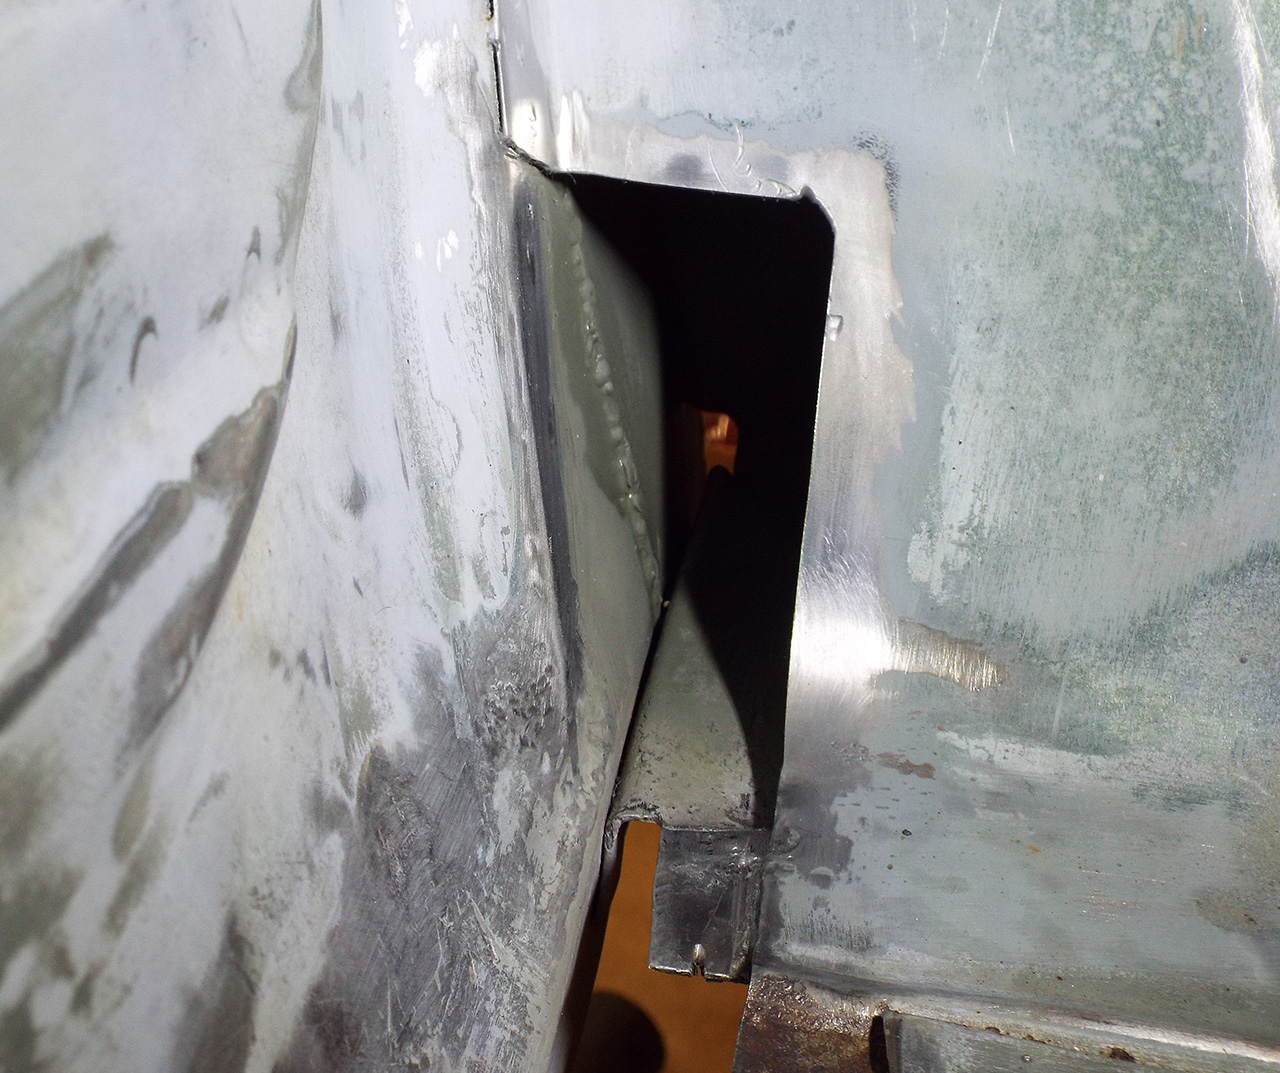
The last real work on the car was cutting away a chunk of floor pan so I could get at and repair the rusted toe board. Probably should have just covered this mess in sealer and forgotten about it, but it bugged me.
First couple approaches to making patterns for a patch panel involved making a two piece patch with a weld down the bend. Wasn't too happy with the idea of having a weld and potential failure place for future rust...
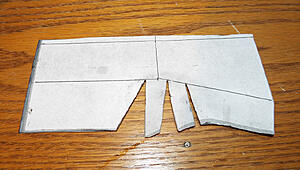
So I whipped up a composite paper and cardboard pattern, encompassing the full compound bent shape of the original part.
Next up I made a duplicate of the paper/cardboard pattern entirely of paper. I made the minimum cuts to allow the folds to lay flat, and then folded the various segments over each other to match the previous pattern. Then I was able to tape the works together and was left with a 3D pattern of my panel.
Of course I have to make my pattern flat again so I can hack a steel version out of the scrap fender. So at this point I made the minimum cuts in the pattern to get it to lay flat.
That gave me a pattern with all the pie cuts I'd need to cut away from a flat sheet of steel, to allow it to fit properly once it's bent into shape. As I work through my patterns, I generally error on the side of too many patterns. As this image shows, I tend to make copies of my patterns before I do anything too crazy, so I don't have to start from scratch if my gamble doesn't pay off.
With my pattern pretty well figured out, next step was to clean up the junk fender, then used a bit of contact adhesive to stick the pattern down, and quickly rough cut it out with the cut off wheel in the die grinder. Next up, I'll cut the chunk-o-fender to more closely match the pattern, refine the edges, cut the pie cuts, make the bends to emulate the original shape... Once it's bent to shape, I'll be able to weld the pie cut kerfs, and get the repair panel ready to weld into the car.
Feels good to finally be back at work on the car, not sure why it took so long to make my patterns and hack out a section of old fender... As usual I spent more time worried about it than actually figuring out a solution, just needed to break the ice to get it moving again.
This portion on my 92 is well,gone already.The images and these how to descriptive post you make are very helpful to lurkers and newbies such as myself.Kudos
Apology to anyone following the thread. Had an incident tonight with a stalker that made me re-evaluate my privacy and what I share online. I decided it's best to close my photo hosting to limit my exposure to the unstable whackjob. Sorry but some people take things far too seriously.
Meh, F&^% that guy... I'm not going to censor myself. (That's the joke.) Doing this for the fans, not the haters.
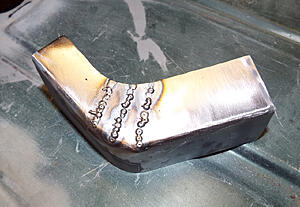
I roughed out my pattern from the section of old fender, trimmed and pie cuts to allow it to follow the contour of the toe board to floor board transition.
First folds, and test fit to the car. Looks acceptable...
Back to the vice for a couple tack welds, check fit to the car, cut a tack weld, adjust, tack weld again...
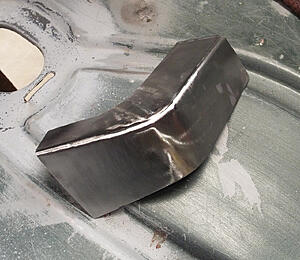
Happy with the fit after tack welds and adjusting, I went back and finished stitch welding the pie cuts. Along the way, I stopped and zipped all the original E-coat and paint/primer from the Mustang away, both to make the welds a bit easier and because I was tired of the flaking mess.
Welds finished, ground smooth, 98% of the old finish removed.
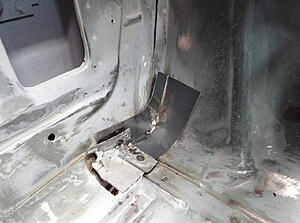
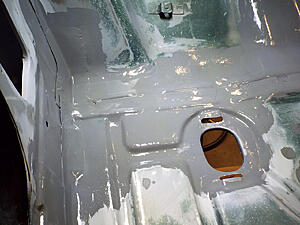
The rough patch panel mocked up how it'll sit in the car along with the piece of floor I removed to access this section of the toe board.
So what's next? I need to cut the patch panel down a bit, right now it's still well over-size for what I need. The fun part will be making the minimal repair, to preserve the original car and keep it close to how GM formed the panel, while giving me enough to work with so I'm not trying to weld a hard to hold or clamp part into the tight quarters of the car.
I'll also need to decide if I want to weld the old section of the floor pan back into the car and plug weld the old spot welds I cut out, and fight the thin areas that have been subjected to rust in the past. Or just knock out a replacement from a good piece of steel and try to make it match up.
In typical fashion, I had an update half ready to post and someone had to walk across the laptop and hit the back button, so forgive the short to the point nature of this update...
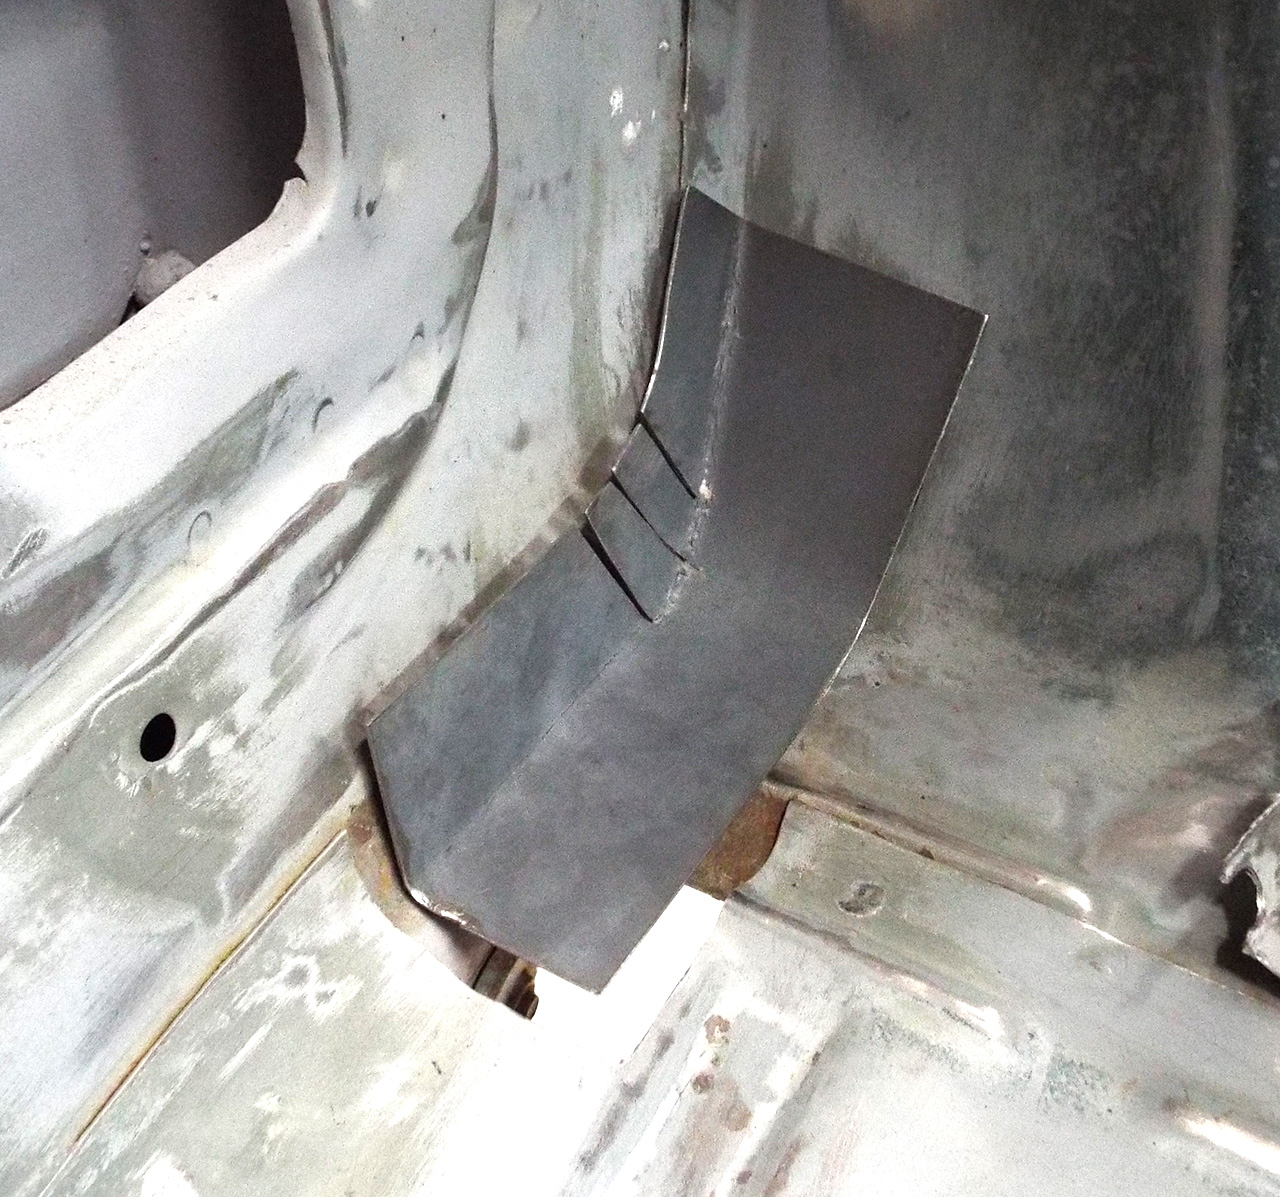
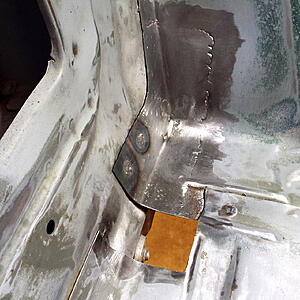
I trimmed the fabricated patch panel down quite a bit to more accurately replace the section of damaged steel, while still giving me enough patch panel to hang onto.
After several rounds trimming the new piece, and the hole in the toe board to slowly make them match, I had the hole the way I wanted it. With the now reasonably large hole, I was able to access the back side of the previous welded repair. It wasn't too bad, but I'm paranoid about leaving places that could rust in the future. So, a bit of scrubbing with the wire brush, and then I went over the back of the previous repair with etching primer, and then later sealer for a bit of rust protection. Then I went back with some solvent and cleaned any overspray off the lap joint where the patch panel will be welded, then followed that with weld thru primer.
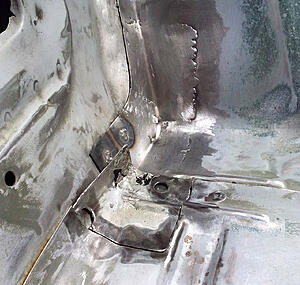
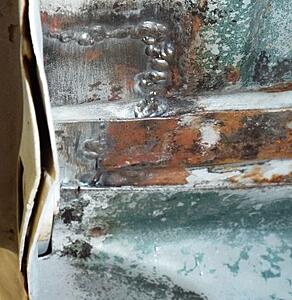
Burned in the new section of steel, and ground the welds relatively smooth. Not exactly happy with the fit of the patch panel, it fit well, I just let it move around a bit during the weld in process. A few plug welds, a few tack welds, and slowly stitch welding the seam.
Test fitting the chunk of floor pan I removed to facilitate patching the toe board... Lots of thin spots and a sloppy spot weld, plus some proximity to the rust damage, has not been overly kind to this chunk of steel.
Rather than fight with trying to weld this battered chunk of steel back into the car only to have it melt away, I figured it's easier to cut away the worst portion where it was spot welded originally, and plug welded during the previous repair, and to weld in a new square of Mustang fender. New section in place, drilled for a plug weld.
Made the chunk of floor pan ride the lightning, and got it melted in if less than attractive. A few pin holes to zap closed, a couple voids in the plug welds that could use some help, just generally looks like hell but is solid. I'm confident I can weld and more importantly grind this mess relatively close to my standards of beauty. At least good enough to be covered in epoxy primer, seam sealer, carpet padding, and carpet.
I'll probably go in with the glass filled filler to smooth out the uneven welds. I'm afraid to look under the car to see the mess of welds I've created filling burn through spots. You can grind away the rust, clean the steel, and get it relatively decent, but with contamination and thin spots from pitting, it's easy to burn through. Good chance the bottom side of the floor pan patch looks a bit like a mig wire porcupine.
At any rate, it's just a matter of filling in the pin holes, smoothing welds, potentially trimming the edges, and it'll be ready to finish just like the parts of the car that were never a rusty mess. Soon I'll be back to sanding off the repaint and getting the shell ready for epoxy primer.
In typical fashion, I had an update half ready to post and someone had to walk across the laptop and hit the back button, so forgive the short to the point nature of this update...
Like my old buddy Joe used to do?
Time consuming and tedious, but those repairs will make for a solid car when you're done.
Exactly! Mr Bill really loves to get in on the action when there's a spreadsheet on the screen, but a long winded thirdgen post with lots of embedded images is just so sweet, he can't resist. Penance for not petting under the chin and behind the ears.
Did a bit of cleanup today... Welded up a couple tiny pin holes that appeared with the work light under the car. Once all was smoothed out, I went over the stitch welds and lap joints with epoxy primer to help seal things from oxidation. Figure epoxy will do a better job of penetrating any voids I can't see and keep them protected. Used a brush to locally apply excess primer to allow it to flow into joints and hopefully protect areas I can't access. Doing this with the spray gun would make a mess of runs, and since the humidity is about 100% (it was raining) I didn't want to get the gun dirty or fight with all the hassles. It doesnt need to be beautiful, most of what is visible will be sanded away before the interior is sprayed anyway.
I guess now I can get back to tacking the clutch master doubler plate to the firewall, welding up the auto shifter cable hole, stripping paint, and so on...
I almost forgot... I peered under the car to check the other side of the repair. I was expecting a MIG wire porcupine, but shockingly it's not bad. A little careful grinding when I get back under there to strip/prep for epoxy and it'll be all set.
These little buttweld clamps are worth every penny of the $6.99 Harbor Freight gets for the set. Had I bought a set of these when I started this project, my finished welds would look vastly better.
These little buttweld clamps are worth every penny of the $6.99 Harbor Freight gets for the set. Had I bought a set of these when I started this project, my finished welds would look vastly better.
I didn't know those were a thing at HF. Need to grab a set.
I'm still no expert welder, hard to gain a lot of skill when the welds are only a fraction of a second BRRRT! If I'd had the butt-welding clamps when I welded in the previous patches, they'd been clamped even with the joining panels, therefore they'd all but disappear when welded and ground smooth. I've got a few spots around the edges where it's difficult to get the weld without burning away a bit of steel, best solution for me is to just leave those spots than try to mess with em. I suppose I could turn the welder down a bit or move the tip of the gun further away to drop the temp, but really, all this stuff will be covered with seam sealer and what not.
The rain is finally here... Pretty much takes the air compressor out of action for the time being. Cure times have stretched out since the temps are cool and the humidity is high. Went over the epoxy this morning with the heat gun a bit to bring it up to a more reasonable temp. It's cured in spots, and curing in others, I'm confident it'll get there if I leave it alone another day. In the meantime, I'm back to sanding and grinding away paint.
I need to dig in a bit and research how thorough I should be about stripping the old finish. Ideally bare steel would be a nice foundation for Epoxy, but mostly I'm just shooting for removing anything that could delaminate under the new finish. Everything I've been stripping so far is down to the original E-coat at least. Seems it usually stays stuck to the steel, and the epoxy should stick to anything clean and roughed up a little.
I got distracted on a side quest that filled most of the late summer/fall. It turns out stripping a car to bare steel or e-coat by hand, with 80-grit takes an eternity. So after reading spec sheets until I was blue in the face, and determining that printed SCFM ratings are pretty much on the honor system, I dropped a hundo at Lowes, and gave a better sanding solution a try.
The difference was eye opening. Rather it just confirmed what I already knew, a good sander would make the job much faster, and Ye Olde "5.5hp" Craftsman law-suit compressor was not going to cut it.
For those that don't know... Craftsman and a few other compressor vendors got sued in the late 90's for selling compressors with fairy tale output ratings. They lost and were supposed to stop doing that, but the industry as a whole took it in stride and continues to just slap whatever tall tale they like on the side of 110v compressors. Anyway, the long story short, the Craftsman Compressor that has never lived up to expectations, could run the Kobalt sander at about half throttle for about a minute, maybe 90 seconds before the pump would kick on and run for 2 or 3 minutes. Running constantly the tank would empty, and the sander would eventually stall. Waiting for the compressor to recover, then sanding some more basically would overheat the oil-less compressor to the point where it'd be vibrating your ears off and blowing water out the exhaust of the tool. It was not going to cut it.
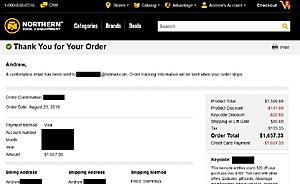
No big deal. I cleaned up the old compressor, made a deal, and had it sold in a few days, and a new compressor in-bound. Unbeknownst to me, a simple compressor upgrade would eat a few months. Because you remember that thing about compressor ratings pretty much being as trustworthy as a used car dealer? Well that applies to buying a new compressor in 2019 just as much as ever. So considering this was going to be a purchase that would exceed the value of the car, I took the time to read a zillion reviews on what was available locally, and opened my consideration to include options that would really push the budget to it's limits. I had budgeted between $500-1500 for a compressor that I wouldn't have to upgrade again any time in the near future. I had my choice narrowed to 2 or 3 options pretty quickly, but then I ran into the first thing I hadn't really given much thought, sales tax. Tax on a $1,500 purchase stings a bit when it's unexpected. Then you learn about the "maintenance kit". That's manufacturer code for blackmail. If you want the extended warranty, you've gotta buy the kit for $180. That's a few quarts of oil, a couple air filters, in a fancy box... For $180. Anyway... So then you get to the part of the transaction where they grin from ear to ear and offer you "lift-gate service". This is vendor code for blackmail 2.0, if you don't have a forklift, or loading ramp, you've gotta get the compressor off the truck yourself or pay an extra $85 for a lift-gate. Punch in a discount code, to take off a whopping $20, and away you go.
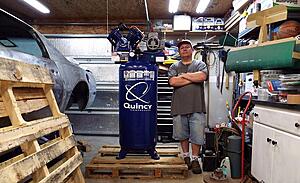
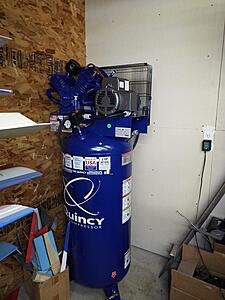
A week and a half later, a nice guy shows up in a truck, and unloads the booty. You've been planning ahead, and you're able to help him roll the top-heavy behemoth up the driveway and into the waiting garage on a pallet jack. Fortunately there's just enough room inside the garage to unload it and close the overhead. Then begins the fun of getting the smaller cracked pallet that the compressor is bolted to, off of the larger pallet the shipping company slipped under the stack for added stability. Stop and take a selfie to document the accomplishment.
Then the fun part, getting it off the smaller pallet, and moving it to the opposite corner of a 24x24 garage. I'll spare us all photos of that process. Just picture an Oompa Loompa Waltzing the Crushinator across the pavement.
In the interest of brevity, I skipped over the in depth process of clearing the back corner of the garage to make room for the compressor. That process alone was a bit arduous. A built in storage rack for model planes had to be cleared, disassembled and relocated, and a large late 90's computer desk had to be moved out of the garage. Plenty of 'stuff' went in the trash, or was otherwise relocated. At this point, it was the beginning of September. So from May when I last posted an update until September just to get the new compressor in the garage, call it 4 months of research, cleaning, moving, and preparing for the compressor to arrive.
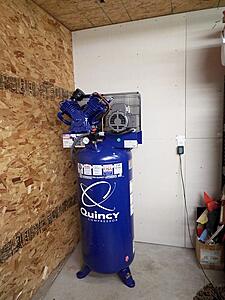
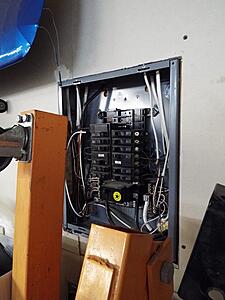
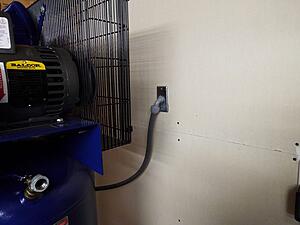
Once the compressor was in the corner, the next 'phase' started. The new unit is 220v. Smarter folks than myself say the best way to wire an appliance like this is to hard wire it to the facility. That meant running #8 wire from the breaker box to the back corner. Fortunately, the shop is fairly new construction and the box is a bit oversized to accommodate electrical demands. In addition to several lighting circuits, a 220v welder circuit, and a dedicated 120v welder circuit, I had room to add a breaker and dedicated circuit just for the compressor. Pics exist of removing the drywall panels to route the wiring up the wall into the attic, and across the attic, then back down the wall to the new box, but if you've seen any wall with it's insulation hanging out, you've seen them all.
Finished off with some weatherproof conduit and fittings, the electrical part of the install was finished.
Then you get into the next part of the install... The plumbing for air. Sure a person could run a 100ft hose across the shop, like some kind of neanderthal, but never one to miss an opportunity to sacrifice the budget on the alter of "a little is good, a lot is better", I figured I should plumb as least as much of the shop as needed to carry air from the compressor to the work bench and a couple other common use areas.
There's almost as much written online about black iron pipe, PVC, copper, and PEX plumbing in air systems, as there are user reviews for air compressors, and professional electricians aghast at people using dryer cords to hook up their 7.5hp 220V compressors. I think I read about half of it, then hit the local Home Improvement Labyrinth(s) with a quick cheat sheet of materials and a pen to make notes and calculations. Copper or black iron are considered safe and durable. Black iron has the edge in a few ways, but threaded fittings can be a bear. Copper doesn't rust, but then you've gotta solder a million and one joints, not to mention it's expensive.
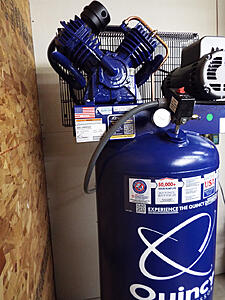
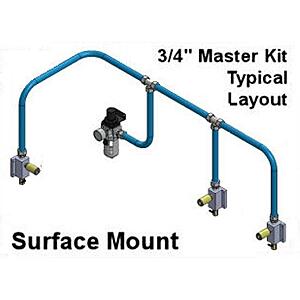
One relatively modern alternative is a product line from RapidAir. They offer a variety of kits and components in different sizes of plastic tubing and fittings for building an air distribution system. Being plastic, the tubing doesn't rust, and it doesn't cost a fortune. I figured it a few ways, and determined the 3/4" Max-Line system wouldn't cost any more than a copper or iron pipe solution, and in theory it should be easier to deal with. $180 later the basic kit was on the way.
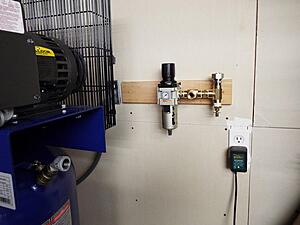
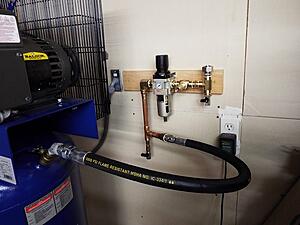
Now the basic kit doesn't include the regulator. So off we go to Ebay, $50 for a NOS RapidAir 3/4" regulator/water separator. Mount that bitch to a nice piece of Maple, build a brass fitting manifold, and screw it to the studs near the compressor.
Now before anyone goes getting the vapors, yes, in a perfect world the water separator should be much further from the compressor for best results. However, I'm using the assembly to hopefully stop some of the trash before it enters the distribution system, and the regulator to chop the 175psi output down to a more reasonable level. So then we get to how to connect the regulator/filter assembly to the compressor. A 3/4" x 3' long 3000psi hydraulic hose will do the job. $40 later for hose, fittings, and shipping... Fish thru the scrap plumbing box for some copper pipe and fittings, solder it all together... Another 3/4" brass elbow... Seal all the threads, screw that shiz together, and boom!
At this point, you're a card carrying member over on the Garage Forums, and a half dozen Auto Body forums, and you're watching a dozen different Max-Line install videos on Youtube getting all kinds of good, bad, and ugly advice. The MaxLine tubing is what is commonly referred to as Pex-Al-Pex. In other words, it's a Pex tube, a layer of Aluminum, and another layer of Pex. It comes in a nice tightly wrapped roll that then has to be unrolled, straightened, and bent to customize your install. The OCD set says that you really need a straightening tool to take the bends out of the tubing and prepare it for custom bends. You can buy the $100+ tool, or you can build the tool. At this point, I'd stopped adding receipts. Most of the parts came from my junk bin, so at least there's that...
So you roll this stuff out sorta straight across the ground, then you fish it through the rollers on the straightener tool, roll it back and forth several times until it's straight, then you can put your bends in as necessary and snap the tubing into plastic anchor clips to retain the tubing against your walls/ceiling.
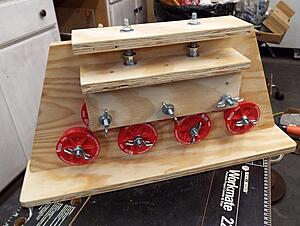
The kit included manifold blocks to build 3 drops/outlets. I decided with 100ft of tubing, I could run the tubing from the back corner of the garage forward to the front wall by the overhead door, and across the back and forward on the opposite wall to the other side of the overhead door, with a drop both sides of the overhead door, a drop at the work bench by the vise and whatnot, another in the middle of the back wall, and another at the compressor. To pull it all off, I used a couple brass manifolds I put together, and the supplied manifold blocks. Every drop got a Milton High Flow female coupler, and a 90* ball valve for draining condensation.
Initially I was unsure about making the bends in the corners, or the long runs of tubing without splices. As it turned out, putting in soft bends wasn't too difficult. A 10.5" brake rotor with foam rubber stuck around the outer diameter made for a nice bending jig to form the soft curves without collapsing the tubing. Moving 40ft lengths of tubing with multiple 90* bends, into position was a two person job, but it was relatively easy to deal with.
The end result after a few days refining hardware, fixing leaks, and so on, was a system with 5 drops around the shop in all the areas where most work is done.
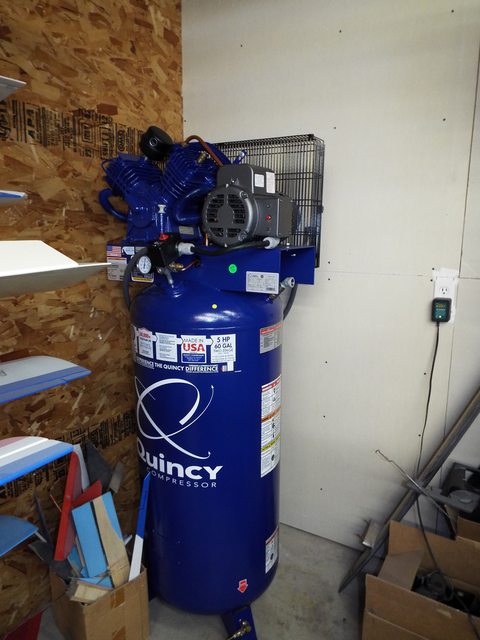
Somewhere along the way, I picked up a set of these vibration isolating pads to slip between the feet of the compressor and the floor.
So how's the new compressor compare to the old one? Well, it's not nearly as loud. It doesn't vibrate so violently that it walks across the floor. You can just about maintain a conversation across the garage while it's running. In fact it hasn't moved a bit. When running the sander, the compressor kicks on, runs for about 45 seconds, then kicks off for a few minutes before the tank runs low and it comes on again. Worth every penny.
That brings us to October, and winter weather. Or at least I was promised climate change, and grand solar minimums, ice ages and bullshit. Not that it mattered, around this time I had a dental issue that pretty much made it uncomfortable to work on anything, and the sticker shock and disgust of getting the compressor all situated, I really didn't even want to think about the car for awhile. I decided to put the Firebird on the back burner and work on something else for awhile.
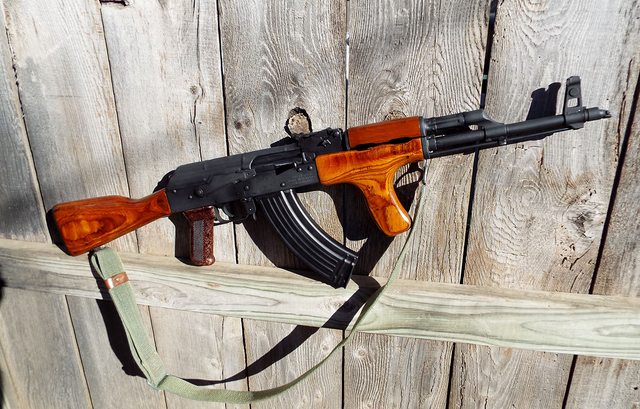
Now that the AK is squared away, and I've refinished my fill of AK furniture, I'm waiting on warm weather to pull the doors and hatch off the car, epoxy prime the areas I can get to, then figure out another way to support the car that will let me access the floors under the passenger's compartment, so I can strip them and epoxy the underbody. Then, I don't know. I'll probably be ready to sell it at that point and just drive the Formula.
Brace yourself... People are paying $70 for just a dong these days. I picked up a pair of them on the files and cleaned them up a bit, one is in my spare wood pile, the other went on the WASR for the time being. Personally I much prefer a palm swell hand guard, but dong is distinctly Romanian. It gives the WASR some identity among the other AKs.
Um, I'm ready for an update on this ....
EDIT: It'd be great if you added pics back in for those of us who kaint read!
Updated just for you... A bit light on Firebird content, but that's what I've been doing while I should have been progressing on the car.
I started going through the thread from page 1 and trying to find the photos on my hard drive. I'm sure I have 90% of them still, the trouble is that the links in the text are generic random imgur filenames, that don't match the filenames of my local files. That means I have to read the old post and try to match up a photo that matches the text. Sometimes I post the caption before the image, other times after, which makes the process... interesting. I gave up on the idea after fixing a couple posts. It's just too fiddly to fish through my filing system trying to find the photos I used. It doesn't make things easier that I've got something like 9GB of photos and notes on the project, and that folder only goes back to 2018. Pretty sure the project started in 2016.
Wow what an update! I wondered why thread got cold. and I appreciate the photo updating there were lots of good pics you had and without them the tread was lacking - you know guys are visual creatures.
in 2012 when I built my shop I planned for my old, noisy runs too much 220V compressor in one corner and got cold feet thinking I hate hearing it run so I left it in my garage and my bead blaster too - too messy! and I guess I'm Ne-ander-tal so I run a hose when I need air- hindsight:I should of plumbed pipe from Garage to shop before the concrete had set, too late now! but most of wrenching I do is 12V & 18V Milwaukee. no compressor noise, no hoses. I did think of one day mounting compressor next to shop on a pad and in a small covered box and run lines in but it isn't that pressing to me.
I thought about building an outhouse style enclosure on the side of the shop/garage to house the compressor. Ended up it was just a little less complicated to put it in the corner. Since it's been in place and hooked up, it hasn't given me a bit of trouble. Meaning I haven't thought at all about moving it outside since I've been using it. I still want to fab an intercooler... aftercooler... inter... whatever... A thirdgen a/c condenser would fit near perfect on the belt cage, but I'm not sure it'd be the best design to utilize. I do get condensation in the tank, so before I go spraying anything too important I need to increase the filtration and drying capacity, but epoxy goes on so quickly it shouldn't be a problem assuming I hit a fairly dry day with reasonable temps, and take the precaution of purging the tank and lines.
Time has sucked a bit of enthusiasm for the project out of me. The budget took a beating with the compressor, which I expected, it was just a little more than I expected. LOL If I can get the body and paint squared away, the rest will be easy as it's just a matter of signing checks and putting the puzzle back together. But until it's in color it just doesn't feel like I've done all that much to move the car from where I found it sinking into the mud, to where it is now.
I actually touched the car today! Shocking, I know... Removed the door hinge bolts from the inside of the car, vacuumed a ton of sanding dust out of the interior, started planning the next phase of getting the doors and hatch off to access the jambs and get some epoxy sprayed. Didn't get really far, had about a million other things going on today to keep me busy. There's a small chance I'll keep working on it, better chance I'll let it sit until spring and only think about it when I get dragged into doing other things with the decent weather before the heat of summer.
Well in typical fashion, I dragged my feet just a bit and missed the window of opportunity. A few weeks ago I pulled all the hardware to remove the hatch, and set some strips of wood between the hatch and the body so I'd be able to lift the hatch off the car. Talked briefly with the brother in law about stopping over to help move the hatch off the car. They were getting ready to leave town on vacation, so I figured I'd wait until they got home before bothering him. The Covid nonsense went full retard before they go back to town, and now everyone is on full quarantine, so until I figure out how to move a get the hatch off by myself, I'm pretty much stalled on the body work.
Today the weather was decent and there wasn't anything else going on, decided to work on part of the project that I could actually deal with on my own.
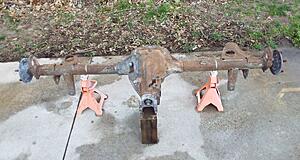
The 3.42 posi 10-bolt has been sitting on stands for about a year now. I ripped the drum brake hardware off awhile ago, to prep for a PBR conversion. All but one of the smaller backing plate bolts broke off flush, but the rest came apart without too much fighting. Anyway, I've been putting off knocking the surface rust down and painting the housing since I don't want to move it indoors and have to work around it. Today I took the wire cup brush on the angle grinder and went over most of the axle housing, aside from the tight corners where the brush wouldn't reach. Once the bulk of the housing was zipped down, I sprayed the entire housing in Ospho and let it sit for a few minutes before rinsing. After the Ospho treatment it was obvious the wire brush hadn't removed as much of the surface corrosion as it had looked before. The wire brush tends to polish the rusty surface without removing it. Anyway, after the acid treatment, the clean steel and iron is visible as dull gray, while the rust returned back to orange with white in areas that the acid has somewhat effected.
After the Ospho treatment, I could start to see where the axle housing was marked during production. It's not easy to see, much less read, but the front of the right side axle tube is marked near the center section. The marking is more of a dot matrix marking than a typical stamping. I'm surprised it's visible at all, and would expect in most cases it's going to be impossible to make out with any corrosion on the axle. The gray area in this photo is largely due to the 10-bolt's propensity for leaky axle tubes, along with the greasy deposits from the vent on top of the center section.
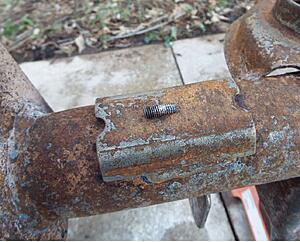
While I was soaking up sun and messing with the axle assembly, I decided to deal with the broken backing plate bolts. I thought about trying to weld a few nuts onto the protruding threads, and using them to back the bolts out, but with the puddle of water from rinsing off the Ospho, and faced with the prospects of dragging the Mig welder out to the patio, I decided it was easier to just drag the Oxy/Acetylene torch out there. It only took a few minutes to heat up the bolts and flanges dull red and I was able to crack them loose with the Vise Grips, and turn them out with pliers.
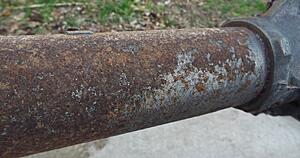
Next up is dealing with the remaining rust. The Ospho treatment would probably work if I could submerge and soak the assembly, or keep it sopping wet for half an hour. Power tools can't really reach the nooks and crannies. I figure I could blast it clean, but I don't really want to deal with the mess. We'll see where I end up eventually, might just sand everything as smooth as possible and hit it with POR15, or another rust paint.
It looks worse than it is. It's not too scaly, just lots of oxidation on the surface. I had a 9-bolt at one point that was from a Minnesota/South Dakota car. Couldn't even get the backing plate bolts to break loose with a good long breaker bar, and the gear ratio/limited slip tags are so thin they're like rusty paper and illegible. Compared to that rear this one is immaculate, and GM even painted the 9-bolts. Had they done the same for the 10-bolt this rear would look a lot better.
I'm not too crazy about slaving away stripping the rust. At this point I'd kind of like to get rid of the car and bring the other Firebird home from storage.
I clean a lot of rear ends and use a 4" grinder and cup brush and I suggest to wear a respirator too
I clean a lot of rear ends and use a 4" grinder and cup brush and I suggest to wear a respirator too
That's what I've been using. It takes some of it off, and polishes the rest, but I'm pretty set on removing the rust down to clean steel and cast iron. Blasting does the job, but it makes one hell of a mess. One of these days I might get around to blasting it clean, so far I work on it a bit and get bored before I get very far.
When they get that bad or worse, I rip them down, sand blast, psi wash the krap out of them, then paint or powdercoat .
That's the direction I'm leaning with this one, I'm just lazy when it comes to laying out a tarp, strapping on enough PPE for a sex act with Courtney Love, and actually projecting the media. I'm making more of an issue out of it, than if I just jumped in and got it done.
Not much of an update, but it's something... Found a remanned GM waterpump without the port in the top, in Rock Auto's bargain bin. I've got a few factory pumps on the shelf that need to be rebuilt, but this saves me the time of finding a rebuilder and sending the cores off to be rebuilt. While I was there, I also found a Gates serpentine belt, and a curly-que bypass hose to take the throttlebody out of the cooling circuit. Tossed another dirt cheap set of FelPro TPI gaskets in the cart too. Found some other odds and ends, and scratched a few other items off the shopping list, but I'll wait until they get here (should be tomorrow) before updating the thread. With this most recent Rock Auto purchase, I've got about 90% of the new cooling hoses acquired. I'm actually running out of things I know I'll need when the car goes together. If nothing else, I like having spares on the shelf since I've got a few cars that all use the same consumable parts.
Pretty sure it was the only one. They do that sometimes, they'll find something in the warehouse from a discontinued product line and it'll go on the website as a closeout item. I'd been keeping an eye out for the stock style pump for awhile, since all the current replacements are "universal".
Markings on the box are an oddball brand, but it's a CARDONE 58320 waterpump. If I were looking for another one I'd look on Ebay. Small corner auto parts stores go out of business all the time, and the parts end up at flea markets, swap meets, and auctions. Ebay is as logical a place to look as any. Looks like there are a lot of them (30+) available on there.
Edit: Rock Auto has them available at the regular price. Pic is correct.
Yep, the original pumps on thirdgens don't have the return on top, they have the port in the radiator. All the "New" pumps went to the universal style with the threaded port and a plug, a few years back. It makes sense from their view point, a pump with the port fits more applications. They just look goofy in a thirdgen. When I was looking for a pump for my Formula, all I could find were the generic pumps. I was going to have a stock unit rebuilt before finding the Cardone remans. Nothing wrong with the remans aside from the possibility of getting a corroded casting, but you'd think if one was very bad they'd throw them out.
"They" say it works well. I've got the number here somewhere, but it's for a 90's 3.1L Gran Prix, so Lumina, Oldsmobubble, etc. Probably other applications too. It looks like it'll work OK. I figured I'd give it a shot. If it doesn't work it'll hack and splice as good as any, and it's another Rock Auto clearance bin part from the days when those a-hole cars ruled the roads. You know, because they stink and everyone had one back then?


 Then I popped the cover and drained the old gear oil. Expended a can and a half of carb cleaner and started looking for the tell-tale stamp.


 I'm still no expert welder, hard to gain a lot of skill when the welds are only a fraction of a second BRRRT! If I'd had the butt-welding clamps when I welded in the previous patches, they'd been clamped even with the joining panels, therefore they'd all but disappear when welded and ground smooth. I've got a few spots around the edges where it's difficult to get the weld without burning away a bit of steel, best solution for me is to just leave those spots than try to mess with em. I suppose I could turn the welder down a bit or move the tip of the gun further away to drop the temp, but really, all this stuff will be covered with seam sealer and what not.


 A bit light on Firebird content, but that's what I've been doing while I should have been progressing on the car.