
1991 Firebird Project

Thread Starter

Joined: Jul 1999
Posts: 20,310
Likes: 1,068
From: Salina, KS
1991 Firebird Project
July 2019 update -
I deleted this post and the images a few months ago due to concerns over my personal privacy. In an effort to contribute to the forum, and share my project. I'll do my best to put back what was removed with identifying features edited out. It's safe to assume it won't be exactly what it was before.
On to the project. In April 2016, I got an IM from a buddy asking if I needed any Firebird parts. Turns out his cousin ran into a guy with a Firebird for parts.

I'd been looking for another project, so I started asking questions about the car. Fun questions like 'Does it run?, Does it have a clean title?' and so on. More pics from his cousin followed.
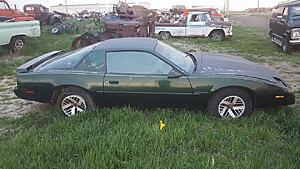
It's nothing fancy, base model Firebird, with next to zero options. 3.1L V6 automatic, crank windows, manual locks, etc. The story was that it had a clean title, no one knew if it'd run, but it seemed to be rust free.
I deleted this post and the images a few months ago due to concerns over my personal privacy. In an effort to contribute to the forum, and share my project. I'll do my best to put back what was removed with identifying features edited out. It's safe to assume it won't be exactly what it was before.
On to the project. In April 2016, I got an IM from a buddy asking if I needed any Firebird parts. Turns out his cousin ran into a guy with a Firebird for parts.

I'd been looking for another project, so I started asking questions about the car. Fun questions like 'Does it run?, Does it have a clean title?' and so on. More pics from his cousin followed.


It's nothing fancy, base model Firebird, with next to zero options. 3.1L V6 automatic, crank windows, manual locks, etc. The story was that it had a clean title, no one knew if it'd run, but it seemed to be rust free.
Last edited by Drew; Jun 30, 2019 at 07:13 PM.
Thread Starter
Joined: Jul 1999
Posts: 20,310
Likes: 1,068
From: Salina, KS
Re: 1991 Firebird Project
The next step was to go check the car out in person. Obstacle #1 was the location, at the opposite end of Kansas. The following weekend, my buddy John drove over from Topeka, and we drove from here all the way to the furthest reaches of western Kansas to give the car a closer look.
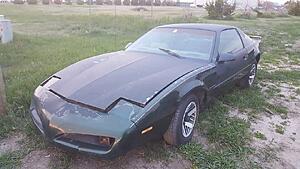
It sure wasn't any beauty queen, but the important parts looked good. It didn't have any obvious accident damage, or significant rust. After talking with my buddy's cousin, he said he had a place he could store the car, and would be happy to deliver it back to Salina a few months later when he was traveling through. So then we started trying to get ahold of the fellow selling the car. It wasn't meant to be on that day, so we wrapped up and drove back to Salina and started planning.
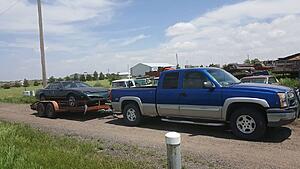
A deal was struck, but it turned out it'd take awhile to get a replacement title. In the meantime, we were told to take the car, and we'd work out the details later. The car was sitting in a muddy lot on at least 3 flat tires, one of which was off the bead. First order of business was to get the car so it would roll. John's cousin went out a few nights later with a weedeater, and knocked down the weeds around the car, and pulled the wheel with the worst tire.
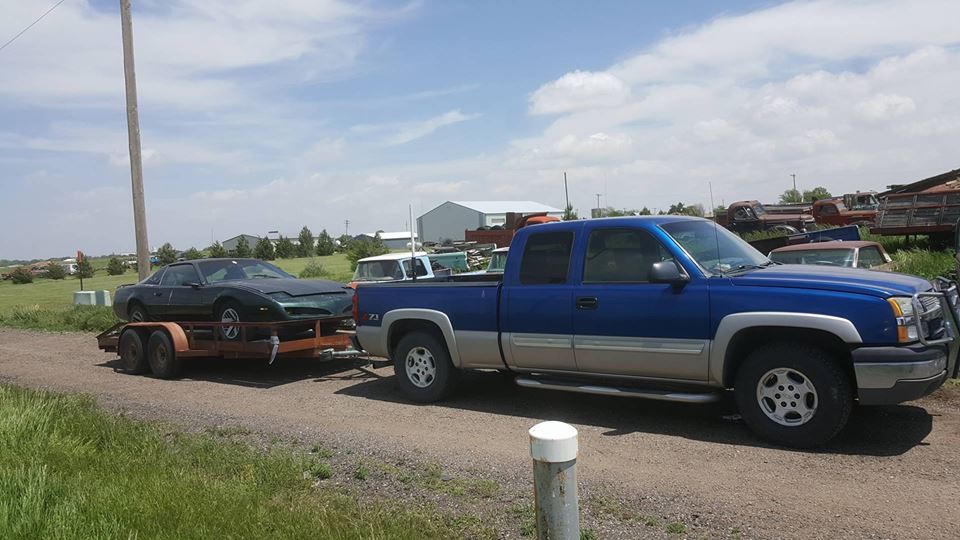
The tires got aired up, then the car was loaded onto a trailer and hauled away.
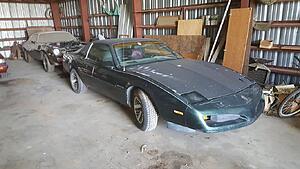
For the time being, the car was tucked away in a friend of John's cousin's buildings. It was obviously in good company.

It sure wasn't any beauty queen, but the important parts looked good. It didn't have any obvious accident damage, or significant rust. After talking with my buddy's cousin, he said he had a place he could store the car, and would be happy to deliver it back to Salina a few months later when he was traveling through. So then we started trying to get ahold of the fellow selling the car. It wasn't meant to be on that day, so we wrapped up and drove back to Salina and started planning.
A deal was struck, but it turned out it'd take awhile to get a replacement title. In the meantime, we were told to take the car, and we'd work out the details later. The car was sitting in a muddy lot on at least 3 flat tires, one of which was off the bead. First order of business was to get the car so it would roll. John's cousin went out a few nights later with a weedeater, and knocked down the weeds around the car, and pulled the wheel with the worst tire.


The tires got aired up, then the car was loaded onto a trailer and hauled away.

For the time being, the car was tucked away in a friend of John's cousin's buildings. It was obviously in good company.

Last edited by Drew; Jun 30, 2019 at 07:34 PM.


Junior Member


Joined: Oct 2017
Posts: 69
Likes: 5
From: Davis County, Utah
Car: 2021 LT1
Engine: Lt1
Transmission: Tr6060
Axle/Gears: 3.73
Re: 1991 Firebird Project
There is a 400 dollar shitbox firebird L03 in central Utah I’m trying to resist the urge to buy, and this isn’t helping

Joined: Mar 2014
Posts: 4,556
Likes: 811
From: South Ms
Car: 89 Firebird
Engine: 355 TBI
Transmission: 700R4
Axle/Gears: 10 Bolt.Posi-3.73s
Re: 1991 Firebird Project
Drew you are more optimistic than me! Good luck with it. I have a nice set of Firebird tail-lites if you need some PM me. One big plus you have is that its a hardtop so I'm guessing your interior is dry. I like the 91-92 models its gona be sharp when your'e done.
Trending Topics
Joined: Dec 2001
Posts: 9,946
Likes: 644
From: Chicagoland
Car: 1989 IROC-Z. Original owner
Engine: LB9. Dual Cats. Big Cam
Transmission: World Class T-5
Axle/Gears: BW 3.45
Re: 1991 Firebird Project
I'll be following this thread with interest, because if we know Drew the way we think we know Drew, all this work will be done properly.
Joined: Oct 2001
Posts: 12,228
Likes: 1,156
From: Il
Car: 1989-92 FORMULA350 305 92 Hawkclone
Engine: 4++,350 & 305 CIs
Transmission: 700R4 4800 vig 18th700R4 t56 ZF6 T5
Axle/Gears: 3.70 9"ford alum chunk,dana44,9bolt
Thread Starter
Joined: Jul 1999
Posts: 20,310
Likes: 1,068
From: Salina, KS
Re: 1991 Firebird Project
 Admittedly, I can look at any heap of a thirdgen, and see promise. There is a story about keeping things dry yet to come, there's just a lot of ground to cover.
The tail lights are in fair condition. I kind of skipped over that in the assessment, but the Driver's side is in rough shape. The center piece looks like it had a Hardly Davison sticker applied to it for a decade, and sort of like it was melted by solvent somehow. A low priority, but at least the Driver's is on my watch list. Thanks for the offer, and I'll definitely keep it in mind.


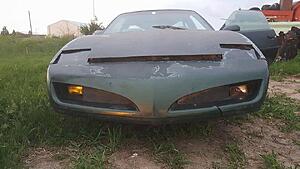
Doesn't look bad aside from the star, but the scratch to the lower right ^^^^ that's a crack.

Hit the image limit on the previous post, so to wrap the discovery of the Antenna hole saga...

Our budding Rocket Surgeon had to drill a second hole, then he duct taped a piece of Marlboro pack foil over the hole, and gave it a skim of Bondo. But I'm getting ahead of myself, I'll return to this later.

As a temporary solution to try to keep water out of the trunk, the open hole received a plastic plug.
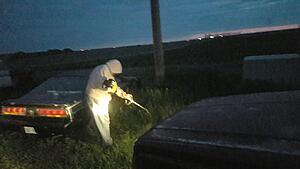
Alright, so I promised a story about water, and I should have covered this earlier, better late than never.... When I drove out to check out the car initially, the hatch wasn't latched. Inside the trunk, there was more trash, a Dora The Explorer sleeping bag, and an Auto-Jacuzzi. In layman's terms, the bottom of the trunk well was full of stagnant water. To be fair, it was the end of April, and the trunk wasn't latched. So once the deal was struck, I kindly asked Justin if he would mind removing the water logged (nasty) sleeping bag from the trunk, and suggested that if he were feeling adventurous, it'd just be fantastic if he could punch the knock-out drain plug out of the trunk floor, to drain the swamp (MAGA). To my shock, my buddy's incredibly awesome cousin, not only extricated the soaking sleeping bag, but he also took to the drain plug task with glee!
 More on this problem to come, as it has plagued the project since Day 1, and
still hasn't really been 100% resolved.
Last edited by Drew; Jun 30, 2019 at 06:28 PM.
Joined: Mar 2014
Posts: 4,556
Likes: 811
From: South Ms
Car: 89 Firebird
Engine: 355 TBI
Transmission: 700R4
Axle/Gears: 10 Bolt.Posi-3.73s
Re: 1991 Firebird Project
Its actually looking better than I thought the more you tear into it.
Joined: Aug 2013
Posts: 4,840
Likes: 921
From: MICHIGAN
Car: 1988 Trans Am
Engine: L03
Transmission: 700R4
Axle/Gears: 10 Bolt 2.73 Open
Re: 1991 Firebird Project
Wow Drew, that's quite a project! Glad you are saving it though. Don't see many 91/92 cars, and I love that green.
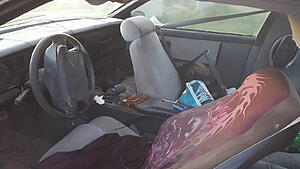
I'm glad you can ID the tan as dust form the roads. I (knowingly) bought a car that had been submerged, and there's a silt line half way up the back of everything in the interior...backs of trim panels, dash, etc. I was afraid this car had been under water.
I'm glad you can ID the tan as dust form the roads. I (knowingly) bought a car that had been submerged, and there's a silt line half way up the back of everything in the interior...backs of trim panels, dash, etc. I was afraid this car had been under water.
Thread Starter
Joined: Jul 1999
Posts: 20,310
Likes: 1,068
From: Salina, KS
Re: 1991 Firebird Project
Ok, so what about what's causing the fender's to bow out a little? Let's look at the pinch welds to see how mangled the fender mounts are from jacking...


Well, as to be expected they were BAD. The photos of the fender tabs were actually after some judicious digging and prying to even begin to see the fender bolts. Note also that nicely mangled rocker panel on the passenger's side. Saving grace is that it's pretty much on the bottom, bottom, or the car. From the side it doesn't look too bad. And hey, it's not rusty so it can just be AutoBodyMan'd back into place. Right?
At this point, I think it was becoming more than a little obvious that the previous owner of the car was a bit of a... uhh... How to put this nicely? I'm a Kansas native, born here, lived here most of my natural life aside from a short stay in South Dakota. I've always lived in rural states, but always in the city, never done much of the farm living. I have never enjoyed country music... Suffice to say, I have been known to occasionally point a finger at the rural minded folk, and enjoyed a laugh. Not like walk up to someone in cowboy boots and a huge hat and hate crime them, or anything, but while only separated by a few miles as the crow flies, it's a world apart. So when I say "hillbilly" or "*******" or whatever, take it with a grain of salt.
Anyway, at this point in time, I could tell that this car had spent some time as an impromptu Off-Road-Vehicle. Like someone watched Smoky and The Bandit a few too many times, and got in adventures like the Duke boys. Undoubtedly this particular Firebird had been 'muddin' in it's lifetime. It carried what I would approximate as 500lbs of clay and gravel in the subframe, or packed into the underbody. Note in the photo's above the dirt on the ground under the car, the grass and weeds, mystery plant-life, stuck to the bottom of the car. Note the dents from bottoming out. Other hints were even more obvious like the air damn and extensions yanked from the front end, or the mud packed into the front control arms, or the solid block of dirt I'd eventually find inside the front crossmember. Parts of this are visible in these photos, like the mangled trans crossmember, also packed in mud.
This dirt and damage, has probably been the single most time consuming issue with the project so far, it will come up frequently. Mercifully, the car clearly was in a dry environment, resulting in little rust, just the bumps and bruises.

After the first rinse...
Early goals were to secure the car, since it'd be parked outside for awhile. As it arrived, the Hatch Power Pull-Down was non-functional. I wanted to be able to close the hatch, to keep curious fingers and water from getting in the car. Also the passenger's door wouldn't lock/unlock from the outside. The non-functional door lock was easily traced to the pushrod having gotten disconnected. It was quickly resolved by simply clipping the rod back into place. So I turned my attention to the Hatch Pull-down.

My memory is a little fuzzy here, since I was moving in multiple directions with hundreds of odd tasks on the car to perform. Best guess from the photo, based on the general dirty appearance, the assembly on the top left was from the Green Chicken. The other two were from my aforementioned stockpile of surplus parts.

With the assembly torn down, it was pretty easy to see the latch sensing switch, the reversing switch, the housing, the gear nut, and the guides were all completely shot. To date this was the most severely and completely destroyed power hatch pulldown I've encountered. Fortunately, I was able to salvage the pieces I needed from one or both of the spares, to build one complete and functional hatch pulldown.


A nice, clean, fully refurbed pulldown, mounted in the dirty as hell, Great Plains Mud-fowl.

While I was playing Trunk Monkey, I also swapped the standard key lock trunk latch cable with the A90 Remote Trunk Release solenoid assembly. This picture shows the fog light and trunk release pigtails behind the switch panel. Note also the screw holes from undoubtedly some idiotic Walmart auto accessory in the guage bezel. But don't worry, I've got a good one in storage. Anyway... Once the foam was peeled off the connector, the release switch could be plugged in (another FREEBIE part from my junk bin). Also pulled a dual switch panel (FREEBIE!) and a spare relay (FREEBIE!) from the stash to complete the A90 Remote Trunk Release conversion.

Technology betrayed me, and my best A90 conversion photos were lost in a hard drive failure, so you'll have to settle for this photo of the switches...
Notice the dark spot on the passenger's side floor pan. This is the third V6 thirdgen I've owned, and the third V6 thirdgen I've pulled the carpet only to find the catalytic converter had a melt down, and melted the carpet/padding to the floor. Here we can also see another ******* Rampage indicator. Attentive eyes might be wondering what's up with with the passenger's floor just in front of the rear seat brace. Well Virginia, that there is where something cut a gash in the floor pan. I'd imagine it was probably a rock, or maybe a tree stump. Because out in Western Kansas, sometimes you forget you're in a Firebird and not your Ferd F-150 Fur-by-Fur, and you decide to go cross country, off-road, in a car that sits 6" off the ground.
You can see that I'd removed the console, and the front compartment carpet. This was done for cleaning, as well as providing a clearer view of the floor pans to assess the damage. When I removed the carpet, I discovered why the carpet was lumpy over the knock-out drain plugs in the floor pans. In addition to the previous signs of off-road excursions, it turned out that mud and clay, gravel, had been forced against the bottom of the car with such force that it pushed the knock-out plugs into the car. The void was filled with mud and rock, which dried and turned to concrete. The worst offenders were in the back seat, but the fronts also needed to be removed, cleaned, and flattened back out so they could be re-used.
Well, as to be expected they were BAD. The photos of the fender tabs were actually after some judicious digging and prying to even begin to see the fender bolts. Note also that nicely mangled rocker panel on the passenger's side. Saving grace is that it's pretty much on the bottom, bottom, or the car. From the side it doesn't look too bad. And hey, it's not rusty so it can just be AutoBodyMan'd back into place. Right?
At this point, I think it was becoming more than a little obvious that the previous owner of the car was a bit of a... uhh... How to put this nicely? I'm a Kansas native, born here, lived here most of my natural life aside from a short stay in South Dakota. I've always lived in rural states, but always in the city, never done much of the farm living. I have never enjoyed country music... Suffice to say, I have been known to occasionally point a finger at the rural minded folk, and enjoyed a laugh. Not like walk up to someone in cowboy boots and a huge hat and hate crime them, or anything, but while only separated by a few miles as the crow flies, it's a world apart. So when I say "hillbilly" or "*******" or whatever, take it with a grain of salt.
Anyway, at this point in time, I could tell that this car had spent some time as an impromptu Off-Road-Vehicle. Like someone watched Smoky and The Bandit a few too many times, and got in adventures like the Duke boys. Undoubtedly this particular Firebird had been 'muddin' in it's lifetime. It carried what I would approximate as 500lbs of clay and gravel in the subframe, or packed into the underbody. Note in the photo's above the dirt on the ground under the car, the grass and weeds, mystery plant-life, stuck to the bottom of the car. Note the dents from bottoming out. Other hints were even more obvious like the air damn and extensions yanked from the front end, or the mud packed into the front control arms, or the solid block of dirt I'd eventually find inside the front crossmember. Parts of this are visible in these photos, like the mangled trans crossmember, also packed in mud.
This dirt and damage, has probably been the single most time consuming issue with the project so far, it will come up frequently. Mercifully, the car clearly was in a dry environment, resulting in little rust, just the bumps and bruises.
After the first rinse...
Early goals were to secure the car, since it'd be parked outside for awhile. As it arrived, the Hatch Power Pull-Down was non-functional. I wanted to be able to close the hatch, to keep curious fingers and water from getting in the car. Also the passenger's door wouldn't lock/unlock from the outside. The non-functional door lock was easily traced to the pushrod having gotten disconnected. It was quickly resolved by simply clipping the rod back into place. So I turned my attention to the Hatch Pull-down.
My memory is a little fuzzy here, since I was moving in multiple directions with hundreds of odd tasks on the car to perform. Best guess from the photo, based on the general dirty appearance, the assembly on the top left was from the Green Chicken. The other two were from my aforementioned stockpile of surplus parts.
With the assembly torn down, it was pretty easy to see the latch sensing switch, the reversing switch, the housing, the gear nut, and the guides were all completely shot. To date this was the most severely and completely destroyed power hatch pulldown I've encountered. Fortunately, I was able to salvage the pieces I needed from one or both of the spares, to build one complete and functional hatch pulldown.
A nice, clean, fully refurbed pulldown, mounted in the dirty as hell, Great Plains Mud-fowl.
While I was playing Trunk Monkey, I also swapped the standard key lock trunk latch cable with the A90 Remote Trunk Release solenoid assembly. This picture shows the fog light and trunk release pigtails behind the switch panel. Note also the screw holes from undoubtedly some idiotic Walmart auto accessory in the guage bezel. But don't worry, I've got a good one in storage. Anyway... Once the foam was peeled off the connector, the release switch could be plugged in (another FREEBIE part from my junk bin). Also pulled a dual switch panel (FREEBIE!) and a spare relay (FREEBIE!) from the stash to complete the A90 Remote Trunk Release conversion.
Technology betrayed me, and my best A90 conversion photos were lost in a hard drive failure, so you'll have to settle for this photo of the switches...
Notice the dark spot on the passenger's side floor pan. This is the third V6 thirdgen I've owned, and the third V6 thirdgen I've pulled the carpet only to find the catalytic converter had a melt down, and melted the carpet/padding to the floor. Here we can also see another ******* Rampage indicator. Attentive eyes might be wondering what's up with with the passenger's floor just in front of the rear seat brace. Well Virginia, that there is where something cut a gash in the floor pan. I'd imagine it was probably a rock, or maybe a tree stump. Because out in Western Kansas, sometimes you forget you're in a Firebird and not your Ferd F-150 Fur-by-Fur, and you decide to go cross country, off-road, in a car that sits 6" off the ground.
You can see that I'd removed the console, and the front compartment carpet. This was done for cleaning, as well as providing a clearer view of the floor pans to assess the damage. When I removed the carpet, I discovered why the carpet was lumpy over the knock-out drain plugs in the floor pans. In addition to the previous signs of off-road excursions, it turned out that mud and clay, gravel, had been forced against the bottom of the car with such force that it pushed the knock-out plugs into the car. The void was filled with mud and rock, which dried and turned to concrete. The worst offenders were in the back seat, but the fronts also needed to be removed, cleaned, and flattened back out so they could be re-used.
Thread Starter
Joined: Jul 1999
Posts: 20,310
Likes: 1,068
From: Salina, KS
Re: 1991 Firebird Project


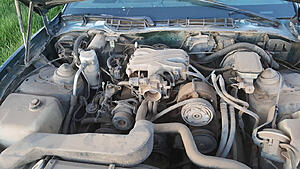
The front end went up on stands, and the puny base model sway bar, and steering linkage started coming apart. The engine harness was stripped from the engine, and removed for safe keeping. Brake booster and master cylinder had to come out for clean-up, and repaint. Very dirty, but little rust, still no real collision damage.

Temporarily mocked the pedals up in the car... Also the crumbling seam sealer is visible here across the floor pan/toe board joint.


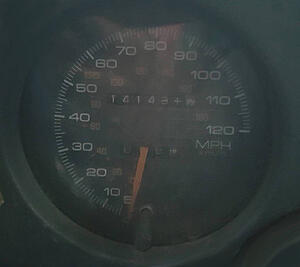
Got a 140mph cluster off of Ebay, and gave it a quick once-thru. Cleaned, airbag light removed, should be A-OK.

Stalked a hood on Craigslist in my buddy John's city, made the deal and he went and picked it up for me and stored it on his back porch with the 4" Harwood hood I found for his Monte Carlo a few years back.

A short while later, his brother had business in Salina, so he hauled the hood with him and delivered it to me. It's nice having friends with similar interests.

Thread Starter
Joined: Jul 1999
Posts: 20,310
Likes: 1,068
From: Salina, KS
Re: 1991 Firebird Project
With the engine and trans barely hanging in the car, the body was hoisted high enough to roll the front suspension and drivetrain out in one piece.

This method mostly worked. I suspect it'll be easier the next time. This is the first time I've dropped the works out of the bottom, so it was a bit of a learning experience. In theory anyway, it's the superior way to go.


Rolled that heap of trash out of the way... Came back the next morning and cleaned up a bit of the mess.


This method mostly worked. I suspect it'll be easier the next time. This is the first time I've dropped the works out of the bottom, so it was a bit of a learning experience. In theory anyway, it's the superior way to go.
Rolled that heap of trash out of the way... Came back the next morning and cleaned up a bit of the mess.
Thread Starter
Joined: Jul 1999
Posts: 20,310
Likes: 1,068
From: Salina, KS
Re: 1991 Firebird Project
Back in reply #19, there's a photo showing the driver's door hinge with it's stop detent excessively worn. The hinge was removed from the body side, and taken to the work bench.


A little judicious heat, and the detent roller pin was pulled free. An NOS roller and pin were reinstalled. The hinge strap on the door was very worn from neglect. I opted to drill the egged holes oversize, and install bushings. That raised the question of how to drill in the tight quarters of the door jamb.

My solution was to braze a brass 10mm nut onto the correct size drill, and used it as a guide to grind the shank down to a 10mm hex. Then I was able to open up the holes with a socket, wobble fitting, and extension.

All back together with bushings, and a new pin. Result is the door opens and closes as new now. In retrospect, I should have ground the detent arm square, while it was apart. The surface of the arm that bears on the roller, is worn at an angle from use while the bushings were bad. The result is the roller tilts. Eventually I'll probably come back and either replace the detent arm, or carefully square it up.


The Booster, Master, and Prop Valve were all cleaned, derusted, inspected, refurbed and refinished.


Back to the larger project... I started removing the floor plugs, and cleaning up the gooey mess GM used to seal them.
A little judicious heat, and the detent roller pin was pulled free. An NOS roller and pin were reinstalled. The hinge strap on the door was very worn from neglect. I opted to drill the egged holes oversize, and install bushings. That raised the question of how to drill in the tight quarters of the door jamb.
My solution was to braze a brass 10mm nut onto the correct size drill, and used it as a guide to grind the shank down to a 10mm hex. Then I was able to open up the holes with a socket, wobble fitting, and extension.
All back together with bushings, and a new pin. Result is the door opens and closes as new now. In retrospect, I should have ground the detent arm square, while it was apart. The surface of the arm that bears on the roller, is worn at an angle from use while the bushings were bad. The result is the roller tilts. Eventually I'll probably come back and either replace the detent arm, or carefully square it up.
The Booster, Master, and Prop Valve were all cleaned, derusted, inspected, refurbed and refinished.
Back to the larger project... I started removing the floor plugs, and cleaning up the gooey mess GM used to seal them.
Thread Starter
Joined: Jul 1999
Posts: 20,310
Likes: 1,068
From: Salina, KS
Re: 1991 Firebird Project


The sealer patches GM used on the floor plugs, is baby-poop brown, and resilient. I used a combination of a heat gun, a putty knife, and following up with paper towels and mineral spirits, to soften the goop, scrape as much off as possible, and then scrub away the residue. As I scraped off the hot sealer, I wiped the sealer in the grocery bag. This stuff was glued to the plugs, and all five of the drain plug holes. Disgusting.

Passenger's Front, partially cleaned.

Passenger's Rear cleaned.

Driver's Front.

Driver's Rear.
I also got after that gouge in the Passenger's floor.


Looks like whatever did the damage, rolled the steel back as it cut into the floor. I was able to go after the rolled up steel, and carefully unroll it, and close up much of the wound.


Finally got a chance to borrow a truck and haul the old engine and trans to the scrapyard. So long, ya filthy bastard.
Thread Starter
Joined: Jul 1999
Posts: 20,310
Likes: 1,068
From: Salina, KS
Re: 1991 Firebird Project
Do you remember way back up there when I mentioned the pair of CB antenna holes in the passenger's 1/4 panel?

Yeah, me neither.

I harnessed the power of lightning and melted new metal into the holes! This was my first experience running the MIG in anger, on something that wasn't a practice piece.


I zipped the welds flush, and it was good. A little sealer to stave off the rust for now... That worked out ok, how about that hole in the floor...


I cut the seat support on either side of the gouge, and commenced to Lectro-zapping the slice. Little grinding...

Not beautiful. Functional. This is thin, oxidized steel, burn-through was a concern. A little long strand filler will blend most of this in, later.


Then I welded the seat support back together, and zipped the welds flush.
Yeah, me neither.
I harnessed the power of lightning and melted new metal into the holes! This was my first experience running the MIG in anger, on something that wasn't a practice piece.
I zipped the welds flush, and it was good. A little sealer to stave off the rust for now... That worked out ok, how about that hole in the floor...
I cut the seat support on either side of the gouge, and commenced to Lectro-zapping the slice. Little grinding...
Not beautiful. Functional. This is thin, oxidized steel, burn-through was a concern. A little long strand filler will blend most of this in, later.
Then I welded the seat support back together, and zipped the welds flush.
Last edited by Drew; Nov 20, 2018 at 09:20 PM.


Thread Starter
Joined: Jul 1999
Posts: 20,310
Likes: 1,068
From: Salina, KS
Re: 1991 Firebird Project


Black stuff is POR-15, Ospho was used heavily along with mechanically abrading away light corrosion. Heavy corrosion was cut out. New patch was fabbed from a good section of rusty, beat-up Fox Mustang fender. I should have cut away a bit more steel, turned out it was too thin, which burned thru, and I made a bit of a Porcupine.
Thread Starter
Joined: Jul 1999
Posts: 20,310
Likes: 1,068
From: Salina, KS
Re: 1991 Firebird Project

Poop


Slowly I started stacking the sandwich back together, and welding each layer back into place, and fabbing patch pieces as I worked through the repair. Again, POR15 is the black stuff, Gray is sealer, Silver is weld-thru primer. It's not obvious from the photos, but a lot of this was done to prevent bare metal from rusting between work sessions, because the car was being kept outside.
Most of the POR15 ended up coming back off. It's pretty much pure crap unless it's applied to rusty metal. I did my best to remove the rust, thus the POR15 didn't stick to anything.
Thread Starter
Joined: Jul 1999
Posts: 20,310
Likes: 1,068
From: Salina, KS
Re: 1991 Firebird Project
Next up was to fab a patch for the rocker panel, on the outside.

More patterns, more patch pieces, most hammer and dolly work, bending, and welding. This piece had enough compound bends, it had to be cut and welded back together.


I went back and cut out the thin area that had burned through. Made a new insert, and burned it in. A few other ZAPS! to fill voids in the earlier welds.


At this point, I was so sick of the rocker panel, that I never took a "finished" photo.
More patterns, more patch pieces, most hammer and dolly work, bending, and welding. This piece had enough compound bends, it had to be cut and welded back together.
I went back and cut out the thin area that had burned through. Made a new insert, and burned it in. A few other ZAPS! to fill voids in the earlier welds.
At this point, I was so sick of the rocker panel, that I never took a "finished" photo.
Thread Starter
Joined: Jul 1999
Posts: 20,310
Likes: 1,068
From: Salina, KS
Re: 1991 Firebird Project
Well, I hope y'all are enjoying the thread. I don't think anyone can say it doesn't have enough photos. With most of my projects I try to document what I'm doing, and also I've felt that a few friends are invested in my project since they've helped so much with logistics, that I've taken pics to annoy them to death with frequent updates.
OK! Since the welding brings us up to about Feb 2017, I need to go back and cover the small projects that were done in evenings after work, or when I didn't have time or the weather to drag the welder and whatnot out of the garage.

Remember the broke busted Map Pouch from the very beginning?

Aside from having been overstuffed, which pulled the glue seams, and killed the elastic, it wasn't in bad shape. I picked up a few feet of elastic that sounded like it'd match pretty close off of Ebay.
The cardboard inside the Naugahyde flap was kaput, so step one, which isn't pictured, is I took that piece of cardboard and cut a piece of Corrugated Plastic (C-store advertising signage). The 'plastic cardboard' would never get damp, or sloppy from age. With it slipped inside the flap, I fired up the Life-Hack Machine! AKA the Hot Glue Gun.

But not so fast, I first took a length of the new elastic, and stapled the end to the end of the old elastic. Then I was able to pull the old elastic out, while pulling the new elastic in. The ends were left long and tack glued to the back, just in case... The loose edges were pulled tight, and glued back together.


Better than new.


Got under there in March and tack welded the fender nut back to the new steel.

So sprinkled in the rust repair photos, some of you might have noticed the bare steel spots on the Driver's Door. Or better you might have noticed the odd appearance of the first photos, or put two & two together about the mismatched driver's mirror.

Long story made short, at some point, someone got the driver's door up against something solid, and the original mirror must have lost. Best I can tell, the antenna installer also repaired the driver's door. This is what it looked like after grinding out the Bondo. The door molding was also hiding a crease down the center of the entire door.

With the structure at the top of the door, hammer and dolly was out. Enter the stud welder.

OK! Since the welding brings us up to about Feb 2017, I need to go back and cover the small projects that were done in evenings after work, or when I didn't have time or the weather to drag the welder and whatnot out of the garage.
Remember the broke busted Map Pouch from the very beginning?
Aside from having been overstuffed, which pulled the glue seams, and killed the elastic, it wasn't in bad shape. I picked up a few feet of elastic that sounded like it'd match pretty close off of Ebay.
The cardboard inside the Naugahyde flap was kaput, so step one, which isn't pictured, is I took that piece of cardboard and cut a piece of Corrugated Plastic (C-store advertising signage). The 'plastic cardboard' would never get damp, or sloppy from age. With it slipped inside the flap, I fired up the Life-Hack Machine! AKA the Hot Glue Gun.
But not so fast, I first took a length of the new elastic, and stapled the end to the end of the old elastic. Then I was able to pull the old elastic out, while pulling the new elastic in. The ends were left long and tack glued to the back, just in case... The loose edges were pulled tight, and glued back together.
Better than new.
Got under there in March and tack welded the fender nut back to the new steel.
So sprinkled in the rust repair photos, some of you might have noticed the bare steel spots on the Driver's Door. Or better you might have noticed the odd appearance of the first photos, or put two & two together about the mismatched driver's mirror.
Long story made short, at some point, someone got the driver's door up against something solid, and the original mirror must have lost. Best I can tell, the antenna installer also repaired the driver's door. This is what it looked like after grinding out the Bondo. The door molding was also hiding a crease down the center of the entire door.
With the structure at the top of the door, hammer and dolly was out. Enter the stud welder.
Thread Starter
Joined: Jul 1999
Posts: 20,310
Likes: 1,068
From: Salina, KS
Re: 1991 Firebird Project

After a few rounds welding and pulling studs, and working the door skin, the skin was mostly flat without Bondo. The exception being the footprint under the mirror that was stretched, buckled and torn. I pulled out the MIG and welded the mirror mounting holes closed, then used a the gasket from the mirror to mark the holes, then redrilled them in their proper location. I also welded up where the skin was cracked.


The upper half of the door much closer to correct.

But I wasn't happy with it, so I stripped it back down and worked over this domed area that had been inadvertently put in the door skin while pulling low spots.


High spots, low spots, but it's getting better.

More tear down!


This was the beginning of the phase of stripping away seam sealer.

The seam sealer in a thirdgen is both inside and out, all around the passenger compartment. From the firewall to hiding behind the tail lights, and inside the wheel wells. To say that I wore myself out scraping, and grinding away sealer, and fighting surface rust, is fair. But I didn't want to put in the effort, only to have water getting inside the car.
Thread Starter
Joined: Jul 1999
Posts: 20,310
Likes: 1,068
From: Salina, KS
Re: 1991 Firebird Project

On the trail of the water's source... Note the crumbly seam sealer, and the surface corrosion at the lower edge of the cowl panel. This is where rain run off from the windshield area ran down and entered the driver's kick panel area.

From inside the cowl, you can see how the seam sealer is completely crumbling away.

Stripping away the old seam sealer, and cleaning/sealing spots of surface rust.

After popping the sealer out of this corner, the rust underneath was plainly visible. This actually was a small hole into the passenger's side of the firewall.

Security...

Scrapping away the old sealer inside the cowl. Note the rusty edges where the sealer has been removed, from water creeping under the peeling sealer.


Scrape, scrub, repeat.

Cheap sealer to protect exposed bare steel for the time being...


Failed seam sealer - Everywhere.
Thread Starter
Joined: Jul 1999
Posts: 20,310
Likes: 1,068
From: Salina, KS
Re: 1991 Firebird Project
I was truly amazed that the driver's side door panel cleaned up. It was caked in dirt in the beginning, like everything else.


To repair the ripped-out holes across the top of the panel, I first used a straight edge and an X-acto blade to cut the cardboard down to the top edge of the holes. Then I cut a strip of Masonite and glued it to the top edge of the door panel board. Once the glue cured, I did some light sanding to blend the surfaces together, then applied a few layers of lightweight fiberglass cloth and resin to bond and reinforce the new strip to the old board. Also while I was at it, I applied resin to the stitching, and around the trim clip holes, to strengthen the old cardboard.


After the resin cured, a little sanding knocked down any high spots, then I used the old Hot Glue Gun to glue the edges of the door panel cloth and vinyl back to the board where the original adhesive had failed from age/heat/moisture. To say that I was happy with the repaired door panel, is an understatement.


The headliner board came out of the car, and was swiftly treated to resin to try to stiffen the board up, so that it could be saved. Some spots around the edges were really bad. After the resin was cured, the high spots of the board could be sanded smooth. Once the board was sufficiently stiff that I figured it'd weather bumping around in the garage, it was set aside until I'm ready to recover it and put it back in the car.


I had a spare Wonder Bar on hand, but it was a bit crusty, so it got media blasted to strip it back to bare steel. Also pulled a 91 WS6 rear sway bar out and started cleaning it up.

Seems the hacksaw or cut-off wheel got into the swaybar when cutting the end links on the donor car. I choose to exercise my fifth amendment rights. I have no clear recollection, of accidentally cutting into a sway bar.

The swaybar was bathed in Ospho, which neutralized the surface rust on the bar.
To repair the ripped-out holes across the top of the panel, I first used a straight edge and an X-acto blade to cut the cardboard down to the top edge of the holes. Then I cut a strip of Masonite and glued it to the top edge of the door panel board. Once the glue cured, I did some light sanding to blend the surfaces together, then applied a few layers of lightweight fiberglass cloth and resin to bond and reinforce the new strip to the old board. Also while I was at it, I applied resin to the stitching, and around the trim clip holes, to strengthen the old cardboard.
After the resin cured, a little sanding knocked down any high spots, then I used the old Hot Glue Gun to glue the edges of the door panel cloth and vinyl back to the board where the original adhesive had failed from age/heat/moisture. To say that I was happy with the repaired door panel, is an understatement.
The headliner board came out of the car, and was swiftly treated to resin to try to stiffen the board up, so that it could be saved. Some spots around the edges were really bad. After the resin was cured, the high spots of the board could be sanded smooth. Once the board was sufficiently stiff that I figured it'd weather bumping around in the garage, it was set aside until I'm ready to recover it and put it back in the car.
I had a spare Wonder Bar on hand, but it was a bit crusty, so it got media blasted to strip it back to bare steel. Also pulled a 91 WS6 rear sway bar out and started cleaning it up.
Seems the hacksaw or cut-off wheel got into the swaybar when cutting the end links on the donor car. I choose to exercise my fifth amendment rights. I have no clear recollection, of accidentally cutting into a sway bar.
The swaybar was bathed in Ospho, which neutralized the surface rust on the bar.


Joined: Oct 2005
Posts: 854
Likes: 107
From: KY
Car: 2 T-Tops
Engine: 327/305
Transmission: TH350/700R4
Axle/Gears: 3:42/2:73
Re: 1991 Firebird Project
"I suppose I better get started before I get so far from the beginning that I can't document it accurately anymore."
Yep! This is my problem with my 82 Trans Am. Lost pictures and memories over the years! Your car reminds me a lot of my 82 when I bought it, except yours was in a LOT worse shape than mine!
Love the attention to detail you are putting in! Subscribed!
Yep! This is my problem with my 82 Trans Am. Lost pictures and memories over the years! Your car reminds me a lot of my 82 when I bought it, except yours was in a LOT worse shape than mine!
Love the attention to detail you are putting in! Subscribed!
Junior Member
iTrader: (5)
Joined: May 2005
Posts: 78
Likes: 1
From: Ohio
Car: 1992 Trans Am
Engine: 350 TPI
Transmission: 700R4
Axle/Gears: 3.23
Re: 1991 Firebird Project
Best thread ever Drew! The repair on the rocker corner/bottom fender mount is great! This project is so cool, because you are actually FIXING things, and doing it right, rather than just bolting on replacement stuff.
Can't wait to see more!
Can't wait to see more!
Joined: Dec 2001
Posts: 9,946
Likes: 644
From: Chicagoland
Car: 1989 IROC-Z. Original owner
Engine: LB9. Dual Cats. Big Cam
Transmission: World Class T-5
Axle/Gears: BW 3.45
Re: 1991 Firebird Project
Yeah, the rocker corner came out great! I feel like I'm binge watching an HBO series. Keep the posts coming!
Thread Starter
Joined: Jul 1999
Posts: 20,310
Likes: 1,068
From: Salina, KS
Re: 1991 Firebird Project
Thanks guys! I'm glad that you're enjoying my rambling.
It might not be entirely obvious, but this project is as much about the learning experience as the destination. I wanted to learn a bit about body and paint work skills. On this car, I didn't figure I had anything to lose. That gives me a little more confidence when it comes to grinding off paint, or going after a dent with the hammer and dolly. Likewise some parts of the project are being done on a strict budget. As much as I'd like to just "send it out" to be media blasted, or to have parts powder coated, or to send it to the body shop and cut to reassembly, that's not really in the budget, and it wouldn't learn me anything beyond paying the bill. So bear with me, I'm fully aware of when the results fall short of my ideal goals, but a lot of this (welding, grinding, painting) is new to me.
I'm also glad that someone is enjoying seeing parts repaired. Truth told, I've got a few 23mm rear sway bars laying around. I decided to use the one that had been cut, because I could keep it from going to waste. Same with the map pouch, must be half a dozen of them in OK condition in the attic, but if the worst one around can be fixed, why not? I'll try to keep touching on parts that have brought back to life, and hopefully sharing how they were refurbished. Of course in some cases, in the interests of time management, I am forced to choose between getting the job done, or taking photos, or the photos get lost... In those cases, documentation loses out. If anyone has any questions about something that I've glossed over, let me know.
There's a lot more to come, just be ready for the inevitable slow period when I eventually got demotivated, and progress seems to slow to a crawl. Cleaning up the seam sealer, and to a greater extent, cleaning up the undercarraige, really took a lot out of me. Season II/III are a bit of a let down.
Here's a small taste of what is yet to come.
Junior Member
iTrader: (5)
Joined: May 2005
Posts: 78
Likes: 1
From: Ohio
Car: 1992 Trans Am
Engine: 350 TPI
Transmission: 700R4
Axle/Gears: 3.23
Re: 1991 Firebird Project
I think that area is a combination of 5 things, because they ALWAYS rot there.
A)Failed cowl, and firewall seam sealer letting water run down and sit there as you mentioned
B) Absolute bare minimum factory coating in that area (never have seen anything more than factory primer there.
C) Being constantly, by default, getting hit with water, and road debris that makes its way past the inner fender liner
D) Improper jacking breaking sealer/glue/paint loose and furthering the process along
E) I think sometimes debris and grime make their way in between the fender and a-pillar, and eventually settle at the bottom of the inside of the fender, introducing more moisture/havoc/crap into the aforementioned scenario.
You are going to be a tough act to follow when I get back to my car, sometime.
Thread Starter
Joined: Jul 1999
Posts: 20,310
Likes: 1,068
From: Salina, KS
Re: 1991 Firebird Project
I suppose I have impossibly high expectations? The goal is perfection, but that's not realistic given the raw materials and my limited skill-set. I will always believe that we (car enthusiasts) always judge our own cars most harshly. My buddy John looks at his 1983 Monte Carlo and he sees every uneven spot in the last paint job, every dent or ding, no matter how small. He's had the car since highschool, and is intimately familiar with the car. I look at it, and I'm blown away and envious. Beautiful car I get to wrench on occasionally.
Moving along...


Getting down inside the driver's 1/4 panel is a bit of a squeeze. Because the filler neck to the gas tank is on that side, it's just a bit in the way. To attack this area that had been FULL of mud, I had washed most of the mud out, cleaned out the drain holes, and pulled out the trash floating down there. To get the rust, I went hog wild with the coarse blasting media. In that last pic you can see the triangular shaped drain hole punched in the bottom of the 1/4 behind the driver's rear wheel.
Blasting is fast and effective, it also makes a hell of a mess. If I can avoid it, I'll go pretty far out of my way to not run the sand blaster. The driver's 1/4 panel blasting pretty much filled the entire rear half of the car with blasting media. There was still media in this area when the sun started going down, and I sprayed the bare metal with sealer to temporarily protect it.

Another look at the drain are inside the driver's 1/4.

More of that glorious GM seam sealer, this time in the passenger's side 1/4, in the spare tire storage well.


Another view of the bottom of the spare tire well after stripping rust, kaput sealer, and applying cheap spray sealer to prevent flash rust.

One of the more subtle issues, that doesn't show up all that well in the photos is that the passenger's side 1/4 is a bit wrinkled at the body line. Somewhat unfortunately, even being a very OPEN area, the spare tire mounting bracket is difficult to get behind with a hammer/dolly. I still haven't gotten around to straightening out the wrinkled 1/4. It's minor enough that I don't want to make it worse, so I've just been putting it off. Filler would probably hide most of the damage. Anyway, that's why the rear marker light has been removed in these pics.


Some more of that seam sealer, nice dusting of blasting media.

Raylene is unimpressed with what I've done with her car.
Thread Starter
Joined: Jul 1999
Posts: 20,310
Likes: 1,068
From: Salina, KS
Re: 1991 Firebird Project


In these photos, you can see the front inner fender well, and the gray showing where the OE seam sealer flaked off in huge chunks. Of course the rest of the coarse texture in the wheel wells stayed stuck. I don't want to refer to this stuff as undercoating, it's more of a chip guard to keep rocks and whatnot from damaging the car. Of course this stuff didn't really stop rocks from chipping the factory e-coat, and there were random spots of surface rust. This had to be stopped. Obviously, you're not going to sand or grind down spots in this stuff. So what do you do?


Well, if you're a bleedin' idiot, you attack this stuff with your scrapers, and solvents, and you remove as much as possible by scraping, then go in with Acetone/Laquer Thinner/Mineral Spirits and paper towels, and you scrub. This didn't get from Before to After overnight. It had to be done to get down to solid steel, but if I had to do this job again, unless the car was a restoration endeavor, I'd probably just apply new seam sealer, and then reapply the rock guard texture, and call it good.


Never satisfied, I scrubbed with solvent until most of the green was rubbed down to the E-coat. Also now you can see some of the more concerning surface rust. Right now it's easy enough to buzz it down to shiny metal and coat it in epoxy primer. Left alone, it could grow and take out the structure integrity of the car.

Joined: Dec 2001
Posts: 9,946
Likes: 644
From: Chicagoland
Car: 1989 IROC-Z. Original owner
Engine: LB9. Dual Cats. Big Cam
Transmission: World Class T-5
Axle/Gears: BW 3.45
Re: 1991 Firebird Project
I shall call this piece: Cat on a Mustang.
Thread Starter
Joined: Jul 1999
Posts: 20,310
Likes: 1,068
From: Salina, KS
Re: 1991 Firebird Project


Will not be requiring your services any longer. Good bye.


Front end came off completely since we're getting closer to shooting epoxy on the front 1/3rd.
Time to check out the inside of the front subframe...


I'll take it!
I'll just skip all the pics that don't exist of cleaning all the mud from under the body. Ok, I'll just share one... This was done MANY times, and this isn't the worst of it. Just know that there were evenings or days when the spray nozzle, hose, or even pressure washer wand locked on "KILL!" were stuffed into holes in the subframe and body, and allowed to just run to dissolve and flush mud, rocks, and plant life out of all the nooks and crannies. So much mud and gravel got washed down the driveway, that the street sweeper(s) didn't put a dent in it. Eventually I shoveled all the dirt road out of the storm gutter, and used it to fill low spots in the yard.


Not bad. Aside from one torn out air damn screw hole, no real damage or serious rust to deal with.


The inside of the wiper/cowl area got a lot more cleaning, scrubbing, sand blasted, and treated with El Cheapo sealer. Eventually this (like all the rattle can sealer) will be stripped back off and epoxy primed.
Thread Starter
Joined: Jul 1999
Posts: 20,310
Likes: 1,068
From: Salina, KS
Re: 1991 Firebird Project
She has been impossible to live with since she saw that Whitesnake video.

Whenever I'm working on anything, I am generally further ahead to put out a moving blanket or an old towel for her to lay on, or I have no say in where she might lay down.

Whenever I'm working on anything, I am generally further ahead to put out a moving blanket or an old towel for her to lay on, or I have no say in where she might lay down.
Thread Starter
Joined: Jul 1999
Posts: 20,310
Likes: 1,068
From: Salina, KS
Re: 1991 Firebird Project


The underside of the floor pans, trunk, and rear wheel wells still needed to be cleaned up. Under the trunk was pure dealership style undercoating. The first photo is before, second photo is after spraying the undercoating with Gunk HD Gel degreaser. This stuff works really well on this type of undercoat.

Of course, spray on, rinse off would only go so far.

This was going to take awhile.


A little more surface rust around the rear impact bumper mounts...


But hey, at least the inside is finally cleaned out...


The small hole under the HVAC box from the inside. Little bit of MIG weld chewing gum hot glued over the hole. No easy way to fix this hole right, the sheet of steel that really needed to be cut away and repaired was more than a little hard to get at. So it got super cleaned, and eventually - Epoxy Primed.


Most of the large, soft dents in the floor pans, simply pushed out by standing on the floor in the backseat. A little surface corrosion, but not bad...


Thread Starter
Joined: Jul 1999
Posts: 20,310
Likes: 1,068
From: Salina, KS
Re: 1991 Firebird Project


A few gallons of mineral spirits, a gallon of lacquer thinner, a few bulk packs of paper towels, a ton of rubber gloves, and lots of time later....