
1987 Camaro "Pro-Touring" Budget Build


Joined: Feb 2001
Posts: 752
Likes: 19
From: Westminster, MD USA
Car: 91 Firebird 'vert, 91 Formula
Engine: 5.7, 5.0
Transmission: T56, T5
Axle/Gears: Auburn w/ 3.73's, 3.42
Re: 1987 Camaro "Pro-Touring" Budget Build
I heard this was a great time. I was supposed to go up but pulled my quad real bad a couple weeks ago and been laid up for most part since. Couple buddies I autocross with were up there in the blue 69 Camaro and black 71 Chevelle. It�s only about 3 hours from my house thought so will definitely plan to make it next year!

Joined: Sep 1999
Posts: 4,353
Likes: 308
From: NJ
Car: 92 Firebird
Engine: 4.8 LR4
Transmission: T56
Axle/Gears: 3.45 9 Bolt
Re: 1987 Camaro "Pro-Touring" Budget Build
Yes, I talked to the owner quite a bit. It has a 408in LS motor, some 18in wheels with 275 tires and some other minor suspension upgrades. He runs CAM-T with the SCCA in the Kentucky region. His name is Caleb and on Instagram he is @eredinkwy. Hope he doesn't mind me sharing his info on here...

Senior Member

Joined: Aug 2004
Posts: 991
Likes: 24
From: Peoria, AZ
Junior Member
Joined: Jan 2007
Posts: 48
Likes: 2
From: Surprise, AZ
Car: 1988 GTA
Engine: LS3
Transmission: T56 Magnum
Axle/Gears: Moser 12 Bolt 3:42
Re: 1987 Camaro "Pro-Touring" Budget Build
Matt,
Cool build! Can't wait to see it on track somewhere.
Thanks for the kind words, the event was amazing and it was nice to catch up with a few fans!
Given its 100+ today in AZ, I can't wait to get back to PA.
Cool build! Can't wait to see it on track somewhere.
Thanks for the kind words, the event was amazing and it was nice to catch up with a few fans!
Given its 100+ today in AZ, I can't wait to get back to PA.
Re: 1987 Camaro "Pro-Touring" Budget Build
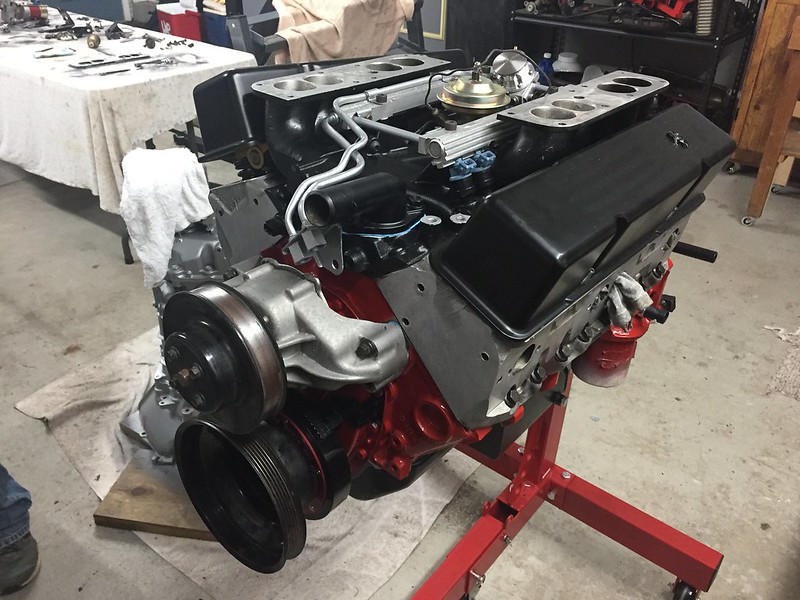
Ok I finally have a bit of an update! I've been very busy in August with lots of weekend plans and other jobs going around the house but I managed to make a bit of progress on the engine.
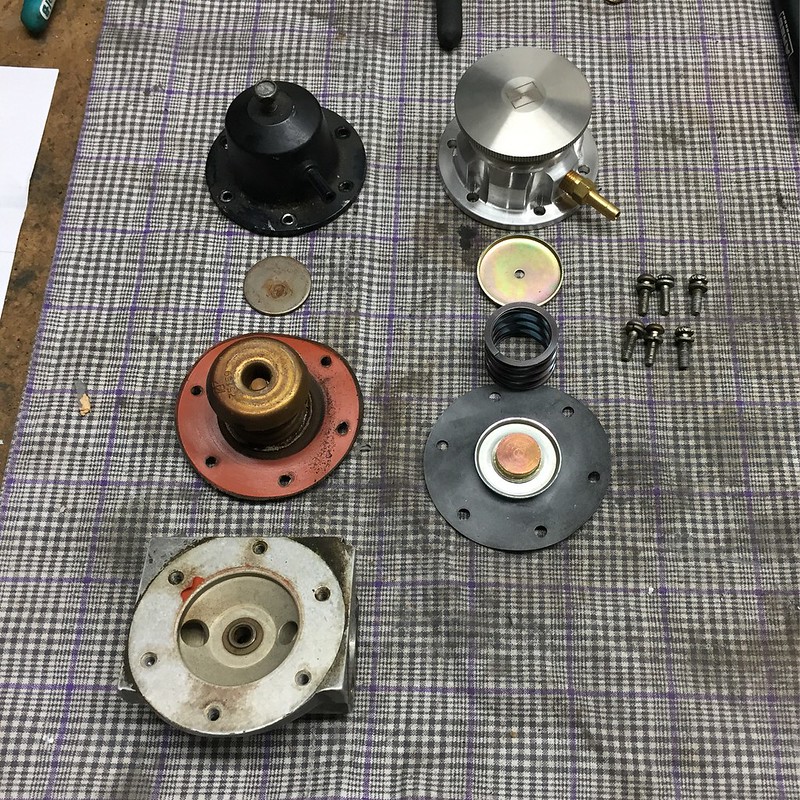
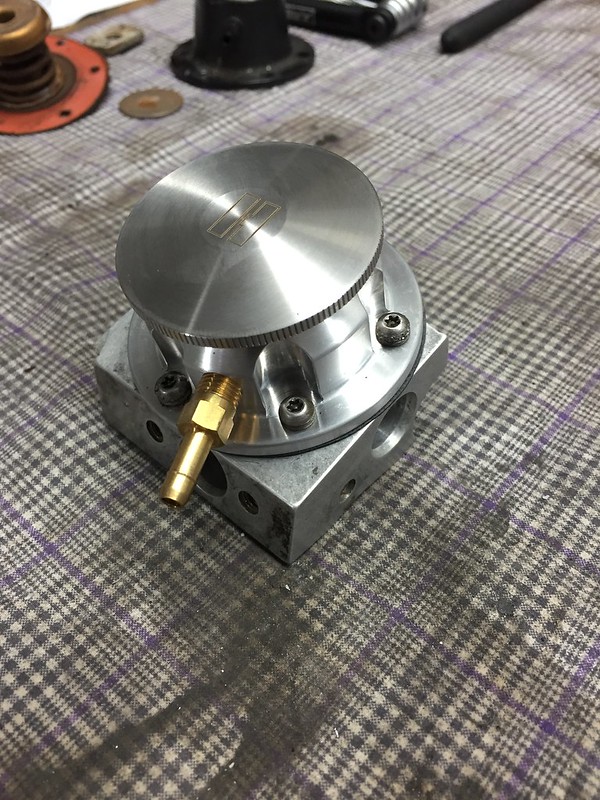
First, I worked on getting the fuel rails back together. I had already disassembled, cleaned and painted them so now was time for reassembly. My next step was rebuilding the fuel pressure regulator with a kit I got from Holley. The rebuild itself was pretty straightforward, except for the fact that I needed to buy some special Torx drivers to get the small perimeter bolts out

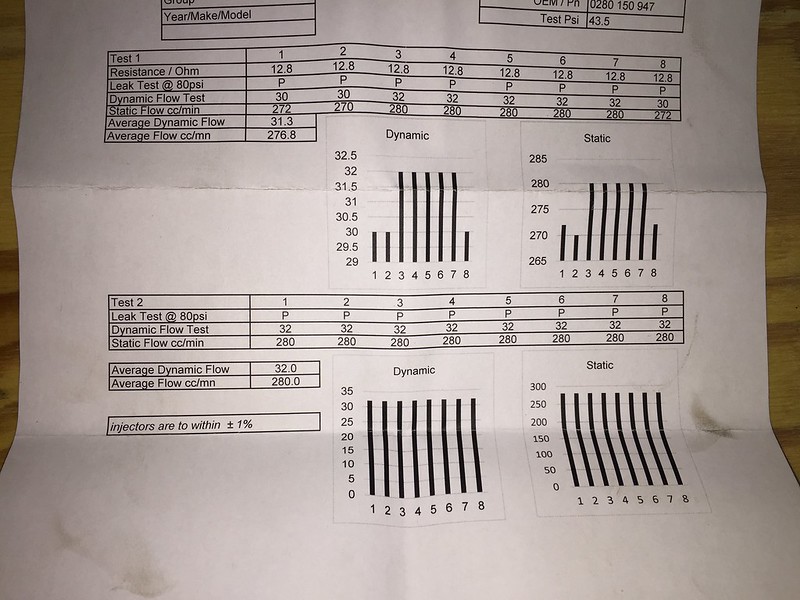
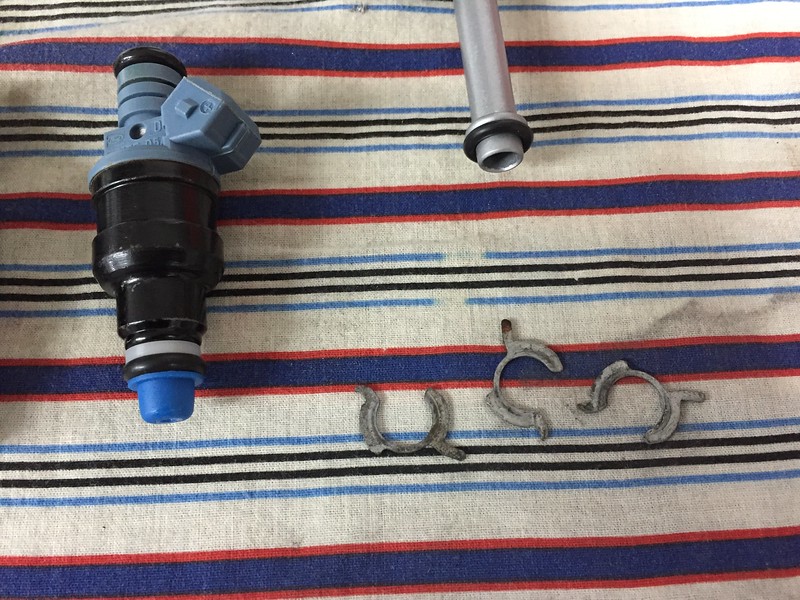
If you remember a while back, the fuel injectors I had on my car are the blue Ford 24lb injectors. I sent them off to be cleaned, rebuilt and flow tested at SouthBay Fuel Injectors. They tested them before and after the rebuild and it turns out they weren't too bad to start with, as only 2 injectors showed a slightly lower flow rate than the others. They are all nice and consistent now though:
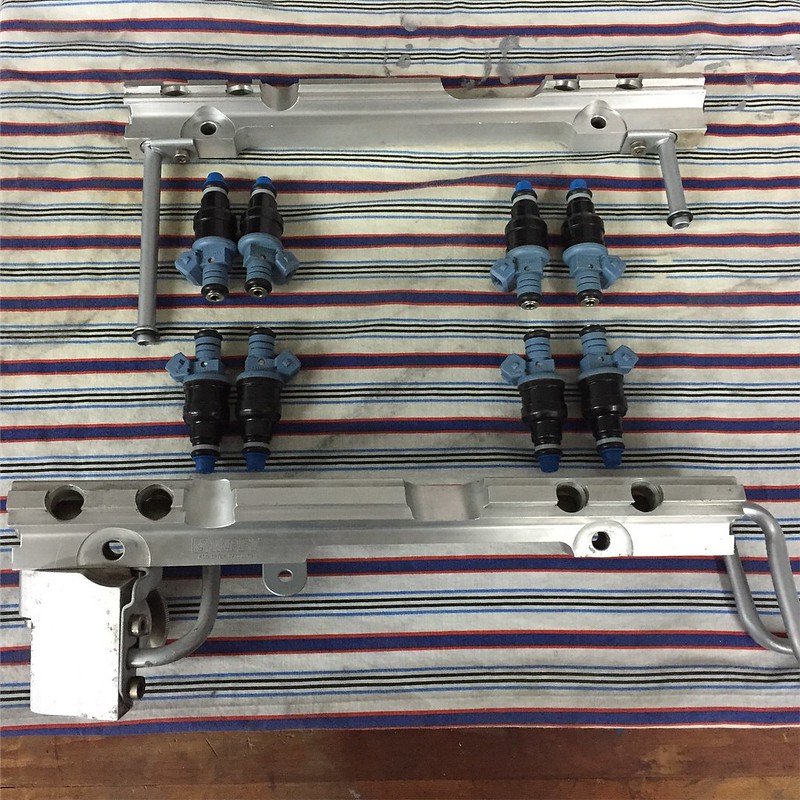
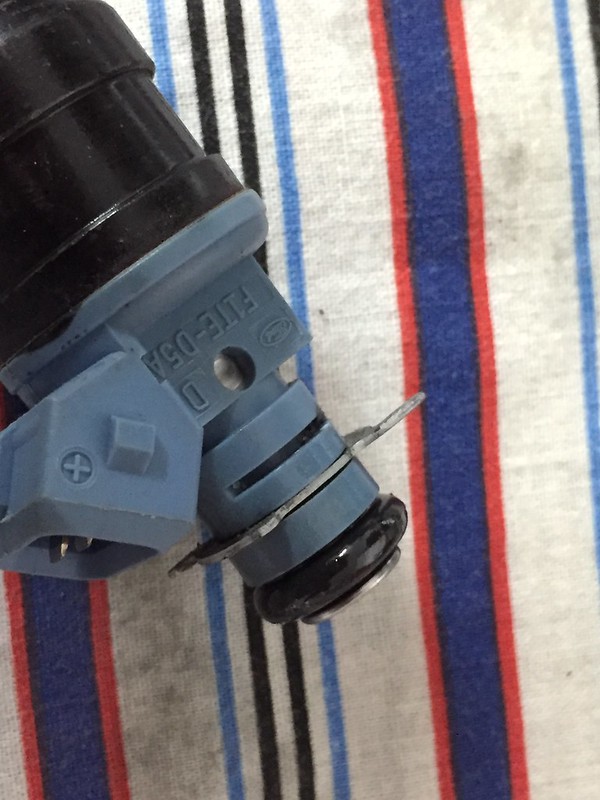
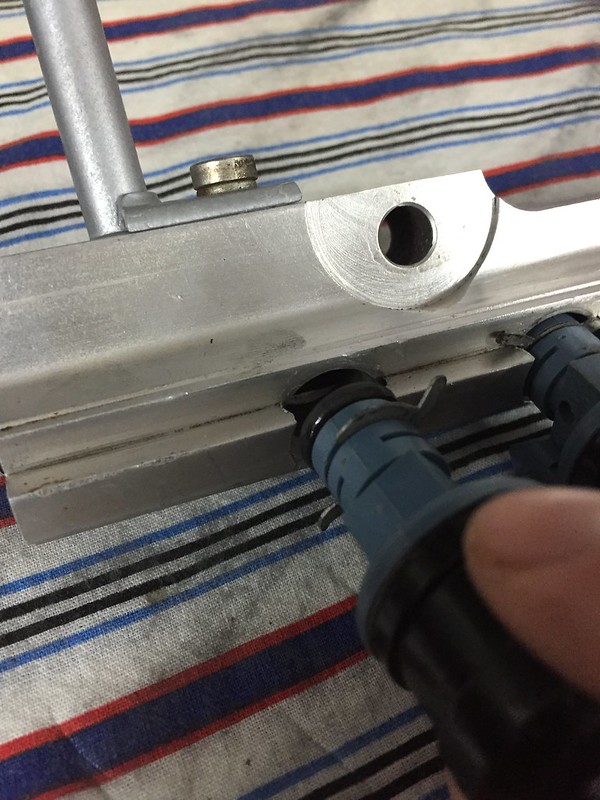
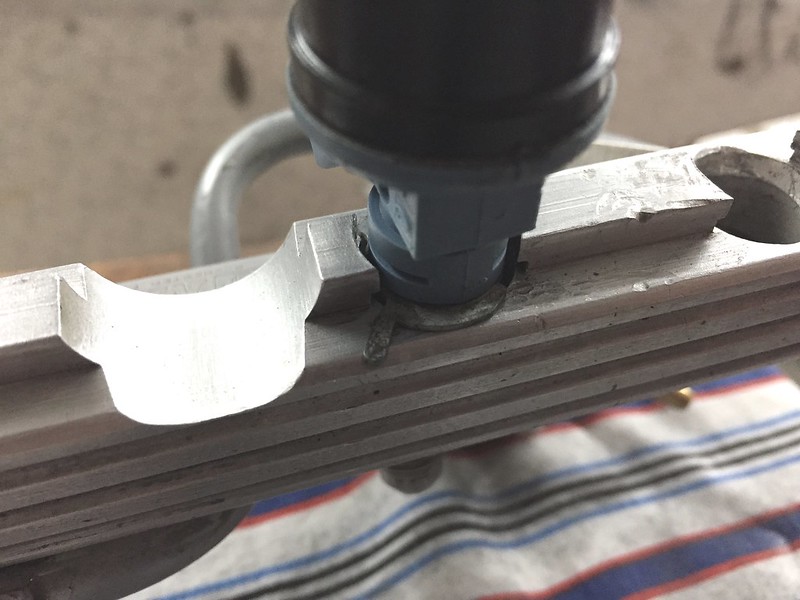
It took me a little while to remember how the small clips that hold the injectors into the fuel rail worked but once I got the trick they slid right in. You need to install the clip beforehand on the injectors, then rotate it once the injector is installed to lock it into place.
Pre-Assembly:
Fuel Injector to Rail Install:
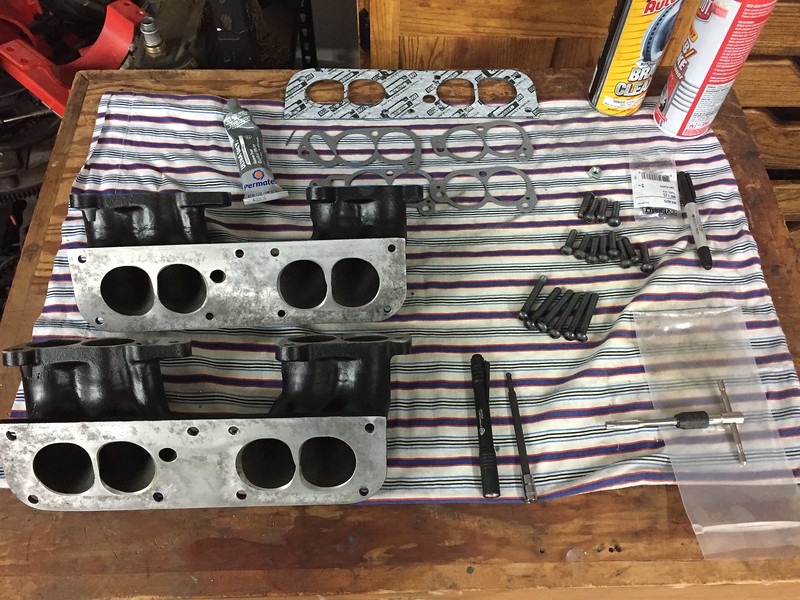
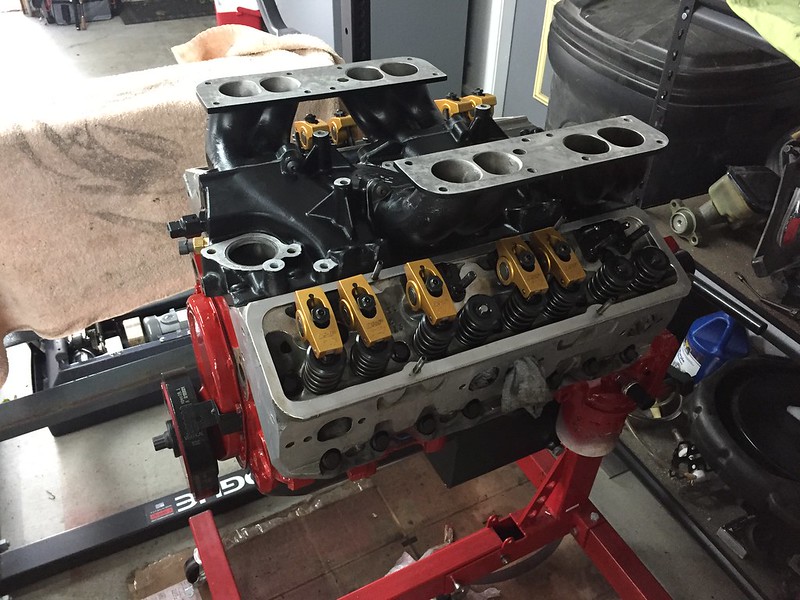
Before I could install the fuel rails onto the intake base, I needed to install the runners for the Super Ram. I ordered a new bolt kit from Hawks but some of them needed to be cut down so they didn't bottom out in some of the blind holes. There were also a few Allen head fasteners I needed to reuse in the lower sections of the runners where there's no room for a Torx head. She's on though!
First, I worked on getting the fuel rails back together. I had already disassembled, cleaned and painted them so now was time for reassembly. My next step was rebuilding the fuel pressure regulator with a kit I got from Holley. The rebuild itself was pretty straightforward, except for the fact that I needed to buy some special Torx drivers to get the small perimeter bolts out
If you remember a while back, the fuel injectors I had on my car are the blue Ford 24lb injectors. I sent them off to be cleaned, rebuilt and flow tested at SouthBay Fuel Injectors. They tested them before and after the rebuild and it turns out they weren't too bad to start with, as only 2 injectors showed a slightly lower flow rate than the others. They are all nice and consistent now though:
It took me a little while to remember how the small clips that hold the injectors into the fuel rail worked but once I got the trick they slid right in. You need to install the clip beforehand on the injectors, then rotate it once the injector is installed to lock it into place.
Pre-Assembly:
Fuel Injector to Rail Install:
Before I could install the fuel rails onto the intake base, I needed to install the runners for the Super Ram. I ordered a new bolt kit from Hawks but some of them needed to be cut down so they didn't bottom out in some of the blind holes. There were also a few Allen head fasteners I needed to reuse in the lower sections of the runners where there's no room for a Torx head. She's on though!
Re: 1987 Camaro "Pro-Touring" Budget Build
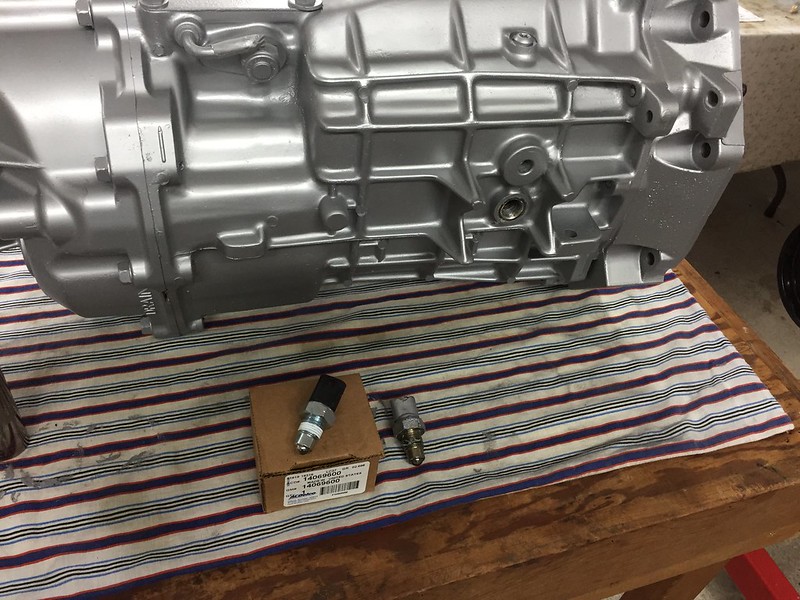
Small update for tonight. I've been chipping away at some small things when I've had some free time (which hasn't been much lately!)
New reverse light switch on the T56:
Masked off and painted the inner wheel wells. The undercoating in there was actually in pretty good shape and mostly intact. I just scraped off the loose bits, cleaned it with some degreaser and hit it with some Rustoleum undercoating in a can. Turned out pretty good!
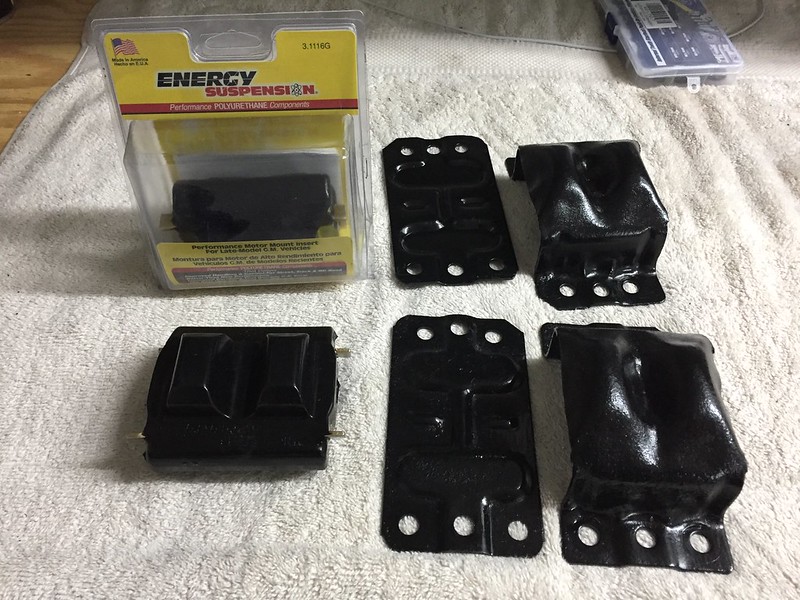
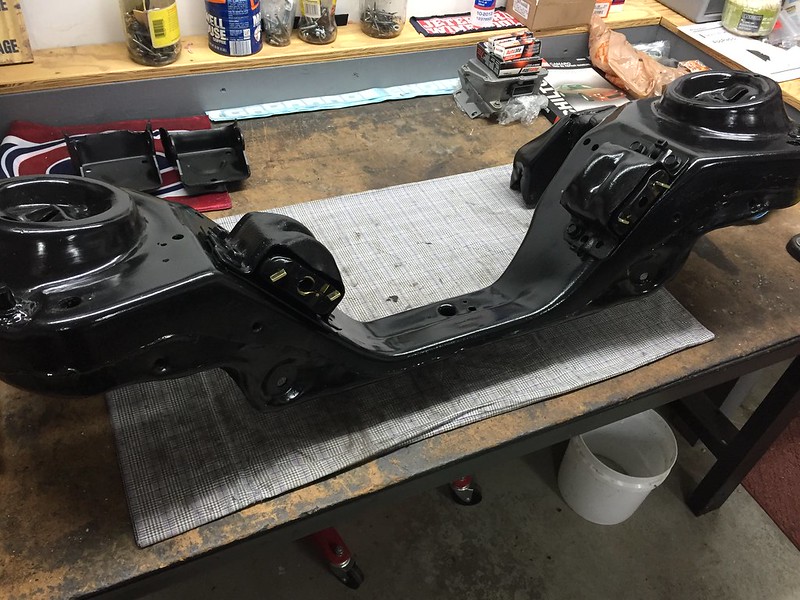
Got my new polyurethane engine mounts mounted up in the clamshells and mounted on the K-member:
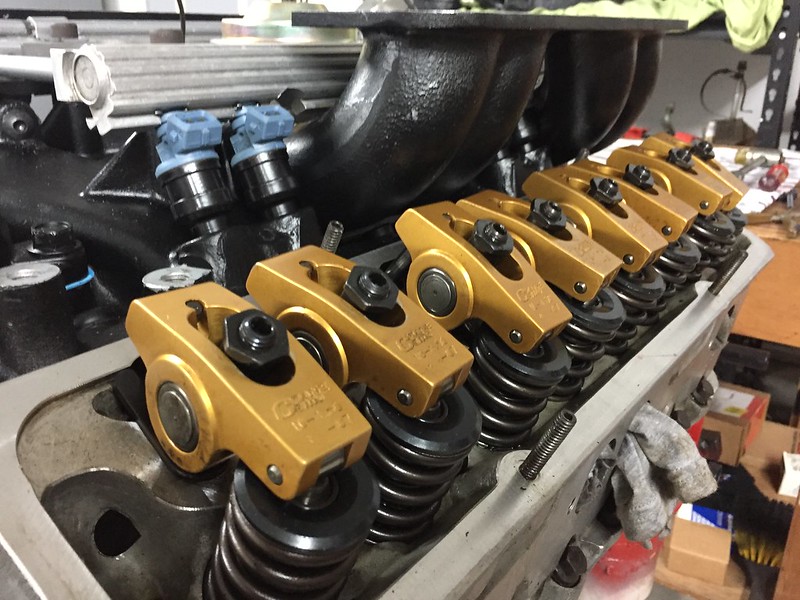
Finally spent some time setting the lash on the lifters:
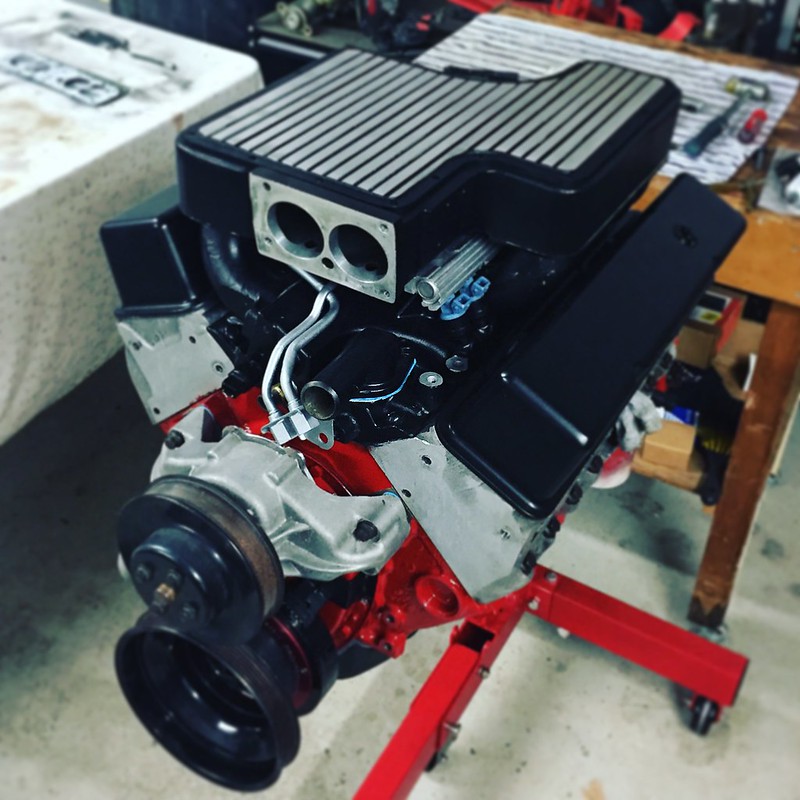
Almost ready to get the engine back on the K-member and get the clutch hooked up!
New reverse light switch on the T56:
Masked off and painted the inner wheel wells. The undercoating in there was actually in pretty good shape and mostly intact. I just scraped off the loose bits, cleaned it with some degreaser and hit it with some Rustoleum undercoating in a can. Turned out pretty good!
Got my new polyurethane engine mounts mounted up in the clamshells and mounted on the K-member:
Finally spent some time setting the lash on the lifters:
Almost ready to get the engine back on the K-member and get the clutch hooked up!
Last edited by garage_engineer; Oct 11, 2018 at 04:18 PM.
Joined: Sep 1999
Posts: 4,353
Likes: 308
From: NJ
Car: 92 Firebird
Engine: 4.8 LR4
Transmission: T56
Axle/Gears: 3.45 9 Bolt
Re: 1987 Camaro "Pro-Touring" Budget Build
That transmission looks way too nice to put under the car, lol. That is the reverse light switch, not the speed sensor. The VSS is in the tail housing on the LH side
Re: 1987 Camaro "Pro-Touring" Budget Build
It did not look that nice when it came out of the car... just a quick shot of engine enamel and it cleaned up pretty good!
Supreme Member


Joined: Dec 2005
Posts: 9,902
Likes: 874
From: 53.0907� N, 113.4695� W
Re: 1987 Camaro "Pro-Touring" Budget Build
Had a busy October but managed to get a few small things done on the car.
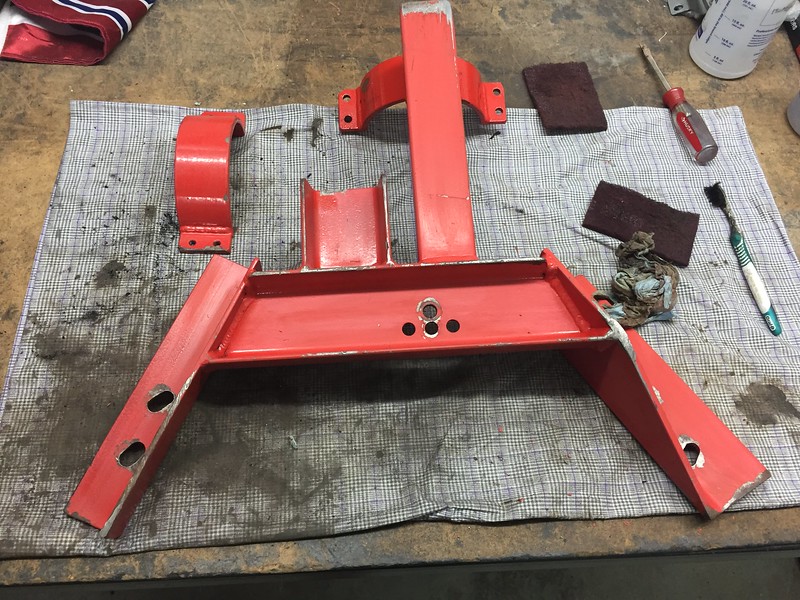
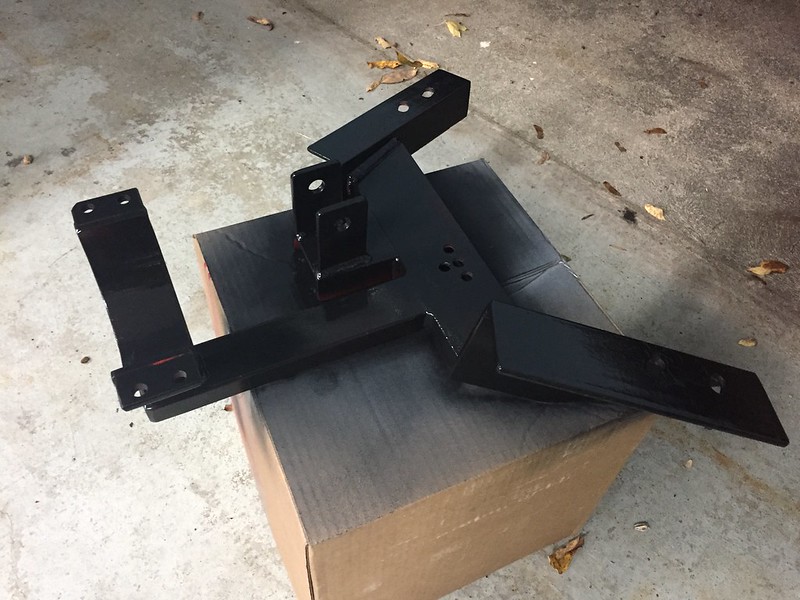
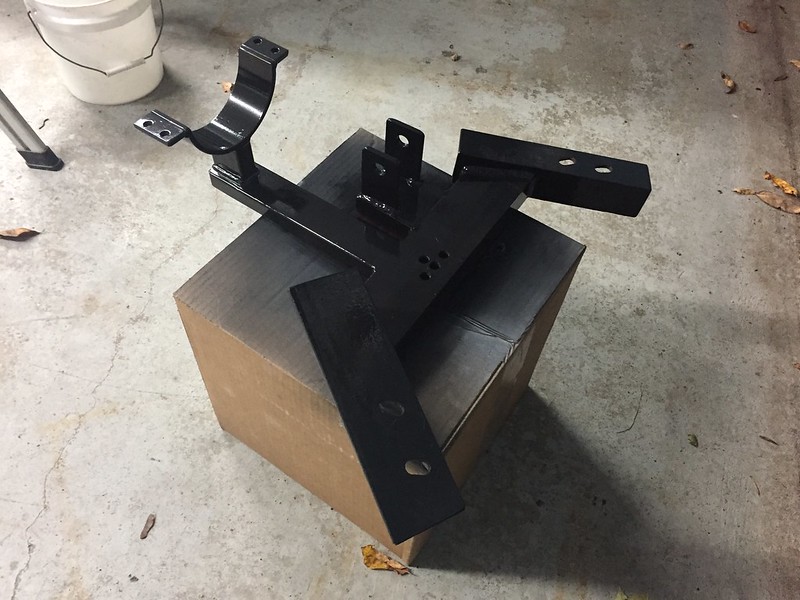
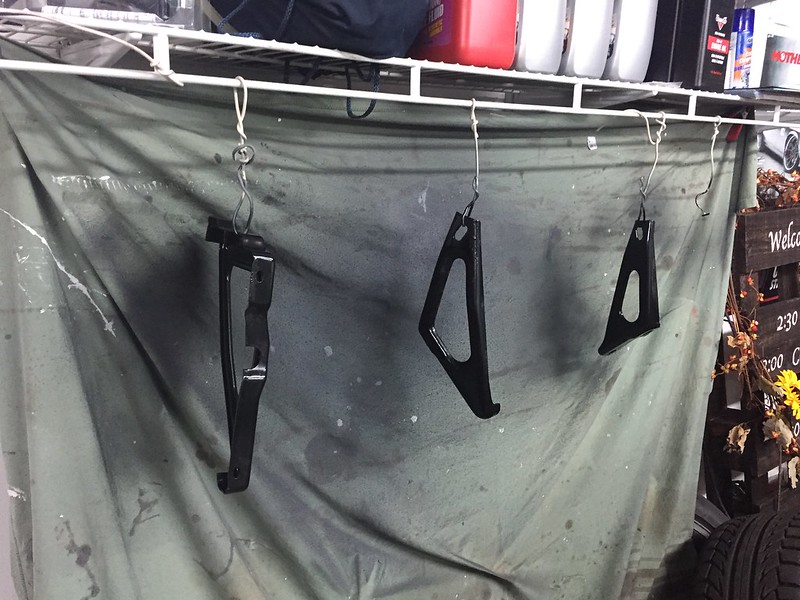
Transmission crossmember and a few other pieces all cleaned up, prepper and painted:
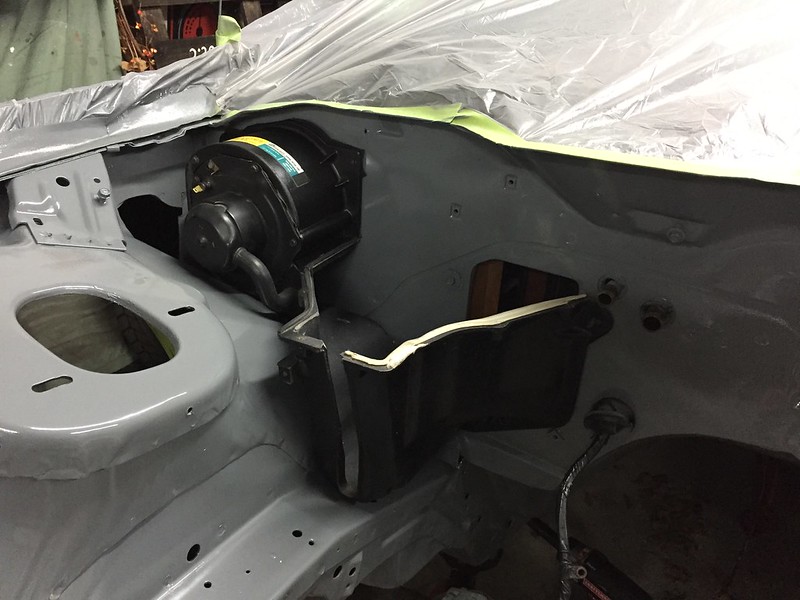
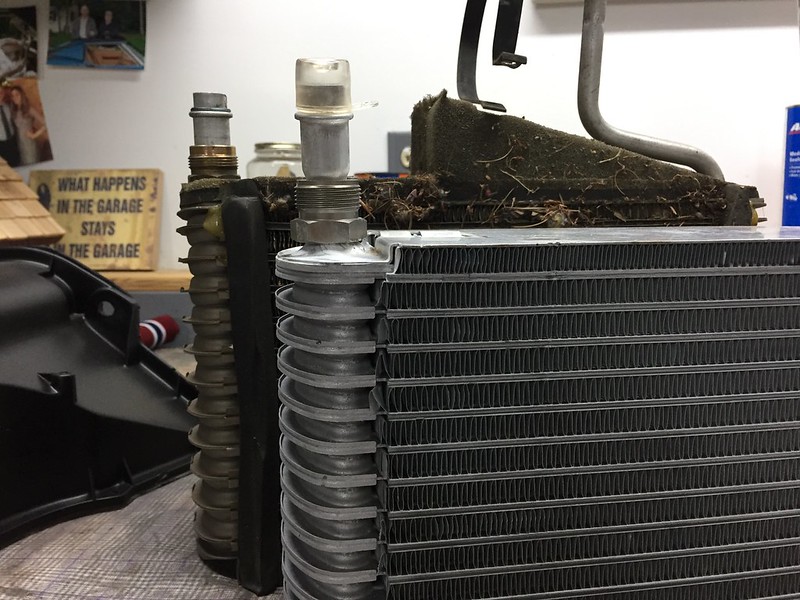
Next I started installing my A/C system on the firewall and ran into a bit of a problem with my new evaporator. My new one wasn't quite the same shape as the original...it was smaller and was also missing the foam needed to seal it against the hosing. This one was from RockAuto… does anyone know where I can get a good replacement evaporator?

Lastly I modified my 4th gen clutch master cylinder to be adjustable using some plans I found here on thirdgen.org. Before I took the car apart, the clutch pedal sat very high and the engagement point was near the top of the pedal travel. I prefer to have the clutch engage pretty close to the floor, and I'm hoping shortening the rod and making it adjustable will help me get that dialed in.
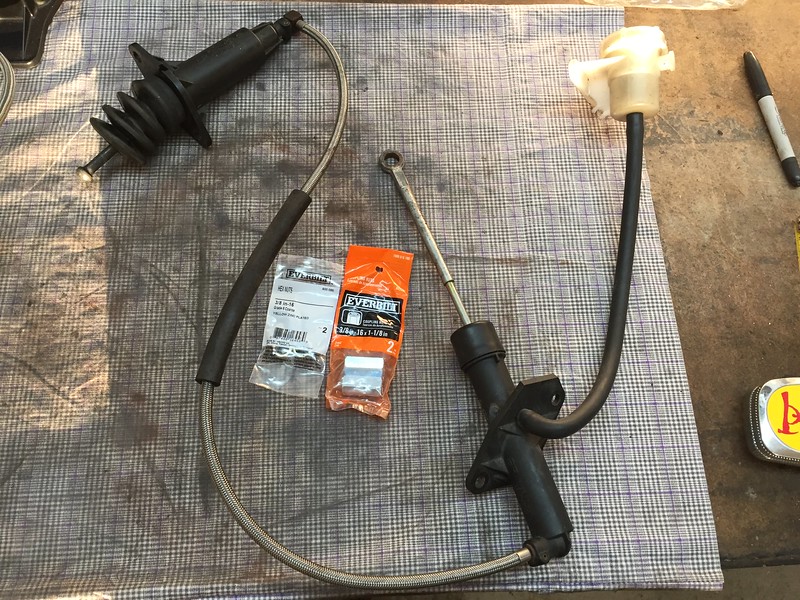
I started by making the following 2 cuts, which took about a 1/2" out of the shaft:

I used a 3/8-16 NC tap to add threads to the ends of the shafts:
I then just joined the 2 ends of the shafts using a 1 1/8" hex nut and 2 jam nuts. If I were to do it again, I would order some thinner nuts to use as jam nuts as the ones I bought take up quite a bit of the available thread and there's not much thread there to begin with. I first practiced on my old one and then repeated the process on my new one.
Transmission crossmember and a few other pieces all cleaned up, prepper and painted:
Next I started installing my A/C system on the firewall and ran into a bit of a problem with my new evaporator. My new one wasn't quite the same shape as the original...it was smaller and was also missing the foam needed to seal it against the hosing. This one was from RockAuto… does anyone know where I can get a good replacement evaporator?
Lastly I modified my 4th gen clutch master cylinder to be adjustable using some plans I found here on thirdgen.org. Before I took the car apart, the clutch pedal sat very high and the engagement point was near the top of the pedal travel. I prefer to have the clutch engage pretty close to the floor, and I'm hoping shortening the rod and making it adjustable will help me get that dialed in.
I started by making the following 2 cuts, which took about a 1/2" out of the shaft:
I used a 3/8-16 NC tap to add threads to the ends of the shafts:
I then just joined the 2 ends of the shafts using a 1 1/8" hex nut and 2 jam nuts. If I were to do it again, I would order some thinner nuts to use as jam nuts as the ones I bought take up quite a bit of the available thread and there's not much thread there to begin with. I first practiced on my old one and then repeated the process on my new one.
Re: 1987 Camaro "Pro-Touring" Budget Build
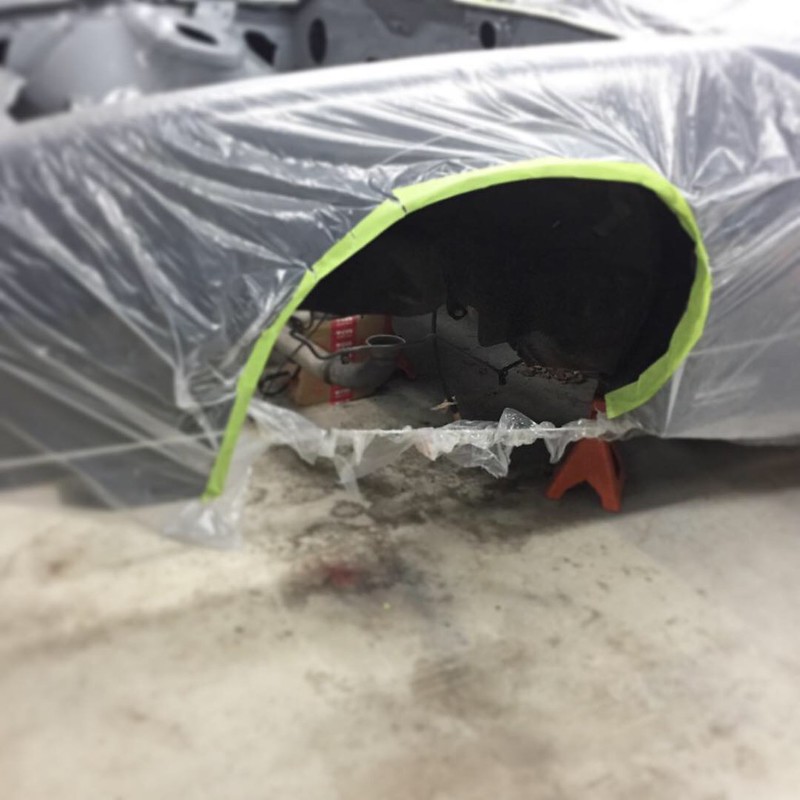
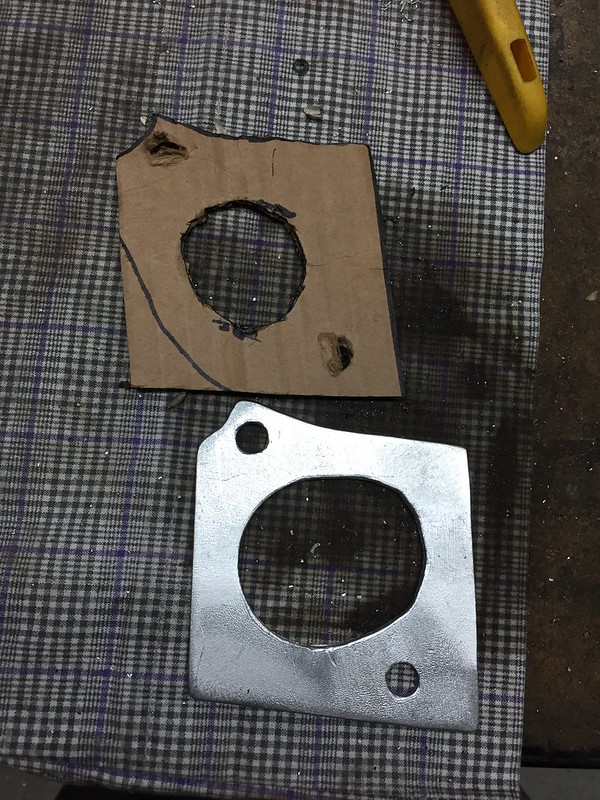
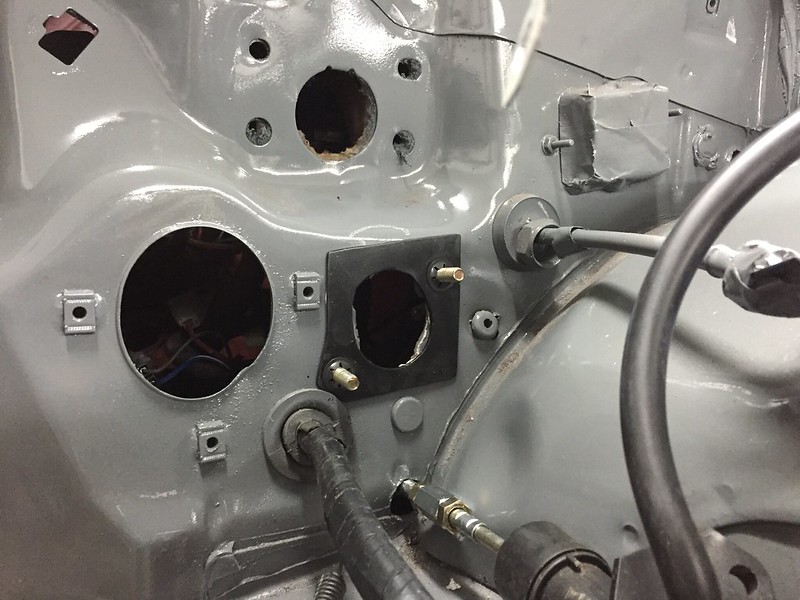
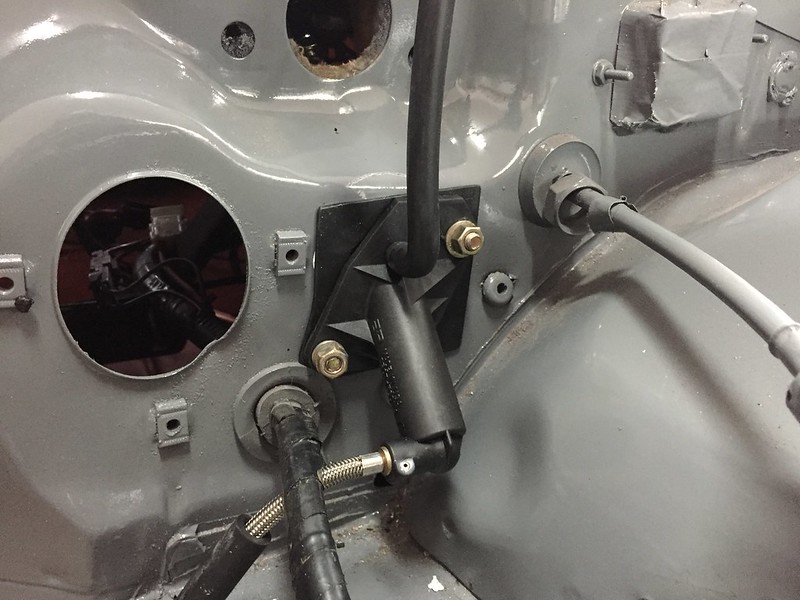
Before I installed my clutch master cylinder I had to repair this nasty hole cut in the firewall by the previous owner. Looks like they used a drill bit and some cutters or something to make this hole... not pretty! I tried my best to clean it up with a grinder but ended up just making a little block off plate to clean up the area:
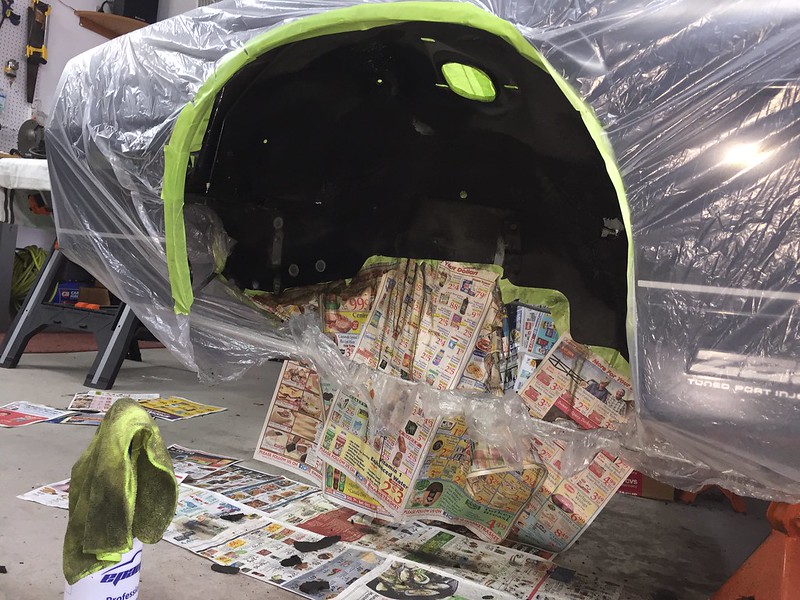
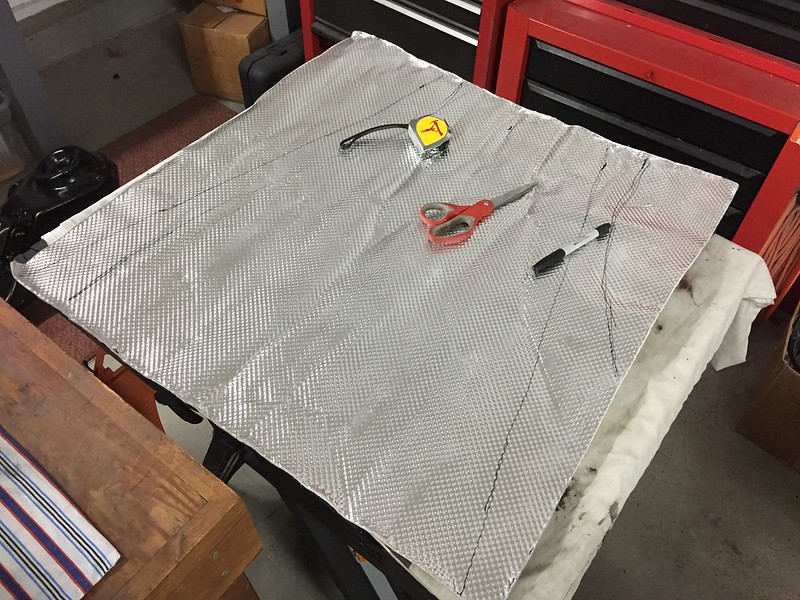
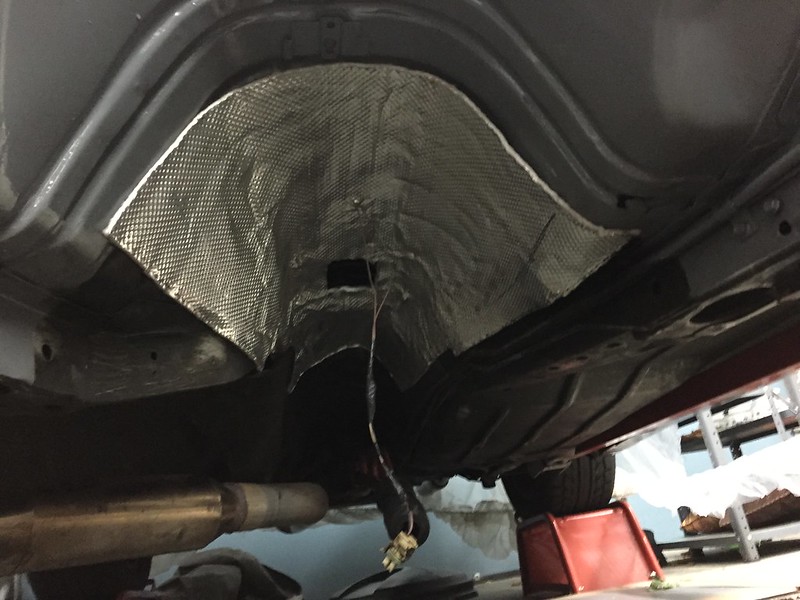
Next I custom cut a sheet of DEI heat shielding to put in my transmission tunnel. Before I took the car apart my center console would get very hot after some aggressive driving. I'm hoping this will help cool it down a bit. It was a bit tricky working on my back and trimming the shape piece by piece but I got it done!
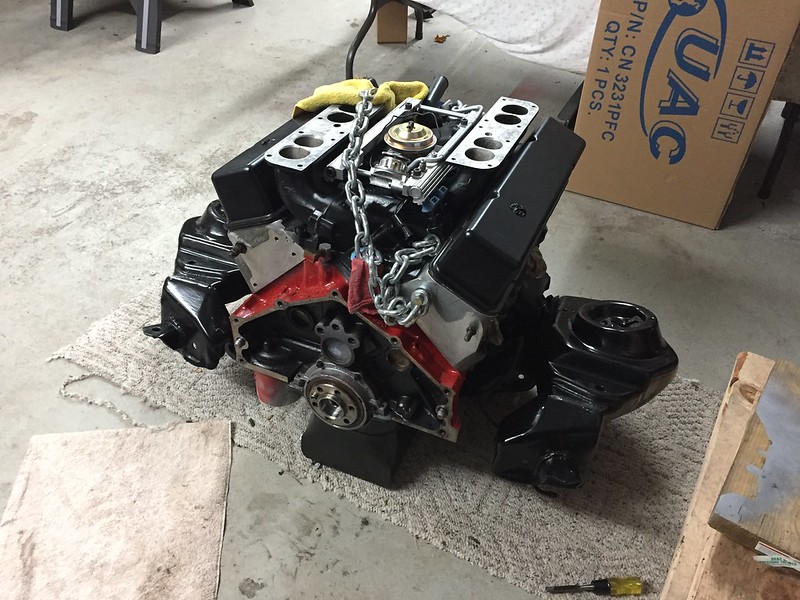
Finally,I worked on getting my engine off the stand (for the first time in about 8 months!) so I could work on getting the clutch and transmission installed:
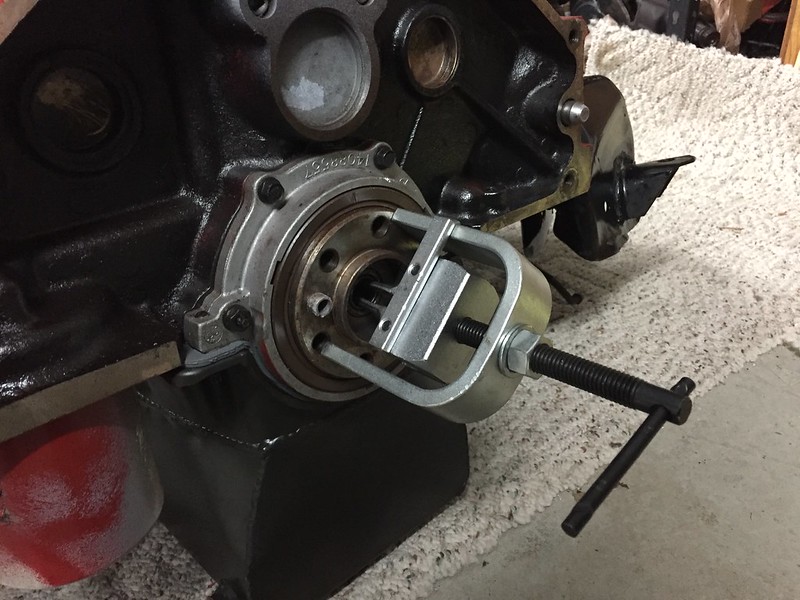
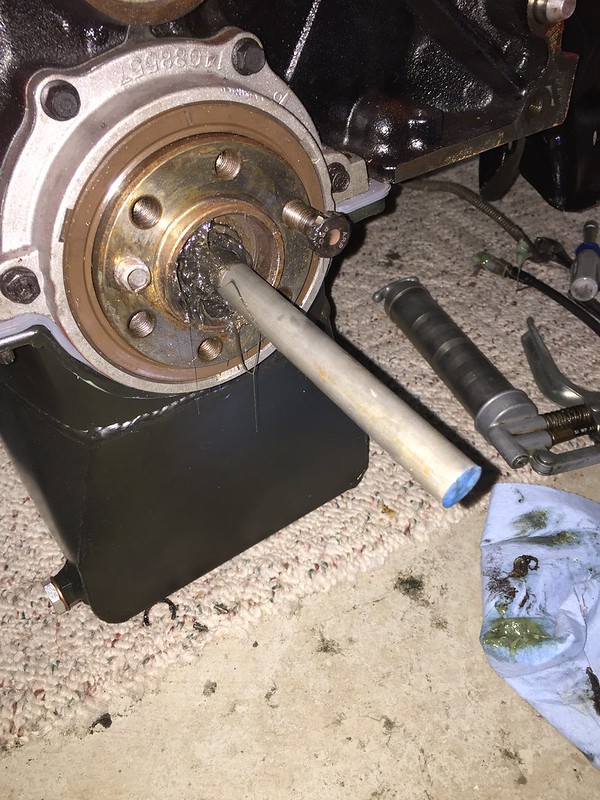
I started with replacing the pilot bearing in the back of the crankshaft. What a battle this turned out to be! I started with using the rental tool from Advanced Auto Parts which didn't work at all and just kept slipping off of the inside edge of the bearing:
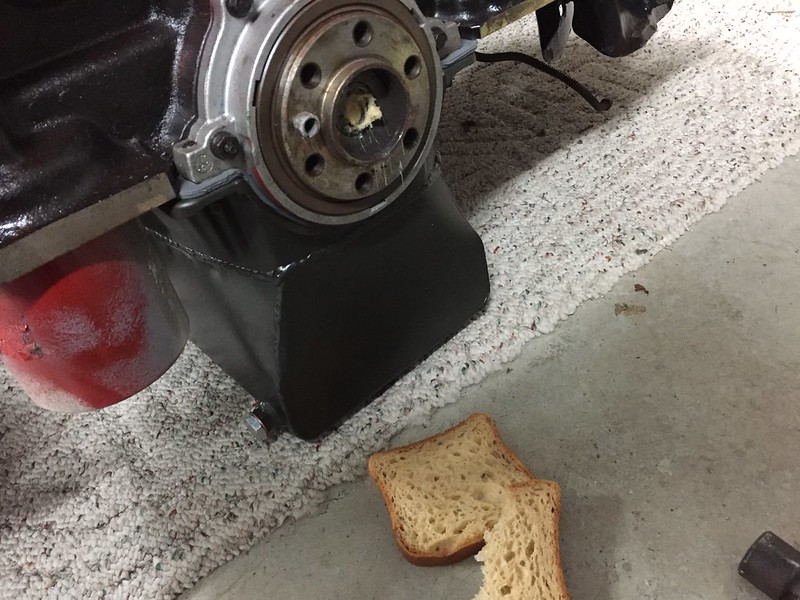
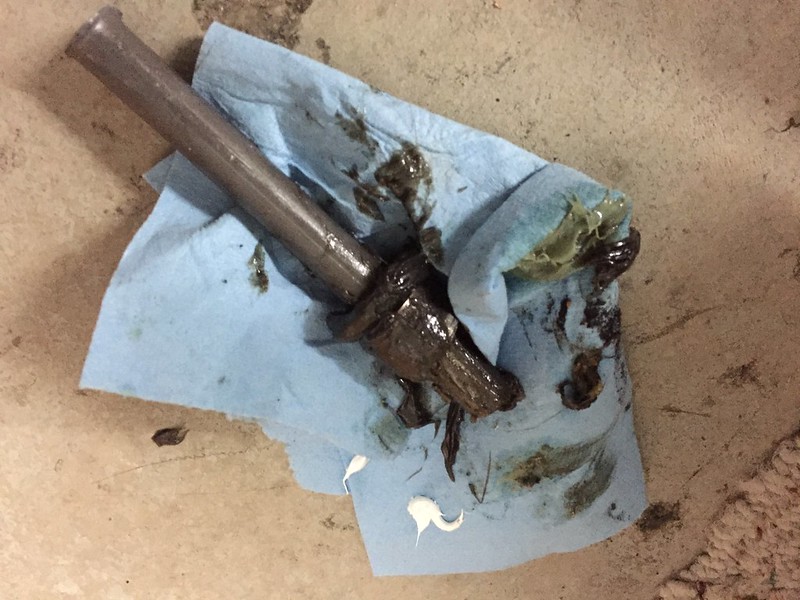
I then tried using the "grease method" by filling the cavity with grease and hammering in a socket. This didn't work out either as the grease kept working its way around the socket instead of forcing the bearing out. I even tried stuffing bread in there and that didn't work!
Next I custom cut a sheet of DEI heat shielding to put in my transmission tunnel. Before I took the car apart my center console would get very hot after some aggressive driving. I'm hoping this will help cool it down a bit. It was a bit tricky working on my back and trimming the shape piece by piece but I got it done!
Finally,I worked on getting my engine off the stand (for the first time in about 8 months!) so I could work on getting the clutch and transmission installed:
I started with replacing the pilot bearing in the back of the crankshaft. What a battle this turned out to be! I started with using the rental tool from Advanced Auto Parts which didn't work at all and just kept slipping off of the inside edge of the bearing:
I then tried using the "grease method" by filling the cavity with grease and hammering in a socket. This didn't work out either as the grease kept working its way around the socket instead of forcing the bearing out. I even tried stuffing bread in there and that didn't work!
Re: 1987 Camaro "Pro-Touring" Budget Build
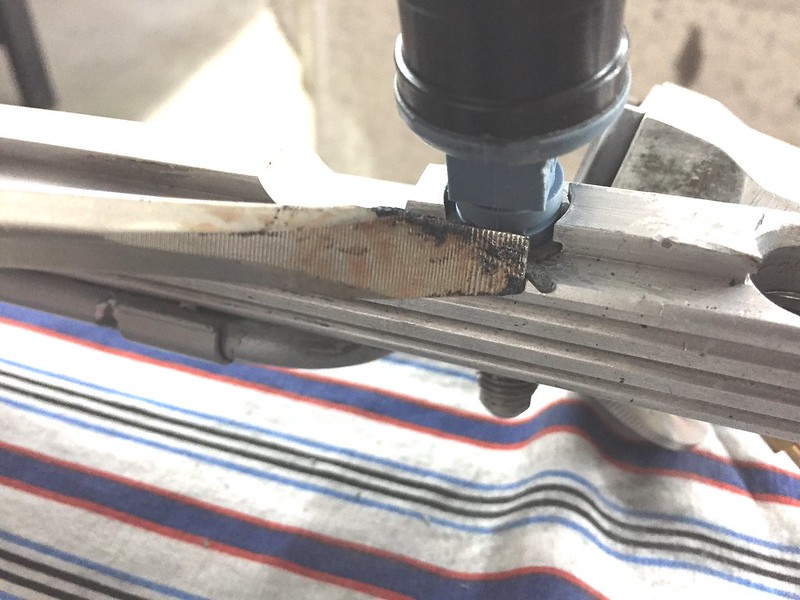
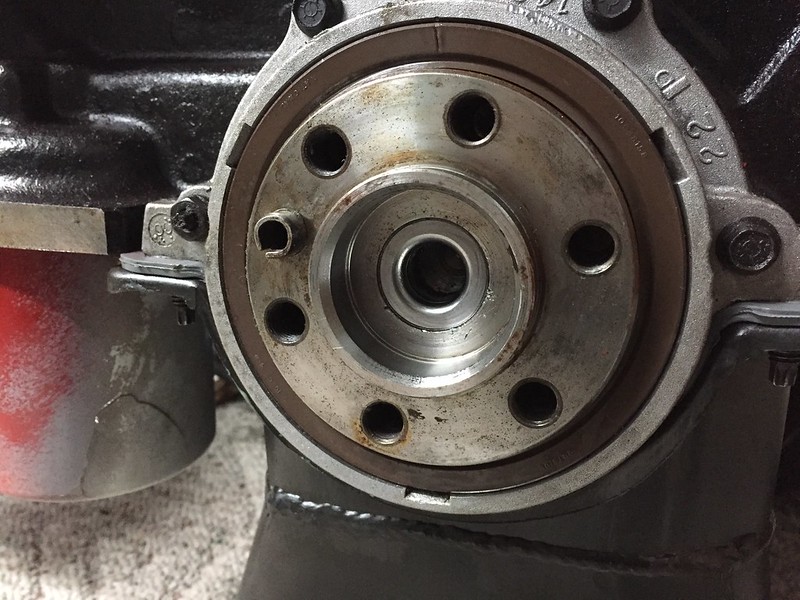
What I finally ended up doing was making a custom tool to get the job done. I grabbed some regular old bar stock at Home Depot and used a lathe at my buddy's shop to get an exact fit inside the bearing. This worked like a charm! Once I packed it tight with grease and gave it a few good shots with the hammer, the bearing moved out about a 1/4inch. I was pumped! After that, I just kept adding more grease and hammering on it until the bearing was out. Success!
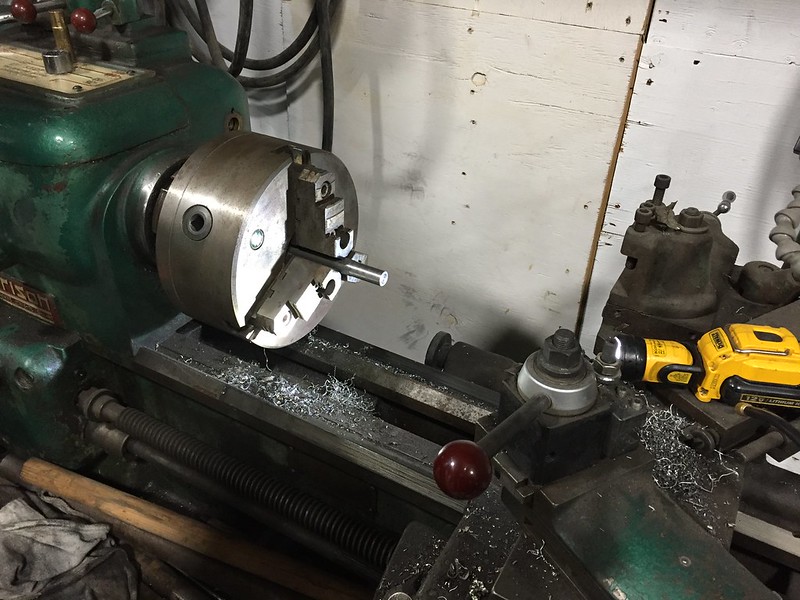
Things like this have been setting me back quite a bit on this project but I've been looking at the positive side: I now have a new tool and some new knowledge on how to get these things out! It's all worth it when you enjoy the journey and know the job was done right! New one installed!
Flywheel and clutch install coming up next!
Joined: Sep 1999
Posts: 4,353
Likes: 308
From: NJ
Car: 92 Firebird
Engine: 4.8 LR4
Transmission: T56
Axle/Gears: 3.45 9 Bolt
Re: 1987 Camaro "Pro-Touring" Budget Build
That doubler plate is better than what GM put stock, should work out well for you in the long run
Joined: Jun 2003
Posts: 5,028
Likes: 78
From: Desert
Car: 1991 Z28 Vert
Engine: 383 single plane efi
Transmission: T-56
Axle/Gears: 8.8 with 3.73s
Re: 1987 Camaro "Pro-Touring" Budget Build
Originally Posted by garage_engineer;6263240
Next I custom cut a sheet of DEI heat shielding to put in my transmission tunnel. Before I took the car apart my center console would get very hot after some aggressive driving. I'm hoping this will help cool it down a bit. It was a bit tricky working on my back and trimming the shape piece by piece but I got it done!
[img
https://farm5.staticflickr.com/4877/45897903202_f7e4771fd2_c.jpg[/img]
Joined: Sep 1999
Posts: 4,353
Likes: 308
From: NJ
Car: 92 Firebird
Engine: 4.8 LR4
Transmission: T56
Axle/Gears: 3.45 9 Bolt
Re: 1987 Camaro "Pro-Touring" Budget Build
It looks like "Heatshield products"
Just one example;
https://www.summitracing.com/parts/hsp-180025/overview/
Just one example;
https://www.summitracing.com/parts/hsp-180025/overview/
Re: 1987 Camaro "Pro-Touring" Budget Build
I has an adhesive backing, so I just trimmed it down to size first and then took the backing off in sections starting from the middle as I stuck in on for good. It seems to stick OK, but the transmission should hold it in place as well.
Re: 1987 Camaro "Pro-Touring" Budget Build
Almost ready to get the engine back in the car, just finishing up a few things and back in it goes!
First I had to get the engine and transmission mated up on the ground. This is my first clutch and transmission install so I thought doing it on the ground would give me better access instead of wrestling with it on my chest under the car.
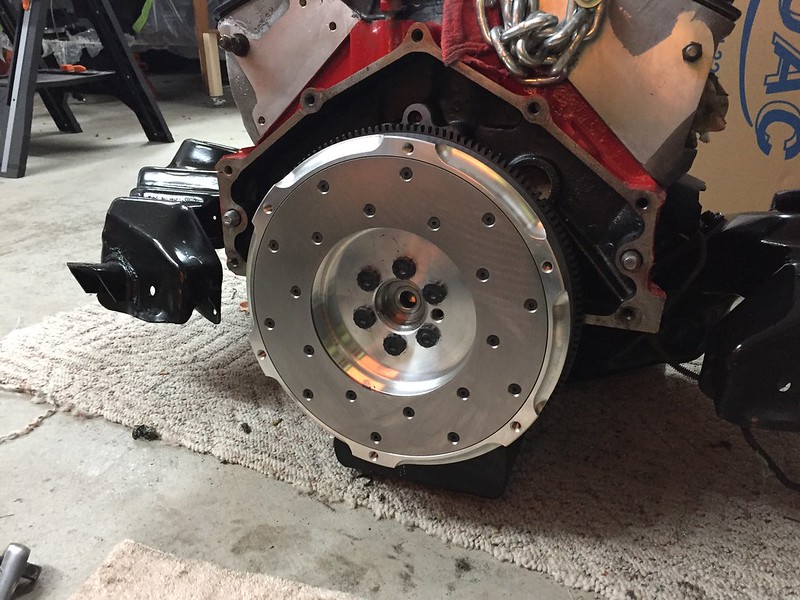
The car had a SPEC Stage 2 clutch already installed when I bought it. I called SPEC, and we decided to freshen it up with a new clutch disk and flywheel and keep the pressure plate. I decided to go with an Aluminum flywheel... I know it will be a little trickier to drive but I had one in my C5 Corvette and loved and how quickly it revved when I blipped the throttle on downshifts. That's an OK tradeoff for me!
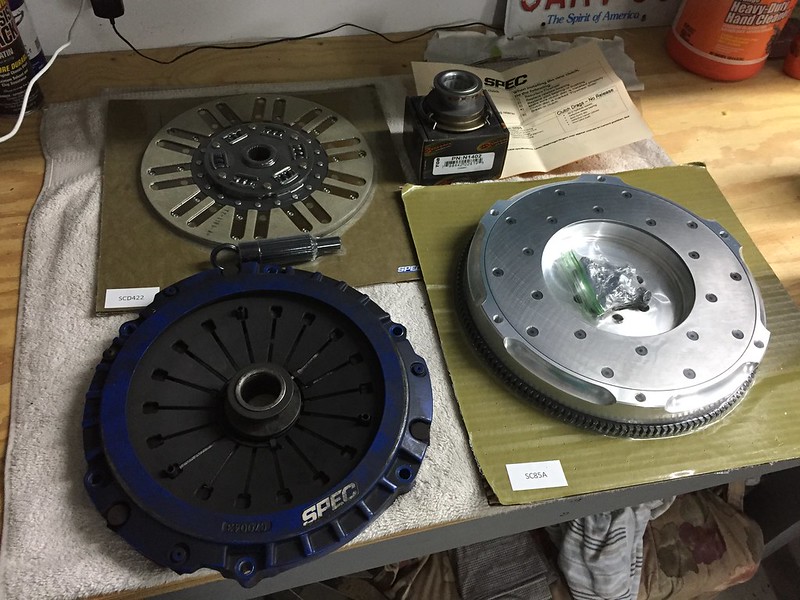
Flywheel installed with new ARP bolts:
Pressure plate torqued down with new bolts:
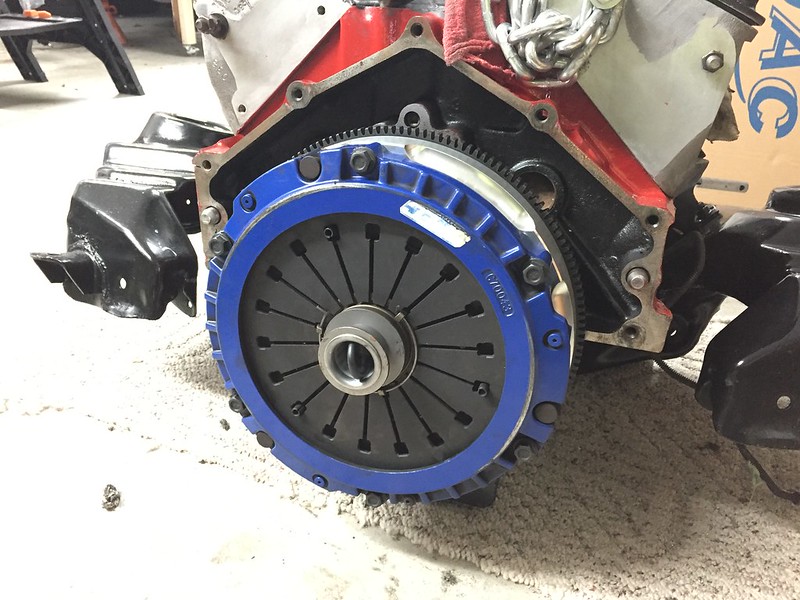
Bellhousing on and ready for the transmission:
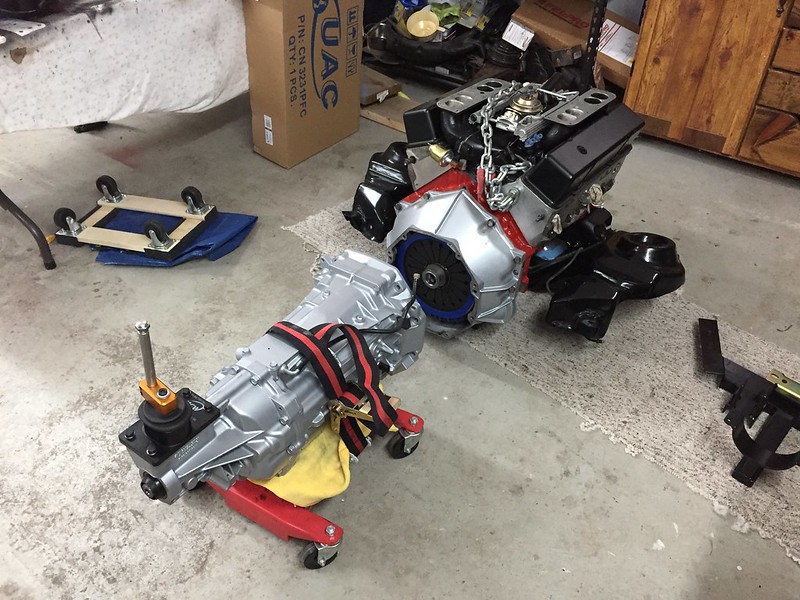
Mated up!
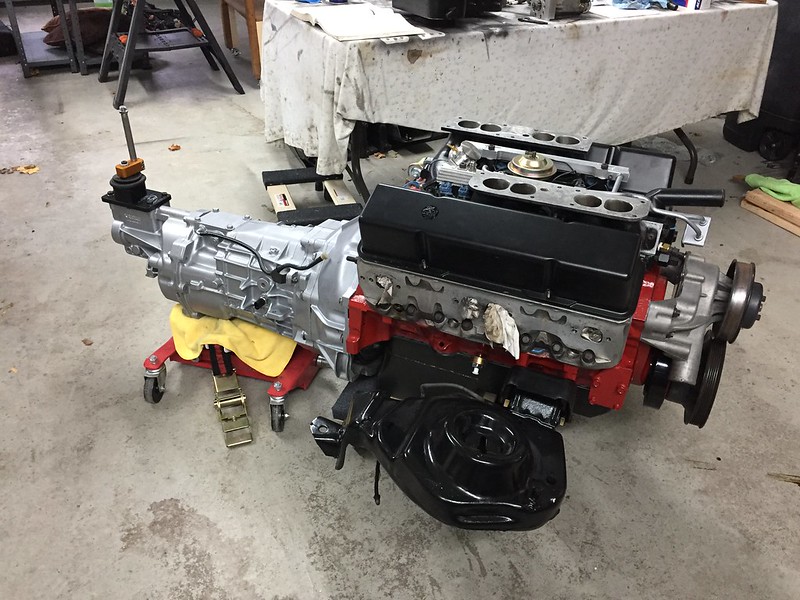
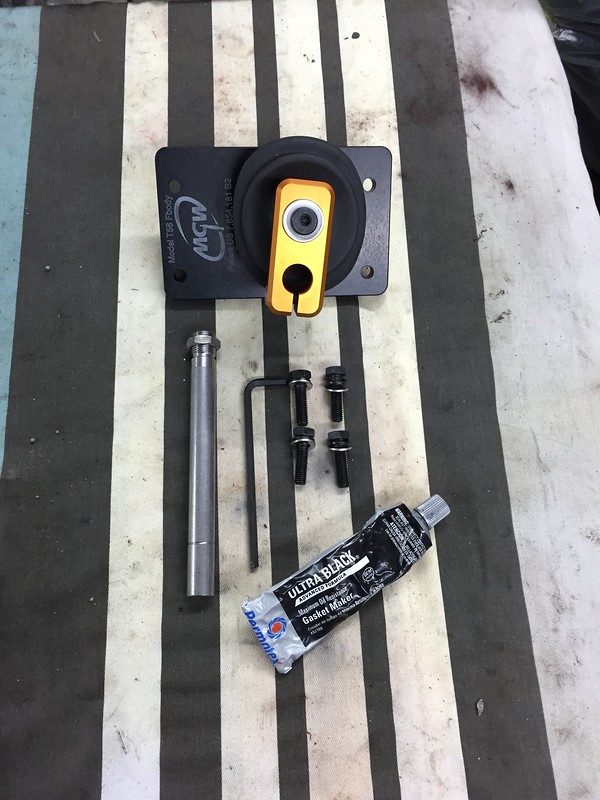
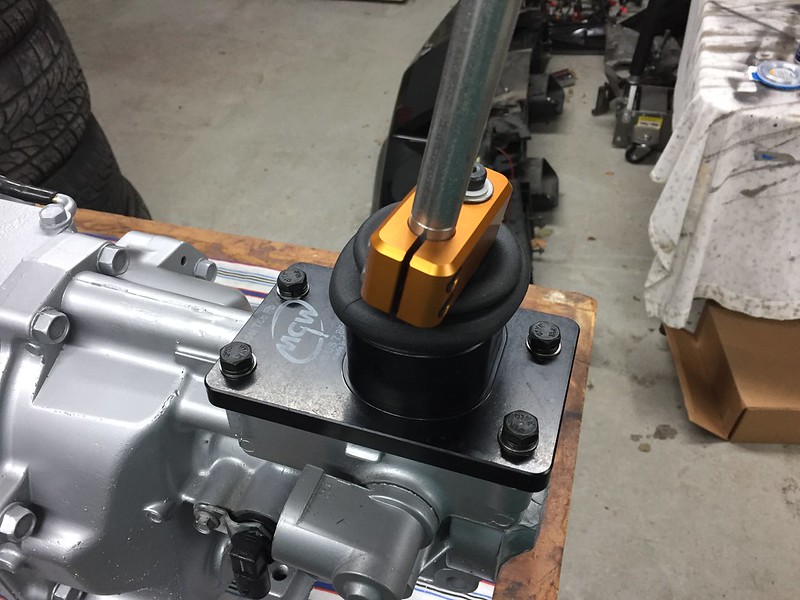
Before I put everything in the car I also installed my new MGW shifter in the T56 with a new bronze bushing. I had a Pro 5.0 in the car, but still felt it was a bit sloppy for my taste. I'm hoping this one will stiffen it up a bit and give the shifts a nice crisp feel:
The drivetrain is pretty much ready to go back in the car now, should have that done in the next update!
First I had to get the engine and transmission mated up on the ground. This is my first clutch and transmission install so I thought doing it on the ground would give me better access instead of wrestling with it on my chest under the car.
The car had a SPEC Stage 2 clutch already installed when I bought it. I called SPEC, and we decided to freshen it up with a new clutch disk and flywheel and keep the pressure plate. I decided to go with an Aluminum flywheel... I know it will be a little trickier to drive but I had one in my C5 Corvette and loved and how quickly it revved when I blipped the throttle on downshifts. That's an OK tradeoff for me!
Flywheel installed with new ARP bolts:
Pressure plate torqued down with new bolts:
Bellhousing on and ready for the transmission:
Mated up!
Before I put everything in the car I also installed my new MGW shifter in the T56 with a new bronze bushing. I had a Pro 5.0 in the car, but still felt it was a bit sloppy for my taste. I'm hoping this one will stiffen it up a bit and give the shifts a nice crisp feel:
The drivetrain is pretty much ready to go back in the car now, should have that done in the next update!
Joined: Sep 1999
Posts: 4,353
Likes: 308
From: NJ
Car: 92 Firebird
Engine: 4.8 LR4
Transmission: T56
Axle/Gears: 3.45 9 Bolt
Re: 1987 Camaro "Pro-Touring" Budget Build
Where is your reverse lockout solenoid?
I also wasn't aware that you can change the TOB on an LT style clutch
I also wasn't aware that you can change the TOB on an LT style clutch
Re: 1987 Camaro "Pro-Touring" Budget Build
The TOB is from McCloud and just attached with a simple snap ring.
Joined: Jun 2003
Posts: 5,028
Likes: 78
From: Desert
Car: 1991 Z28 Vert
Engine: 383 single plane efi
Transmission: T-56
Axle/Gears: 8.8 with 3.73s
Re: 1987 Camaro "Pro-Touring" Budget Build
You can run it off a relay triggered by the brake pedal. That's how I did mine, works perfectly and is inexpensive.
Joined: Sep 1999
Posts: 4,353
Likes: 308
From: NJ
Car: 92 Firebird
Engine: 4.8 LR4
Transmission: T56
Axle/Gears: 3.45 9 Bolt
Re: 1987 Camaro "Pro-Touring" Budget Build
That is a terrible idea, I have personally seen someone zing reverse downshifting from 6th gear because that is how he had it wired. IMO the electronic box or a momentary switch is the best way, or there is really no point in having it at all.
Joined: Jun 2003
Posts: 5,028
Likes: 78
From: Desert
Car: 1991 Z28 Vert
Engine: 383 single plane efi
Transmission: T-56
Axle/Gears: 8.8 with 3.73s
Re: 1987 Camaro "Pro-Touring" Budget Build
I still don't see how wiring it off the brake pedal switch is a bad idea. Lots of guys out there running it from brake pedal feed as evidenced by the bevy of "How to wire a T56 reverse lockout" threads across varying message boards on the web. The T5 along with the four speeds in our cars had no reverse lockout at all. I've daily driven a T5 for a decade and never almost, accidentally put it in reverse. Having said that, anything is really safer than nothing.
Re: 1987 Camaro "Pro-Touring" Budget Build
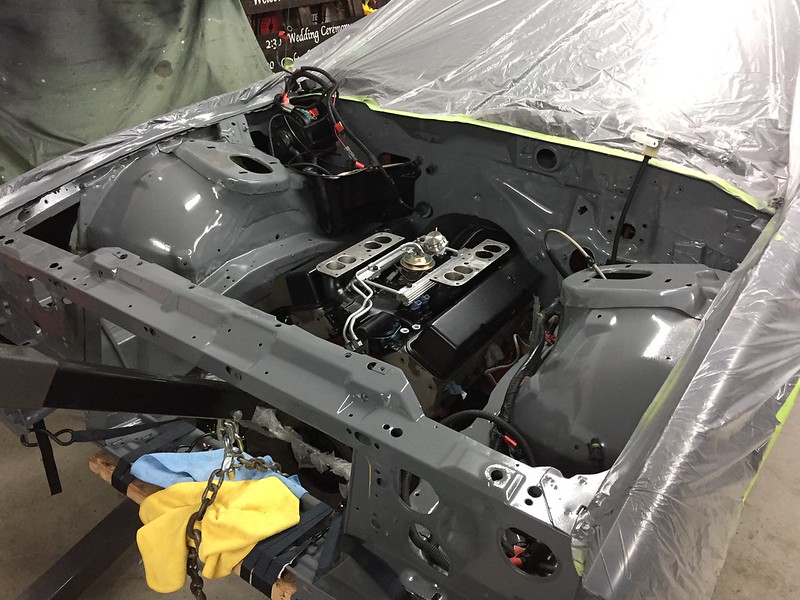
BIG MILESTONE IN THE PROJECT! ENGINE IS BACK IN THE CAR!
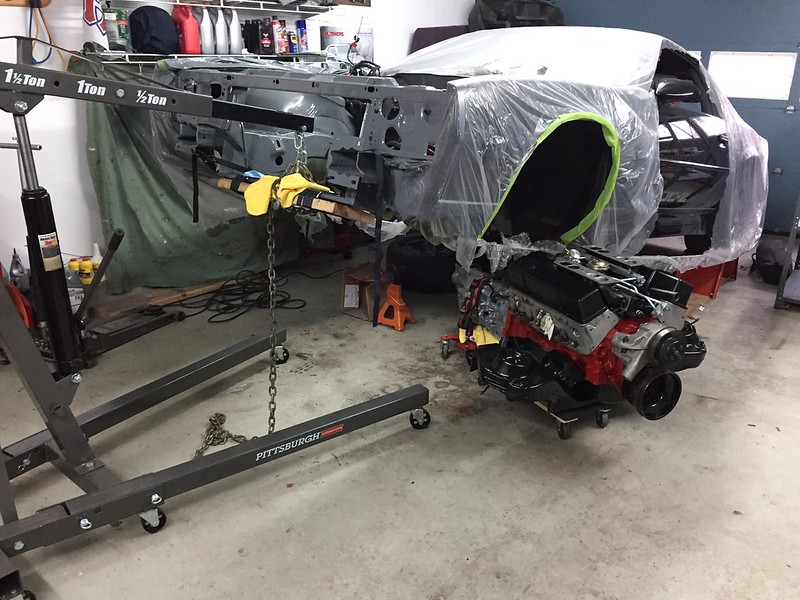
I decided to put the engine and transmission back into the car as a unit from the bottom and it ended up working out awesome. I was able to do it myself in just a couple of hours. Here's how I did it:
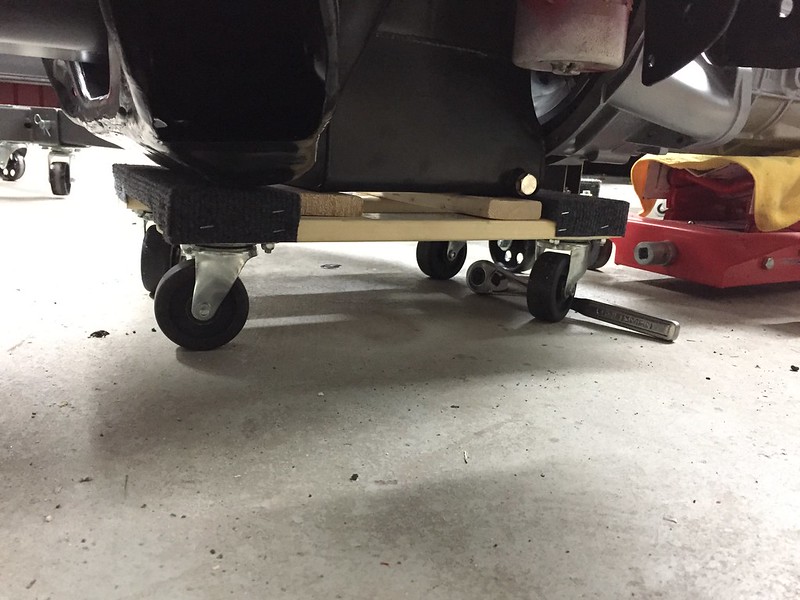
I had the transmission on a small scissor lift and put the engine and K-member on a cheap $20 moving cart I found at Harbor Freight. It was awesome, the whole drivetrain rolled the garage around pretty easy!
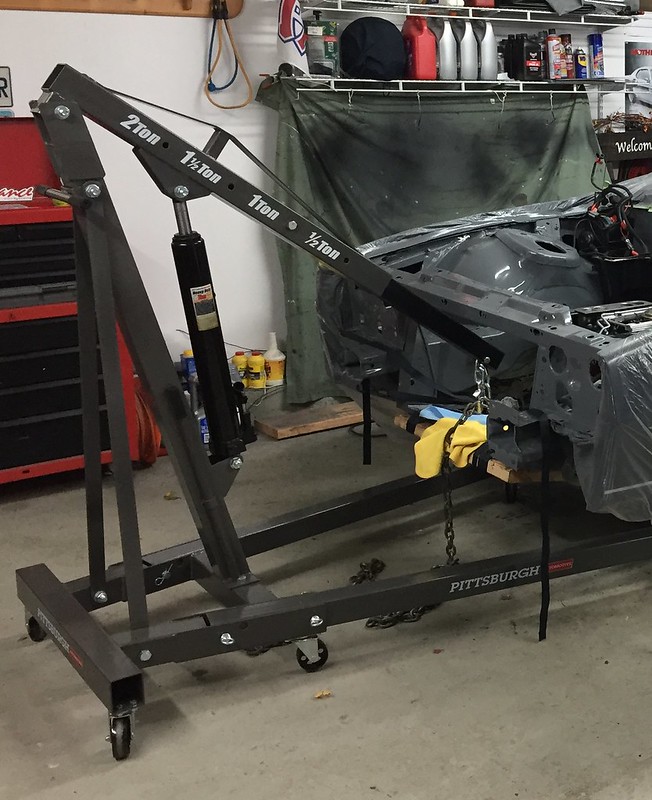
To get the engine under the car, I had the rear wheels up on ramps and lifted the front end using my engine crane attached to the lower radiator support. I reinforced the radiator support by ratchet-strapping a 2x6 underneath it to help spread the load:
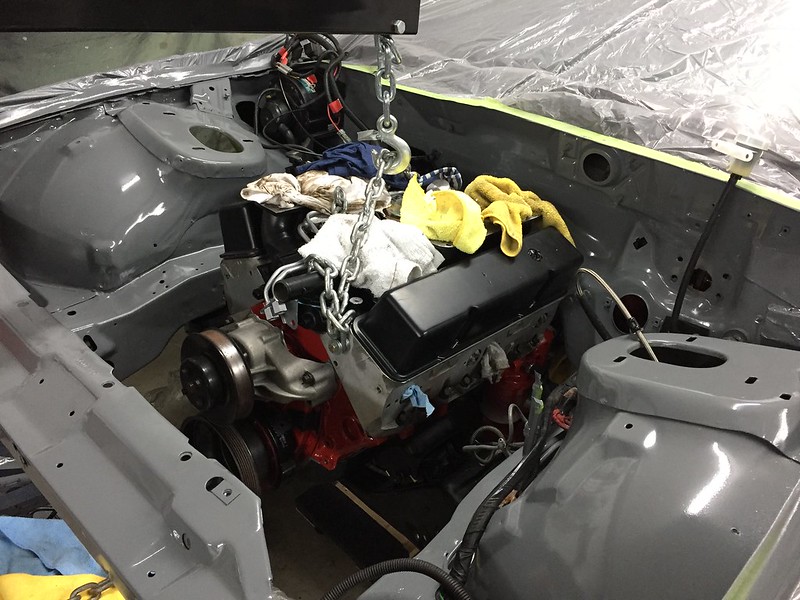
Getting the motor in place under the car:
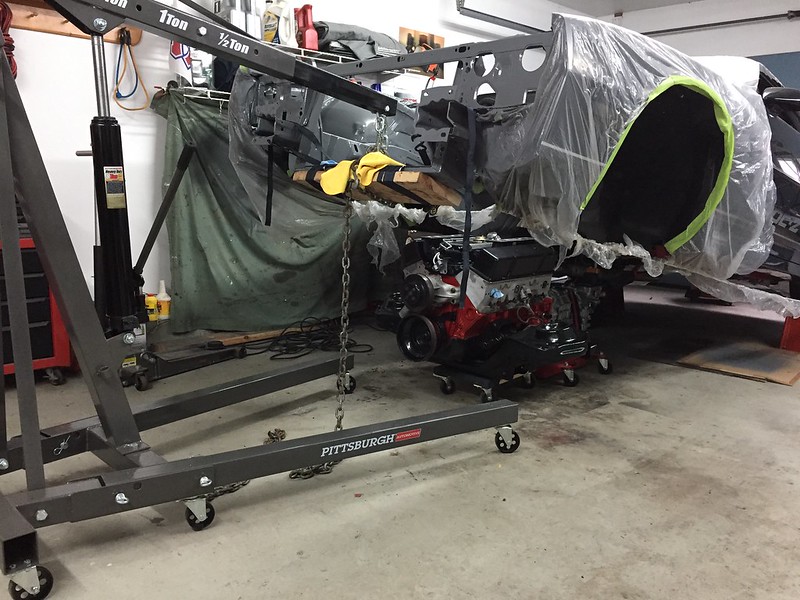
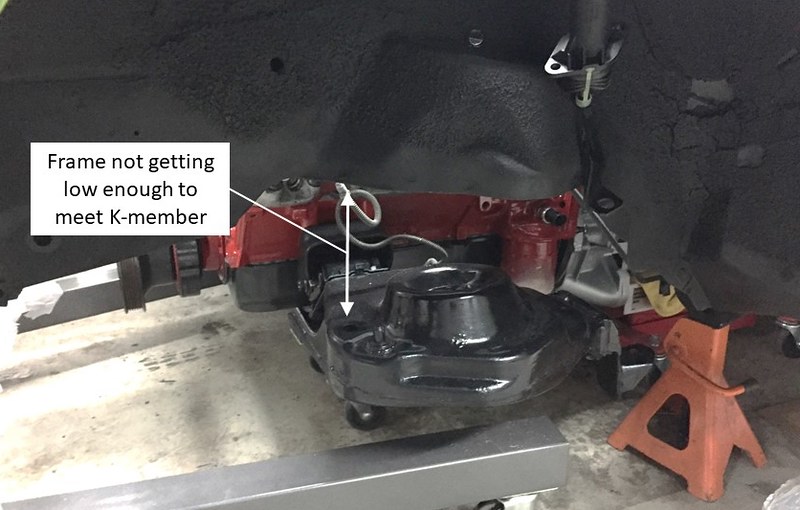
I then started lowering the body to meet the engine:
I ended up not being able to get the front of the car low enough to meet the K-member, so what I ended up doing was placing the body on jackstands and using my engine hoist and transmission jack to bring the K-member up to meet the frame. Ended up working like a charm!
Engine coming up!
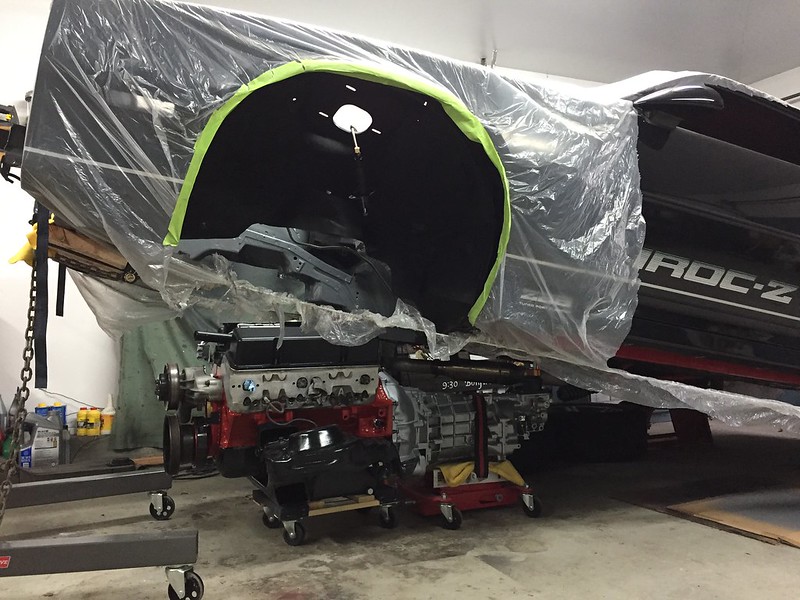
Motor, transmission and K-member in place and bolted up!
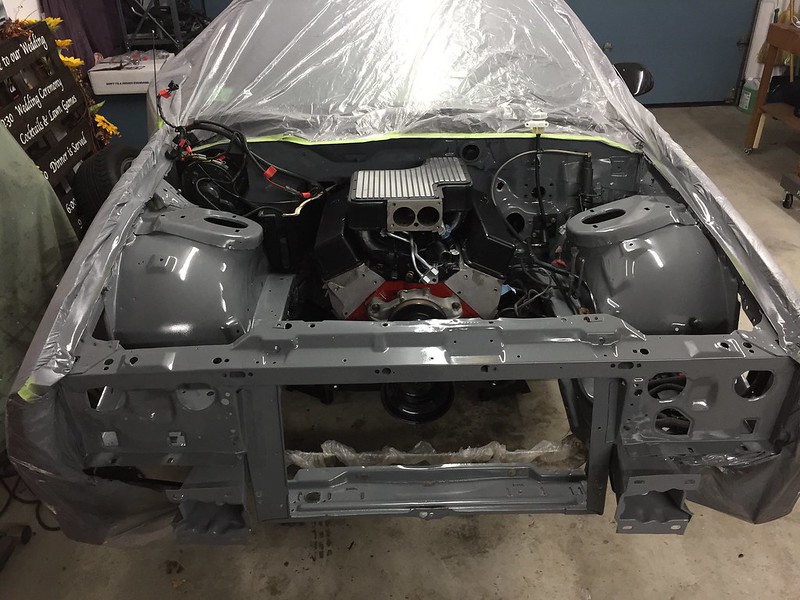
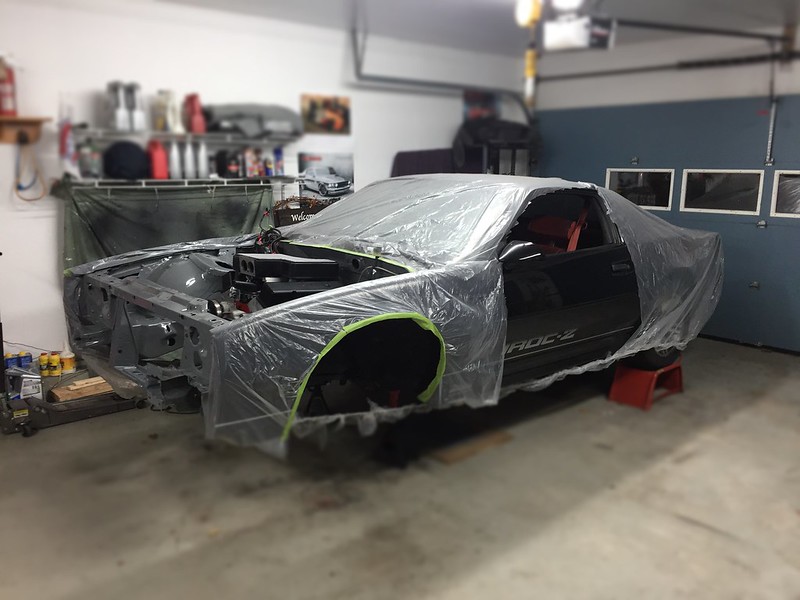
If you can't tell, I'm super fired up to get this done! I still have a long way to go but it feels like a big milestone to get the engine back in. I can't wait to start putting parts back on for good, knowing everything is one step closer to getting this thing fired up!
I decided to put the engine and transmission back into the car as a unit from the bottom and it ended up working out awesome. I was able to do it myself in just a couple of hours. Here's how I did it:
I had the transmission on a small scissor lift and put the engine and K-member on a cheap $20 moving cart I found at Harbor Freight. It was awesome, the whole drivetrain rolled the garage around pretty easy!
To get the engine under the car, I had the rear wheels up on ramps and lifted the front end using my engine crane attached to the lower radiator support. I reinforced the radiator support by ratchet-strapping a 2x6 underneath it to help spread the load:
Getting the motor in place under the car:
I then started lowering the body to meet the engine:
I ended up not being able to get the front of the car low enough to meet the K-member, so what I ended up doing was placing the body on jackstands and using my engine hoist and transmission jack to bring the K-member up to meet the frame. Ended up working like a charm!
Engine coming up!
Motor, transmission and K-member in place and bolted up!
If you can't tell, I'm super fired up to get this done! I still have a long way to go but it feels like a big milestone to get the engine back in. I can't wait to start putting parts back on for good, knowing everything is one step closer to getting this thing fired up!
Last edited by garage_engineer; Dec 3, 2018 at 07:10 AM.

Junior Member
Joined: Nov 2018
Posts: 22
Likes: 0
Car: 1990 Firebird Drag car build
Engine: 355 being rebuilt
Axle/Gears: 4.56 LDS
Re: 1987 Camaro "Pro-Touring" Budget Build
Just have to ask if it would have been easier to have the headers installed prior to lifting the engine into the body? I know my drivers side header has to go in through the bottom and my passenger side goes in through the top and neither are easy to do this with.
Re: 1987 Camaro "Pro-Touring" Budget Build
Thanks guys!
I thought about it, but there is really nothing in the way of me installing them right now so it should be pretty easy to bolt them up. They'll be one of the next things to put in before the steering, suspension, etc.
I thought about it, but there is really nothing in the way of me installing them right now so it should be pretty easy to bolt them up. They'll be one of the next things to put in before the steering, suspension, etc.
Last edited by garage_engineer; Dec 5, 2018 at 08:56 PM.
Re: 1987 Camaro "Pro-Touring" Budget Build
i have installed from bottom a few times on 4th gens. main benefit is being able to have all the accessories, harness, headers, etc. on the engine when it goes under the car.
Re: 1987 Camaro "Pro-Touring" Budget Build
Running into a couple of road blocks and was hoping I could get some help on here. I've posted both of these issues in the transmission and brake sections, but thought I would share here as well in case anyone had any input:
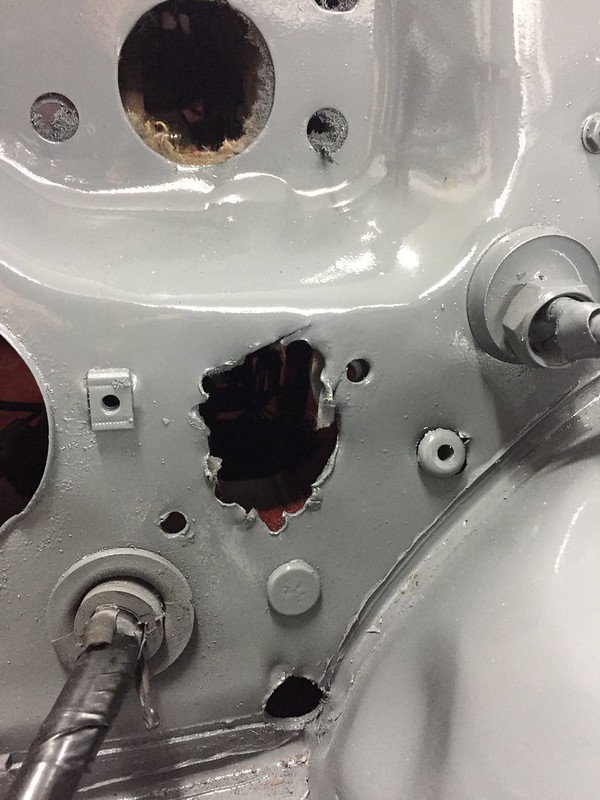
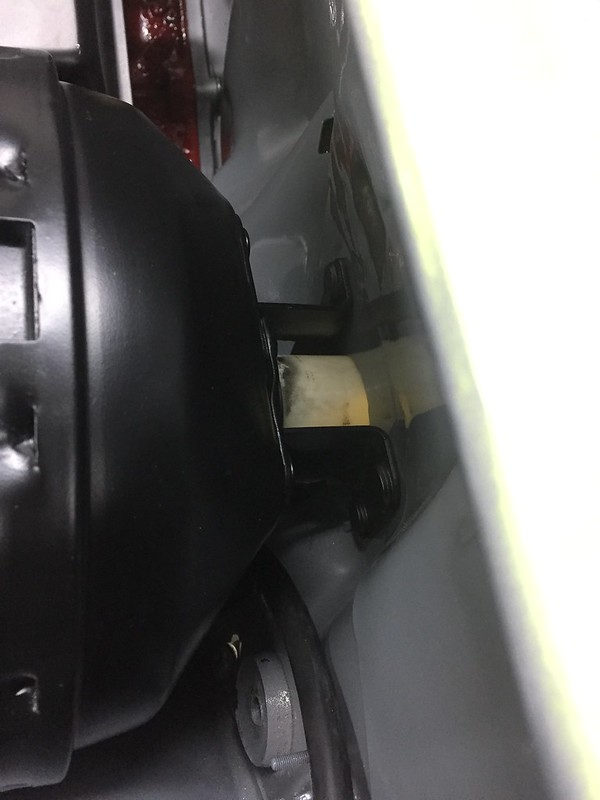
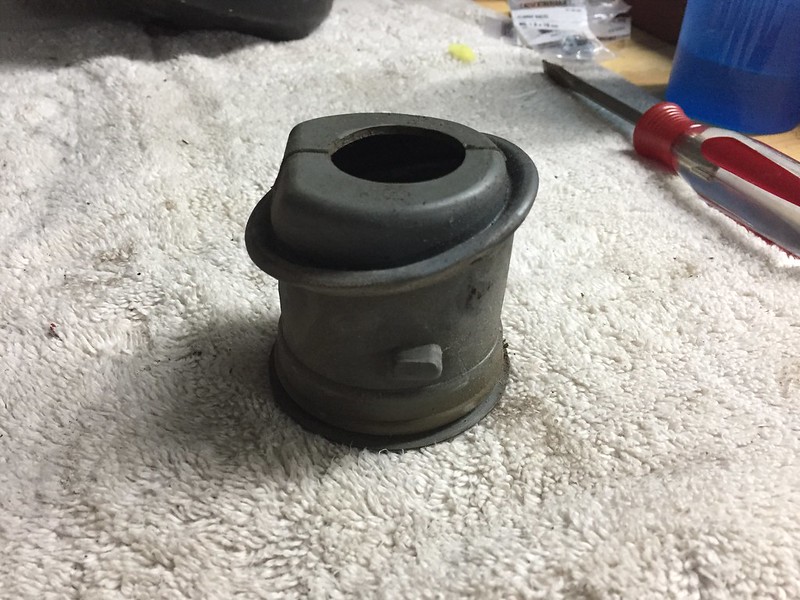
For my brake booster, I am using a new AC Delco unit from a 4th gen Camaro. I just installed it on the firewall, but I think I am missing a piece. The natural-colored plastic piece that passes through the firewall is a tight fit, and I just noticed that it actually moves with the rod connected to the pedal, essentially leaving me with no seal on the firewall. Am I missing a rubber boot here or something?
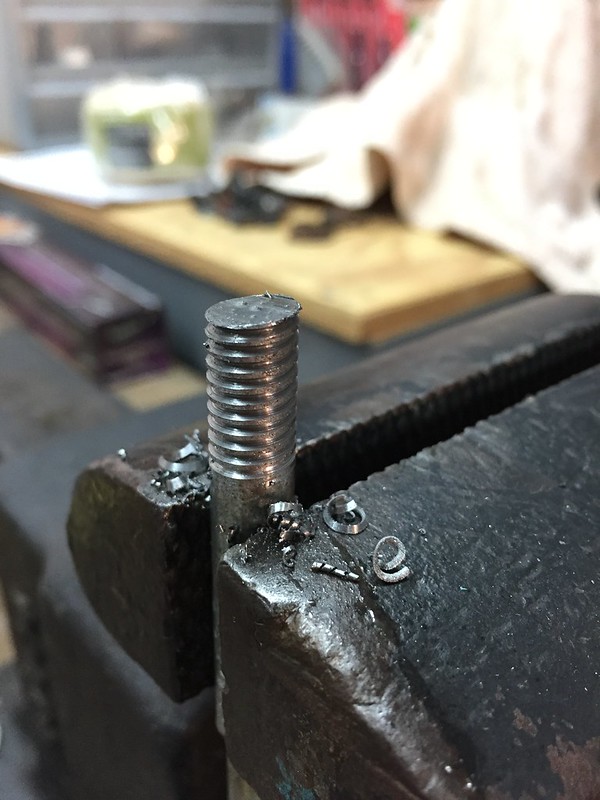
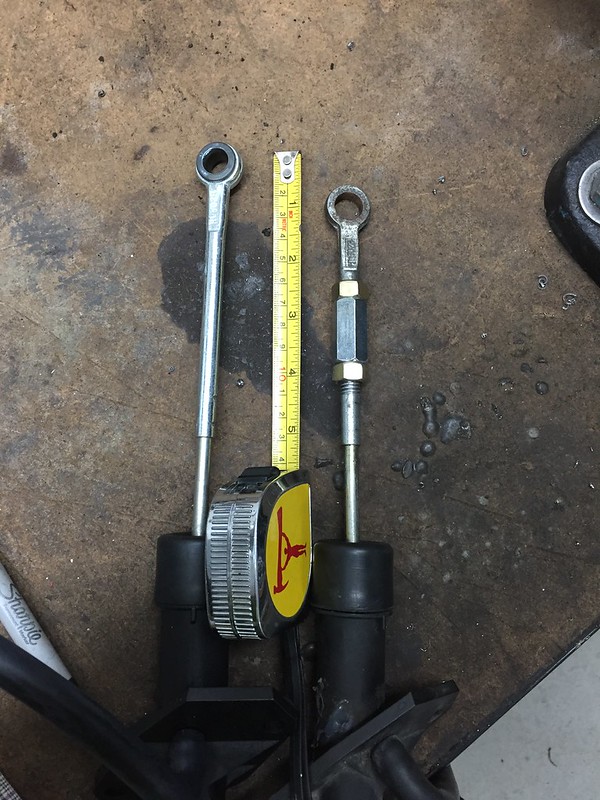
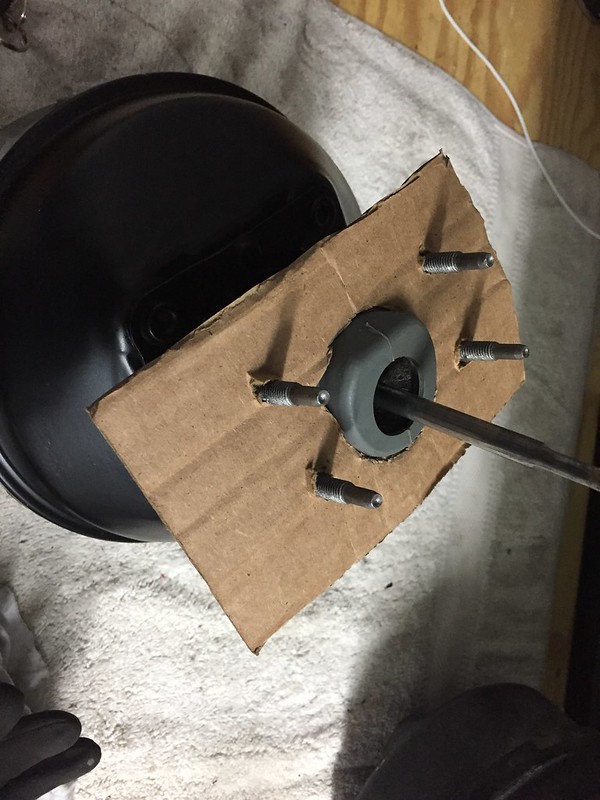
My second issue is scaring me the most. My LT1 T56 is already installed, but I noticed that I forgot to install the little T-pivot piece that the clutch fork pivots on. The threaded hole for this piece is pretty deep in the master cylinder hole, and I have been unsuccessful so far in getting it started. I am wondering if anyone has run into this before and can offer any tips or tricks in getting this done? I really don't want to take the transmission out again!
This is the piece I need to install:

And the problem I'm facing:

For my brake booster, I am using a new AC Delco unit from a 4th gen Camaro. I just installed it on the firewall, but I think I am missing a piece. The natural-colored plastic piece that passes through the firewall is a tight fit, and I just noticed that it actually moves with the rod connected to the pedal, essentially leaving me with no seal on the firewall. Am I missing a rubber boot here or something?
My second issue is scaring me the most. My LT1 T56 is already installed, but I noticed that I forgot to install the little T-pivot piece that the clutch fork pivots on. The threaded hole for this piece is pretty deep in the master cylinder hole, and I have been unsuccessful so far in getting it started. I am wondering if anyone has run into this before and can offer any tips or tricks in getting this done? I really don't want to take the transmission out again!
This is the piece I need to install:
And the problem I'm facing:

Re: 1987 Camaro "Pro-Touring" Budget Build
Been a while since I posted an update! Hope everyone had a good holiday.
Decided to drop my transmission to install the clutch fork pivot... couldn't figure out any other way! So down came the transmission so I could get it in there correctly!
The good news is I have now can get my transmission dropped pretty quickly!
OK back on track now...
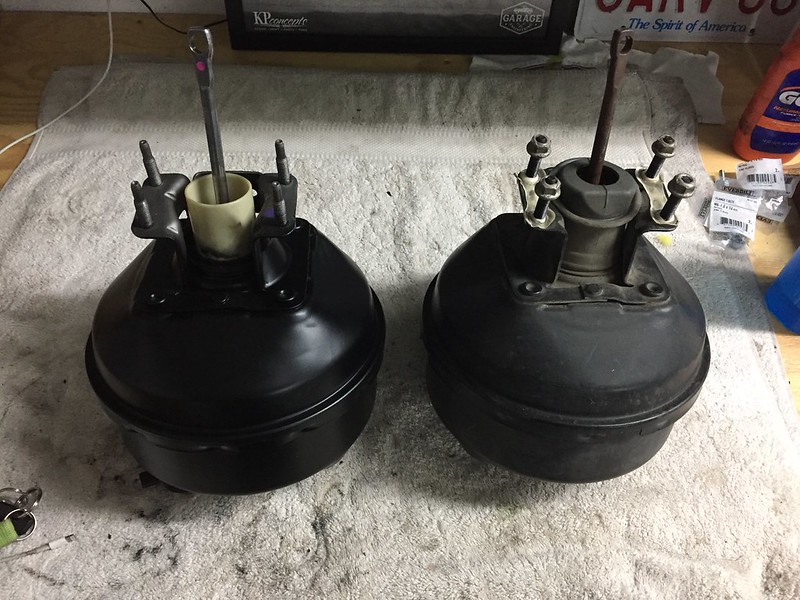
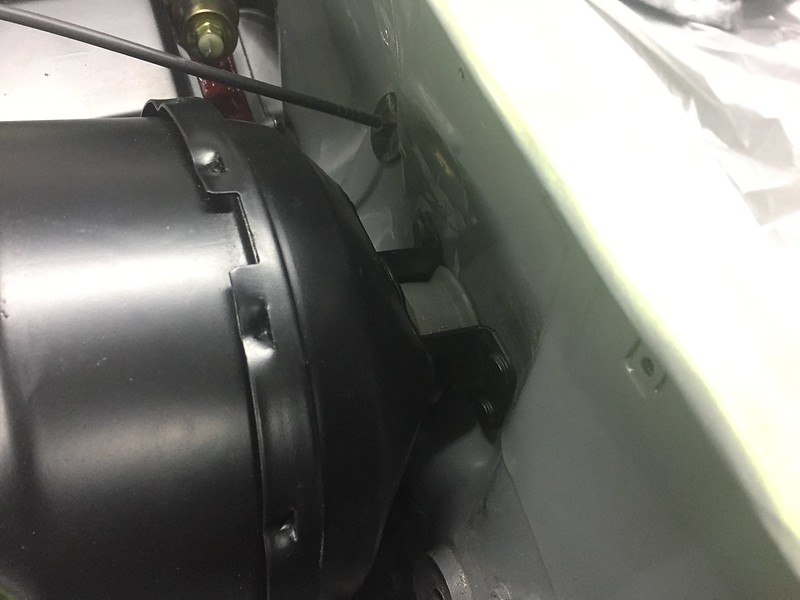
For my booster and master cylinder, I have decided to upgrade to 4th gen Camaro pieces, both which I got from AC Delco. I could have used my 3rd gen booster with the newer 4th gen master cylinder, but coming from an automotive engineering background, I know how much work goes into making these parts work together and wanted to swap them in as a unit. I'm going to be plumbing in a Wilwood proportioning valve as well.
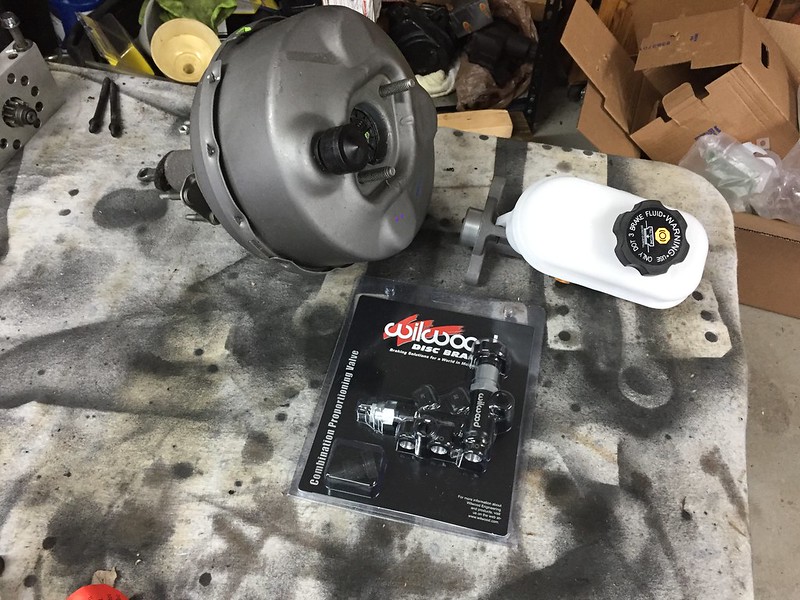
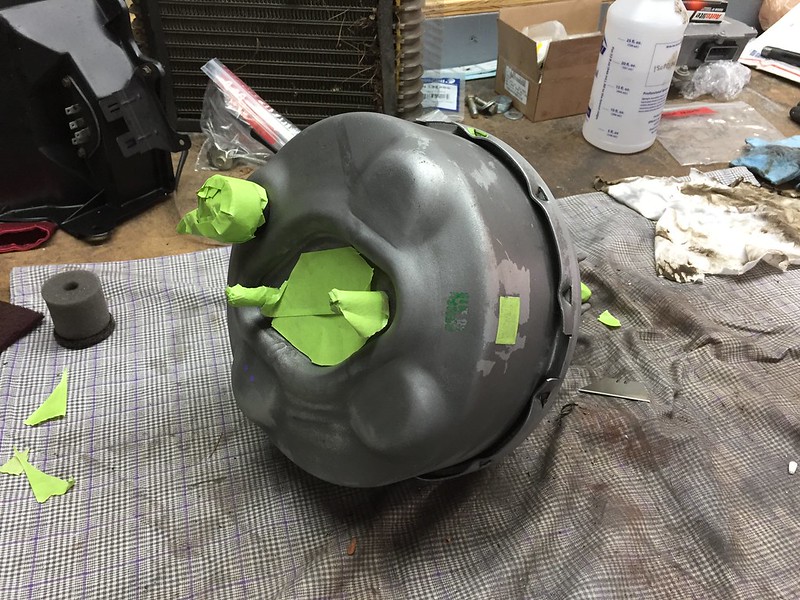
I mocked everything up and it fit well but I wasn't quite happy with the grey color of the booster. So, off it all comes again so I can scuff up and paint a brand new booster! I think the black looks much better though.


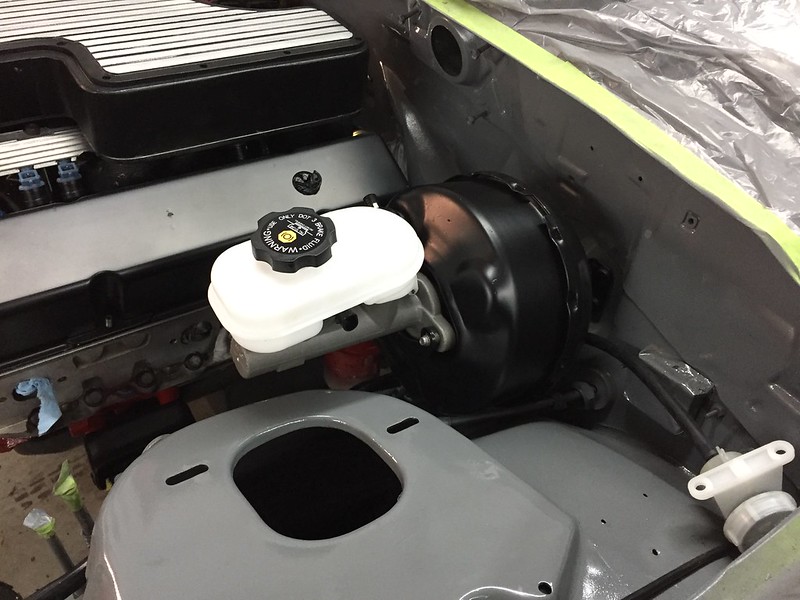
I still need to add a rubber boot to cover the plastic sleeve that passes through the firewall and I'm working on a solution for that now... should have it figured out soon.
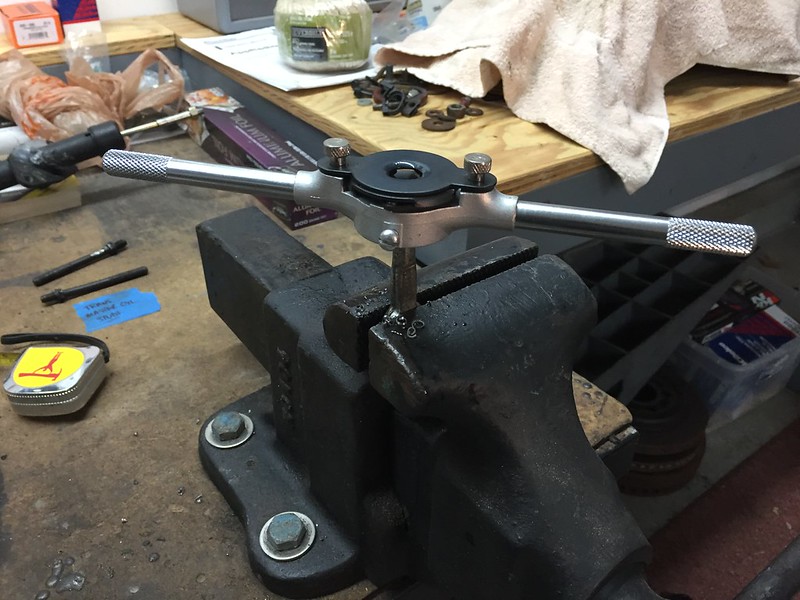
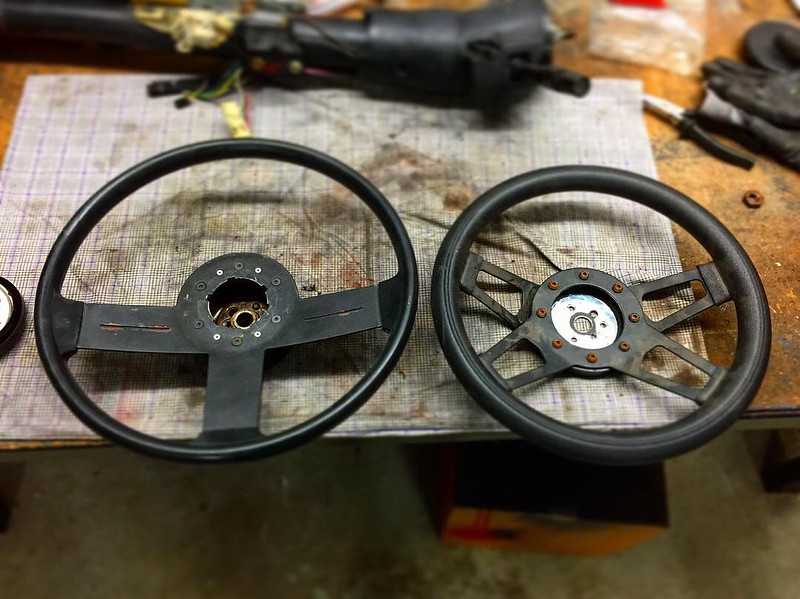
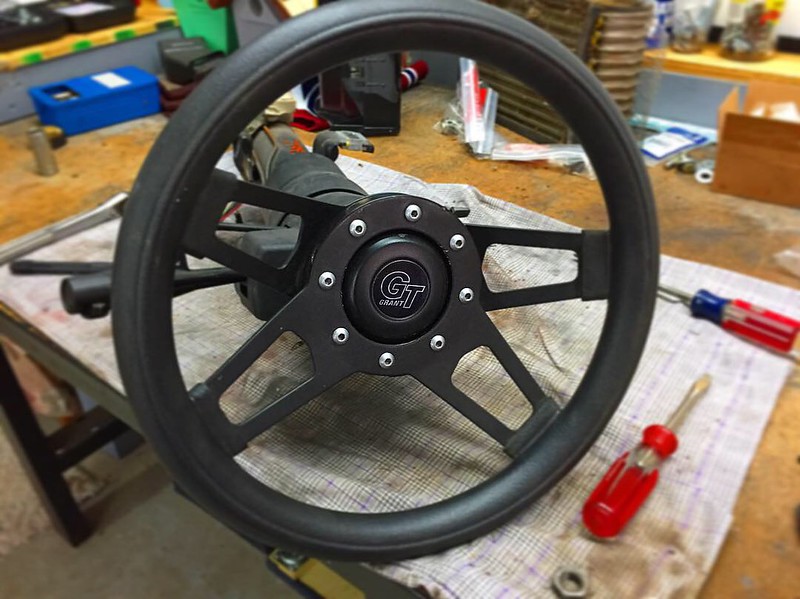
Next I added a new steering wheel to my steering column and got that ready for installation. First time using a steering wheel puller and it worked like a charm:
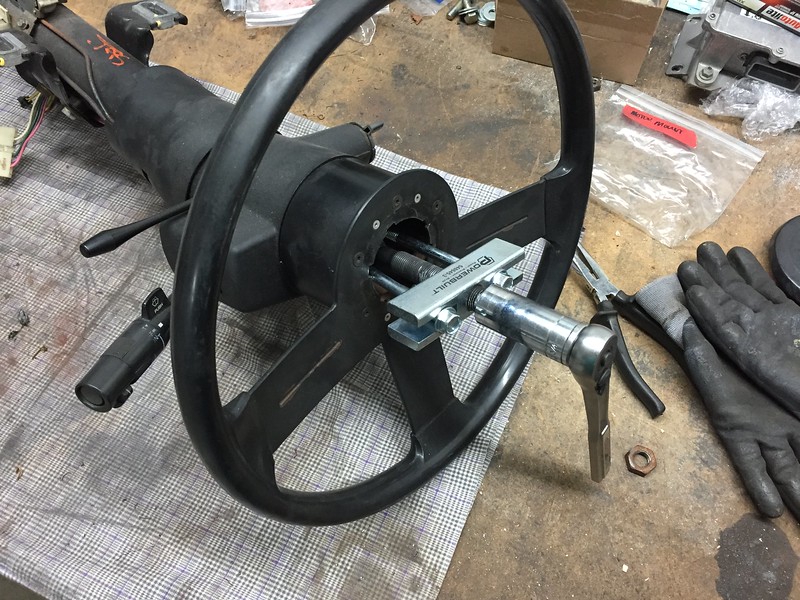
The "new" wheel (actually was given to me with the car) is a little smaller and MUCH thicker than the stock one which I like:
Hoping to keep the parts flying on the car to get it ready for spring!
Decided to drop my transmission to install the clutch fork pivot... couldn't figure out any other way! So down came the transmission so I could get it in there correctly!
The good news is I have now can get my transmission dropped pretty quickly!
OK back on track now...
For my booster and master cylinder, I have decided to upgrade to 4th gen Camaro pieces, both which I got from AC Delco. I could have used my 3rd gen booster with the newer 4th gen master cylinder, but coming from an automotive engineering background, I know how much work goes into making these parts work together and wanted to swap them in as a unit. I'm going to be plumbing in a Wilwood proportioning valve as well.
I mocked everything up and it fit well but I wasn't quite happy with the grey color of the booster. So, off it all comes again so I can scuff up and paint a brand new booster! I think the black looks much better though.
I still need to add a rubber boot to cover the plastic sleeve that passes through the firewall and I'm working on a solution for that now... should have it figured out soon.
Next I added a new steering wheel to my steering column and got that ready for installation. First time using a steering wheel puller and it worked like a charm:
The "new" wheel (actually was given to me with the car) is a little smaller and MUCH thicker than the stock one which I like:
Hoping to keep the parts flying on the car to get it ready for spring!
Joined: Jun 2003
Posts: 5,028
Likes: 78
From: Desert
Car: 1991 Z28 Vert
Engine: 383 single plane efi
Transmission: T-56
Axle/Gears: 8.8 with 3.73s
Re: 1987 Camaro "Pro-Touring" Budget Build
I know it all comes down to preference but those IROC style steering wheels in decent shape are starting to command some higher prices. I'd hang on to it and tuck it away for a future refinishing project. I swapped back from a Grant steering wheel to a refinished IROC wheel last summer.
Re: 1987 Camaro "Pro-Touring" Budget Build
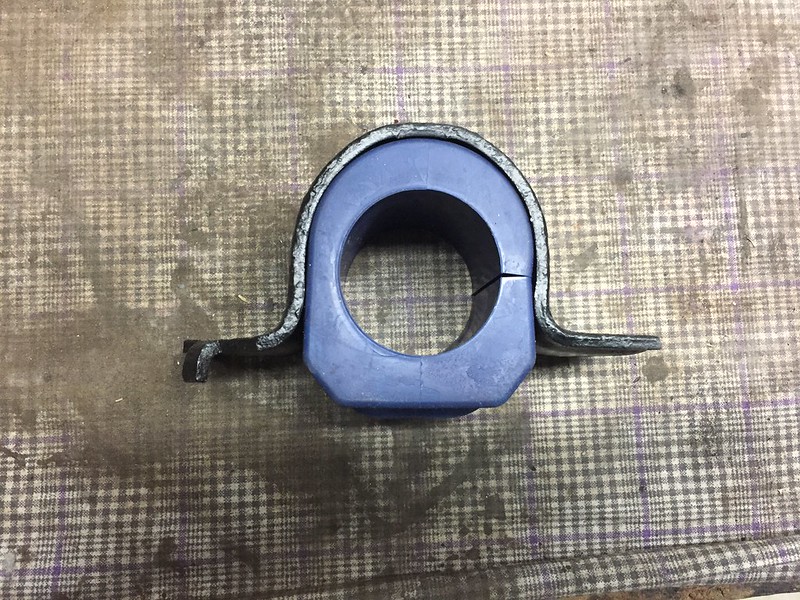
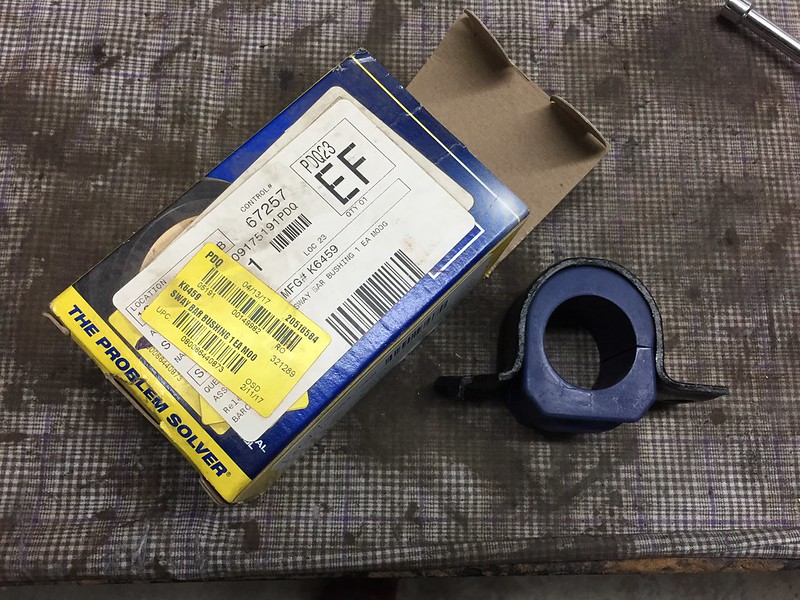
Does anyone know the part number for front sway bar bushings for an '87 IROC? I measured my bar to be 35mm and thought I had ordered the right part number from Moog. The diameter seems right, but the bushings are tool tall. I would prefer a poly bushings if someone has the right part number. Thanks!
Re: 1987 Camaro "Pro-Touring" Budget Build
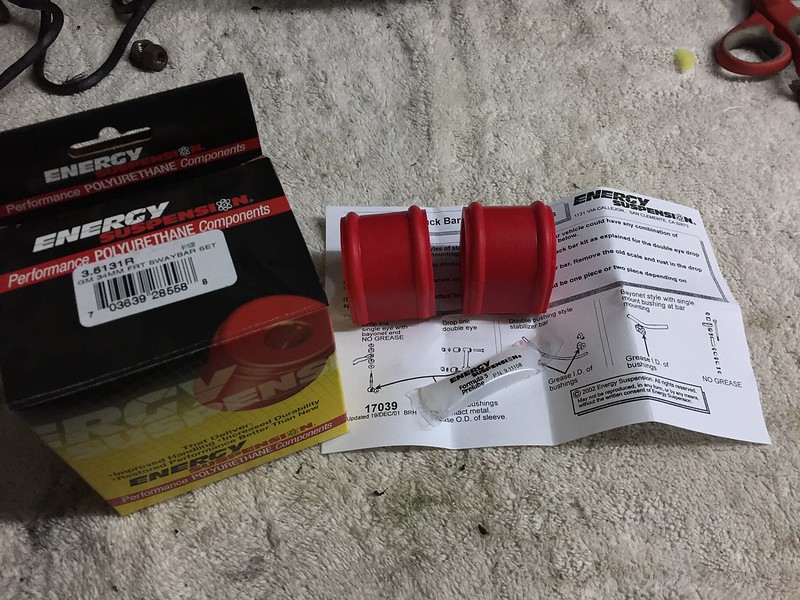
Ok I got my sway bar bushing issue figured out. Apparently this has happened before and I posted a thread in the suspension section and got the right part number for a 34mm front bar.
Energy Suspension - 3.5131R
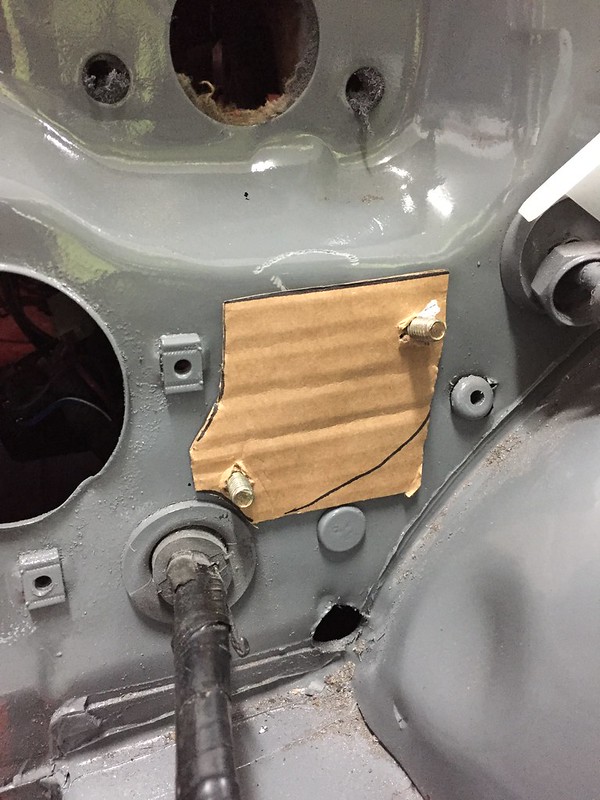
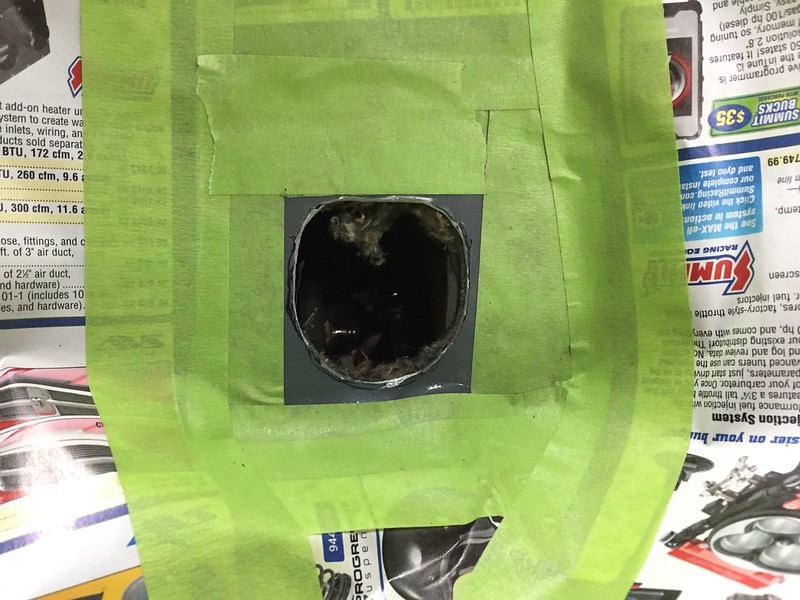
Adding the rubber boot to my brake booster was a bit bigger pain than I thought. I couldn't find one for sale, so I ended up buying a used booster off of Ebay so I could grab the boot from it. The boot wasn't a perfect fit in the hole in the firewall, so I made a little template and opened the hole a bit for a nicer fit:
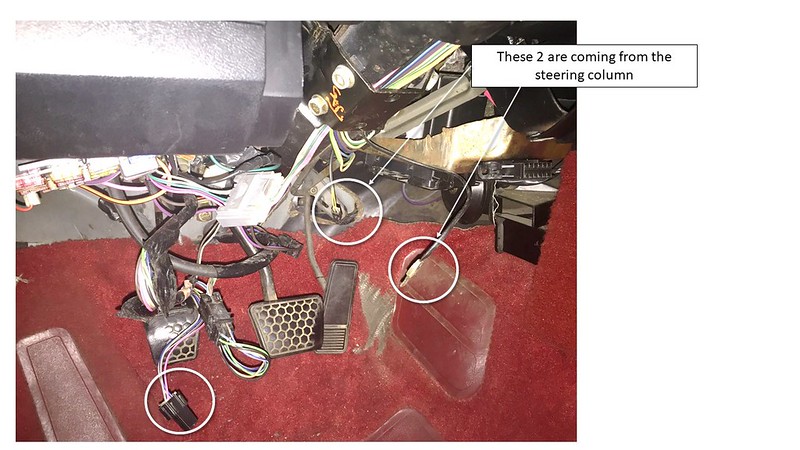
Getting the booster in means I could move on to installing the steering column. I got most of it wired up and installed, but need a bit of help identifying some connectors that I did not leave myself notes for. Can anyone help me figure out where these 3 connectors go?
Energy Suspension - 3.5131R
Adding the rubber boot to my brake booster was a bit bigger pain than I thought. I couldn't find one for sale, so I ended up buying a used booster off of Ebay so I could grab the boot from it. The boot wasn't a perfect fit in the hole in the firewall, so I made a little template and opened the hole a bit for a nicer fit:
Getting the booster in means I could move on to installing the steering column. I got most of it wired up and installed, but need a bit of help identifying some connectors that I did not leave myself notes for. Can anyone help me figure out where these 3 connectors go?
Joined: Sep 1999
Posts: 4,353
Likes: 308
From: NJ
Car: 92 Firebird
Engine: 4.8 LR4
Transmission: T56
Axle/Gears: 3.45 9 Bolt
Re: 1987 Camaro "Pro-Touring" Budget Build
Th connector on the LH side at the floor is the connector for the cruise control. The lower connector with the circle and the note are from the cruise stalk, those connect together.
The picture is so small, I can't tell what the 3rd one is, it might be VATS?
The picture is so small, I can't tell what the 3rd one is, it might be VATS?
Re: 1987 Camaro "Pro-Touring" Budget Build
Not much of an update tonight, been busy with a kitchen remodel so car time has been minimal.
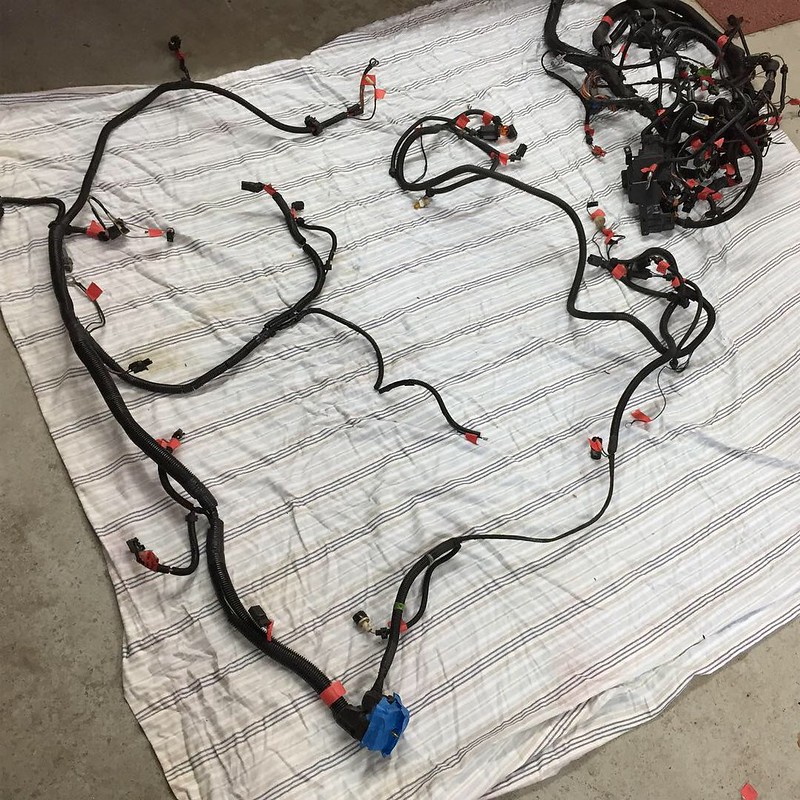
One thing I did get started on was the wiring harness. I've done some basic soldering in the past to extend and shorten wires or put on a new connector here and there, but nothing to this magnitude. I'm looking forward to it though, there's a been a lot of learning experiences along the way here and this is just another one to take on!
I started with just laying out the harness to get a good look at it:
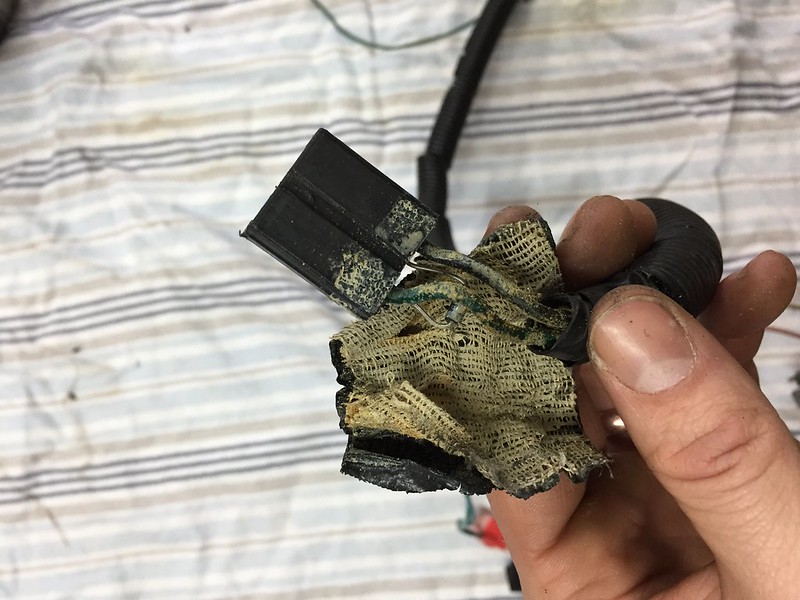
I started taking off all of the old plastic loom next since I plan on re-taping the whole harness using some quality tape. The stuff was literally disintegrating in some places:

Some of the connectors are in rough shape too... this one for the AC compressor has a resistor shoved in it for some reason:
I'll post some updates as I move along with the harness!
I had some issues with overheating when I had the car on track back when it was running so I've been doing some research on a new AL radiator. I ended up going with a drop in replacement from Cold Case Radiators. I hadn't heard much about them before but as I started looking around I found they had some great quality products and their prices were quite a bit lower than the big guys out there. I decided to give them a shot and so far everything looks good... it will be a little while before I can install it but I wanted to unpack it and see what she looked like:
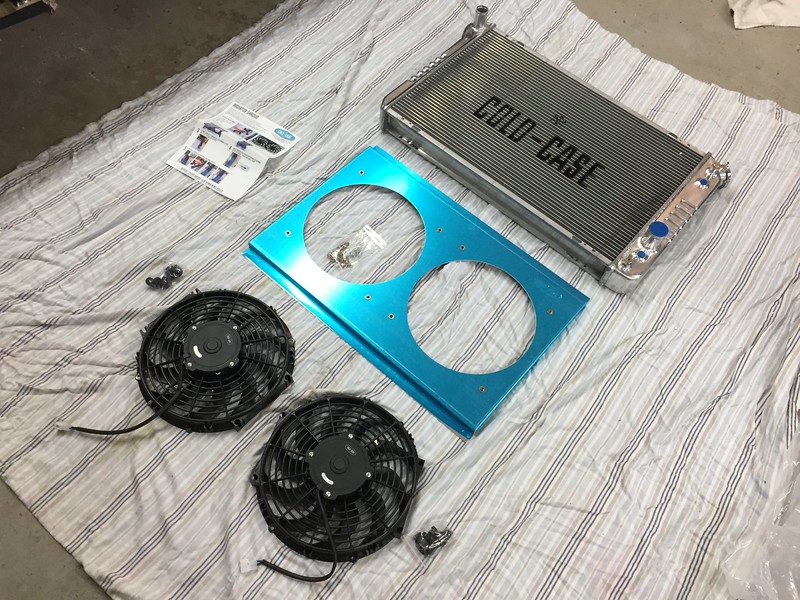

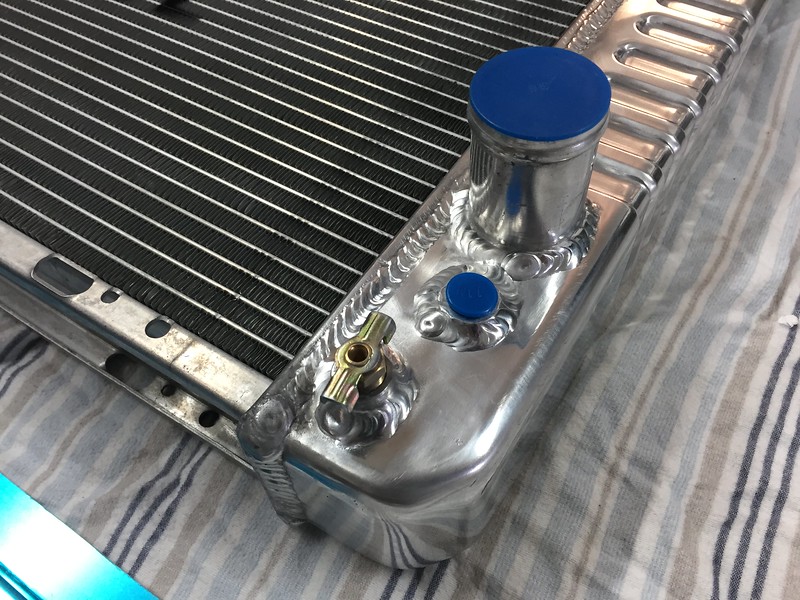
One thing I'm a little concerned with is that the fans do not have any designated mounting holes in the shroud. It seems that I'll have to drill these and use some riv-nuts or something to get them mounted. Maybe this is where the lower cost comes from:
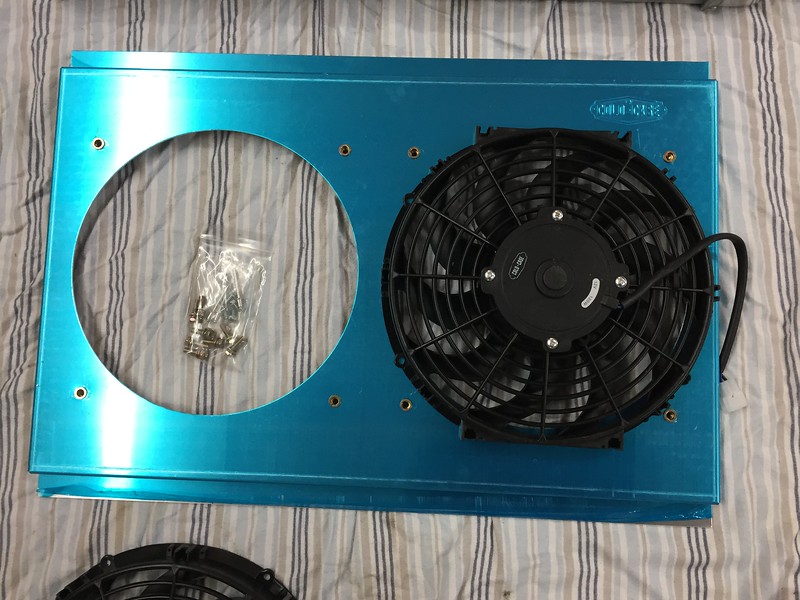
One last question - the radiator is universal for 3rd gens, so it has an automatic transmission cooler built in. Has anyone ever used this for an oil cooler? I was going to buy a separate cooler but maybe this would be more efficient?
One thing I did get started on was the wiring harness. I've done some basic soldering in the past to extend and shorten wires or put on a new connector here and there, but nothing to this magnitude. I'm looking forward to it though, there's a been a lot of learning experiences along the way here and this is just another one to take on!
I started with just laying out the harness to get a good look at it:
I started taking off all of the old plastic loom next since I plan on re-taping the whole harness using some quality tape. The stuff was literally disintegrating in some places:
Some of the connectors are in rough shape too... this one for the AC compressor has a resistor shoved in it for some reason:
I'll post some updates as I move along with the harness!
I had some issues with overheating when I had the car on track back when it was running so I've been doing some research on a new AL radiator. I ended up going with a drop in replacement from Cold Case Radiators. I hadn't heard much about them before but as I started looking around I found they had some great quality products and their prices were quite a bit lower than the big guys out there. I decided to give them a shot and so far everything looks good... it will be a little while before I can install it but I wanted to unpack it and see what she looked like:
One thing I'm a little concerned with is that the fans do not have any designated mounting holes in the shroud. It seems that I'll have to drill these and use some riv-nuts or something to get them mounted. Maybe this is where the lower cost comes from:
One last question - the radiator is universal for 3rd gens, so it has an automatic transmission cooler built in. Has anyone ever used this for an oil cooler? I was going to buy a separate cooler but maybe this would be more efficient?
Joined: Sep 1999
Posts: 4,353
Likes: 308
From: NJ
Car: 92 Firebird
Engine: 4.8 LR4
Transmission: T56
Axle/Gears: 3.45 9 Bolt
Re: 1987 Camaro "Pro-Touring" Budget Build
It's not a resistor, it's a diode, and that is to bleed off the collapsing magnetic field when the compressor clutch is shut off. It's so the rest of the electrical system doesn't see a voltage spike when it shuts off
Re: 1987 Camaro "Pro-Touring" Budget Build
Good to know! Is it factory to have it exposed behind the connector like that? Rather than duct taping it I think I'll try to get it covered with some heat shrink for a little nicer appearance.
Joined: Sep 1999
Posts: 4,353
Likes: 308
From: NJ
Car: 92 Firebird
Engine: 4.8 LR4
Transmission: T56
Axle/Gears: 3.45 9 Bolt
Re: 1987 Camaro "Pro-Touring" Budget Build
I think it was just taped from GM, it's crappy. When I put them in the harnesses I make, I just leave it exposed, it really isn't a problem
Re: 1987 Camaro "Pro-Touring" Budget Build
OK I'm back!
I took most of the winter doing a complete remodel of my kitchen and most of the first floor of my house. Been sneaking out to the garage here and there, but I've learned that it's best to focus on one project at a time or else neither of them get done. So, this weekend I should be putting the final touches on the kitchen and then it's full speed ahead on the car!
I've signed up for the UMI autocross at the end of July so I have a lot of work to do

Joined: Aug 2013
Posts: 4,795
Likes: 895
From: MICHIGAN
Car: 1988 Trans Am
Engine: L03
Transmission: 700R4
Axle/Gears: 10 Bolt 2.73 Open
Re: 1987 Camaro "Pro-Touring" Budget Build
UMI event is a good goal. Gives you a fixed date to shoot for.
Joined: Sep 2005
Posts: 1,914
Likes: 321
From: NJ
Car: 1987 IROC-Z
Engine: 406 on N20 w/ EFI
Transmission: P.B. 700R4
Axle/Gears: 12 bolt w/ 3.91
Re: 1987 Camaro "Pro-Touring" Budget Build
I had been wondering about how you were doing with everything Matt. You have some time, but best of luck getting it built and well road tested. I had hoped to do that UMI event in July, and when I went to sign up I found that it was already fully sold out. bummer. What are you planning to do for tires/wheels? If I remember correctly you had the BFG Sport Comps on when I last saw you at NJMP in 2017.
Joined: Feb 2001
Posts: 752
Likes: 19
From: Westminster, MD USA
Car: 91 Firebird 'vert, 91 Formula
Engine: 5.7, 5.0
Transmission: T56, T5
Axle/Gears: Auburn w/ 3.73's, 3.42
Re: 1987 Camaro "Pro-Touring" Budget Build
The UMI event sold out in minutes! I unfortunately was too late but am thinking of going up to hang out as I have a few friends going. Hopefully I�ll see you there, would love to see this in person!
Re: 1987 Camaro "Pro-Touring" Budget Build


