
GTA digital dash swap - doing it the hard way - pic heavy

Thread Starter
Member
iTrader: (1)
Joined: Nov 2013
Posts: 443
Likes: 26
From: Switzerland
Car: Red 1991 Firebird with digital dash
Engine: L03 V8 TBI
Transmission: 700 R4
Axle/Gears: 2.73
Re: GTA digital dash swap - doing it the hard way - pic heavy
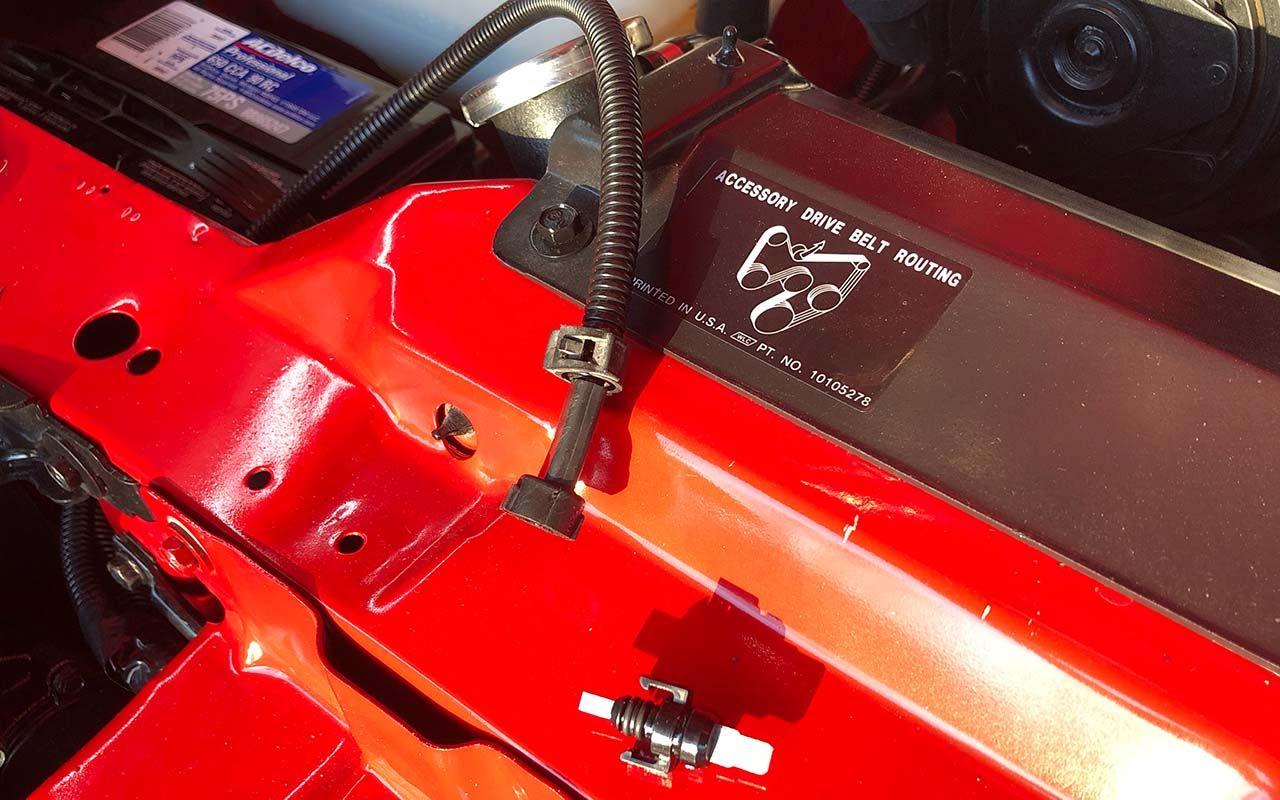
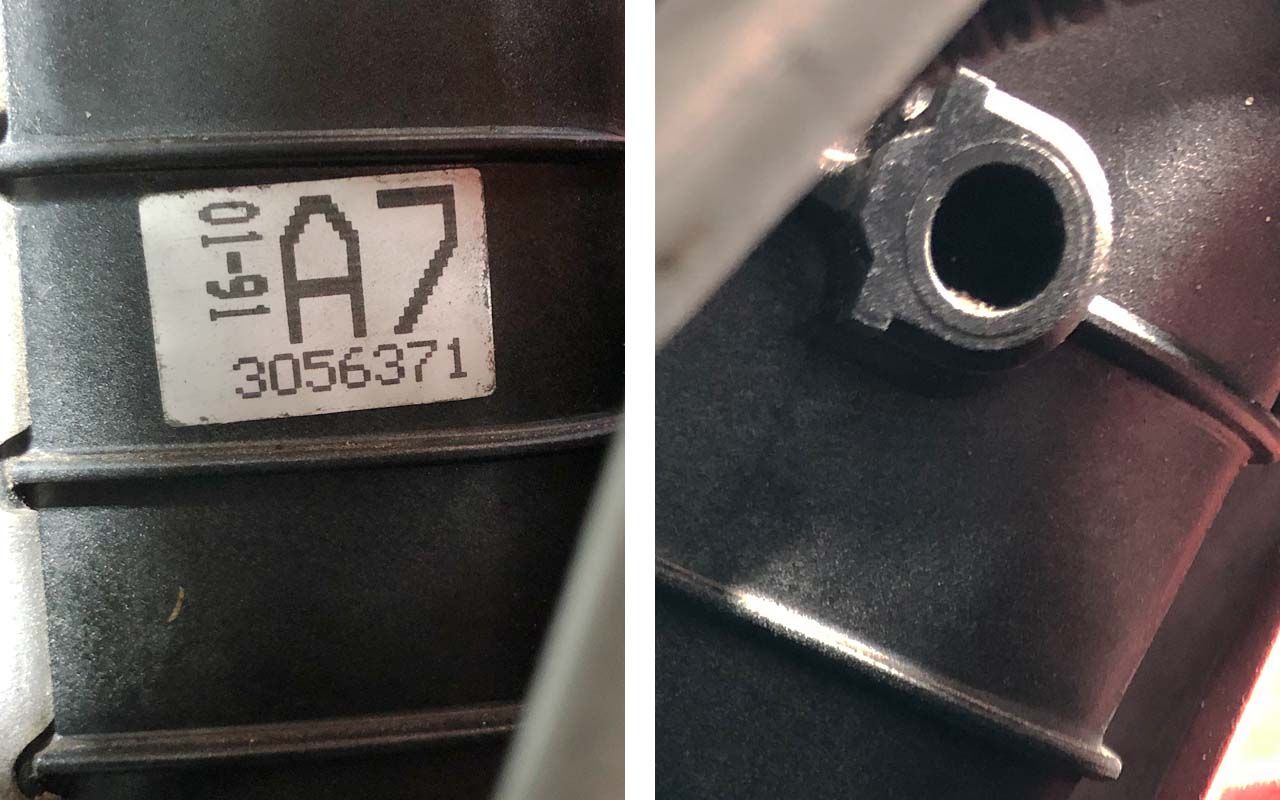
There's a little problem I ran into: I got the low coolant sensor with the part #3055285. The yellow/black wire is all hooked up and has the correct plug as well. However I can't seem to stick that probe into the radiator. There is a hole in the same spot as depicted in the 1988 service manual and it has the correct diameter.
But it's locked, I can't get it in! What should I do?
But it's locked, I can't get it in! What should I do?


Senior Member

Joined: Jun 2016
Posts: 520
Likes: 28
From: Malta
Car: 1988 Trans AM GTA
Engine: 350 TPI
Transmission: 700R4
Axle/Gears: 9-Bolt 3.27
Re: GTA digital dash swap - doing it the hard way - pic heavy
Could it be that non Digital Dash radiators don’t have the actual hole? Mine goes through as I recently replaced the sensor? You could probably drill it paying attention not to hit the trans oil cooler if it goes that far.
Thread Starter
Member
iTrader: (1)
Joined: Nov 2013
Posts: 443
Likes: 26
From: Switzerland
Car: Red 1991 Firebird with digital dash
Engine: L03 V8 TBI
Transmission: 700 R4
Axle/Gears: 2.73
Re: GTA digital dash swap - doing it the hard way - pic heavy
Thanks for your suggestion! I might try that. Does the socket on your radiator look the same as mine?
Thread Starter
Member
iTrader: (1)
Joined: Nov 2013
Posts: 443
Likes: 26
From: Switzerland
Car: Red 1991 Firebird with digital dash
Engine: L03 V8 TBI
Transmission: 700 R4
Axle/Gears: 2.73
Re: GTA digital dash swap - doing it the hard way - pic heavy
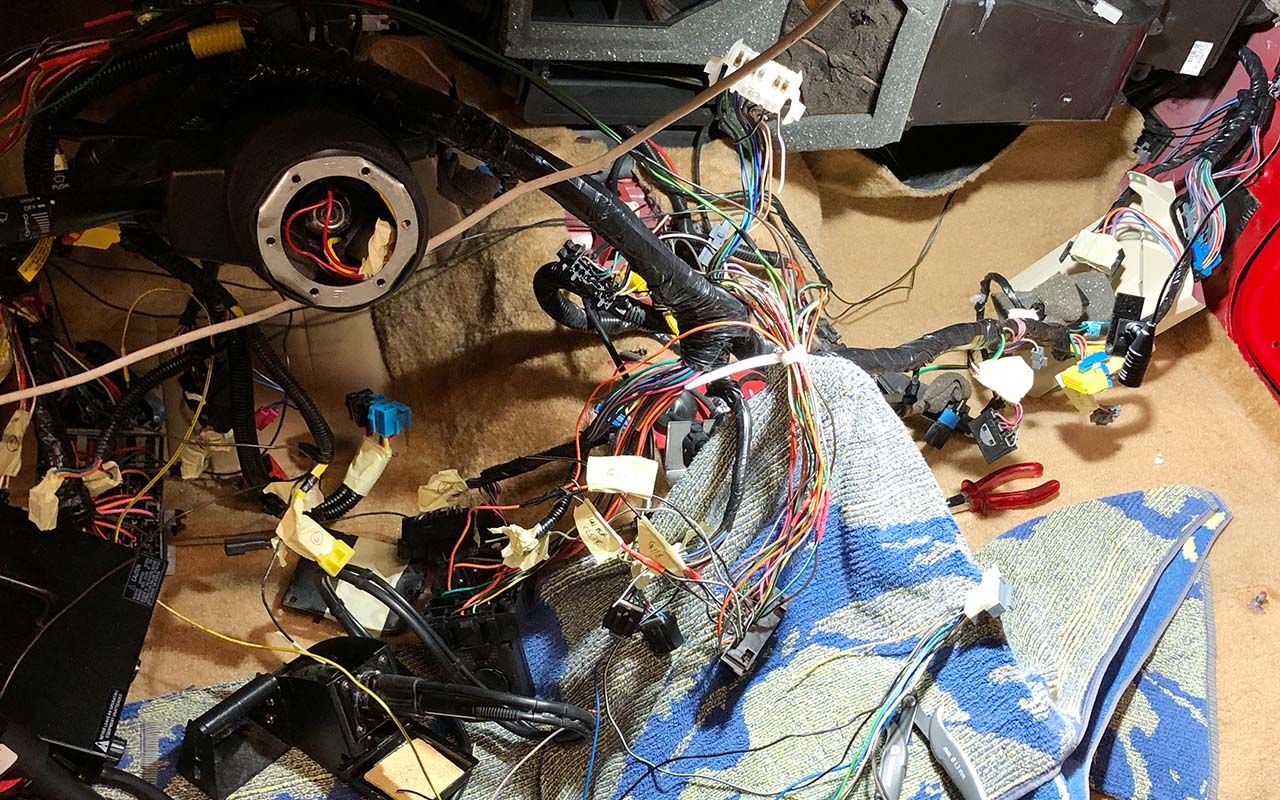
The wire mess keeps becoming worse and worse. I'm going to post a shocker pic daily now lol. The big digital dash connector C2 is all soldered in. Tomorrow will be the day of the white/gray connector and the DIC. Then a first test run, fingers crossed.

Thread Starter
Member
iTrader: (1)
Joined: Nov 2013
Posts: 443
Likes: 26
From: Switzerland
Car: Red 1991 Firebird with digital dash
Engine: L03 V8 TBI
Transmission: 700 R4
Axle/Gears: 2.73
Senior Member
Joined: Jun 2016
Posts: 520
Likes: 28
From: Malta
Car: 1988 Trans AM GTA
Engine: 350 TPI
Transmission: 700R4
Axle/Gears: 9-Bolt 3.27
Re: GTA digital dash swap - doing it the hard way - pic heavy
Maybe you can try heating up a metal rod and melting the plastic rather than drilling although I don’t thing some small plastic chips are going to do any harm anyway.


Re: GTA digital dash swap - doing it the hard way - pic heavy
Don't drill a date coded, original radiator. Save the OEM radiator, and pick up a stock replacement. For $100 you get a nice clean new radiator that already has the probe installed. Of course that's in the US.
Thread Starter
Member
iTrader: (1)
Joined: Nov 2013
Posts: 443
Likes: 26
From: Switzerland
Car: Red 1991 Firebird with digital dash
Engine: L03 V8 TBI
Transmission: 700 R4
Axle/Gears: 2.73
Re: GTA digital dash swap - doing it the hard way - pic heavy
Re: GTA digital dash swap - doing it the hard way - pic heavy
My go-to is Rock Auto. Here's a 5% off coupon 8113040272877486
But here in the US, Autozone, Advance Auto, Oreilly Auto, etc all carry stock replacement radiators. To date I have never seen one without the coolant probe. Seems it's easier for them to drill the hole and plug it with the probe than to stock two different radiators.
Kinda wish I had a stack of date coded Harrison radiators around. Unfortunately, when I did, all of them had cracked end tanks from age. When the technology was new, you could get the tanks changed by a radiator shop, but now we live in a throw-away culture. Radiator shops don't exist anymore, the ones that do don't recore radiators or have replacement service parts, they only have replacement radiators.
When I needed to replace my last thirdgen radiator, I went to the pile and found three I had saved. All of them showed stress cracks forming on the end tanks. I kept them around awhile, but they got purged in the last move.
/babbling

Joined: Sep 1999
Posts: 4,353
Likes: 308
From: NJ
Car: 92 Firebird
Engine: 4.8 LR4
Transmission: T56
Axle/Gears: 3.45 9 Bolt
Re: GTA digital dash swap - doing it the hard way - pic heavy
I have not bought a replacement radiator, but looking at the pictures on Rock (not that they are all correct) none of them seem to have the coolant probe, nor the provisions for it. Not even the AC Delco replacement


Joined: Sep 1999
Posts: 4,353
Likes: 308
From: NJ
Car: 92 Firebird
Engine: 4.8 LR4
Transmission: T56
Axle/Gears: 3.45 9 Bolt
Re: GTA digital dash swap - doing it the hard way - pic heavy
OK, I saw those, but I thought they were too low, seeing as the 4th gens put them up about 3/4 level.
Was I wrong about the Delco replacement though?
Was I wrong about the Delco replacement though?
Re: GTA digital dash swap - doing it the hard way - pic heavy
The Delco doesn't even look like a thirdgen radiator. Someone at RA may have goofed. Sometimes you'll see a part that really doesn't make sense. I'm not going to order one to find out. 
Joined: Sep 1999
Posts: 4,353
Likes: 308
From: NJ
Car: 92 Firebird
Engine: 4.8 LR4
Transmission: T56
Axle/Gears: 3.45 9 Bolt
Re: GTA digital dash swap - doing it the hard way - pic heavy
Yeah, I was just looking out for the OP, since he is 1/4 the way around the world
Thread Starter
Member
iTrader: (1)
Joined: Nov 2013
Posts: 443
Likes: 26
From: Switzerland
Car: Red 1991 Firebird with digital dash
Engine: L03 V8 TBI
Transmission: 700 R4
Axle/Gears: 2.73
Re: GTA digital dash swap - doing it the hard way - pic heavy
Thanks guys, really appreciate your effort! 
I'm gonna order one of these.
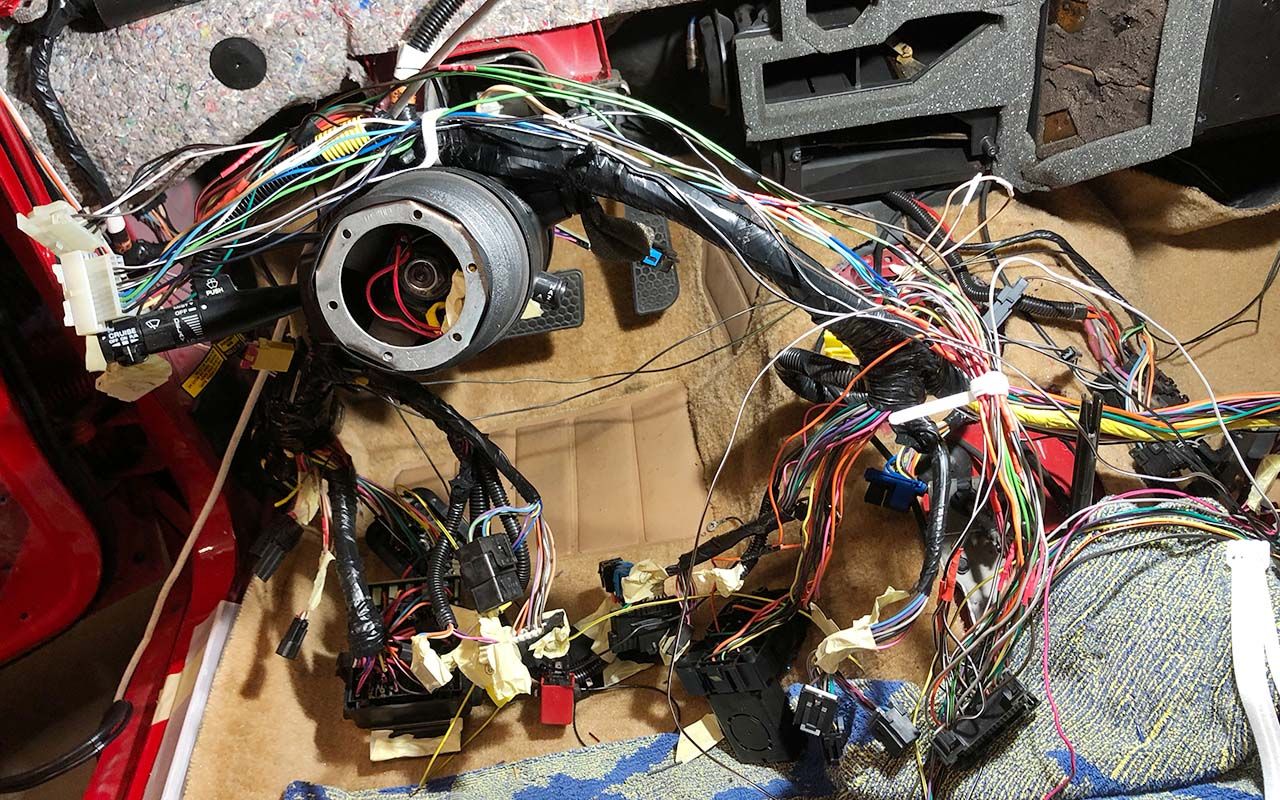
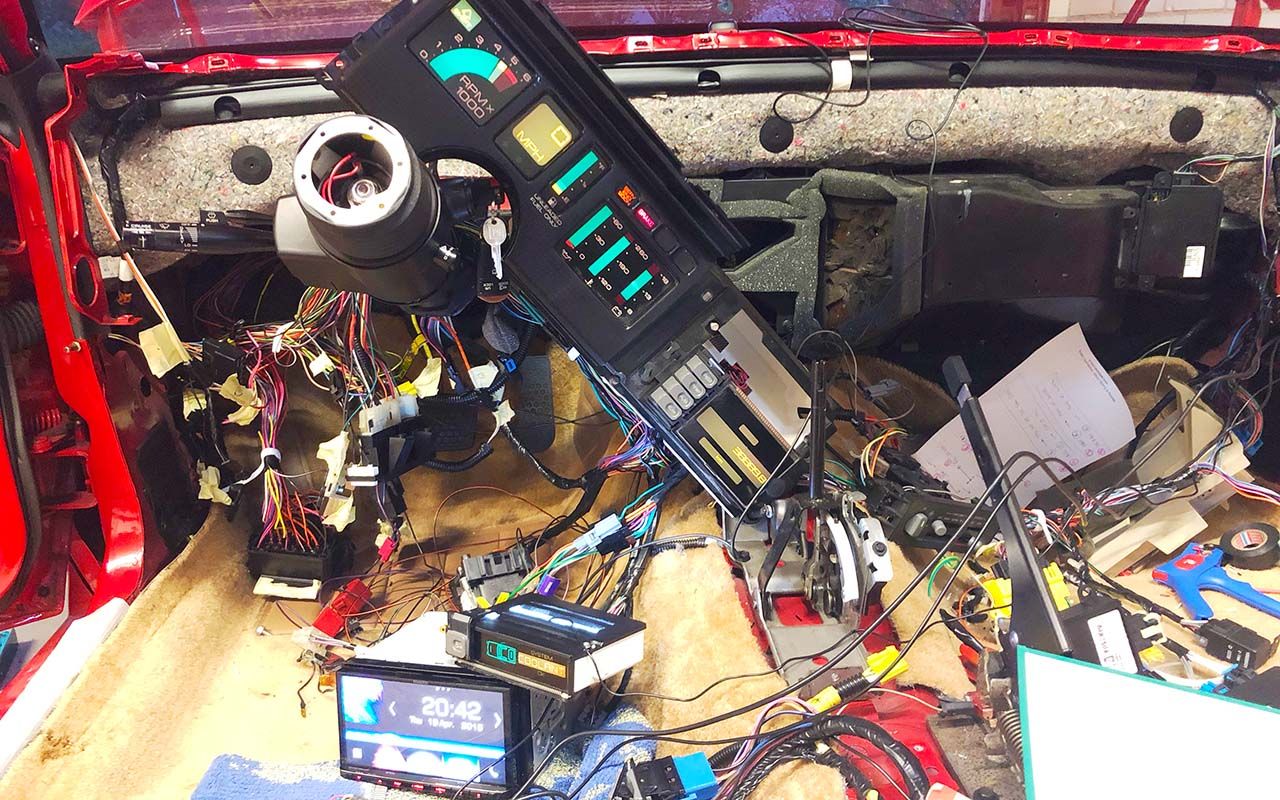
Here's today's shocker pic, all the dash connectors wired up, except the ignition power from cluster fuse, as that one doesn't exist in the 91 Firebird. I will have to add this 10 A fuse to the fuse box myself.
I'm gonna order one of these.
Here's today's shocker pic, all the dash connectors wired up, except the ignition power from cluster fuse, as that one doesn't exist in the 91 Firebird. I will have to add this 10 A fuse to the fuse box myself.


Member
Joined: Mar 2012
Posts: 115
Likes: 1
From: Athens Ohio
Car: Teal 92 Z28
Engine: 5.7
Transmission: 700r4
Axle/Gears: 3.73
Re: GTA digital dash swap - doing it the hard way - pic heavy
When you have time could you post more pics of the radio install. Would like to put a DD in my sons 92 z.
Re: GTA digital dash swap - doing it the hard way - pic heavy
That shouldn't be too bad. Can probably grab it off the one of the existing circuits, like maybe Gauges. Or add it to one of the expansion ports on the front or back side. Could splice into a hot circuit with the signal you need, and run it over to the convenience center, and use one of the extra fuse spots there, just need a couple pac-con III terminals.
Thread Starter
Member
iTrader: (1)
Joined: Nov 2013
Posts: 443
Likes: 26
From: Switzerland
Car: Red 1991 Firebird with digital dash
Engine: L03 V8 TBI
Transmission: 700 R4
Axle/Gears: 2.73
Thread Starter
Member
iTrader: (1)
Joined: Nov 2013
Posts: 443
Likes: 26
From: Switzerland
Car: Red 1991 Firebird with digital dash
Engine: L03 V8 TBI
Transmission: 700 R4
Axle/Gears: 2.73
Re: GTA digital dash swap - doing it the hard way - pic heavy
That shouldn't be too bad. Can probably grab it off the one of the existing circuits, like maybe Gauges. Or add it to one of the expansion ports on the front or back side. Could splice into a hot circuit with the signal you need, and run it over to the convenience center, and use one of the extra fuse spots there, just need a couple pac-con III terminals.
Thread Starter
Member
iTrader: (1)
Joined: Nov 2013
Posts: 443
Likes: 26
From: Switzerland
Car: Red 1991 Firebird with digital dash
Engine: L03 V8 TBI
Transmission: 700 R4
Axle/Gears: 2.73
Re: GTA digital dash swap - doing it the hard way - pic heavy
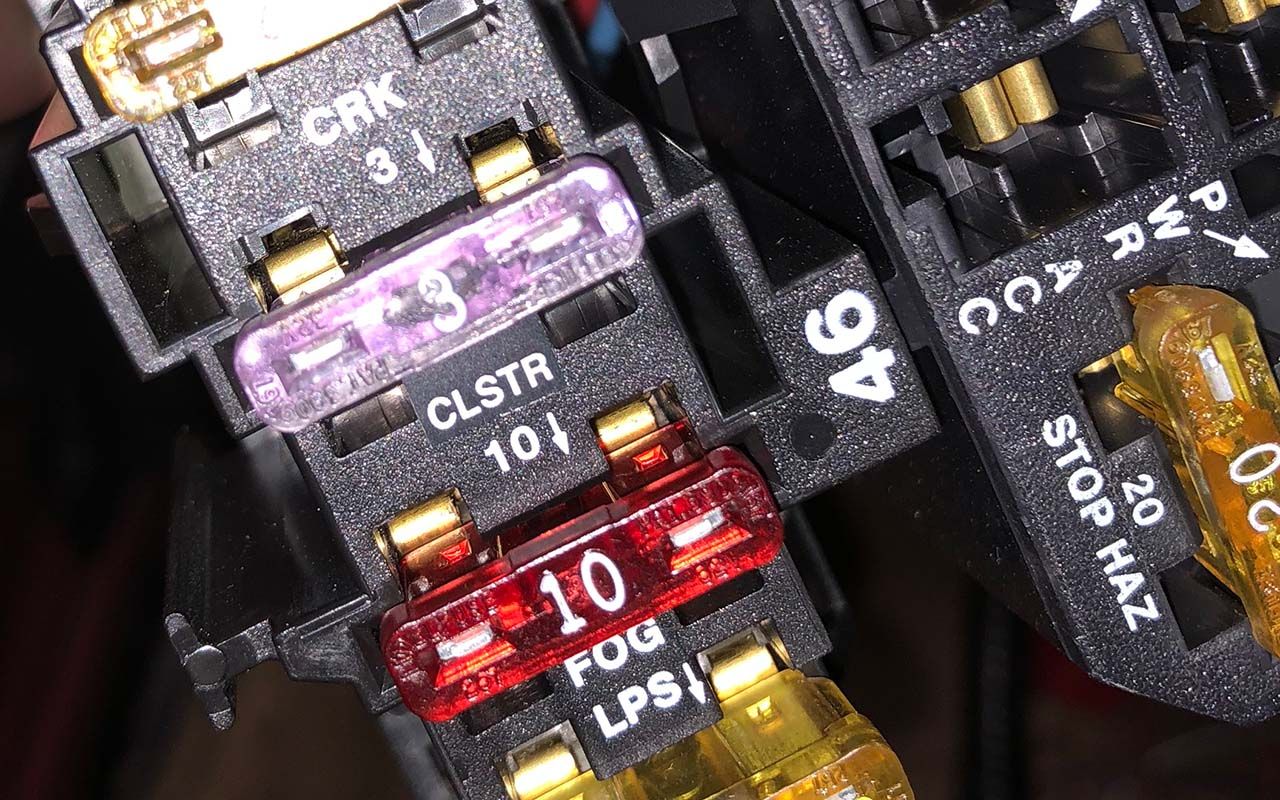
All right, I set up a new cluster fuse and grabbed it from the red 'hot in run' wire that goes to the heater A/C 25 A fuse (and others). I put it in the place of the DRL fuse (my car was not equipped with that system) and labelled it CLSTR. I think that should do the trick.

Last edited by Cehbra; Jun 12, 2018 at 07:05 AM.
Thread Starter
Member
iTrader: (1)
Joined: Nov 2013
Posts: 443
Likes: 26
From: Switzerland
Car: Red 1991 Firebird with digital dash
Engine: L03 V8 TBI
Transmission: 700 R4
Axle/Gears: 2.73
Re: GTA digital dash swap - doing it the hard way - pic heavy
Now for the first test, fingers crossed...
and voil�...
things light up as they should!
and voil�...
things light up as they should!

Thread Starter
Member
iTrader: (1)
Joined: Nov 2013
Posts: 443
Likes: 26
From: Switzerland
Car: Red 1991 Firebird with digital dash
Engine: L03 V8 TBI
Transmission: 700 R4
Axle/Gears: 2.73
Re: GTA digital dash swap - doing it the hard way - pic heavy
Not all is perfect yet...
on the plus side, the DIC, gages, radio and keyless entry work. All the things that were in the car before seem to do the job nicely as well, like the windows, locks, blowers, interior lights etc.
BUT
there's a tiny little detail. The car won't start!
When I turn the key to start, I can hear a relay shutting off and the dash does a re-initialization. Once or twice I heard an ugly noise and the belt moved a bit but that's all!
The battery is good for sure (rather new and loaded) and the C100 connector is tightly screwed in. Should the digital dash restart after the engine starts? I think not?!
Help really appreciated!
Thread Starter
Member
iTrader: (1)
Joined: Nov 2013
Posts: 443
Likes: 26
From: Switzerland
Car: Red 1991 Firebird with digital dash
Engine: L03 V8 TBI
Transmission: 700 R4
Axle/Gears: 2.73
Re: GTA digital dash swap - doing it the hard way - pic heavy
I watched some youtube videos on the digital dash. As it seems, when they turn the key to run, the dash initializes. By turning the key to start, the dash keeps the service engine soon indicator and the brake warning on but otherwise does a new initialization. So this seems to be the same behavior as in my car and not a fault.
Thread Starter
Member
iTrader: (1)
Joined: Nov 2013
Posts: 443
Likes: 26
From: Switzerland
Car: Red 1991 Firebird with digital dash
Engine: L03 V8 TBI
Transmission: 700 R4
Axle/Gears: 2.73
Re: GTA digital dash swap - doing it the hard way - pic heavy
Then I went full retard and kept the key in start for 10 seconds straight and guess what, the car started after some 7 seconds with some ugly noises but then kept running like normal. Just when I noticed white smoke behind the dash I shut it down immediately. That smoke didn't seem to come from the dash though and I smelt nothing.
Totally confused...
Totally confused...

Joined: Jul 2002
Posts: 1,983
Likes: 6
From: Stamford, New York
Car: 80 SE/TTA;88 T/A GTA;86 T/A
Engine: 4.9L Turbo; LT1; empty
Transmission: TH350; T56; empty
Axle/Gears: 3:23 disk; 4:10 disk ; 3.42 disk
Re: GTA digital dash swap - doing it the hard way - pic heavy
Looks like your making some good progress, keep up the good work!
Thread Starter
Member
iTrader: (1)
Joined: Nov 2013
Posts: 443
Likes: 26
From: Switzerland
Car: Red 1991 Firebird with digital dash
Engine: L03 V8 TBI
Transmission: 700 R4
Axle/Gears: 2.73
Re: GTA digital dash swap - doing it the hard way - pic heavy
Thanks, I will!
Good news: car is running again PHEW!!! what a relief
I have absolutely no idea what the problem was. Still making weird noises when cranking but running smoothly as ever afterwards. And no smoke.
So basically everything is working now.
Now I need to decide, if I put in the digital HVAC or not. I'm eager to get everything mounted back and redoing another harness will be a lot of work. On the other hand that push button HVAC looks so smooth... Suggestions?
Joined: Jul 2002
Posts: 1,983
Likes: 6
From: Stamford, New York
Car: 80 SE/TTA;88 T/A GTA;86 T/A
Engine: 4.9L Turbo; LT1; empty
Transmission: TH350; T56; empty
Axle/Gears: 3:23 disk; 4:10 disk ; 3.42 disk
Re: GTA digital dash swap - doing it the hard way - pic heavy
Do you have the complete climate control harness or just the pigtails from the individual items? if not, I have my car in pieces and piles right now, and can take some pics of the harness for you if needed, having the complete climate control harness, it seems really easy that anyone could add that part of the system alone to their car in less than a day with the right parts.
Btw, if you didnt recognize my name, I'm the one that talked to you about my restoration and getting an odometer chip from you about a month back. Still interested, finally broke ground on the car, shes damn near naked sitting on the rotisserie as I type this.
Otherwise keep up the good work, if you need any pics of brackets, wiring pictures or schematics, service manual info, or hardware feel free to send me a message!
Thread Starter
Member
iTrader: (1)
Joined: Nov 2013
Posts: 443
Likes: 26
From: Switzerland
Car: Red 1991 Firebird with digital dash
Engine: L03 V8 TBI
Transmission: 700 R4
Axle/Gears: 2.73
Re: GTA digital dash swap - doing it the hard way - pic heavy
I do have the complete digital HVAC harness, but the connectors that go to the dash harness are all different. I probably won't get around doing some rather extensive modification to one of the harnesses

Joined: Jul 2002
Posts: 1,983
Likes: 6
From: Stamford, New York
Car: 80 SE/TTA;88 T/A GTA;86 T/A
Engine: 4.9L Turbo; LT1; empty
Transmission: TH350; T56; empty
Axle/Gears: 3:23 disk; 4:10 disk ; 3.42 disk
Re: GTA digital dash swap - doing it the hard way - pic heavy
I mean, there is nothing saying you cant do it at a later time, it is a pretty isolated system, where in it doesn't care what cluster your using, as long as all the peripheral vacuum hoses and what not are hooked up correctly.
Thread Starter
Member
iTrader: (1)
Joined: Nov 2013
Posts: 443
Likes: 26
From: Switzerland
Car: Red 1991 Firebird with digital dash
Engine: L03 V8 TBI
Transmission: 700 R4
Axle/Gears: 2.73
Re: GTA digital dash swap - doing it the hard way - pic heavy
yes, I agree. I just fear that there will be a lot of work removing that whole dash to get to the hvac again. I think I�ll swap in the digital hvac , if it can be fitted
Joined: Jul 2002
Posts: 1,983
Likes: 6
From: Stamford, New York
Car: 80 SE/TTA;88 T/A GTA;86 T/A
Engine: 4.9L Turbo; LT1; empty
Transmission: TH350; T56; empty
Axle/Gears: 3:23 disk; 4:10 disk ; 3.42 disk
Re: GTA digital dash swap - doing it the hard way - pic heavy
Now will be the simplest time to get to everything. I think everything is the same hardware wise, just different vacuum hoses, an electronic brain, solenoid for the hot cold mix, and one other piece...going from memory is horrible when you barely have one to start lol.
Joined: Jul 2002
Posts: 1,983
Likes: 6
From: Stamford, New York
Car: 80 SE/TTA;88 T/A GTA;86 T/A
Engine: 4.9L Turbo; LT1; empty
Transmission: TH350; T56; empty
Axle/Gears: 3:23 disk; 4:10 disk ; 3.42 disk
Re: GTA digital dash swap - doing it the hard way - pic heavy
I did notice messing with my digital hvac harness today that depending on the year, the plug for the fan might be different. I believe my car had a 2 pin blower motor and the digital hvac as a one pin on mine. Then again I have multiple setups, 3 or 4 complete dashes, 2 complete wiring harnesses I believe. Can never have too many spares when relying on 35 year old digital gauges.
Joined: Sep 1999
Posts: 4,353
Likes: 308
From: NJ
Car: 92 Firebird
Engine: 4.8 LR4
Transmission: T56
Axle/Gears: 3.45 9 Bolt
Re: GTA digital dash swap - doing it the hard way - pic heavy
There are modules that attach for the controls on the digital, you can't just slap it in and call it a day. You HAVE to have those hardware pieces.
Thread Starter
Member
iTrader: (1)
Joined: Nov 2013
Posts: 443
Likes: 26
From: Switzerland
Car: Red 1991 Firebird with digital dash
Engine: L03 V8 TBI
Transmission: 700 R4
Axle/Gears: 2.73
Re: GTA digital dash swap - doing it the hard way - pic heavy
I think I will have to modify the existing 1991 harness as both harnesses do have plugs that don't fit anyway.
These are the three modules that replace the mechanical A/C control of the 1991 Firebird:
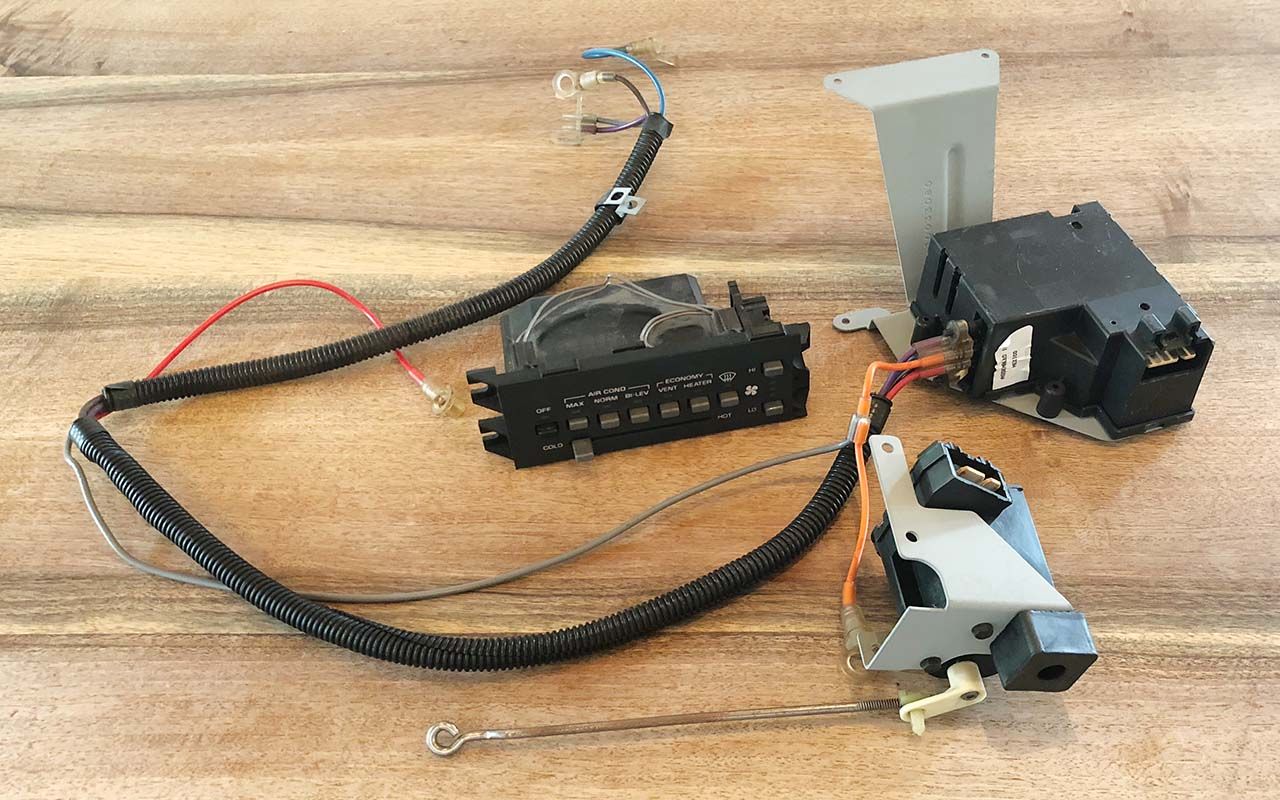
These are the three modules that replace the mechanical A/C control of the 1991 Firebird:

Last edited by Cehbra; Apr 25, 2018 at 07:28 AM.
Thread Starter
Member
iTrader: (1)
Joined: Nov 2013
Posts: 443
Likes: 26
From: Switzerland
Car: Red 1991 Firebird with digital dash
Engine: L03 V8 TBI
Transmission: 700 R4
Axle/Gears: 2.73
Re: GTA digital dash swap - doing it the hard way - pic heavy
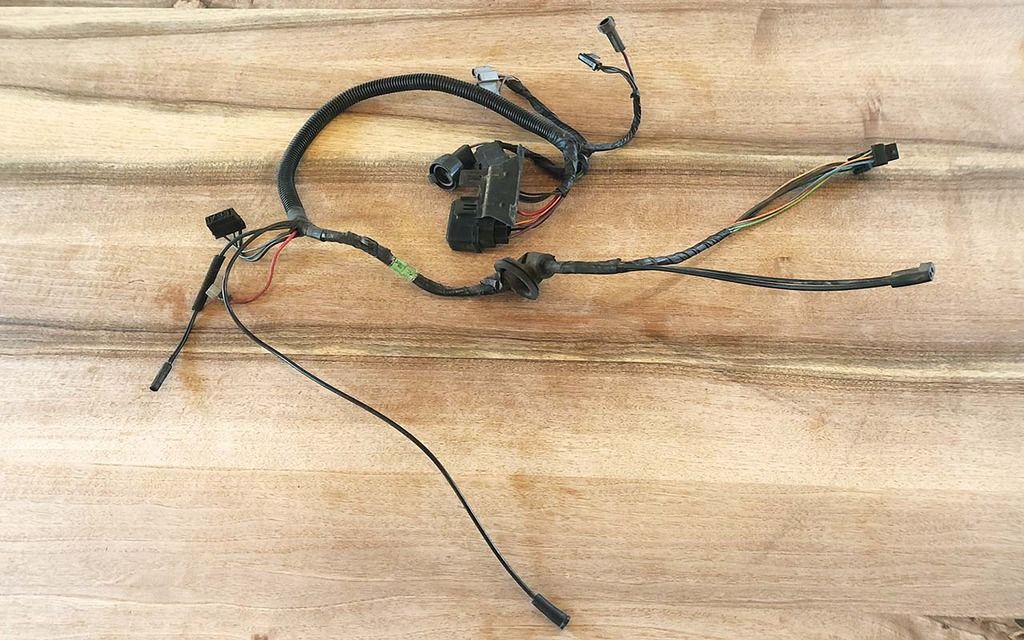
And this is the digital HVAC harness:

Thread Starter
Member
iTrader: (1)
Joined: Nov 2013
Posts: 443
Likes: 26
From: Switzerland
Car: Red 1991 Firebird with digital dash
Engine: L03 V8 TBI
Transmission: 700 R4
Axle/Gears: 2.73
Re: GTA digital dash swap - doing it the hard way - pic heavy
The electronic A/C control head connects to the vacuum diverter (that bigger box with the colored vacuum tubes) to control the flaps, depending on the settings of the buttons (OFF, NORM, MAX, etc..). The other box is the blend door motor which adjusts the temperature flap, meaning it controls how much cold air goes through the heater core. In the analog version this is connected mechanically with a simple wire line, in the digital version a potentiometer controls a stepping motor.
Interestingly, there are some differences between digital and analog dashes concerning how the heater core is bypassed: in the digital dash it's the buttons that control the bypassing of the heater core. Only in MAX mode the heater core is shut off. In the analog dash it's the temperature selector that keeps the heater core off in the cold position - in all modes.
Other than that, there are still more differences that I have to study. I will keep my findings posted.
Thread Starter
Member
iTrader: (1)
Joined: Nov 2013
Posts: 443
Likes: 26
From: Switzerland
Car: Red 1991 Firebird with digital dash
Engine: L03 V8 TBI
Transmission: 700 R4
Axle/Gears: 2.73
Re: GTA digital dash swap - doing it the hard way - pic heavy
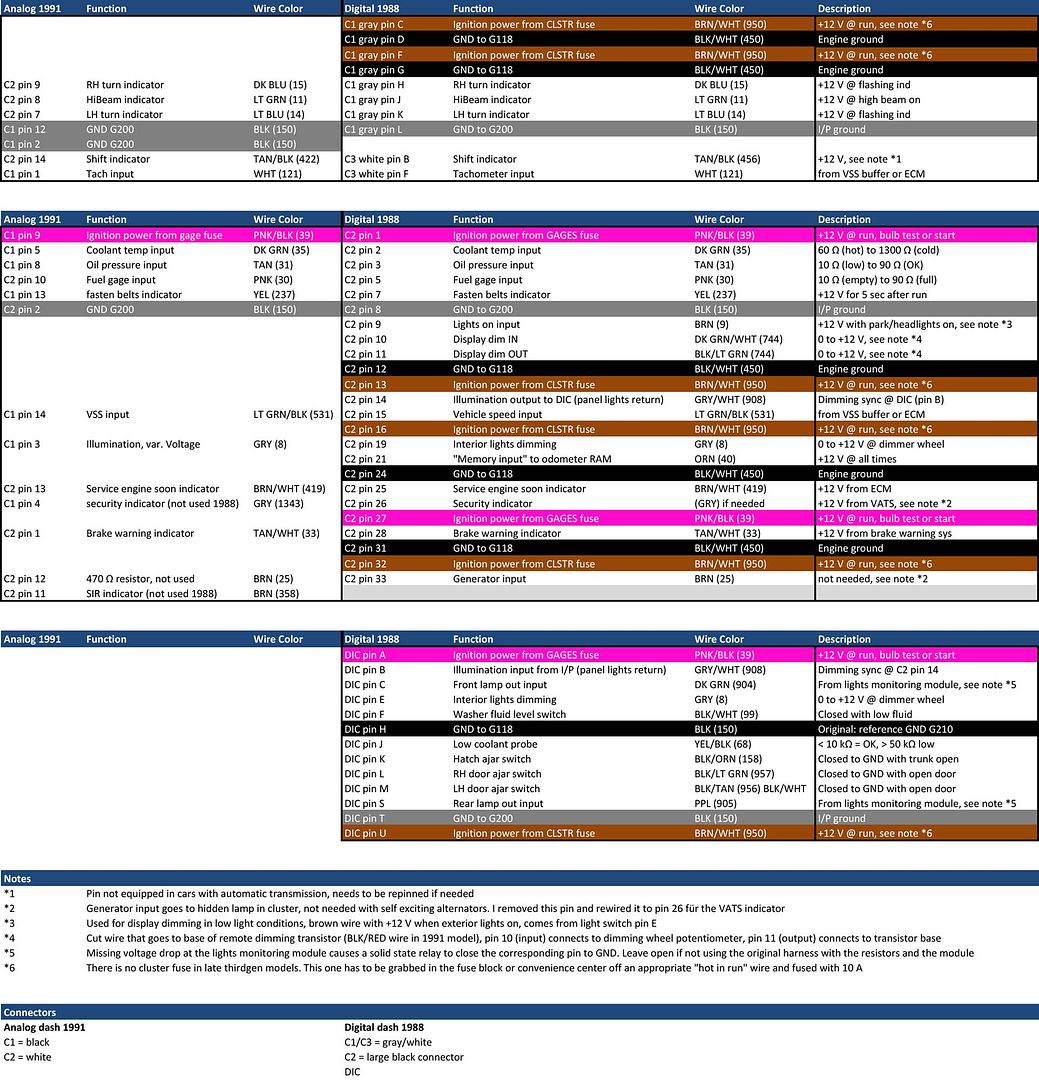
I'm using this thread as a sort of diary lol. So it might be a bit cluttered after all. But to get the things I did so far out of my head and make room for new challenges here is the updated connector list. Therefore the list from post #13 is no longer valid. I still hope fellow insanes would find some use in this info.

Joined: Sep 1999
Posts: 4,353
Likes: 308
From: NJ
Car: 92 Firebird
Engine: 4.8 LR4
Transmission: T56
Axle/Gears: 3.45 9 Bolt
Re: GTA digital dash swap - doing it the hard way - pic heavy
You may want to check that, but I think that was how it works.
Thread Starter
Member
iTrader: (1)
Joined: Nov 2013
Posts: 443
Likes: 26
From: Switzerland
Car: Red 1991 Firebird with digital dash
Engine: L03 V8 TBI
Transmission: 700 R4
Axle/Gears: 2.73
Re: GTA digital dash swap - doing it the hard way - pic heavy
Yes, you are of course right, I was unprecise. Thank you for that
Thread Starter
Member
iTrader: (1)
Joined: Nov 2013
Posts: 443
Likes: 26
From: Switzerland
Car: Red 1991 Firebird with digital dash
Engine: L03 V8 TBI
Transmission: 700 R4
Axle/Gears: 2.73
Re: GTA digital dash swap - doing it the hard way - pic heavy
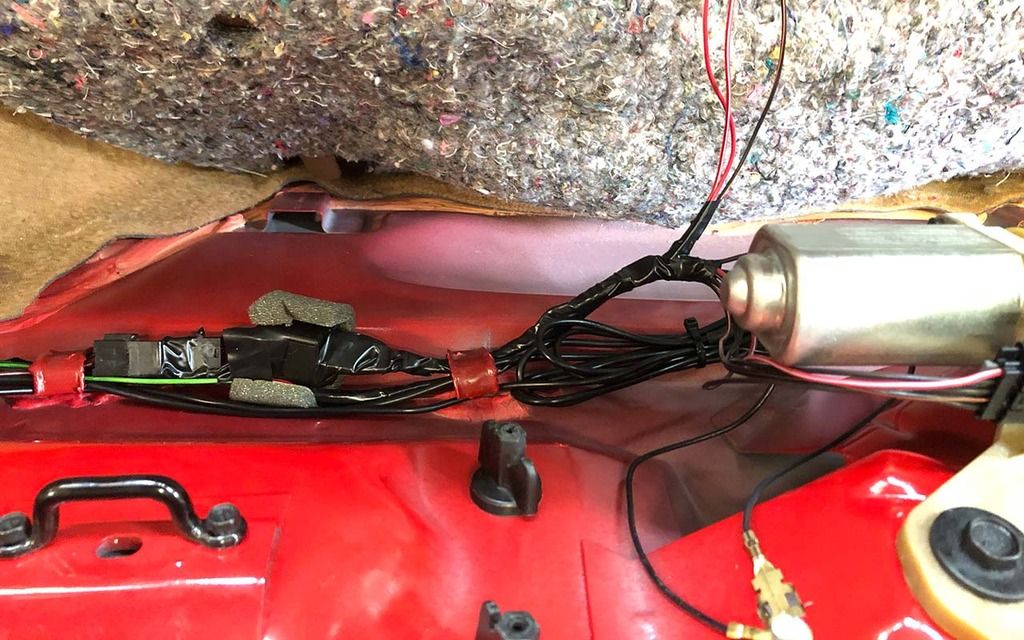
I forgot to mention how I did the hatch ajar switch. That switch is unobtanium, so I thought about a different approach.
The DIC expects a connection to GND on pin K (BLK/ORN) when the hatch is open. Quite simple.
In the end I settled for a relay, that closes when the cargo compartment light comes on. It's a simple solution that doesn't need any special parts. The relay is mounted inline with the harness. Works like a charm.
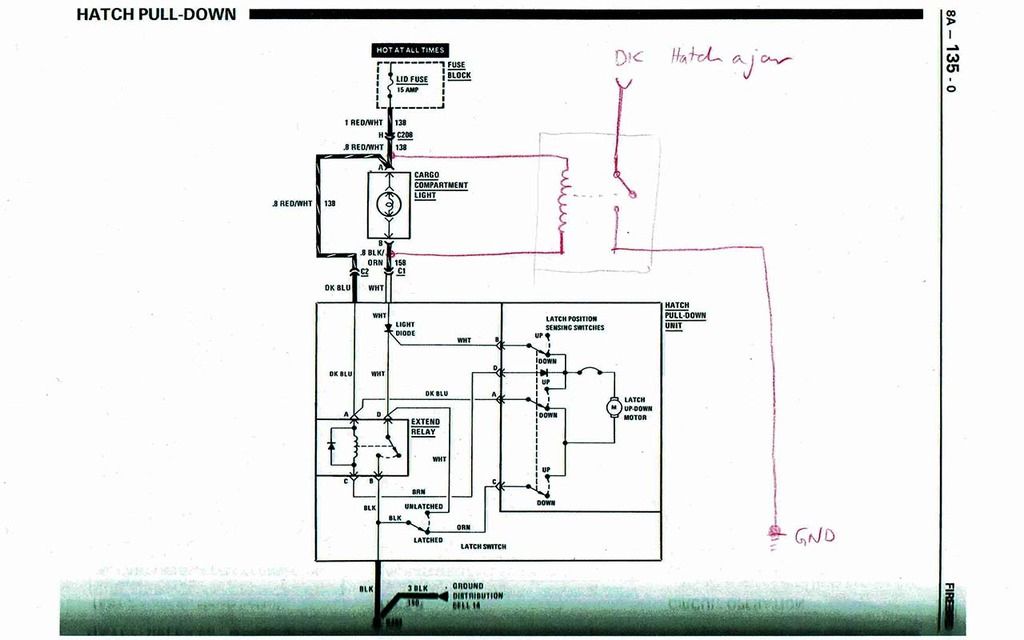


Last edited by Cehbra; Apr 28, 2018 at 03:37 PM.
Thread Starter
Member
iTrader: (1)
Joined: Nov 2013
Posts: 443
Likes: 26
From: Switzerland
Car: Red 1991 Firebird with digital dash
Engine: L03 V8 TBI
Transmission: 700 R4
Axle/Gears: 2.73
Re: GTA digital dash swap - doing it the hard way - pic heavy
So I got most of the sensors wired - LH and RH door ajar, hatch ajar, low washer fluid and low coolant sensor. I will stop here, as I believe that lights monitoring module and the resistance measuring won't work anyway as I have a lot of LEDs in my harness. There could be a way of doing that with a photo diode though. Anyway, I have other plans now. Need to get that HVAC going...
Thread Starter
Member
iTrader: (1)
Joined: Nov 2013
Posts: 443
Likes: 26
From: Switzerland
Car: Red 1991 Firebird with digital dash
Engine: L03 V8 TBI
Transmission: 700 R4
Axle/Gears: 2.73
Re: GTA digital dash swap - doing it the hard way - pic heavy
In case somebody wanted to know how the inside of the digital HVAC box looks, here are some pictures. This is the one that came with the dash I got more than a year ago. It's still assembled as it was in the car back then.
The box I have in my 1991 Firebird looks exactly the same and has the same mounting holes for the vacuum diverter box and the blend door motor. Only difference is that there is the cruise control mounted instead.
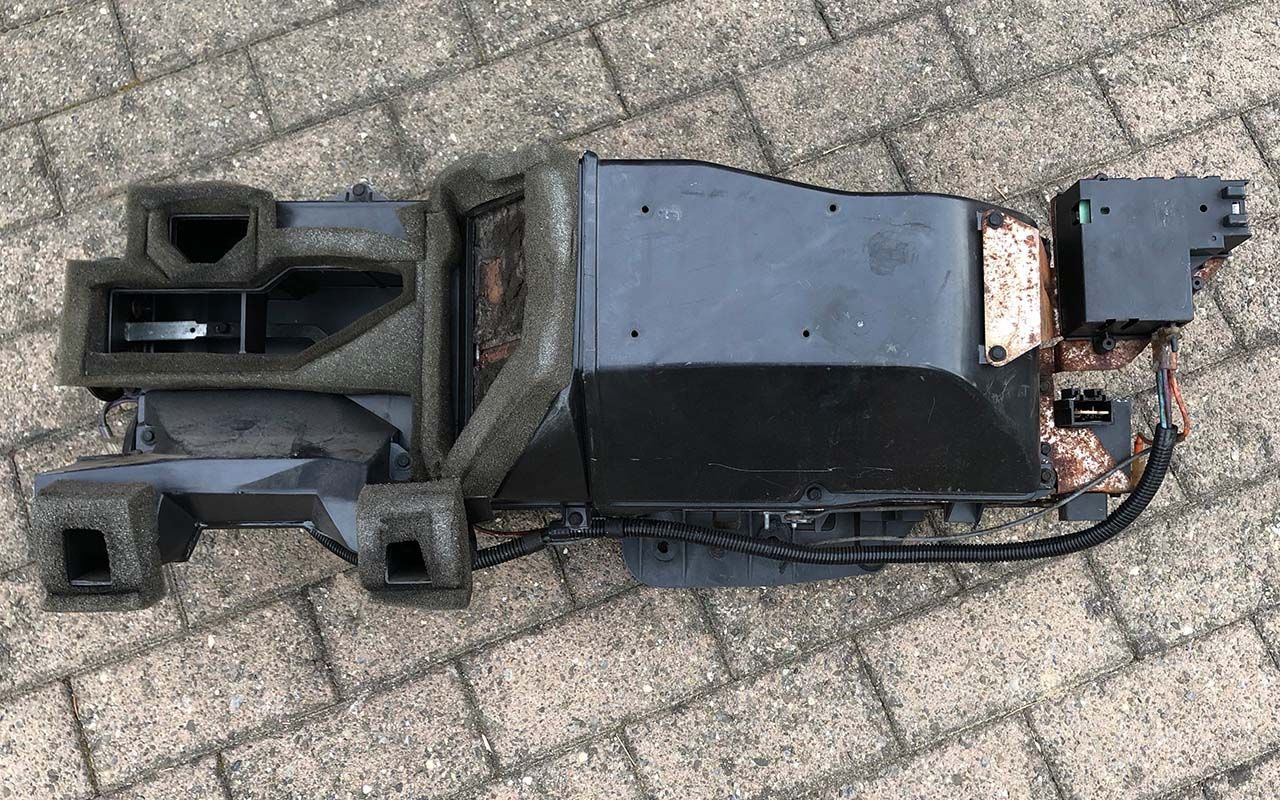

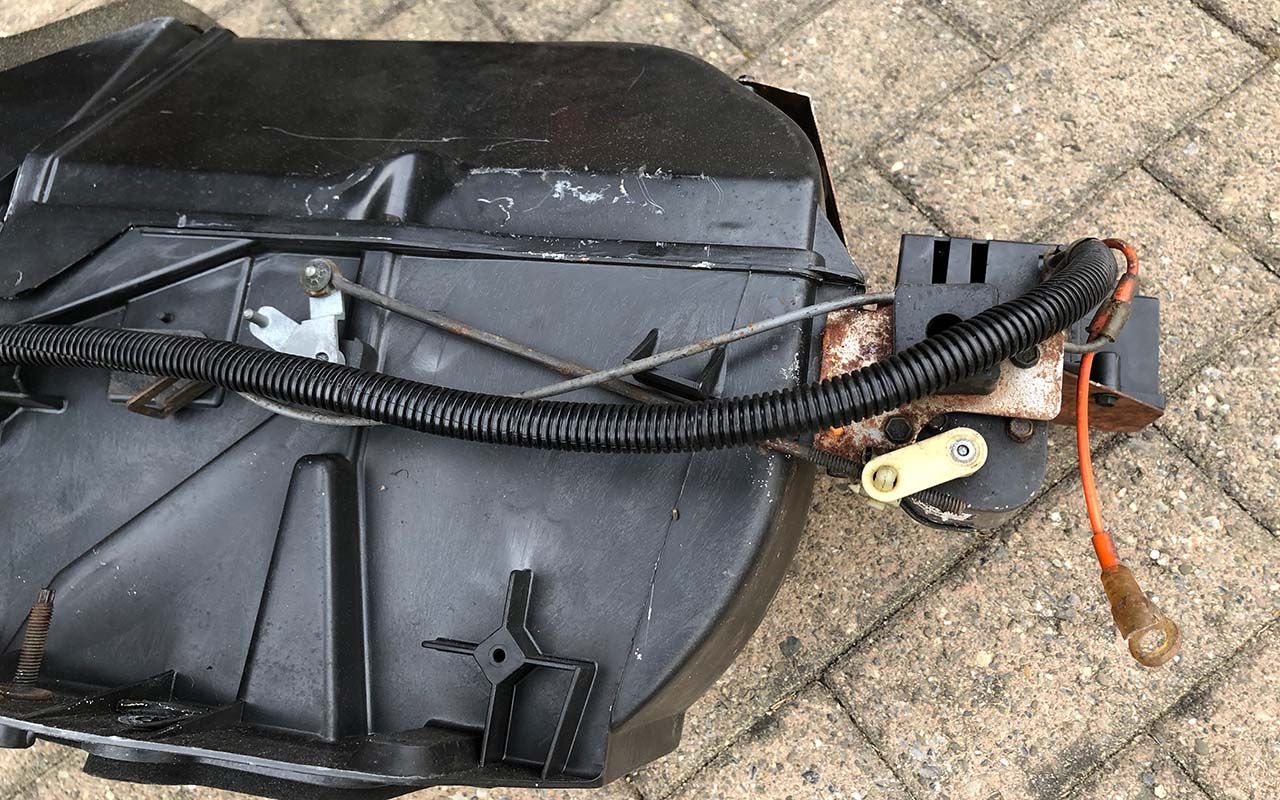
The box I have in my 1991 Firebird looks exactly the same and has the same mounting holes for the vacuum diverter box and the blend door motor. Only difference is that there is the cruise control mounted instead.


Thread Starter
Member
iTrader: (1)
Joined: Nov 2013
Posts: 443
Likes: 26
From: Switzerland
Car: Red 1991 Firebird with digital dash
Engine: L03 V8 TBI
Transmission: 700 R4
Axle/Gears: 2.73
Re: GTA digital dash swap - doing it the hard way - pic heavy
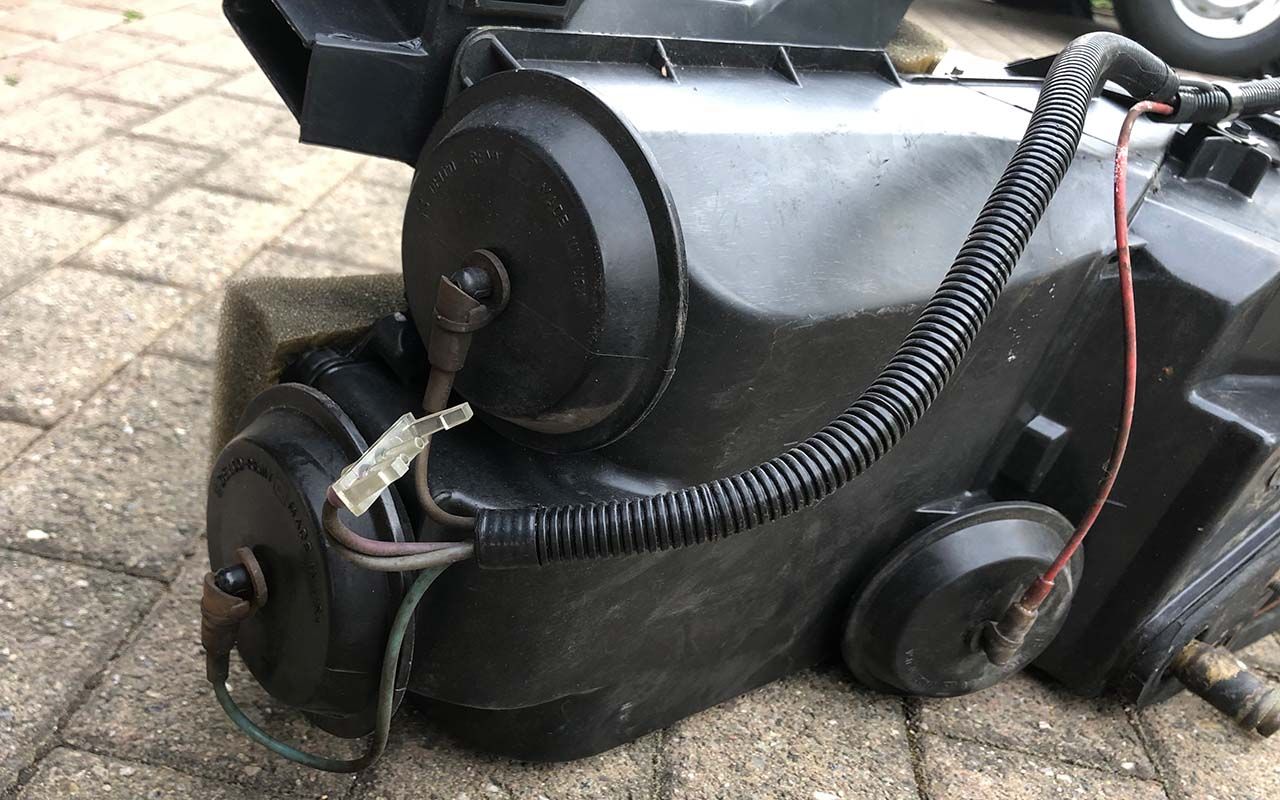
And with the top lids removed:
There is this nasty foam on top of the flaps that is all dried up and brittle from the hot air that passed by. In my 1991 Firebird it has turned to a sticky goo that flies around in the car and turns to oil when it lands on the carpet.
I need this cleaned soon.
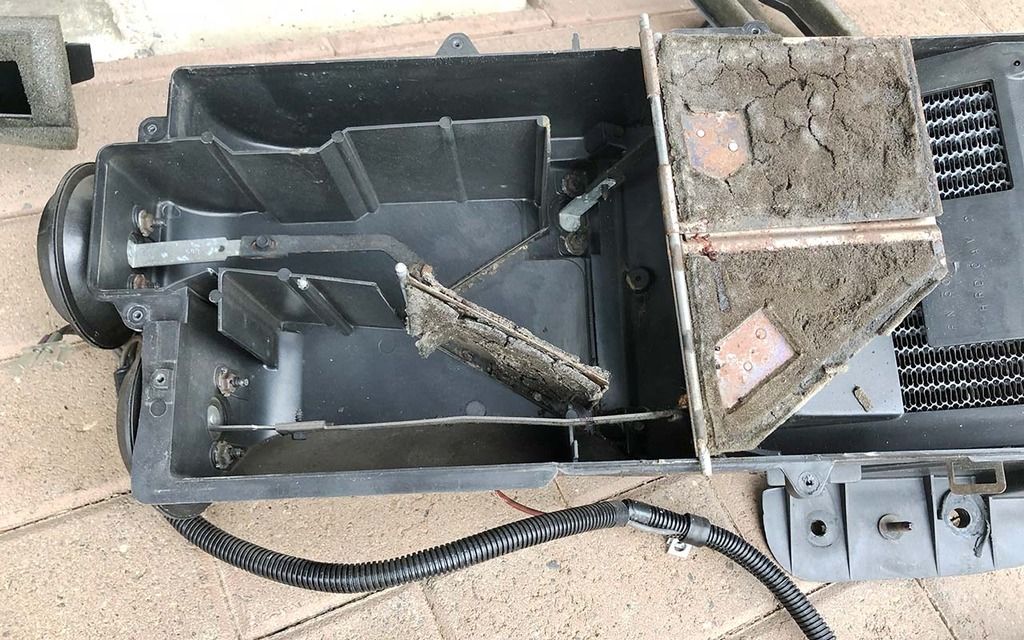
There is this nasty foam on top of the flaps that is all dried up and brittle from the hot air that passed by. In my 1991 Firebird it has turned to a sticky goo that flies around in the car and turns to oil when it lands on the carpet.
I need this cleaned soon.

Joined: Sep 1999
Posts: 4,353
Likes: 308
From: NJ
Car: 92 Firebird
Engine: 4.8 LR4
Transmission: T56
Axle/Gears: 3.45 9 Bolt
Re: GTA digital dash swap - doing it the hard way - pic heavy
I didn't realize you had all the HVAC digital stuff. Cool, hope it works out for you


Joined: Oct 2012
Posts: 143
Likes: 2
From: Montreal, QC, Canada
Car: 1987 GTA, Digital Dash
Engine: L98 TPI
Transmission: 1994 LT1 T56
Axle/Gears: 9 bolt, 3.27
Re: GTA digital dash swap - doing it the hard way - pic heavy
I've been following this since you started. Nice work so far. 
I noticed you're using a lot of black tape - it degrades quickly over time and becomes a sticky goo within a couple years. You ever heard of Tesa tape? It's a specific purpose tape, but is much easier to work with and higher grade than pvc. I redid all the interior harnesses in my GTA with it a couple years ago and would highly recommend it.
https://www.tesa.com/industry/automo...ire-harnessing
Thread Starter
Member
iTrader: (1)
Joined: Nov 2013
Posts: 443
Likes: 26
From: Switzerland
Car: Red 1991 Firebird with digital dash
Engine: L03 V8 TBI
Transmission: 700 R4
Axle/Gears: 2.73
Re: GTA digital dash swap - doing it the hard way - pic heavy
I've been following this since you started. Nice work so far.
I noticed you're using a lot of black tape - it degrades quickly over time and becomes a sticky goo within a couple years. You ever heard of Tesa tape? It's a specific purpose tape, but is much easier to work with and higher grade than pvc. I redid all the interior harnesses in my GTA with it a couple years ago and would highly recommend it.
https://www.tesa.com/industry/automo...ire-harnessing
I will order some of that Tesa tape, it really looks promising. And sorry for the late response. I had a few intensive days lol.
Thread Starter
Member
iTrader: (1)
Joined: Nov 2013
Posts: 443
Likes: 26
From: Switzerland
Car: Red 1991 Firebird with digital dash
Engine: L03 V8 TBI
Transmission: 700 R4
Axle/Gears: 2.73
Re: GTA digital dash swap - doing it the hard way - pic heavy
Well that stupid problem from post #123 kept returning over the last few days: When I tried to start the engine it would either not do anything or the cranking motor would make some weird noises. Whenever I kept the key in start for a few seconds I would notice white smoke coming from somewhere. Not cool.
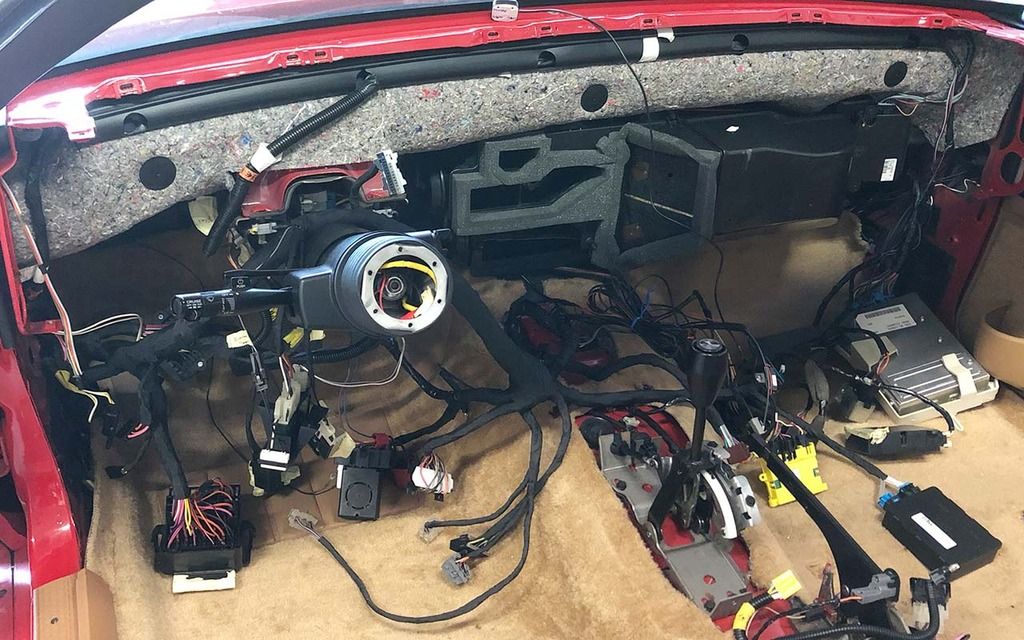
So I checked all the fuses (all good), checked all my soldering (all good as well) and checked for a shortage and I noticed a high permanent drain on the battery. I then removed the dash, keyless entry module, radio and all the rest that was not needed - to no avail.
I again kept the key in start for five seconds (I know that's retarded). But this time I noticed the smoke coming from the dash harness itself.
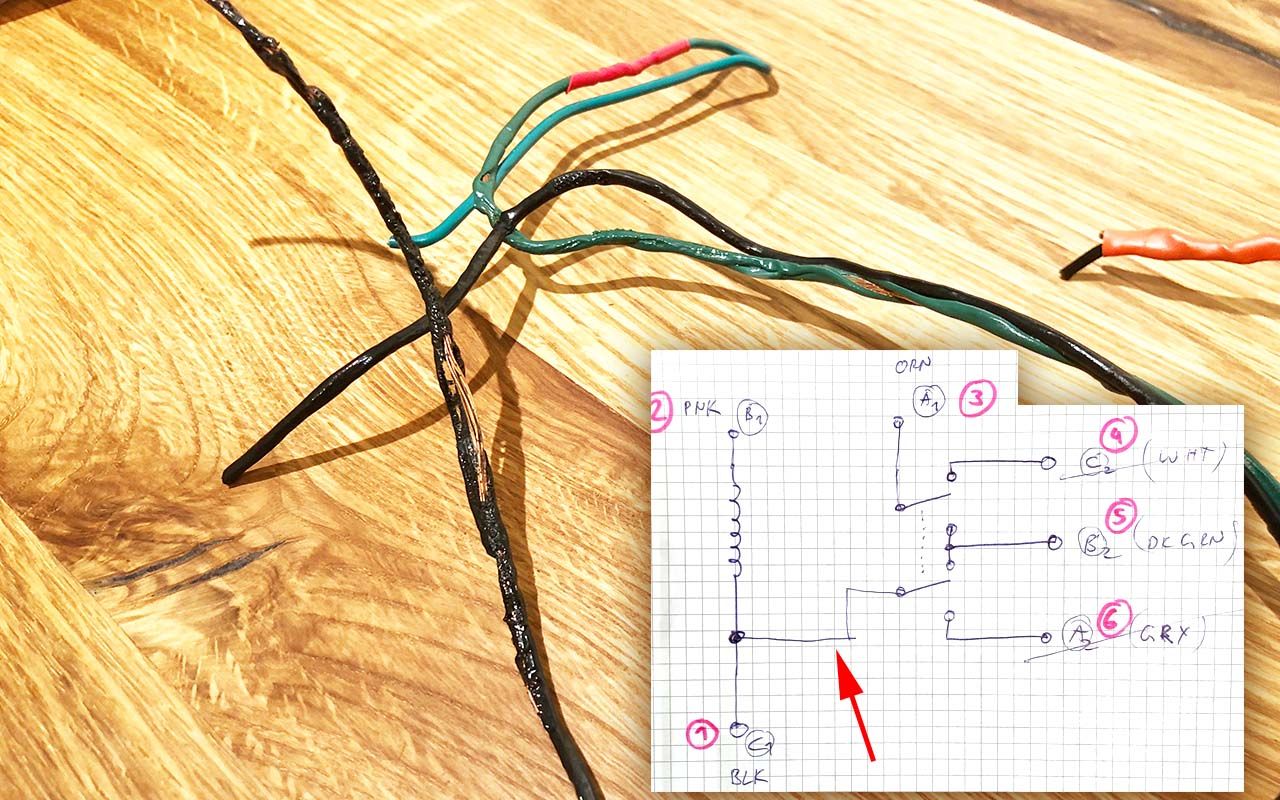
And then the G200 - which I had just tucked under the shifter - slipped off and guess what, the car started smoothly as ever...
So I traced G200 and I found this totally fused wire inside the big dash harness:
So I checked all the fuses (all good), checked all my soldering (all good as well) and checked for a shortage and I noticed a high permanent drain on the battery. I then removed the dash, keyless entry module, radio and all the rest that was not needed - to no avail.
I again kept the key in start for five seconds (I know that's retarded). But this time I noticed the smoke coming from the dash harness itself.
And then the G200 - which I had just tucked under the shifter - slipped off and guess what, the car started smoothly as ever...
So I traced G200 and I found this totally fused wire inside the big dash harness:

Last edited by Cehbra; May 6, 2018 at 04:34 PM.
Thread Starter
Member
iTrader: (1)
Joined: Nov 2013
Posts: 443
Likes: 26
From: Switzerland
Car: Red 1991 Firebird with digital dash
Engine: L03 V8 TBI
Transmission: 700 R4
Axle/Gears: 2.73
Re: GTA digital dash swap - doing it the hard way - pic heavy
Here's what happened:
As I wanted to add keyless entry I had to somehow get that +12 V 'trunk open' signal to do its work. I wanted to keep the stock functionality and have the trunk open only when the car is in PARK - and not accidentally open the lid while driving. So I used a relay to simulate the hatch open button.
And for that I took the power antenna relay because I didn't need this one anymore... That was a mistake!!! Turns out this relay shorts to ground on the green wire
So I got it off and finally things have settled... My heart rate has come down to normal now. This night I will sleep nicely.
Now things should move on a bit quicker.
Thread Starter
Member
iTrader: (1)
Joined: Nov 2013
Posts: 443
Likes: 26
From: Switzerland
Car: Red 1991 Firebird with digital dash
Engine: L03 V8 TBI
Transmission: 700 R4
Axle/Gears: 2.73
Re: GTA digital dash swap - doing it the hard way - pic heavy
As suggested by RunawayRadio I ordered some of that Tesa harness tape. I can really recommend that stuff, it worked out nicely for me. I got the dash harness loomed and I think it looks quite nice. All clean and still flexible.
Yesterday I took a first drive in months - cluster hanging down and all the wires floating around lol. Everything working as it should. I'm very happy so far. The next thing will be to get the dash carrier back on. And then of course the radio pod and that should more or less be it then...
Yesterday I took a first drive in months - cluster hanging down and all the wires floating around lol. Everything working as it should. I'm very happy so far. The next thing will be to get the dash carrier back on. And then of course the radio pod and that should more or less be it then...
