GTA digital dash swap - doing it the hard way - pic heavy


Joined: Aug 2013
Posts: 621
Likes: 149
From: Chicago
Car: 85-6 TA 85 IROC 82-86 MSE 83 Pace
Engine: Slow ones
Transmission: Noisy ones
Axle/Gears: Weak ones
Re: GTA digital dash swap - doing it the hard way - pic heavy
This thread is great. Gives me hope when I swap mine.
Thread Starter
Member
iTrader: (1)
Joined: Nov 2013
Posts: 443
Likes: 26
From: Switzerland
Car: Red 1991 Firebird with digital dash
Engine: L03 V8 TBI
Transmission: 700 R4
Axle/Gears: 2.73
Re: GTA digital dash swap - doing it the hard way - pic heavy
Thanks!
It's not for the faint-hearted, I'm at a constant heart rate of 220 and I need two psychiatrists in my back cause I always fear I wreck a perfectly running car and I'll be left with nothing but a roller and a heap of colored wires
It's not for the faint-hearted, I'm at a constant heart rate of 220 and I need two psychiatrists in my back cause I always fear I wreck a perfectly running car and I'll be left with nothing but a roller and a heap of colored wires

Thread Starter
Member
iTrader: (1)
Joined: Nov 2013
Posts: 443
Likes: 26
From: Switzerland
Car: Red 1991 Firebird with digital dash
Engine: L03 V8 TBI
Transmission: 700 R4
Axle/Gears: 2.73
Re: GTA digital dash swap - doing it the hard way - pic heavy
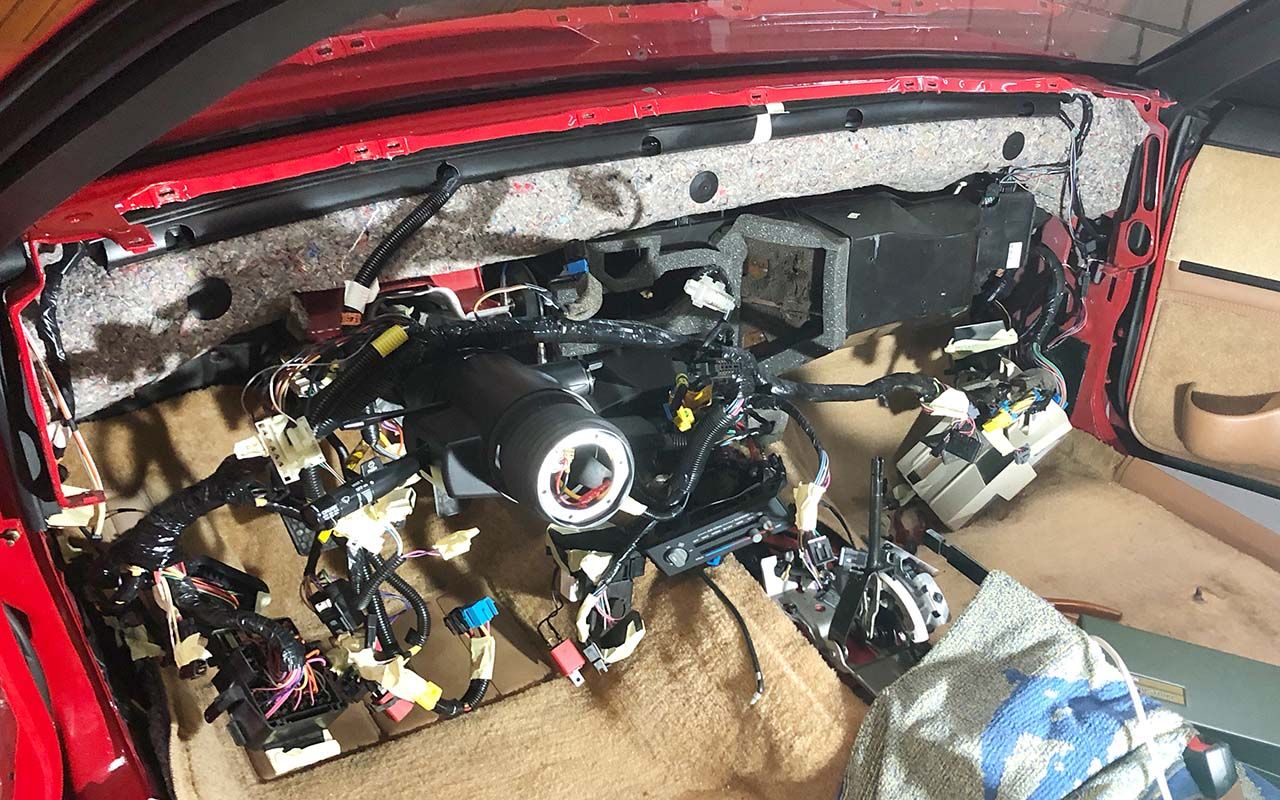
While it doesn't look like a big step at all - it actually took me three days to get the dash out. The hardest part was labelling all the connectors. That way I hope to ease to reconnect everything when I put the digital dash in.
I decided to leave the main harness in place and do the soldering directly in the car. Otherwise I would have had to remove the carpet and everyting else as well.
The next few days will be used to create a new digital dash assembly out of parts from the new and the old dash.
I decided to leave the main harness in place and do the soldering directly in the car. Otherwise I would have had to remove the carpet and everyting else as well.
The next few days will be used to create a new digital dash assembly out of parts from the new and the old dash.

Thread Starter
Member
iTrader: (1)
Joined: Nov 2013
Posts: 443
Likes: 26
From: Switzerland
Car: Red 1991 Firebird with digital dash
Engine: L03 V8 TBI
Transmission: 700 R4
Axle/Gears: 2.73
Re: GTA digital dash swap - doing it the hard way - pic heavy
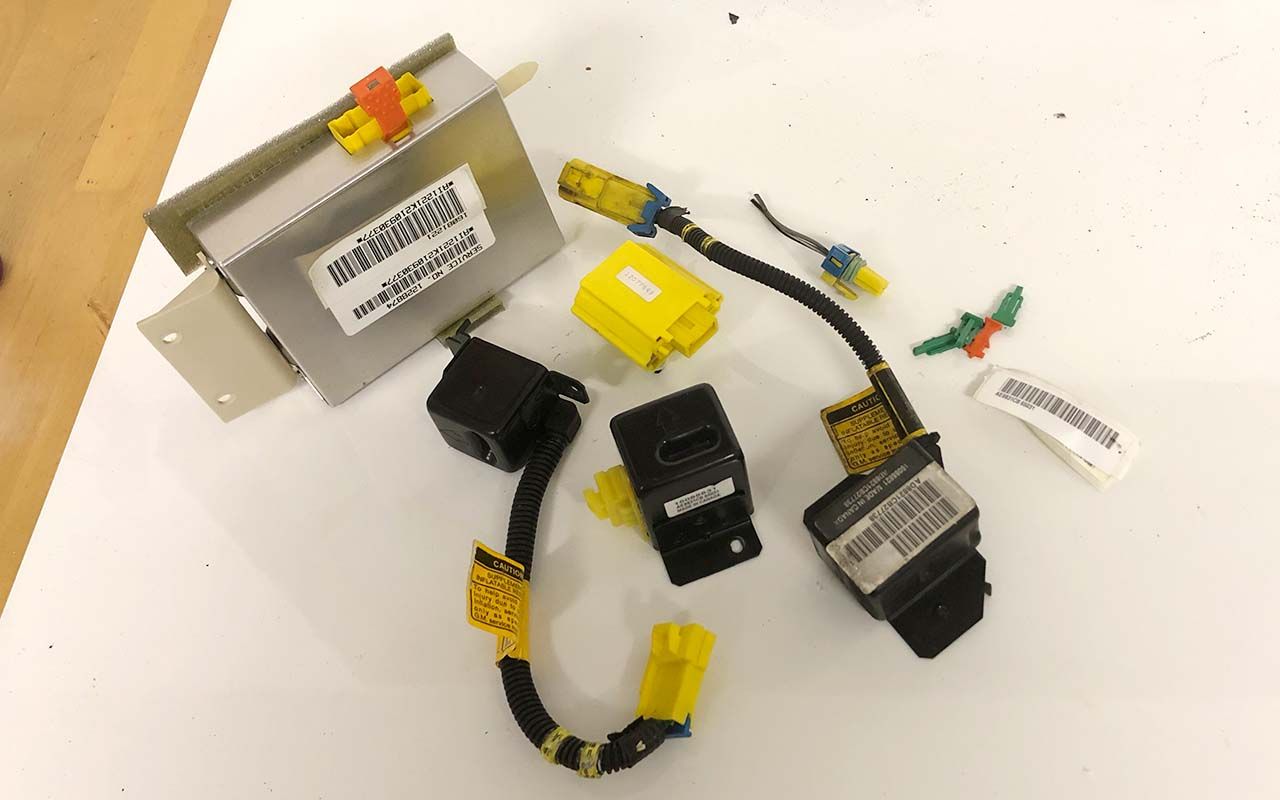
There are several components and connectors for the airbag (SIR). As I don't have an airbag on my momo steering wheel I'm planning on removing all that is not needed.
Does anyone know if that can be done easily? Can I just remove those components or will I have OBD errors?
Help very much appreciated.
Does anyone know if that can be done easily? Can I just remove those components or will I have OBD errors?
Help very much appreciated.

Joined: Jul 2002
Posts: 1,983
Likes: 6
From: Stamford, New York
Car: 80 SE/TTA;88 T/A GTA;86 T/A
Engine: 4.9L Turbo; LT1; empty
Transmission: TH350; T56; empty
Axle/Gears: 3:23 disk; 4:10 disk ; 3.42 disk
Re: GTA digital dash swap - doing it the hard way - pic heavy
Its relatively an independent system, so most everything can be removed. Great work so far, glad to see some serious interest in digital dashes, my friends roll their eyes as I keep buying complete systems (I'm up to 3 or 4 complete car swaps in collection).
Thread Starter
Member
iTrader: (1)
Joined: Nov 2013
Posts: 443
Likes: 26
From: Switzerland
Car: Red 1991 Firebird with digital dash
Engine: L03 V8 TBI
Transmission: 700 R4
Axle/Gears: 2.73
Re: GTA digital dash swap - doing it the hard way - pic heavy
That airbag control box takes up so much valuable space behind the dash. I will use the free space to mount a 4th gen keyless entry system.

Senior Member

Joined: Jun 2016
Posts: 520
Likes: 28
From: Malta
Car: 1988 Trans AM GTA
Engine: 350 TPI
Transmission: 700R4
Axle/Gears: 9-Bolt 3.27
Re: GTA digital dash swap - doing it the hard way - pic heavy
I am planning in refurbishing my digital dash and would be extremely grateful if you could provide me with a BOQ of all the led�s that I will need to replace the normal bulbs including the lights in the buttons and DIC.
I studied electronics so I guess I should be fit for the job.
thanks
I studied electronics so I guess I should be fit for the job.
thanks
Thread Starter
Member
iTrader: (1)
Joined: Nov 2013
Posts: 443
Likes: 26
From: Switzerland
Car: Red 1991 Firebird with digital dash
Engine: L03 V8 TBI
Transmission: 700 R4
Axle/Gears: 2.73
Re: GTA digital dash swap - doing it the hard way - pic heavy
I am planning in refurbishing my digital dash and would be extremely grateful if you could provide me with a BOQ of all the led�s that I will need to replace the normal bulbs including the lights in the buttons and DIC.
I studied electronics so I guess I should be fit for the job.
thanks
I studied electronics so I guess I should be fit for the job.
thanks
- the small wedge based T5 (same as 74) for the indicator lights
- the larger wedge based T10 (same as 194) for the I/P lighting
Instrument panel (I/P) LEDs:
- 4x T10
- 7x T5
- 1x T10 / GE 882 (inside I/P, see below)
DIC LEDs
- 2x T10
You might want to consider colored T5 LEDs behind the indicator lights.
In some digital dashes there was a GE 882 bulb behind the pressure gages, and some had an ordinary 194. I'm not sure what that bulb is for as it doesn't seem to light up any of the sections. In case it is meant for the alternator light it probably should stay an incandescent bulb.
There are two button panels in total, one for the DIC (Sys Chk) and one with four buttons next to the odometer. Both have a soldered bulb that is difficult to change. I guess it is a T5 or even smaller. I haven't gotten to those two as I was afraid I'd break the plastic. Guess you'll have to find out yourself!
Senior Member
Joined: Jun 2016
Posts: 520
Likes: 28
From: Malta
Car: 1988 Trans AM GTA
Engine: 350 TPI
Transmission: 700R4
Axle/Gears: 9-Bolt 3.27
Re: GTA digital dash swap - doing it the hard way - pic heavy
Thanks for the information. Much appreciated. Will let you know for sure once I start working on it.
i guess color LEDs for the indicator lights are green correct?
i guess color LEDs for the indicator lights are green correct?
Thread Starter
Member
iTrader: (1)
Joined: Nov 2013
Posts: 443
Likes: 26
From: Switzerland
Car: Red 1991 Firebird with digital dash
Engine: L03 V8 TBI
Transmission: 700 R4
Axle/Gears: 2.73
Re: GTA digital dash swap - doing it the hard way - pic heavy
When I replaced the bulbs in my digital dash I used green for the blinkers, blue for the high beam and red and yellow for the warning lights. I guess all white LEDs nowadays will work nicely, too.
Senior Member
Joined: Jun 2016
Posts: 520
Likes: 28
From: Malta
Car: 1988 Trans AM GTA
Engine: 350 TPI
Transmission: 700R4
Axle/Gears: 9-Bolt 3.27
Re: GTA digital dash swap - doing it the hard way - pic heavy
One question though. Will I losethe dimming facilty with LEDs. I mean the LEDs are quite bright to withstand at full power.
Thread Starter
Member
iTrader: (1)
Joined: Nov 2013
Posts: 443
Likes: 26
From: Switzerland
Car: Red 1991 Firebird with digital dash
Engine: L03 V8 TBI
Transmission: 700 R4
Axle/Gears: 2.73
Re: GTA digital dash swap - doing it the hard way - pic heavy
In my analog dash it worked well without tweaking the potentiometer. I don't have experiences with the digital dash yet.
Senior Member
Joined: Jun 2016
Posts: 520
Likes: 28
From: Malta
Car: 1988 Trans AM GTA
Engine: 350 TPI
Transmission: 700R4
Axle/Gears: 9-Bolt 3.27
Re: GTA digital dash swap - doing it the hard way - pic heavy
I guess this is a trial and error thing then 
One last question (Sorry for all these questions).
Any particular LED I should look for. I am searching an can see there are various models with different amounts of LEDs on each bulb
One last question (Sorry for all these questions).
Any particular LED I should look for. I am searching an can see there are various models with different amounts of LEDs on each bulb

Joined: Sep 1999
Posts: 4,353
Likes: 308
From: NJ
Car: 92 Firebird
Engine: 4.8 LR4
Transmission: T56
Axle/Gears: 3.45 9 Bolt
Re: GTA digital dash swap - doing it the hard way - pic heavy
I have tried swapping out regular 194s for LED in a stock dash. One problem is that the LEDs are directional, and only tend to light in one direction. I can't see a regular 194 replacement LED being able to light the digital dash well/correctly. I was looking at the DIC I got with a swap cluster and I am thinking that LED strip lighting will work much better than replacement bulbs, for the back lighting
Thread Starter
Member
iTrader: (1)
Joined: Nov 2013
Posts: 443
Likes: 26
From: Switzerland
Car: Red 1991 Firebird with digital dash
Engine: L03 V8 TBI
Transmission: 700 R4
Axle/Gears: 2.73
Re: GTA digital dash swap - doing it the hard way - pic heavy
I have tried swapping out regular 194s for LED in a stock dash. One problem is that the LEDs are directional, and only tend to light in one direction. I can't see a regular 194 replacement LED being able to light the digital dash well/correctly. I was looking at the DIC I got with a swap cluster and I am thinking that LED strip lighting will work much better than replacement bulbs, for the back lighting
You're probably right about LED strips being the best way to get an even illumination. But that's also going to be much harder to do.

Thread Starter
Member
iTrader: (1)
Joined: Nov 2013
Posts: 443
Likes: 26
From: Switzerland
Car: Red 1991 Firebird with digital dash
Engine: L03 V8 TBI
Transmission: 700 R4
Axle/Gears: 2.73
Re: GTA digital dash swap - doing it the hard way - pic heavy
Difficult to say. I ordered a few different 194/T10 and tried them out. One was too high for the lid to close I remember. In case of doubt go for the stronger ones with more lumen, you can always dim them down. CANBUS version will probably not work.
Thread Starter
Member
iTrader: (1)
Joined: Nov 2013
Posts: 443
Likes: 26
From: Switzerland
Car: Red 1991 Firebird with digital dash
Engine: L03 V8 TBI
Transmission: 700 R4
Axle/Gears: 2.73
Re: GTA digital dash swap - doing it the hard way - pic heavy
Not much done today, except for some assembling and studying the digital HVAC elements. This one causes me quite a headache... I might end up leaving the analog HVAC in the car, not sure though.
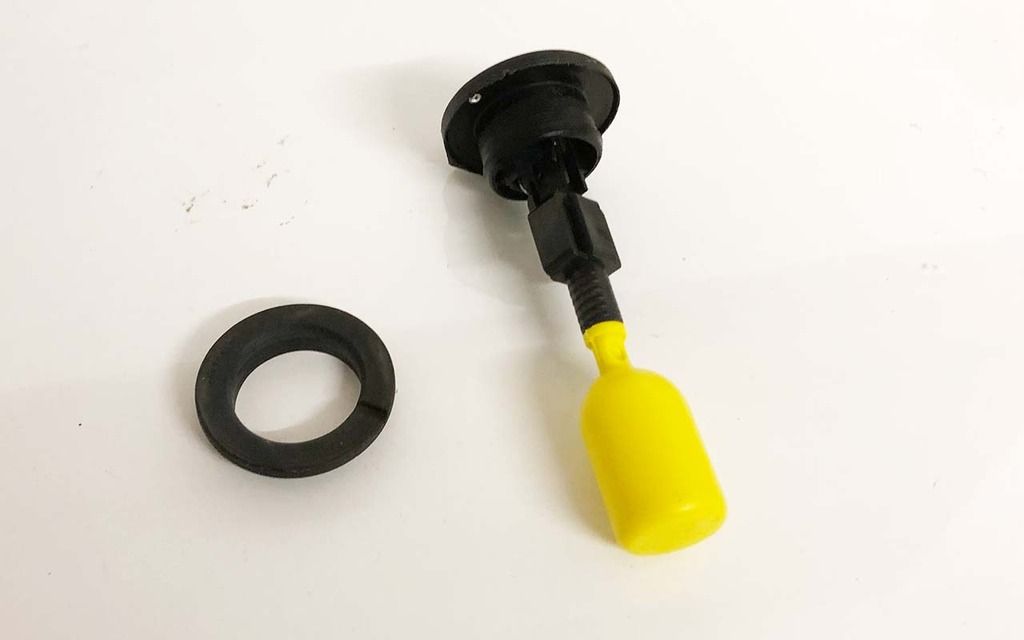
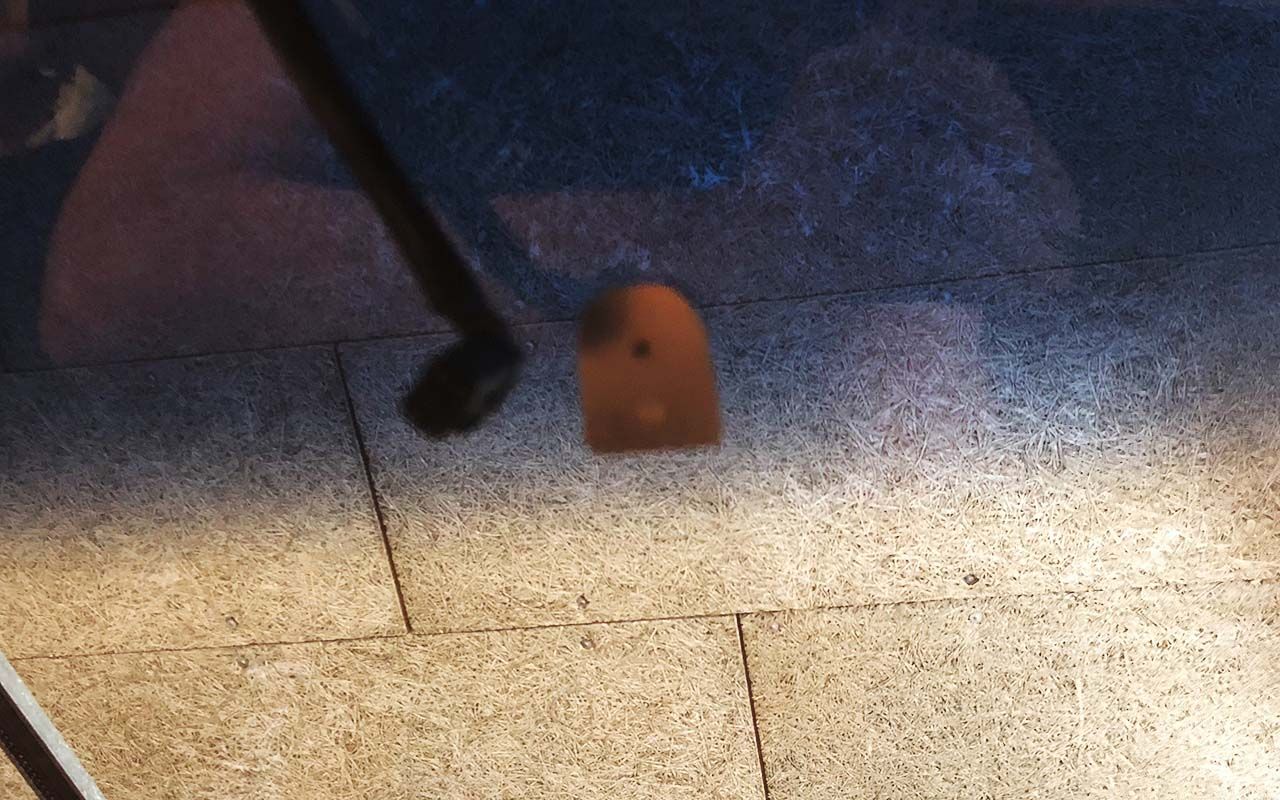
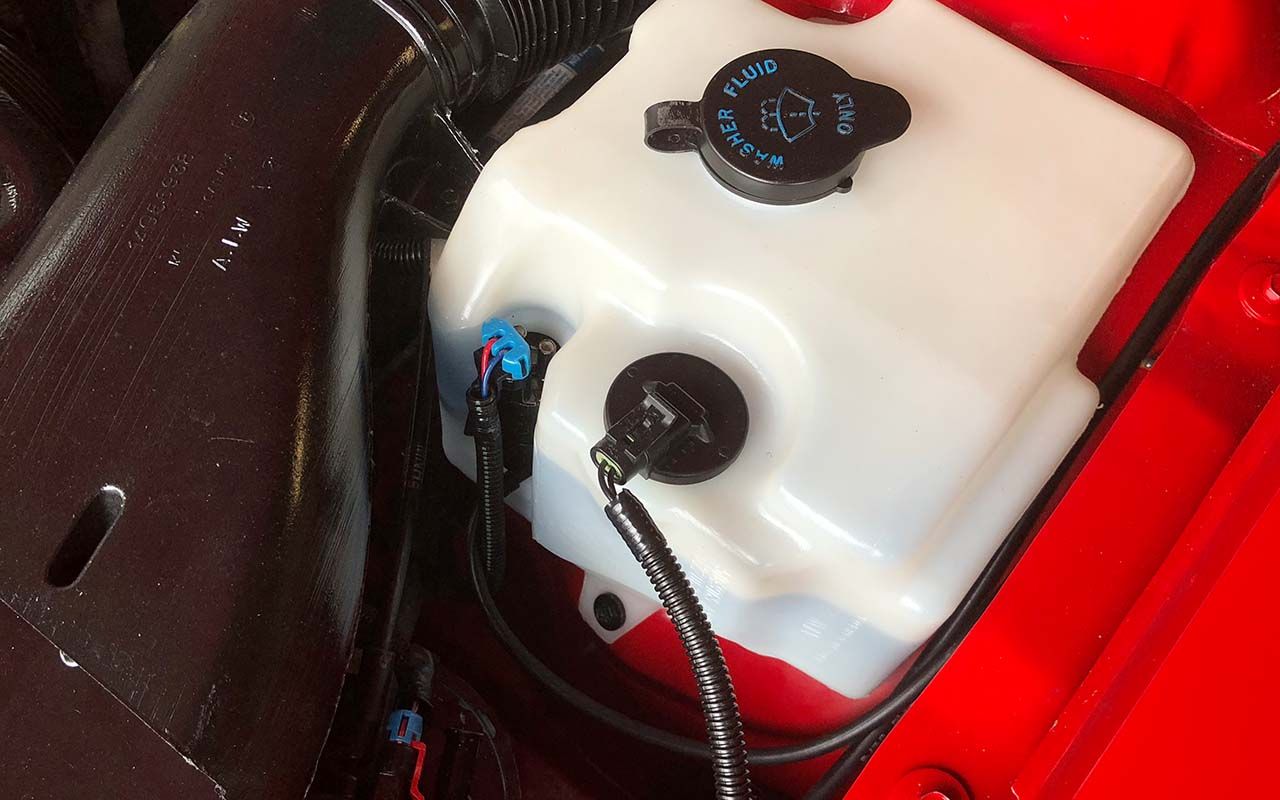
One small update: the DIC has a sensor input for the washer fluid bottle. If the washer fluid is low the sensor will close electrically (red arrow). Unfortunately the digital washer bottle I have is not really a beauty.
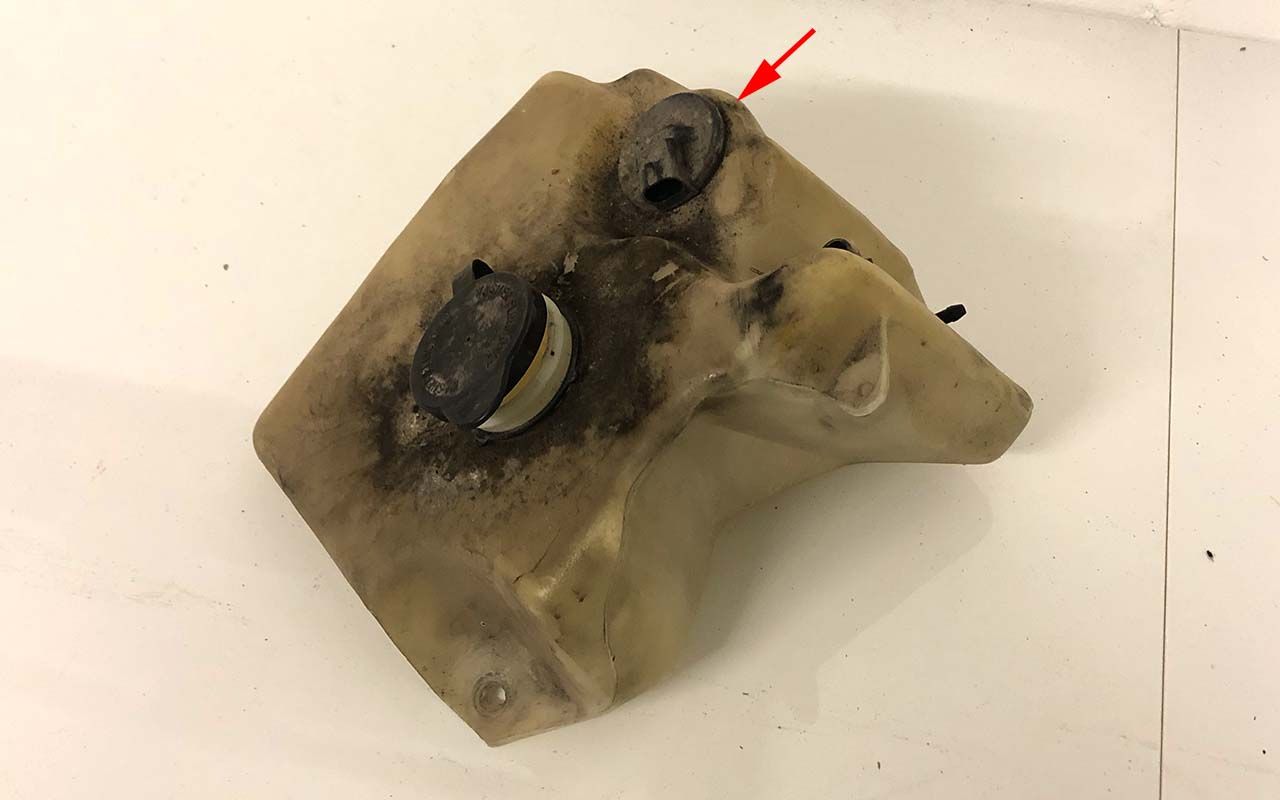
One small update: the DIC has a sensor input for the washer fluid bottle. If the washer fluid is low the sensor will close electrically (red arrow). Unfortunately the digital washer bottle I have is not really a beauty.

Thread Starter
Member
iTrader: (1)
Joined: Nov 2013
Posts: 443
Likes: 26
From: Switzerland
Car: Red 1991 Firebird with digital dash
Engine: L03 V8 TBI
Transmission: 700 R4
Axle/Gears: 2.73
Re: GTA digital dash swap - doing it the hard way - pic heavy
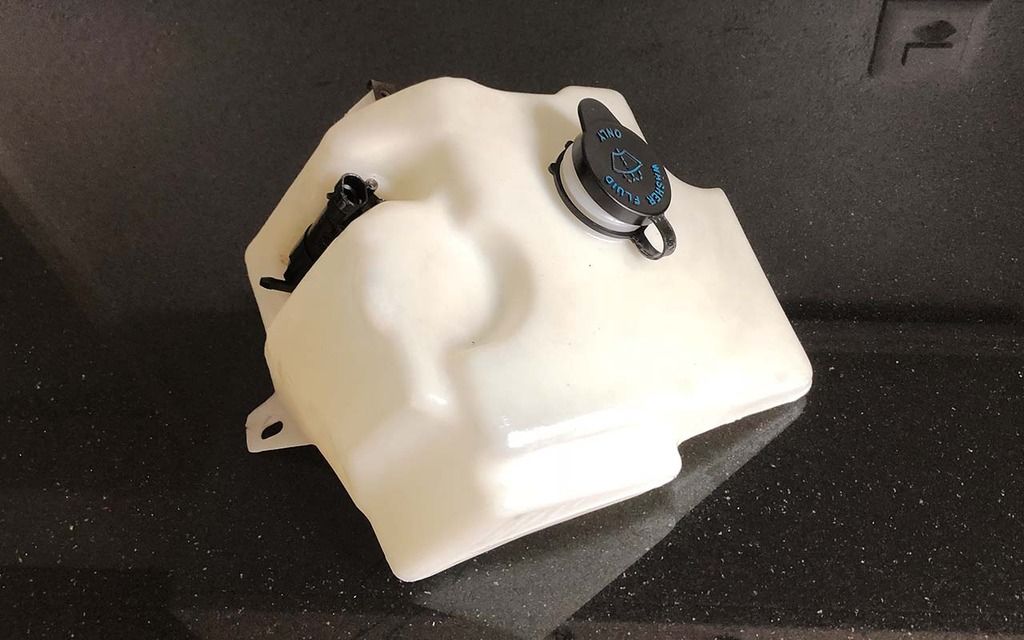
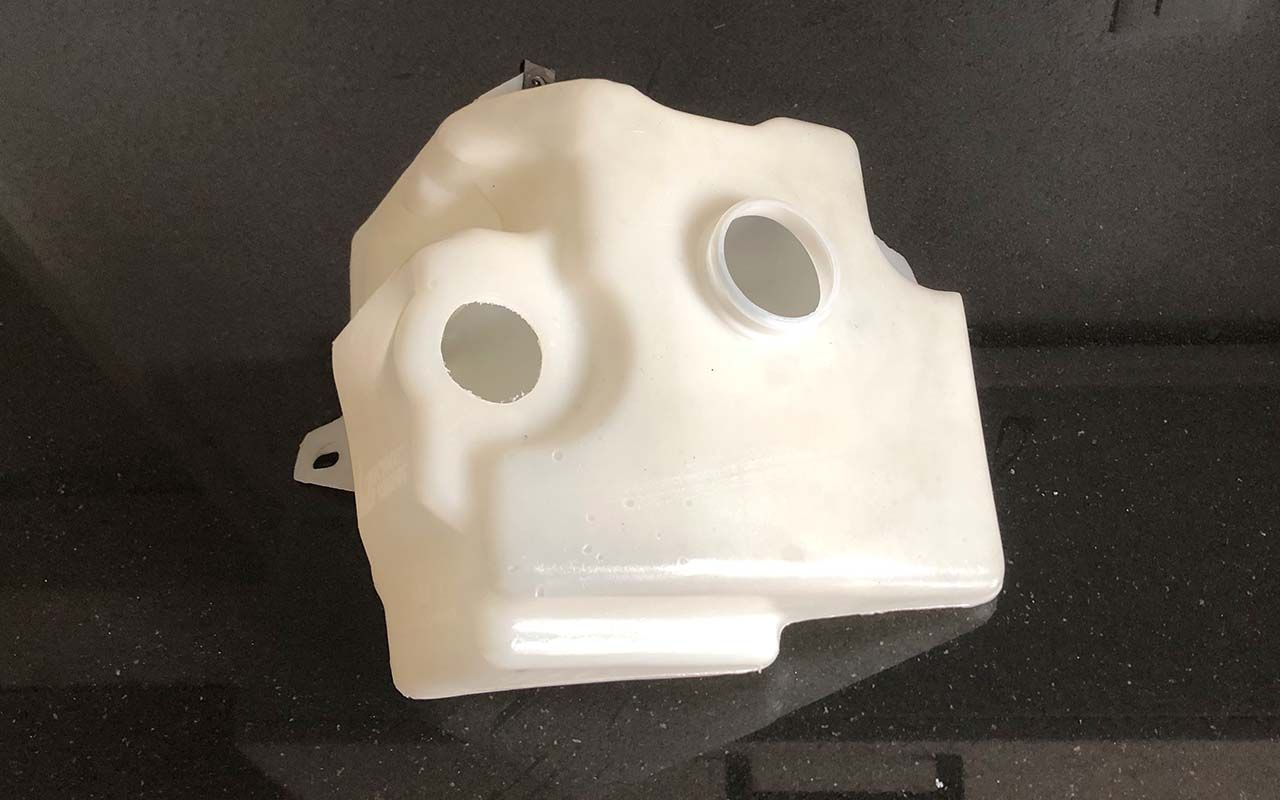
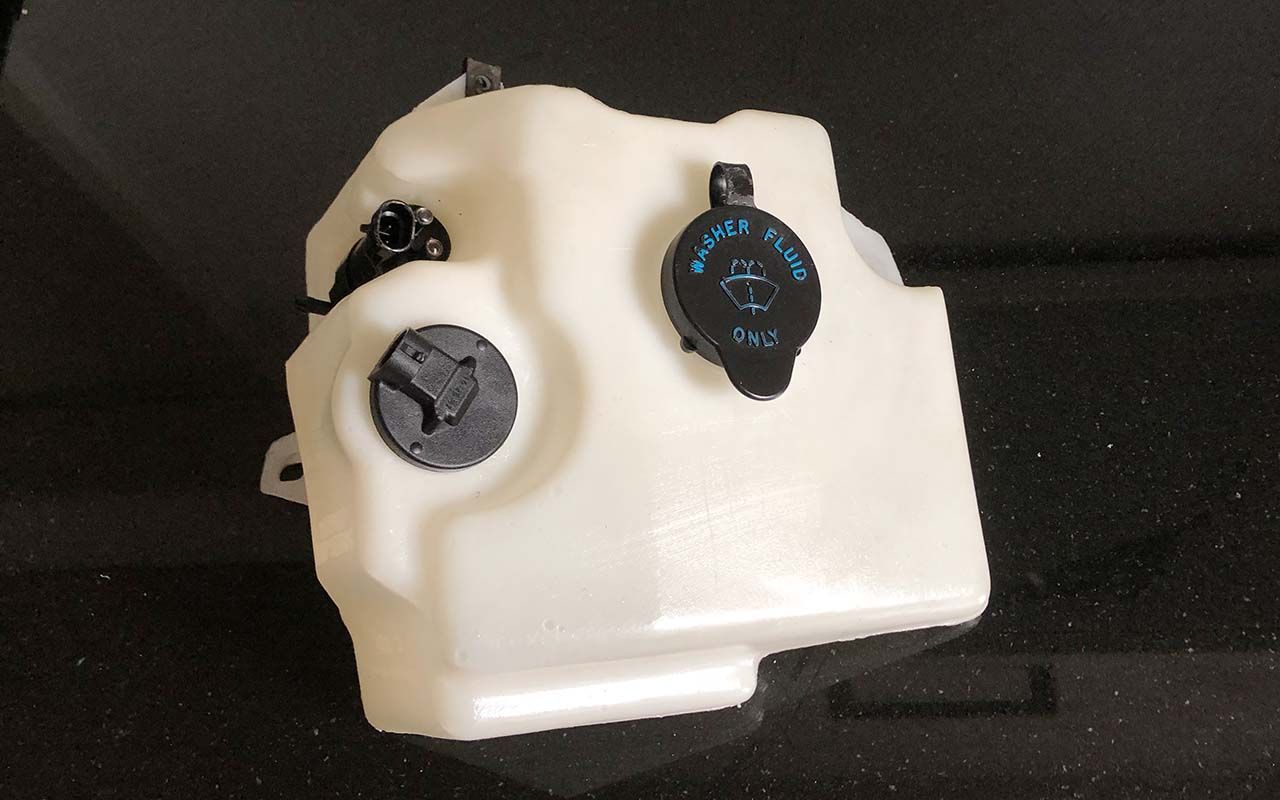
So I decided that my standard washer bottle looks better. I removed the sensor from the digital washer bottle, which takes a lot of force. Then I grabbed a box cutter and cut a 1.5 inch hole in my standard washer bottle.


Thread Starter
Member
iTrader: (1)
Joined: Nov 2013
Posts: 443
Likes: 26
From: Switzerland
Car: Red 1991 Firebird with digital dash
Engine: L03 V8 TBI
Transmission: 700 R4
Axle/Gears: 2.73
Re: GTA digital dash swap - doing it the hard way - pic heavy
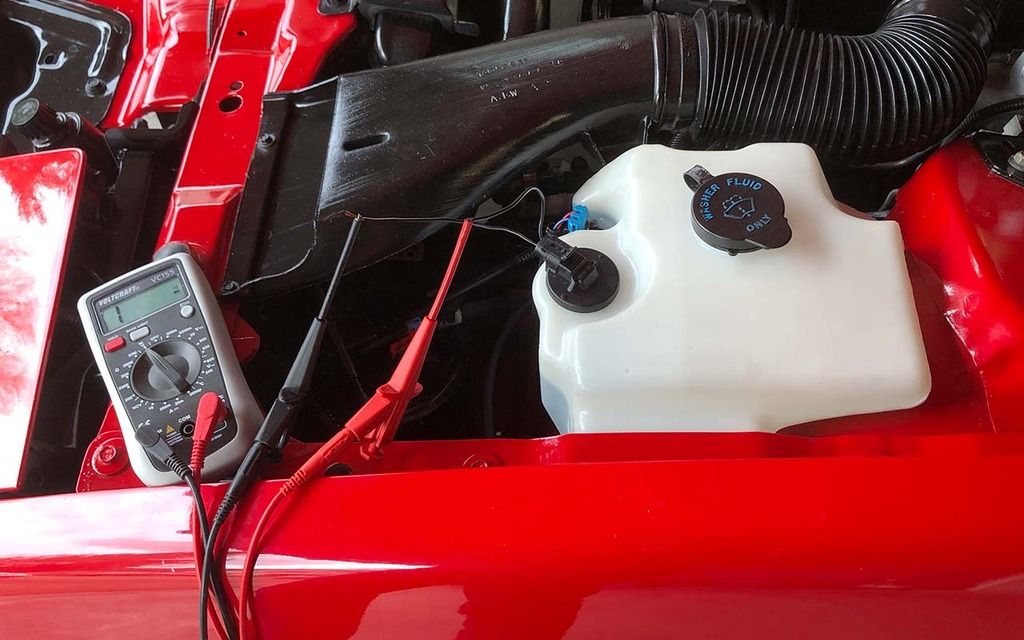
And voil�, an upgraded washer fluid bottle! Testing confirmed that the sensor is working.


Joined: Sep 1999
Posts: 4,353
Likes: 308
From: NJ
Car: 92 Firebird
Engine: 4.8 LR4
Transmission: T56
Axle/Gears: 3.45 9 Bolt
Re: GTA digital dash swap - doing it the hard way - pic heavy
I was thinking the same too, I would rather put a new washer bottle in my car. Looks pretty good
Thread Starter
Member
iTrader: (1)
Joined: Nov 2013
Posts: 443
Likes: 26
From: Switzerland
Car: Red 1991 Firebird with digital dash
Engine: L03 V8 TBI
Transmission: 700 R4
Axle/Gears: 2.73
Thread Starter
Member
iTrader: (1)
Joined: Nov 2013
Posts: 443
Likes: 26
From: Switzerland
Car: Red 1991 Firebird with digital dash
Engine: L03 V8 TBI
Transmission: 700 R4
Axle/Gears: 2.73
Re: GTA digital dash swap - doing it the hard way - pic heavy
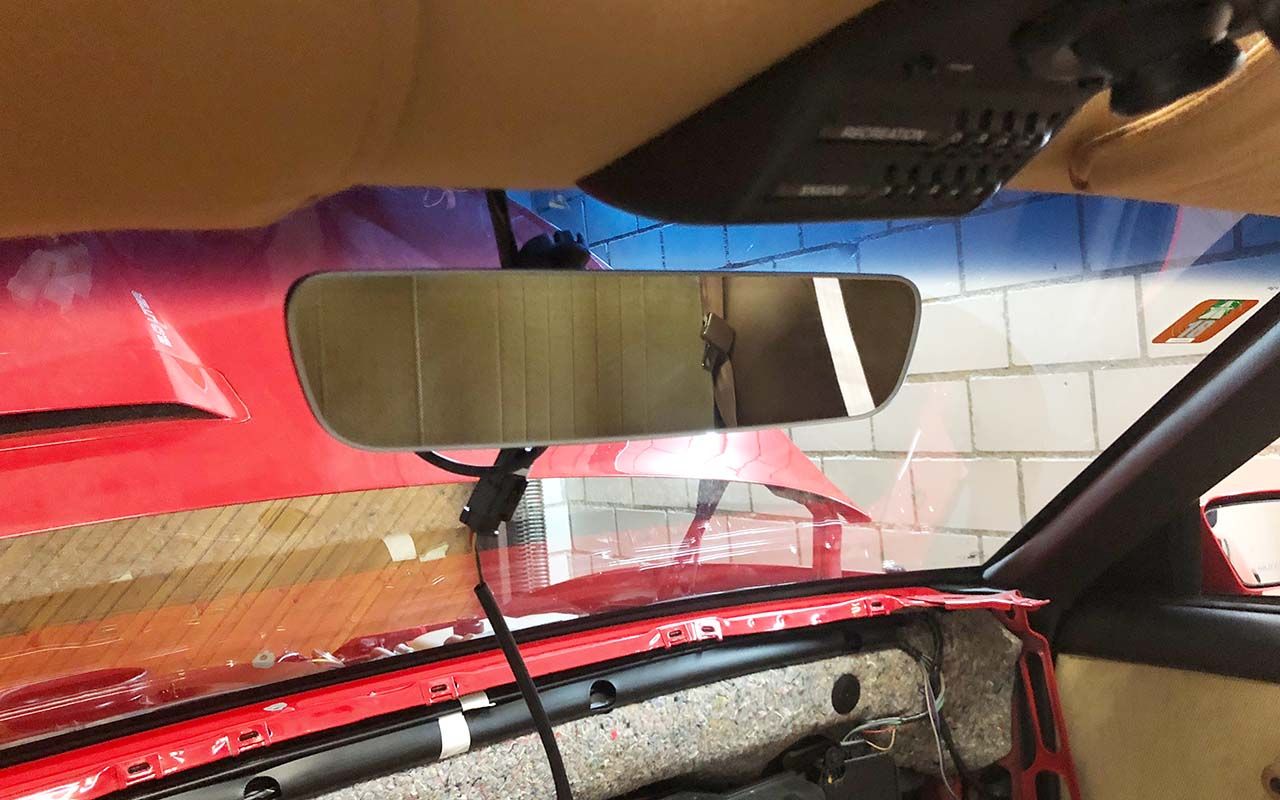
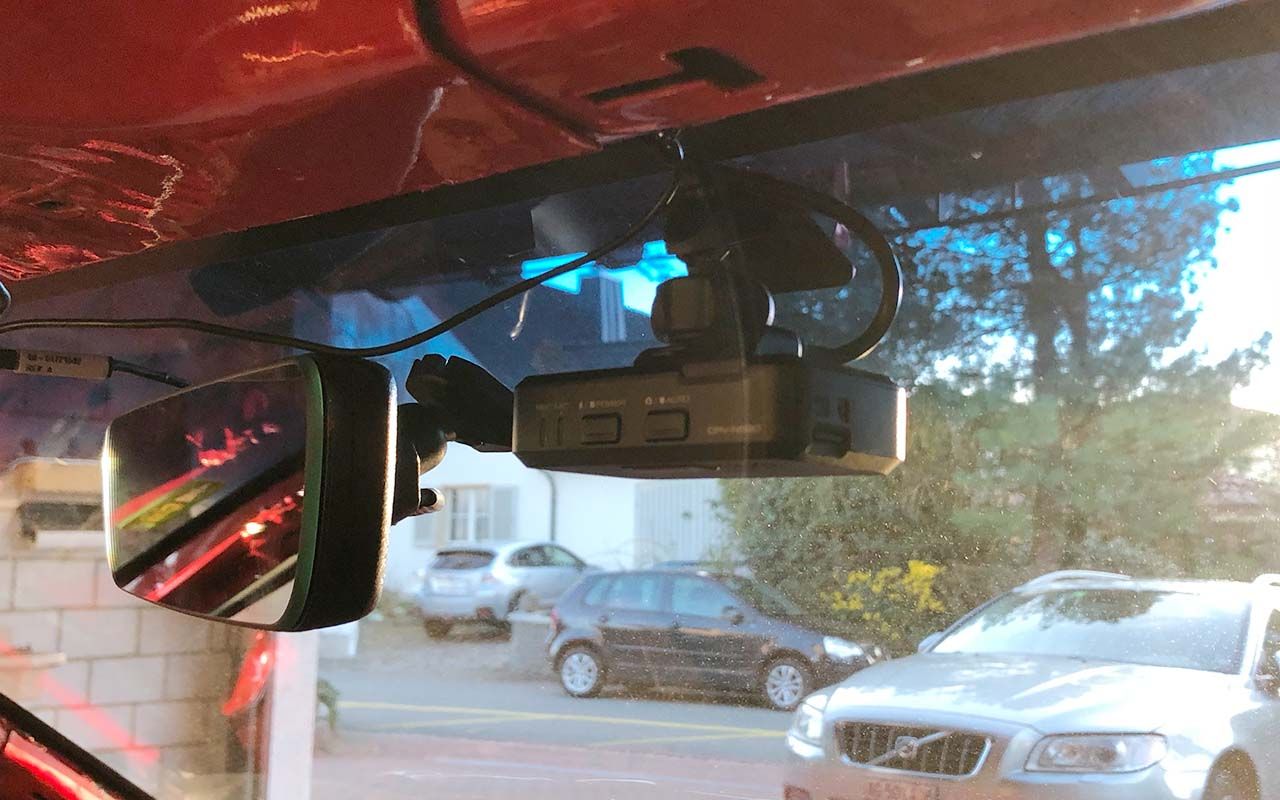
Just a little side track: I got myself a new rear view mirror: the Gentex Series 8 Frameless Auto-Dimming Mirror with Homelink (50-genk80a)
http://mito-auto.com/index.php?optio..._category_id=1
While I'm struggling with integrating a dash from an 88 Firebird into a 91 Firebird - literally 3-4 years apart, even in the same generation! - nothing really matches well and everything has to be made to fit. So it was a real surprise to find that mirror (as of 2018) is a direct drop in!!!!
Sorry for the crappy picture, this is the GM attachment plate on the windshield. I just had to add the new mirror and it sits perfectly, how cool is that?


Joined: Sep 1999
Posts: 4,353
Likes: 308
From: NJ
Car: 92 Firebird
Engine: 4.8 LR4
Transmission: T56
Axle/Gears: 3.45 9 Bolt
Re: GTA digital dash swap - doing it the hard way - pic heavy
Just a little side track: I got myself a new rear view mirror: the Gentex Series 8 Frameless Auto-Dimming Mirror with Homelink (50-genk80a)
http://mito-auto.com/index.php?optio..._category_id=1
While I'm struggling with integrating a dash from an 88 Firebird into a 91 Firebird - literally 3-4 years apart, even in the same generation! - nothing really matches well and everything has to be made to fit. So it was a real surprise to find that mirror (as of 2018) is a direct drop in!!!!
Sorry for the crappy picture, this is the GM attachment plate on the windshield. I just had to add the new mirror and it sits perfectly, how cool is that?
http://mito-auto.com/index.php?optio..._category_id=1
While I'm struggling with integrating a dash from an 88 Firebird into a 91 Firebird - literally 3-4 years apart, even in the same generation! - nothing really matches well and everything has to be made to fit. So it was a real surprise to find that mirror (as of 2018) is a direct drop in!!!!
Sorry for the crappy picture, this is the GM attachment plate on the windshield. I just had to add the new mirror and it sits perfectly, how cool is that?

Thread Starter
Member
iTrader: (1)
Joined: Nov 2013
Posts: 443
Likes: 26
From: Switzerland
Car: Red 1991 Firebird with digital dash
Engine: L03 V8 TBI
Transmission: 700 R4
Axle/Gears: 2.73
Re: GTA digital dash swap - doing it the hard way - pic heavy
Thread Starter
Member
iTrader: (1)
Joined: Nov 2013
Posts: 443
Likes: 26
From: Switzerland
Car: Red 1991 Firebird with digital dash
Engine: L03 V8 TBI
Transmission: 700 R4
Axle/Gears: 2.73
Re: GTA digital dash swap - doing it the hard way - pic heavy
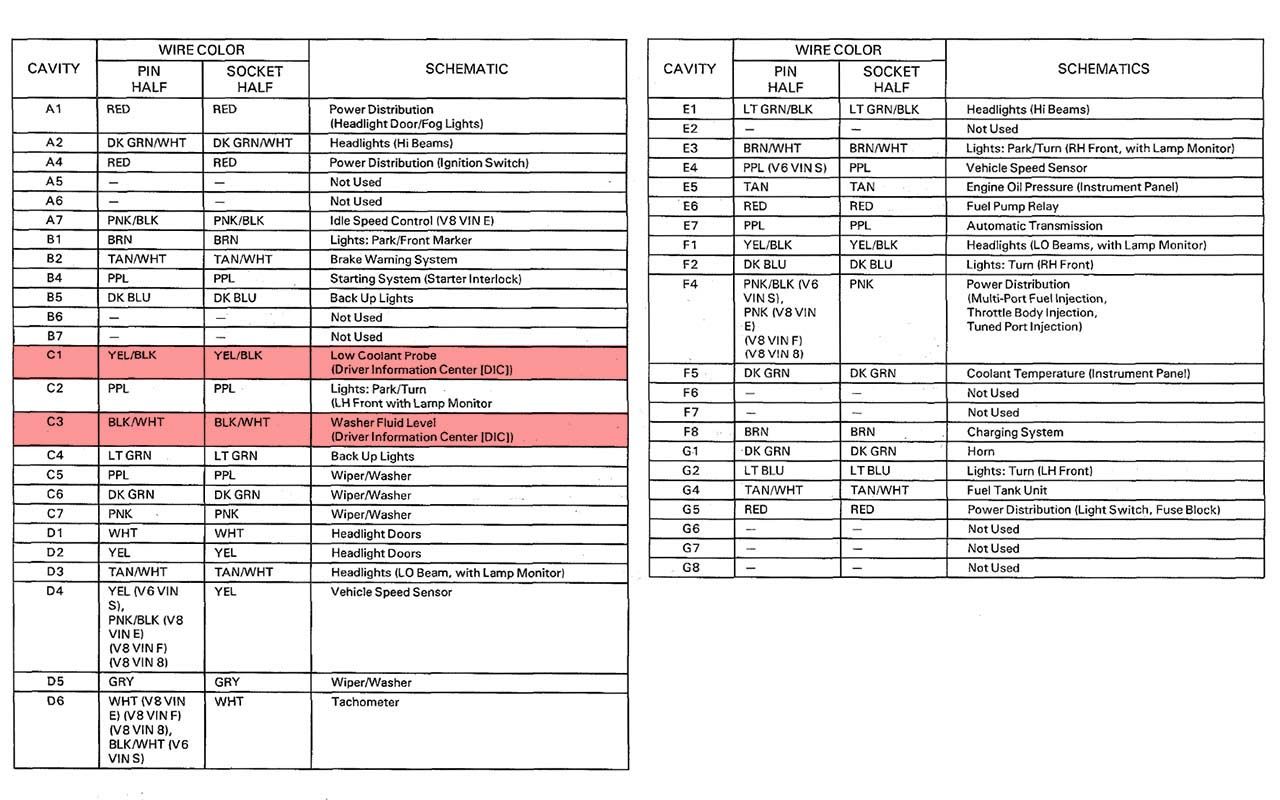
Today I decided to wire up the washer fluid sensor. The information from that probe needs to go to the DIC. So the wire must pass the firewall. The 1988 service manual shows the routing through that large bulk connector C100 (LH part of the cowl) on pin C3.


Thread Starter
Member
iTrader: (1)
Joined: Nov 2013
Posts: 443
Likes: 26
From: Switzerland
Car: Red 1991 Firebird with digital dash
Engine: L03 V8 TBI
Transmission: 700 R4
Axle/Gears: 2.73
Re: GTA digital dash swap - doing it the hard way - pic heavy
Unfortunately there are no unassigned pins in the 1991 version. Well there are, but I mean pins that are wired and not just naked.

Last edited by Cehbra; Mar 28, 2018 at 11:04 AM.
Thread Starter
Member
iTrader: (1)
Joined: Nov 2013
Posts: 443
Likes: 26
From: Switzerland
Car: Red 1991 Firebird with digital dash
Engine: L03 V8 TBI
Transmission: 700 R4
Axle/Gears: 2.73
Re: GTA digital dash swap - doing it the hard way - pic heavy
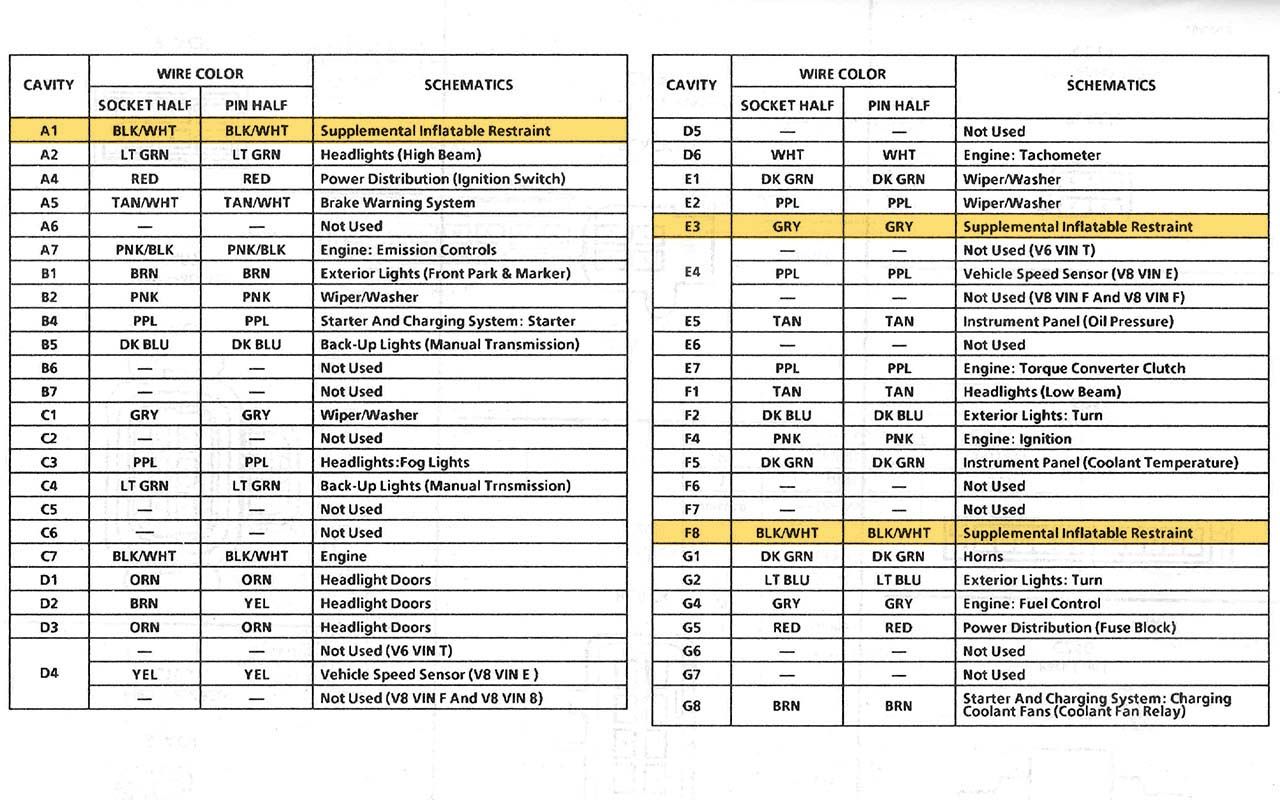
One option could be to get some Metri-Pack pins and fill the holes. But I settled for a different approach. As I anyway plan to delete the airbag (SIR system) I get three spare pins to work with. Here is my plan:
Conveniently A1 and E3 go to the SIR forward discriminating sensor which is behind the front bumper, close to the washer bottle. So wiring this was easy. I still need to locate the F8 wires to connect the cowl induction line.
- A1: washer fluid sensor to DIC
- E3: low coolant probe to DIC
- F8: cowl induction (WOT sensing) to tach (shift light section)
Conveniently A1 and E3 go to the SIR forward discriminating sensor which is behind the front bumper, close to the washer bottle. So wiring this was easy. I still need to locate the F8 wires to connect the cowl induction line.

Last edited by Cehbra; Mar 29, 2018 at 01:31 AM.
Thread Starter
Member
iTrader: (1)
Joined: Nov 2013
Posts: 443
Likes: 26
From: Switzerland
Car: Red 1991 Firebird with digital dash
Engine: L03 V8 TBI
Transmission: 700 R4
Axle/Gears: 2.73
Re: GTA digital dash swap - doing it the hard way - pic heavy
I got out all the airbag stuff, just the connectors are still in the car and these will come out shortly. Anyone interested in the modules? Just shoot me a pm.

Thread Starter
Member
iTrader: (1)
Joined: Nov 2013
Posts: 443
Likes: 26
From: Switzerland
Car: Red 1991 Firebird with digital dash
Engine: L03 V8 TBI
Transmission: 700 R4
Axle/Gears: 2.73
Re: GTA digital dash swap - doing it the hard way - pic heavy
I need a low coolant sensor, but I don't know the GM part number. Anyone?
Joined: Sep 1999
Posts: 4,353
Likes: 308
From: NJ
Car: 92 Firebird
Engine: 4.8 LR4
Transmission: T56
Axle/Gears: 3.45 9 Bolt
Re: GTA digital dash swap - doing it the hard way - pic heavy
So you removed the SIR just because you didn't have the packard pins to put in the C100 connector?
Are you sure removing the SIR system won't screw you over if you get into an accident over there? I know here in the U.S.A. if they find out you modify the SIR the insurance company could potentially deny any claims you put in.
I can get the PN for the low coolant sensor when I get home, from the GM parts book, but I think you may have a hard time finding a new one. I looked in the CD I have that has all the part pages scanned, and it is not listed in there, I will have to go to the paper manual. I will definitely forget though, so if you shoot me a PM after 6 EST I can get the book out.
Thread Starter
Member
iTrader: (1)
Joined: Nov 2013
Posts: 443
Likes: 26
From: Switzerland
Car: Red 1991 Firebird with digital dash
Engine: L03 V8 TBI
Transmission: 700 R4
Axle/Gears: 2.73
Re: GTA digital dash swap - doing it the hard way - pic heavy
So you removed the SIR just because you didn't have the packard pins to put in the C100 connector?
Are you sure removing the SIR system won't screw you over if you get into an accident over there? I know here in the U.S.A. if they find out you modify the SIR the insurance company could potentially deny any claims you put in.
I can get the PN for the low coolant sensor when I get home, from the GM parts book, but I think you may have a hard time finding a new one. I looked in the CD I have that has all the part pages scanned, and it is not listed in there, I will have to go to the paper manual. I will definitely forget though, so if you shoot me a PM after 6 EST I can get the book out.
Are you sure removing the SIR system won't screw you over if you get into an accident over there? I know here in the U.S.A. if they find out you modify the SIR the insurance company could potentially deny any claims you put in.
I can get the PN for the low coolant sensor when I get home, from the GM parts book, but I think you may have a hard time finding a new one. I looked in the CD I have that has all the part pages scanned, and it is not listed in there, I will have to go to the paper manual. I will definitely forget though, so if you shoot me a PM after 6 EST I can get the book out.
I checked with my insurance company and they stated that it's only supplemental and not relevant in an insurance claim. I had to go to inspection twice already and the steering wheel was never a problem. So I thought I might as well remove SIR.
Thanks for the offer about the low coolant sensor PN, pm sent.
Joined: Sep 1999
Posts: 4,353
Likes: 308
From: NJ
Car: 92 Firebird
Engine: 4.8 LR4
Transmission: T56
Axle/Gears: 3.45 9 Bolt
Re: GTA digital dash swap - doing it the hard way - pic heavy
Oh ok. Not usually recommended to remove stuff like that, just a warning to others.
Joined: Sep 1999
Posts: 4,353
Likes: 308
From: NJ
Car: 92 Firebird
Engine: 4.8 LR4
Transmission: T56
Axle/Gears: 3.45 9 Bolt
Re: GTA digital dash swap - doing it the hard way - pic heavy
Unfortunately, there are three part numbers for that sensor, but I think it is 22071516
For some reason I am missing the pages that contain the illustration in the book, so I attached the other page
For some reason I am missing the pages that contain the illustration in the book, so I attached the other page
Thread Starter
Member
iTrader: (1)
Joined: Nov 2013
Posts: 443
Likes: 26
From: Switzerland
Car: Red 1991 Firebird with digital dash
Engine: L03 V8 TBI
Transmission: 700 R4
Axle/Gears: 2.73
Re: GTA digital dash swap - doing it the hard way - pic heavy
Thank you scooter!
That seems to be the washer fluid sensor though, not low coolant. Would you mind having another look at the pn?
That seems to be the washer fluid sensor though, not low coolant. Would you mind having another look at the pn?
Joined: Sep 1999
Posts: 4,353
Likes: 308
From: NJ
Car: 92 Firebird
Engine: 4.8 LR4
Transmission: T56
Axle/Gears: 3.45 9 Bolt
Thread Starter
Member
iTrader: (1)
Joined: Nov 2013
Posts: 443
Likes: 26
From: Switzerland
Car: Red 1991 Firebird with digital dash
Engine: L03 V8 TBI
Transmission: 700 R4
Axle/Gears: 2.73
Re: GTA digital dash swap - doing it the hard way - pic heavy
The 1988 Firebird Service Manual doesn�t show a part number for the sensor. I found a part with the GM #3055285 that looks similar to the picture in the manual. Can you confirm?
Joined: Sep 1999
Posts: 4,353
Likes: 308
From: NJ
Car: 92 Firebird
Engine: 4.8 LR4
Transmission: T56
Axle/Gears: 3.45 9 Bolt
Re: GTA digital dash swap - doing it the hard way - pic heavy
I remembered to look last night, but then like 20 seconds later I forgot. 
I will set another reminder for myself. I looked through the CD I have, while at work, and it wasn't in there either, so I have to go to the book again.
I will set another reminder for myself. I looked through the CD I have, while at work, and it wasn't in there either, so I have to go to the book again.
Thread Starter
Member
iTrader: (1)
Joined: Nov 2013
Posts: 443
Likes: 26
From: Switzerland
Car: Red 1991 Firebird with digital dash
Engine: L03 V8 TBI
Transmission: 700 R4
Axle/Gears: 2.73
Re: GTA digital dash swap - doing it the hard way - pic heavy
Thread Starter
Member
iTrader: (1)
Joined: Nov 2013
Posts: 443
Likes: 26
From: Switzerland
Car: Red 1991 Firebird with digital dash
Engine: L03 V8 TBI
Transmission: 700 R4
Axle/Gears: 2.73
Re: GTA digital dash swap - doing it the hard way - pic heavy
I am planning in refurbishing my digital dash and would be extremely grateful if you could provide me with a BOQ of all the led�s that I will need to replace the normal bulbs including the lights in the buttons and DIC.
I studied electronics so I guess I should be fit for the job.
thanks
I studied electronics so I guess I should be fit for the job.
thanks
There are two types of LEDs needed:
- the small wedge based T5 (same as 74) for the indicator lights
- the larger wedge based T10 (same as 194) for the I/P lighting
Instrument panel (I/P) LEDs:
- 4x T10
- 7x T5
- 1x T10 / GE 882 (inside I/P, see below)
DIC LEDs
- 2x T10
You might want to consider colored T5 LEDs behind the indicator lights.
In some digital dashes there was a GE 882 bulb behind the pressure gages, and some had an ordinary 194. I'm not sure what that bulb is for as it doesn't seem to light up any of the sections. In case it is meant for the alternator light it probably should stay an incandescent bulb.
There are two button panels in total, one for the DIC (Sys Chk) and one with four buttons next to the odometer. Both have a soldered bulb that is difficult to change. I guess it is a T5 or even smaller. I haven't gotten to those two as I was afraid I'd break the plastic. Guess you'll have to find out yourself!

Joined: Sep 1999
Posts: 4,353
Likes: 308
From: NJ
Car: 92 Firebird
Engine: 4.8 LR4
Transmission: T56
Axle/Gears: 3.45 9 Bolt
Re: GTA digital dash swap - doing it the hard way - pic heavy
Holy crap, I found it, finally. It took me well over an hour. I wound up having to go line-by-line in the book to find it. That is the correct number. Once I found the RPO number, UW1, it helped.
Thread Starter
Member
iTrader: (1)
Joined: Nov 2013
Posts: 443
Likes: 26
From: Switzerland
Car: Red 1991 Firebird with digital dash
Engine: L03 V8 TBI
Transmission: 700 R4
Axle/Gears: 2.73
Re: GTA digital dash swap - doing it the hard way - pic heavy
Perfect! Awesome! Thanks a thousand times!!!! Really appreciate it that you took the time! Thanks a lot Scooter!
Joined: Sep 1999
Posts: 4,353
Likes: 308
From: NJ
Car: 92 Firebird
Engine: 4.8 LR4
Transmission: T56
Axle/Gears: 3.45 9 Bolt
Re: GTA digital dash swap - doing it the hard way - pic heavy
Hopefully you will reciprocate when I ask you for one of those chips to roll the mileage back on the digital dash.
On a postitive note, it's only $3.40
On a postitive note, it's only $3.40
Last edited by scooter; Apr 4, 2018 at 01:09 PM.
Thread Starter
Member
iTrader: (1)
Joined: Nov 2013
Posts: 443
Likes: 26
From: Switzerland
Car: Red 1991 Firebird with digital dash
Engine: L03 V8 TBI
Transmission: 700 R4
Axle/Gears: 2.73


Thread Starter
Member
iTrader: (1)
Joined: Nov 2013
Posts: 443
Likes: 26
From: Switzerland
Car: Red 1991 Firebird with digital dash
Engine: L03 V8 TBI
Transmission: 700 R4
Axle/Gears: 2.73
Re: GTA digital dash swap - doing it the hard way - pic heavy
There is this crazy guy - JeremyE - who actually did a GTA digital dash swap into a Camaro, see here:
https://www.thirdgen.org/forums/auto...-89-rs-v8.html
On the other hand, the Berlinettas had an extremely cool digital dash as well. Check out the site by John in RI, a TGO member here:
http://berlinetta.info
https://www.thirdgen.org/forums/auto...-89-rs-v8.html
On the other hand, the Berlinettas had an extremely cool digital dash as well. Check out the site by John in RI, a TGO member here:
http://berlinetta.info
Thread Starter
Member
iTrader: (1)
Joined: Nov 2013
Posts: 443
Likes: 26
From: Switzerland
Car: Red 1991 Firebird with digital dash
Engine: L03 V8 TBI
Transmission: 700 R4
Axle/Gears: 2.73
Re: GTA digital dash swap - doing it the hard way - pic heavy
Progress is not as fast as I hoped. At least I got some of the peripherals wired up:
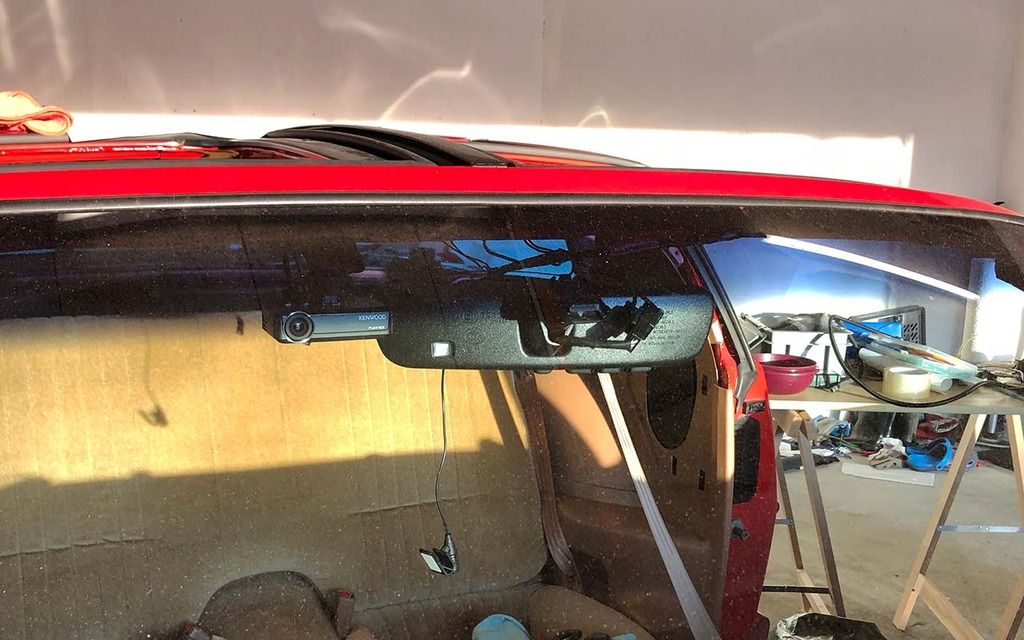
- door ajar sensors
- low washer fluid sensor
- low coolant sensor (most of it)
- dash cam
- rearview mirror with homelink
- DAB antenna


Thread Starter
Member
iTrader: (1)
Joined: Nov 2013
Posts: 443
Likes: 26
From: Switzerland
Car: Red 1991 Firebird with digital dash
Engine: L03 V8 TBI
Transmission: 700 R4
Axle/Gears: 2.73
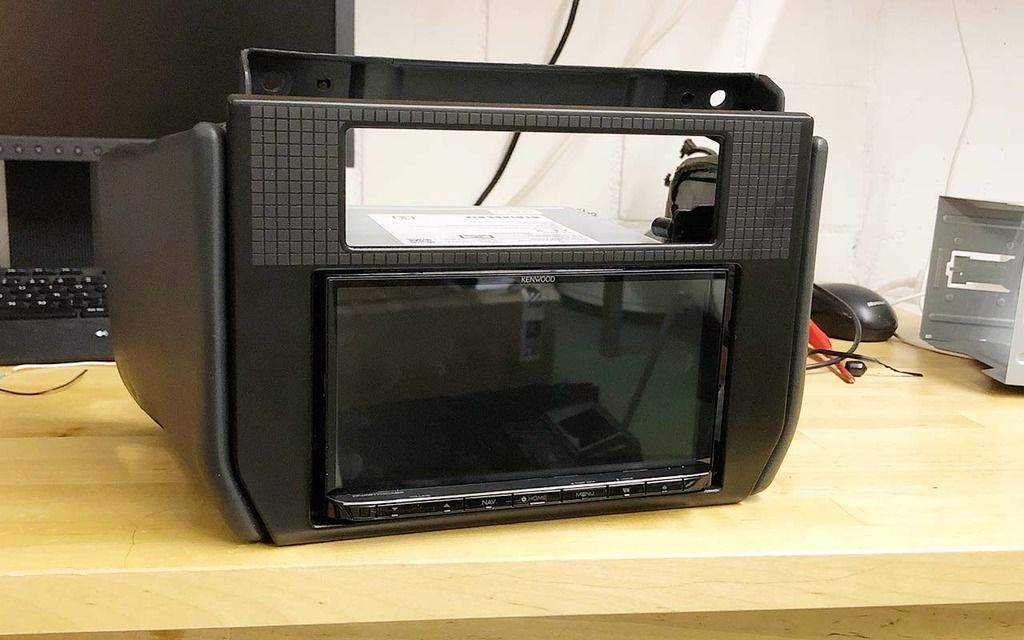
Re: GTA digital dash swap - doing it the hard way - pic heavy
I'm going to put in a new double din stereo. Now I need to find a good way to mount that thing in the radio pod.