

JamesC
Moderator
close


Apr 15, 2026
I recently discovered a pond on the pass side floor board. After researching both on this site and in my Chilton's and 85 Camaro Shop Manual, I've come to believe that we who own the earlier cars are fortunate where replacing the heater core is concerned. All can be accomplished from beneath the dash. The horrible top screw that is so widely complained about was, frankly, a breeze. Note that you can insert the rachet (intermediate sized-extension and 7mm socket) between the dash and heater box; note too that you can insert your hand up over the box to guide the rachet/socket onto the screw head (to make reinsertion of the screw easier, I applied a bit of auto shop sticky to the socket, which kept the screw in place so that I could again guide it into place). Ten-minute job to remove and replace all four screws. The whole core replacement was probably an hour and a half or so.
JamesC
JamesC


Senior Member
yeah the screws and cover i admit was easy
getting the core into the braket and getting it to posisiton itself back into the box was the hard part...
getting the core into the braket and getting it to posisiton itself back into the box was the hard part...


Why exactly are the earlier cars easier?
JamesC
Moderator
close
Apr 15, 2026
As I recall, the later cars required dash or partial dash removal.
JamesC
JamesC

I replaced a heater core on a '87 IROC. Exact same way as my '84 T/A. Its so easy to change a heater core on a 3rd-gen compared to a 1st or 2nd-gen! 

I just replaced mine about 5 min. ago. easy! the tech artical is not that helpful,
all you need to do is remove the hoses (duh)
remove the lower kick panel (if equipped)
remove the lower dash panel (on the firebirds they often say "performance suspention")
remove the cruise module (if equipped)
now all of the screws are easy to reach. the top screw can be seen now just look strait back in opening the cruise module was covering and that's it a strait ext. with a 7mm socket (1/4 drive seems to work well)
the rest is plain as day. just take your time reinstalling the heater core (getting those tubes through the firewall takes a little wiggling but, don't force it)
the picture above is a perfect one of the screw location, I have a tpi and I did not move the ecm only the cruise module.
all you need to do is remove the hoses (duh)
remove the lower kick panel (if equipped)
remove the lower dash panel (on the firebirds they often say "performance suspention")
remove the cruise module (if equipped)
now all of the screws are easy to reach. the top screw can be seen now just look strait back in opening the cruise module was covering and that's it a strait ext. with a 7mm socket (1/4 drive seems to work well)
the rest is plain as day. just take your time reinstalling the heater core (getting those tubes through the firewall takes a little wiggling but, don't force it)
the picture above is a perfect one of the screw location, I have a tpi and I did not move the ecm only the cruise module.

Supreme Member
Angelis83LT
Supreme Member
close
Apr 9, 2013
- Join DateMar 2005
- LocationSpicer, MN
- Posts:1,121
- iTrader Positive Feedback0
- iTrader Feedback Score(0)
- Car'83 Berli, '84 Berli, '84 Z28 HO
- EngineL69, LG4, L69
- TransmissionTH700-R4, TH700-R4, T-5
- Axle/Gears3.08, 3.08, 3.73 Posi
- Likes:0
- Liked:0 Times in 0 Posts
the firebirds and the camaros may be a little different.. Mine did not have the cruise modual there, and the heating duct was touching the heater box preventing the socket to sit like that. else yes it would have been a snap... I had to do all the nice removal stuff. but it really does not take that long even doing it that way... takes an extra 15 to 20 minutes. Plus it gets you a little knowledgable about how your dash goes on in case you ever want to replace it with say a 4th gen dash or something

Junior Member
ok......fisrt of all I didn't bother in checking here first on removing and reinstalling heater core.....so I'm learning the hard way.....I've just broke the new heater core trying to installing.do you really need brackets in box?.....also I broke cover but I've glue most of it back. S o please help me so tips and ideas please?
Supreme Member
Angelis83LT
Supreme Member
close
Apr 9, 2013
- Join DateMar 2005
- LocationSpicer, MN
- Posts:1,121
- iTrader Positive Feedback0
- iTrader Feedback Score(0)
- Car'83 Berli, '84 Berli, '84 Z28 HO
- EngineL69, LG4, L69
- TransmissionTH700-R4, TH700-R4, T-5
- Axle/Gears3.08, 3.08, 3.73 Posi
- Likes:0
- Liked:0 Times in 0 Posts
Go get yourself a Haynes Manual from a parts place and it will tell you right down to the last nut or screw u have to remove.. the only brack in the heater box is a metal traingle that is part of the vac door system.. you do not need it.. but it is needed if you want the vents to work like they should... the only other part in there is the part the heater core sets on... you need that too.. one thing to note is to make sure the tubes are the same distance apart on the new one vs the old one... my new one was about 1/2" to close together so I had to very carefully bend one tube into place.

Member
Quote:
Originally posted by JamesC
I recently discovered a pond on the pass side floor board. After researching both on this site and in my Chilton's and 85 Camaro Shop Manual, I've come to believe that we who own the earlier cars are fortunate where replacing the heater core is concerned. All can be accomplished from beneath the dash. The horrible top screw that is so widely complained about was, frankly, a breeze. Note that you can insert the rachet (intermediate sized-extension and 7mm socket) between the dash and heater box; note too that you can insert your hand up over the box to guide the rachet/socket onto the screw head (to make reinsertion of the screw easier, I applied a bit of auto shop sticky to the socket, which kept the screw in place so that I could again guide it into place). Ten-minute job to remove and replace all four screws. The whole core replacement was probably an hour and a half or so.
JamesC
i was prepared to take the dash apart like it says in the haynes manual but after reading your post i followed your directions and it took 2 hrs. thanks.Originally posted by JamesC
I recently discovered a pond on the pass side floor board. After researching both on this site and in my Chilton's and 85 Camaro Shop Manual, I've come to believe that we who own the earlier cars are fortunate where replacing the heater core is concerned. All can be accomplished from beneath the dash. The horrible top screw that is so widely complained about was, frankly, a breeze. Note that you can insert the rachet (intermediate sized-extension and 7mm socket) between the dash and heater box; note too that you can insert your hand up over the box to guide the rachet/socket onto the screw head (to make reinsertion of the screw easier, I applied a bit of auto shop sticky to the socket, which kept the screw in place so that I could again guide it into place). Ten-minute job to remove and replace all four screws. The whole core replacement was probably an hour and a half or so.
JamesC
only thing i can add is after removing the first screw of the five take an extra socket and use silicone to glue the screw to the socket. while you are doing the other stuff it will have time to dry. that will make putting in that top screw easier.
Supreme Member
Angelis83LT
Supreme Member
close
Apr 9, 2013
- Join DateMar 2005
- LocationSpicer, MN
- Posts:1,121
- iTrader Positive Feedback0
- iTrader Feedback Score(0)
- Car'83 Berli, '84 Berli, '84 Z28 HO
- EngineL69, LG4, L69
- TransmissionTH700-R4, TH700-R4, T-5
- Axle/Gears3.08, 3.08, 3.73 Posi
- Likes:0
- Liked:0 Times in 0 Posts
you know. taking out the dash like it shows in the manual only takes 2 hours... at least if you have the right tools for the job.. nice and quick and easy.

Member
Where did you guys get your replacement heater cores?
I'm thinking of ordering the replacement for my '88 IROC from Classic Industries; any better source?
I'm thinking of ordering the replacement for my '88 IROC from Classic Industries; any better source?
Member
Oh never mind; I just picked up a new core at my local AC Delco store for less than 1/2 the price at Classic...
Supreme Member
Angelis83LT
Supreme Member
close
Apr 9, 2013
- Join DateMar 2005
- LocationSpicer, MN
- Posts:1,121
- iTrader Positive Feedback0
- iTrader Feedback Score(0)
- Car'83 Berli, '84 Berli, '84 Z28 HO
- EngineL69, LG4, L69
- TransmissionTH700-R4, TH700-R4, T-5
- Axle/Gears3.08, 3.08, 3.73 Posi
- Likes:0
- Liked:0 Times in 0 Posts
yea. heater cores are pretty easy to come by at any parts store....
Member
I finally figured out how to get the heater core "assembly" out, after loosening most of the dash. Eventually my Chilton's gave me a better mental image of the setup than my new GM Shop Manual, how about that.
I just got the new core back in and will be instaling the cover tomorrow. Then comes the coolant line hookup and the TB collant bypass.
Since the dash is now pretty much open it's a good time to drop down and connect the wiring for the "new" lighted RVM and the hi-mounted radar detector.
Thanks to all for the helpful tips that got me moving pretty much in the right direction...
I just got the new core back in and will be instaling the cover tomorrow. Then comes the coolant line hookup and the TB collant bypass.
Since the dash is now pretty much open it's a good time to drop down and connect the wiring for the "new" lighted RVM and the hi-mounted radar detector.
Thanks to all for the helpful tips that got me moving pretty much in the right direction...

Junior Member
Used this thread to replace my heater core today. I have one thing to add.
Ya know those little screwdrivers for 1/4" sockets? Take a cheap one........smash the handle with a hammer.......throw whats left in a vise with about 1" in the vise and bend it in a L. Makes an awesome little wrench for getting in little places you can't get into.
Thanks!! Kevin
Ya know those little screwdrivers for 1/4" sockets? Take a cheap one........smash the handle with a hammer.......throw whats left in a vise with about 1" in the vise and bend it in a L. Makes an awesome little wrench for getting in little places you can't get into.
Thanks!! Kevin

Junior Member
Your hands may fit up there, but I cut mine up, and diffinately could not get up over the top of the vent passage to the side vents. Also, didn't your car have another piece of plastic to remove before getting the core out?....and can I just stick that core back in the place, allowing the tubes passing through the fire wall to hold it in place? I'm afraid it would rattle around.....

Chevy86 IROC-Z
Supreme Member
close


May 13, 2026
Quote:
JamesC
Sound almost too easy. When I looked up from under the dash board, I thought that it is impossible to get up in there. So is it really that easy to get up in there on my 86 IROC-Z. I really dont want to go through all the cramps and scrapes. But if its possible, I will suck it up and move on with the installation.Originally Posted by JamesC
I recently discovered a pond on the pass side floor board. After researching both on this site and in my Chilton's and 85 Camaro Shop Manual, I've come to believe that we who own the earlier cars are fortunate where replacing the heater core is concerned. All can be accomplished from beneath the dash. The horrible top screw that is so widely complained about was, frankly, a breeze. Note that you can insert the rachet (intermediate sized-extension and 7mm socket) between the dash and heater box; note too that you can insert your hand up over the box to guide the rachet/socket onto the screw head (to make reinsertion of the screw easier, I applied a bit of auto shop sticky to the socket, which kept the screw in place so that I could again guide it into place). Ten-minute job to remove and replace all four screws. The whole core replacement was probably an hour and a half or so.JamesC

Supreme Member
I just did mine, was a 3 hour job and I was working fast. Alldata says it pays 3.1hrs. on an 89 iroc I had to pull the dash, instrument cluster, center console and pull the dash back to get at it also youll need a 7mm universal. Word to the wise I bought an aftermarket heater core and it was aluminum with "swivel tubes" and it did not fit, the brackets that bolt to it wont fit and it comes with some foam **** that I dont know what you do with it. Went and got one from ac delco store, the correct one (is brass first off and fixed tubes) where the tubes go the little tank has a "V" notch in it and the aftermarket is straight across.
Chevy86 IROC-Z
Supreme Member
close
May 13, 2026
Its a pain aint it. It took me about 2 1/2 hours with the passengerside dash pulled out about 5 inches.

Supreme Member
Quote:
I have the one with the swivel tubes you speak of. The brackets don't fit, but they will work. The V-notch bracket isn't used since the new core is flat along there. And the "strap" bracket that used to cover the old brass original unit is more like a fence that stops the new one from sliding past it.Originally Posted by Rayzor32
I just did mine, was a 3 hour job and I was working fast. Alldata says it pays 3.1hrs. on an 89 iroc I had to pull the dash, instrument cluster, center console and pull the dash back to get at it also youll need a 7mm universal. Word to the wise I bought an aftermarket heater core and it was aluminum with "swivel tubes" and it did not fit, the brackets that bolt to it wont fit and it comes with some foam **** that I dont know what you do with it. Went and got one from ac delco store, the correct one (is brass first off and fixed tubes) where the tubes go the little tank has a "V" notch in it and the aftermarket is straight across. However....I found it rather difficult to put the heater core and it's mounting bracket back in under the dash and through those 2 holes into the engine compartment. So I put the heater core in by itself and through the holes. Then added the heater core bracket on behind it. It fit like a glove! The bolt holes lined up flat and flush for the heater core bracket.
So I'd definitely recommend putting the heater core in by itself and then adding the heater core bracket behind it. With the brass original style core though, you'd probably have to bolt all the brackets on first. Although once the heater hoses are attached, I can't see how any heater core could move around under the dash.
Supreme Member
it just seemed too cheesy to me that it wouldn't fit in the old brackets and the foam strip they give you not sure what that was about either, i just bolted my heater core with the brackets to the plastic piece then slipped it in and bolted it down.

Junior Member
I am going to start taking my 92 apart tomorrow. Can anyone tell the differences between the 92 core replacement verses the earlier car? Jim
Chevy86 IROC-Z
Supreme Member
close
May 13, 2026
I dont think there is a major difference. Here is a copy of Rockauto.com


Junior Member
im starting a heater core replacement on my 91 z28 at 8 this morning, overslept had planned on starting at 6, its well over 100 degrees forecasted today, sucks working in the heat, so ibegin at 8 and will let you know how it all goes...
Chevy86 IROC-Z
Supreme Member
close
May 13, 2026
Good luck removing the dashboard and aligning the heater core tubes through the firewall.

Member
So you guys say it's sooooo easy huh? Well, before I jump into it up to my elbows, how do I know for sure that the heater core is bad? I don't see a puddle in the pass side but I do loose coolant from time to time somehow. But, when I switch from off to vent or defrost I get hot air through the vents both on the front of the dash and out the top. For winter this is fine but I don't like hot air on top of hot air in the summer. When I go to vent my cold/warm switch is in cold also. I'm gonna yank the intake off soon to seal it back up so was thinking I could do the heater core at the same time. Whatcha'll think?
Chevy86 IROC-Z
Supreme Member
close
May 13, 2026
Really up to you.
Member
What do you mean really up to me? Weather I want to replace it or not? I want to know if someone thinks it's bad before I do. I really don't want to take out a good core only to find out that it isn't the problem. I see enough of that in my current job, break one thing to fix another.....
Chevy86 IROC-Z
Supreme Member
close
May 13, 2026
Quote:
Kind of confusing the way you explained. But if you believe that it'll work out and benefit you, then do it. There is nothing technical or it doesnt sound like if you need any help pertaining to a problem. It seems like your asking for advice but it is your car and you can do as you please. If it'll stop any hot air on top of hot air (Originally Posted by krazefbird
So you guys say it's sooooo easy huh? Well, before I jump into it up to my elbows, how do I know for sure that the heater core is bad? I don't see a puddle in the pass side but I do loose coolant from time to time somehow. But, when I switch from off to vent or defrost I get hot air through the vents both on the front of the dash and out the top. For winter this is fine but I don't like hot air on top of hot air in the summer. When I go to vent my cold/warm switch is in cold also. I'm gonna yank the intake off soon to seal it back up so was thinking I could do the heater core at the same time. Whatcha'll think?  ), then go for it.
 JamesC
Moderator
close
Apr 15, 2026
If the windshield isn't fogging over and if there's no pool on the pass side floor boards, I doubt the core requires replacement--but giving everything a visual can't hurt. The default setting is defrost, so if that's the situation, you have a vac leak somewhere. Often the vac selector switch is the culprit. Stick your ear to the HAVC. If you hear 'hissing' you've found the leak.
JamesC
JamesC
Chevy86 IROC-Z
Supreme Member
close
May 13, 2026
Another way to test if the vac diapram is still good is by turning on the car for about 10 seconds with the selector on heater and fan off. The turn off the car and wait about 1 minute and push the slider to ac. You should hear the pressure release. If not, then the diaphram is leaking. Not to sure if it's the correct step but if there is no sound of hissing, do the opposite steps to verify if there is a leak or not.
Chevy86 IROC-Z
Supreme Member
close
May 13, 2026
Also IIRC, the issue could be that the check valve in the engine bay may be going bad too In a way that it's not holding the pressure.

Supreme Member
ASE doc
Supreme Member
close
Feb 20, 2024
Ive seen more than a few of these check valves removed because they broke during a repair. The check valve should be close to the back of the intake manifold. A small hard plastic tube connects to it and supplies vacuum to the heater/AC controls. Look for a cracked vacuum line or other leak in the hoses around this check valve. Look for the valve to be missing.
Chevy86 IROC-Z
Supreme Member
close
May 13, 2026
Usually the valve has a t-off which goes to the wirng harness, and the other to the cruise control (if equipt). Another source of issues could be the vacuum ball. My vac ball is located above my brake booster. I dont even know if mine is OEM because most vac ***** are towards the front and can only be seen by peeking up under the bumper (from what I was told).

Member
hahahahahahaha uuuuuhhhhhh uh oh? Reading your comments made me realize yeah, there is NO check valve. I just have the two hoses going from the intake and water pump to the heater core. I do have the hissing noise when going from vent or whichever to defrost. I know my explanations are kinda confusing but I have swapped so much stuff that it takes so long to explain. Basically it's a '68 307 with an edlebrock 600 cfm carb and performer intake. rapid fire plugs, crane fire wires and that's about it. Anything that goes to the computer is pretty much cut off.
Chevy86 IROC-Z
Supreme Member
close
May 13, 2026

Mine took forever but it wasnt getting to it, it was mounting the dang thing back in the box i kept second guessing my hose connections because it was so wierd, so i just packed it back in and put it all thogether, i just moved my hush panel and the ecm out of the way and violla, didnt even use a manual or the tech article its pretty self explanitory, funny thing is thats my second one i replaced in a year
Supreme Member
ASE doc
Supreme Member
close
Feb 20, 2024
If youre going through heater cores, there are two things to consider. First, be sure there is no electrolysis in the cooling system. This can be measured using a volt meter on the heater core body and engine block. Should be 0v.
To eliminate electrolysis, simply attach a length of wire to either the inlet or outlet of the heater core, doesnt matter which(I use a hose clamp to attach it). Run the wire to a good ground. This grounds the heater core, eliminating electrical current passing through it.
Also a sacrificial zink anode can be installed. They are available attached to a radiator cap. Just remove your rad cap and install the anode equipped cap. Its that easy. Also be sure to flush coolant every two years or whenever it becomes cloudy.
To eliminate electrolysis, simply attach a length of wire to either the inlet or outlet of the heater core, doesnt matter which(I use a hose clamp to attach it). Run the wire to a good ground. This grounds the heater core, eliminating electrical current passing through it.
Also a sacrificial zink anode can be installed. They are available attached to a radiator cap. Just remove your rad cap and install the anode equipped cap. Its that easy. Also be sure to flush coolant every two years or whenever it becomes cloudy.
ok well ive never SEEN electolysis in the cooling system personally, i had the factory core, i live in a state where its 115 on a good day, in the shade... the cooling system pumps as hard as it can, ive always had it goin thru the heater core so the coolant has a mini rad...not that it works but still... anyway... ive only seen electolysis on an intake/ heads using different metals. My second core got jacked from the engine bay and broke the tube so i had to get a replacement...which checker likes to give the wrong one so that was a hassle in itself but now that its 115 out im glad my heat works lol
Member
hahahahahaha 115 and heat working, know what you mean there. Was in NM for 6 years. @Chevy 86 IROC, why the confusion? @ASE doc, what is and why do I have to worry about electrolysis? Hasn't done anything so far that I know of why now?
Back to my main question, is there any other way besides a puddle or no heat that I could tell that my heater core is bad? The car used to heat like crazy in the winter but now not so much.
Back to my main question, is there any other way besides a puddle or no heat that I could tell that my heater core is bad? The car used to heat like crazy in the winter but now not so much.

Member
I don't want to assume, so can anyone tell me what the ac delco store is? I want a brass core AND one that will fit correctly. I am frustrated
Quote:
Originally Posted by Rayzor32
I just did mine, was a 3 hour job and I was working fast. Alldata says it pays 3.1hrs. on an 89 iroc I had to pull the dash, instrument cluster, center console and pull the dash back to get at it also youll need a 7mm universal. Word to the wise I bought an aftermarket heater core and it was aluminum with "swivel tubes" and it did not fit, the brackets that bolt to it wont fit and it comes with some foam **** that I dont know what you do with it. Went and got one from ac delco store, the correct one (is brass first off and fixed tubes) where the tubes go the little tank has a "V" notch in it and the aftermarket is straight across. Member
An "AC Delco store" is a parts house that specializes in AC Delco parts, that is OEM parts. Do a web search on AC Delco Store to find one in your area.
Junior Member
my local chevy dealer said GM no longer makes cores for the 3rd gen and he searched inventory of other deales with out success. I used a NAPA core seemed OK but was aluminum.

Junior Member
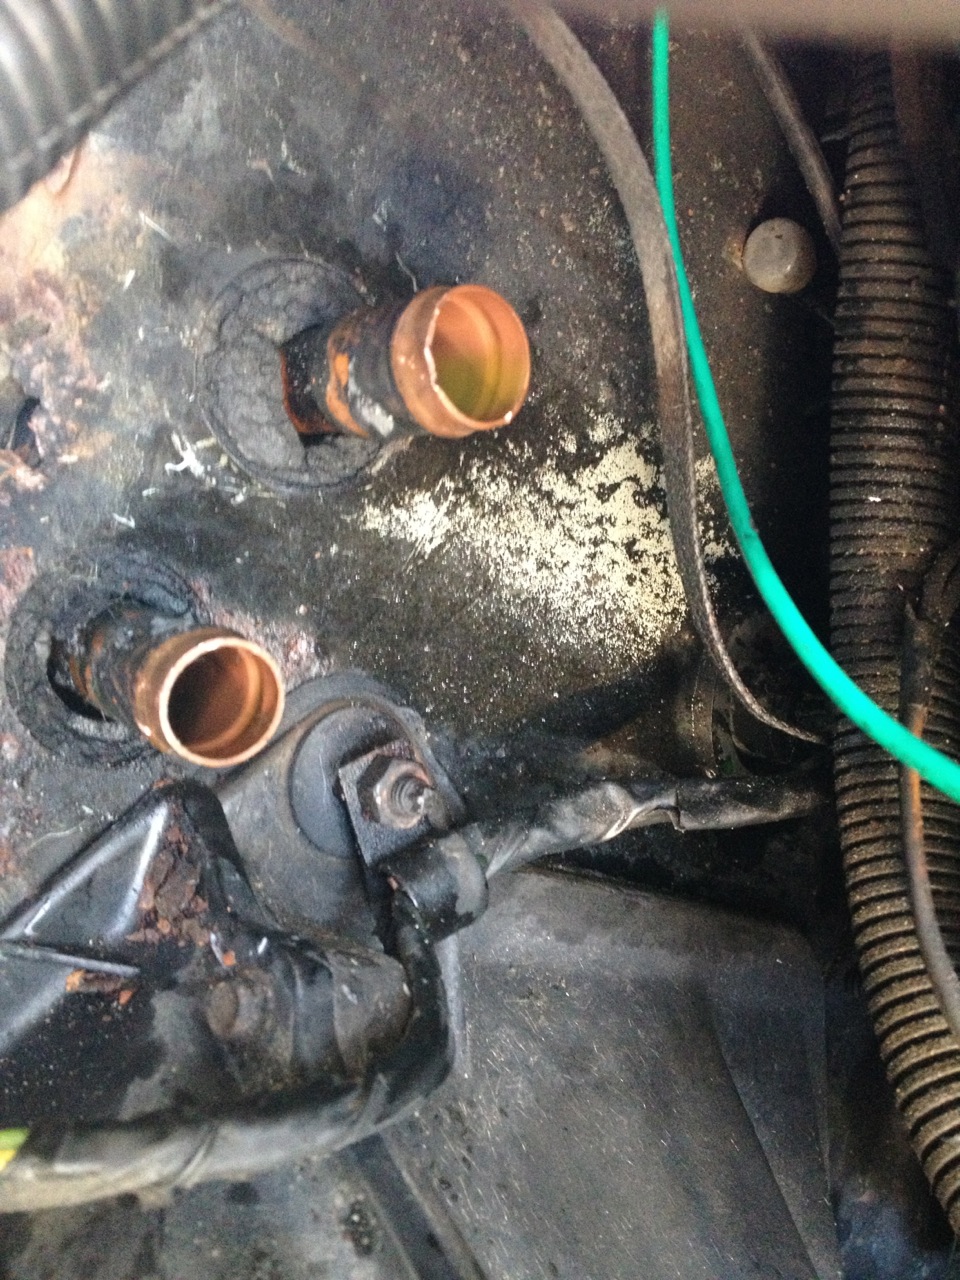
I just handled this today thanks to the wealth of helpful knowledge on this thread and a few other posts on the forum. After all that worrying turned out the PO had removed that pesky top screw (slightly worried about the fact that this part has apparently already been replaced but I was already elbow deep). The hardest part was scraping the end of the cut hoses off the core on the engine side of the firewall. Those damn hoses were pretty much melted on there so I just scraped them off happy I had enough slack to cut the ends loose as autozone was out of the larger size hoses.
Anyway thank you guys so much for the tips on here.
I highly encourage others to try this on their own its not a hard job, though maybe time consuming but definitely worth avoiding the labor charge for something thats really not that complicated.
Best of luck
oh yeah I have some pics as well (this is an 83 z28) if anyone needs them
(new core in housing) (old hoses) (old core at firewall)
Anyway thank you guys so much for the tips on here.
I highly encourage others to try this on their own its not a hard job, though maybe time consuming but definitely worth avoiding the labor charge for something thats really not that complicated.
Best of luck
oh yeah I have some pics as well (this is an 83 z28) if anyone needs them
(new core in housing) (old hoses) (old core at firewall)



Member
Just did this myself. Thanks to this post it was a breeze. The only problem I ran into was finding the heater core.
First, I got one from Oreillys, 399083, for around $28. It was all aluminum, did not match the stock one nor the picture on their website. The manager called the supplier, who said I would have to do some cutting up of the car to make it fit. I gave it back to them.
I went to Napa Auto Parts, got their heater core (6603284) for around $34. It is not aluminum, I believe brass, looked identical to stock and fit right in without any cutting. Anyway, just wanted to put the word out....
First, I got one from Oreillys, 399083, for around $28. It was all aluminum, did not match the stock one nor the picture on their website. The manager called the supplier, who said I would have to do some cutting up of the car to make it fit. I gave it back to them.
I went to Napa Auto Parts, got their heater core (6603284) for around $34. It is not aluminum, I believe brass, looked identical to stock and fit right in without any cutting. Anyway, just wanted to put the word out....

Member
tom1985
Member
close
Oct 30, 2025
Hi all
85 camaro sport w/AC -already had console out and dash cover for cleaning and fix parking brake and stupid BM megashifter neutral switches, as would start in most gears) Just found soaked pass floor, soon after hooking up heater hoses and getting motor running again.
Starting removal after reading all posts and watching a few videos out there. Removed pass speaker and bracket , not sure this will help, but looks like to have a chance at 5 small bolts, 2 unaccessable, the upper middle and upper left bolts on the cover.
Thus, my immediate question is how to get the lower pass front dash plastic off. The one about 2-3 inches deep that has a small vent coming out on the far pass side to maybe get at heater core cover upper bolts. It appears to be 1 piece that extends ast the steering column which would have many bolts to take out. Is this true and will it come off in doing that or do more things also need to be removed.
Thanks for any promt input as I am hesitant to go farther at this point-My manuals want to remove the entire dash (not gonna do) and the videos already start with this stuff removed.
thanks again for your time/knowledge
tom
85 camaro sport w/AC -already had console out and dash cover for cleaning and fix parking brake and stupid BM megashifter neutral switches, as would start in most gears) Just found soaked pass floor, soon after hooking up heater hoses and getting motor running again.
Starting removal after reading all posts and watching a few videos out there. Removed pass speaker and bracket , not sure this will help, but looks like to have a chance at 5 small bolts, 2 unaccessable, the upper middle and upper left bolts on the cover.
Thus, my immediate question is how to get the lower pass front dash plastic off. The one about 2-3 inches deep that has a small vent coming out on the far pass side to maybe get at heater core cover upper bolts. It appears to be 1 piece that extends ast the steering column which would have many bolts to take out. Is this true and will it come off in doing that or do more things also need to be removed.
Thanks for any promt input as I am hesitant to go farther at this point-My manuals want to remove the entire dash (not gonna do) and the videos already start with this stuff removed.
thanks again for your time/knowledge
tom

Junior Member
Hey guys I'm about to replace my heater core in my 87 firebird, do you guys have any tips or pics to show? if you do that'd be great. I know to take off all the lower dash trim (passenger ) other than that I'm not sure if there are any other tips, all data says about 3 hrs so I'm hoping for a more efficient method thanks guys!

OrangeBird
Supreme Member
close

May 26, 2026
- Join DateFeb 2012
- Posts:3,939
- iTrader Positive Feedback100
- iTrader Feedback Score(1)
- Car1989 Firebird
- Likes:679
- Liked:801 Times in 570 Posts
Quote:
Originally Posted by D87bird
Hey guys I'm about to replace my heater core in my 87 firebird, do you guys have any tips or pics to show? if you do that'd be great. I know to take off all the lower dash trim (passenger ) other than that I'm not sure if there are any other tips, all data says about 3 hrs so I'm hoping for a more efficient method thanks guys! My advice would be to go to the "cooling" section and type the two words "heater core" into the searchbar and read the threads that search produces . I do know that the entire dashboard does not need to be removed to change the heater core as some service manuals suggest , but there is at least one bolt , I think 7MM , that is a bear to get to with the dash in place . Some people , to get to that bolt , have mentioned taking off the map pocket from the passenger's side dash and drilling a small hole to provide real easy access to that bolt , but I drilled no holes and mine came out fine (problem being it was so long ago that I don't remember all of the particulars) ....
Supreme Member
Quote:
Its called "nu way" here. I recommend the brassOriginally Posted by FNFAL308
I don't want to assume, so can anyone tell me what the ac delco store is? I want a brass core AND one that will fit correctly. I am frustrated