

Im going crazy!! Car playing tricks on me!


Supreme Member
Joined: May 2005
Posts: 1,701
Likes: 0
From: San Diego, CA
Car: 1991 Camaro RS
Engine: LO3
Transmission: 700R4
Axle/Gears: 3.42 LS1
1) SPARK TEST - Do this with every wire/spark plug, start with no.1. Remove sparkplug wire, remove spark plug, put spark plug back in wire boot. Have someone crank the engine, trying to start it, while you at the same time find a bare metal spot, and touch the spark plug tip against it. It'll be like a welder, kinda, it should spark.
2) Regarding TDC, there are reasons why people do it by hand. I cranked mine over with the key, but I had to move the rest by hand, using big gloves.
On the pulley, you'll see a groove, make sure you put some white paint there.
Crank the engine, check no.1 spark plug hole to see if piston is at TDC, it should be close, however you MUST have the white line on the pulley line up with the timing mark at the same time, so you may have to move the pulley by hand the final step.
i.e.
A) White mark pointing towards 12, or close to it, lined up with timing tab's 0
B) At the same time, no.1 piston at TDC.
C) Last step, rotor pointing towards no.1 spark plug wire.
You may have to remove the distributor and move it one tooth or so.
----------
It may be hard to see the line I'm talking about, you may have to crawl in underneath the car, to be able to paint the line on the pulley with white-out.
What you need to look for, is behind the water pump etc. Grab a flash light, and look.
Took me F O R E V E R to even find my timing tab, I was sure I didn't even have one.
Last edited by vorgath; Jul 24, 2006 at 02:25 AM. Reason: Automerged Doublepost
Thread Starter
Supreme Member
Joined: Feb 2005
Posts: 1,286
Likes: 3
From: Torrance, CA
Car: 1991 Camaro RS
Engine: THE LT1 SWAP SHALL BEGIN!!!!
Transmission: 700 R4
Axle/Gears: LSD! =(
I removed all the spark plugs again and im going to charge the battery and remove the distributor, my friend that knows more about me on engines is going to come over and help me do everything from scratch he will bring his timing gun and battery charger along with him.
Originally Posted by vorgath
1) SPARK TEST - Do this with every wire/spark plug, start with no.1. Remove sparkplug wire, remove spark plug, put spark plug back in wire boot. Have someone crank the engine, trying to start it, while you at the same time find a bare metal spot, and touch the spark plug tip against it. It'll be like a welder, kinda, it should spark.
2) Regarding TDC, there are reasons why people do it by hand. I cranked mine over with the key, but I had to move the rest by hand, using big gloves.
On the pulley, you'll see a groove, make sure you put some white paint there.
Crank the engine, check no.1 spark plug hole to see if piston is at TDC, it should be close, however you MUST have the white line on the pulley line up with the timing mark at the same time, so you may have to move the pulley by hand the final step.
i.e.
A) White mark pointing towards 12, or close to it, lined up with timing tab's 0
B) At the same time, no.1 piston at TDC.
C) Last step, rotor pointing towards no.1 spark plug wire.
You may have to remove the distributor and move it one tooth or so.
----------
It may be hard to see the line I'm talking about, you may have to crawl in underneath the car, to be able to paint the line on the pulley with white-out.
What you need to look for, is behind the water pump etc. Grab a flash light, and look.
Took me F O R E V E R to even find my timing tab, I was sure I didn't even have one.
2) Regarding TDC, there are reasons why people do it by hand. I cranked mine over with the key, but I had to move the rest by hand, using big gloves.
On the pulley, you'll see a groove, make sure you put some white paint there.
Crank the engine, check no.1 spark plug hole to see if piston is at TDC, it should be close, however you MUST have the white line on the pulley line up with the timing mark at the same time, so you may have to move the pulley by hand the final step.
i.e.
A) White mark pointing towards 12, or close to it, lined up with timing tab's 0
B) At the same time, no.1 piston at TDC.
C) Last step, rotor pointing towards no.1 spark plug wire.
You may have to remove the distributor and move it one tooth or so.
----------
It may be hard to see the line I'm talking about, you may have to crawl in underneath the car, to be able to paint the line on the pulley with white-out.
What you need to look for, is behind the water pump etc. Grab a flash light, and look.
Took me F O R E V E R to even find my timing tab, I was sure I didn't even have one.

Junior Member
Joined: Aug 2005
Posts: 5
Likes: 0
From: Torrance, CA
Car: Rx-7, Rx-2
Engine: 13b wankel @ 18psi GT35R
Alright, I went to his house to check out the car, he had it TDC.. but on the wrong stroke.. the intake vavle was still open! So he was 90* off on the timing.
So we took off the vavle cover, made sure both valves were closed, found tdc, restabed the dizzy. Then put everything back together.. after putting out a small engine fire we were able to fire it up.
I later found out that the ignition switch(where the key goes, is that whats its called?) is screwed up. It gives no power to the car ecu/igintion in the "on" position. Only in the start posistion. If I played with it a bit, it would fire right up and stay running smooth.. but I had to keep my hand on the igntion switch, pressing it in to keep power going... After we get that fixed the car should be running like a champ again.
Thread Starter
Supreme Member
Joined: Feb 2005
Posts: 1,286
Likes: 3
From: Torrance, CA
Car: 1991 Camaro RS
Engine: THE LT1 SWAP SHALL BEGIN!!!!
Transmission: 700 R4
Axle/Gears: LSD! =(
cool, thanks TRAINWRECK! (ALVARITO!) he did it! I know I can always count on my Japanese car loving friend for help!!!! thanks vorgath for all your help and thoughts!

Junior Member
Joined: Jul 2006
Posts: 40
Likes: 0
Car: 83 T-Top w/ 85 Z-28 and 91 RS parts
Engine: 377 (in progress)
Transmission: 700-R4 (unless i find a t-56)
Axle/Gears: from the Z
this may be a little late, but could save trouble next time. i use my thumb in the spark plug hole to make sure it's on the compression stroke...then turn it by hand to hit TDC. glad you found the problem, i was about to say it sounded like 180* off (intake still open)
Supreme Member
iTrader: (3)
Joined: May 2005
Posts: 1,942
Likes: 0
From: Southern IL
Car: 88 GTA "Cocaine"
Engine: 350 tpi
Transmission: 700r4
Axle/Gears: 3.27
u r a bad a$$ jr for bieng able to turm the motor over and keep you thumb over the hole.
I ball up a piece of paper towel and when it pops out I am comming up on tdc.
I wish I was that good jr
I ball up a piece of paper towel and when it pops out I am comming up on tdc.
I wish I was that good jr
Thread Starter
Supreme Member
Joined: Feb 2005
Posts: 1,286
Likes: 3
From: Torrance, CA
Car: 1991 Camaro RS
Engine: THE LT1 SWAP SHALL BEGIN!!!!
Transmission: 700 R4
Axle/Gears: LSD! =(
so how do I go about removing the ignition switch?? and installing the new one? would I have to remove the steering wheel?
Supreme Member
Joined: May 2005
Posts: 1,701
Likes: 0
From: San Diego, CA
Car: 1991 Camaro RS
Engine: LO3
Transmission: 700R4
Axle/Gears: 3.42 LS1
Not sure, don't have my factory manual by me, but I can tell you one thing. Disconnect the airbag first, just in case.
Thread Starter
Supreme Member
Joined: Feb 2005
Posts: 1,286
Likes: 3
From: Torrance, CA
Car: 1991 Camaro RS
Engine: THE LT1 SWAP SHALL BEGIN!!!!
Transmission: 700 R4
Axle/Gears: LSD! =(
yeah I read up on some posts by others on here, I have the bottom tray out and have disconnected the air bag plugs.and removed the AIR BAG console.. but my PULLER is missing both of the screws!!!! and I tried using these 2 bolts which were the correct size, but the left hole was stripped because they were to short!!!! ughh.. tommorow I will go to pep boys and buy everything.. I need

Junior Member
Joined: Jun 2006
Posts: 84
Likes: 0
i replaced my ignition switch yesterday
i replaced my ignition switch in my 1991 camaro z28 automatic yesterday...
Its simple and kind of a bitch at first...
.. and i didnt have to disconnect the air bag or anything...
I will tell you...
So take out the panel under the steering wheel, then remove the v shaped black metal piece with 2 medium sized huts with a box wrench or deep socket, then spin down the nuts and put them aside, do 2 more nuts the same size for the second piece of v shaped metal, now use ur TILT and get the steering wheel column down 4 or 6 inch's, next step you will see the dimmer switch on the left and the ignition switch on the right, on the top of the collumn with 2 rods going into them, 1 rod each switch, study the plugs and take note whichg belongs to which, disconnect the plugs, and get them out of the way, now unplug the bl;ack box / vats thing? from the fuse panel near ur right so u dont break it.. now the plusg are gonew u got 5 more inch's . let the steering wheel sit on the front seat... oh yah unplug the batrtery first..
then there are 3 total screws, 2 of them for the ignition switch, and then another one for ther dimmer, but the main screws / holes for the both of them i th9ink.. take picture for me.. please ???
but the dimmer comes out first, so u can get at the 3rd hidden screw, its a different style screw, and pay attyention how everything is assembled originally, cause putting it bac\k together was sort of a bit..ch.. but then re-assemble.. i did it by myself and it took 4 hours... but i didnt know what i was doing...
also take note of connecting the rod back into the switch, and the 2 detents thing, so the switch is in the position of not ON, but not off.. 2 clicks fdorward.. and screw it tight, and then connect the high beam switch/rod.. etc... then plug it back together and bolt it all tight, dont forget ur vats thing.. then reconnect ur battery
Thread Starter
Supreme Member
Joined: Feb 2005
Posts: 1,286
Likes: 3
From: Torrance, CA
Car: 1991 Camaro RS
Engine: THE LT1 SWAP SHALL BEGIN!!!!
Transmission: 700 R4
Axle/Gears: LSD! =(
Originally Posted by xklipze
i replaced my ignition switch in my 1991 camaro z28 automatic yesterday...
Its simple and kind of a bitch at first...
.. and i didnt have to disconnect the air bag or anything...
I will tell you...
So take out the panel under the steering wheel, then remove the v shaped black metal piece with 2 medium sized huts with a box wrench or deep socket, then spin down the nuts and put them aside, do 2 more nuts the same size for the second piece of v shaped metal, now use ur TILT and get the steering wheel column down 4 or 6 inch's, next step you will see the dimmer switch on the left and the ignition switch on the right, on the top of the collumn with 2 rods going into them, 1 rod each switch, study the plugs and take note whichg belongs to which, disconnect the plugs, and get them out of the way, now unplug the bl;ack box / vats thing? from the fuse panel near ur right so u dont break it.. now the plusg are gonew u got 5 more inch's . let the steering wheel sit on the front seat... oh yah unplug the batrtery first..
then there are 3 total screws, 2 of them for the ignition switch, and then another one for ther dimmer, but the main screws / holes for the both of them i th9ink.. take picture for me.. please ???
but the dimmer comes out first, so u can get at the 3rd hidden screw, its a different style screw, and pay attyention how everything is assembled originally, cause putting it bac\k together was sort of a bit..ch.. but then re-assemble.. i did it by myself and it took 4 hours... but i didnt know what i was doing...
also take note of connecting the rod back into the switch, and the 2 detents thing, so the switch is in the position of not ON, but not off.. 2 clicks fdorward.. and screw it tight, and then connect the high beam switch/rod.. etc... then plug it back together and bolt it all tight, dont forget ur vats thing.. then reconnect ur battery
Its simple and kind of a bitch at first...
.. and i didnt have to disconnect the air bag or anything...
I will tell you...
So take out the panel under the steering wheel, then remove the v shaped black metal piece with 2 medium sized huts with a box wrench or deep socket, then spin down the nuts and put them aside, do 2 more nuts the same size for the second piece of v shaped metal, now use ur TILT and get the steering wheel column down 4 or 6 inch's, next step you will see the dimmer switch on the left and the ignition switch on the right, on the top of the collumn with 2 rods going into them, 1 rod each switch, study the plugs and take note whichg belongs to which, disconnect the plugs, and get them out of the way, now unplug the bl;ack box / vats thing? from the fuse panel near ur right so u dont break it.. now the plusg are gonew u got 5 more inch's . let the steering wheel sit on the front seat... oh yah unplug the batrtery first..
then there are 3 total screws, 2 of them for the ignition switch, and then another one for ther dimmer, but the main screws / holes for the both of them i th9ink.. take picture for me.. please ???
but the dimmer comes out first, so u can get at the 3rd hidden screw, its a different style screw, and pay attyention how everything is assembled originally, cause putting it bac\k together was sort of a bit..ch.. but then re-assemble.. i did it by myself and it took 4 hours... but i didnt know what i was doing...
also take note of connecting the rod back into the switch, and the 2 detents thing, so the switch is in the position of not ON, but not off.. 2 clicks fdorward.. and screw it tight, and then connect the high beam switch/rod.. etc... then plug it back together and bolt it all tight, dont forget ur vats thing.. then reconnect ur battery
Where is the "then remove the v shaped black metal piece with 2 medium sized huts with a box wrench or deep socket," you talk about?? should my battery be disconnected first before anything? could you explain it on a step by step process? I would grealty appreciate that!!! thanks!!
Junior Member
Joined: Jun 2006
Posts: 84
Likes: 0
...
all i can add is...
just do it cold turkey, its not that hard, once you get started you will figure everything out...
"it's all nuts and bolts" you know...
just start unscrewing the NUTS while hold up the steering column, and do whatever n\essicary to get the steeringh column lowered like 8 inch;s.. and pay attention to what ur doing and where everything goes.. once u take it apart, u'll figure it out...
most of the stuff i fix, i fix it by just tinkering with ****.... the key to sucess with ur fbody is to understand how it works, and enjoy getting ur hands dirty.,.. after i have have replaced my ignition switch.. i laugh at how easy it is...
just make sure u got a wide variety of random tools, the only problem with the ignition switch is limited space to work with,..
and the #1 step is always to discconect the battery first .. just in case anything...
Thread Starter
Supreme Member
Joined: Feb 2005
Posts: 1,286
Likes: 3
From: Torrance, CA
Car: 1991 Camaro RS
Engine: THE LT1 SWAP SHALL BEGIN!!!!
Transmission: 700 R4
Axle/Gears: LSD! =(
Thanks, im going to get the key cylinder today and some screws for the steering wheel puller, I HOPE it's still able to screw in since I kinda stripped one hole...")
Originally Posted by xklipze
all i can add is...
just do it cold turkey, its not that hard, once you get started you will figure everything out...
"it's all nuts and bolts" you know...
just start unscrewing the NUTS while hold up the steering column, and do whatever n\essicary to get the steeringh column lowered like 8 inch;s.. and pay attention to what ur doing and where everything goes.. once u take it apart, u'll figure it out...
most of the stuff i fix, i fix it by just tinkering with ****.... the key to sucess with ur fbody is to understand how it works, and enjoy getting ur hands dirty.,.. after i have have replaced my ignition switch.. i laugh at how easy it is...
just make sure u got a wide variety of random tools, the only problem with the ignition switch is limited space to work with,..
and the #1 step is always to discconect the battery first .. just in case anything...
just do it cold turkey, its not that hard, once you get started you will figure everything out...
"it's all nuts and bolts" you know...
just start unscrewing the NUTS while hold up the steering column, and do whatever n\essicary to get the steeringh column lowered like 8 inch;s.. and pay attention to what ur doing and where everything goes.. once u take it apart, u'll figure it out...
most of the stuff i fix, i fix it by just tinkering with ****.... the key to sucess with ur fbody is to understand how it works, and enjoy getting ur hands dirty.,.. after i have have replaced my ignition switch.. i laugh at how easy it is...
just make sure u got a wide variety of random tools, the only problem with the ignition switch is limited space to work with,..
and the #1 step is always to discconect the battery first .. just in case anything...
Junior Member
Joined: Jul 2006
Posts: 40
Likes: 0
Car: 83 T-Top w/ 85 Z-28 and 91 RS parts
Engine: 377 (in progress)
Transmission: 700-R4 (unless i find a t-56)
Axle/Gears: from the Z
depends on if you're replacing the switch or the key cylinder. the key involves removing the wheel and lock plate and the switch is a matter of dropping the column. i can give a step-by step if ya need it
Thread Starter
Supreme Member
Joined: Feb 2005
Posts: 1,286
Likes: 3
From: Torrance, CA
Car: 1991 Camaro RS
Engine: THE LT1 SWAP SHALL BEGIN!!!!
Transmission: 700 R4
Axle/Gears: LSD! =(
Originally Posted by jr. gearhead
depends on if you're replacing the switch or the key cylinder. the key involves removing the wheel and lock plate and the switch is a matter of dropping the column. i can give a step-by step if ya need it
yes step by step is what I need, since im an idiot. I have the steering wheel out now.. THERE WAS A BIG MESS!! hahah I had to drill a bigger hole because I stripped the left hole where the steering wheel puller bolts go in. But I got it out. Now im stumpt... theres a black plate that I HAVE NO IDEA how to remove!!!? Im going to remove the ignition KEY CYLINDER and the SWITCH... well right now Im going to remove the key cylinder but when I go to pep boys im going to ask for a ignition switch as well so that way both get replaced...and I wont have to go back if the ignition switch gets messed up in the future. ALso will I have to go to the dealer to get a new key or something?? or could I just use the same key that the key cylinder comes with?? I will be working on this in about 2-3 hours again. Any help would be greatly appreciated!


Joined: May 2004
Posts: 2,262
Likes: 1
From: houston
Car: 83 POS monte carlo 2015 chevy P/U
Engine: 92 5.7 tpi 5.3
Transmission: 700r4 6L60E
Axle/Gears: 2.42 too high
to get that black plate off, it may have a plastic cover on it which comes off just by wiggling & pulling up on it. you need a lock plate depressor, thats what the black plate is for, locking the steering wheel when you turn the key to the off position.
once you have it pressed down, it doesn't need to go down far, about 1/8 of an inch or so is enough, there is a small retaining clip around the shaft you have to remove.
getting that little retainer off is a major pain & probably about the hardest part of replacing the lock cylinder.
to remove the retainer, you need either a pair of snap ring pliers or a small flat bladed screw driver & a pick. you don't want to damage that little retainer, you will need to put in back on.
next you need to pull the turn signal switch. remove the hazard button from the side of the column, remove the screw that holds the turn signal actuator bracket, & remove the 3 screws that hold the turn signal switch to the column. you just need to get the turn signal switch up enough to get to the
screw that holds the lock cylinder in, you may need to get under the dash & remove the turn signal harness connector from where it is mounted on the column to get enough slack in the wiring harness. once you have the turn signal switch pulled up enough, remove the 1 screw that holds the lock cylinder in place.
now that you have the old lock cylinder ready to come out, if you have VATS,
DO NOT CUT VATS WIRING ON THE NEW LOCK CYLINDER!!
you now need to get the new VATS wiring fed down through the column, i cut the old VATS wiring about an inch away from the old lock cylinder & tape the plug on the new VATS wiring harness to where i cut the old harness & then use the old VATS harness to gently pull the new VATS harness down through the column. there may be a plastic piece that the wires go through, its on the bottom side of the column & if it is there, you need to pull the wiring out of it before trying to pull the harness
through the column.
DO NOT CUT VATS WIRING ON THE NEW LOCK CYLINDER!!
now reverse everything you have just done & your finished
i would recommend using an A/C Delco lock cylinder over one of the cheap aftermarket cylinders, there is a big difference in quality, and if you have VATS then i wouldn't even think about anything other than a Delco lock cylinder, unless you want to learn how to get really fast at replacing them.
there is a plastic part the goes right under the lock plate, its round with a hole in the middle of it & it has a round piece the sticks up through the steering wheel, its for your horn, i highly recommend replacing it while you have it out.
go slow & watch what your doing, if you have a digital camera, use it & take pictures of each step so you know what parts go where.
if i have missed any steps, im sure someone will jump in & mention them.
do you have a tilt column? if so is the steering column loose? by that i mean does it move around alot with out hitting the tilt lever. if so then check here,.. https://www.thirdgen.org/steeringcolumn
it may be a good ideal to read though that anyway as it covers what you doing with replacing the lock cylinder & then goes beyond it.
Last edited by DENN_SHAH; Jul 27, 2006 at 01:22 AM. Reason: Automerged Doublepost
Thread Starter
Supreme Member
Joined: Feb 2005
Posts: 1,286
Likes: 3
From: Torrance, CA
Car: 1991 Camaro RS
Engine: THE LT1 SWAP SHALL BEGIN!!!!
Transmission: 700 R4
Axle/Gears: LSD! =(
Thank you Denn Shah, I did exactly that..but had some troubles:
I went to pep boys got the ignition lock cylinder which was $79.00 for FREE, I got the steering wheel plate depresser tool for FREE. (a certain friend hooked it up) Came back home and did everything you mentioned, and I cut and unhooked and pulled out the original orange wire that connected to the wireharness and found out something. The Previous owner CUT both of the white wires leading to the WIREHARNESS (The 2 white Wires that connect to the orange wire from the ignition lock cylinder) What im trying to figure out is why he did it? DID HE BYPASS VATS or something? and the strange thing is all these years I had the car it turned on fine and at random times it didnt turn on fine could this been the problem all along? Nevertheless im still changing the ignition cylinder. Now I read on the paper that came with the ignition cylinder that I have to take my new ignition cylinder along with my original keys, to a locksmith or a dealership to have them specially made for my set up??? what is that all about do I really have to do this?
Oh and I accidently pulled out these 2 metal clip things that hold down the turn signal on the bottom right side of the circle plastic piece, I forgot how they get hooked on, could someone do me a favor and post a picture of how it looks once its all set up? It would really help me!!! thanks everyone for all your input I really appreciate this to the fullest!
Originally Posted by DENN_SHAH
to get that black plate off, it may have a plastic cover on it which comes off just by wiggling & pulling up on it. you need a lock plate depressor, thats what the black plate is for, locking the steering wheel when you turn the key to the off position.
once you have it pressed down, it doesn't need to go down far, about 1/8 of an inch or so is enough, there is a small retaining clip around the shaft you have to remove.
getting that little retainer off is a major pain & probably about the hardest part of replacing the lock cylinder.
to remove the retainer, you need either a pair of snap ring pliers or a small flat bladed screw driver & a pick. you don't want to damage that little retainer, you will need to put in back on.
next you need to pull the turn signal switch. remove the hazard button from the side of the column, remove the screw that holds the turn signal actuator bracket, & remove the 3 screws that hold the turn signal switch to the column. you just need to get the turn signal switch up enough to get to the
screw that holds the lock cylinder in, you may need to get under the dash & remove the turn signal harness connector from where it is mounted on the column to get enough slack in the wiring harness. once you have the turn signal switch pulled up enough, remove the 1 screw that holds the lock cylinder in place.
now that you have the old lock cylinder ready to come out, if you have VATS,
DO NOT CUT VATS WIRING ON THE NEW LOCK CYLINDER!!
you now need to get the new VATS wiring fed down through the column, i cut the old VATS wiring about an inch away from the old lock cylinder & tape the plug on the new VATS wiring harness to where i cut the old harness & then use the old VATS harness to gently pull the new VATS harness down through the column. there may be a plastic piece that the wires go through, its on the bottom side of the column & if it is there, you need to pull the wiring out of it before trying to pull the harness
through the column.
DO NOT CUT VATS WIRING ON THE NEW LOCK CYLINDER!!
now reverse everything you have just done & your finished
i would recommend using an A/C Delco lock cylinder over one of the cheap aftermarket cylinders, there is a big difference in quality, and if you have VATS then i wouldn't even think about anything other than a Delco lock cylinder, unless you want to learn how to get really fast at replacing them.
there is a plastic part the goes right under the lock plate, its round with a hole in the middle of it & it has a round piece the sticks up through the steering wheel, its for your horn, i highly recommend replacing it while you have it out.
go slow & watch what your doing, if you have a digital camera, use it & take pictures of each step so you know what parts go where.
if i have missed any steps, im sure someone will jump in & mention them.
do you have a tilt column? if so is the steering column loose? by that i mean does it move around alot with out hitting the tilt lever. if so then check here,.. https://www.thirdgen.org/steeringcolumn
it may be a good ideal to read though that anyway as it covers what you doing with replacing the lock cylinder & then goes beyond it.
once you have it pressed down, it doesn't need to go down far, about 1/8 of an inch or so is enough, there is a small retaining clip around the shaft you have to remove.
getting that little retainer off is a major pain & probably about the hardest part of replacing the lock cylinder.
to remove the retainer, you need either a pair of snap ring pliers or a small flat bladed screw driver & a pick. you don't want to damage that little retainer, you will need to put in back on.
next you need to pull the turn signal switch. remove the hazard button from the side of the column, remove the screw that holds the turn signal actuator bracket, & remove the 3 screws that hold the turn signal switch to the column. you just need to get the turn signal switch up enough to get to the
screw that holds the lock cylinder in, you may need to get under the dash & remove the turn signal harness connector from where it is mounted on the column to get enough slack in the wiring harness. once you have the turn signal switch pulled up enough, remove the 1 screw that holds the lock cylinder in place.
now that you have the old lock cylinder ready to come out, if you have VATS,
DO NOT CUT VATS WIRING ON THE NEW LOCK CYLINDER!!
you now need to get the new VATS wiring fed down through the column, i cut the old VATS wiring about an inch away from the old lock cylinder & tape the plug on the new VATS wiring harness to where i cut the old harness & then use the old VATS harness to gently pull the new VATS harness down through the column. there may be a plastic piece that the wires go through, its on the bottom side of the column & if it is there, you need to pull the wiring out of it before trying to pull the harness
through the column.
DO NOT CUT VATS WIRING ON THE NEW LOCK CYLINDER!!
now reverse everything you have just done & your finished
i would recommend using an A/C Delco lock cylinder over one of the cheap aftermarket cylinders, there is a big difference in quality, and if you have VATS then i wouldn't even think about anything other than a Delco lock cylinder, unless you want to learn how to get really fast at replacing them.
there is a plastic part the goes right under the lock plate, its round with a hole in the middle of it & it has a round piece the sticks up through the steering wheel, its for your horn, i highly recommend replacing it while you have it out.
go slow & watch what your doing, if you have a digital camera, use it & take pictures of each step so you know what parts go where.
if i have missed any steps, im sure someone will jump in & mention them.
do you have a tilt column? if so is the steering column loose? by that i mean does it move around alot with out hitting the tilt lever. if so then check here,.. https://www.thirdgen.org/steeringcolumn
it may be a good ideal to read though that anyway as it covers what you doing with replacing the lock cylinder & then goes beyond it.
Thread Starter
Supreme Member
Joined: Feb 2005
Posts: 1,286
Likes: 3
From: Torrance, CA
Car: 1991 Camaro RS
Engine: THE LT1 SWAP SHALL BEGIN!!!!
Transmission: 700 R4
Axle/Gears: LSD! =(
I went to the locksmith to get a new key made with the chip thing.. and came back......replaced the lock cylinder hooked everything back how its suppose to be and then fired her up and it almost started but then it quickly died.. I looked under the column and seen that the previous owner did a vats bypass relay.. and I then removed that without thinking much of it and connected it to the orange VATS wire from the cylinder lock and turned her onn and NOTHING......I think I had it the first time but I only tried turning it on twice... what do I have to do to bypass VATS again with the new igniton cylinder??? measure the ohms on my old key and then what???
Thread Starter
Supreme Member
Joined: Feb 2005
Posts: 1,286
Likes: 3
From: Torrance, CA
Car: 1991 Camaro RS
Engine: THE LT1 SWAP SHALL BEGIN!!!!
Transmission: 700 R4
Axle/Gears: LSD! =(
I went to radio shack early this morning spet about $20.00 dollars there buying an assortment of resistors and caps and sauder. I came home went to my garage, and found the 2 original resistors I put them on the OHM reader and found out that the previous owner used 2 resistors hooked up together.
1 measured at 900 OHMS
1 measured at 300 OHMS
Makes a total of 1200 ohms
I then grabbed a 1200ohm resistor and put it on the 2 wires... and it did not even turn on NOT A SOUND OR CLICK!!! just the regular SERVICE ENGINE light and other guages stuff... whats the deal???? whats going on?? should I just sauder the original resisters together? and install it again??
This is what I have observed:
Yesterday after I installed the NEW Ignition lock cylinder I tried starting the car (with the ORIGINAL VATS BYPASS) still in place, and the car just kept turning over and fired once but it quickly died. I then tried turning it on again and it just turned over but never fired. Not knowing that the previous owner had already bypassed the 2 wires by seeing this wire which was a resistor, I took it off and hooked back the plug that was suppose to be there. I then plugged it in the VATS (ORANGE WIRE) that came with the ignition lock cylinder and it just kept turning over and over.. and then I tried turning it on and this time it didnt even turn over nothing!!! silent... nothing turned on except the usual gauges and lights... and ever since then it wont turn over, whats going on? can anyone help me??? PLEEASE? I really need this car running it's been 3 weeks.. pleeease MODERATORS CAN DELETE THIS after I have been helped if thats what concerns people? and is making them not want to reply... just help me and after my car runs.. the mods can delete it!! PLEASE!!
Thread Starter
Supreme Member
Joined: Feb 2005
Posts: 1,286
Likes: 3
From: Torrance, CA
Car: 1991 Camaro RS
Engine: THE LT1 SWAP SHALL BEGIN!!!!
Transmission: 700 R4
Axle/Gears: LSD! =(
I finally bypassed VATS
Alright so now that I bypassed the VATS SYSTEM... I see a security light come on and the car cuts fuel after turning it on... whats going on?? what can I do!!! I have the timing right! what else could I do!!??? any suggestions!? I will try to have pictures for everyone tommorow

Senior Member
Joined: Jun 2006
Posts: 503
Likes: 0
From: Desert Heat
Car: 90 RS/90 Z-71/73 Vega
Engine: 3.1/5.7 TBI/5.7
Transmission: 700R4/700R4/350turbo
Axle/Gears: 3.23/3.42/3.42
If your plugs are flooded with fuel.. I would look into a bad injector or injectors..they will cause what you explained.
Dont know how this got on this thread didnt reply to this one???...sorry..clitch
Dont know how this got on this thread didnt reply to this one???...sorry..clitch
Last edited by jstrdn90rs; Jul 29, 2006 at 12:59 AM.
Thread Starter
Supreme Member
Joined: Feb 2005
Posts: 1,286
Likes: 3
From: Torrance, CA
Car: 1991 Camaro RS
Engine: THE LT1 SWAP SHALL BEGIN!!!!
Transmission: 700 R4
Axle/Gears: LSD! =(
Originally Posted by jstrdn90rs
If your plugs are flooded with fuel.. I would look into a bad injector or injectors..they will cause what you explained.
Dont know how this got on this thread didnt reply to this one???...sorry..clitch
Dont know how this got on this thread didnt reply to this one???...sorry..clitch
aww man I was all excited to read a progressive answer!!!


Junior Member
Joined: Jun 2006
Posts: 84
Likes: 0
....
ok.. im no expert, but i'd say go back and buy a 300 ohm resistor and a 900 ohm resistor to keep **** the same as before,
also i had an idea u can use starting fluid into the throttle body to try to get it started and single out the fuel as a problem if it is...
if the starting fluid makes ur car start then ur not getting gas into the engine.
have u thought about throwing a nice intake manifold and sexy carburator on the car... i bought a setup used for $250 bucks and made me happy for a long time.. havin a carb will bypass everythign
Thread Starter
Supreme Member
Joined: Feb 2005
Posts: 1,286
Likes: 3
From: Torrance, CA
Car: 1991 Camaro RS
Engine: THE LT1 SWAP SHALL BEGIN!!!!
Transmission: 700 R4
Axle/Gears: LSD! =(
Originally Posted by vorgath
Were the resistors in series with each other, or parallel or what ?
the originals were twisted next to each other so I guess that would make it in series.


Thread Starter
Supreme Member
Joined: Feb 2005
Posts: 1,286
Likes: 3
From: Torrance, CA
Car: 1991 Camaro RS
Engine: THE LT1 SWAP SHALL BEGIN!!!!
Transmission: 700 R4
Axle/Gears: LSD! =(
Originally Posted by deadtemple
If you cut the resistor out, what did you do with it?
I guess the car was not starting before this?
What was the car doing? Trying to start or nothing at all?
Need some more info on what led up to you getting a new cylinder for the car. I am going through the vats thing right now. Luckilly a fellow member is sending me something to fix my problem. Tell us more about your situation.
After I turned it on the car would not start...... and then after a few tries it did not EVEN TURN OVER!! NOTHING WORKED.... it only lit up the cluster guages with the SES light on... but its always been on, ever since I bought the car. I then was stumped and removed the battery and connected it back again after 1 day of being disconnected and it did not turn over or crank. I then contacted Louz28 and he helped me get her started again, by bypassing VATS again he told me to connect the GREEN gear selector to the YELLOW wire from the steering column.. I did it, and it worked joyfully I thanked him and got a bit ahead of myself and thought to myself "oh yeah the car starts" in reality the car didnt fully idle and stay on for long, me and a friend checked the timing while I was in the car flooring it to keep it on, as he was standing by the engine bay he observed that everytime I stepped on the gas it only spit out a bit of gas and would stop spitting gas and after a few seconds the injectors would stop spitting gas and got a security light. I then talked with Lou and he told me it's a resister reading the wrong resistence so we talked and he led me and educated me on how they work and set up, I then but the resistors he told me on the vats wires and I tried turning on the car.. and found out the battery was dead :-/ so I recharged it and started her up and she did not fire up only turned over, and now here I am.
Lou, and everyone else here are the orignal resistors that the previous owner used to BYPASS vats! NO HE DID NOT SOLDER them I did it but failed
but you all can see the color bands clearly.. they were both twisted with each other, before I broke them.
Member
Joined: Apr 2006
Posts: 389
Likes: 0
From: Washington DC metro
Car: 89 RS
Engine: 2.8
Transmission: 700r4 auto
Axle/Gears: huh?? guessing stock.
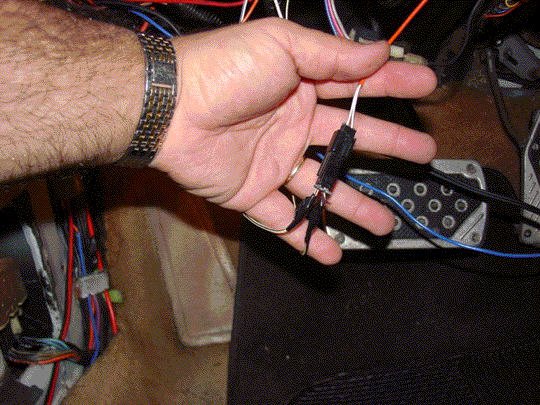
your car has a aftermarket alarm in it? I noticed the interior shock sensor (post 81, third pic down clear box thing) and the relay tree (post 81 fifth pic down in your hand) most use. does it possibly have a starter kill? lookon the brain box of it (post 81 sixth pic down in your hand) and google the manufacturer and model to find out.Ive had to do that on a couple cars. NO FUN. but it is doable. You also might try checking all the fuses in the alarm system. maybe one of them got blown while you were playing with your VATs system and has disabled your car.
Hey none of the "Normal" things have worked for you, so why not try something straight outta left field!!
here is the home page for your alarms manufacturer.... Hope it helps.... Welcome to Avital Security Systems
Hey none of the "Normal" things have worked for you, so why not try something straight outta left field!!
here is the home page for your alarms manufacturer.... Hope it helps.... Welcome to Avital Security Systems
Last edited by Stealthy-One; Jul 31, 2006 at 05:44 AM.
Thread Starter
Supreme Member
Joined: Feb 2005
Posts: 1,286
Likes: 3
From: Torrance, CA
Car: 1991 Camaro RS
Engine: THE LT1 SWAP SHALL BEGIN!!!!
Transmission: 700 R4
Axle/Gears: LSD! =(
Heres what I did, I removed all the aftermarket crap such as the remote starter and alarm I HAVE NOTHING TO LOOSE! DIE GREMLINS!!!!!!!!
Under my Car had to use the fish tank light to see those god forsaken gremlins!

Heres it is after I removed all the vats crap... yes im wearing all black and yes those chucks are all worn out... hey im a Rocker, what do you expect when your a broke psychobilly?

It was getting hot in the garage so I took off my Japanese Psychobilly shirt...

Pics of underneath after I removed the remote starter and alarm


What is this? and what does it do? the alarm was connected to it

Dead Gremlins

Yes thats my dropped ECU.. in need of a removal from pesky VATS

Under my Car had to use the fish tank light to see those god forsaken gremlins!
Heres it is after I removed all the vats crap... yes im wearing all black and yes those chucks are all worn out... hey im a Rocker, what do you expect when your a broke psychobilly?
It was getting hot in the garage so I took off my Japanese Psychobilly shirt...
Pics of underneath after I removed the remote starter and alarm
What is this? and what does it do? the alarm was connected to it
Dead Gremlins
Yes thats my dropped ECU.. in need of a removal from pesky VATS
Last edited by Psycho_91Camaro; Aug 2, 2006 at 02:56 AM.
Thread Starter
Supreme Member
Joined: Feb 2005
Posts: 1,286
Likes: 3
From: Torrance, CA
Car: 1991 Camaro RS
Engine: THE LT1 SWAP SHALL BEGIN!!!!
Transmission: 700 R4
Axle/Gears: LSD! =(
I recieved the chip today, installed it, put everything back the way it's suppose to be. Fired her up and she just turned over.... did it again and SHE FIRED UP AND STAYED ON!!!!!!!!! YEEEEAAAAAHHH.... drove her out of the garage... and went around for a spin, noticed the Idle was low. I then turned the car off and noticed a small dieseling after I removed the key. I thought it was the timing so I took it to my friends house (trainwreck) got it timed. Drove her home.... and as I was driving I floored it real quick and noticed a big loss of response and power. I took her home and I tried checking for vaccum leaks and other loose or disconnected things, even messed with the IDLE AIR CONTROL VALVE to see if it would make a difference and drove it and still the same. And sometimes I have to keep cranking the engine a few times for it to turn on, I dont know if the computer has to have some time to learn all its functions or what? it still diesels a little bit when I turn off the ignition.... Im stumped... where else can I look or do?
Thanks bigbabylou!!!! and 83z28camaro and everyone else who posted!! thanks for your efforts, they are tremendously appreciated
Thanks bigbabylou!!!! and 83z28camaro and everyone else who posted!! thanks for your efforts, they are tremendously appreciated
Thread Starter
Supreme Member
Joined: Feb 2005
Posts: 1,286
Likes: 3
From: Torrance, CA
Car: 1991 Camaro RS
Engine: THE LT1 SWAP SHALL BEGIN!!!!
Transmission: 700 R4
Axle/Gears: LSD! =(
Originally Posted by DENN_SHAH
how are your fans wired up? do they run when ever the key is on?
yeahp... theyve been hooked directly to the fusebox
Joined: May 2004
Posts: 2,262
Likes: 1
From: houston
Car: 83 POS monte carlo 2015 chevy P/U
Engine: 92 5.7 tpi 5.3
Transmission: 700r4 6L60E
Axle/Gears: 2.42 too high
i take that to mean the power wire goes from the fuse box right to the fan motors, if so, that won't work.
the fan motors must get their power through relays which get their main power feed right from the battery, you can supply power to turn on the relays from the switched side of the fuse box with no problem.
by going through the fuse box without using relays your robbing power power from the rest of the car.
plus when you turn the key off the fan motors keep running for a few seconds from inertia & turn into generators supplying power to the ECM & ignition system which is very hard on both the ignition module & ECM.
over in the cooling part of the boards there is a thread called "Willie's updated Total Fan Control" which goes through the correct way to wire up your fans, do that & see how it works, i think it should solve your after-run problem & maybe even your loss of power problem too. if nothing else its a start in the right direction
Thread Starter
Supreme Member
Joined: Feb 2005
Posts: 1,286
Likes: 3
From: Torrance, CA
Car: 1991 Camaro RS
Engine: THE LT1 SWAP SHALL BEGIN!!!!
Transmission: 700 R4
Axle/Gears: LSD! =(
But before my car started to act up it turned on fine, and thats with the same set up that was hooked to my fusebox right now. Im going to try to disconnect it from the fusebox and try turning on the car again and see if it affects it any, brb.
Originally Posted by DENN_SHAH
i take that to mean the power wire goes from the fuse box right to the fan motors, if so, that won't work.
the fan motors must get their power through relays which get their main power feed right from the battery, you can supply power to turn on the relays from the switched side of the fuse box with no problem.
by going through the fuse box without using relays your robbing power power from the rest of the car.
plus when you turn the key off the fan motors keep running for a few seconds from inertia & turn into generators supplying power to the ECM & ignition system which is very hard on both the ignition module & ECM.
over in the cooling part of the boards there is a thread called "Willie's updated Total Fan Control" which goes through the correct way to wire up your fans, do that & see how it works, i think it should solve your after-run problem & maybe even your loss of power problem too. if nothing else its a start in the right direction
the fan motors must get their power through relays which get their main power feed right from the battery, you can supply power to turn on the relays from the switched side of the fuse box with no problem.
by going through the fuse box without using relays your robbing power power from the rest of the car.
plus when you turn the key off the fan motors keep running for a few seconds from inertia & turn into generators supplying power to the ECM & ignition system which is very hard on both the ignition module & ECM.
over in the cooling part of the boards there is a thread called "Willie's updated Total Fan Control" which goes through the correct way to wire up your fans, do that & see how it works, i think it should solve your after-run problem & maybe even your loss of power problem too. if nothing else its a start in the right direction

Thread
Thread Starter
Forum
Replies
Last Post