

Those that have modified their tpi airbox...


Supreme Member
Joined: Jan 2003
Posts: 1,931
Likes: 1
From: Ontario, Canada
Car: 1989 IROC-Z
Engine: 5.7L EFI LTR setup
Transmission: T-5 World Class
No water being "sucked in " . You can unbolt the whole assembly after you take the top off and the filters out. It's real easy to do.
Supreme Member
iTrader: (25)
Joined: Jul 2004
Posts: 2,623
Likes: 0
From: Beautiful BC
Car: '88 IROC-Z / '91 Z28 / '91 GTA
Engine: LT4 Hot Cam 305 / L98 355 / MR 383
Transmission: 5-spd / 700R4 / 700R4
Axle/Gears: 3:45 / 3:23 / 3:23
thanks, I'll have to try that.
Thread Starter
Supreme Member
iTrader: (10)
Joined: Jul 1999
Posts: 1,780
Likes: 2
From: Fla
Car: 90 IROC
Engine: 406
Transmission: GMPP 93/4L60
Axle/Gears: 9 bolt 3.27
Hey Guys.. just got back from a test drive! Big Difference in power!
If your thinking about doing this...do it! Its worth the effort! Topend is much improved. It was a restriction on my setup.
Feels like the peak has even raised a few hundred rpm. 10-20 rwh is not out of the question. when i get it on the dyno i will know for sure.
If your thinking about doing this...do it! Its worth the effort! Topend is much improved. It was a restriction on my setup.
Feels like the peak has even raised a few hundred rpm. 10-20 rwh is not out of the question. when i get it on the dyno i will know for sure.
Thread Starter
Supreme Member
iTrader: (10)
Joined: Jul 1999
Posts: 1,780
Likes: 2
From: Fla
Car: 90 IROC
Engine: 406
Transmission: GMPP 93/4L60
Axle/Gears: 9 bolt 3.27
Yeah its speed density.
Brisk...i have the boxes cut off at the bottum as well. Ive never had any problems with water that ive noticed. ive Driven in the rain many times.
Last edited by MikeH; Oct 19, 2006 at 05:16 PM.
Supreme Member
iTrader: (1)
Joined: Jul 2001
Posts: 4,627
Likes: 5
From: Houston Area
Car: Faster
Engine: Than
Transmission: You!
I custom made my air-boxes out of thin galvanized sheet metal, I tig welded the boxes together and sealed the inside seams with silicone. The motor never gets above 190* under any circumstance. However, I do have my fans wired together, so they both come on at the same time. Yes, I did notice a difference from arround 55 mph on up. Nice little gain, but dont expect a huge gain. Hope this helps!
Thread Starter
Supreme Member
iTrader: (10)
Joined: Jul 1999
Posts: 1,780
Likes: 2
From: Fla
Car: 90 IROC
Engine: 406
Transmission: GMPP 93/4L60
Axle/Gears: 9 bolt 3.27
Good job on those 1bad91z ive seen yours before. Those are about as good as it gets for this design.
IM still working on the finish for the lid its in epoxy primer. IM undecided if i should paint it semi-gloss, gloss, or satin. Black of course.
For those interested i bought the tubing from Intake Hoses, IntakeTubing, and Intake Clamps
IM still working on the finish for the lid its in epoxy primer. IM undecided if i should paint it semi-gloss, gloss, or satin. Black of course.
For those interested i bought the tubing from Intake Hoses, IntakeTubing, and Intake Clamps
Senior Member
iTrader: (4)
Joined: Mar 2004
Posts: 813
Likes: 1
From: San Antonio, Tx
Car: 86 Camaro Z28/ 87 Camaro IROC Z28
Engine: 5.0L TPI LB9 / 5.0 TPI LB9 w/cam
Transmission: Built 700R4 with Transgo shift kit
Axle/Gears: 3.27 9 bolt Posi/ 2.73 10 bolt Posi
Those are some really interesting mods, i would like to do the intake tract as well, but i have a MAF setup. I did drill some 1/2" holes in the lower airbox, near the side vents that it actually uses to suck air in. On top of the vents, i offset drilled some 1/4" holes down along the side, so that if it sucked water in, they would still hit those baffles/silencers. It does help it build the airmass faster and coupled with drilling down the EGR walls inside the plenum on the tpi, it has more top end. I am going to start looking around at the duct work at home depot, lol


Joined: Oct 1999
Posts: 549
Likes: 0
From: Apple Valley, MN
Car: 92 Z28 convertible
Engine: Miniram 383
Transmission: T-56
Axle/Gears: 4.10 stk 10 bolt
MikeH, Thats an awesome mod to the stock airbox! Im gonna have a 550 HP 383 breathing thru the stock airbox and this looks like something I want to do to mine. Do you have any more pics of the airbox before you started finishing it? i just wanted to see what the "popped" out plastic looked like beore you started smoothing it out. How hard was it to make the 3.5 pvc pipe blend into the airbox?? A tech article would be cool, but I can see your a busy man. LOL. Thanks in advance.
Thread Starter
Supreme Member
iTrader: (10)
Joined: Jul 1999
Posts: 1,780
Likes: 2
From: Fla
Car: 90 IROC
Engine: 406
Transmission: GMPP 93/4L60
Axle/Gears: 9 bolt 3.27
Hi Randy....Thanks..I wish I had taken more pics. I had every intention, to take lots of pics. But was short on time and wanted to complete it.
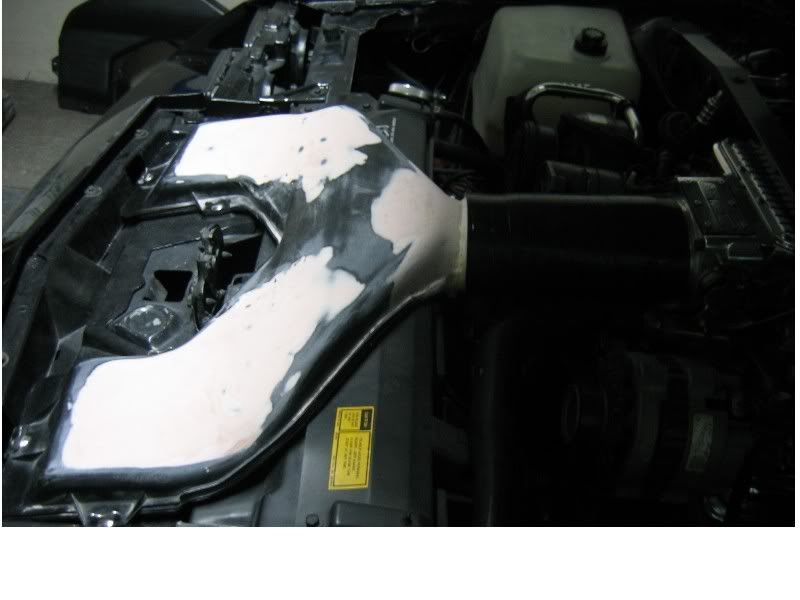
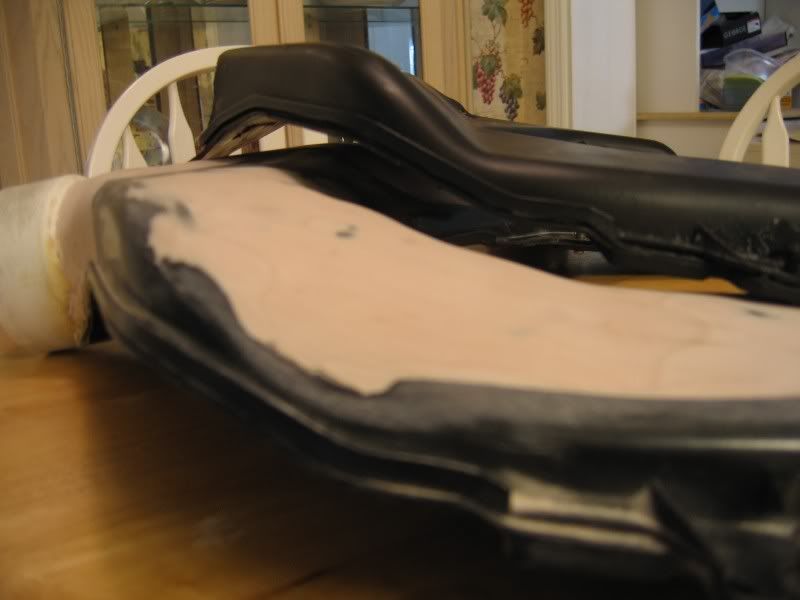
Sorry, I dont have any of the box before the filler work. The filler is pretty thin though. If you take your time with the heat it will come out nice. And not need much filler. I was just starting to get the hang of heating and prying the plastic up. If you have an extra lid you might want to practice on it first. i had to heat an area and apply pressure from the inside. It took quite a awhile to do this. The trick is to work a small section at a time. not try to over stretch it all at once. I could have made it higher in the filter area even, but wanted to be done with it. It was mostly the same height from the neck to the filters anyway after.
There area in the middle of the lid just behind the latch. i couldnt raise because it hit the hood. With a little work to the hood. i could have really opened the lid. but i think what i did is good enough.
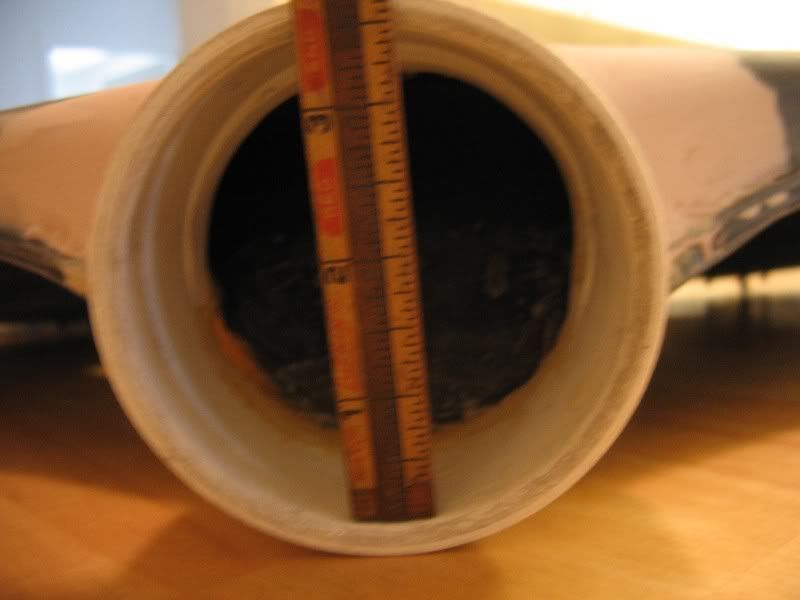
The neck peice was the easy part. What i used was a three way fitting. I choose it because it had a nice flare to the neck of it. I cut it about 3" from the end. It was around 12 bucks at home depot. It necked down at one point to 3" and i opened it up to almost 3.5. Had to leave a little for strenght. If you look at the picture above where the stock box is cut at the neck. Thats what it looked like before i inserted the neck peice. I knife edged the neck peice. Kind of a press fit. I wish i had pics for you. I used a pair of tin snips and a sawsall to cut the lid and pvc.
Tech article? i would like to but im just to busy with work right now. Hard to find time to work my car. But maybe in the near future.
One reason i think it works so well. is that the silicone hose is 4" id and goes over the pvc fitting. Not inside..where it necks down to 3.5" this stores alot more air. And the stock lid necked down to about 5/8" id. Almost like the factory was trying to restrict power.
Sorry, I dont have any of the box before the filler work. The filler is pretty thin though. If you take your time with the heat it will come out nice. And not need much filler. I was just starting to get the hang of heating and prying the plastic up. If you have an extra lid you might want to practice on it first. i had to heat an area and apply pressure from the inside. It took quite a awhile to do this. The trick is to work a small section at a time. not try to over stretch it all at once. I could have made it higher in the filter area even, but wanted to be done with it. It was mostly the same height from the neck to the filters anyway after.
There area in the middle of the lid just behind the latch. i couldnt raise because it hit the hood. With a little work to the hood. i could have really opened the lid. but i think what i did is good enough.
The neck peice was the easy part. What i used was a three way fitting. I choose it because it had a nice flare to the neck of it. I cut it about 3" from the end. It was around 12 bucks at home depot. It necked down at one point to 3" and i opened it up to almost 3.5. Had to leave a little for strenght. If you look at the picture above where the stock box is cut at the neck. Thats what it looked like before i inserted the neck peice. I knife edged the neck peice. Kind of a press fit. I wish i had pics for you. I used a pair of tin snips and a sawsall to cut the lid and pvc.
Tech article? i would like to but im just to busy with work right now. Hard to find time to work my car. But maybe in the near future.
One reason i think it works so well. is that the silicone hose is 4" id and goes over the pvc fitting. Not inside..where it necks down to 3.5" this stores alot more air. And the stock lid necked down to about 5/8" id. Almost like the factory was trying to restrict power.
Thread Starter
Supreme Member
iTrader: (10)
Joined: Jul 1999
Posts: 1,780
Likes: 2
From: Fla
Car: 90 IROC
Engine: 406
Transmission: GMPP 93/4L60
Axle/Gears: 9 bolt 3.27
Hey guys...Found a little something i didnt notice at first. I had the intake off today for the final paint.
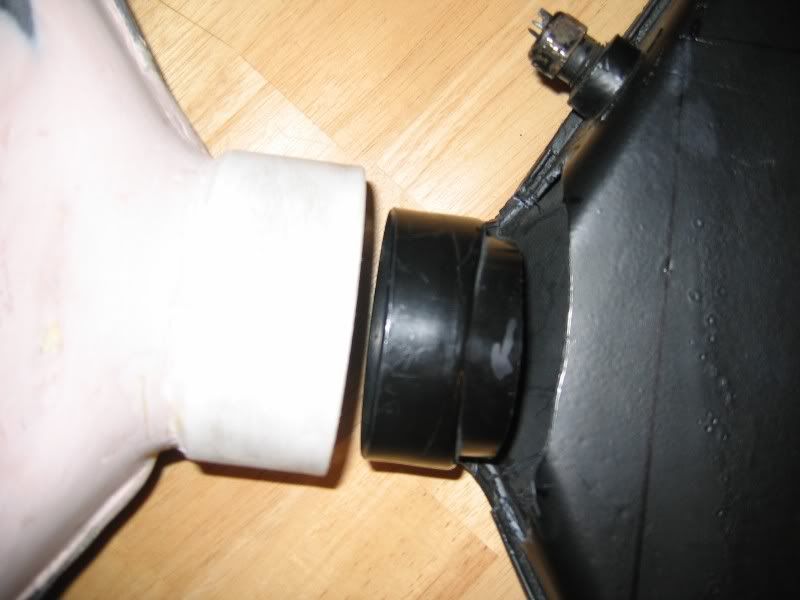
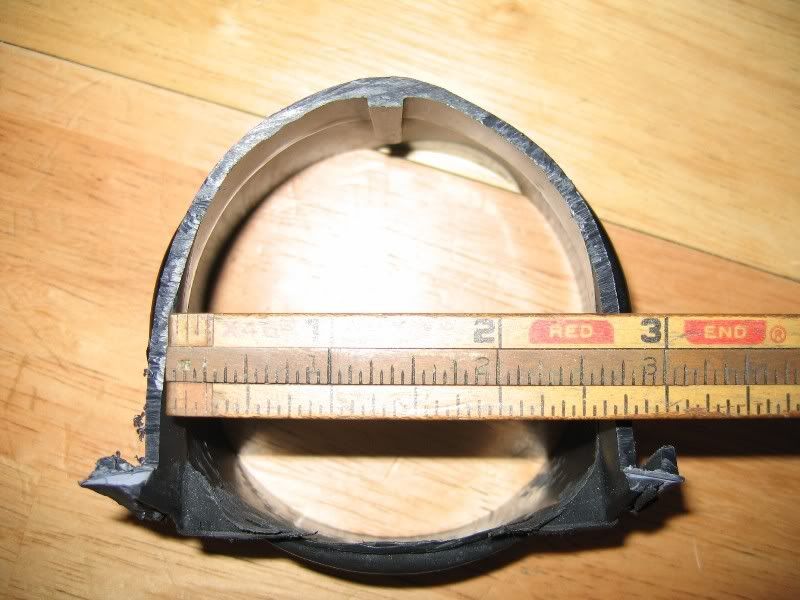
The TB is oval and the box is round, but you knew that anyways right.
Well, when i stuffed the 4" od pipe into the 4" id boot. I pressed the pipe inward to make the oval. it fit fine but didnt take much time with it.
Well when i looked into the boot it was blocking the throttle bores some. So I pulled it off and on. and messaged it with a hammer, and rattail file to get rid of the bur.
If your running a larger tb like a 58mm you might want to spend some time working on it. Mine still needs some but its much better then before.
Heres a pic of what im talking about.
I hope to have some finished pics for you guys today!

Senior Member
Joined: May 2002
Posts: 570
Likes: 0
From: Maryland
Car: 91 z28
Engine: 350 TPI
Transmission: 700 R4
Axle/Gears: 3.23
MikeH I am looking at doing the same mod and was wondering if you had to order 3 of the 4 x 8" silicone hose sections like you initially thought. I was looking at the website where you ordered yours and saw that they only offered 4 x 6" sections.

Supreme Member
iTrader: (3)
Joined: Oct 2005
Posts: 1,833
Likes: 0
From: Cincinatti OH
Car: 1991 L03 700r4 RS
Engine: 1987 WS6 Trans AM Lb2
Transmission: Th350 red neck Performance 3k stall
Axle/Gears: 95 Mustang 8.8 built with 3.73s
I tried fitting the CAI I built with no luck last night so I started on a modified air box. I didn't want to saw off any ends or have to epoxy much so I wanted to see how far I could port the stock box. I used a heat gun and a torch to heat the ridges in the inlet and slowly roll them outward, then used a 60 grit flap wheel to finish up the inside. I also raised the roof at the crease somewhat. The little bit of lifting I did in this area created alot more space for air to flow and didn't change the shape of the box much. I managed to get the inlet opened up to 3in at its narrowest, and took that silly ridge at the bottom almost completely out. I cut through in a few places but it's no big issue to fill those spots in or tape them over. This box is for a MAF car or I would've just done the mod as this thread described.
Thread Starter
Supreme Member
iTrader: (10)
Joined: Jul 1999
Posts: 1,780
Likes: 2
From: Fla
Car: 90 IROC
Engine: 406
Transmission: GMPP 93/4L60
Axle/Gears: 9 bolt 3.27
I got side tracked on other things last weekend. But will have some pics for you guys tomarrow.
I didnt buy the one piece hose. yeah i would of had to buy three costing around 65.00 dollars.
So what i did was buy the 4x3 and the 4x6. When i slid them over the 4x6 pipe they fit so well. And are pretty much seem less. Even when looking close at it. Works just as good and much cheaper. The 4x9" Total length fit just right. It nice and tight on the pipe and only needed two clamps one on each end.
1991camaroRslow..good job i know that was alot of work! 3" is a big improvement over the stocker.

Member
iTrader: (1)
Joined: Jan 2005
Posts: 317
Likes: 0
From: willow grove, PA
Car: 1992 Camaro vert
Engine: 355
Transmission: 700r4
Axle/Gears: 10 bolt... not blow up yet

Thread Starter
Supreme Member
iTrader: (10)
Joined: Jul 1999
Posts: 1,780
Likes: 2
From: Fla
Car: 90 IROC
Engine: 406
Transmission: GMPP 93/4L60
Axle/Gears: 9 bolt 3.27
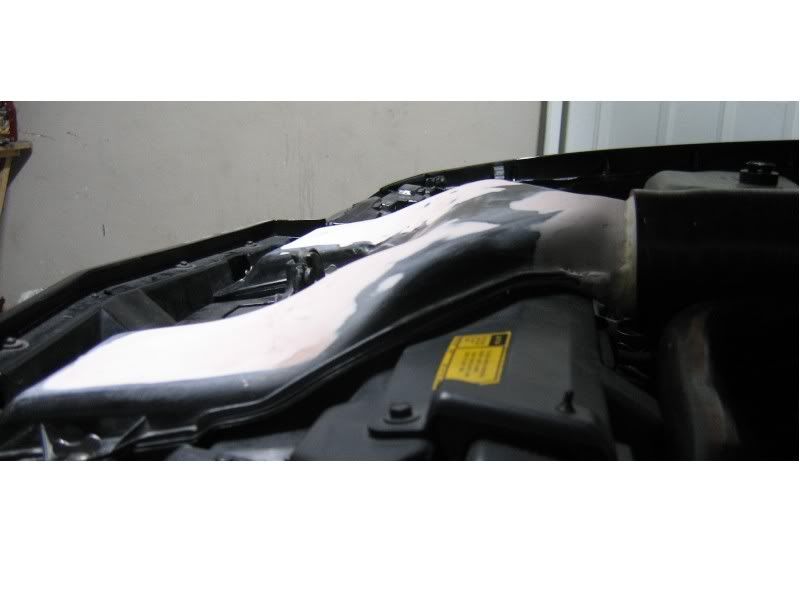
Its done 2 coats of epoxy, 3 coats of primer surfacer, and 3 coats of single stage urethane.
Here is a couple pics i will post more later after i upload them. I still need one more 4" clamp see if i can pick one up monday.
Let me know what you think!
Here is a couple pics i will post more later after i upload them. I still need one more 4" clamp see if i can pick one up monday.
Let me know what you think!
Supreme Member
iTrader: (3)
Joined: Oct 2005
Posts: 1,833
Likes: 0
From: Cincinatti OH
Car: 1991 L03 700r4 RS
Engine: 1987 WS6 Trans AM Lb2
Transmission: Th350 red neck Performance 3k stall
Axle/Gears: 95 Mustang 8.8 built with 3.73s
No joke that looks absolutly show car quality. Congrats on the finished product!

Junior Member
Joined: Aug 2006
Posts: 28
Likes: 0
From: Kansas City
Car: 1990 IROC-Z
Engine: 305
Transmission: 5 Speed
Man that air lid looks beautiful and it looks like it would really flow a whole lot more, but I was wondering if that would work for cars with the stock hood, as it looks like you'd have some fitment issues. You have any idea how much taller than the stock lid it is? thanks for the pics and write-ups.
Thread Starter
Supreme Member
iTrader: (10)
Joined: Jul 1999
Posts: 1,780
Likes: 2
From: Fla
Car: 90 IROC
Engine: 406
Transmission: GMPP 93/4L60
Axle/Gears: 9 bolt 3.27
Hey thanks for the kind words guys! Looking at the new paint on the lid. made me realize how bad the engine bay and core support needs to be painted. Maybe later! I picked up another 4" clamp today. Installed it, and its good to go.
I got a chance to take the car out tonight and really run it out. If i had known how much the stock lid. was restricting my setup, i would have done this along time ago. Part throttle, topend, the whole power band is noticably improved. One of the single best mods ive done to this car. Next to the 406.
I didnt bother because i kept hearing the stock lid is not that bad. But At some point it did become THAT bad. Ive modified everything from it back so it stands to reason it was a restriction. I think i might have to play with AE even. I think I felt a slight off idle hesition that wasnt there before.
I really dont know if it will clear the stock hood or not. it just barely clears my SS hood. I have a stock IROC hood but the paint is new and i hate to take a chance with installing it to see. What i will do is compare the two the best i can and report back.
I will measure the two lids as well, and let you guys know how much taller it is.
Looking at the new paint on the lid. made me realize how bad the engine bay and core support needs to be painted. Maybe later! I picked up another 4" clamp today. Installed it, and its good to go.I got a chance to take the car out tonight and really run it out. If i had known how much the stock lid. was restricting my setup, i would have done this along time ago. Part throttle, topend, the whole power band is noticably improved. One of the single best mods ive done to this car. Next to the 406.
I didnt bother because i kept hearing the stock lid is not that bad. But At some point it did become THAT bad. Ive modified everything from it back so it stands to reason it was a restriction. I think i might have to play with AE even. I think I felt a slight off idle hesition that wasnt there before.
I really dont know if it will clear the stock hood or not. it just barely clears my SS hood. I have a stock IROC hood but the paint is new and i hate to take a chance with installing it to see. What i will do is compare the two the best i can and report back.
I will measure the two lids as well, and let you guys know how much taller it is.
Thread Starter
Supreme Member
iTrader: (10)
Joined: Jul 1999
Posts: 1,780
Likes: 2
From: Fla
Car: 90 IROC
Engine: 406
Transmission: GMPP 93/4L60
Axle/Gears: 9 bolt 3.27
Well it looks like there is around an 1 1/4" more clearance with the SS hood. Over the stock IROC hood In the latch area above the lid. The lid I modified is about 1 1/4 taller then the stock lid in this same area. So i have about the same clearance as stock now. There is a cross brace on the stock hood thats absent on the SS hood.
Will it fit a stock hood.. i dont know. If someone could take some modeling clay or playdough for those with kids lol. And place few pieces around on top of the air lid above the filters. Close the hood and measure the height of the clay. That will tell you how much ceiling you have to work with.
Will it fit a stock hood.. i dont know. If someone could take some modeling clay or playdough for those with kids lol. And place few pieces around on top of the air lid above the filters. Close the hood and measure the height of the clay. That will tell you how much ceiling you have to work with.
Junior Member
Joined: Aug 2006
Posts: 95
Likes: 0
Car: 1991 Z28
Engine: 383 TPIS Mini Ram
Transmission: D&D Perf Viper/GM T-56
Axle/Gears: 3.73's Eaton Posi
When I still had my TPI, before I went to a TPIS miniram, I set up mine from pieces from Home Depot. I built it when I was about 18 (29now) but it worked very well. I took aluminum dryer ducting and cut them approx 18''. I cut the bottom of the stock air filter holers leaving the bump out in the plastic. I took two plastic dryer exits. the ones that mount on the outside of the house with the three fins. Took out the fins mounted them to the ducting and curved the ducting right behind the fog lights. On the bottom of the fog lights there are self tapping screws, and I pushed the ducting onto them to hold them there. I then got to K&N filters and snapped the cover back on. Cost me about 12 bucks in parts and although it wasn't show quality it worked really well. Later I did sheet metal and formed it to fit in its place. Got a better seat of the pants ride from both, now I have a speed density system to I fabed up a huge K&N to pick up air from where my battery tray used to be.
Supreme Member
iTrader: (3)
Joined: Oct 2005
Posts: 1,833
Likes: 0
From: Cincinatti OH
Car: 1991 L03 700r4 RS
Engine: 1987 WS6 Trans AM Lb2
Transmission: Th350 red neck Performance 3k stall
Axle/Gears: 95 Mustang 8.8 built with 3.73s
Did you notice a difference between the dryer ducting and the the sheet metal boxes?


Thread Starter
Supreme Member
iTrader: (10)
Joined: Jul 1999
Posts: 1,780
Likes: 2
From: Fla
Car: 90 IROC
Engine: 406
Transmission: GMPP 93/4L60
Axle/Gears: 9 bolt 3.27
I tried fitting the CAI I built with no luck last night so I started on a modified air box. I didn't want to saw off any ends or have to epoxy much so I wanted to see how far I could port the stock box. I used a heat gun and a torch to heat the ridges in the inlet and slowly roll them outward, then used a 60 grit flap wheel to finish up the inside. I also raised the roof at the crease somewhat. The little bit of lifting I did in this area created alot more space for air to flow and didn't change the shape of the box much. I managed to get the inlet opened up to 3in at its narrowest, and took that silly ridge at the bottom almost completely out. I cut through in a few places but it's no big issue to fill those spots in or tape them over. This box is for a MAF car or I would've just done the mod as this thread described.
Member
Joined: Jun 2003
Posts: 273
Likes: 0
From: Arroyo Grande CA
Car: 87 IROC - 67 Camaro
Engine: 383 TPI - ZZ4 TPI
Transmission: 700R4 in both cars
Axle/Gears: 3.27 - 3.36 posi in both cars
I modified my air box 3 years ago. I built a fiberglass mold for the top which adds 1" of height from the front "Y" and fairs out in front of the outlet to the MAF. You will have a hood clearence problem with my lid though. I built my fiberglass hood that has a deep indentation for the air box.

Junior Member
Joined: Aug 2006
Posts: 95
Likes: 0
Car: 1991 Z28
Engine: 383 TPIS Mini Ram
Transmission: D&D Perf Viper/GM T-56
Axle/Gears: 3.73's Eaton Posi
I have to say that I didn't notice a difference between the dryer ducting and the molded sheet metal. The only difference was that at the track I wasn't trying to quickly take out my filters without anyone seeing the dryer ducting. I actually made quite a few of the dryer ducting systems for my buddies and everyone couldn't believe that for under 20bucks they actually noticed more of a difference than with a chip.
Senior Member
iTrader: (1)
Joined: Nov 2006
Posts: 452
Likes: 1
From: Tennessee
Car: 1989 Pontiac GTA
Engine: 350 5.7 T.P.I.
Transmission: TH 700-R4
Axle/Gears: 3.27

Senior Member
iTrader: (1)
Joined: Nov 2006
Posts: 452
Likes: 1
From: Tennessee
Car: 1989 Pontiac GTA
Engine: 350 5.7 T.P.I.
Transmission: TH 700-R4
Axle/Gears: 3.27
Did you get a noticable difference in the miniram, because i was really thinking about buying it.
Supreme Member
iTrader: (3)
Joined: Oct 2005
Posts: 1,833
Likes: 0
From: Cincinatti OH
Car: 1991 L03 700r4 RS
Engine: 1987 WS6 Trans AM Lb2
Transmission: Th350 red neck Performance 3k stall
Axle/Gears: 95 Mustang 8.8 built with 3.73s
The air lid made a noticeable difference past 4000rpm on a stock cammed TPI. The air lid, ported base, LS1 injectors, and stock ARAP prom with 2 degrees PE timing taken out at 3500 and programmed for 25lb injectors (had the regular ARAP before the injector swap) got me a pair of 13.5's at the track on Saturday. That's 4 tenths better than it's best ever 1/4 mile. The very first run of the day without really heating the ET streets it ran a 13.6. This mod is something you should most definetly do. The hood's barely hitting the air box at the highest point where I heat raised it. You can actually raise the indention on a stock box quite a bit before it'll hit, probably 1/2in.
Thread Starter
Supreme Member
iTrader: (10)
Joined: Jul 1999
Posts: 1,780
Likes: 2
From: Fla
Car: 90 IROC
Engine: 406
Transmission: GMPP 93/4L60
Axle/Gears: 9 bolt 3.27
Jmiller...good job on that. I thought about cutting the top off one lid, and stacking them, but it flares out at the bottom, so that wouldnt work to well.
You must have some good fiberglass skills to have done that. Did you open the restriction at the neck? Cant tell from the pic.
You must have some good fiberglass skills to have done that. Did you open the restriction at the neck? Cant tell from the pic.
Thread Starter
Supreme Member
iTrader: (10)
Joined: Jul 1999
Posts: 1,780
Likes: 2
From: Fla
Car: 90 IROC
Engine: 406
Transmission: GMPP 93/4L60
Axle/Gears: 9 bolt 3.27
The air lid made a noticeable difference past 4000rpm on a stock cammed TPI. The air lid, ported base, LS1 injectors, and stock ARAP prom with 2 degrees PE timing taken out at 3500 and programmed for 25lb injectors (had the regular ARAP before the injector swap) got me a pair of 13.5's at the track on Saturday. That's 4 tenths better than it's best ever 1/4 mile. The very first run of the day without really heating the ET streets it ran a 13.6. This mod is something you should most definetly do. The hood's barely hitting the air box at the highest point where I heat raised it. You can actually raise the indention on a stock box quite a bit before it'll hit, probably 1/2in.
Thats great... good ETs...i was wondering how much room there was between the lid and the stock hood.
----------
kuulkatdadieo...Thanks.. welcome to tgo.
Last edited by MikeH; Nov 20, 2006 at 02:54 PM. Reason: Automerged Doublepost
Thread Starter
Supreme Member
iTrader: (10)
Joined: Jul 1999
Posts: 1,780
Likes: 2
From: Fla
Car: 90 IROC
Engine: 406
Transmission: GMPP 93/4L60
Axle/Gears: 9 bolt 3.27
Hey guys found some pics of the expoy i used.
And a pic of the fitting i used for the neck. It has a nice flare to the end. So it flows/fits the opening of the stock air lid.
oh yeah dont use the epoxy in the house anywhere. The fumes are to strong, keep it in the garage or outside if possible.
And a pic of the fitting i used for the neck. It has a nice flare to the end. So it flows/fits the opening of the stock air lid.
oh yeah dont use the epoxy in the house anywhere. The fumes are to strong, keep it in the garage or outside if possible.
Last edited by MikeH; Nov 25, 2006 at 02:24 PM.
Joined: Oct 1999
Posts: 549
Likes: 0
From: Apple Valley, MN
Car: 92 Z28 convertible
Engine: Miniram 383
Transmission: T-56
Axle/Gears: 4.10 stk 10 bolt
re: Those that have modified their tpi airbox...
Here is my airbox mod process going. Here are some before and after pic's of the airfilters view of the airbox. Thanks to MikeH for all the help and good idea!!
Senior Member
Joined: May 2002
Posts: 570
Likes: 0
From: Maryland
Car: 91 z28
Engine: 350 TPI
Transmission: 700 R4
Axle/Gears: 3.23
re: Those that have modified their tpi airbox...
I have a question about raising the roof because I was trying to do this and I couldn't get it to move. How hot did you guys have to get the plastic to make it pliable and what did you use to push it up?
Joined: Oct 1999
Posts: 549
Likes: 0
From: Apple Valley, MN
Car: 92 Z28 convertible
Engine: Miniram 383
Transmission: T-56
Axle/Gears: 4.10 stk 10 bolt
re: Those that have modified their tpi airbox...
I used a Wagner power stripper to heat mine up. You have to pick a section and work it up slowly. I used a 1" and 1 1/8" wrenches to "pop" up the airbox lid, MikeH mentioned he used the wrenches and then ended up using a ball peen hammer handle to do his. I would usually heat the 2" by 2" area for 5 minutes, sometimes the plastic would bubble a bit, but just back off the heat alittle, pry up the area and let it cool.
Last edited by Randy92Z; Apr 11, 2007 at 06:20 PM.
Thread Starter
Supreme Member
iTrader: (10)
Joined: Jul 1999
Posts: 1,780
Likes: 2
From: Fla
Car: 90 IROC
Engine: 406
Transmission: GMPP 93/4L60
Axle/Gears: 9 bolt 3.27
re: Those that have modified their tpi airbox...
Hey Randy...Great job.. ..the filler work looks really good also! Its a lot of work but worth it when you go for that first test drive!
Yeah it takes a good bit of heat to soften it. I used a heat gun i bought from home depot. Mine bubbled too, but once its all sanded and filled it will look nice.
..the filler work looks really good also! Its a lot of work but worth it when you go for that first test drive!Yeah it takes a good bit of heat to soften it. I used a heat gun i bought from home depot. Mine bubbled too, but once its all sanded and filled it will look nice.
Last edited by MikeH; Apr 11, 2007 at 07:46 PM.
Joined: Oct 1999
Posts: 549
Likes: 0
From: Apple Valley, MN
Car: 92 Z28 convertible
Engine: Miniram 383
Transmission: T-56
Axle/Gears: 4.10 stk 10 bolt
re: Those that have modified their tpi airbox...
Here are a few more pics of my current progress. I decided to let the 4" pipe be exposed for a different look. I know it may absorb some heat but I plan on powdercoating it mirror black and when my hood gets painted, I plan on painting the airbox car color. (blue)
Senior Member

Joined: Apr 2001
Posts: 798
Likes: 3
From: Powder Springs, Georgia, USA
Car: 1992 Black Z28 Hardtop
Axle/Gears: 2002 10 bolt w/3:23
re: Those that have modified their tpi airbox...
I've been trying to find out how much the factory airbox flows. Any Ideas or opinions
Thread Starter
Supreme Member
iTrader: (10)
Joined: Jul 1999
Posts: 1,780
Likes: 2
From: Fla
Car: 90 IROC
Engine: 406
Transmission: GMPP 93/4L60
Axle/Gears: 9 bolt 3.27
re: Those that have modified their tpi airbox...
Post some pics when its done, i want to see how the pipe looks mirror black and the body color lid. Ive seen some intakes in that color(mirror black)and it looks really sharp!
The problem i had doing mine was trying not to get to carried away with raising it. I would keep it on the car over night when i wasnt working on it. So the lower part of the lid didnt loose its shape. It follows closely over the radiator support. And with the heating its easy to get it bent out of shape. And sticking up off the core support.
92BLKL98...I had an old mag and there was some flow testing in it. But cant remember what the numbers where. They did a before and after test. Removing the bottums. IM thinking it was in the high 500s low 600s cfms. Not sure though, if i can find the mag i will let you know.
If you can get a copy of TPS insider hints book i think there are flow numbers in it.
Last edited by MikeH; Apr 19, 2007 at 07:11 PM.
Senior Member
Joined: Apr 2001
Posts: 798
Likes: 3
From: Powder Springs, Georgia, USA
Car: 1992 Black Z28 Hardtop
Axle/Gears: 2002 10 bolt w/3:23
re: Those that have modified their tpi airbox...
92BLKL98...I had an old mag and there was some flow testing in it. But cant remember what the numbers where. They did a before and after test. Removing the bottums. IM thinking it was in the high 500s low 600s cfms. Not sure though, if i can find the mag i will let you know.
If you can get a copy of TPS insider hints book i think there are flow numbers in it.
If you can get a copy of TPS insider hints book i think there are flow numbers in it.

Junior Member

Joined: Feb 2007
Posts: 64
Likes: 0
re: Those that have modified their tpi airbox...
Thread Starter
Supreme Member
iTrader: (10)
Joined: Jul 1999
Posts: 1,780
Likes: 2
From: Fla
Car: 90 IROC
Engine: 406
Transmission: GMPP 93/4L60
Axle/Gears: 9 bolt 3.27
re: Those that have modified their tpi airbox...
Yeah..Thanks for sharing that! Would be interesting to see the numbers without the maf in the mix.
Looks like the lid and maybe the filters are the biggest restriction. cutting the bottums off the base without doing work to the lid added little if i read that right.
I have an idea of putting a small K@N filter in the top of the lid. Too increase the filter media area but didnt follow thru with it Yet.
Supreme Member
iTrader: (3)
Joined: Sep 2003
Posts: 6,859
Likes: 14
From: Cypress, California
Car: 1989 GTA
Engine: 369 TPI
Transmission: 4L60E
Axle/Gears: 3.70 Nine Bolt
re: Those that have modified their tpi airbox...
Something I was reminded of today at our dyno session. The air lid modification that MikeH did was worth a solid seven horsepower on one of the cars we dyno'd awhile back. I would imagine the more horsepower your car is making the bigger the horsepower increase you would see from MikeH's modification.

Supreme Member
Joined: Jul 1999
Posts: 2,149
Likes: 4
From: Mims, Florida
Car: '87 IROCZ
Engine: 395 ZZ4
Transmission: ProBuilt 700R4
Axle/Gears: 9 bolt 3.70s
re: Those that have modified their tpi airbox...
I want to say that this mod is awesome, both the airbox mod and the ram air mod.. Together this dual mod is very effective on the MAP cars, they will see the max effect of the mods. Us MAF guys will not see nearly the same effect because the MAF sensor is a major restriction. That was the inspiration for me the construction my MEGA MAF.
Member
Joined: Jul 2013
Posts: 179
Likes: 46
From: Green bow Ala-freakin-bama
Car: 88 Iroc
Engine: 388 Vortec Pro-Flo 4 Small Block
Transmission: T56
Axle/Gears: 3.77 to 1
re: Those that have modified their tpi airbox...


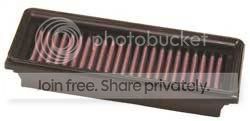
2002 corvette intake made by Volant
Ram air box was custom made out of 0.028� thick 304 stainless.
Last edited by Tombowman89; Oct 30, 2022 at 02:38 PM.