

Those that have modified their tpi airbox...

Thread Starter
Supreme Member
iTrader: (10)
Joined: Jul 1999
Posts: 1,780
Likes: 2
From: Fla
Car: 90 IROC
Engine: 406
Transmission: GMPP 93/4L60
Axle/Gears: 9 bolt 3.27
Those that have modified their tpi airbox...
I want to open the restriction. where the boot connects to the y shaped air box. IM going to get some 3.5" pvc from the local hardware. How do i weld or connect it to the box.
Ive seen others that have done this but cant find the post or person. If you have done this please share how you connected the new piece to the box.
Ive opened the area up where it necks down to 3/4. using a heat gun, the only restriction now is where the boot connects.
Thanks,
Mike
Ive seen others that have done this but cant find the post or person. If you have done this please share how you connected the new piece to the box.
Ive opened the area up where it necks down to 3/4. using a heat gun, the only restriction now is where the boot connects.
Thanks,
Mike

Member
Joined: Nov 2005
Posts: 213
Likes: 0
From: KC MO
Car: 90 iroc
Engine: 305 tpi
Transmission: 700R4
First check in the tech articles section it should be located in the tpi mods area. But if that doest have what your looking for simply search the site using the search function
Thread Starter
Supreme Member
iTrader: (10)
Joined: Jul 1999
Posts: 1,780
Likes: 2
From: Fla
Car: 90 IROC
Engine: 406
Transmission: GMPP 93/4L60
Axle/Gears: 9 bolt 3.27
lol..really i never thought of that...lol...Of course i searched had i found what i was looking for i wouldnt have made this post.


Joined: Jul 1999
Posts: 10,950
Likes: 27
From: Orange, SoCal
Car: 1990 Pontiac Trans Am
Engine: 355 TPI siamesed runners
Transmission: Tremec T56
Axle/Gears: 12-Bolt 3.73
I have my airbox modded this way, done by JerryWho. It was worth 8 hp at the wheels on my car and on other car. I dont have any pictures though. He used some kind of plastic glue.
Thread Starter
Supreme Member
iTrader: (10)
Joined: Jul 1999
Posts: 1,780
Likes: 2
From: Fla
Car: 90 IROC
Engine: 406
Transmission: GMPP 93/4L60
Axle/Gears: 9 bolt 3.27
I took a heat gun to the part where it really necks down. Opened it up pretty good, not pretty but it should help. I have a stocker i can throw on there if i need to. I plan to make a before and after pull on the dyno using it.
Ive never glued stuff like this before so im unsure what would hold up to the heat. I was talking to a buddy and he suggested marine grade epoxy. He said they Also make, some type of glue that welds plexi glass. I might give those a try.
Trending Topics


Supreme Member
iTrader: (3)
Joined: Oct 2005
Posts: 1,833
Likes: 0
From: Cincinatti OH
Car: 1991 L03 700r4 RS
Engine: 1987 WS6 Trans AM Lb2
Transmission: Th350 red neck Performance 3k stall
Axle/Gears: 95 Mustang 8.8 built with 3.73s
Pics of where you opened the box with the heat gun would be appreciated. I'm thinking of doing a CAI that drops down in front of the tire but if I can get the stock Y intake opened up good enough I'll just stick with that.
Thread Starter
Supreme Member
iTrader: (10)
Joined: Jul 1999
Posts: 1,780
Likes: 2
From: Fla
Car: 90 IROC
Engine: 406
Transmission: GMPP 93/4L60
Axle/Gears: 9 bolt 3.27
Thanks i will look for that.
I got alot done on the intake tonight. its turning out good so far. when its all filled and painted should look close to stock. just flow alot better.
1991CamaroRslow...I will be sure to post some pics when its done.
Thread Starter
Supreme Member
iTrader: (10)
Joined: Jul 1999
Posts: 1,780
Likes: 2
From: Fla
Car: 90 IROC
Engine: 406
Transmission: GMPP 93/4L60
Axle/Gears: 9 bolt 3.27
That plastic weld epoxy worked great! Its all welded up just have to paint it, and make it look pretty.
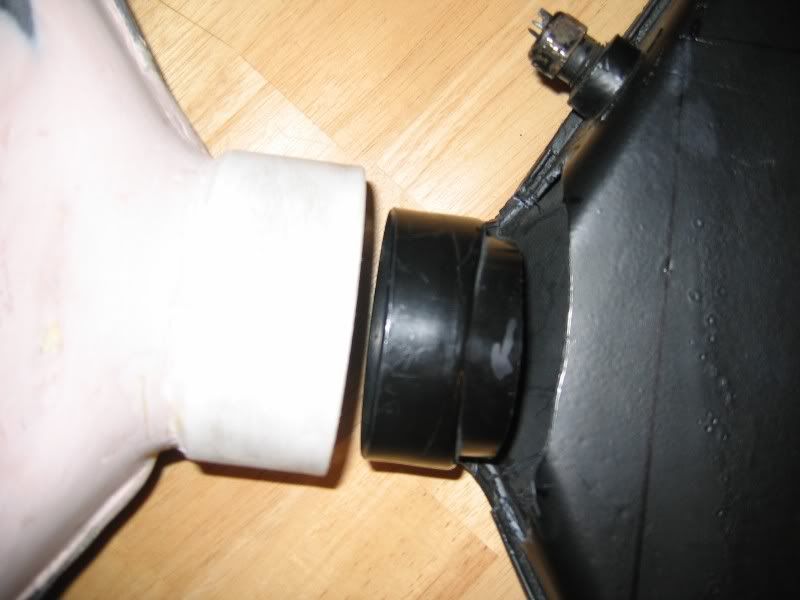
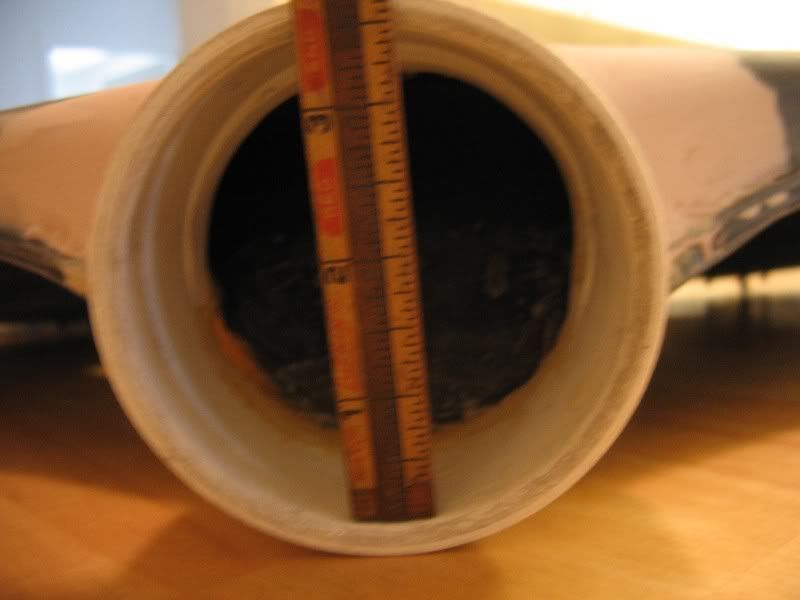
The smallest area now is 3.5" just as it goes into the box. I ported it as much as i could. Stock was 2 5/8" im going to run a 4"x8" silicone intake hose. The stock intake hose is 4" on the tb end. And the new intake opening is 4" so it should look clean with the 4" one peice hose.
IM hope to get about 15 rwh out of it. But will see.....
Thread Starter
Supreme Member
iTrader: (10)
Joined: Jul 1999
Posts: 1,780
Likes: 2
From: Fla
Car: 90 IROC
Engine: 406
Transmission: GMPP 93/4L60
Axle/Gears: 9 bolt 3.27
Heres the boots im looking at, not sure what would work better.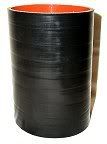
or this one.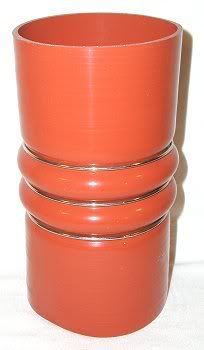
or go with the two rubber ends and the aluminum pipe in the middle.

or this one.
or go with the two rubber ends and the aluminum pipe in the middle.
Supreme Member
iTrader: (3)
Joined: Oct 2005
Posts: 1,833
Likes: 0
From: Cincinatti OH
Car: 1991 L03 700r4 RS
Engine: 1987 WS6 Trans AM Lb2
Transmission: Th350 red neck Performance 3k stall
Axle/Gears: 95 Mustang 8.8 built with 3.73s
Can you post some pics of how you heat gunned the stock box open? I'de like to see the entire setup once it's done.
Supreme Member
Joined: Dec 2005
Posts: 1,244
Likes: 1
From: Texas City, Texas Area
Car: 89 RS, 92 Z28
Engine: 305 TBI, 350 TPI
Transmission: 700R4 Both Cars
Axle/Gears: 3.23 Posi.. 4 wheel disc both cars
Yes PLEASE post some pics for us, I am interested in doing something similar..Thanks, Tom
Thread Starter
Supreme Member
iTrader: (10)
Joined: Jul 1999
Posts: 1,780
Likes: 2
From: Fla
Car: 90 IROC
Engine: 406
Transmission: GMPP 93/4L60
Axle/Gears: 9 bolt 3.27
Hey guys, im sorry i dont have any pics yet. My work is really crazy right now. So i dont have much time for the car at the moment. But when i can i will take some pics for you.
What i did with the heatgun, was apply the heat to the outside of the box. And used a large wrench from the inside to pry the plastic as it got soft upward. Crude but it worked to open the area as it dropped down to the air filter area. Im sure you know the spot it gets real thin. Just keep working the crease till it pops upward. This will bubble the plastic some, but it can be sanded and filled to look nice. Just try to keep it looking as uniform as possible. Saves work in the end. IM not sure if this will work on the stock hood though. Might not close.
Also this works in the filter area to sort of raise the roof. Just flipp the box over and apply the heat to the inside. Place the box over something thats open. I used a large pipe. Then take your tool of choice and push the top of the filter area up. Just try to raise the roof.
The plastic epoxy can be sanded as well. Im still working on getting the silicone hose im going with the black one pictured. But i might have to by three to get the one because its a special order because of the 8" lenght. Havent found it anywhere else yet.
Last edited by MikeH; Oct 19, 2006 at 09:17 PM.

Supreme Member
Joined: Jan 2003
Posts: 1,931
Likes: 1
From: Ontario, Canada
Car: 1989 IROC-Z
Engine: 5.7L EFI LTR setup
Transmission: T-5 World Class
Here is a pic of my setup . It may not be as ncie as your plans but man it fits in there sweet. It's a furnace elbow. 6" round into a 3x? square mouth. It fits right over the boot that comes outthe back of the fog lights.

Thread Starter
Supreme Member
iTrader: (10)
Joined: Jul 1999
Posts: 1,780
Likes: 2
From: Fla
Car: 90 IROC
Engine: 406
Transmission: GMPP 93/4L60
Axle/Gears: 9 bolt 3.27
Hey thanks for sharing that. Ive seen that done. good way to bring in the cold air. I might end up doing something similar with mine as well.

Member
Joined: Apr 2005
Posts: 350
Likes: 0
From: england, UK
Car: '87 iroc camaro
Engine: 350 L98
Transmission: 700-R4
Axle/Gears: 3.27 posi
this is what i'm looking to do also
I've got a '87 350 , i'm trying to figure out what bit you heated up and removed. if i undone the butter fly clips holding the y-shaped housing and remove the airfilters all i chan see is a plastic set up , so are you saying that you heat all of that up and gouge it all out and just run a clear peice of ducting down to the fog lights ?????
I'm a simple guy that struggles with the stuff you guys find easy
Supreme Member
iTrader: (3)
Joined: Oct 2005
Posts: 1,833
Likes: 0
From: Cincinatti OH
Car: 1991 L03 700r4 RS
Engine: 1987 WS6 Trans AM Lb2
Transmission: Th350 red neck Performance 3k stall
Axle/Gears: 95 Mustang 8.8 built with 3.73s
You cut all those silencers out. I believe he's heating the actual box.
Member
Joined: Apr 2005
Posts: 350
Likes: 0
From: england, UK
Car: '87 iroc camaro
Engine: 350 L98
Transmission: 700-R4
Axle/Gears: 3.27 posi
what before it goes into the y part.
its a bit difficult for me as my car has been in the garage for 3 weeks getting the transmission sorted so i cant look and realte to anything. so that plastic setup under the filters is silencers then once i cut them out is the area free to run ducting down to the fogs ?
its a bit difficult for me as my car has been in the garage for 3 weeks getting the transmission sorted so i cant look and realte to anything. so that plastic setup under the filters is silencers then once i cut them out is the area free to run ducting down to the fogs ?
Thread Starter
Supreme Member
iTrader: (10)
Joined: Jul 1999
Posts: 1,780
Likes: 2
From: Fla
Car: 90 IROC
Engine: 406
Transmission: GMPP 93/4L60
Axle/Gears: 9 bolt 3.27
Right, look at the picture above you need to remove all the stuff under the filters. There is info on this in the tech section.
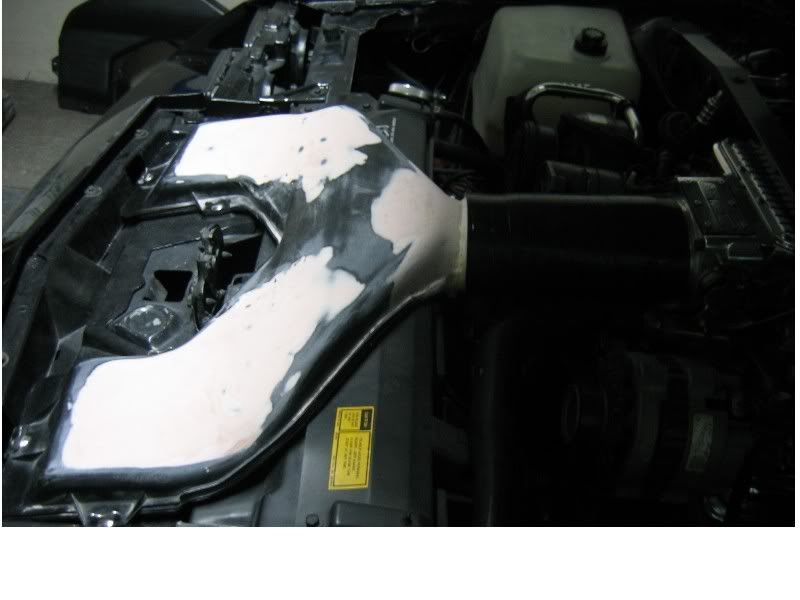
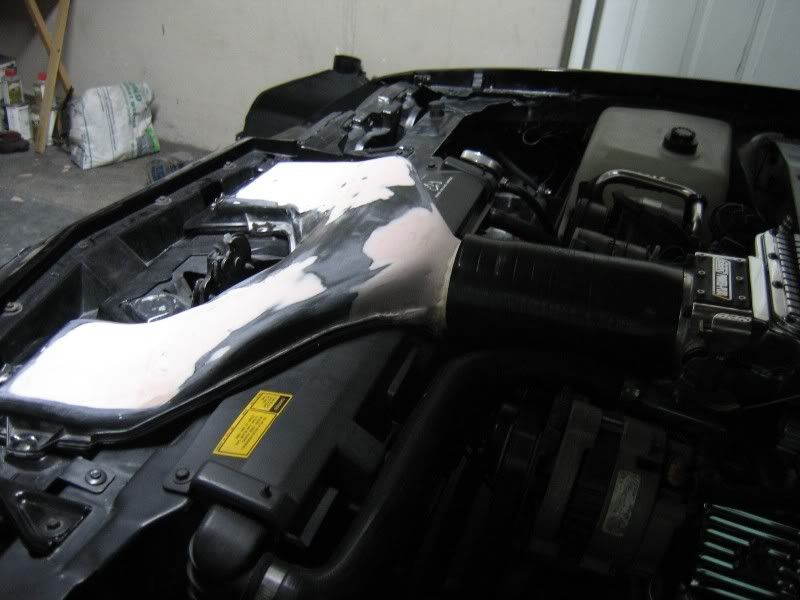
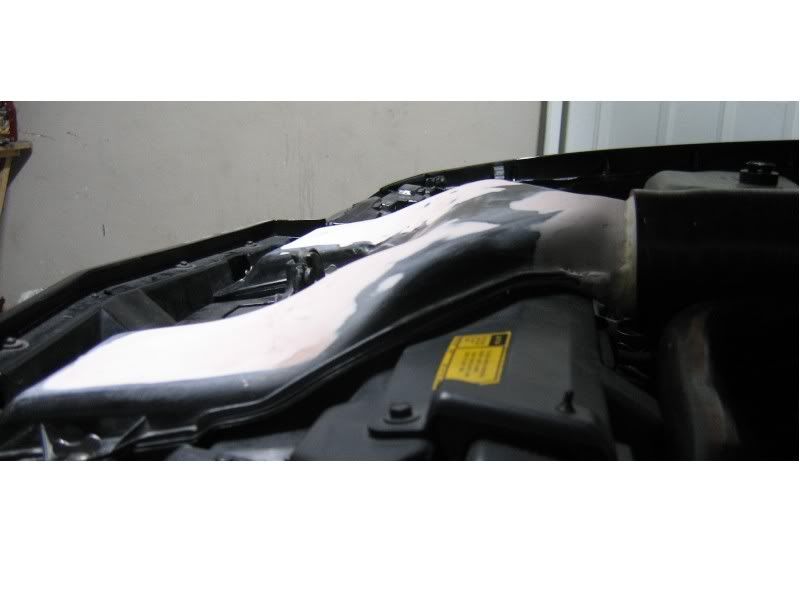
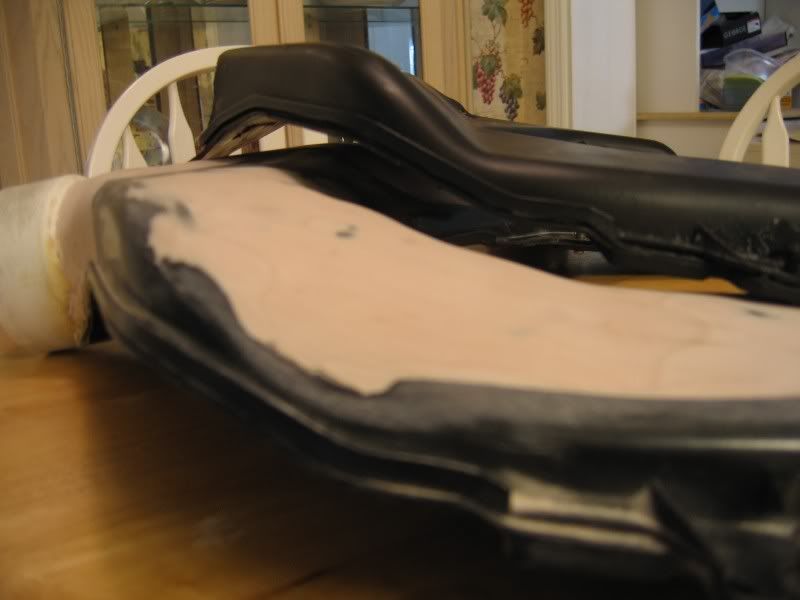
I got some more done last night on the box. I found the wooden end of a large ballpeen hammer i have worked great at finishing the box. I just kept heating the low spots and working them up to smooth the box out. Kinda like metal working a panel. So it looks uniform, not like someone just heated the thing with a torch lol.
The lid is now the same height from the boot area. And slopes down nicely to the filter area. Before it necked down really tight.
I ordered the 4"id silicone hose,and a peice of 4" od aluminum intake pipe. IM gonna shove the pipe, into the hose to prevent any collapsing. Thats common on the stocker on the topend.
Heres a picture of the filter im talking about.
I also have a idea for a third K&N filter that mounts on the top of the box. I found one on the website thats 7"x3" a panel type filter. It will fit into the bottum of the hood when the hood is closed, and pull cold air from the scoop and the latch area like the stocker. But it will mount on top of the air box.
The SS hood i have has an air gap between the top and bottum peices. And the filter would sit in this area when the hood is closed. Looks like it will work just have to buy the filter and try it out. I have a spare that im using as a test box.
Last edited by MikeH; Oct 8, 2006 at 04:56 PM.

Junior Member
Joined: Aug 2006
Posts: 28
Likes: 0
From: Kansas City
Car: 1990 IROC-Z
Engine: 305
Transmission: 5 Speed
I was just curious as to whether running ducting down to the fog lights decreases the airflow to the radiator. Because when i took out my lower airbox to cut off those silencers, I noticed what looked like a shroud leading back to the radiator. So have any of you guys with the ducting to the fog lights noticed any increase in temps or anything? and did you cut through this plastic shroud thing as well? Thanks.

Member
Joined: Jun 2002
Posts: 234
Likes: 0
From: Ottawa,Ontario,Canada
Car: 1989 Iroc-Z
Engine: 305 TPI
Transmission: 700R4
Axle/Gears: 2.73 (for now)
I was just curious as to whether running ducting down to the fog lights decreases the airflow to the radiator. Because when i took out my lower airbox to cut off those silencers, I noticed what looked like a shroud leading back to the radiator. So have any of you guys with the ducting to the fog lights noticed any increase in temps or anything? and did you cut through this plastic shroud thing as well? Thanks.

Supreme Member
iTrader: (1)
Joined: Mar 2005
Posts: 1,171
Likes: 0
From: Hamilton
Car: 1990 IROCZ Camaro
Engine: 350 4bbl, 200cc Heads, 270hr Cam
Transmission: 700R4 w/ Trans-Go shift kit.
Axle/Gears: GM 10 bolt Posi
I was just curious as to whether running ducting down to the fog lights decreases the airflow to the radiator. Because when i took out my lower airbox to cut off those silencers, I noticed what looked like a shroud leading back to the radiator. So have any of you guys with the ducting to the fog lights noticed any increase in temps or anything? and did you cut through this plastic shroud thing as well? Thanks.
I noticed that it felt like it was pulling slightly harder at higher rpms, and I'm even the skeptical type of person when it comes to increasing horsepower.
1bad91Z, what are the size specs on the ducting you got, and where did you get it from?
Supreme Member
Joined: Dec 2005
Posts: 1,244
Likes: 1
From: Texas City, Texas Area
Car: 89 RS, 92 Z28
Engine: 305 TBI, 350 TPI
Transmission: 700R4 Both Cars
Axle/Gears: 3.23 Posi.. 4 wheel disc both cars
1bad91Z, awesome job man.....Love the way the front end looks with the silver in there from the duct work.....What about engine temp???? What about power (if any) difference...Thanks, Tom

1bad91z, looks real nice! My bud wanted to do the same thing.
Does **** from the road collect in the bottom though? Water a problem? I would think drilling a few small holes in the bottom of the ducts to let water escape and putting say a mesh screen at the openings. Even some window mesh...
Does **** from the road collect in the bottom though? Water a problem? I would think drilling a few small holes in the bottom of the ducts to let water escape and putting say a mesh screen at the openings. Even some window mesh...
Supreme Member
iTrader: (1)
Joined: Mar 2005
Posts: 1,171
Likes: 0
From: Hamilton
Car: 1990 IROCZ Camaro
Engine: 350 4bbl, 200cc Heads, 270hr Cam
Transmission: 700R4 w/ Trans-Go shift kit.
Axle/Gears: GM 10 bolt Posi
1bad91z, looks real nice! My bud wanted to do the same thing.
Does **** from the road collect in the bottom though? Water a problem? I would think drilling a few small holes in the bottom of the ducts to let water escape and putting say a mesh screen at the openings. Even some window mesh...
Does **** from the road collect in the bottom though? Water a problem? I would think drilling a few small holes in the bottom of the ducts to let water escape and putting say a mesh screen at the openings. Even some window mesh...

I don't get any rain or crap or anything in there, and I have driven through a hurricane. Is this due to the fact that there are ridges/baffling throughout the entire tube? No idea, but it's done well thus far.
Supreme Member
Joined: Jan 2003
Posts: 1,931
Likes: 1
From: Ontario, Canada
Car: 1989 IROC-Z
Engine: 5.7L EFI LTR setup
Transmission: T-5 World Class
I cut everything off the bottom of the box . Like when you unscrewthe whole base assembly ... everything under it is gone ...boxes and all
Supreme Member
iTrader: (25)
Joined: Jul 2004
Posts: 2,623
Likes: 0
From: Beautiful BC
Car: '88 IROC-Z / '91 Z28 / '91 GTA
Engine: LT4 Hot Cam 305 / L98 355 / MR 383
Transmission: 5-spd / 700R4 / 700R4
Axle/Gears: 3:45 / 3:23 / 3:23
this is what I want to do.. how do you get into to to remove it?? I don't even know where to start. also have you had or noticed any water getting sucked up to your filters or to the motor?
Member
iTrader: (2)
Joined: May 2003
Posts: 124
Likes: 0
From: Northeastern MD
Car: 92Z
Engine: 6.6
Transmission: 6
related..
Index of /~dzug/92z28/pics/intake-pipe
Pics of my stealth intake tract mod. 4" exhaust pipe in there. the 406 was collapsing the silicone intake tube at high underhood temps. Power dropped of slightly , MAP decreased, and it took a while for me to figure out just why. The first picture shows the collapse, held in place by a crushed coffee-can that was the first attempt at correction.
I suppose if I modified the Ypipe FIRST, I wouldn't have so easily collapsed the tube huh...
Since swapping to a 15 pound hood I planned on cutting the top curve completely off the Y and replacing with a flat sheet.. someday.
Pics of my stealth intake tract mod. 4" exhaust pipe in there. the 406 was collapsing the silicone intake tube at high underhood temps. Power dropped of slightly , MAP decreased, and it took a while for me to figure out just why. The first picture shows the collapse, held in place by a crushed coffee-can that was the first attempt at correction.
I suppose if I modified the Ypipe FIRST, I wouldn't have so easily collapsed the tube huh...
Since swapping to a 15 pound hood
I planned on cutting the top curve completely off the Y and replacing with a flat sheet.. someday. Supreme Member
Joined: Dec 2005
Posts: 1,244
Likes: 1
From: Texas City, Texas Area
Car: 89 RS, 92 Z28
Engine: 305 TBI, 350 TPI
Transmission: 700R4 Both Cars
Axle/Gears: 3.23 Posi.. 4 wheel disc both cars
1bad, what exactly is the ducting you are using??????????????Thanks..
Member
iTrader: (2)
Joined: May 2003
Posts: 124
Likes: 0
From: Northeastern MD
Car: 92Z
Engine: 6.6
Transmission: 6
It looks like metal HVAC duct tin, available at home depot etc, put together with crimps and silicone. If so, he may have patterns made... but the tin is cheap enough for you to make a few attempts..
I say take the picture he posted and try to DIY, it's more satisfying than following someone elses precise instructions anyway :P
prolly gotta be careful in the heavy downpours with many modded intakes, mine included, which is just a gutted stock box. can't slam into snowdrifts with that car huh ;P
I say take the picture he posted and try to DIY, it's more satisfying than following someone elses precise instructions anyway :P
prolly gotta be careful in the heavy downpours with many modded intakes, mine included, which is just a gutted stock box. can't slam into snowdrifts with that car huh ;P
Last edited by 92Z-666; Oct 13, 2006 at 09:30 PM.

Supreme Member
iTrader: (25)
Joined: Jul 2004
Posts: 2,623
Likes: 0
From: Beautiful BC
Car: '88 IROC-Z / '91 Z28 / '91 GTA
Engine: LT4 Hot Cam 305 / L98 355 / MR 383
Transmission: 5-spd / 700R4 / 700R4
Axle/Gears: 3:45 / 3:23 / 3:23
they're right here; Camaro 85-92 TPI Ram Air Boxes - HT-012
Supreme Member
iTrader: (3)
Joined: Oct 2005
Posts: 1,833
Likes: 0
From: Cincinatti OH
Car: 1991 L03 700r4 RS
Engine: 1987 WS6 Trans AM Lb2
Transmission: Th350 red neck Performance 3k stall
Axle/Gears: 95 Mustang 8.8 built with 3.73s
Hawks makes some pretty serious claims about those Ram Air boxes, 19ft lbs and 12hp should very be noticeable, I'm wondering if this wouldn't be a worthwhile mod. To all of the guys who have done a Ram Air setup, do you think these boxes are true to Hawks claims?

Senior Member
iTrader: (4)
Joined: May 2000
Posts: 588
Likes: 0
From: Oaks,Pa
Car: 89 IROC
Engine: 350 HSR
Transmission: modified 700R4
Axle/Gears: 3.42
Hawks makes some pretty serious claims about those Ram Air boxes, 19ft lbs and 12hp should very be noticeable, I'm wondering if this wouldn't be a worthwhile mod. To all of the guys who have done a Ram Air setup, do you think these boxes are true to Hawks claims?
Supreme Member
iTrader: (1)
Joined: Mar 2005
Posts: 1,171
Likes: 0
From: Hamilton
Car: 1990 IROCZ Camaro
Engine: 350 4bbl, 200cc Heads, 270hr Cam
Transmission: 700R4 w/ Trans-Go shift kit.
Axle/Gears: GM 10 bolt Posi
@ $100 too? You can definately scrap together an identical system from home depot for under $30.
Supreme Member
iTrader: (3)
Joined: Oct 2005
Posts: 1,833
Likes: 0
From: Cincinatti OH
Car: 1991 L03 700r4 RS
Engine: 1987 WS6 Trans AM Lb2
Transmission: Th350 red neck Performance 3k stall
Axle/Gears: 95 Mustang 8.8 built with 3.73s
I can scrap together an identical setup with my trusty rivet gun, tin snips, and the sheet of steel laying in my friends garage, anyone happen to have the measurements for those boxes 
Supreme Member
Joined: Dec 2005
Posts: 1,244
Likes: 1
From: Texas City, Texas Area
Car: 89 RS, 92 Z28
Engine: 305 TBI, 350 TPI
Transmission: 700R4 Both Cars
Axle/Gears: 3.23 Posi.. 4 wheel disc both cars
I have used a gutted TPI air box (No filters) and modded my factory TBI breather with a larger opening, and K, and N filter...I looks pretty good, kinda weird, yet has a factory look......We moved the opening on the round breather, and tack weilded a plate on the old opening..(will post pics soon) My question is should i use the electric sensor that is on the TPI part (cooler aire there) or should I use the one one the factory TBI breather?? (warmer air there) not sure I really understand the purpose of that????? Ideas anyone.....????? Thanks for any help guys....Tom
Supreme Member
iTrader: (3)
Joined: Oct 2005
Posts: 1,833
Likes: 0
From: Cincinatti OH
Car: 1991 L03 700r4 RS
Engine: 1987 WS6 Trans AM Lb2
Transmission: Th350 red neck Performance 3k stall
Axle/Gears: 95 Mustang 8.8 built with 3.73s
Use the one in the air breather if it's the same part number. I don't believe it is so double check that.
Thread Starter
Supreme Member
iTrader: (10)
Joined: Jul 1999
Posts: 1,780
Likes: 2
From: Fla
Car: 90 IROC
Engine: 406
Transmission: GMPP 93/4L60
Axle/Gears: 9 bolt 3.27
Well...I got some pics for you guys! Its still not painted yet. But, i thought you might. like to see what ive been talking about. I will post the finished ones later.

Member
Joined: Apr 2005
Posts: 350
Likes: 0
From: england, UK
Car: '87 iroc camaro
Engine: 350 L98
Transmission: 700-R4
Axle/Gears: 3.27 posi
Now i undestand whta you've been doing . LOL
Good job
I'm new to this so excuse the retard statement but i presume your running speed density due to the lack of MAF ?
Good job
I'm new to this so excuse the retard statement but i presume your running speed density due to the lack of MAF ?
Supreme Member
iTrader: (3)
Joined: Oct 2005
Posts: 1,833
Likes: 0
From: Cincinatti OH
Car: 1991 L03 700r4 RS
Engine: 1987 WS6 Trans AM Lb2
Transmission: Th350 red neck Performance 3k stall
Axle/Gears: 95 Mustang 8.8 built with 3.73s
I looked pretty closely and I don't think this mod will clear a stock hood, BUT I have 2 breathers so I might find out for everyone  This may go along with the ported base plate and LS1 injector mods, I'll keep everyone posted.
This may go along with the ported base plate and LS1 injector mods, I'll keep everyone posted.