Humount - Maptech review / howto
 10-08-2012, 12:52 AM
#1
Junior Member
Thread Starter
iTrader: (1)

Join Date: Jun 2012
Location: North central Alabama
Posts: 57
Likes: 0
Received 0 Likes
on
0 Posts
Car: 1985 Trans Am
Engine: Stock 305 converted to carb
Humount - Maptech review / howto
I kept seeing these wonderful looking radio installs here on the forums and really wanted one of these for my car. Despite being able to find lots of pictures more in depth info seemed scarce.

Yep. Did that. I learned enough to be sure it could work in my '85 Bird but more details would have made me feel allot better about it. Providing those details for the next guy is what this post is all about.
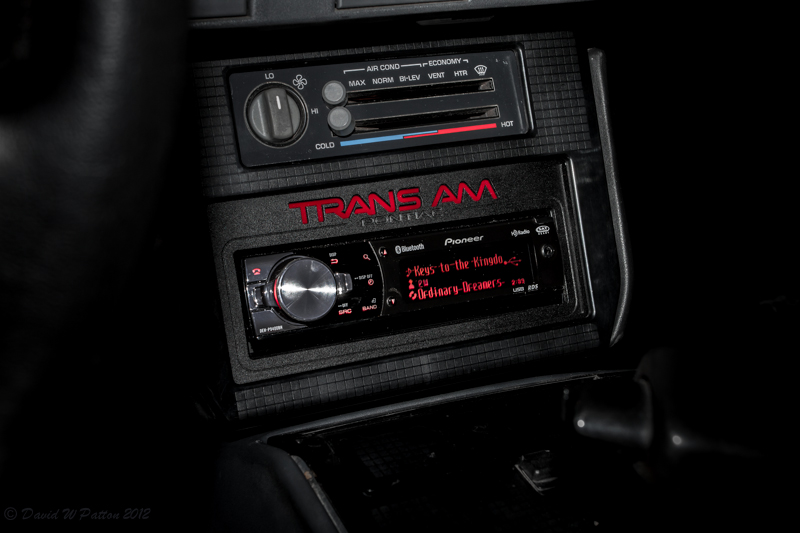
I made my way to http://maptechenterprises.com/storefront/ and went through the selection process to order my Head Unit Mount. When it came to choosing the "Main Lettering" I was unsure what the text "Trans AM (3rd Gen Design)" would actually look like. No pictures of what your ordering on the order page, just text. So I took a chance and got what you'll see below. Perfect. I chose "Pontiac" for the "Trim Lettering" and the "Red LED" option for the "Illumination".
"Products
------------------------------------------------------
1 x Firebird / Trans Am 1982-1992 = $87.00
Main Lettering Trans Am (3rd Gen Design)
Trim Lettering Pontiac
Lettering Location Above Opening
Illumination Red LED
Head Unit Name / Model Used Pioneer
DEH-P9400BH
------------------------------------------------------
Sub-Total: $87.00
Canada Post Small Parcel Air 7-14 Days (Shipping to US): $11.00"
Total with shipping came to $98.
I forked over my money and proceeded to wait.
Ordered on the 15th
Shipped on the 25th
Another week or so and I had it in my hands.
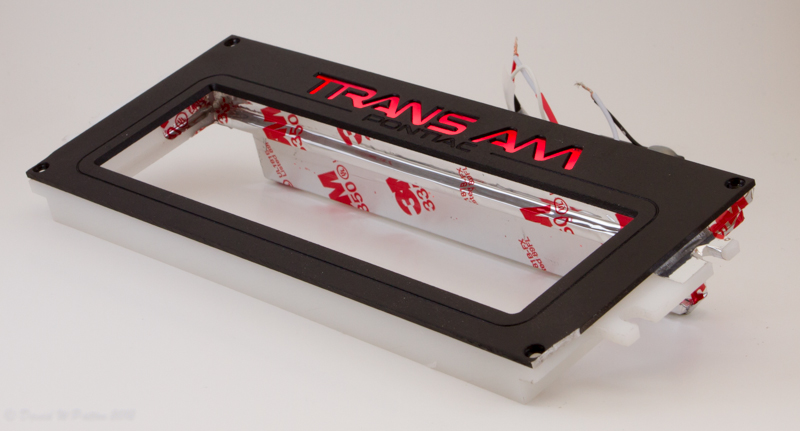
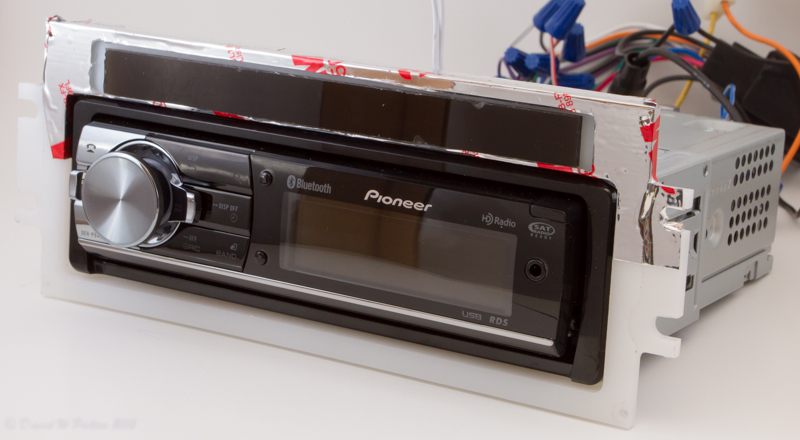
This photo shows the Humount with foil tape applied and LEDs illuminated.
It is a simple thing really. A machined chunk of very strong plastic, some LEDs and a machined aluminum face plate. Add to that a bar of tinted lexan? and a couple strips of metal tape 4 screws and you have the kit.
The metal tape is to block the light from the LEDs from leaking out in undesirable ways around the head unit. I had some trouble with the provided metal tape. The adhesive is pretty much permanent and I allowed some of it to stick to its self rendering it unusable. The 3M tape you see in these photos was provided by my local Lowe's store. Not as effective as what is provided with the Humount, but it got the job done.
The Humount comes with a full page of clear and helpful instructions. I will run through some of it here to give you an idea what your in for.
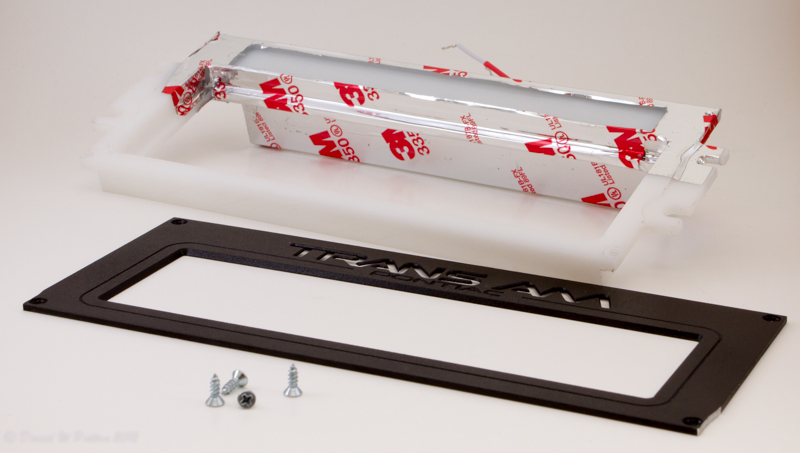
The mount comes fully assembled, so the first step is to take out the 4 screws and remove the face plate.
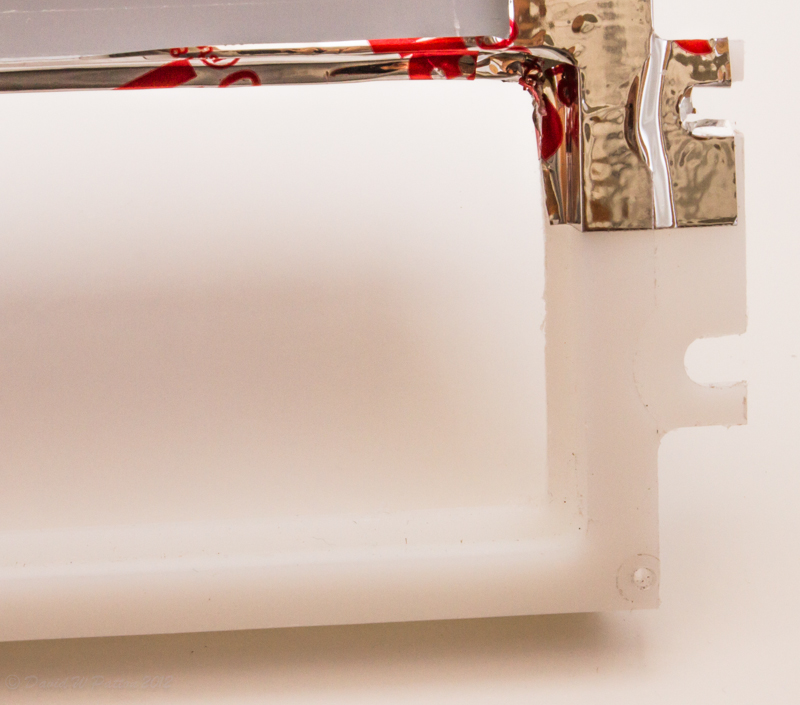
Next you will need the mounting cage that comes with your head unit. Test to see if it fits inside the Humount. It may not. I had to use a file to square up the corners and take a little off the ends to make mine fit. This is to be expected per the instructions.
Now that the cage fits the next step would be to apply the foil tape. The objective being to keep the light from going where it is not wanted. Of course with a non lighted unit no tape is needed.
Once the tape is on install the cage.
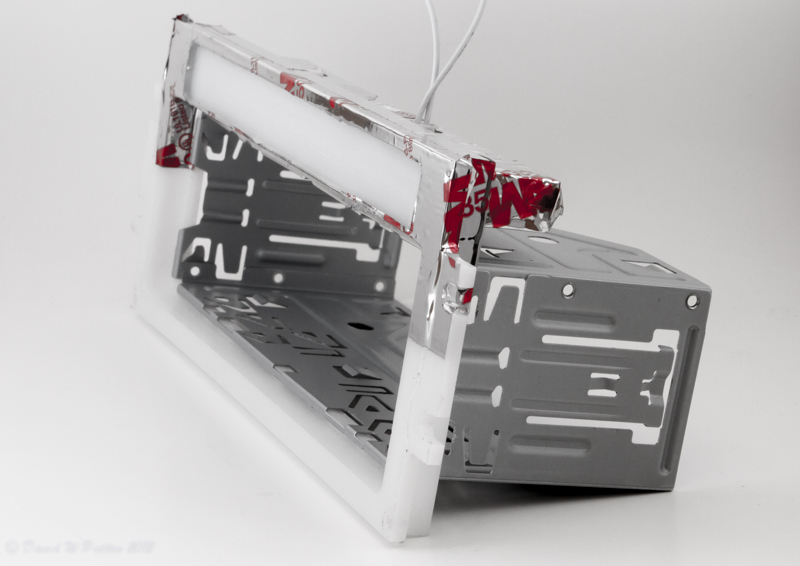
Bend the tabs down to secure the cage to the Humount.
Install the radio and tinted bar that goes behind the text.
Next - reattach the face plate.

At this point I think it is important to point out the lower corners of the face plate have been ground off. It did not come that way. When test fitting the unit I discovered the Firebird radio pod trim bezel would not sit down over the Humount. The Humount face plate is about 1/8th inch to wide. The choice is to grind away a bit of plastic reinforcement from the clips that hold the trim bezel on, or grind a little off the Humount face plate. I figured it won't hurt the Humount where as weakening the often broken trim piece would be an unnecessary risk.
The wiring has two places to plug in on the top of the Humount. Either will illuminate the whole thing.
When I saw the empty socket with no wires to plug in I thought I was in trouble, but it is just made that way. This photo shows the two sockets and the wires that feed the LEDs on the top of the Humount. The little black box is just a battery I was using to demo the lighting in the other photos.
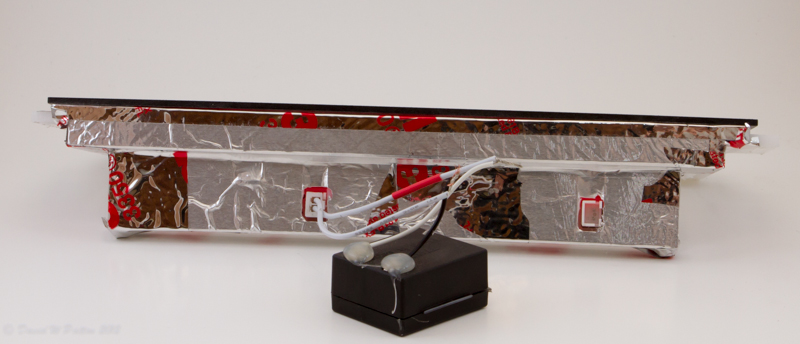
Both wires are white on my unit, but one has a piece of red shrink tube on it. The red goes to positive 12 volts and the other to ground. I chose to connect mine to the switched 12 volt wire rather than the dash lights wire so that the LEDs will come on when I start the car and not just when the lights are on.
That's it folks. we have successfully assembled our new Humount. Next challenge is getting the radio to fit in the Firebird radio pod. My suggestion is to take the radio pod out of the car and test fit the Humount / head unit into the pod to figure out what plastic you will need to cut out to achieve stuffing a flush mounted modern radio into it. The original radios were much shorter in depth than a typical single din radio of today. Just remember not to cut any more than necessary to get it to fit. You need to keep a little structural integrity in there. My head unit fit without modifying the duct work at all. I only had to cut out the center part that supported the old radio. Once you have the pod trimmed you will have the fun of making it all fit mounted in the car. I wound up putting the climate controls in then swiveling the pod toward the drivers side and working the radio in with one hand behind the pod to work the wires around in the back. When it was all said and done most of the wire was stuffed between the radio and the climate controls as their is almost no space behind the radio. Just saying, don't expect this to be easy. It is doable, just not easy.
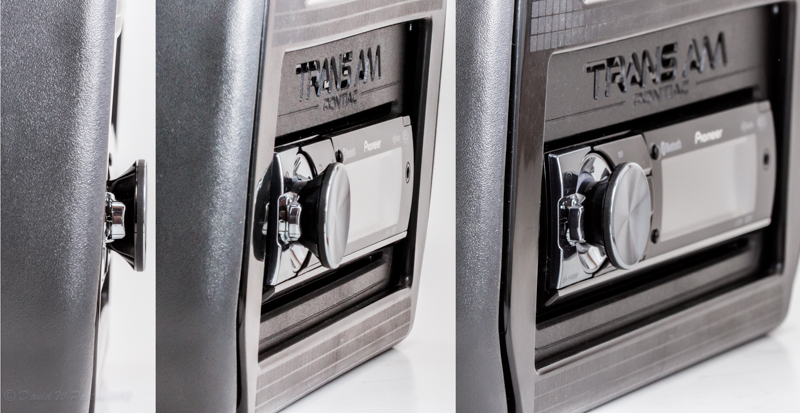
Just can't get any more flush than this.
Yep. Did that. I learned enough to be sure it could work in my '85 Bird but more details would have made me feel allot better about it. Providing those details for the next guy is what this post is all about.
I made my way to http://maptechenterprises.com/storefront/ and went through the selection process to order my Head Unit Mount. When it came to choosing the "Main Lettering" I was unsure what the text "Trans AM (3rd Gen Design)" would actually look like. No pictures of what your ordering on the order page, just text. So I took a chance and got what you'll see below. Perfect. I chose "Pontiac" for the "Trim Lettering" and the "Red LED" option for the "Illumination".
"Products
------------------------------------------------------
1 x Firebird / Trans Am 1982-1992 = $87.00
Main Lettering Trans Am (3rd Gen Design)
Trim Lettering Pontiac
Lettering Location Above Opening
Illumination Red LED
Head Unit Name / Model Used Pioneer
DEH-P9400BH
------------------------------------------------------
Sub-Total: $87.00
Canada Post Small Parcel Air 7-14 Days (Shipping to US): $11.00"
Total with shipping came to $98.
I forked over my money and proceeded to wait.
Ordered on the 15th
Shipped on the 25th
Another week or so and I had it in my hands.
This photo shows the Humount with foil tape applied and LEDs illuminated.
It is a simple thing really. A machined chunk of very strong plastic, some LEDs and a machined aluminum face plate. Add to that a bar of tinted lexan? and a couple strips of metal tape 4 screws and you have the kit.
The metal tape is to block the light from the LEDs from leaking out in undesirable ways around the head unit. I had some trouble with the provided metal tape. The adhesive is pretty much permanent and I allowed some of it to stick to its self rendering it unusable. The 3M tape you see in these photos was provided by my local Lowe's store. Not as effective as what is provided with the Humount, but it got the job done.
The Humount comes with a full page of clear and helpful instructions. I will run through some of it here to give you an idea what your in for.
The mount comes fully assembled, so the first step is to take out the 4 screws and remove the face plate.
Next you will need the mounting cage that comes with your head unit. Test to see if it fits inside the Humount. It may not. I had to use a file to square up the corners and take a little off the ends to make mine fit. This is to be expected per the instructions.
Now that the cage fits the next step would be to apply the foil tape. The objective being to keep the light from going where it is not wanted. Of course with a non lighted unit no tape is needed.
Once the tape is on install the cage.
Bend the tabs down to secure the cage to the Humount.
Install the radio and tinted bar that goes behind the text.
Next - reattach the face plate.
At this point I think it is important to point out the lower corners of the face plate have been ground off. It did not come that way. When test fitting the unit I discovered the Firebird radio pod trim bezel would not sit down over the Humount. The Humount face plate is about 1/8th inch to wide. The choice is to grind away a bit of plastic reinforcement from the clips that hold the trim bezel on, or grind a little off the Humount face plate. I figured it won't hurt the Humount where as weakening the often broken trim piece would be an unnecessary risk.
The wiring has two places to plug in on the top of the Humount. Either will illuminate the whole thing.
When I saw the empty socket with no wires to plug in I thought I was in trouble, but it is just made that way. This photo shows the two sockets and the wires that feed the LEDs on the top of the Humount. The little black box is just a battery I was using to demo the lighting in the other photos.
Both wires are white on my unit, but one has a piece of red shrink tube on it. The red goes to positive 12 volts and the other to ground. I chose to connect mine to the switched 12 volt wire rather than the dash lights wire so that the LEDs will come on when I start the car and not just when the lights are on.
That's it folks. we have successfully assembled our new Humount. Next challenge is getting the radio to fit in the Firebird radio pod. My suggestion is to take the radio pod out of the car and test fit the Humount / head unit into the pod to figure out what plastic you will need to cut out to achieve stuffing a flush mounted modern radio into it. The original radios were much shorter in depth than a typical single din radio of today. Just remember not to cut any more than necessary to get it to fit. You need to keep a little structural integrity in there. My head unit fit without modifying the duct work at all. I only had to cut out the center part that supported the old radio. Once you have the pod trimmed you will have the fun of making it all fit mounted in the car. I wound up putting the climate controls in then swiveling the pod toward the drivers side and working the radio in with one hand behind the pod to work the wires around in the back. When it was all said and done most of the wire was stuffed between the radio and the climate controls as their is almost no space behind the radio. Just saying, don't expect this to be easy. It is doable, just not easy.
Just can't get any more flush than this.
Last edited by Nunazet; 12-25-2012 at 09:05 PM. Reason: clarity
 10-08-2012, 12:46 PM
#2
Supreme Member

iTrader: (6)

Join Date: Oct 2006
Location: West of Toronto
Posts: 3,041
Likes: 0
Received 6 Likes
on
6 Posts
Car: 89 IROC
Engine: 305 TPI / ZZ4 cam
Transmission: Stage 2 700R4, LS1 driveshaft
Axle/Gears: Strange 3.42 w/ Auburn
Re: Humount review / howto
Good write up. 
I recall having to "trim" the plastic housing in the bottom corner as well to get my chassis to slide in. Took 30 sec with a hand file.
Mark @ Humount was great to talk to and offered quick advise.


I recall having to "trim" the plastic housing in the bottom corner as well to get my chassis to slide in. Took 30 sec with a hand file.
Mark @ Humount was great to talk to and offered quick advise.
Last edited by The Project; 10-08-2012 at 12:52 PM.
10-14-2012, 10:38 PM
#4
Junior Member
Thread Starter
iTrader: (1)
Join Date: Jun 2012
Location: North central Alabama
Posts: 57
Likes: 0
Received 0 Likes
on
0 Posts
Car: 1985 Trans Am
Engine: Stock 305 converted to carb
Re: Humount review / howto
Thanks guys, appreciate the complements.
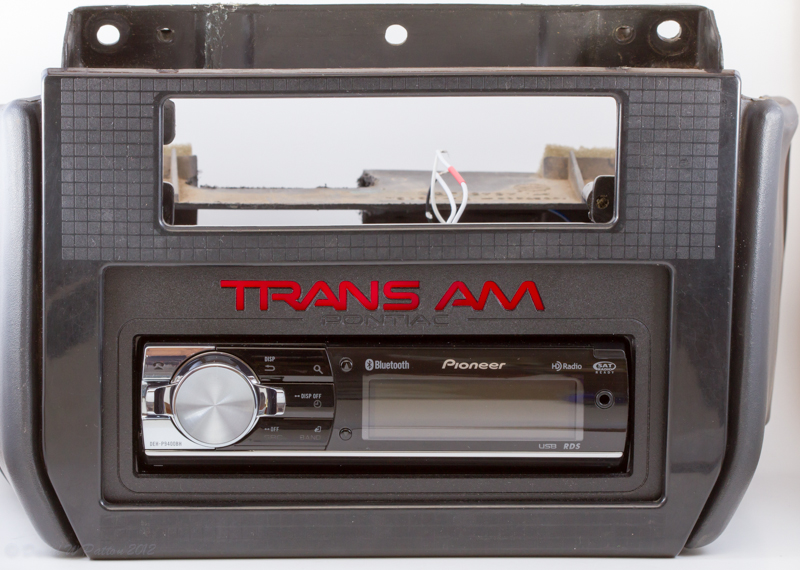
Thought I should add this photo now that I have it in the car.
Thought I should add this photo now that I have it in the car.
 12-25-2012, 05:46 AM
#6

Re: Humount review / howto
Great writeup thanks for sharing.
I did mine some time ago and worked with them to alter the design to fit the Firebird (85-92) much better than their original design ... just so it sits flush and no interference etc so the final design is a "plug-n-play" install.
I posted it over on TurboTransAm.com at the time http://www.turbotransam.com/forums/s...ht=humount.com
(note you might need to register to see the photos).
I also opted to not have the lighted logo on mine rather just the engraved logo and also centred the head-unit vertically.
12-25-2012, 06:13 PM
#7
Supreme Member
Join Date: Apr 2006
Location: Northern, CA
Posts: 4,482
Likes: 0
Received 8 Likes
on
8 Posts
Car: 1989 Iroc-Z Camaro
Engine: TBI,5.0
Transmission: Automatic 700R4
Axle/Gears: Eaton Posi,3.42,LPW Ultimate Cover
Re: Humount review / howto
Very nice set up and the guide to the install is great .
I looked that Pioneer unit up and man is there anything it cant do? Thats one face plate I would take with me for sure.
I looked that Pioneer unit up and man is there anything it cant do? Thats one face plate I would take with me for sure.
Last edited by Ron U.S.M.C.; 12-25-2012 at 06:26 PM.
Trending Topics
12-25-2012, 07:33 PM
#8
12-25-2012, 08:47 PM
#10
Junior Member
Thread Starter
iTrader: (1)
Join Date: Jun 2012
Location: North central Alabama
Posts: 57
Likes: 0
Received 0 Likes
on
0 Posts
Car: 1985 Trans Am
Engine: Stock 305 converted to carb
Re: Humount review / howto
I bought the unit based on price per feature. It has a lot more than I need but includes the things I wanted most for the best price I could find. the face plate tilts for access to the CD then is removed with a twist to take it with you. The humount does not interfere at all.
Last edited by Nunazet; 12-25-2012 at 08:57 PM.
 12-26-2012, 12:31 AM
#12
Supreme Member
iTrader: (2)

Join Date: Aug 2001
Location: Peoria, IL USA
Posts: 1,081
Likes: 0
Received 2 Likes
on
2 Posts
Car: 91 GTA
Engine: 377ci
Transmission: T56
Axle/Gears: QP Ford 9" 3.70s
Re: Humount - Maptech review / howto
I am also satisfied with the humount face plate. I had to do some triming to get it all in but was able to keep the vents also.
https://www.thirdgen.org/forums/post...79-post56.html
https://www.thirdgen.org/forums/post...79-post56.html
12-30-2012, 07:56 PM
#13
Senior Member
iTrader: (3)

Join Date: Jan 2004
Location: K.C. Mo.
Posts: 684
Likes: 0
Received 0 Likes
on
0 Posts
Car: '89 GTA 9,000 MILES
Engine: 350
Transmission: 700R4
Axle/Gears: 3.27 9 bolt
Re: Humount - Maptech review / howto
So have a low mileage car and don't want to modify things behind the radio.
Does this make it impossible since it is flush mount ?
Does this make it impossible since it is flush mount ?
12-30-2012, 09:07 PM
#14
Junior Member
Thread Starter
iTrader: (1)
Join Date: Jun 2012
Location: North central Alabama
Posts: 57
Likes: 0
Received 0 Likes
on
0 Posts
Car: 1985 Trans Am
Engine: Stock 305 converted to carb
Re: Humount - Maptech review / howto
Yes and no. The radio pod must be modified. So If you really like it just get a radio pod from a car being parted out and modify it. Then keep your original on the side unmodified for future use.
 12-30-2012, 11:00 PM
#16
Senior Member
iTrader: (3)
Join Date: Jan 2004
Location: K.C. Mo.
Posts: 684
Likes: 0
Received 0 Likes
on
0 Posts
Car: '89 GTA 9,000 MILES
Engine: 350
Transmission: 700R4
Axle/Gears: 3.27 9 bolt
Re: Humount - Maptech review / howto
Well yes but everyone talks about the ductwork needing cut, warped with heat and using duct tape ?
12-30-2012, 11:12 PM
#17
Senior Member
iTrader: (3)
Join Date: Jan 2004
Location: K.C. Mo.
Posts: 684
Likes: 0
Received 0 Likes
on
0 Posts
Car: '89 GTA 9,000 MILES
Engine: 350
Transmission: 700R4
Axle/Gears: 3.27 9 bolt
Re: Humount review / howto
Great writeup thanks for sharing.
I did mine some time ago and worked with them to alter the design to fit the Firebird (85-92) much better than their original design ... just so it sits flush and no interference etc so the final design is a "plug-n-play" install.
I posted it over on TurboTransAm.com at the time http://www.turbotransam.com/forums/s...ht=humount.com
(note you might need to register to see the photos).
I also opted to not have the lighted logo on mine rather just the engraved logo and also centred the head-unit vertically.
I did mine some time ago and worked with them to alter the design to fit the Firebird (85-92) much better than their original design ... just so it sits flush and no interference etc so the final design is a "plug-n-play" install.
I posted it over on TurboTransAm.com at the time http://www.turbotransam.com/forums/s...ht=humount.com
(note you might need to register to see the photos).
I also opted to not have the lighted logo on mine rather just the engraved logo and also centred the head-unit vertically.
So you only had to modify the radio pod and not the ductwork ?
Of course this would depend on the depth of the radio being used.....
12-31-2012, 08:39 AM
#18
Supreme Member
iTrader: (2)
Join Date: Aug 2001
Location: Peoria, IL USA
Posts: 1,081
Likes: 0
Received 2 Likes
on
2 Posts
Car: 91 GTA
Engine: 377ci
Transmission: T56
Axle/Gears: QP Ford 9" 3.70s
Re: Humount - Maptech review / howto
If you check out the link I posted you will see what the conventional face plate looks like that requires n modification. Without any modification you are going to have a deck that sticks out a bit. You will see why if you remove the stock radio. The reason the stock radio is a din and a half is so they could make it shorter and still cram all the stuff in the head unit. I suppose f a guy wanted to get creative he may be able to find one of those abbreviated marine head units with a separate amp and put it in there.

 12-31-2012, 07:48 PM
#21
Supreme Member
iTrader: (2)
Join Date: Aug 2001
Location: Peoria, IL USA
Posts: 1,081
Likes: 0
Received 2 Likes
on
2 Posts
Car: 91 GTA
Engine: 377ci
Transmission: T56
Axle/Gears: QP Ford 9" 3.70s
Re: Humount - Maptech review / howto
It can be flush mounted but the hvac ducts will need some of the bracing removed behind the head unit!
12-31-2012, 09:50 PM
#22
Supreme Member
Join Date: Dec 2000
Location: stallings,n.c.
Posts: 1,271
Likes: 0
Received 1 Like
on
1 Post
Car: 1989 camaro rs convertable
Engine: 305 tbi
Transmission: 700r4
Axle/Gears: 7.5"3.42 gears forth gen 2000 camar
Re: Humount - Maptech review / howto
i will never go to single din.the larger face on the 1.5 and 2 din radios mean the controls are large enough to use and the display is large enough to see clearly.im still waiting to see a double din radio mounted in a camaro.
01-05-2013, 08:57 PM
#23
Junior Member
Thread Starter
iTrader: (1)
Join Date: Jun 2012
Location: North central Alabama
Posts: 57
Likes: 0
Received 0 Likes
on
0 Posts
Car: 1985 Trans Am
Engine: Stock 305 converted to carb
Re: Humount - Maptech review / howto
The duct work being referred to is actually in the radio pod. Every thing that has to be modified is contained in the radio pod.
The head unit I used did not require any modification of the ducts, only removal of the plastic that supported the back of the original radio.
Last edited by Nunazet; 01-05-2013 at 09:04 PM.
01-05-2013, 09:48 PM
#24
Junior Member
Thread Starter
iTrader: (1)
Join Date: Jun 2012
Location: North central Alabama
Posts: 57
Likes: 0
Received 0 Likes
on
0 Posts
Car: 1985 Trans Am
Engine: Stock 305 converted to carb
Re: Humount - Maptech review / howto
It would be pointless but Yes. You could mount the cage into the aluminum face rather than into the plastic behind it. (May require significant filing to make it fit.) However it would only be a 1/4 inch difference and you would still have to modify the pod. The inside of the pod is molded to fit the original shorter radio and simply does not allow a single din radio to fit without modification or having it stick out significantly.
01-05-2013, 10:15 PM
#25
Junior Member
Thread Starter
iTrader: (1)
Join Date: Jun 2012
Location: North central Alabama
Posts: 57
Likes: 0
Received 0 Likes
on
0 Posts
Car: 1985 Trans Am
Engine: Stock 305 converted to carb
Re: Humount - Maptech review / howto
"Providing those details for the next guy is what this post is all about."
It seems I missed some important ones in that first post.
So here are the missing details.
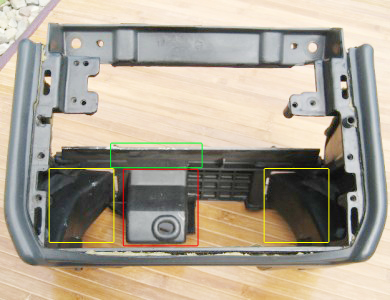
This is a view of the pod from the front with the trim, radio and climate controls removed.
Cut out the support in the red box but keep the part in the green box.
If needed modify or remove the ducts in the yellow boxes. The ducts are held in by one or two screws and are easily removed for modification or preservation if desired.
There is also a stud in the floor with a metal L bracket that attaches to the support boxed in red. Remove the L bracket. The stud should not need to be modified.
Test fit before you commit.
It seems I missed some important ones in that first post.
So here are the missing details.
This is a view of the pod from the front with the trim, radio and climate controls removed.
Cut out the support in the red box but keep the part in the green box.
If needed modify or remove the ducts in the yellow boxes. The ducts are held in by one or two screws and are easily removed for modification or preservation if desired.
There is also a stud in the floor with a metal L bracket that attaches to the support boxed in red. Remove the L bracket. The stud should not need to be modified.
Test fit before you commit.
Last edited by Nunazet; 01-05-2013 at 10:49 PM.
01-05-2013, 10:32 PM
#26
Senior Member
iTrader: (3)
Join Date: Jan 2004
Location: K.C. Mo.
Posts: 684
Likes: 0
Received 0 Likes
on
0 Posts
Car: '89 GTA 9,000 MILES
Engine: 350
Transmission: 700R4
Axle/Gears: 3.27 9 bolt
Re: Humount - Maptech review / howto
oK SO THE BACK OF THE RADIO IS LEFT TO BASICALLY FLOP AROUND.............................?
pERSONALLY I don't like that.
I have had this argument with others that fell it ok to attach a heavy car radio at the front panel and leave the rear to dangle..............
pERSONALLY I don't like that.
I have had this argument with others that fell it ok to attach a heavy car radio at the front panel and leave the rear to dangle..............
01-05-2013, 11:01 PM
#27
Re: Humount - Maptech review / howto
i didnt have any support on the back of the head unit, this time i made a bracket to hold one of the pins from a factory head unit so now its supported and i can tell the pod is much mor solid this time round.
wonder if you remove the ducts, block the ports that supplied them and made a support for the back of the head unit. this would do away with a bunch of duct modding.
01-05-2013, 11:03 PM
#28
Junior Member
Thread Starter
iTrader: (1)
Join Date: Jun 2012
Location: North central Alabama
Posts: 57
Likes: 0
Received 0 Likes
on
0 Posts
Car: 1985 Trans Am
Engine: Stock 305 converted to carb
Re: Humount - Maptech review / howto
The Humount is designed to support the weight, but I do see your point in that the weight could be too much for the front panel to support. However in my case the rear of the radio actually rests on the floor. It will not flop around. If I was concerned about it though I would fabricate a bracket that could attach to the radio and to the stud that sticks up out of the floor behind the radio. That type of stress relief is the original purpose of that stud. The only other option in my opinion would be to keep the factory radio as it is the only type I know of that would fit properly and make proper use of the support designed into the car.
01-06-2013, 10:21 AM
#29
Supreme Member
iTrader: (2)
Join Date: Aug 2001
Location: Peoria, IL USA
Posts: 1,081
Likes: 0
Received 2 Likes
on
2 Posts
Car: 91 GTA
Engine: 377ci
Transmission: T56
Axle/Gears: QP Ford 9" 3.70s
Re: Humount - Maptech review / howto
I used a small piece of L channel with a hole drilled in it and welded it to the floor. I road race my car, so that is why I did the rear support. Unless your radio is extremely heavy or shorter than a normal single din. I would not be to concerned about it. It rests on the floor and unless the roads you frequent are country trails it should be fine. To be totally honest I am concerned my radio takes more of a beating fastened to the car. I have though of getting some foam to let it rest on and calling it a day.
01-06-2013, 10:43 AM
#30
Senior Member
iTrader: (3)
Join Date: Jan 2004
Location: K.C. Mo.
Posts: 684
Likes: 0
Received 0 Likes
on
0 Posts
Car: '89 GTA 9,000 MILES
Engine: 350
Transmission: 700R4
Axle/Gears: 3.27 9 bolt
Re: Humount - Maptech review / howto
So everyone that has done this has had to cut into and or block off the ducts/vents on the radio pod ?
01-06-2013, 12:50 PM
#31
Supreme Member
iTrader: (2)
Join Date: Aug 2001
Location: Peoria, IL USA
Posts: 1,081
Likes: 0
Received 2 Likes
on
2 Posts
Car: 91 GTA
Engine: 377ci
Transmission: T56
Axle/Gears: QP Ford 9" 3.70s
Re: Humount - Maptech review / howto
I was able to keep the ducts intact as is,but had to cut the plastic out between them I think the 90-92 firebirds may be a little different.
01-06-2013, 12:56 PM
#32
Senior Member
iTrader: (3)
Join Date: Jan 2004
Location: K.C. Mo.
Posts: 684
Likes: 0
Received 0 Likes
on
0 Posts
Car: '89 GTA 9,000 MILES
Engine: 350
Transmission: 700R4
Axle/Gears: 3.27 9 bolt
Re: Humount - Maptech review / howto
Working with an 87 TA for my daughter's car.
If I can do this without citting the duct work which I won't do then I will do it.
Course different radios have different depths.
We are eyeing a Kenwood HU that has a red display and I-pod control.
The red led HUMount with Trans AM lettering would match almost perfect
to the radio and car and basically impress the hell out of my 16 year old.
I won't cut the ducts...........
01-06-2013, 01:39 PM
#33
Supreme Member
iTrader: (8)
Join Date: Aug 2003
Location: LeRoy, NY
Posts: 7,240
Likes: 0
Received 5 Likes
on
4 Posts
Car: 2003 Hyundai Tiburon GT
Engine: 2.7L V6
Transmission: 6-speed
Axle/Gears: 4.41
Re: Humount - Maptech review / howto
You do NOT need to remove the entire support at the back of the pod. Unless your HU is crazy wide, you don't need to modify the ducts. Take the pod out, mount your HU in the conventional manner (sticking out of the trim), mark the support where the back of the HU is, and cut THERE. I made a 1/2" cut in mine (plus a bit on the left side, when viewed from the front, for the wiring harness) and that supported the back of my HU. Basically, you're just cutting the middle out of the support, not eliminating the whole thing.
08-29-2019, 06:49 AM
#34
Junior Member
Join Date: Jun 2019
Location: Canada
Posts: 3
Likes: 0
Received 0 Likes
on
0 Posts
Car: 1987 Trans am GTA
Engine: 5.7L
Transmission: Auto
Axle/Gears: 3:27
Re: Humount - Maptech review / howto
Thanks for the excellent post, this is EXACTLY what I was hoping to see in my search and gives me a lot of comfort ordering one for you GTA.
01-25-2020, 10:44 AM
#35
Junior Member
Join Date: Jun 2019
Location: Canada
Posts: 3
Likes: 0
Received 0 Likes
on
0 Posts
Car: 1987 Trans am GTA
Engine: 5.7L
Transmission: Auto
Axle/Gears: 3:27
Re: Humount - Maptech review / howto
Just wanted to say thank you for this great post. I've purchased one of these from Mark at Humount for my GTA. I'll be doing the install in the spring and you've probably saved me countless hours of frustration. All your tips and photos are really appreciated. Things like this is what makes this online community so great!

Thread
Thread Starter
Forum
Replies
Last Post