Post up pics of your custom dash!
 11-03-2009, 08:17 PM
#1

Post up pics of your custom dash!
Hey guys, im starting a ultralight dash project on my GTA and I was wondering if anyone on here has done one yet? I searched and found one custom dash made of wood... coughfirehazardcough. But thats all.
Anybody?!
coughfirehazardcough. But thats all. Anybody?!
 11-05-2009, 09:01 PM
#2
Re: Post up pics of your custom dash!
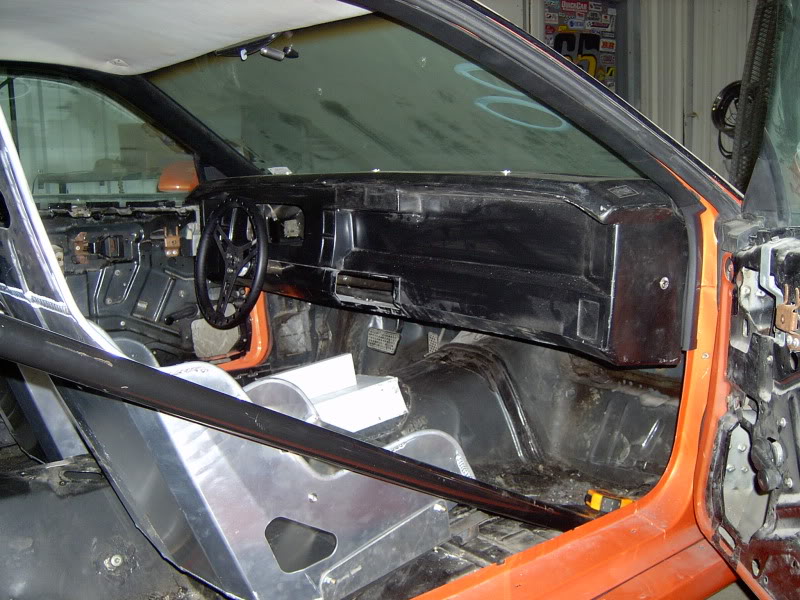
I'm in the middle of installing a fiberglass dash that looks very close to stock. I'm trying to get all the weight out of the car and still be able to drive on the street. I have an ARC switch panel and Racepak dash that will be mounted to the frame behind the dash. I will try to post the pics tomorrow night.
11-07-2009, 06:22 PM
#4
Re: Post up pics of your custom dash!
Well, you will have to excuse all the dust. It has been an ongoing project for a couple of years now. Damn economy!! Here are the pics of how I did my dash. I know it is not for everybody but, please be constructive with the criticism.
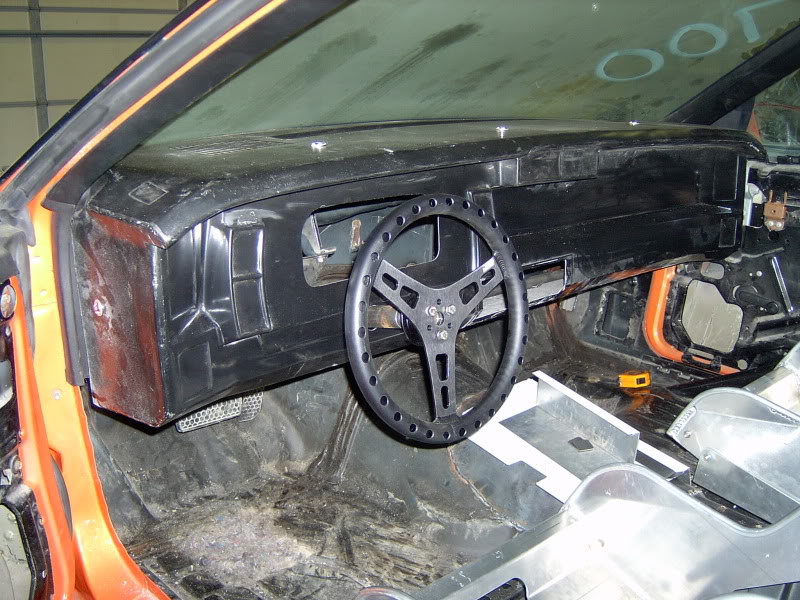
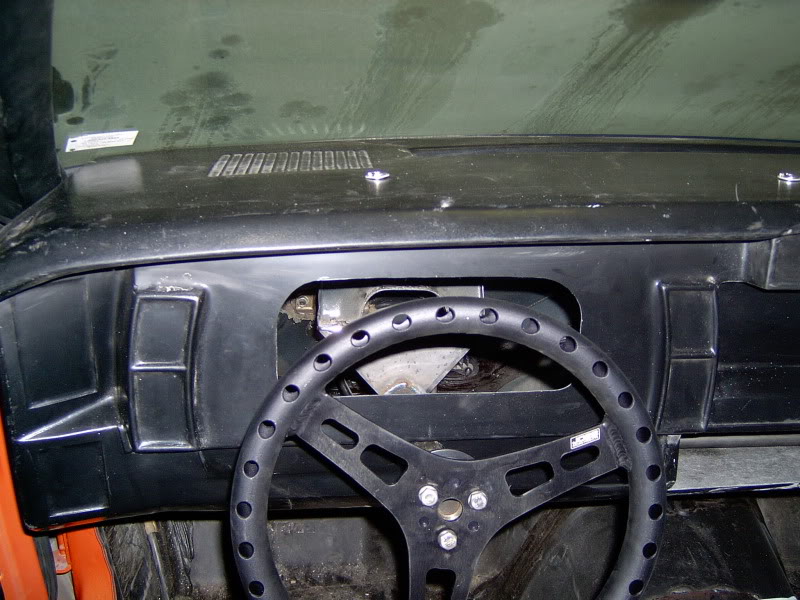
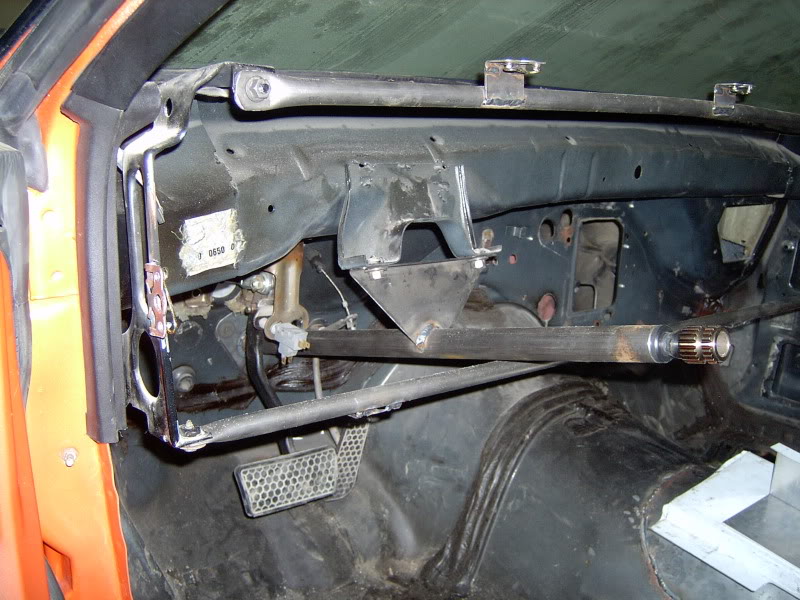
Here's how I mounted it:
That's it. Hope it will give you some ideas.
Here's how I mounted it:
That's it. Hope it will give you some ideas.
11-07-2009, 09:21 PM
#5
Moderator

Join Date: Jul 1999
Location: 51�N 114�W, 3500'
Posts: 17,119
Likes: 0
Received 123 Likes
on
104 Posts
Car: 87 IROC L98
Engine: 588 Alcohol BBC
Transmission: Powerglide
Axle/Gears: Ford 9"/31 spline spool/4.86
Re: Post up pics of your custom dash!
Nice mount design although it looks heavy. Nice steering column support.
This is what my dash looked like for a few years. I'm in the process of rewiring the car so I finally ditched this dash and made one completely out of aluminum.
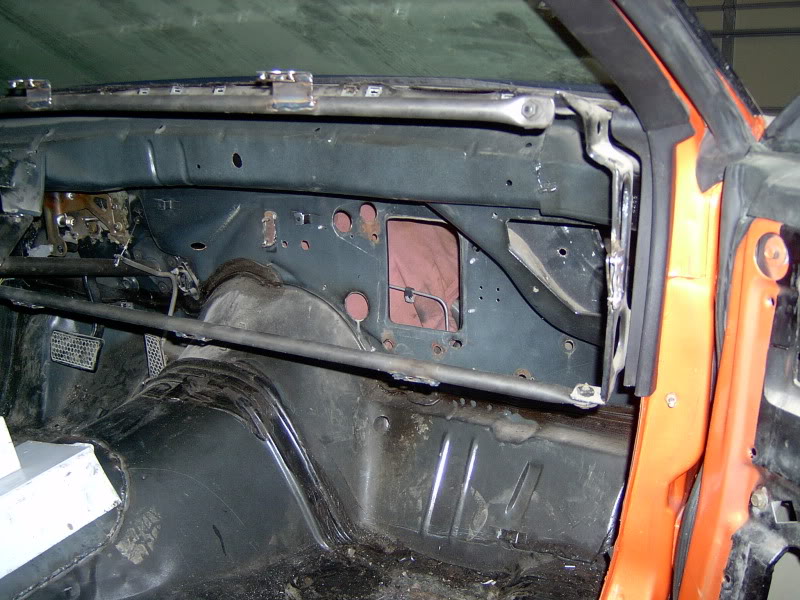
Old dash, or at least the best picture I had of it taken back in 2007. The dash pad was cut on both ends to fit around the cage tubes. The face of the aluminum panel is covered with some decal material that I picked up from Walmart.

This is what the new dash looks like. I just made and installed it today. 0.032" thick aluminum. I need to make a few more braces for it and need to wire up the gauges and tach. Nothing but an oil pressure warning light, oil pressure, oil temperature, coolant temperature. All the toggle switches and a voltage gauge are mounted in an overhead switch panel which can just be seen at the top left. With the 5 point harness cinched down tight, it's easier to reach the switch panel than the dash.

This is what my dash looked like for a few years. I'm in the process of rewiring the car so I finally ditched this dash and made one completely out of aluminum.
Old dash, or at least the best picture I had of it taken back in 2007. The dash pad was cut on both ends to fit around the cage tubes. The face of the aluminum panel is covered with some decal material that I picked up from Walmart.
This is what the new dash looks like. I just made and installed it today. 0.032" thick aluminum. I need to make a few more braces for it and need to wire up the gauges and tach. Nothing but an oil pressure warning light, oil pressure, oil temperature, coolant temperature. All the toggle switches and a voltage gauge are mounted in an overhead switch panel which can just be seen at the top left. With the 5 point harness cinched down tight, it's easier to reach the switch panel than the dash.
11-08-2009, 09:32 AM
#6
Re: Post up pics of your custom dash!
Stephen, your dash turned out well. I've been following the re-wire and it's turning out very well also. The dash is not as heavy as it might look. I think the fiberglass part is only like 6 lbs. The mount part is made of .049" CM so it is actually pretty light too. I wanted it to look as close to stock as a fiberglass replacement could. I was happy with the way the steering column worked out. Got all of the supplies from Larson Race Cars. He gave me a little guidence as to how he might do it. Still have a ways to go but, I will try to update as I make progress.

Trending Topics
11-18-2009, 12:30 AM
#8
Junior Member
Join Date: Jan 2007
Location: Tempe, Az.
Posts: 84
Likes: 0
Received 0 Likes
on
0 Posts
Car: 1987 Camaro IROC Z-28
Engine: 305 T.P.I.
Transmission: 700 R4
Re: Post up pics of your custom dash!
American Flag Dash. This isn't what ya may be looking for but it doesn't hurt to look. I did complete dash strip down to metal and built it back up and made the flag on it. All 50 stars and 13 stripes. It is an ongoing project,final surface isn't finished. It will be flat black in color though.
11-18-2009, 03:01 PM
#10
Senior Member
Join Date: Aug 2009
Location: greenfield indiana
Posts: 913
Likes: 0
Received 2 Likes
on
2 Posts
Car: 86' IROC-Z....and 5 other 3rdgens
Engine: 383 hsr
Transmission: built 700r4
Axle/Gears: stock 3.23, 10bolt
Re: Post up pics of your custom dash!
orangepeeler, that is freakin AWSOME!! how did you mold that whole structure with (appears to be) ONE piece???
11-18-2009, 07:53 PM
#11
Re: Post up pics of your custom dash!
It's actually a fiberglass dash made by Hairy Glass. I chose it because from a distance you can't tell it apart from the stock dash. It even has the grain in the dash top, so when the doors are closed it REALLY looks stock. Thanks for the replies.
11-18-2009, 11:55 PM
#12
Junior Member
Join Date: Jan 2007
Location: Tempe, Az.
Posts: 84
Likes: 0
Received 0 Likes
on
0 Posts
Car: 1987 Camaro IROC Z-28
Engine: 305 T.P.I.
Transmission: 700 R4
Re: Post up pics of your custom dash!
I stripped it down to metal,then had some rubber matting i used for the first layer.Then I used a yoga mat from target.You can see the texure of the mat in the pic of my windshield vents. I do have all the vents cut and fitted to fill in gaps. It came out real nice.
11-18-2009, 11:59 PM
#13
Junior Member
Join Date: Jan 2007
Location: Tempe, Az.
Posts: 84
Likes: 0
Received 0 Likes
on
0 Posts
Car: 1987 Camaro IROC Z-28
Engine: 305 T.P.I.
Transmission: 700 R4
Re: Post up pics of your custom dash!
Steven, how do I get my pics to be normal size like yours. Mine are thumbnail attachments.
11-19-2009, 02:58 AM
#14
Junior Member
Join Date: Jan 2007
Location: Tempe, Az.
Posts: 84
Likes: 0
Received 0 Likes
on
0 Posts
Car: 1987 Camaro IROC Z-28
Engine: 305 T.P.I.
Transmission: 700 R4
Re: Post up pics of your custom dash!
I just made an album of all the pics from my dash restoration, in order of progress. I don't know how to make a link to view them. So if ya want, click on my name, then pictures. I only have 1 album right now. It is of my "Flag Dash".
11-21-2009, 08:18 PM
#15
Junior Member

Join Date: Sep 2009
Location: MO
Posts: 22
Likes: 0
Received 0 Likes
on
0 Posts
Car: 1992 RS CAMARO 25TH ANNIVERSARY
Engine: 305 TBI
Transmission: 700R4
Re: Post up pics of your custom dash!
have you tried vaccume forming its very simple to do and its fun .well i dont know how much it will cost you for the plastic but to make the machine is like 70 bucks.all you need is a 6ft by 4ft piece of peg board 2 6ft 2by4s 2 4ft 2by4s a 6ft by 4ft piece of mdf or plywood whatever is cheaper it would be the ply cause mdf is 35 t0 45 dollars a panel. and a shop vac a 10 gallon would work and some heating coils . and you heat the plastic drop it on your dash thats off turn the vac on and it basicly copies your dash pad and it very detailed so whatever you dont want on it fill it in with putty and mod it but you get great results by that but google vaccume forming and watch it on you tube the skys the limit when vaccume forming .you can redo your interior plastic pieces or mod them you can make your own anything and its cheaper and less messy than fiberglass well i hope this helps you or anybody maybe get the creativity flowing
11-21-2009, 08:44 PM
#16
Member

Join Date: Nov 2009
Location: PA
Posts: 230
Likes: 0
Received 0 Likes
on
0 Posts
Car: 1985 trans am
Engine: 1969 chevy 350 .060 over
Transmission: 5spd
Re: Post up pics of your custom dash!
dude, that sounds pretty neat, ima have to look that up, because I have my interior out of my car, and im loooking into different mods
11-21-2009, 08:46 PM
#17
Moderator
Join Date: Jul 1999
Location: 51�N 114�W, 3500'
Posts: 17,119
Likes: 0
Received 123 Likes
on
104 Posts
Car: 87 IROC L98
Engine: 588 Alcohol BBC
Transmission: Powerglide
Axle/Gears: Ford 9"/31 spline spool/4.86
Re: Post up pics of your custom dash!
Your thumbnail pictures are because you're using TGO to host your pictures. My pictures are hosted on my own domain and I simply use the IMG tags to display the picture URL. To use the IMG tags, the picture needs to be hosted somewhere on the internet. For the forum, try keeping the pictures no larger than 800x600.
12-03-2009, 07:24 PM
#18
Member
Re: Post up pics of your custom dash!
A/C blockoffs short console and 4th gen gauges
12-04-2009, 02:30 PM
#20
Junior Member
Join Date: Aug 2009
Location: McKee, KY
Posts: 35
Likes: 0
Received 0 Likes
on
0 Posts
Car: 1980 Malibu
Engine: 496 BBC (E85)
Transmission: TH400 w/brake
Axle/Gears: Moser 12 bolt 4.10
Re: Post up pics of your custom dash!
some nice custom work by you guys, here is a pic of mine

12-04-2009, 03:09 PM
#21
Junior Member
iTrader: (3)

Join Date: Jun 2008
Location: Fayetteville, NC
Posts: 99
Likes: 0
Received 0 Likes
on
0 Posts
Car: '92 Camaro RS
Engine: 305 TBI
Transmission: Richmond Gear street 5 speed
Re: Post up pics of your custom dash!
from VFN
82-92 Camaro One piece Dash . Weight=4 each Ship: UPS Items. Price=$279.00

82-92 Camaro One piece Dash . Weight=4 each Ship: UPS Items. Price=$279.00


 12-30-2009, 10:51 PM
#27
Member
iTrader: (1)

Join Date: Nov 2008
Location: Lynchburg, VA
Posts: 109
Likes: 0
Received 0 Likes
on
0 Posts
Car: 92 RS
Engine: 305 TBI
Transmission: T-5
Axle/Gears: 4th Gen/3.23/Posi
Re: Post up pics of your custom dash!
Hey - Do you have any more info on how you put just the 4th gen gauges in there? I really like that. I don't care much for full 4th gen dash swaps because I think the 3rd gen interior fits the car stylistically. Your approach seems like a nice compromise...
01-10-2010, 10:59 PM
#28
Member
Re: Post up pics of your custom dash!
Cut trim and fit. Once you start you cant go back,get a spare dash from 91 - 92 .
 01-11-2010, 09:20 PM
#31
Member
01-14-2010, 02:35 AM
#32
Junior Member
Join Date: Nov 2005
Location: phoenix arizona
Posts: 84
Likes: 0
Received 0 Likes
on
0 Posts
Car: 1985 Nascar Budweiser IROC replica
Engine: 358 CI .040 11.88 aluminum heads
Transmission: Muncie 4 speed
Axle/Gears: Moser Axles, Auburn Pro posi,410's
Re: Post up pics of your custom dash!
Here are pic's of two different ones I made, the first pic is with the factory dash with a custom panel added on for the Autometer gauges. I painted it with VHT wrinkle paint so it matched the dash.

This is the current one I made(same car) out of aluminum, "Nascar style"

This is the current one I made(same car) out of aluminum, "Nascar style"
01-14-2010, 11:28 PM
#33
Member
iTrader: (2)
Join Date: Mar 2009
Location: Evansville, IN
Posts: 340
Likes: 0
Received 0 Likes
on
0 Posts
Car: I have a 91 Camaro RS
Engine: 383 stroker
Transmission: Stock automatic 700r4
Axle/Gears: I have 3.73 Gears with a Eaton posi
Re: Post up pics of your custom dash!
how hard is it to install those autometer gagues... I have no idea where to start!
01-15-2010, 10:58 PM
#34
Senior Member

Join Date: Nov 2008
Location: Ft Campbell, KY
Posts: 311
Likes: 0
Received 0 Likes
on
0 Posts
Car: 1991 Camaro RS/Z28
Engine: 357 Edelbrock Intake & Holley Carb
Transmission: WC T-5
Axle/Gears: whatever stock is
Re: Post up pics of your custom dash!
After looking at some of these ideas I'm really thinking about making mine a reality. I want to do a custom dash for electronics on mine, and hopefully keep the 91-92 styling.
01-30-2010, 10:53 PM
#35
Supreme Member
iTrader: (1)
Join Date: Jan 2008
Location: Sacramento Ca
Posts: 1,428
Likes: 0
Received 0 Likes
on
0 Posts
Car: 91 Pontiac Firebird
Engine: Killer SBC, w/ RV cam
Transmission: AutoMatic, w/ shift kit
Axle/Gears: Posi-Traction
Re: Post up pics of your custom dash!
I emptied out the entire dash & the only thing there now is the top dash pad & the facia w/ 1/4" ABS plastic cemented to the back of the facia & holes cut out for the AutoMeter gauges sitting in the factory location.
02-17-2010, 11:37 PM
#37

Re: Post up pics of your custom dash!
i started on mine again after putting it to the side for a few months. the dashpad is fully fiberglassed with no vents at all now. i took all the vents out the dash and now ready to do step 2 of the radio instal


02-28-2010, 10:17 PM
#38
Supreme Member

Join Date: Feb 2010
Location: Orlando
Posts: 1,446
Likes: 0
Received 2 Likes
on
2 Posts
Car: 1991 Camaro Z28
Engine: 357, Canfield heads, solid roller,
Transmission: Upgraded 03 Cobra T56
Axle/Gears: 9" 3.50 gears and Detroit Locker
Re: Post up pics of your custom dash!
Here's mine. I made the guage cluster myself. All the AutoMeter guages are electric including the speedometer. All the AC ducts have been taken out of the dash. I also removed the box for the evaporator and heater core. Its completely empty behind the dash except for wiring, which you can unforunetly see throught the AC vents. The two cirles under the small guages in the middle are LED's. They are for the turn signals.

Never mind the ugle hood

Never mind the ugle hood
03-01-2010, 09:57 PM
#39
Member

Re: Post up pics of your custom dash!
The aluminum dash wraps all the way down and around, about 10 inches short of the firewall so you can't see anything but carpet unless you really get down. Behind is an amplifier and computer. The top is wood/fiberglass wrapped in fake leather. The computer is a single board 1.6Ghz with a SSD drive running Linux and my own interface to the Holley 950, cameras, gps, etc. Center gauge on drivers side is the Autometer D-PIC. I'm working on the center console.
Last edited by Spifz; 03-01-2010 at 10:01 PM.
 03-01-2010, 10:43 PM
#42
Member
Re: Post up pics of your custom dash!
The passenger side gauges are navigator gauges, so they have a speedo/odometer for target time/distance events or road races. And where there is a speedo, might as well have a tach, eh.
03-02-2010, 07:44 AM
#43
Supreme Member
iTrader: (1)
Join Date: Apr 2000
Location: Northern CA.
Posts: 5,321
Likes: 0
Received 4 Likes
on
4 Posts
Car: '82 Z28
Engine: 350
Transmission: TH400 4,000 stall
Axle/Gears: Currie 9", 4.56 gears
Re: Post up pics of your custom dash!
Here's the one I did a while ago.

Also made this about 8 years ago since I took out the stereo.

Also made this about 8 years ago since I took out the stereo.
05-06-2010, 07:36 AM
#44
Member

Join Date: Nov 2009
Location: Middle of Nowhere, SC
Posts: 202
Likes: 0
Received 0 Likes
on
0 Posts
Car: 1984 Camaro Sports Coupe
Engine: 355 chev
Transmission: none at the time
Axle/Gears: stock 10bolt v6 gears
Re: Post up pics of your custom dash!
Are your speedo and tach 5" gauges?
05-06-2010, 12:11 PM
#45
Member
Re: Post up pics of your custom dash!
Most of the tach/speedos on the page look like the larger autometer 5" gauges. They do make an intermediate size, 3 5/8 or something. You can fit a 5" in place of the factory stuff with a bit of plastic trimming; I originally had mine mounted behind the factory front black bezel with the clear plate removed.
05-06-2010, 02:49 PM
#46
Member
Join Date: Nov 2009
Location: Middle of Nowhere, SC
Posts: 202
Likes: 0
Received 0 Likes
on
0 Posts
Car: 1984 Camaro Sports Coupe
Engine: 355 chev
Transmission: none at the time
Axle/Gears: stock 10bolt v6 gears
Re: Post up pics of your custom dash!
i figured they were 5's but i was just making sure 
 05-17-2010, 05:20 PM
#49
Junior Member
Join Date: Sep 2005
Location: augusta ga.
Posts: 36
Likes: 0
Received 0 Likes
on
0 Posts
Car: 1984 trans am
Engine: 350
Transmission: 350
Axle/Gears: 3.73
05-17-2010, 09:53 PM
#50
Member
Join Date: Nov 2009
Location: Middle of Nowhere, SC
Posts: 202
Likes: 0
Received 0 Likes
on
0 Posts
Car: 1984 Camaro Sports Coupe
Engine: 355 chev
Transmission: none at the time
Axle/Gears: stock 10bolt v6 gears
Re: Post up pics of your custom dash!
Let me know how this goes. i have a TV that installs in a radio slot, that i'd like to put up there