Homemade Bellhousing
 05-26-2011, 10:34 PM
#1

Homemade Bellhousing
Basically, I made my own bellhousing to adapt a Ford Toploader 4spd transmission to my old school SB Chev V8. I can buy one for around $450, but it's a heavy 1/4" thick steel monster, and I prefer building my own lighter parts if i can. I'm not concerned about it not being "SFI certified", as it's just a fun street car and i had no desire to make it legal for the track.
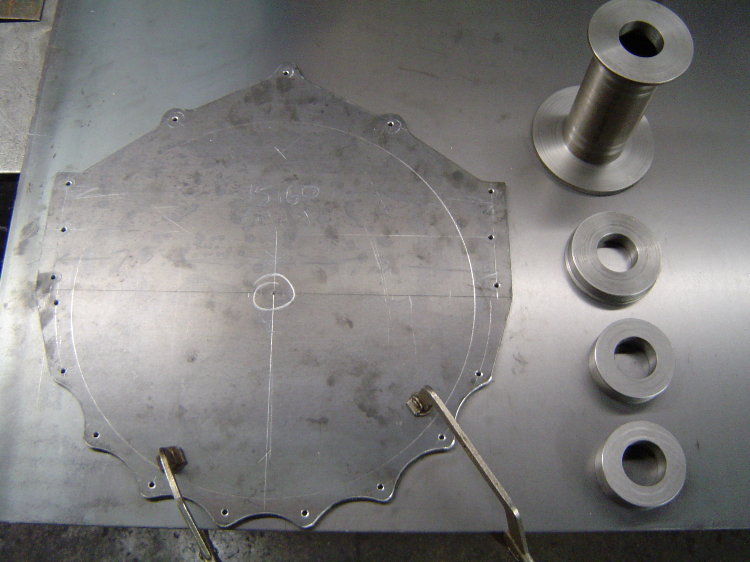
The mock-up began with an old 400 block and an empty transmission case. I am using the alignment bar from my rearend narrowing jig to keep everything straight and true. I spent a couple nights machining some steel pucks to fit in the block's main bearing bores and also the bearing bores in the transmission case. The pucks have an 1.501" hole in the center so that my alignment bar will slide inside everything to keep the engine and transmission bores concentric. I made a ring to center the plate that the transmission will bolt to, and a tube spacer that will set the desired distance between the block and transmission face. I have also made the rear plate that the transmission will bolt to, and have laid out the the flange that will bolt to the block and serve as a pattern for the block plate that will fit behind the flywheel.
I'll snap some pictures in the next day or so. Working in my spare time after hours, I expect it will take me a week or two to get it done. The transmission is getting some special work as well, getting faceplated in 2nd, 3rd, and 4th. I'm adapting an aluminum tailhousing from an SROD overdrive trans to replace the Toploader's stock iron piece to shed some weight. Also machined down the Ford throwout collar so that I can use my existing Chevy hyd throwout bearing. Here's the pattern I made out of 1/4" steel. All the hole locations were laid out, centerpunched, and drilled 3/16" so that the pattern could be transferred to the blank piece of 1/8" that it's laying on, which will be used to make the block protection plate. The steel pucks on the right are the pilot rings and spacer that i mentioned in an earlier post that locate everything in the correct positions for mock-up. Later this pattern will get the bolt holes drilled and the large center hole will be cut out, turning the pattern into the flange for the front of the bell...
Here's the drawing I used to lay out the block bolt pattern...

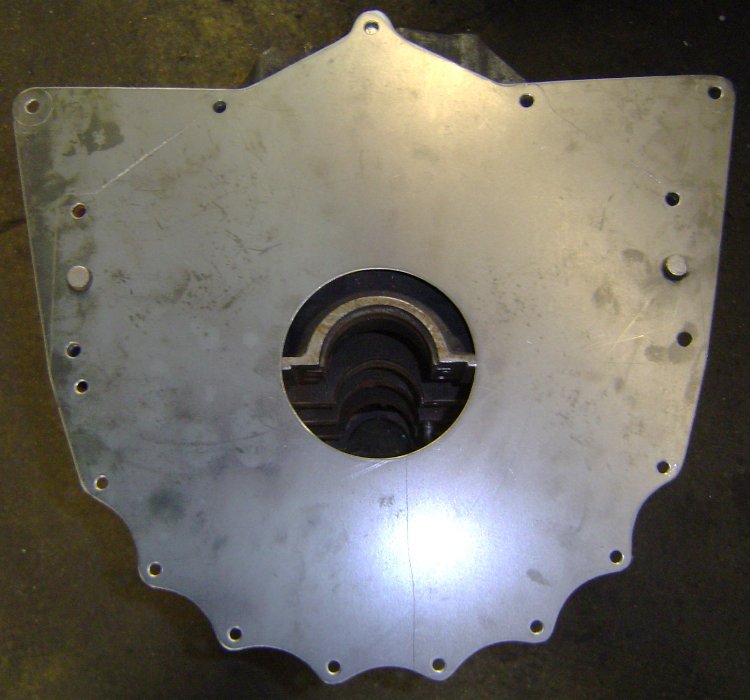
This is the block plate after it was cut out and drilled. The large hole in the center is for the crank's flywheel flange to stick thru, and the 2 larger holes on the sides are for the locating dowels in the block...

This is the pattern after i drilled it out and cut the center out. It is going to be the forward flange of the bellhousing that bolts to the block, the large hole in the center is necessary to clear the flywheel...

Here's the block plate on a block. The upper "wings" were added as mid-mounting points that will hang the back of the engine at the firewall...
Here's the block plate and flange on a block. The block plate will be sandwiched between the block and bellhousing as shown. I'll soon be creating a hole and pocket for the starter.
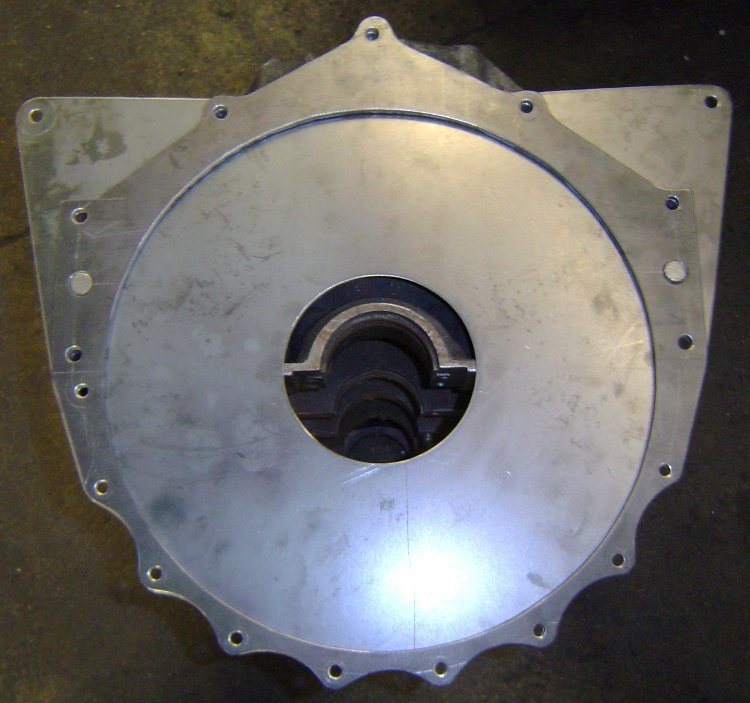
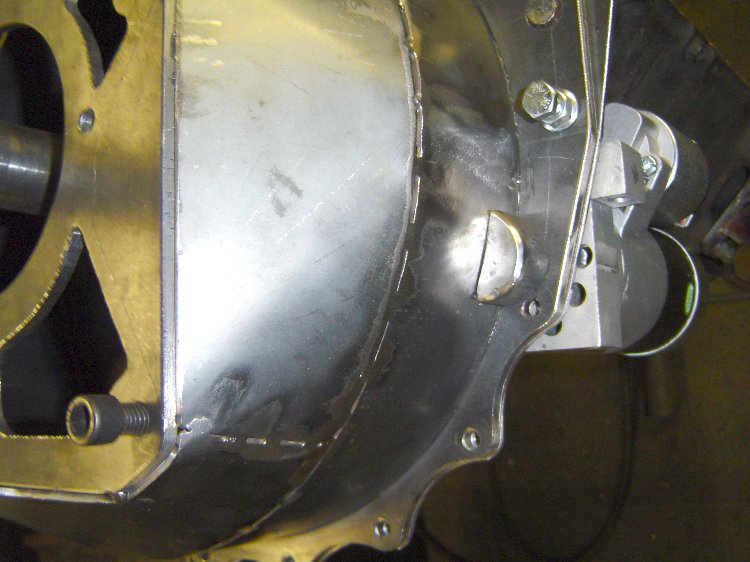
Here's a pic of the rolled ring welded to the bellflange. All the holes still fit perfectly...

The mid-mounts incorporated into the block plate allow me to easily remove the bellhousing/clutch/flywheel from the car without needing to support the engine. Greatly simplifies my clutch and transmission maintenance. Here's the alignment bar in place in the block, as well as the spacer that sets the depth between the block and trans case...

The mock-up began with an old 400 block and an empty transmission case. I am using the alignment bar from my rearend narrowing jig to keep everything straight and true. I spent a couple nights machining some steel pucks to fit in the block's main bearing bores and also the bearing bores in the transmission case. The pucks have an 1.501" hole in the center so that my alignment bar will slide inside everything to keep the engine and transmission bores concentric. I made a ring to center the plate that the transmission will bolt to, and a tube spacer that will set the desired distance between the block and transmission face. I have also made the rear plate that the transmission will bolt to, and have laid out the the flange that will bolt to the block and serve as a pattern for the block plate that will fit behind the flywheel.
I'll snap some pictures in the next day or so. Working in my spare time after hours, I expect it will take me a week or two to get it done. The transmission is getting some special work as well, getting faceplated in 2nd, 3rd, and 4th. I'm adapting an aluminum tailhousing from an SROD overdrive trans to replace the Toploader's stock iron piece to shed some weight. Also machined down the Ford throwout collar so that I can use my existing Chevy hyd throwout bearing. Here's the pattern I made out of 1/4" steel. All the hole locations were laid out, centerpunched, and drilled 3/16" so that the pattern could be transferred to the blank piece of 1/8" that it's laying on, which will be used to make the block protection plate. The steel pucks on the right are the pilot rings and spacer that i mentioned in an earlier post that locate everything in the correct positions for mock-up. Later this pattern will get the bolt holes drilled and the large center hole will be cut out, turning the pattern into the flange for the front of the bell...
Here's the drawing I used to lay out the block bolt pattern...
This is the block plate after it was cut out and drilled. The large hole in the center is for the crank's flywheel flange to stick thru, and the 2 larger holes on the sides are for the locating dowels in the block...
This is the pattern after i drilled it out and cut the center out. It is going to be the forward flange of the bellhousing that bolts to the block, the large hole in the center is necessary to clear the flywheel...
Here's the block plate on a block. The upper "wings" were added as mid-mounting points that will hang the back of the engine at the firewall...
Here's the block plate and flange on a block. The block plate will be sandwiched between the block and bellhousing as shown. I'll soon be creating a hole and pocket for the starter.
Here's a pic of the rolled ring welded to the bellflange. All the holes still fit perfectly...
The mid-mounts incorporated into the block plate allow me to easily remove the bellhousing/clutch/flywheel from the car without needing to support the engine. Greatly simplifies my clutch and transmission maintenance. Here's the alignment bar in place in the block, as well as the spacer that sets the depth between the block and trans case...
 05-26-2011, 10:35 PM
#2
Re: Homemade Bellhousing
Here's the trans case in position located by the pilot rings...

I had to take it out of the fixture to make sure i had created enough room to install a SoftLoc clutch, so i figured i'd snap a few pics of the progress.
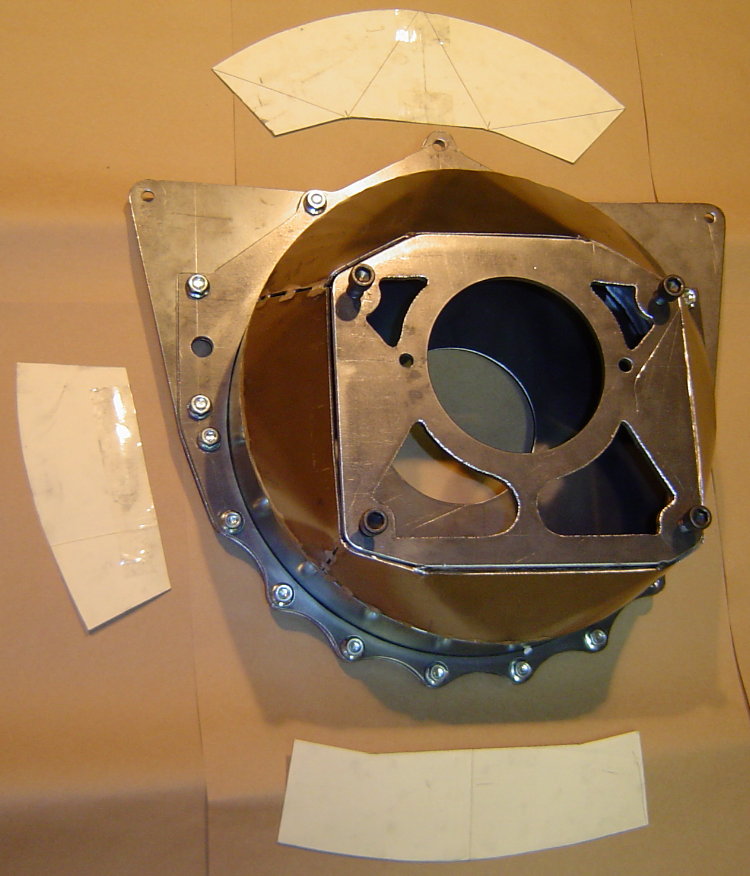
I started making patterns for closing in the bell by laying out the the top section on posterboard. I quickly realized it was much easier to just cut out slightly larger pieces of posterboard, hold them in place on the bell, and simply apply a little pressure by running my finger around the edges of the steel. This puts a small crease in the posterboard and transfers the exact shape needed, a much quicker way to create a pattern...
The transmission plate is still only tacked in 4 places. After all the rest of the welding is done, i'll put the bell back into the fixture, cut the tacks, and re-position the plate for the best alignment possible before welding it in place. I doubt there will be any need to machine the block or transmission mating surfaces.

Still need to make a pocket for the mini-starter that's going on the car...

Added a cutout for the mini-starter's drive...
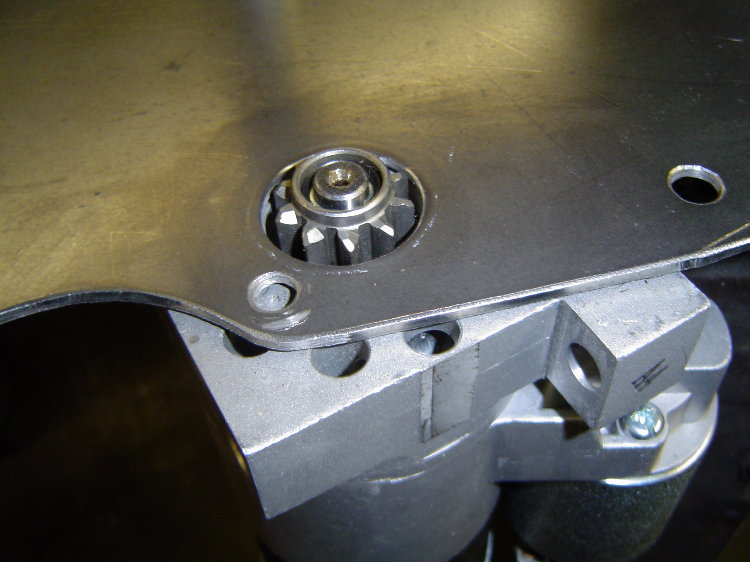
Added a starter pocket to the bell as well...
Next is adding a few holes, one for setting the clutch gap and a hole for the hyd t-brg's hose. After that, i'll drill all the bolt holes to finished size, sandblast it, and send it out for powdercoat.
I had to take it out of the fixture to make sure i had created enough room to install a SoftLoc clutch, so i figured i'd snap a few pics of the progress.
I started making patterns for closing in the bell by laying out the the top section on posterboard. I quickly realized it was much easier to just cut out slightly larger pieces of posterboard, hold them in place on the bell, and simply apply a little pressure by running my finger around the edges of the steel. This puts a small crease in the posterboard and transfers the exact shape needed, a much quicker way to create a pattern...
The transmission plate is still only tacked in 4 places. After all the rest of the welding is done, i'll put the bell back into the fixture, cut the tacks, and re-position the plate for the best alignment possible before welding it in place. I doubt there will be any need to machine the block or transmission mating surfaces.
Still need to make a pocket for the mini-starter that's going on the car...
Added a cutout for the mini-starter's drive...
Added a starter pocket to the bell as well...
Next is adding a few holes, one for setting the clutch gap and a hole for the hyd t-brg's hose. After that, i'll drill all the bolt holes to finished size, sandblast it, and send it out for powdercoat.


 05-26-2011, 10:43 PM
#4
Senior Member

iTrader: (1)

Join Date: Jul 2000
Location: New Berlin Wi
Posts: 570
Likes: 0
Received 0 Likes
on
0 Posts
Car: 88 Iroc
Engine: 94 lt1 modded
Transmission: t 56
Re: Homemade Bellhousing
Thats awesone. nice work. Did you use an english wheel to make the curved top part?
Kory
Kory
05-26-2011, 10:49 PM
#5
Supreme Member
iTrader: (14)
Join Date: Aug 2006
Location: Central NJ
Posts: 12,650
Likes: 0
Received 44 Likes
on
42 Posts
Car: 86 Trans Am, 92 Firebird
Engine: 408 sbc, 3.1L of raw power
Transmission: TKO600, T5
Axle/Gears: Moser 9", 3:70 trutac, 3:23 torsion
Re: Homemade Bellhousing
honestly, i came in here expecting to see a FAIL of epic proportions, but was instead greatly impressed by what I saw
Good work! Looks really nice. What thickness material did you use for the bell part?
Good work! Looks really nice. What thickness material did you use for the bell part?
05-26-2011, 11:16 PM
#6
Re: Homemade Bellhousing
Thanks guys. It was all cut out by hand w/ a little Hypertherm 350 (1/4" max cap)
No english wheel here, just a simple homemade brake.
The ring around the ring gear is 3/16", the transition is 11ga.
No english wheel here, just a simple homemade brake.
The ring around the ring gear is 3/16", the transition is 11ga.

Trending Topics
05-27-2011, 04:18 AM
#9
Senior Member
iTrader: (15)

Join Date: Jan 2009
Location: Ogden UT
Posts: 753
Likes: 0
Received 0 Likes
on
0 Posts
Car: '88 Camaro (Gone...)
Re: Homemade Bellhousing
I think you're going to love the face-plating treatment. Good thinking for leaving 1st gear with synchros, that way you don't have to remember to leave it in gear when coasting up to a stop. I made that mistake a couple times
05-27-2011, 11:10 AM
#10
Senior Member
iTrader: (2)
Join Date: Jan 2003
Location: MN
Posts: 721
Likes: 0
Received 2 Likes
on
2 Posts
Car: 1982 Camaro
Engine: 555 BBC
Transmission: TSI Glide
Axle/Gears: Aluminum Moser 3.89
Re: Homemade Bellhousing
BTW, excellent job with the fabrication. I was expecting a trash can lid to be used in this project.
05-29-2011, 10:36 PM
#11
Supreme Member
iTrader: (24)
Join Date: Jun 2005
Location: NC
Posts: 7,893
Likes: 0
Received 67 Likes
on
49 Posts
Car: 92 Firebird
Engine: Supercharged 6.0
Transmission: T56
Axle/Gears: 8.8 3.73
Re: Homemade Bellhousing

Nice work
How confident are you that the input shaft is perfect along the crank axis?
05-31-2011, 12:26 PM
#14
Re: Homemade Bellhousing


 05-31-2011, 04:41 PM
#17
Supreme Member
iTrader: (24)
Join Date: Jun 2005
Location: NC
Posts: 7,893
Likes: 0
Received 67 Likes
on
49 Posts
Car: 92 Firebird
Engine: Supercharged 6.0
Transmission: T56
Axle/Gears: 8.8 3.73
Re: Homemade Bellhousing
Thanks. You can't see it in the pics, but the alignment bar extends thru the block as well, and uses alignment bushings in the block's front and rear main bearing bores as well. "Perfect" means different things to different people, but I'm pretty confident that the engine and transmission centerlines are concentric enough for my purposes
12-05-2012, 07:12 PM
#18
Re: Homemade Bellhousing
--------------------------------------------------------------------------------
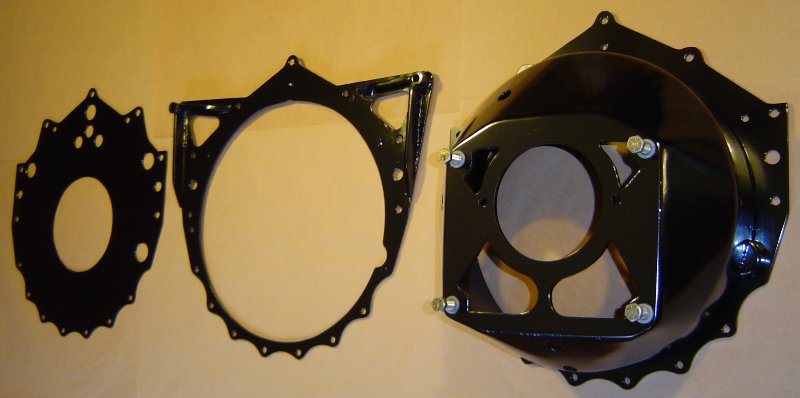
Here's an update...I went to a 3pc style bellhousing...blockplate, midplate, bell/can. Now i can remove the engine from the car with the flywheel and clutch, and leave the bell and transmission mounted in the car. I can also remove the transmission/bell/clutch/flywheel from the car without supporting the rear of the engine. I also added a couple external "ears" to the block plate, which gives me some easy attachment points for lifting the engine...
I'll take some pics of the engine lifting fixture i made for it. It plugs into the blockplate's added "ears" and into an "eye" that screws into a hole in the top of the waterpump. It fits over the complete engine with the aircleaner and distributor in place. Before i was always using some type of hokey chains trying to find a perfect balance point without damageing something. Now i have a dedicated fixture that plugs in and makes the job easy. Been thinking about attaching the radiator to the engine just to make choosing between a couple engines that much easier
12-05-2012, 07:23 PM
#19
Senior Member
iTrader: (-1)

Join Date: Oct 2008
Location: Siloam Springs AR.
Posts: 809
Likes: 0
Received 1 Like
on
1 Post
Car: 1998 Trans/Am, 1989 RS Camaro
Engine: LS1, LQ9 6.0
Transmission: 4L60E, 4L60E
Axle/Gears: 2.73, 2.73
Re: Homemade Bellhousing
I was also expecting to see something made out of a stop sign and then welded with a hanger and lamp cord...
Good job looks great.
Good job looks great.
12-06-2012, 07:33 AM
#20
Re: Homemade Bellhousing
Very impressive! That looks fantastic and seems like the extra features you added will come in handy down the road! I like hwo you have it designed so things can be removed without tearing it all out or rigging the motor/trans up with jacks and blocks of wood.
Great stuff!
J.
Great stuff!
J.
12-06-2012, 12:01 PM
#21
Senior Member
iTrader: (1)

Join Date: Sep 2006
Location: Canada
Posts: 962
Likes: 0
Received 13 Likes
on
10 Posts
Car: 1979 Malibu
Engine: Blown LSx
Transmission: T56 Magnum
Axle/Gears: 9"/wavetrac/35's/3.70
Re: Homemade Bellhousing
I also came in here expecting a pile of junk, But let me say, I am impressed. Very nice work.
12-06-2012, 12:05 PM
#22
Supreme Member

Join Date: Feb 2010
Location: Orlando
Posts: 1,446
Likes: 0
Received 2 Likes
on
2 Posts
Car: 1991 Camaro Z28
Engine: 357, Canfield heads, solid roller,
Transmission: Upgraded 03 Cobra T56
Axle/Gears: 9" 3.50 gears and Detroit Locker
Re: Homemade Bellhousing
Same as everyone else. Expecting a hack job, but definitely impressed. Good work!
 12-06-2012, 04:53 PM
#24
Member

Join Date: Feb 2010
Location: San Antonio TX.
Posts: 395
Likes: 0
Received 3 Likes
on
3 Posts
Car: Currently have 3 cars and 1 truck.
Engine: 1970&92 Cams,both BBC's
Transmission: LS1 T-56 & PG w/vendor's
Axle/Gears: Built 10 bolt& 9inch w/spool
Re: Homemade Bellhousing
Impressive. Mad Fab skills.
 12-06-2012, 05:20 PM
#26
Member

Join Date: Oct 2011
Location: Black Hills
Posts: 226
Likes: 0
Received 0 Likes
on
0 Posts
Car: 88 rs
Engine: ls1
Transmission: t56
Axle/Gears: moser 4:10
Re: Homemade Bellhousing
Very cool. After seeing the first pics of the block shield I thought it would be cool to put some lightening holes in the upper corners, both for looks and weight. Then I get to the finished product and you already did it. Made me laugh, again very cool.
12-06-2012, 07:31 PM
#27
Senior Member
iTrader: (1)

Join Date: Sep 2003
Location: St. Louis, Missouri
Posts: 988
Likes: 0
Received 0 Likes
on
0 Posts
Car: 1989 Firebird Formula
Engine: 383 Stealth Ram
Transmission: 700R4
Axle/Gears: 3.73 9 bolt Posi
Re: Homemade Bellhousing
Great work! Very impressive!
12-08-2012, 03:08 PM
#28
Re: Homemade Bellhousing
Forgot to add that...
...the bell itself weighs in at 16.3lbs. The entire 3pc assembly, bell/blockplate/midplate/bolts/hardware, weigh 26.2lbs.
The Quicktimes say they weigh around 17lbs.
Not sure what the old Lakewood style bell weighs.
...the bell itself weighs in at 16.3lbs. The entire 3pc assembly, bell/blockplate/midplate/bolts/hardware, weigh 26.2lbs.
The Quicktimes say they weigh around 17lbs.
Not sure what the old Lakewood style bell weighs.
12-10-2012, 09:41 AM
#29
Member
iTrader: (6)
Join Date: Sep 2007
Location: Appleton, WI & Platteville, WI
Posts: 144
Likes: 0
Received 0 Likes
on
0 Posts
Car: 92 Camaro
Engine: 404 SBC
Transmission: The strongest stock T5 ever made
Axle/Gears: 3.73 w/Detriot Tru Trac Locker
Re: Homemade Bellhousing
Very impressed. Excellent fabrication

Thread
Thread Starter
Forum
Replies
Last Post