My Little Two Week Project: Bumper Shaving
 02-13-2012, 08:21 PM
#1
Member
Thread Starter
iTrader: (2)
Join Date: Sep 2010
Location: Birmingham, AL
Posts: 397
Likes: 0
Received 0 Likes
on
0 Posts
Car: 1984 Camaro Z28 Clone
Engine: Bored .030, vortec sbc350
Transmission: Built T5 WC
Axle/Gears: 1999 Torsen 4:10 Locker
My Little Two Week Project: Bumper Shaving
I've long wanted to do this. Finally got down to getting the bumper pulled and my painter dated to come and paint it next week. When I painted the car 1 year ago for some reason the rear bumper never adheared properly. So has been flaking and coming off ever since. Driven my crazy because it made the car look bad. 
I am also having my front lip and hood repainted: lip because of some road chipping and hood because a mechanic closed the hood on a socket and put a nice dent in it. So I am repairing that while I am at it. Trying to get it finalized for upcoming shows this summer.
So...first off. Bumper. Pulled, striped, almost fully sanded down and prep'd. Just need to shave the emblem strip.

A lot of problems with this arise because of rear bumper flex. So to avoid it cracking or popping out I am drilling feet holes for the fiberglass/bondo-glass to mold around and too. Also roughing up the area very well with 80grit. I'll have to be careful to mix the bondo hotter then usual, but very throughly as to not have unhardend bondo anywhere.
I also am bondoing/fiberglassing the backside of the area. To give the whole area support.
Now, obviously this isn't going to withstand a superman kick or a rear collision but if that were to happen we have larger issues then "oh, my bondo cracked"
The idea is to give it strength for vibrations and road movement while on the road. I am confident this will be plenty to suffice.

That's a start!
I am also having my front lip and hood repainted: lip because of some road chipping and hood because a mechanic closed the hood on a socket and put a nice dent in it.
So I am repairing that while I am at it. Trying to get it finalized for upcoming shows this summer. So...first off. Bumper. Pulled, striped, almost fully sanded down and prep'd. Just need to shave the emblem strip.
A lot of problems with this arise because of rear bumper flex. So to avoid it cracking or popping out I am drilling feet holes for the fiberglass/bondo-glass to mold around and too. Also roughing up the area very well with 80grit. I'll have to be careful to mix the bondo hotter then usual, but very throughly as to not have unhardend bondo anywhere.
I also am bondoing/fiberglassing the backside of the area. To give the whole area support.
Now, obviously this isn't going to withstand a superman kick or a rear collision but if that were to happen we have larger issues then "oh, my bondo cracked"
The idea is to give it strength for vibrations and road movement while on the road. I am confident this will be plenty to suffice.
That's a start!
 02-13-2012, 08:37 PM
#2
Supreme Member
iTrader: (5)
Join Date: Mar 2011
Location: Central Texas
Posts: 2,893
Likes: 0
Received 4 Likes
on
4 Posts
Car: GTA
Engine: 350 TPI
Transmission: 700R4
Axle/Gears: Aussie 9-bolt/3.27 posi
Re: My Little Two Week Project: Bumper Shaving
Use a 2-part epoxy urethane filler not bondo & you won't hafta worry about flex popping it out & cracking the paint.
02-13-2012, 08:44 PM
#3
Member
Thread Starter
iTrader: (2)
Join Date: Sep 2010
Location: Birmingham, AL
Posts: 397
Likes: 0
Received 0 Likes
on
0 Posts
Car: 1984 Camaro Z28 Clone
Engine: Bored .030, vortec sbc350
Transmission: Built T5 WC
Axle/Gears: 1999 Torsen 4:10 Locker
Re: My Little Two Week Project: Bumper Shaving
I was considering this...I have used some in the past and it was absolutely horrible to work with...but maybe that as the fill and then just glass over with bondo...hmm
02-14-2012, 10:18 AM
#4
Supreme Member
iTrader: (4)
Join Date: Mar 2009
Location: Pepperell, MA
Posts: 3,079
Likes: 0
Received 3 Likes
on
3 Posts
Car: 1987 Trans Am
Engine: LQ9/L92
Transmission: 4L60E
Re: My Little Two Week Project: Bumper Shaving
great idea, but i also agree to go with epoxy over bondo-hair type materials. look forward to seeing updates!
02-14-2012, 10:22 AM
#5
Member
Thread Starter
iTrader: (2)
Join Date: Sep 2010
Location: Birmingham, AL
Posts: 397
Likes: 0
Received 0 Likes
on
0 Posts
Car: 1984 Camaro Z28 Clone
Engine: Bored .030, vortec sbc350
Transmission: Built T5 WC
Axle/Gears: 1999 Torsen 4:10 Locker
Re: My Little Two Week Project: Bumper Shaving

The only thing I am worried about with the epoxy is I don't trust the bondo to adhear to it. I've worked with it before and there is almost no way to get a good enough sand finish on it for paint, meaning it would need a thin glaze of bondo..which I am worried wouldn't hold on... thoughts?
02-14-2012, 10:26 AM
#6

Re: My Little Two Week Project: Bumper Shaving
I disagree with using any filler, just buy the same urethane bumper and cut up pieces and melt them then pour into the cavity. I did this on a vette bumper.
02-14-2012, 10:30 AM
#7
Supreme Member
iTrader: (4)
Join Date: Mar 2009
Location: Pepperell, MA
Posts: 3,079
Likes: 0
Received 3 Likes
on
3 Posts
Car: 1987 Trans Am
Engine: LQ9/L92
Transmission: 4L60E
Re: My Little Two Week Project: Bumper Shaving

that is the best idea if you can come by another bumper
also happy to hear you like your weatherstripping. still need to do mine sometime this year....
Trending Topics
02-14-2012, 10:34 AM
#8
Member
Thread Starter
iTrader: (2)
Join Date: Sep 2010
Location: Birmingham, AL
Posts: 397
Likes: 0
Received 0 Likes
on
0 Posts
Car: 1984 Camaro Z28 Clone
Engine: Bored .030, vortec sbc350
Transmission: Built T5 WC
Axle/Gears: 1999 Torsen 4:10 Locker
Re: My Little Two Week Project: Bumper Shaving
I hear you. Took me a good weekends worth of work to tear it all down and replace. Was worth it though!
02-14-2012, 10:51 AM
#9
Re: My Little Two Week Project: Bumper Shaving
You could also lay strips of urethane bumper in the cavity and use a heat iron to fuse it.
youtube urethane bumper repairs and there are many videos on how to repair them and those repairs can be used to fill the cavity and create and original stregth fill.
youtube urethane bumper repairs and there are many videos on how to repair them and those repairs can be used to fill the cavity and create and original stregth fill.
02-14-2012, 10:58 AM
#10
Member
Thread Starter
iTrader: (2)
Join Date: Sep 2010
Location: Birmingham, AL
Posts: 397
Likes: 0
Received 0 Likes
on
0 Posts
Car: 1984 Camaro Z28 Clone
Engine: Bored .030, vortec sbc350
Transmission: Built T5 WC
Axle/Gears: 1999 Torsen 4:10 Locker
Re: My Little Two Week Project: Bumper Shaving
I like it Jeff. Thanks for the idea. Sounds like I'll be melting bumper this evening.
02-14-2012, 11:03 AM
#11
Re: My Little Two Week Project: Bumper Shaving
But watch the videos and you should be able to end up with a nice cover and after you have melted the stuff in just sand it smooth and it should never release even if hit.
02-14-2012, 11:11 AM
#12
Member
Thread Starter
iTrader: (2)
Join Date: Sep 2010
Location: Birmingham, AL
Posts: 397
Likes: 0
Received 0 Likes
on
0 Posts
Car: 1984 Camaro Z28 Clone
Engine: Bored .030, vortec sbc350
Transmission: Built T5 WC
Axle/Gears: 1999 Torsen 4:10 Locker
Re: My Little Two Week Project: Bumper Shaving
Practice on a junk bumper first so you dont melt the hell out of your nice one. Those holes you drilled probably will help the urethane grip better to.
But watch the videos and you should be able to end up with a nice cover and after you have melted the stuff in just sand it smooth and it should never release even if hit.
But watch the videos and you should be able to end up with a nice cover and after you have melted the stuff in just sand it smooth and it should never release even if hit.
I'm thinking I'll melt it off the bumper and pour it. I don't like the idea of melting the strips on the bumper.
02-14-2012, 11:23 AM
#13
Re: My Little Two Week Project: Bumper Shaving
If you have a front bumper IIRC the nose emblem fits in a recessed area just remove it and practice filling that. Grind into the urethane so there is no paint/primer.
After it is filled just sand smooth and have a trouble free bumper.
02-14-2012, 11:29 AM
#14
Member
Thread Starter
iTrader: (2)
Join Date: Sep 2010
Location: Birmingham, AL
Posts: 397
Likes: 0
Received 0 Likes
on
0 Posts
Car: 1984 Camaro Z28 Clone
Engine: Bored .030, vortec sbc350
Transmission: Built T5 WC
Axle/Gears: 1999 Torsen 4:10 Locker
Re: My Little Two Week Project: Bumper Shaving
Is what I did when I filled mine was do section fills and had a damp towel handy to cool down excessive hot spots fast. A heat gun with small heat iron attachment works well for fusing too. There are a couple ways you can do it, just take your time, by section filling I mean pour a little in each spot at a time and build it up. If you go the route of liquifying urethane when pouring just make sure it isn't so hot that it burns right through.
If you have a front bumper IIRC the nose emblem fits in a recessed area just remove it and practice filling that. Grind into the urethane so there is no paint/primer.
After it is filled just sand smooth and have a trouble free bumper.
If you have a front bumper IIRC the nose emblem fits in a recessed area just remove it and practice filling that. Grind into the urethane so there is no paint/primer.
After it is filled just sand smooth and have a trouble free bumper.
 I'll keep ya'll updated on how it goes tonight.
02-14-2012, 11:33 AM
I'll keep ya'll updated on how it goes tonight.
02-14-2012, 11:33 AM
#15
Member
Join Date: Feb 2010
Location: rittman,ohio
Posts: 222
Likes: 0
Received 0 Likes
on
0 Posts
Car: 82 camaro berlinetta (z28clone)
Engine: gmpp 350,edelbrock,msd,k&n
Transmission: stage 2 maddog 700r4
Axle/Gears: motive gear 4.10/ eaton posi
Re: My Little Two Week Project: Bumper Shaving
i think it will look nice.....keep updates
02-14-2012, 11:41 AM
#18
Re: My Little Two Week Project: Bumper Shaving
One of these drill attachments from pepboys (rust remover) should clean up the fill area fast just watch it cause it will cut into the
urethane fast.
I think that area is what about 1/8th inch thick? That should absorb the liquified urethane without melting through. One of those wide metal putty knives should work well in countouring the urethane as it is hardening.
urethane fast.
I think that area is what about 1/8th inch thick? That should absorb the liquified urethane without melting through. One of those wide metal putty knives should work well in countouring the urethane as it is hardening.
Last edited by Jeffs82TA; 02-14-2012 at 11:46 AM.
02-14-2012, 06:59 PM
#19
Senior Member

iTrader: (4)
Join Date: May 2006
Location: Beloeil, Quebec
Posts: 704
Likes: 0
Received 2 Likes
on
2 Posts
Car: IROC-Z
Engine: LSx
Transmission: T56
Axle/Gears: Fabbed 9"
Re: My Little Two Week Project: Bumper Shaving
Body shop did it for me, no idea what was used. Its been holding great for the past years.
02-14-2012, 08:05 PM
#20
Member
Thread Starter
iTrader: (2)
Join Date: Sep 2010
Location: Birmingham, AL
Posts: 397
Likes: 0
Received 0 Likes
on
0 Posts
Car: 1984 Camaro Z28 Clone
Engine: Bored .030, vortec sbc350
Transmission: Built T5 WC
Axle/Gears: 1999 Torsen 4:10 Locker
Re: My Little Two Week Project: Bumper Shaving
That picture is the whole reason I have wanted to do this. Your build on LS1 tech is just beautiful. If I ever get the chance to do what you did with your car, I will be a lucky man! Great work!
02-14-2012, 08:13 PM
#21
Member
Thread Starter
iTrader: (2)
Join Date: Sep 2010
Location: Birmingham, AL
Posts: 397
Likes: 0
Received 0 Likes
on
0 Posts
Car: 1984 Camaro Z28 Clone
Engine: Bored .030, vortec sbc350
Transmission: Built T5 WC
Axle/Gears: 1999 Torsen 4:10 Locker
Re: My Little Two Week Project: Bumper Shaving
UPDATE!
Bad news first. Our plan on melting in the area with the scrap bumper was a complete failure. I spent two hours trying to get it to melt properly. The problem is, as soon as it gets hot enough to melt, it also combusts!
So I am going with my original plan. Love the idea, and many thanks to Jeff for the idea, I think it would work beautifully if I press melted them in, but I don't feel comfortable doing that, with the chance of harming my own bumper.
First coat of bondo hair going in.
Quick sand:

Second coat of Bondo-Hair going in.

That should be all the fiberglass I need. That'll get sanded down either late tonight or tomorrow, then Bondo will be glazed over that. Should turnout baby butt smooth. I'll get a pick of the backside too so ya'll can see how the foot holes I drilled, worked out.
Bad news first. Our plan on melting in the area with the scrap bumper was a complete failure. I spent two hours trying to get it to melt properly. The problem is, as soon as it gets hot enough to melt, it also combusts!
So I am going with my original plan. Love the idea, and many thanks to Jeff for the idea, I think it would work beautifully if I press melted them in, but I don't feel comfortable doing that, with the chance of harming my own bumper.
First coat of bondo hair going in.
Quick sand:
Second coat of Bondo-Hair going in.
That should be all the fiberglass I need. That'll get sanded down either late tonight or tomorrow, then Bondo will be glazed over that. Should turnout baby butt smooth.
I'll get a pick of the backside too so ya'll can see how the foot holes I drilled, worked out.
02-15-2012, 12:22 AM
#22
Senior Member
Join Date: Aug 2010
Location: Lincoln, NE
Posts: 680
Likes: 0
Received 1 Like
on
1 Post
Car: 86 Iroc-Z28
Engine: 5.3
Transmission: 4l60
Re: My Little Two Week Project: Bumper Shaving
Just found this thread ive been doin the same with my rear bumber, fuel door, and my 92 side skirts heres a pic of them check my build thread in my sig for more pics

Close up(the gap is due to it wasnt bolted up yet)

Close up(the gap is due to it wasnt bolted up yet)
02-15-2012, 05:25 AM
#23
Re: My Little Two Week Project: Bumper Shaving
UPDATE!
Bad news first. Our plan on melting in the area with the scrap bumper was a complete failure. I spent two hours trying to get it to melt properly. The problem is, as soon as it gets hot enough to melt, it also combusts!
So I am going with my original plan. Love the idea, and many thanks to Jeff for the idea, I think it would work beautifully if I press melted them in, but I don't feel comfortable doing that, with the chance of harming my own bumper.
First coat of bondo hair going in.
Quick sand:
Second coat of Bondo-Hair going in.
That should be all the fiberglass I need. That'll get sanded down either late tonight or tomorrow, then Bondo will be glazed over that. Should turnout baby butt smooth. I'll get a pick of the backside too so ya'll can see how the foot holes I drilled, worked out.
Bad news first. Our plan on melting in the area with the scrap bumper was a complete failure. I spent two hours trying to get it to melt properly. The problem is, as soon as it gets hot enough to melt, it also combusts!
So I am going with my original plan. Love the idea, and many thanks to Jeff for the idea, I think it would work beautifully if I press melted them in, but I don't feel comfortable doing that, with the chance of harming my own bumper.
First coat of bondo hair going in.
Quick sand:
Second coat of Bondo-Hair going in.
That should be all the fiberglass I need. That'll get sanded down either late tonight or tomorrow, then Bondo will be glazed over that. Should turnout baby butt smooth.
I'll get a pick of the backside too so ya'll can see how the foot holes I drilled, worked out.
02-15-2012, 08:08 AM
#24
Member
Thread Starter
iTrader: (2)
Join Date: Sep 2010
Location: Birmingham, AL
Posts: 397
Likes: 0
Received 0 Likes
on
0 Posts
Car: 1984 Camaro Z28 Clone
Engine: Bored .030, vortec sbc350
Transmission: Built T5 WC
Axle/Gears: 1999 Torsen 4:10 Locker
Re: My Little Two Week Project: Bumper Shaving
nope, controlled burner. Like I said, spent 2 hours at different heats doing a slow gradual heat. But I mean as soon as it started melting it would ignite.
02-15-2012, 09:05 AM
#25
Re: My Little Two Week Project: Bumper Shaving
That is weird, mine worked fine. Make us a video though!
02-15-2012, 10:28 AM
#28
Member
iTrader: (1)
Join Date: Apr 2003
Location: SoCal
Posts: 153
Likes: 0
Received 0 Likes
on
0 Posts
Car: 1982 Camaro Z28
Engine: electric
Transmission: powerglide
Axle/Gears: 10 bolt
Re: My Little Two Week Project: Bumper Shaving
02-16-2012, 07:23 PM
#30
Member

Join Date: Nov 2005
Location: Edmonton, AB
Posts: 428
Likes: 0
Received 0 Likes
on
0 Posts
Car: '87 Z-28
Engine: LT1-topped 400
Transmission: T56
Axle/Gears: 3.42
Re: My Little Two Week Project: Bumper Shaving
I have some of the flexible 2-part bumper stuff holding a crack together on my nose... I found it clogs up sandpaper quicker than Bondo, but is just as sandable and easy to shape.
02-16-2012, 07:56 PM
#31
Member
Thread Starter
iTrader: (2)
Join Date: Sep 2010
Location: Birmingham, AL
Posts: 397
Likes: 0
Received 0 Likes
on
0 Posts
Car: 1984 Camaro Z28 Clone
Engine: Bored .030, vortec sbc350
Transmission: Built T5 WC
Axle/Gears: 1999 Torsen 4:10 Locker
Re: My Little Two Week Project: Bumper Shaving
Some more progress pics coming soon. Finished with the fiberglass. Body filler going on now.
02-23-2012, 08:24 PM
#32
Supreme Member
iTrader: (1)
Join Date: Apr 2008
Location: Utah
Posts: 10,401
Likes: 0
Received 2 Likes
on
2 Posts
Car: 89 RS 89 iroc 87 firebird
Engine: 3.1 Turbo/ 355 twin turbo
Transmission: a4 w/ 4500 stall/ a4 / t5
Axle/Gears: strange s60 /w 3:42's
Re: My Little Two Week Project: Bumper Shaving
hows it comming along im about to do this on my rear bumper cover
02-23-2012, 09:51 PM
#33
Re: My Little Two Week Project: Bumper Shaving
What type of plastic is the bumper im right they are PUR if so it is not good to melt the plastic it will break down the compound and can fail you need a patch of the same type of meterial and weld it in
Last edited by Mirror Image; 02-23-2012 at 10:11 PM.
02-23-2012, 10:15 PM
#34
Member
Thread Starter
iTrader: (2)
Join Date: Sep 2010
Location: Birmingham, AL
Posts: 397
Likes: 0
Received 0 Likes
on
0 Posts
Car: 1984 Camaro Z28 Clone
Engine: Bored .030, vortec sbc350
Transmission: Built T5 WC
Axle/Gears: 1999 Torsen 4:10 Locker
Re: My Little Two Week Project: Bumper Shaving
Ill try and update tomorrow. its finishe, just been to busy with my rear swap. ill get pics tomorrow!
02-23-2012, 10:44 PM
#35
Supreme Member
iTrader: (1)
Join Date: Apr 2008
Location: Utah
Posts: 10,401
Likes: 0
Received 2 Likes
on
2 Posts
Car: 89 RS 89 iroc 87 firebird
Engine: 3.1 Turbo/ 355 twin turbo
Transmission: a4 w/ 4500 stall/ a4 / t5
Axle/Gears: strange s60 /w 3:42's
Re: My Little Two Week Project: Bumper Shaving
i started mine tonight ill post up some pics in a bit
im doing mine with an epoxy and then a light coat of flexible bondo over that
i drilled a bunch of 1/4 holes down the strip
then i duckt taped a peice of alimunum flat stock on the backside with an 1/8th inch gap between the flat bar and the bumper cover
then i poured the epoxy in leaving it slightly below the surface so i could finish it off with the flexable bondo
im waiting for the epoxy to dry now when it dries ill grab some pics
02-24-2012, 09:50 AM
#36
Member
Thread Starter
iTrader: (2)
Join Date: Sep 2010
Location: Birmingham, AL
Posts: 397
Likes: 0
Received 0 Likes
on
0 Posts
Car: 1984 Camaro Z28 Clone
Engine: Bored .030, vortec sbc350
Transmission: Built T5 WC
Axle/Gears: 1999 Torsen 4:10 Locker
Re: My Little Two Week Project: Bumper Shaving
i started mine tonight ill post up some pics in a bit
im doing mine with an epoxy and then a light coat of flexible bondo over that
i drilled a bunch of 1/4 holes down the strip
then i duckt taped a peice of alimunum flat stock on the backside with an 1/8th inch gap between the flat bar and the bumper cover
then i poured the epoxy in leaving it slightly below the surface so i could finish it off with the flexable bondo
im waiting for the epoxy to dry now when it dries ill grab some pics
im doing mine with an epoxy and then a light coat of flexible bondo over that
i drilled a bunch of 1/4 holes down the strip
then i duckt taped a peice of alimunum flat stock on the backside with an 1/8th inch gap between the flat bar and the bumper cover
then i poured the epoxy in leaving it slightly below the surface so i could finish it off with the flexable bondo
im waiting for the epoxy to dry now when it dries ill grab some pics
 02-25-2012, 06:33 PM
#37
Supreme Member
iTrader: (1)
Join Date: Apr 2008
Location: Utah
Posts: 10,401
Likes: 0
Received 2 Likes
on
2 Posts
Car: 89 RS 89 iroc 87 firebird
Engine: 3.1 Turbo/ 355 twin turbo
Transmission: a4 w/ 4500 stall/ a4 / t5
Axle/Gears: strange s60 /w 3:42's
Re: My Little Two Week Project: Bumper Shaving
i do not like the bondo im using , its made for like 2002 and up cars with plastic and rubber panels.
the problem is its very hard to sand and it goes on way to thick to work real nice.
the bumper cover only needs a very final tlight thin coat so im going to pick up some of the normal grey or red body filler and see what happenes .i hate to use that stuff since its not flexable but this other stuff is just way to hard to shape and sand
02-27-2012, 09:52 PM
#38
Supreme Member
iTrader: (1)
Join Date: Apr 2008
Location: Utah
Posts: 10,401
Likes: 0
Received 2 Likes
on
2 Posts
Car: 89 RS 89 iroc 87 firebird
Engine: 3.1 Turbo/ 355 twin turbo
Transmission: a4 w/ 4500 stall/ a4 / t5
Axle/Gears: strange s60 /w 3:42's
Re: My Little Two Week Project: Bumper Shaving
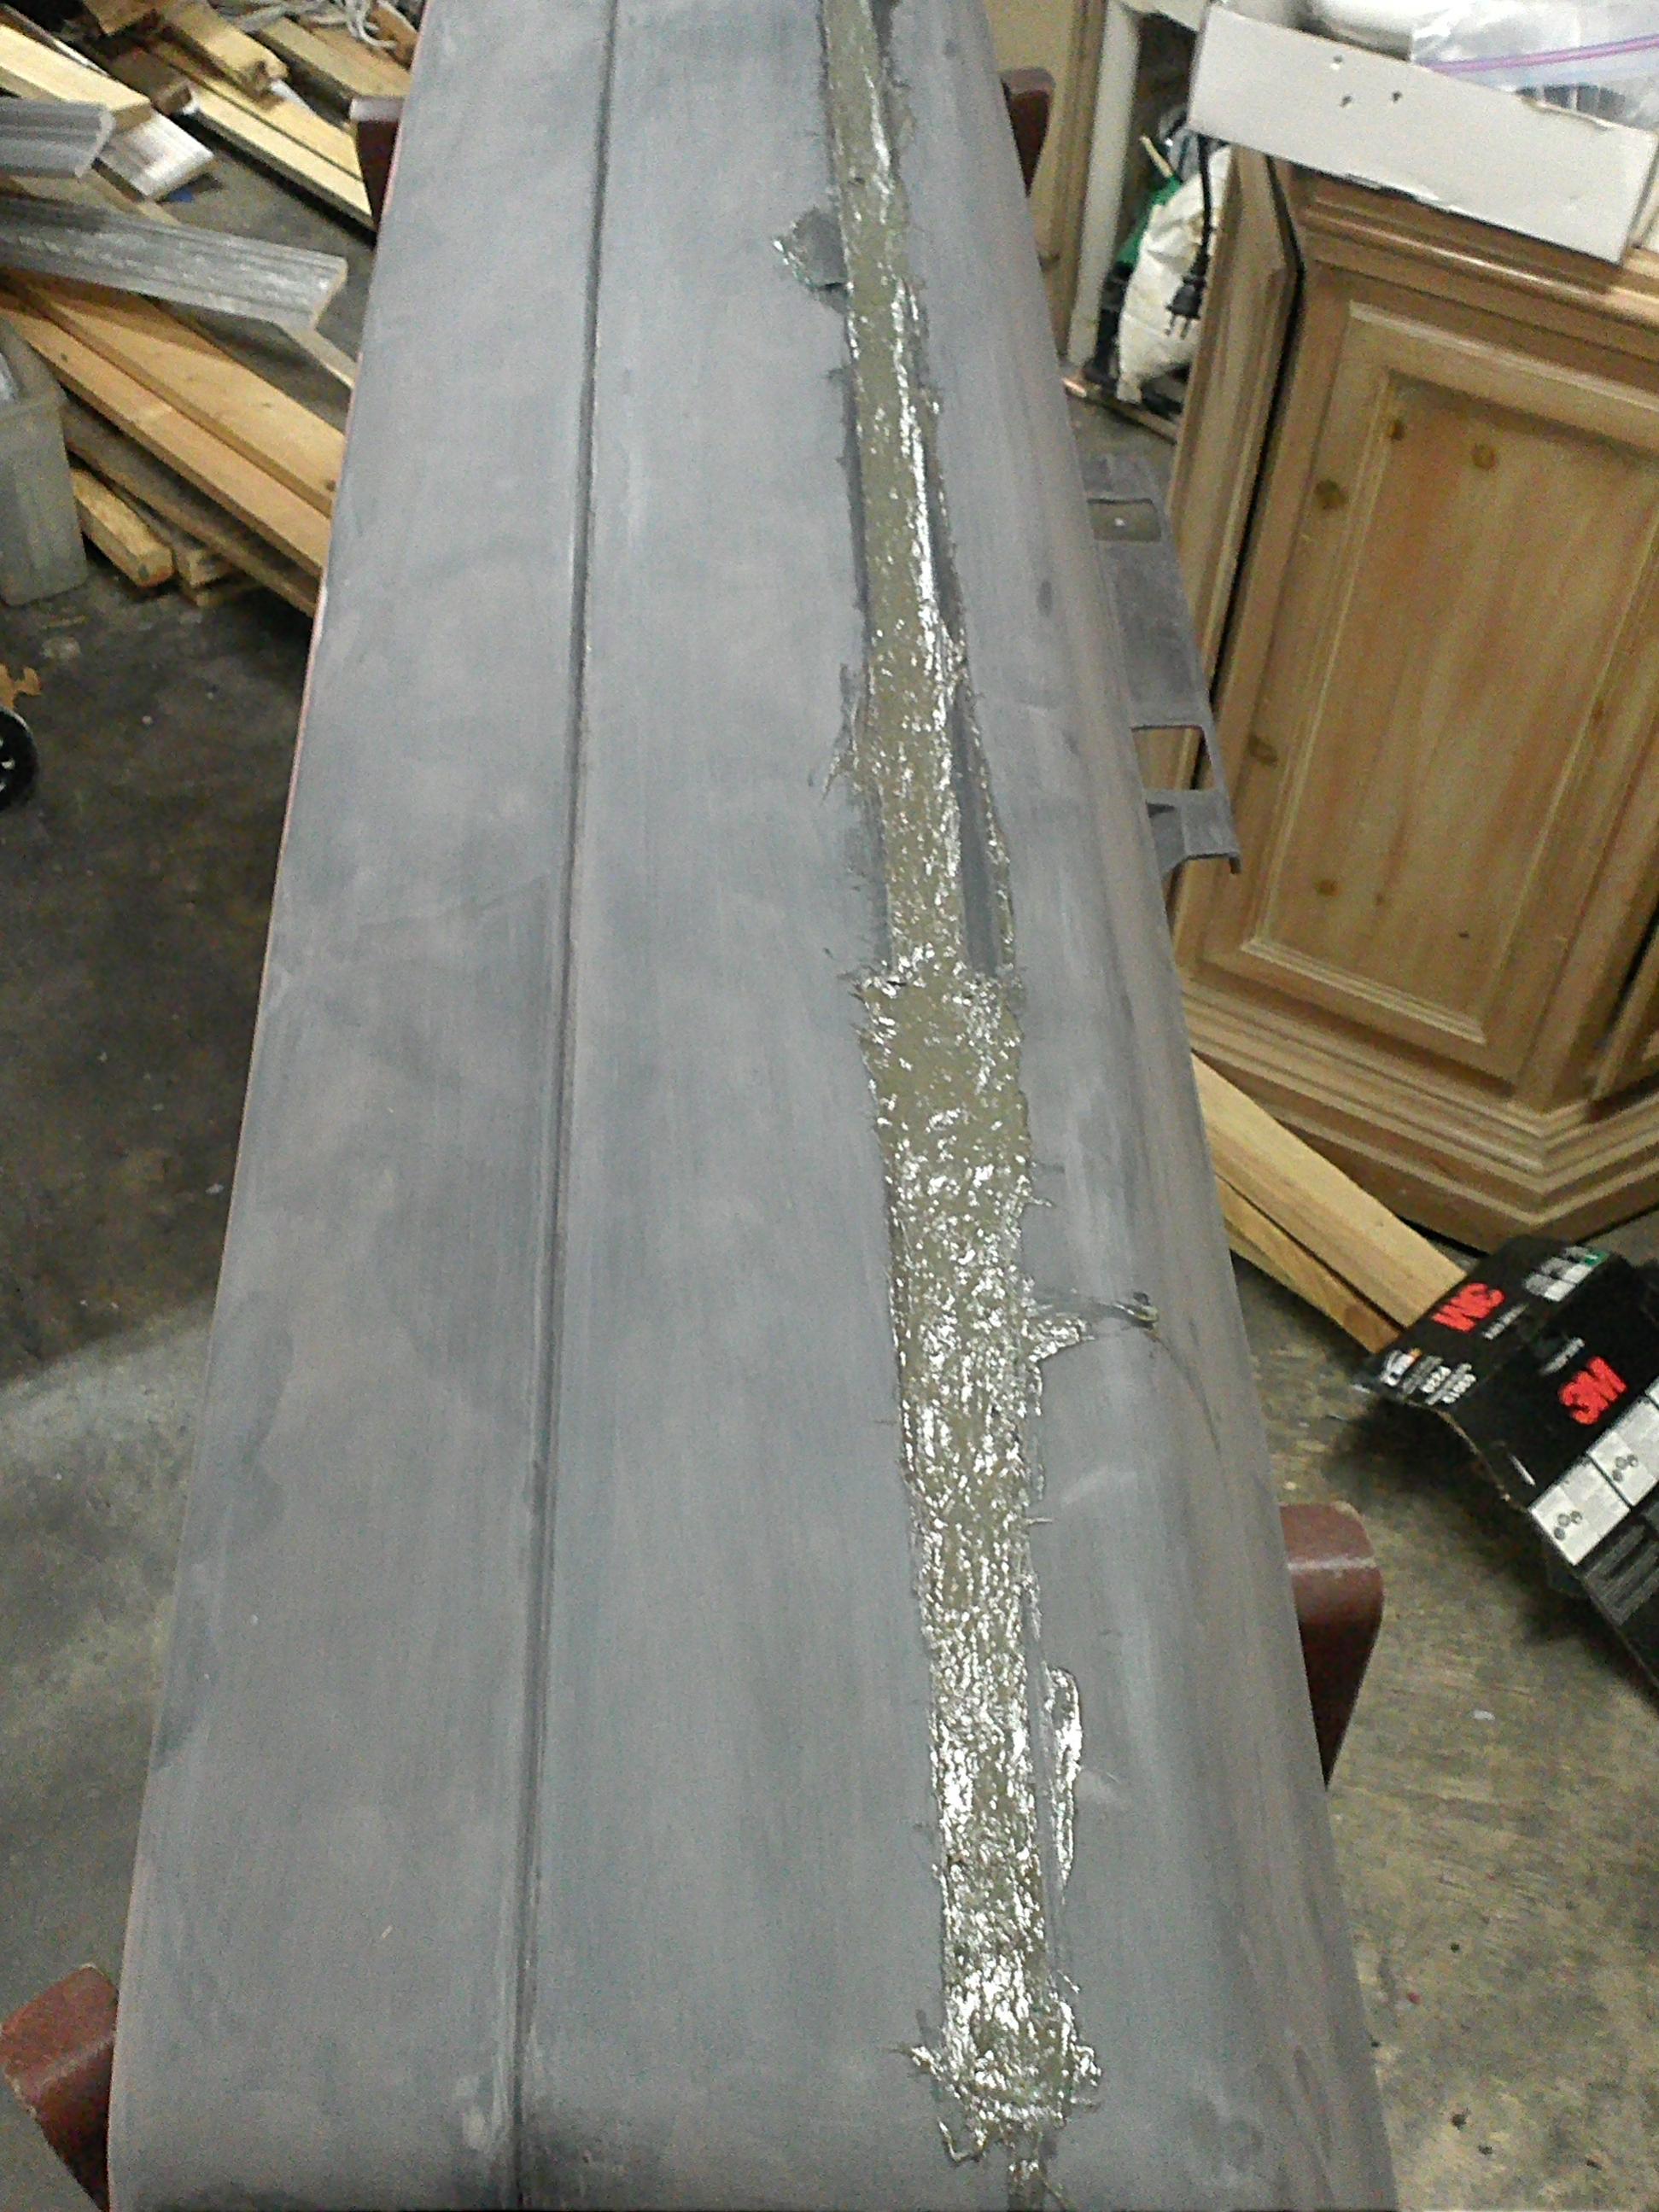
this is as far as i got with smoothing my rear bumper cover.
need to pick up some different filler that will work on the plastic cover as the stuff i got for it is way to hard to sand and shape, and it is to thick to go on as thin is a need it to to finish

need to pick up some different filler that will work on the plastic cover as the stuff i got for it is way to hard to sand and shape, and it is to thick to go on as thin is a need it to to finish
02-27-2012, 09:59 PM
#39
Member
Thread Starter
iTrader: (2)
Join Date: Sep 2010
Location: Birmingham, AL
Posts: 397
Likes: 0
Received 0 Likes
on
0 Posts
Car: 1984 Camaro Z28 Clone
Engine: Bored .030, vortec sbc350
Transmission: Built T5 WC
Axle/Gears: 1999 Torsen 4:10 Locker
Re: My Little Two Week Project: Bumper Shaving
Looks really good man. Def needs some more. I can still see the outline of it. I havent had a chance to get pics of mine yet. I have been nose to the grind stone getting the car ready for Saturday. Still have a Hood to finish prepping...
02-27-2012, 10:06 PM
#40
Supreme Member
iTrader: (1)
Join Date: Apr 2008
Location: Utah
Posts: 10,401
Likes: 0
Received 2 Likes
on
2 Posts
Car: 89 RS 89 iroc 87 firebird
Engine: 3.1 Turbo/ 355 twin turbo
Transmission: a4 w/ 4500 stall/ a4 / t5
Axle/Gears: strange s60 /w 3:42's
Re: My Little Two Week Project: Bumper Shaving
yeah it needs one more really thin coat.
i have more of the stuff ive been using but its very thick and it dosent sand down very easy so i decided to wait till i get some other filler to try out instead of fighting with the stuff i have
i have more of the stuff ive been using but its very thick and it dosent sand down very easy so i decided to wait till i get some other filler to try out instead of fighting with the stuff i have
02-28-2012, 03:51 PM
#41
Member
Thread Starter
iTrader: (2)
Join Date: Sep 2010
Location: Birmingham, AL
Posts: 397
Likes: 0
Received 0 Likes
on
0 Posts
Car: 1984 Camaro Z28 Clone
Engine: Bored .030, vortec sbc350
Transmission: Built T5 WC
Axle/Gears: 1999 Torsen 4:10 Locker
Re: My Little Two Week Project: Bumper Shaving
You not wanting to use Bondo Gold?
02-28-2012, 04:32 PM
#42
Supreme Member
iTrader: (1)
Join Date: Apr 2008
Location: Utah
Posts: 10,401
Likes: 0
Received 2 Likes
on
2 Posts
Car: 89 RS 89 iroc 87 firebird
Engine: 3.1 Turbo/ 355 twin turbo
Transmission: a4 w/ 4500 stall/ a4 / t5
Axle/Gears: strange s60 /w 3:42's
Re: My Little Two Week Project: Bumper Shaving
thats what i have now its green, its just so dam hard to sand compared to the red or grey filler.i may try to do the final coat with it i just wish there was a way to thin it out a lil bit before i applied it
02-29-2012, 10:03 AM
#44
Member
Thread Starter
iTrader: (2)
Join Date: Sep 2010
Location: Birmingham, AL
Posts: 397
Likes: 0
Received 0 Likes
on
0 Posts
Car: 1984 Camaro Z28 Clone
Engine: Bored .030, vortec sbc350
Transmission: Built T5 WC
Axle/Gears: 1999 Torsen 4:10 Locker
Re: My Little Two Week Project: Bumper Shaving
Sweet man!!
02-29-2012, 02:46 PM
#46
Member
Thread Starter
iTrader: (2)
Join Date: Sep 2010
Location: Birmingham, AL
Posts: 397
Likes: 0
Received 0 Likes
on
0 Posts
Car: 1984 Camaro Z28 Clone
Engine: Bored .030, vortec sbc350
Transmission: Built T5 WC
Axle/Gears: 1999 Torsen 4:10 Locker
Re: My Little Two Week Project: Bumper Shaving
Looks great man!
03-05-2012, 06:52 PM
#47
Member
Thread Starter
iTrader: (2)
Join Date: Sep 2010
Location: Birmingham, AL
Posts: 397
Likes: 0
Received 0 Likes
on
0 Posts
Car: 1984 Camaro Z28 Clone
Engine: Bored .030, vortec sbc350
Transmission: Built T5 WC
Axle/Gears: 1999 Torsen 4:10 Locker
Re: My Little Two Week Project: Bumper Shaving
Well guys, this was the ultimate outcome. Turned out great IMO.


03-06-2012, 11:19 AM
#49
Member
Thread Starter
iTrader: (2)
Join Date: Sep 2010
Location: Birmingham, AL
Posts: 397
Likes: 0
Received 0 Likes
on
0 Posts
Car: 1984 Camaro Z28 Clone
Engine: Bored .030, vortec sbc350
Transmission: Built T5 WC
Axle/Gears: 1999 Torsen 4:10 Locker
Re: My Little Two Week Project: Bumper Shaving
Thanks! I like it myself!

Thread
Thread Starter
Forum
Replies
Last Post
CAMAROBEAV
European Region
0
09-12-2015 09:34 AM