82-83 Seatbelt Restoration
 08-04-2008, 01:01 AM
#1
Supreme Member

Thread Starter
iTrader: (1)

Join Date: Sep 2004
Location: Toledo, OH
Posts: 1,372
Likes: 0
Received 2 Likes
on
2 Posts
Car: 1982 Trans Am
Engine: SBC 400
Transmission: 700-R4
Axle/Gears: 9 Bolt 2.77
82-83 Seat belt Receiver Restoration
How many people with an 82-83 Firebird or Camaro want to change their seat belts because they are faded, worn, cracked, etc??? I know cracking on the front receivers is pretty common, also fading on the receiver, and possibly worn or missing blue "GM" buttons. Well, they aren't making replacements for any of this stuff so really you have to work with what you have.
Anyway, I am making this thread to show what is involved if you want to change the webbing on your receivers, and maybe even freshen up your receiver it self, by cleaning or even re-dyeing. Maybe you want to put in some better looking blue "GM" buttons but don't want to ruin your receiver. I recently picked 4 buttons up at a junk yard that were pretty much brand new looking from an '82 Camaro. I figured I would show the "right" way to do it, vs. destroying the receiver it self to get them out
The receiver webbing is held in the plastic part by some stitching at the bottom. I didn't take a pic of this, but it's pretty self explanatory. Just take a knife and carefully cut the thread, and the receiver and webbing will slide right out. What you have is something like this:
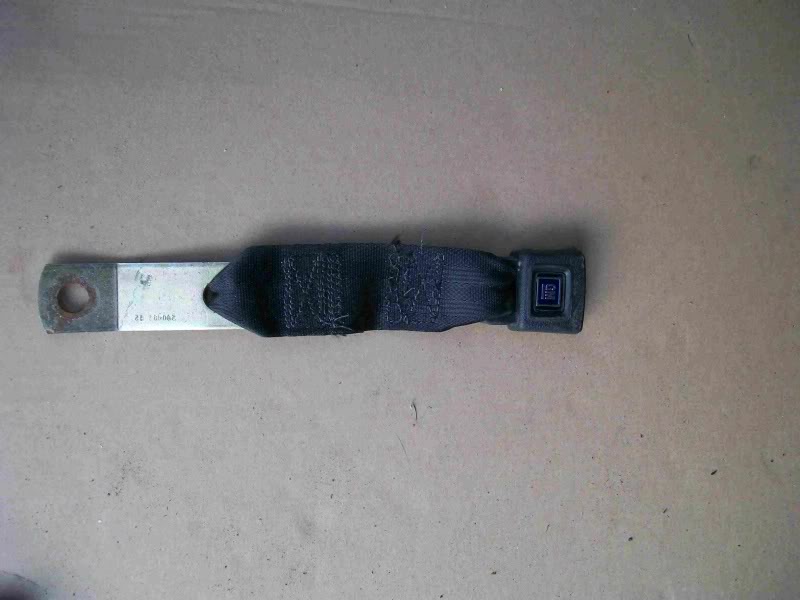
Now to remove the plastic receiver you will need to cut through the stitching on the webbing itself. This is pretty easy, just take a sharp knife and run it between the webbing and cut through the threads. It's tough but you will get through. This is the result:
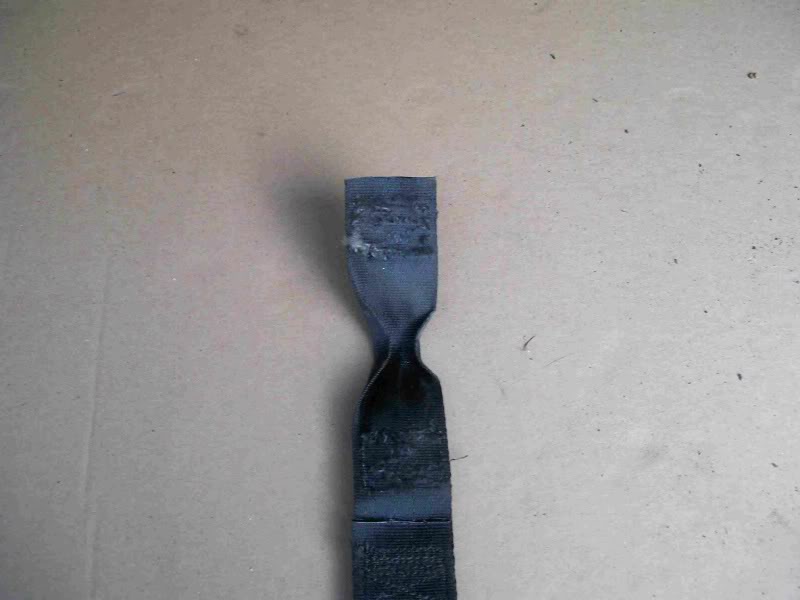
Now you will have the receiver by itself. Be VERY careful with how you handle this, and also all the plastic parts. This plastic is so flimsy and fragile I swear you could probably cut through it with a butter knife!!
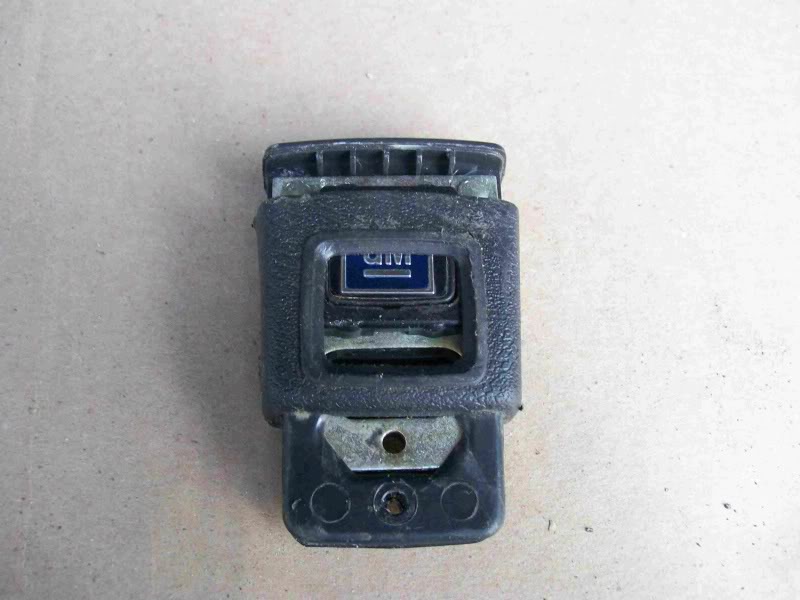
Here is the receiver removed from the webbing:
Front
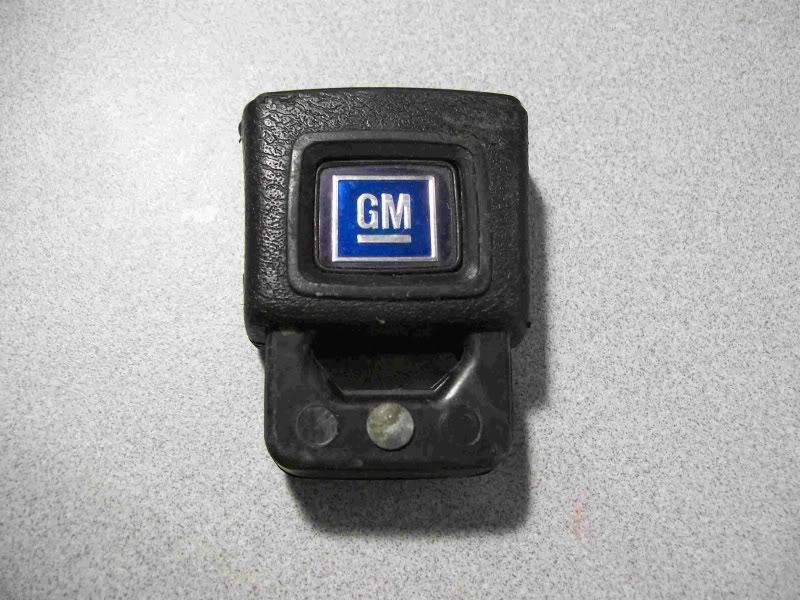
You will notice that there is a rivet holding it together. You will need to drill through this to separate the receiver from the plastic. Be very careful when doing this. Like I said, the plastic is very fragile and can be ruined easily. I took a 1/8" drill bit and drilled through the back of the rivet. You will want to take a piece of duct tape, or get some vice grips to prevent the rivet from spinning while you are drilling. Don't use a lot of pressure, just light and steady. You don't want to drill through completely, just enough to remove the rivet. If all goes well you will end up with this:

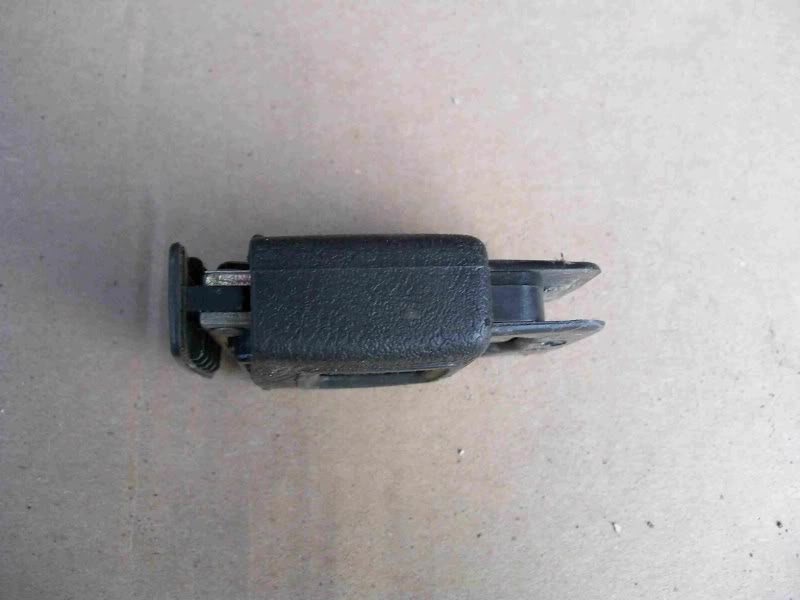
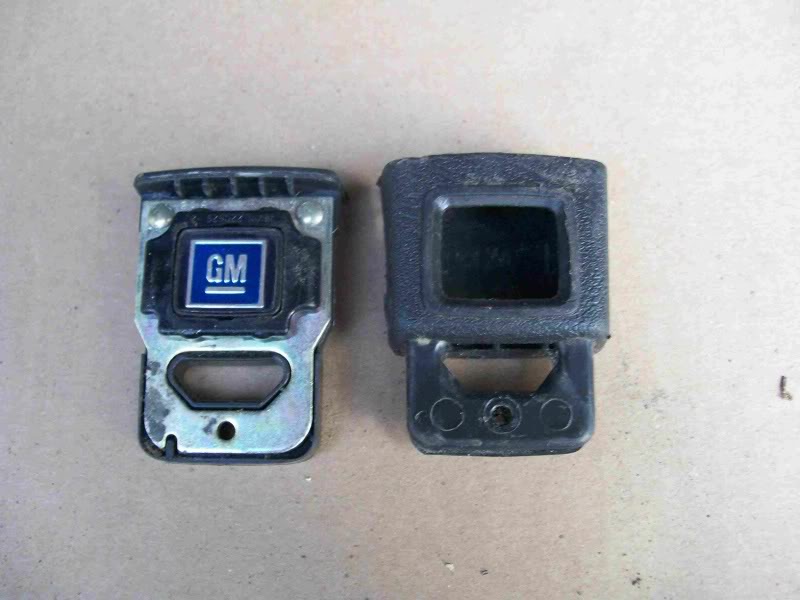
Now you can separate the receiver from the plastic housing. It just slides right out:
Side
Front
Receiver and housing
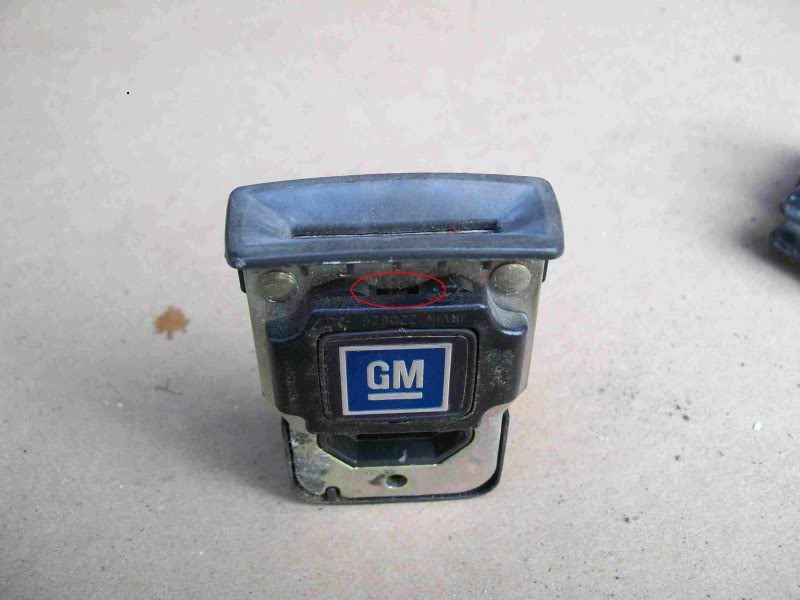
Now you will have the receiver by itself. The blue "GM" button is held on by a plastic surround that clips into the receiver. You can gently pry this off with a flat head screwdriver or knife tip where the red circle is:
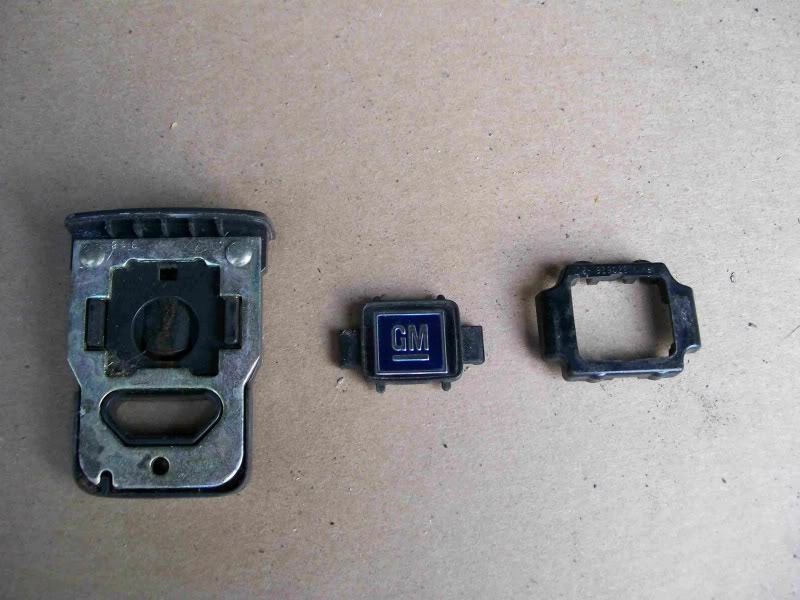
Here is everything separated:
Installation is just the reverse. You will need to get a new rivet to hold it back together. These are pretty easy to find so it should be a problem. You can also get new webbing pretty easily also, and pretty much any upholstery shop can re-sew it back together using the correct stitch pattern.
If anyone ever wanted to do this, here is how. I know this isn't for everyone, but if it can help out anyone then I am happy. I had a spare set of seat belts laying around that were pretty much junk in my opinion, since the plastic was cracked very badly. So I tried to see how I could make them new. If you go this route, you don't necessarily have to worry about getting the correct color you want...just find some belts that have good plastic and you can redye them, and just get new webbing.
Any comments good, or bad, let me know
Anyway, I am making this thread to show what is involved if you want to change the webbing on your receivers, and maybe even freshen up your receiver it self, by cleaning or even re-dyeing. Maybe you want to put in some better looking blue "GM" buttons but don't want to ruin your receiver. I recently picked 4 buttons up at a junk yard that were pretty much brand new looking from an '82 Camaro. I figured I would show the "right" way to do it, vs. destroying the receiver it self to get them out
The receiver webbing is held in the plastic part by some stitching at the bottom. I didn't take a pic of this, but it's pretty self explanatory. Just take a knife and carefully cut the thread, and the receiver and webbing will slide right out. What you have is something like this:
Now to remove the plastic receiver you will need to cut through the stitching on the webbing itself. This is pretty easy, just take a sharp knife and run it between the webbing and cut through the threads. It's tough but you will get through. This is the result:
Now you will have the receiver by itself. Be VERY careful with how you handle this, and also all the plastic parts. This plastic is so flimsy and fragile I swear you could probably cut through it with a butter knife!!
Here is the receiver removed from the webbing:
Front
You will notice that there is a rivet holding it together. You will need to drill through this to separate the receiver from the plastic. Be very careful when doing this. Like I said, the plastic is very fragile and can be ruined easily. I took a 1/8" drill bit and drilled through the back of the rivet. You will want to take a piece of duct tape, or get some vice grips to prevent the rivet from spinning while you are drilling. Don't use a lot of pressure, just light and steady. You don't want to drill through completely, just enough to remove the rivet. If all goes well you will end up with this:
Now you can separate the receiver from the plastic housing. It just slides right out:
Side
Front
Receiver and housing
Now you will have the receiver by itself. The blue "GM" button is held on by a plastic surround that clips into the receiver. You can gently pry this off with a flat head screwdriver or knife tip where the red circle is:
Here is everything separated:
Installation is just the reverse. You will need to get a new rivet to hold it back together. These are pretty easy to find so it should be a problem. You can also get new webbing pretty easily also, and pretty much any upholstery shop can re-sew it back together using the correct stitch pattern.
If anyone ever wanted to do this, here is how. I know this isn't for everyone, but if it can help out anyone then I am happy. I had a spare set of seat belts laying around that were pretty much junk in my opinion, since the plastic was cracked very badly. So I tried to see how I could make them new. If you go this route, you don't necessarily have to worry about getting the correct color you want...just find some belts that have good plastic and you can redye them, and just get new webbing.
Any comments good, or bad, let me know
Last edited by 1982TA; 08-04-2008 at 01:08 AM.
 08-04-2008, 06:21 PM
#2
 08-04-2008, 07:57 PM
#3
Supreme Member
iTrader: (21)
Join Date: Dec 2005
Posts: 4,075
Likes: 0
Received 1 Like
on
1 Post
Car: 04 Silverado
Engine: 4.8
Transmission: auto
Re: 82-83 Seatbelt Restoration
Awsome in-depth write up. I would do this if I had a show car, I wouldn't do it if I depended on my seatbelts to save my life, I would rather swap over to
4th gen belts for safety. I know you are doing this to preserve the originality of the car but how safe is it to resew the belts? BTW thanks again for the write up, I don't think it has been done before.
4th gen belts for safety. I know you are doing this to preserve the originality of the car but how safe is it to resew the belts? BTW thanks again for the write up, I don't think it has been done before.
08-04-2008, 08:19 PM
#4
Senior Member
iTrader: (1)
Join Date: Feb 2004
Location: Seattle
Posts: 536
Likes: 0
Received 49 Likes
on
25 Posts
Car: 1983 Trans Am
Engine: L69 5.0L HO
Transmission: Manual
Axle/Gears: 3.73
Re: 82-83 Seatbelt Restoration
Thanks, I�ll need to do that with my 83� at some point. Getting the webbing put back together is what I worry about. I�m sure it needs to meet some DOT specifications. I�m sure just sowing it back together with dime store thread is bad. Have you looked into getting the webbing redone? There must be some company that can resew it.
08-04-2008, 08:49 PM
#5
Member
Join Date: Sep 2001
Location: Roanoke VA
Posts: 211
Likes: 0
Received 0 Likes
on
0 Posts
Car: 83 ta
Engine: 305
Transmission: 700r4
Re: 82-83 Seatbelt Restoration
Check out Ssbake Oyl http://www.ssnake-oyl.com/. They can redo any seatbelts back to the original look but are costly. But being a item like the seatbelt I think it would be worth the price. It is were I am going to have the belts for my 83 TA redone when it comes time.
08-05-2008, 10:22 AM
#6
Supreme Member
Thread Starter
iTrader: (1)
Join Date: Sep 2004
Location: Toledo, OH
Posts: 1,372
Likes: 0
Received 2 Likes
on
2 Posts
Car: 1982 Trans Am
Engine: SBC 400
Transmission: 700-R4
Axle/Gears: 9 Bolt 2.77
Re: 82-83 Seatbelt Restoration
I knew this would come up eventually...the safety aspect of it anyway. Any competent upholstery shop should be able to re-sew the seatbelt back together and not with just thread, but the heavy duty thread that is made for this applicaiton. I mean, you can buy replacement webbing, so I don't see why it would be impossible to sew it back correctly. I really doubt that the manufacturer is the only place this could be done.
08-05-2008, 03:26 PM
#7
Member
Re: 82-83 Seatbelt Restoration
Yes, the upholstery shops carry heavy duty UV resistant thread. I mean, regular thread isn't going to hold up on a boat cover or something like that. It has to be the good stuff. I would trust it if sewn right.
Trending Topics
08-06-2008, 01:17 AM
#8
Supreme Member
Thread Starter
iTrader: (1)
Join Date: Sep 2004
Location: Toledo, OH
Posts: 1,372
Likes: 0
Received 2 Likes
on
2 Posts
Car: 1982 Trans Am
Engine: SBC 400
Transmission: 700-R4
Axle/Gears: 9 Bolt 2.77
Re: 82-83 Seatbelt Restoration
There are a couple of shops some guys at work told me about that should be able to do the stitching. It must be some kind of standard stitching pattern because where I work we have ratchet straps for our semi trailers and where they are sewn at the ends, they have the same pattern as the seat belts. It's a square with an "X" in it. It's pretty much the same webbing material also.
Now the next project are the retractors
Now the next project are the retractors
09-05-2010, 09:30 AM
#9
Member
Join Date: Oct 2003
Location: Commerce MI
Posts: 212
Likes: 0
Received 0 Likes
on
0 Posts
Car: 1991 Trans Am
Engine: 5L TPI
Transmission: 700R4
Re: 82-83 Seatbelt Restoration
Thanks for the write-up 82TA, that no doubt will help those trying to restore belts with the parts you mention.
I figured I'd chime in on this, with a solution that worked for me. The belts on my 84 Camaro weren't all that heavily worn/beat up thankfully, just grimy from 25+ years of not being cleaned. I decided to just ultra-clean mine and see how they would come out. Here's what I did....
1. Removed the belts. To get the front shoulder belts out you have to drop a corner of the headliner, and reach up in there with a 13mm ratchet to get the retractor assy out.
2. I used laundry and potato chip bag clips to hold the belts all the way out of the retractors at each end. It helps to fold over a little crease in the belt and start it into the retractor before putting the clip on, sort of like causing an intentional jam. Also, to get the belt completely extended for this you must hold the retractors at the same attitude as they'd be if installed, due to the little safety pendulums in the retractors.
3. I put hot water, some Simple Green cleaner, and some regular liquid Dawn dish soap in our kitchen sink. Make the water as hot as your hands can tolerate. I laid the retractors right beside the sink and put the belts in the solution.
4. Now for the tedious part. Basically you're going to imitate a clothes washer for 5 or 10 minutes. If you've ever watched your clothes washer during the agitation cycle, it just twirls and jerks the garments around to get "water thru the weave" as an appliance salesman once told me. I just kept moving the belt around, bending it and twirling around. You'll be amazed how filthy the water will become!
5. Next rinse the belt thoroughly. Use the little spray nozzle on your sink if you have one. Rinse each belt 5 or 6 times.
6. Keeping the clips on still, hang the belts out in the sun for an hour or so. It's really important to get them all the way dry! Some portions you've exposed will hardly ever see sun, and if left wet may corrode retractors.
7. Re-install. I was really surprised how mine turned out. Not only are they essentially clean as a new belt, it also really made them more soft and pliable as well.
Hope that helps.
Last edited by Red90IROC; 09-05-2010 at 09:35 AM.
10-18-2010, 10:17 PM
#10
Member
Join Date: Oct 2003
Location: Commerce MI
Posts: 212
Likes: 0
Received 0 Likes
on
0 Posts
Car: 1991 Trans Am
Engine: 5L TPI
Transmission: 700R4
Re: 82-83 Seatbelt Restoration
Sry all, to again be spamming this thread. But I had my Z28 out last week for a little spin... I was amazed again, how well the above method had worked last month! Granted my car is a low-mile example (<20k miles) but it really felt and looked like a brand new seat belt. Soft, pliable, shiny and essentially just like new!

Thread
Thread Starter
Forum
Replies
Last Post