[MN] Auto Dimming Mirrors for Thirdgens
 08-15-2009, 01:32 PM
#1
Supreme Member

Thread Starter
iTrader: (4)
Join Date: Sep 2004
Location: MN
Posts: 2,069
Likes: 0
Received 3 Likes
on
3 Posts
Car: 85 SC, 86 Berlinetta
Engine: V6, V8
Transmission: 700r4, 700r4
Auto Dimming Mirrors for Thirdgens
I have a couple of dimming mirrors that I could get rid of if anyone is interested. I have the first three versions of the Gentex series. I bought my first one here on TGO for $35 a while back and it didn’t work. As a tech I found the Gen I to be kind of fun to play around with and fixed it. I noticed a few people are looking for them so I thought I might get rid of some and help people out in the process.
Gen I – (electromechanical) - This style is the most interesting but its weakness is a small belt that wears with age. I won’t guarantee anything with these as their reliability isn’t that great. (I don't have any of these left that are dependable enough to sell to anyone. I had two but used both up to make one good one. )
Gen II – This version has no moving parts inside. It uses a film in-between two glass plates to darken the mirror. These have a switch on the bottom for low, hi, and off. $30
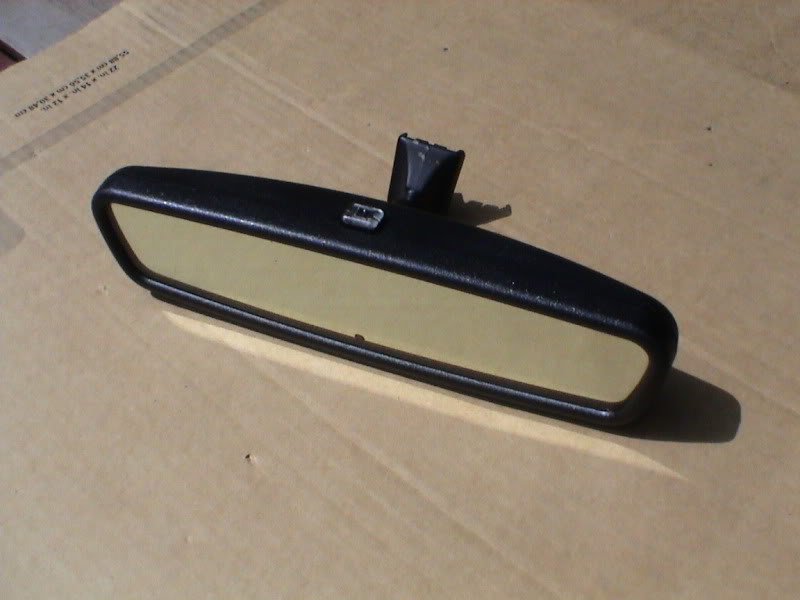
Gen III – This version operates just like the Gen II but is more sleek with a single button to turn it on and off. $40
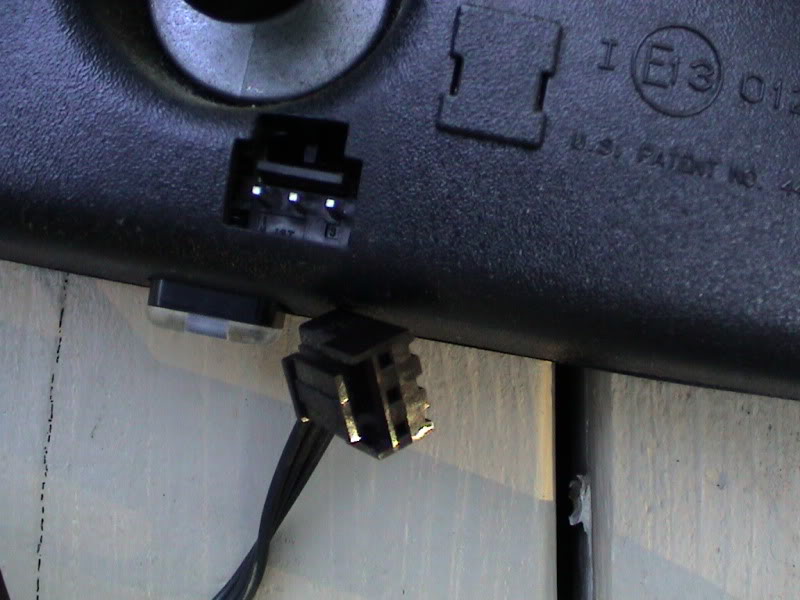
Because I’ve noticed people getting non-working units, I will test to verify that they work and can try to help with the wiring if you have a different connector or are doing a new install. They have three wires, positive, negative, and a wire to shut the unit off when the car is put in reverse. Please Post up or send me an image of the connector you have, or let me know if you will need any wiring. The wiring is ultimately your responsibility, but isn’t difficult to verify if you have a meter to check it before installation. Replacements shouldn’t need any wiring at all.
Below is the Gen III (Gentex - 126 in pic)

Connectors for reference:
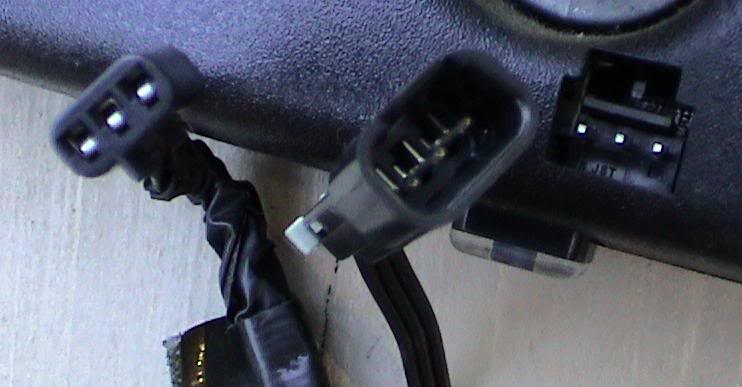
Connection farther down the line:
Gen I – (electromechanical) - This style is the most interesting but its weakness is a small belt that wears with age. I won’t guarantee anything with these as their reliability isn’t that great. (I don't have any of these left that are dependable enough to sell to anyone. I had two but used both up to make one good one. )
Gen II – This version has no moving parts inside. It uses a film in-between two glass plates to darken the mirror. These have a switch on the bottom for low, hi, and off. $30
Gen III – This version operates just like the Gen II but is more sleek with a single button to turn it on and off. $40
Because I’ve noticed people getting non-working units, I will test to verify that they work and can try to help with the wiring if you have a different connector or are doing a new install. They have three wires, positive, negative, and a wire to shut the unit off when the car is put in reverse. Please Post up or send me an image of the connector you have, or let me know if you will need any wiring. The wiring is ultimately your responsibility, but isn’t difficult to verify if you have a meter to check it before installation. Replacements shouldn’t need any wiring at all.
Below is the Gen III (Gentex - 126 in pic)
Connectors for reference:
Connection farther down the line:
Last edited by Scorpner; 12-10-2009 at 08:04 PM.
 08-15-2009, 02:00 PM
#2
Banned
iTrader: (12)
Join Date: Jul 1999
Location: Bertram (outside Austin), TX
Posts: 12,212
Likes: 0
Received 10 Likes
on
10 Posts
Car: 87 GTA
Engine: L98
Transmission: 700R4
Axle/Gears: Dana M78 3.27 posi
Re: Auto Dimming Mirrors for Thirdgens
Can you share any info on why my 87 mirror works at random?
I didn't know it had one, for th first 3 years I owned the car, then it started working one night. Then just stopped again & randomly works on & off ever since.
I opened it up & see nothing obviosly broken, so I'm at a loss.
I didn't know it had one, for th first 3 years I owned the car, then it started working one night. Then just stopped again & randomly works on & off ever since.
I opened it up & see nothing obviosly broken, so I'm at a loss.
08-15-2009, 02:40 PM
#3
Supreme Member
Thread Starter
iTrader: (4)
Join Date: Sep 2004
Location: MN
Posts: 2,069
Likes: 0
Received 3 Likes
on
3 Posts
Car: 85 SC, 86 Berlinetta
Engine: V6, V8
Transmission: 700r4, 700r4
Re: Auto Dimming Mirrors for Thirdgens
I think that's probably the Gen I, I don't know which years they changed them but noticed these in the mid eighties Thirdgens.
When you have it open you can see which lines are positive and negative so then you can power it up. You can then trigger the unit in the dark with a flashlight (or you could try covering the front sensor) and shining a flashlight on the rear sensor. The Gen I has a sensitivity dial that you can adjust and that may also be why it only works part of the time.
My first thoughts are:
Clean the contacts with alcohol and a Q-tip. The belt/s may dry out with alcohol so clean it with something that won't dry it out or at least rinse it off. I was able to get a new belt from an engineer at my old job. Check that nothing is binding and try running it to see if you notice anything out of place. If the motor sounds like it's free spinning it's probably the belt. Most of the time it's an electrical contact or wear issue unless it was damaged (ie. dropped or something). The one I replaced the belts in works reliably, but I would trust the newer versions more since they don't have any moving parts.
When you have it open you can see which lines are positive and negative so then you can power it up. You can then trigger the unit in the dark with a flashlight (or you could try covering the front sensor) and shining a flashlight on the rear sensor. The Gen I has a sensitivity dial that you can adjust and that may also be why it only works part of the time.
My first thoughts are:
- (+/-) electrical connection - verify power to the unit.
- the belt/s is worn and is barely grabbing
- the electrical contacts inside are dirty
- some other mechanical issue
Clean the contacts with alcohol and a Q-tip. The belt/s may dry out with alcohol so clean it with something that won't dry it out or at least rinse it off. I was able to get a new belt from an engineer at my old job. Check that nothing is binding and try running it to see if you notice anything out of place. If the motor sounds like it's free spinning it's probably the belt. Most of the time it's an electrical contact or wear issue unless it was damaged (ie. dropped or something). The one I replaced the belts in works reliably, but I would trust the newer versions more since they don't have any moving parts.
Last edited by Scorpner; 08-15-2009 at 02:57 PM.
08-15-2009, 02:56 PM
#4
Supreme Member
Thread Starter
iTrader: (4)
Join Date: Sep 2004
Location: MN
Posts: 2,069
Likes: 0
Received 3 Likes
on
3 Posts
Car: 85 SC, 86 Berlinetta
Engine: V6, V8
Transmission: 700r4, 700r4
Re: Auto Dimming Mirrors for Thirdgens
Actually, here is a thread I posted in 2005 when I was working on it:
https://www.thirdgen.org/forums/elec...or-repair.html
General troubleshooting info from then:
(I was up late BTW.)
Pics of belts:

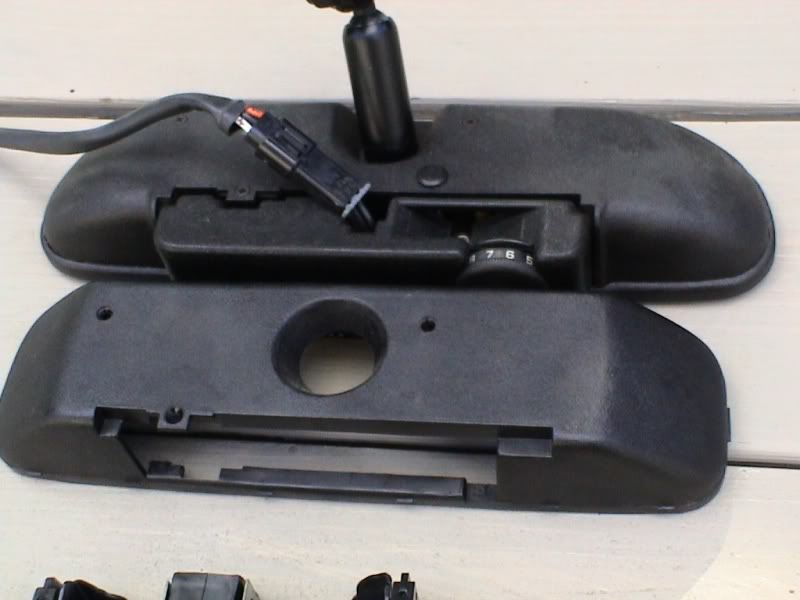
Different mirror styles Gen I and Gen III:

https://www.thirdgen.org/forums/elec...or-repair.html
General troubleshooting info from then:
(I was up late BTW.)
These things seem to have a mind of their own when everything isn't perfect.
Note: The input connector when looking at the mirror upside down with the mirror side facing you is [ POS - GRD - Reverse( Over ride). ] For reference, the pos lead goes to the switch. I put a piece of shrink tubing over the GND post and connected the ground wire to a screw on the metal plate instead of at the connector. I attached a small alligator to the positive post making sure it wouldn�t short to the ground post.
Test the unit with the covers off using a 12-volt power supply and small alligator clips. Be careful that it�s situated in an upright position (you might have to lay it down as well, but keep the area clear of any metal objects!). You need to be able to see and feel what�s going on.
1.) First of all I removed the pulleys and cleaned the teeth and pulley surfaces with alcohol and a tooth brush (I really soaked them and got into the teeth so they were like new), and added lubricant only after they were installed. The idea is to have the belt contact area really clean and a small amount of grease on the gears and very light on the cams. I used fresh belts and washed my hands before handling them. Grease attracts dirt and gets into the belts and contacts. Doing this frees up the drive train and will help the aging motor. This is a micro system so everything makes a difference. When the pulleys were out I cleaned the contacts below with a Q-tip soaked in alcohol. Clean under the contacts good and the area around them. Check that they aren�t bent and will be activated by the cam. (This is where I think your problem is.) I also blew it out with compressed air. Check the that the belts are not slipping (probably not the case but I had to try a couple of different sized belts to get it to work right.) You can turn the pulleys by hand trying to get them to slip. Hold one pulley and turn the other- does the belt slip? Also check that the drive train isn�t binding by hand. I know you already checked this but do it anyways. Check that the cams are activating the contacts below. Also clean the light sensor openings and the rear view sensor window.
2.) Connect just the Pos and Grd as above with the mirror off. Now turn it on. If the motor starts running continuously, then turn it off or disconnect it because I think the motor will burn out. I smell a lot of �stuff � when mine runs too long. See below on what to do with this � in other words for you � see below.
3.) The mirror may run to day light position and stop. Watch the LED in the middle, it lights up when the mirror is activated (dimmed) and shuts off when it�s not. The square LED is just a light for the dial. I want to find a blue one for this.
4.) If the light stays on (dimmed) and the motor does not run, move the output pulley by hand, back and forth just a nudge. It should move to correct itself until it activates the contact. Now try moving the dial pot (where the dial shaft goes). Be careful with what you use obviously. I found a 1� allen driver for this that didn�t fall through and sat straight up. Plastic would have been better. If the mirror is dimmed (led on), it should return to daylight position with the room light on and the dial pot moved towards far I believe. Just move it one way and then the other to try to get it to move. You may have to wait approximately 10 sec for it to do so. So move it and wait, then the other way and wait. Now the mirror should be in daylight position.
5.) Now turn the lights out! Wait a bit (Note this: The mirror has an approximate 10 second delay that can really mess things up at times. I meant approximate because it varies between 5-15 seconds sometimes.) Turn your flash light on poining away from the mirror and then hold it on the light sensor on the mirror side. It should activate the motor and the dimmer LED should turn on. If not, play with the dial pot (keep the flashlight on the sensor) until it does. After it�s in dim mode turn the flashlight away (or off) and wait to see if it goes back to day light mode. Play with the pot AFTER waiting. Then try turning the lights on, waiting again to get the mirror to return to daylight mode. Play with the pot again if it still doesn�t work. If it still just sits there, try moving the flashlight between both light sensors. If it didn�t go to daylight mode and you waited over 15 seconds then keep playing with it until it does. The light sensors are supposed to return the mirror to daylight mode when they both have approximately equal light. Remember the �10� second delay when going to daylight mode.
6.) If you made it to this step and it doesn�t work, well it�s 2:30 am and I�m really tired. You could probably tell anyways. If it does work then verify that the reverse override works by activating to dim mode and then connecting a jumper from the reverse over ride post to positive. (I actually didn�t check this on the mechanical one yet.)
7.) Oh, and when you reassemble it, turn the dial pot and the dial itself all the way over to one side and then check it before it�s assembled completely. I had a �special� strip of electrical tape that ran along the bottom of the board as well. I took a piece of wax paper, attached some electrical tape to it, then the old one on top of that and cut out the shape onto the new piece. I again cleaned the board with alcohol and attached the new piece to it. It worked out really well. I also freshened up some of the solder joints and cleaned the flux off with� alcohol.
Motor running continuously:
If the motor continuously runs, first (quickly) try to determine if the drive train is slipping. Do the belts bow out on one side with the motor running? Try a different size then. Can you push on the side of the output pulley with the motor running without the belts slipping? Try to see if the contacts are being depressed by the cams. Try pushing down on the contacts to stop the motor without getting caught up in the belts (I don�t know if you can actually, and I think one is for dim and the other for day light- haven�t had to look into this and it�s difficult to figure out what the little bugger is trying to do anyways). If the drive train is solid (not slipping) and the cams are pushing down on the contacts then I would check the contacts again. Again much of this can be checked by hand. You could try a continuity test on the top and bottom of the contacts if these seem to be an issue but I think the bottoms are hard to get to. Make sure the contacts aren�t bent and that the cams activate them.
Different mirror styles Gen I and Gen III:
08-15-2009, 03:01 PM
#5
Supreme Member
iTrader: (101)
Join Date: Feb 2004
Location: Levittown Pa
Posts: 1,914
Likes: 0
Received 19 Likes
on
17 Posts
Car: 89 Iroc Convertible
Engine: 305 TPI
Transmission: 700R4
Axle/Gears: 3.27 Posi 9 bolt PBR
Re: Auto Dimming Mirrors for Thirdgens
I just pulled another gen 1 mirror yesterday from an olds trofeo.I have found that if you remove the glass and spin the belts by hand it sometimes frees them up and the mirror will start to work as it should.Ive done this in a few of them and it usually fixes the problem.Sorry to hijack your post
08-15-2009, 03:11 PM
#6
Supreme Member
Thread Starter
iTrader: (4)
Join Date: Sep 2004
Location: MN
Posts: 2,069
Likes: 0
Received 3 Likes
on
3 Posts
Car: 85 SC, 86 Berlinetta
Engine: V6, V8
Transmission: 700r4, 700r4
Re: Auto Dimming Mirrors for Thirdgens
Lol, that's fine. Maybe this can be moved to a tech section if it helps.
That's the thing is that the Gen I's are kind of finicky and if something is off, they won't work. I never found a good source for the belts but I think if they were replaced they would be more reliable.
That's the thing is that the Gen I's are kind of finicky and if something is off, they won't work. I never found a good source for the belts but I think if they were replaced they would be more reliable.
08-19-2009, 07:40 PM
#7
Supreme Member
iTrader: (5)
Join Date: Aug 2007
Location: Milwaukee, Wisconsin
Posts: 1,525
Likes: 0
Received 1 Like
on
1 Post
Car: 1987 IROC-Z
Engine: 383 with Edelbrock ProFlow EFI
Transmission: TH350
Axle/Gears: 12 bolt 3.73 Eaton posi
Re: Auto Dimming Mirrors for Thirdgens
My car came with one from the factory so I'm assuming it is the gen1 style. Anyway, I got into my car sometime last year and started it up and noticed smoke coming from the mirror. Could I have fried the little motor in it? I've been looking for a new mirror, but I'm afraid of paying for a broken part and like you said, no one is willing to guarantee it will work. So, what would it take to swap in a gen3 mirror? It just looks slimmer and may save some weight (not much, but some). Or, how hard do you think it will be to swap in a mirror from a car that had a temp sensor in it?
Mike
Mike
Trending Topics
08-19-2009, 08:10 PM
#8
Supreme Member
Thread Starter
iTrader: (4)
Join Date: Sep 2004
Location: MN
Posts: 2,069
Likes: 0
Received 3 Likes
on
3 Posts
Car: 85 SC, 86 Berlinetta
Engine: V6, V8
Transmission: 700r4, 700r4
Re: Auto Dimming Mirrors for Thirdgens
I was just helping someone with one of the mechanical ones similar to yours and I've found that there's actually a lot of variances between the mirrors themselves. Specifically, the connectors where it plugs into the back of the mirror vary as well as the type of mount that attaches it to the window. There's also a couple of body styles where one is squarish with an angled back cover and the other is more rounded and longer. I was curious abut the style that you have because I was trying to find the correct style for someone doing a factory restoration on his 1986.
Here:
I'm assuming the drive train became too much for the motor on yours and ended up overheating components on the main board. I have one that binds up once in a while and the components on the right hand side start to get really hot. The motor is above the on/off switch btw.
I would go with a newer one because they don't have mechanical parts to wear out. The only exception is if you wanted something as close to factory as possible. You might have to change the tab or mount attached to the window for the newer style and possibly change the connector or make an extension. I can probably help with the connector. I've thought about changing stems, but I'd have to use the old one and they're difficult to open without leaving marks on the seams. Also, there's less surface area on the smaller mounting tabs. I can easily verify if anything I have works or not and was going to do some kind of write up on how to test them. I haven't done anything with a temp sensor yet, otherwise the mirror would work just fine.
08-27-2009, 03:07 PM
#9
Supreme Member
Thread Starter
iTrader: (4)
Join Date: Sep 2004
Location: MN
Posts: 2,069
Likes: 0
Received 3 Likes
on
3 Posts
Car: 85 SC, 86 Berlinetta
Engine: V6, V8
Transmission: 700r4, 700r4
Re: Auto Dimming Mirrors for Thirdgens
I started a thread explaining a little more about the mirrors.
It includes both mechanical and electrochromatic (at the bottom) as well as the difference in the mounting tabs.
If you have an older mechanical one please post the style you have (wiring and shape) with the make and year of your car.
Link
It includes both mechanical and electrochromatic (at the bottom) as well as the difference in the mounting tabs.
If you have an older mechanical one please post the style you have (wiring and shape) with the make and year of your car.
Link

Thread
Thread Starter
Forum
Replies
Last Post