Turning point of my rebuild!
 02-07-2010, 09:05 AM
#1
Member

Thread Starter
Join Date: May 2009
Location: Bergen, Norway
Posts: 225
Likes: 0
Received 0 Likes
on
0 Posts
Car: '87 Camaro SC
Engine: 305 LG4
Transmission: TH-700R4
Axle/Gears: 3.42
Turning point of my rebuild!
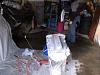
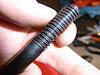
Today is a great day. The sun's been shining bright and warm for the first time since before the winter and as such I took the opportunity to prime and paint my long since otherwise finished engine block, marking the first day of my rebuild after which I can start putting things back together. My car has been out of commission since September of 09. Since then I have ordered some new parts, refurbished a lot of the old parts, and I'm now only 3 unpolished pistons away from having everything ready for the short block to be assembled. I'm giddy as a child, and I can't wait for the engine to be ready and get it back in my maro
Wish me luck!
Just out of curiosity, anyone wanna hazard a guess at what kinda power I'll be looking at when it's all done? It's an '87 305 LG4 with stock crank, rods and pistons (9.3:1 CR) 081 heads ported and polished (half way there) with 1.84int and 1.5exh, a Comp Cams XR258HR cam, stock alu intake manifold (14101074), hooker 2055 headers and Y, dual snorkel air intake, 180* stat and fan switch, MSD street fire coil, smog and a.i.r delete.
Thank you
 02-07-2010, 09:33 AM
#2
Junior Member
iTrader: (2)

Join Date: Feb 2006
Location: North carolina via LI New York
Posts: 49
Likes: 0
Received 0 Likes
on
0 Posts
Car: 85 T/A
Engine: 305 TPI
Transmission: 700R
Re: Turning point of my rebuild!
I'd say 230 -250hp @ the flywheel. It's always nice when things start going forward, good luck and keep us posted!!
02-09-2010, 06:16 AM
#3
Member
Thread Starter
Join Date: May 2009
Location: Bergen, Norway
Posts: 225
Likes: 0
Received 0 Likes
on
0 Posts
Car: '87 Camaro SC
Engine: 305 LG4
Transmission: TH-700R4
Axle/Gears: 3.42
Re: Turning point of my rebuild!
Well, one of the main bolts snapped. New ones are on their way, but till then I'll have my hands full trying to remove the other half of the bolt. Other than than that I've installed the cam shaft.
02-09-2010, 09:25 PM
#4
Re: Turning point of my rebuild!
My guess is 240 - 250 HP at wheels after tuning.
Did you do any porting on the intake manifold? Did you block off the exhaust heat-riser passages in the heads & intake?
The stock intake may end up holding you back by between 10 & 20 HP.
The aluminum (Edelbrock knock-offs) RPM & airgap versions from professional products or Renegade go for pretty cheap new, and you may find a cheaper one on ebay.
02-10-2010, 09:10 AM
#5
Member
Thread Starter
Join Date: May 2009
Location: Bergen, Norway
Posts: 225
Likes: 0
Received 0 Likes
on
0 Posts
Car: '87 Camaro SC
Engine: 305 LG4
Transmission: TH-700R4
Axle/Gears: 3.42
A bit of porting
@ 305sbc: No, haven't gotten as far as the intake manifold yet. I'll see what I can do about it, but at this point I'm more inclined to let the intake be as is, and rather buy an after market intake down the road. Now, about the exhaust heat-riser passages, are you talking about the exhaust passages that run from the mid two exhaust runners and back up to the intake manifold? How would you go about blocking them? Also, wouldn't blocking them off mess with the EGR-valve?
As far as keeping you posted on my progress:
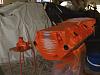
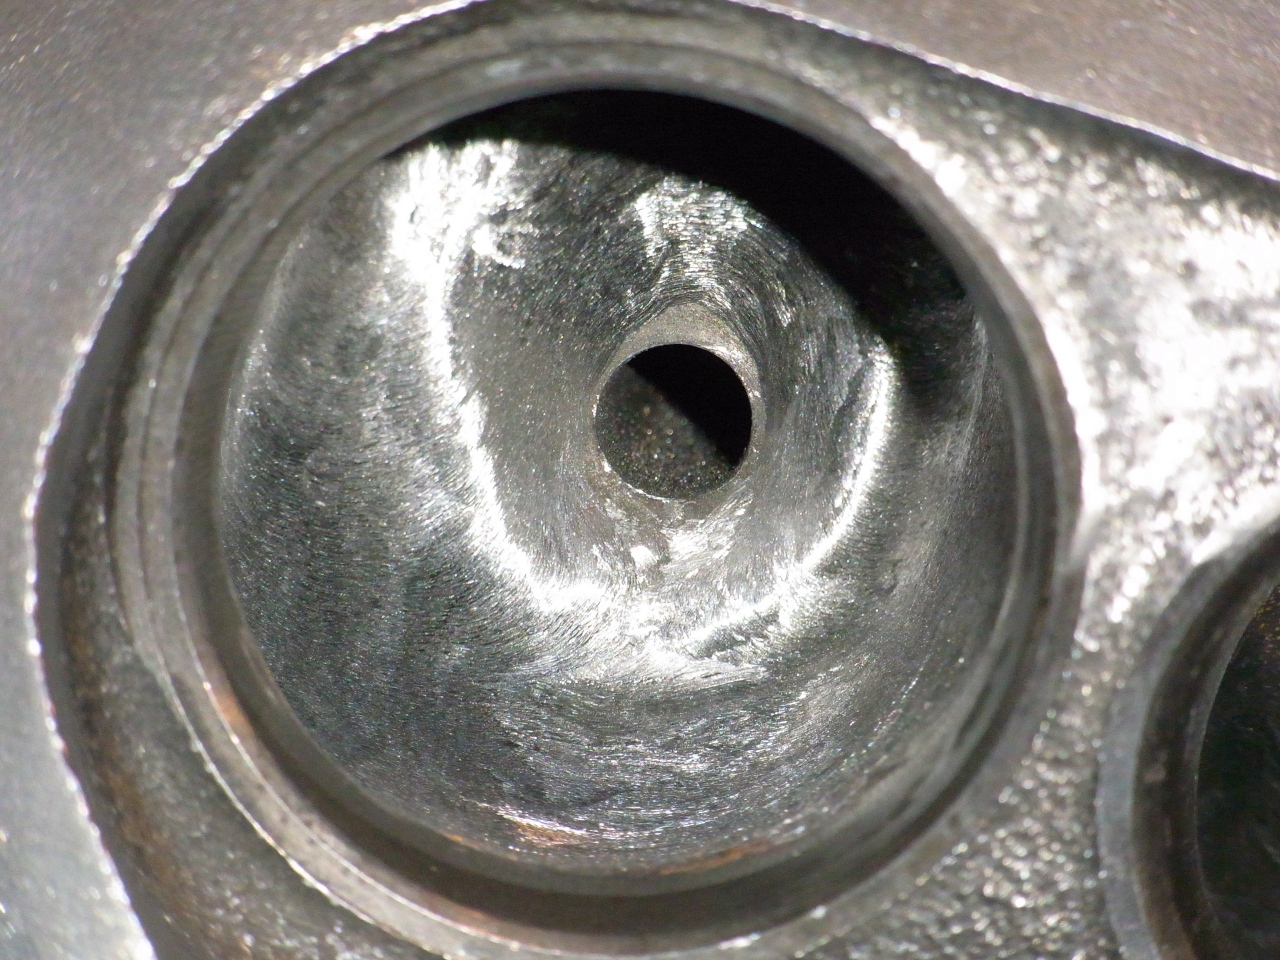
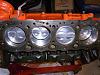
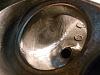
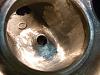
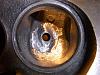
I'm just about finished gasket matching the intake ports, all that's left is the 80 grit finish. So now I've moved on to the short side radius and bowl area. Here are a few pics of my progress. These are from the first bowl I did, but I've decided to go back on it and smooth out the area directly behind the valve guide.
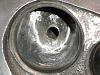
Pict 1: Untouched bowl
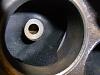
Pict 2: Ported bowl, lit through the intake runner
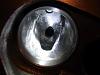
Pict 3: Ported bowl, lit from above
What do you think? If anybody sees anything they think I might have done wrong or could do better, please don't be afraid to speak up.
As far as keeping you posted on my progress:
I'm just about finished gasket matching the intake ports, all that's left is the 80 grit finish. So now I've moved on to the short side radius and bowl area. Here are a few pics of my progress. These are from the first bowl I did, but I've decided to go back on it and smooth out the area directly behind the valve guide.
Pict 1: Untouched bowl

Pict 2: Ported bowl, lit through the intake runner

Pict 3: Ported bowl, lit from above
What do you think? If anybody sees anything they think I might have done wrong or could do better, please don't be afraid to speak up.
02-10-2010, 09:38 AM
#6
Supreme Member
iTrader: (3)
Join Date: Jun 2007
Location: Pennsylvania
Posts: 2,359
Likes: 0
Received 5 Likes
on
5 Posts
Car: 1992 Camaro RS
Engine: Rebuilt 350 going in after paint
Transmission: WCT5, 7k & counting behind the 350
Axle/Gears: 4thgen disc rear w/ 3.73 Posi
Re: Turning point of my rebuild!
Port work looks good! That's how far I went with mine, it's a lot of work. Are you using sanding rolls or a carbide burr? I did notice in the second pic you can see a round bump or bulge towards the top of the port, are you planning on smoothing that out when you do the runners? My heads had several of them spaced down the length of the runners and 3 around the valve guide that I took out when I did my heads.
02-10-2010, 10:46 AM
#7
Member
Thread Starter
Join Date: May 2009
Location: Bergen, Norway
Posts: 225
Likes: 0
Received 0 Likes
on
0 Posts
Car: '87 Camaro SC
Engine: 305 LG4
Transmission: TH-700R4
Axle/Gears: 3.42
Re: Turning point of my rebuild!
Well, I was using a bunch of sanding stones with my dremel, which actually worked pretty well (I hear a lot of people say the dremel doesn't have enough power to port). However, notice I say "was", as my poor little multi-tool just died a few minutes ago. Thankfully I kept the receipt, so I'll hopefully just get a new one. Can't imagine they would want to try and repair the thing. Anyways, I will be smoothing out all the bumps I can find in the runners when I get that far. As yours, mine also has several casting bumps in the roof and along the floor of the runners, but I don't think I have any around the valve guides.
Trending Topics
02-10-2010, 03:11 PM
#8
Supreme Member
iTrader: (3)
Join Date: Jun 2007
Location: Pennsylvania
Posts: 2,359
Likes: 0
Received 5 Likes
on
5 Posts
Car: 1992 Camaro RS
Engine: Rebuilt 350 going in after paint
Transmission: WCT5, 7k & counting behind the 350
Axle/Gears: 4thgen disc rear w/ 3.73 Posi
Re: Turning point of my rebuild!
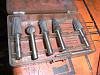
Dremel will work just fine, I used mine for part of the process, but found it a little hard to work with. I went and bought a die grinder for my air compressor and while my compressor couldn't quite keep up with it things went a lot faster. I also tried the grinding stone approach at first, even with the die grinder but I was having problems with the glue holding the stone in place melting. Probably just cause I was using cheapie Harbor Freight stones. The BEST thing I did was buy a carbide burr on Ebay. It had a 3/8" double fluted "tree" shaped head and a 6" shank. Let me tell you, that thing EATS cast iron. They make a single fluted design for aluminum heads. If you have patience you can score them for a great deal. I got mine for less than $20 including shipping.
They do make a smaller one for Dremels, it only has a 2" shank and you can get them at Home Depot/Lowes.
The bumps around the casting guides were just 3 small bumps spaced around the guides on the manifold side. If you don't have them you're lucky as they were kind of a pain to remove.
They do make a smaller one for Dremels, it only has a 2" shank and you can get them at Home Depot/Lowes.
The bumps around the casting guides were just 3 small bumps spaced around the guides on the manifold side. If you don't have them you're lucky as they were kind of a pain to remove.
02-10-2010, 03:31 PM
#9
Member
Thread Starter
Join Date: May 2009
Location: Bergen, Norway
Posts: 225
Likes: 0
Received 0 Likes
on
0 Posts
Car: '87 Camaro SC
Engine: 305 LG4
Transmission: TH-700R4
Axle/Gears: 3.42
Re: Turning point of my rebuild!
I do have a set of burrs which I used with great success on the intake ports. I do however wish the shaft would be a couple of inches longer (insert "that's what she said") so that I could reach all the way down the runners. Another problem is I don't have a die grinder. All I have is my dads big *** power drill. Which is very effective when it comes to the straight up cutting, but it's not what you would call a precision tool. So for the bowl work, where you have to be careful not to damage the valve seats, I found the dremel to be quite easy to work with.
 02-15-2010, 06:40 AM
#10
Member
Thread Starter
Join Date: May 2009
Location: Bergen, Norway
Posts: 225
Likes: 0
Received 0 Likes
on
0 Posts
Car: '87 Camaro SC
Engine: 305 LG4
Transmission: TH-700R4
Axle/Gears: 3.42
Re: Turning point of my rebuild!
Slight set back folks. As I told you before, one of the old main bolts stretched out and snapped when I tried to torque it about a week ago.
So I ordered a set of new ARP main bolts that arrived today. This time I thought I'd take it real slow, not rushing the tightening sequence. So I applied some of the included assembly lube that came with the bolts, set the torque wrench to 40 ft-lbs and start to turn. I tighten pretty hard, but the wrench didn't indicate that the desired torque had been reached, so I figured every thing was as it should be. Then I heard a loud snap, figuring it was the wrench. But wouldn't you know it, the eff-ing threads had been torn clean off the block. The bolt was fine, but now I have no god damn threads in my engine block. What the heck am I supposed to do now? I'm really disappointed right about now. Every thing was going so well. If things had gone according to plan, I would have assembled the short block today. On top of this, I spent the last of my cash on those bolts. Please tell me this can be fixed without me having to get a new block.

So I ordered a set of new ARP main bolts that arrived today. This time I thought I'd take it real slow, not rushing the tightening sequence. So I applied some of the included assembly lube that came with the bolts, set the torque wrench to 40 ft-lbs and start to turn. I tighten pretty hard, but the wrench didn't indicate that the desired torque had been reached, so I figured every thing was as it should be. Then I heard a loud snap, figuring it was the wrench. But wouldn't you know it, the eff-ing threads had been torn clean off the block. The bolt was fine, but now I have no god damn threads in my engine block. What the heck am I supposed to do now? I'm really disappointed right about now. Every thing was going so well. If things had gone according to plan, I would have assembled the short block today. On top of this, I spent the last of my cash on those bolts. Please tell me this can be fixed without me having to get a new block.

 02-15-2010, 07:40 AM
#12
Senior Member

Re: Turning point of my rebuild!
Torque wrench might be bad too. 40 ft/lbs is not very tight. I would be suprised if the threads break out at less than 40 ft/lbs.
Torque wrenches need to be recalibrated or replaced occasionally, especially if they are "clicker" type and you store them with it on a torque setting (tension on spring inside).
Torque wrenches need to be recalibrated or replaced occasionally, especially if they are "clicker" type and you store them with it on a torque setting (tension on spring inside).
02-16-2010, 10:47 AM
#13
Member
Thread Starter
Join Date: May 2009
Location: Bergen, Norway
Posts: 225
Likes: 0
Received 0 Likes
on
0 Posts
Car: '87 Camaro SC
Engine: 305 LG4
Transmission: TH-700R4
Axle/Gears: 3.42
Re: Turning point of my rebuild!
Figured out what was wrong with the torque wrench. After you set the desired torque you have to lock the handle with a screw at the bottom of the wrench. There are no indications as to which way to turn that screw, and it locks at both ends. Initially, I had turned that screw till it stopped and locked, and thought that was correct. Turns out, I had screwed it the wrong way, effectively rendering it into a solid wrench. DUH!
As far as the heli-coils go, they seem like a do-able repair. I can get them here in Norway, but it'll take 1-3 weeks from ordering before they get here, and the guy said he wasn't sure he could get them in UNC, although most likely he could. They are 7/16x14 right?
Thanks
As far as the heli-coils go, they seem like a do-able repair. I can get them here in Norway, but it'll take 1-3 weeks from ordering before they get here, and the guy said he wasn't sure he could get them in UNC, although most likely he could. They are 7/16x14 right?
Thanks
Last edited by 87_LG4; 02-16-2010 at 03:46 PM.
02-16-2010, 11:49 AM
#14
Re: A bit of porting
@ 305sbc: No, haven't gotten as far as the intake manifold yet. I'll see what I can do about it, but at this point I'm more inclined to let the intake be as is, and rather buy an after market intake down the road. Now, about the exhaust heat-riser passages, are you talking about the exhaust passages that run from the mid two exhaust runners and back up to the intake manifold? How would you go about blocking them? Also, wouldn't blocking them off mess with the EGR-valve?
Your porting looks ok. I would open the seat area further, out until you get into the bottom angle cut on the seat, then blend with a sanding flapper. It is advantageous to open the bowl further into the seat on the short-side of the seat so there is a straighter shot off of the short-side radius. The long-side (especially toward the chamber-wall side) works better with a larger radius between the seat and bowl area.
If you're using a small/mild camshaft, then you will get great results if you also put a smooth radius on your valves, then just have the 45* on the valve refreshed a bit.
02-25-2010, 01:00 PM
#15
Member
Thread Starter
Join Date: May 2009
Location: Bergen, Norway
Posts: 225
Likes: 0
Received 0 Likes
on
0 Posts
Car: '87 Camaro SC
Engine: 305 LG4
Transmission: TH-700R4
Axle/Gears: 3.42
Re: Turning point of my rebuild!
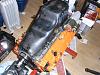
Heli Coils have been inserted and all is well once again 
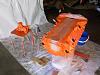
During the past few days I've assembled the short block, and now I'll push on with porting the heads, which I reckon will take at least the better part of a week to finish, probably more. Speaking of which, I'm a bit uncertain as to exactly which is the long-side and which is the short-side of the seat , as 305sbc suggested I should open the latter. (If anyone could edit one of my previously posted pictures with pointing arrows and such that would help me alot)
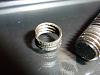
Mmm, look at those shiny pistons. Nice. Way better that when I removed them during disassembly:
They all looked like this.")
During the past few days I've assembled the short block, and now I'll push on with porting the heads, which I reckon will take at least the better part of a week to finish, probably more. Speaking of which, I'm a bit uncertain as to exactly which is the long-side and which is the short-side of the seat , as 305sbc suggested I should open the latter. (If anyone could edit one of my previously posted pictures with pointing arrows and such that would help me alot)


Mmm, look at those shiny pistons. Nice. Way better that when I removed them during disassembly
:
They all looked like this.
02-25-2010, 01:07 PM
#16
Re: Turning point of my rebuild!
Heli Coils have been inserted and all is well once again
During the past few days I've assembled the short block, and now I'll push on with porting the heads, which I reckon will take at least the better part of a week to finish, probably more. Speaking of which, I'm a bit uncertain as to exactly which is the long-side and which is the short-side of the seat , as 305sbc suggested I should open the latter. (If anyone could edit one of my previously posted pictures with pointing arrows and such that would help me alot)
Attachment 193820
Attachment 193821
Mmm, look at those shiny pistons. Nice. Way better that when I removed them during disassembly:
Attachment 193826
They all looked like this.
During the past few days I've assembled the short block, and now I'll push on with porting the heads, which I reckon will take at least the better part of a week to finish, probably more. Speaking of which, I'm a bit uncertain as to exactly which is the long-side and which is the short-side of the seat , as 305sbc suggested I should open the latter. (If anyone could edit one of my previously posted pictures with pointing arrows and such that would help me alot)
Attachment 193820
Attachment 193821
Mmm, look at those shiny pistons. Nice. Way better that when I removed them during disassembly
:Attachment 193826
They all looked like this.
02-25-2010, 01:21 PM
#17
Member
Thread Starter
Join Date: May 2009
Location: Bergen, Norway
Posts: 225
Likes: 0
Received 0 Likes
on
0 Posts
Car: '87 Camaro SC
Engine: 305 LG4
Transmission: TH-700R4
Axle/Gears: 3.42
Re: Turning point of my rebuild!
This is my first time porting heads as well. At first I too was nervous about ruining my heads, but so far so good (knock on wood). If you follow the SA porting guide, Sittings Bull's thread and this article you should be more than fine. Oh, and make sure you have all the right tools for the job. That'll make it a whole lot easier. The most difficult part is getting started.
02-25-2010, 06:13 PM
#18
Member
Thread Starter
Join Date: May 2009
Location: Bergen, Norway
Posts: 225
Likes: 0
Received 0 Likes
on
0 Posts
Car: '87 Camaro SC
Engine: 305 LG4
Transmission: TH-700R4
Axle/Gears: 3.42
Re: Turning point of my rebuild!
Quick-bump.. Can anybody shed some light on what 305sbc said about opening up the bowl into the seat on short-side radius of the seat? I'm not quite sure which side is the short side of the seat. Also, what is the difference between opening the short-side radius and having a large radius on the long-side?
Thank you
Thank you
02-26-2010, 04:28 PM
#19
Supreme Member
iTrader: (3)
Join Date: Jun 2007
Location: Pennsylvania
Posts: 2,359
Likes: 0
Received 5 Likes
on
5 Posts
Car: 1992 Camaro RS
Engine: Rebuilt 350 going in after paint
Transmission: WCT5, 7k & counting behind the 350
Axle/Gears: 4thgen disc rear w/ 3.73 Posi
Re: Turning point of my rebuild!
Quick-bump.. Can anybody shed some light on what 305sbc said about opening up the bowl into the seat on short-side radius of the seat? I'm not quite sure which side is the short side of the seat. Also, what is the difference between opening the short-side radius and having a large radius on the long-side?
Thank you
Thank you
The short-side radius is the turn the port makes into the intake port. If you hold the head right-side up(the way it sits when installed) then it is where the floor of the port turns down into the valve opening. Generally the floor of the port rises up into a slight "bump" before turning down into the valve opening. There is also usually a pretty good ridge you can feel where it transitions from the bottom of the "bump" to the valve seat area. If you stick your finger in through the valve opening you can usually feel the bump and ridge there.
To "open it up" simply means to lower that bump and smooth out that ridge. You can also open up(ie widen) a lot of the valve seat itself. As long as you leave room for the angles at the bottom(chamber-side) so the valve can seal properly.
The other thing to be careful of is some heads have a coolant passage under that bump. You don't want to grind into that by mistake.
The large side radius is the opposite side of where the intake passage turns into the valve opening(top of the port when the head is installed). Again, there tends to be a bump and/or ridge where the passage turns into the valve opening. You want this transition to be as open and as smooth as possible. There is also a coolant passage behind this so be careful.
I didn't have any issues when I did mine, but I didn't take a ton of material out of those areas either. I just smoothed them down and removed enough to open the valve area up into a nice funnel shape. I'll have to see if I can dig up some pics of my heads. I know I have some, I'm just not sure where they got to.
02-26-2010, 05:02 PM
#20
Member
Thread Starter
Join Date: May 2009
Location: Bergen, Norway
Posts: 225
Likes: 0
Received 0 Likes
on
0 Posts
Car: '87 Camaro SC
Engine: 305 LG4
Transmission: TH-700R4
Axle/Gears: 3.42
Re: Turning point of my rebuild!
Ah, of course.. I think I get it now. Thank you so much! I'll get right back to porting tomorrow morning (it's midnight here in Norway now, so I'm goin' to bed and I'll post pictures and updates later.
Thank you!
and I'll post pictures and updates later.Thank you!
03-02-2010, 02:48 PM
#21
Member
Thread Starter
Join Date: May 2009
Location: Bergen, Norway
Posts: 225
Likes: 0
Received 0 Likes
on
0 Posts
Car: '87 Camaro SC
Engine: 305 LG4
Transmission: TH-700R4
Axle/Gears: 3.42
Re: Turning point of my rebuild!
Quick update on my progress.
(The following is based on my use of the dremel 300 series)
I have now figured out why people mainly don't recommend using dremels when porting. It's hardly because of any lack of power, because they have plenty if used with the right grinding burrs. It is, as I have discovered the hard way, a lack of durability. I am now on my third dremel, and have as such deduced the shortcomings of these types of (otherwise splendid) tools when it comes to porting. Before I get there however, I'll take the time to mention some pros, because there are: The dremel is a very nimble, agile and precise rotary tool, and therefore it gives you complete control of where you are grinding or cutting, especially when doing so close to the valve seats, which if sufficiently damaged might render the entire head useless. There is also a wealth of accessories available at just about any hardware store. On the cons side I just thought I'd mention two main weak points that, especially when combined, can lead to catastrophic failure for the dremel: First off, the dremel is not really designed to grind heavy cast iron on any larger scale, and when operated in such a manner it can place an excessive load on it's internal components. It is not designed to handle such over a prolonged period of time without the given the chance to cool off every now and then. Therefore you must not apply heavy pressure on your dremel when porting. Use a light touch. If you have sharp carbide burrs this will not be a problem and you will still be able to grind down whatever you might desire. The other condition that will ultimately lead to failure is if you use a grinding stone that creates a very fine metal dust when grinding. Because of the shape and aerodynamic properties of the valve bowls combined with the dremel's internal cooling fan, this metal dust will be sucked straight into your tool and will find it's way into bearings, coils and other sensitive parts. This will also contribute to overheating and ultimately a broken dremel. In my case, two. This is not to say that you cannot use dremels to port, just handle them with care, keep them clean and use proper, sharp carbide burrs as these will produce coarser metal shavings that will not so easily be sucked into the dremel. A sharp carbide burr will also place a lesser operating load on the dremel whilst still removing more material.
There! If anyone should ever wonder why most people will recommend you get a die grinder with carbide burrs, just link to this post.
Now on to more pressing matters. Despite my rambling stated above I am confident that I can finish porting my heads with my dremel. I am almost finished with the intake ports on the passenger side head. What is left is mainly to determine if I can or should remove more material than I have (I'm thinking mainly of the short side radius). If so, from where? Tell me what you think. Bare in mind I will smooth out the rough patches, remove the casting bumps and give it that soothing 80 grit finish.
Thank you.
(The following is based on my use of the dremel 300 series)
I have now figured out why people mainly don't recommend using dremels when porting. It's hardly because of any lack of power, because they have plenty if used with the right grinding burrs. It is, as I have discovered the hard way, a lack of durability. I am now on my third dremel, and have as such deduced the shortcomings of these types of (otherwise splendid) tools when it comes to porting. Before I get there however, I'll take the time to mention some pros, because there are: The dremel is a very nimble, agile and precise rotary tool, and therefore it gives you complete control of where you are grinding or cutting, especially when doing so close to the valve seats, which if sufficiently damaged might render the entire head useless. There is also a wealth of accessories available at just about any hardware store. On the cons side I just thought I'd mention two main weak points that, especially when combined, can lead to catastrophic failure for the dremel: First off, the dremel is not really designed to grind heavy cast iron on any larger scale, and when operated in such a manner it can place an excessive load on it's internal components. It is not designed to handle such over a prolonged period of time without the given the chance to cool off every now and then. Therefore you must not apply heavy pressure on your dremel when porting. Use a light touch. If you have sharp carbide burrs this will not be a problem and you will still be able to grind down whatever you might desire. The other condition that will ultimately lead to failure is if you use a grinding stone that creates a very fine metal dust when grinding. Because of the shape and aerodynamic properties of the valve bowls combined with the dremel's internal cooling fan, this metal dust will be sucked straight into your tool and will find it's way into bearings, coils and other sensitive parts. This will also contribute to overheating and ultimately a broken dremel. In my case, two. This is not to say that you cannot use dremels to port, just handle them with care, keep them clean and use proper, sharp carbide burrs as these will produce coarser metal shavings that will not so easily be sucked into the dremel. A sharp carbide burr will also place a lesser operating load on the dremel whilst still removing more material.
There! If anyone should ever wonder why most people will recommend you get a die grinder with carbide burrs, just link to this post.
Now on to more pressing matters. Despite my rambling stated above I am confident that I can finish porting my heads with my dremel. I am almost finished with the intake ports on the passenger side head. What is left is mainly to determine if I can or should remove more material than I have (I'm thinking mainly of the short side radius). If so, from where? Tell me what you think. Bare in mind I will smooth out the rough patches, remove the casting bumps and give it that soothing 80 grit finish.


Thank you.
Last edited by 87_LG4; 03-02-2010 at 02:51 PM.
03-02-2010, 03:18 PM
#22
Supreme Member
iTrader: (3)
Join Date: Jun 2007
Location: Pennsylvania
Posts: 2,359
Likes: 0
Received 5 Likes
on
5 Posts
Car: 1992 Camaro RS
Engine: Rebuilt 350 going in after paint
Transmission: WCT5, 7k & counting behind the 350
Axle/Gears: 4thgen disc rear w/ 3.73 Posi
Re: Turning point of my rebuild!
I'm no porting expert, but just going off my experience with my heads:
The valve guides can be taken down a bit further. Looks like they are kind of ovalled now, you can round them off a bit more.
Also looks like you can take a little more the short side radius on the ports. It still looks like there is a point on the short side radius where the port "floor" is curving down but then it just drops off into the valve opening. Depending on the water jackets on the heads, you can probably open up that some more so that its more of a gradual curve from the port "floor" into the valve seat.
The large radius and the sides between the large and small radii look like they are blended into the valve seat well.
Overall, it looks good to me!
03-02-2010, 03:55 PM
#23
Re: Turning point of my rebuild!
On the first (top) photo of the bowl and seat area, mentally draw a straight line from the center of the guide hole straight up, then another line from the guide hole to the right side of the picture, making a 90* angle.
You generally need to take more material from the seat area inside that 90* area. I use a large sanding roll and go straight down 90* to how the valve sits in the chamber. This gives a straight shot with minimal radius at the seat. At the top of that hump (short side turn) where the port floor first starts to drop off, you want a fairly large radius. Stock heads to have a water passage in there so don't go too crazy.
In this same photo, the copper colored eyebrow at the top should be your 45* seat cut. If so, then you sand straight down until you just come out to the bottom of that seat cut, then radius it. This makes a thin radius just below the seat.
On the rest of that 270* of seat area you want a larger radius. Just don't open the bowl out as much on those sides, then do a lot of smoothing so the turn from the wall to the seat is very gentle.
When I do heads I spend a lot of time on a great radius all around. A large scotchbrite sanding flapper works great for this. I then recut the 45* (46* actually).
You can radius your valves yourself with a drill and your dremel. Then just have the 45* recut on the valves.
A radiused valve job gives a big boost in low lift flow, which in effect extends the cylinder filling time like a longer duration cam would, but without the increase in overlap. It's especially effective on the exhaust during blow-down if you have a large radius on the exhaust valve edge that extends into the chamber.
03-03-2010, 08:18 AM
#24
Member
Thread Starter
Join Date: May 2009
Location: Bergen, Norway
Posts: 225
Likes: 0
Received 0 Likes
on
0 Posts
Car: '87 Camaro SC
Engine: 305 LG4
Transmission: TH-700R4
Axle/Gears: 3.42
Re: Turning point of my rebuild!
Ok, this is good. Now we're making progress. I'll take some pictures of my valves later on just to make sure I get it right with the back cutting.
You (92RS_Ttop) mention the shape of the valve guides, and that they should be rounded off. I'm not saying you're wrong, I just wondered if this is to open up the runner/bowl for more airflow, or if it was purely for aerodynamic purposes? I don't think they impede airflow that much the way they are now, and I sort of envisioned that an airfoil type design might have a lesser aerodynamic resistance. Just a thought though, but I'll throw in a quick illustration to show you where I'm going here.
This is sort of what I had in mind:
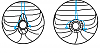
It's not the best of drawings, but imagine looking at the bowl from the chamber side of the head. I imagine that a rounder shape (right) would be a slight hindrance to airflow as apposed to a wing shape design (left). What do you think? Could there be anything to gain from this, or do I just have too much spare time to let my brain concoct these sorts of things?
Thank you
03-03-2010, 09:07 AM
#25
Re: Turning point of my rebuild!
The back-side of the guide shape is as important as the front side.
The air needs to be able to come back together smoothly after passing the guide, so taper it on both sides.
The flow isn't straight into the seat area. It actually curves from the cylinder wall side of the port, across the back of the valve, and towards the center of the cylinder. An angle of about 10* towards the center of the cylinder is applicable.
Airfoil shape is generally best, but it's not all that big of a deal as long as the guide is tapered like a volcano at least. The valve stem is the biggest obstruction, and most of the flow is lower towards the back of the valve at that point. Not so much flow hugging the port roof right there since it has to turn early to move towards the center of the cylinder, where the strongest pressure drop is pulling the air charge.
03-03-2010, 03:09 PM
#26
Supreme Member
iTrader: (3)
Join Date: Jun 2007
Location: Pennsylvania
Posts: 2,359
Likes: 0
Received 5 Likes
on
5 Posts
Car: 1992 Camaro RS
Engine: Rebuilt 350 going in after paint
Transmission: WCT5, 7k & counting behind the 350
Axle/Gears: 4thgen disc rear w/ 3.73 Posi
Re: Turning point of my rebuild!
Most of your port's flow is going to be on the floor of the port, not on the roof as 305sbc mentioned. What I was referring to mainly was the last pic in post #21. It looks to me like you tried an airfoil shape, which is fine, but it looks like its not straight to the port side. Maybe its just the angle of the pic, but it looks like its twisted about 30* to the left of where it should be. If it is, it will be a bigger impedance to airflow than if you simply rounded it off.

Thread
Thread Starter
Forum
Replies
Last Post
backtothe80s
Suspension and Chassis
33
09-05-2015 12:39 AM
db057
TBI
10
08-11-2015 10:11 PM