When you click on links to various merchants on this site and make a purchase, this can result in this site earning a commission. Affiliate programs and affiliations include, but are not limited to, the eBay Partner Network.
Question, when the headlights on my 87 GTA are up, and I go over a bump, the headlights shake a bit as if they were not very well secured internally. With the lights in the up position, I popped the hood and looked at the assembly. It appears as though there's nothing on the bottom of the headlight assembly that secures it to the engine compartment.
Is that correct? Or are there some screws or something that hold it down, and I can't find them? What am I missing?
So heres the thing. There are alot of points in the headlight assembly that can make this occur. You really have to take the whole things out and inspect the pivot points. I just did this to my passenger side headlight last week and its not 100% but much better. My main culprit that i found was the main arm that the headlight motor actuates. The cup/bushing its rides on is the only point I cant fix. But I found other places that were making things worse. The actual bump/limiter stops were busted, there were other bolts that were loose, and a weak headlight motor.
Its not a quick easy fix with the hood open..you need to removed the headlight assembly..take out the headlight bulb and start checking where the vibration is coming from. Also if you do attempt this,make sure to mark exactly where the headlight is bolted in as to make alignment easy when you put it back inplace.Very easy to miss align them if you arent paying attention.
Grab hold of the headlight door, and lift it up/down. Observe for slop. Chances are good the 'pellets' in the headlight motors are kaput, allowing the output arm to flop relative to the motor.
While it's possible the other pivot points in the system could be worn, they're largely bushed with nylon/plastic that wears well.
There is a bit of slop on each one. But the motors were rebuilt/replaced early last year so they're practically brand new. So the slop would seem odd?
I had this same issue, and in my case it was at the top of the control arm that raises/lowers the headlight mechanism. In my case all I had to do was to tighten the bolt that held the arm to the upper part of the headlight assembly. This required that I remove both the headlight and the bucket, as I could not get a wrench in there to tighten things up. If it helps, I also added a lock washer to it so it doesn't come loose again.
FWIW, there are 4, 10mm bolts that hold the headlight assembly in. 2 on the front side of the top radiator support, and 2 on the bottom side that go "up". You can only get to the bottom ones from the underside of the car.
Yeah, there are quite a few bolts holding the assembly to the car. The headlight bulb bucket has two adjusters and a spring. The hinge/pivot points between the headlight assembly and mounting bracket. Motor to bracket bolts. Just go through and check all of the above.
I had this same issue, and in my case it was at the top of the control arm that raises/lowers the headlight mechanism. In my case all I had to do was to tighten the bolt that held the arm to the upper part of the headlight assembly. This required that I remove both the headlight and the bucket, as I could not get a wrench in there to tighten things up. If it helps, I also added a lock washer to it so it doesn't come loose again.
If all else checks out ok, and it sounds like everything does, then the problem is most likely
FWIW, there are 4, 10mm bolts that hold the headlight assembly in. 2 on the front side of the top radiator support, and 2 on the bottom side that go "up". You can only get to the bottom ones from the underside of the car.
Right, but from what I can tell only the two on the front side/top that attacht the assembly to the vehicle. The bottom two are not actually connected to anything, which makes no sense to me. When I reach my hand down (with the headlight up) and press where the bottom two 10mm bills are against that radiator support, the entire headlight assembly is much more stable and secure. I can take some pics if you'd like.
You don't have to get underneath the car to access the lower bolts, never had to, wasn't designed to be done that way. Just take apart the assembly as if you were going to change the headlight. Then after you've disconnected and removed the headlight, remove the mounting ring to gain access to the lower bolts... or not, if you have tiny hands. The mounting ring is the "bowl" w/spring that the headlight fits into. Most people refer to it as the "bucket," but it's called the mounting ring; the ring on the front of the headlight that holds the headlight into the mounting ring is the trim ring. Now with clear access to the lower bolts, troubleshoot, including the motor's pivot arm. Repair.
Before reassembling, now would be the time to adjust the headlight assembly(with the headlight door attached, of course) and align it with the fenders and hood, if it's been needing it. Slightly loosen all of the bolts, upper and lower, just enough to allow you to slide the assembly left-right, forward-back; the holes through which the bolts pass are elongated for this very purpose. Manually-lower the assembly to the closed position, square-up everything, tighten the upper bolts, then manually-raise the assembly and tighten the lower bolts. Reassemble. Like new again.
You don't have to get underneath the car to access the lower bolts, never had to, wasn't designed to be done that way.
Yes it was. Cars are assembled as modules. They didn't have some dipshit on the assembly line bolting together every little piece of a headlight assembly in the car. They had the entire headlight assembly already together, so the dipshit could drop it in place and put in two bolts on the bottom and two on the top, and send it down the line.
There are two bolts on the top, and two on the bottom that bolt the mounting brackets to the headlight assembly, you generally don't want to mess with those unless you like fiddling with adjustments. The bolts you want to remove to remove the assembly are the bolts that hold the brackets to the car. Two from underneath, two right on top, remove the entire damn thing in one piece and carry it to your work bench. When you're done, drop it right back into place and put the bolts back in, won't have to adjust shiz if it was adjusted properly before.
I have a cheat for getting access to the bottom bolts without having to get under the car. I simply unbolt the entire hoodlatch tray and slide it out and overtop the engine. Its the perimeter 10mm bolts and the center bolt to the hoodlatch support bracket. Allows your meat hands ton of space to get the bottom bolts should you want to remove the entire headlight out.
As a few have said, you want to tighten everything. I found that the pivot arms itself were just worn out and no amount of tightening was going to fix that. Luckily I like buying spare headlights when I see then come up for sale because I had a decent one to swap it with. Another good point is the headlight motor itself. Ive rebuilt mine years ago with nylon bushings and metal gears and new grease. Something every Firebird owner MUST do if you haven't already. This makes a big difference in stability when the headlights are up as well.
Ill be posting a video tomorrow as I swapped in led headlights and made a review.
Question, are the bottom 10mm bolts supposed to attach to the body? In my car, they don't, so the entire headlight assembly just "hangs" by the two upper 10mm bolts.
Question, are the bottom 10mm bolts supposed to attach to the body? In my car, they don't, so the entire headlight assembly just "hangs" by the two upper 10mm bolts.
Yes, the 2 lower bolts attach to a rail. There's probably your shake is coming from, right there
Damn I just parted out an 89 firebird and had all that apart.....I could have taken pics but the shell of the car went to a new owner a week ago
I literally just posted a link to photos of a headlight assembly out of the car. The four yellow circled bolts all bolt to the body. Two on top, two on bottom.
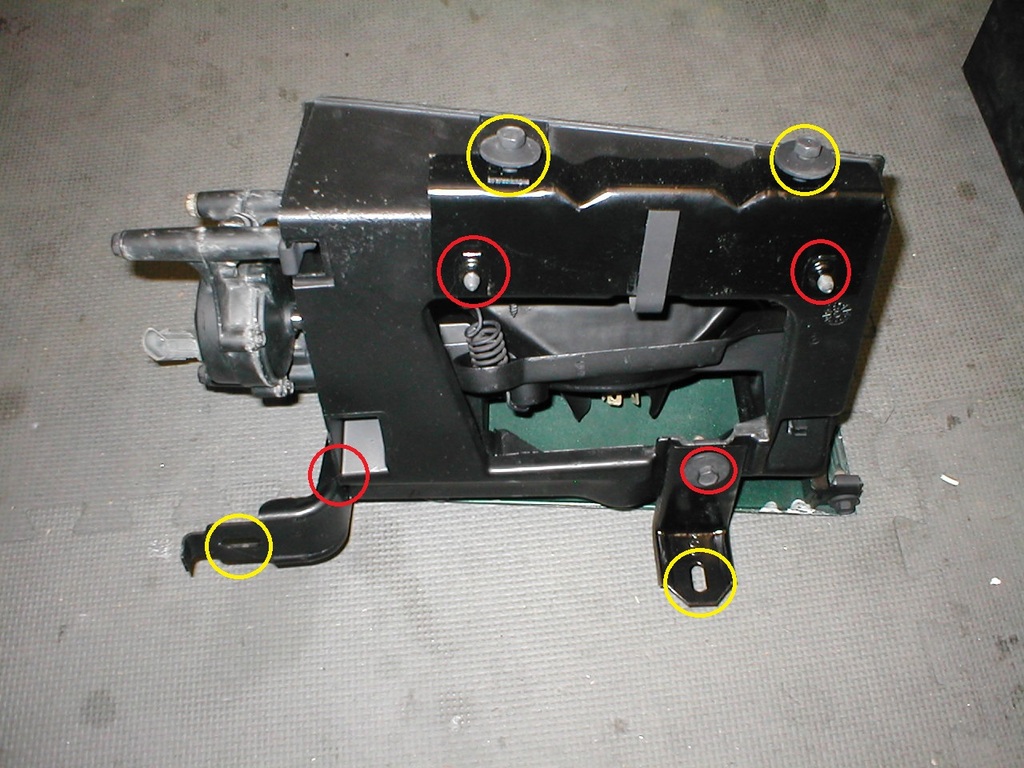
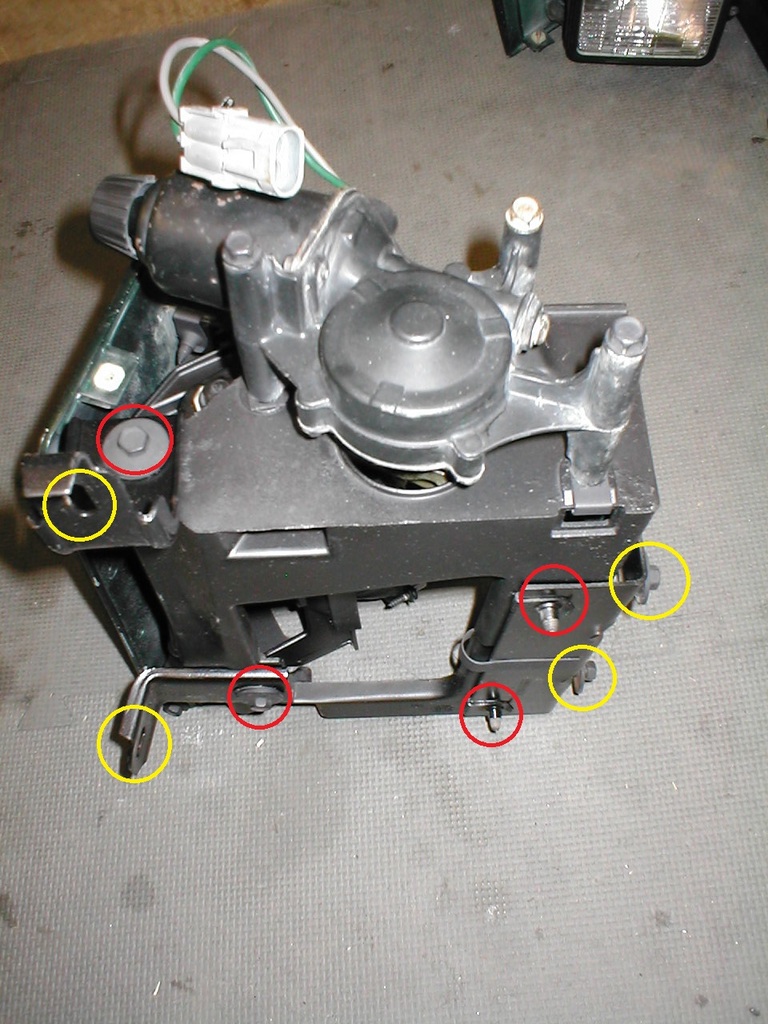
They say a picture is worth a thousand words, so let's try this...
There are 8 bolts, and 3 brackets per headlight assembly. 4 of the bolts retain the mounting brackets to the headlight housing, the other 4 retain the brackets to the body.
Generally, the adjustment is going to depend MORE on the bolts that retain the brackets to the body. They're the bolts or bolt holes circled in Yellow in the photos.
In the event that the adjustment is grossly off, there is some potential for adjustment in the bracket to housing bolts, circled in Red in the photos.
Beyond that, I'd be looking at the housing, brackets, or radiator support for bent parts. Fortunately the brackets are all square/flat/90* bends, so they're fairly easy to tweak back to square if they're bent.
I'm mis-reading something. Because I thought you said in post 12 TO remove the whole unit (yellow bolts in the photos?), because that would leave the adjustment intact. But then in the text accompanying the photos, you say "Generally, the adjustment is going to depend MORE on the bolts that retain the brackets to the body. They're the bolts or bolt holes circled in Yellow in the photos."
I'm mis-reading something. Because I thought you said in post 12 TO remove the whole unit (yellow bolts in the photos?), because that would leave the adjustment intact. But then in the text accompanying the photos, you say "Generally, the adjustment is going to depend MORE on the bolts that retain the brackets to the body. They're the bolts or bolt holes circled in Yellow in the photos."
Help.
What has saying is this.....The bolts in yellow are super easy to adjust the alignment of everything, and super easy to remove. Its easier to take the entire assembly out of the car using the yellow bolts, and you dont have to mess with any of the red bolts that way if everything lined up good before removal. There is some adjustment with the red bolts, but dont mess with them if ya dont need to
Yes it was. Cars are assembled as modules. They didn't have some dipshit on the assembly line bolting together every little piece of a headlight assembly in the car. They had the entire headlight assembly already together, so the dipshit could drop it in place and put in two bolts on the bottom and two on the top, and send it down the line.
There are two bolts on the top, and two on the bottom that bolt the mounting brackets to the headlight assembly, you generally don't want to mess with those unless you like fiddling with adjustments. The bolts you want to remove to remove the assembly are the bolts that hold the brackets to the car. Two from underneath, two right on top, remove the entire damn thing in one piece and carry it to your work bench. When you're done, drop it right back into place and put the bolts back in, won't have to adjust shiz if it was adjusted properly before.
Always good for an entertainingly-animated write-up lol. And, sadly, that's probably exactly what GM thought of its line workers. I work for one of today's largest corporations in the world, and they hate us. If we weren't union, the company would stomp on us even more than it already gets away with.
No question, that would've been extremely simple for a line worker to install onto a partially-assembled car. With no front end installed yet, he wouldn't even have had to squat down to install the lower bolts of the assembled product, and the assembly line would've moved swiftly along. No dropping of the underbelly, and no trying to reach up to the bolts, as a car owner would have to do, when he could simply work from the top and only remove the parts he had to remove to get his job done.
Also, sadly, GM probably thought exactly the same of its customers, too, just as our corporation does. With such a documented installation/removal "procedure," GM probably saw this as an opportunity for its dealerships to get $300 for a simple headlight change. "How much?!" "Oh, uh, well, you see, sir, the underside of the front of the car has to be removed, just to get to the headlight assembly, and then that entire pop-up assembly has to be removed first." When, in reality, it takes only minutes to work from the top and do it as I described, quite easily, without disturbing any other part of the car.
Here's a pic of one of the lower bolts. It might be hard to tell, but the lower bolt is not attached to the body. The end of the bolt sort of goes into that large cutout, but the bolt itself is definitely not attached. So the entire assembly is hanging by the upper bolts.
Wrong bolt. The ones you are looking for are installed straight up and down, from the under side of the car.
See the empty threaded clip just under that bolt you pictured? That's one if the holes you are looking to put a bolt through
Yep, looks like you're missing the bottom-up bolt(s).
Here lemme see if this helps... Just happen to have a stripped Firebird sitting here, let me get everything out of the way so we can see whats going on... Not the best pics, it's a 91 not an 87, but it's the same in this aspect.
Any questions? Looks like you have the lower bracket, but you're missing the bottom bracket to body bolts.
You can try your local hardware emporium. They usually will have a small assortment of body bolts in the Hillman fasteners line. Otherwise, hit your local junkyard, or jump onto Auveco's online catalog and see if they have them. The catch is Auveco will usually have the exact right nuts and bolts, but the part number has usually changed, AND you'll have to fimd a distributor that carries their products, and the usually are packaged in large quantities. If you need one or two, you probably don't want 25 - 100 of them.
If you're in the lower 48 US states, I could probably mail you a few with random paint overspray and surface rust for a few bucks. Then if you want them pretty, you setup the Jr G-man chemical plant with a bucket of Acetone to soak and loosen paint, a bucket of Ospho to convert/strip/neutralize rust, and another to neutralize the ospho (acid)... Then media blast, dip in phosphate plating solution, and paint over the oxide coating so they never rust again... Easier to buy 25 - 100 and sell the leftovers. lol