When you click on links to various merchants on this site and make a purchase, this can result in this site earning a commission. Affiliate programs and affiliations include, but are not limited to, the eBay Partner Network.
Hi everyone!
I recently purchased a pair of long tube headers. I got my driver side in with no issues. I am struggling with the passanger side. Ive got the valve cover, spark plugs, starter and spark plug wires all of and out of the way. My header almost slides in but hits the control arm and refuses to go down any further. It appears to just need a good push but I've tried just about everything to get it to get in.
I was curious if anyone has replaced their A Arms with the tubular ones? Would that help in my case? I figured I should replace them anyway just as an upgrade. But I searched some up on ebay and found they were about $400.
Would tubulars help? Should I drop my control arm then get the header in and put everything back (without replacing the control arm)?
Any suggestions would help!
I got the headers off ebay. So far I've had no issues with them aside from my lack of space on the passenger side.
Any help is greatly appreciated!
The picture of the passanger side spot... The part it keeps hitting is the part towards the bottom of the pic. It hits right there. I believe that's my control arm right? I could be wrong!
These are the headers I got.
Hope to hear from you soon!
That is the mounting pocket for the LCA. Changing to a tubular LCA will not do anything for it... Denting the pipe and or new Poly inserts in the motor mounts are your only options....
The poly mounts are stiffer and will not allow the motor to "sink" into the mount as much. That may not cure the issue but it might help with minimizing the size of the dent in the pipe. Also have you lifted the motor up some and tried to install them and then seen if they clear once they are in place?
I have not tried to lift the engine. I still wonder about how the hood closes without hitting the air intake filter thing. So I don't think lifting it a bit will help. I also font have the crane to lift it. My step dad tried to use a jack to push the engine up from underneath but he didn't disconnect it from the tranny or anything around, so he was just shredding my oil pan and lifting the car. Can someone post a picture of the dent they made? If it's too much trouble, no worries! Is there a safe way to dent it? Or will I just have to take a hammer to the guessed spot? Is that part in the picture (spot where it's hitting) the control arm? Or is that a different part I've got it confused with?
Thanks for all the help!
Take the bolt out of the engine mount, and lift the engine to get the weight off the mount. It'll move a bit without disconnecting everything, slip the header in, then let the engine back down. If the header still won't line up without hitting, take something hard and preferably round, and put a small dent in the header to clear where it's rubbing. Don't forget to put the bolt back int he motor mount when you're done.
Take the bolt out of the engine mount, and lift the engine to get the weight off the mount. It'll move a bit without disconnecting everything, slip the header in, then let the engine back down. If the header still won't line up without hitting, take something hard and preferably round, and put a small dent in the header to clear where it's rubbing. Don't forget to put the bolt back int he motor mount when you're done.
Sounds pretty simple! Thank you, I'll start watching some videos on motor mounts and try to find that bolt!
Okay, so I undo that bolt.. This will let me jack the engine up enough to get the header in? Once in, I put the bolt back? I thought I had to disconnect the transmission from the motor?
You're not pulling the engine, just trying to gain enough room to slip the header in. It might not even work. Sometimes you just gotta try things and see. Adapt, improvise, overcome. Just don't go doing anything too crazy or destructive. Removing the trans to install headers, would be crazy.
That is the bolt. The nut at the opposite end is captured to the bracket right behind the fuel pump - looks like a big square nut.
You don't even have to get a wrench on that nut. Use your floor jack with a piece of wood to protect the oil pan (and spread the load) and take some of the weight off of that bolt. Remove the bolt. Use the jack to lift the engine. You do not have to disconnect the transmission. The engine will pivot on the driver's side motor mount bolt like a door swinging on its hinges and will go up on the passenger side. Raise it only enough to slip the header in. Then you will have to determine whether you still need to dent a header tube for clearance.
If you think this is bad, wait until you try to get the spark plugs back in once the headers are installed.
Last edited by NoEmissions84TA; 06-28-2019 at 12:15 AM.
That is the bolt. The nut at the opposite end is captured to the bracket right behind the fuel pump - looks like a big square nut.
You don't even have to get a wrench on that nut. Use your floor jack with a piece of wood to protect the oil pan (and spread the load) and take some of the weight off of that bolt. Remove the bolt. Use the jack to lift the engine. You do not have to disconnect the transmission. The engine will pivot on the driver's side motor mount bolt like a door swinging on its hinges and will go up on the passenger side. Raise it only enough to slip the header in. Then you will have to determine whether you still need to dent a header tube for clearance.
If you think this is bad, wait until you try to get the spark plugs back in once the headers are installed.
Thank you so much for the detailed help! It's too late now, but tomorrow morning I'll get on it! I did get the sparks out, so I'm hoping putting them back in won't be too hard.. That leads me to ask... Do I need special "short" sparkplug due to my new headers? I thought I had heard something like that awhile back.
Thank you all for the info! Ill update on it tomorrow evening
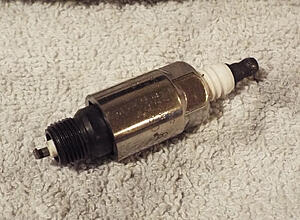
Short plugs - most likely - at least in some positions.
Accel shorty header plugs are the shortest I have found.
Sometimes you can find them cheap(er) on ebay.
You may also need some of those heat resistant sleeves to protect the plug wires and boots.
Some header tubes will not let you get a straight shot at the plugs.
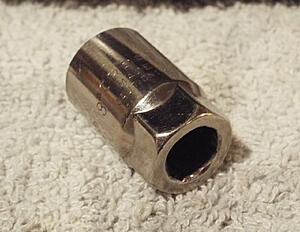
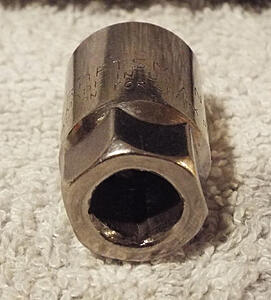
You will have to get creative with "box" wrenches and a special short and drilled out spark plug socket, such as this will help.
The porcelain can come through the center and you use whatever tool you can on the hex.
Last edited by NoEmissions84TA; 06-28-2019 at 01:00 AM.
Short plugs - most likely - at least in some positions.
Accel shorty header plugs are the shortest I have found.
Sometimes you can find them cheap(er) on ebay.
You may also need some of those heat resistant sleeves to protect the plug wires and boots.
Some header tubes will not let you get a straight shot at the plugs.
You will have to get creative with "box" wrenches and a special short and drilled out spark plug socket, such as this will help.
The porcelain can come through the center and you use whatever tool you can on the hex.
Interesting. Thank you. I wish I took pictures of my sparkplug, I could look up their replacements. Are those spark plug wire "sleeves" acually called that? Just so I know what to look for next time I'm at the store
Spark Plug Protect Boot Heat Shield
They are available everywhere - prices & quality vary. Other members can recommend what brands work and which are junk.
If you have access to a lathe (or a technical school with one), you can modify a standard spark plug socket easily like the one pictured above.
TIP: Should you have to dent a header tube for clearance, DO NOT bang directly on the tube. Place a heavy-walled pipe in the proper location and hit the pipe with a big hammer.
Last edited by NoEmissions84TA; 06-28-2019 at 09:12 PM.
Lathe? Sheetdawg, a cut off wheel in a dremel or a die grinder to cut to length, then the hard part drill or rat tail file the 3/8" square drive to a round hole. A burr on a die grinder makes fast work of the square hole, but a dremel would probably work in a pinch. I remember making my spark plug header socket, fanciest tool used was a die grinder, took a minute or two at most. Doesn't really look pretty, but it gets the job done.
Doesn't take much. Looking in the drilled out end, I think the detent notches are still visible from the original 3/8" drive. Could probably almost still turn the socket with a 3/8 drive tool. LOL
I'll be trying one more time before I set fire to the car. Hopefully the header goes in. But it wasn't going in too easy earlier. Did you guys check out that video? I believe it was hitting the dip stick thing as well, it was preventing it from going in further
It looks like you're close, on the right track. You might try removing the other motor mount bolt (if you haven't already) and see if it'll let you shift the engine a bit to the driver's side and give you a hair more room. But really it looks like you're just at the point where you gotta try slipping it into the hole at different angles and wiggle-as-u-turn just right, until it drops in. Sounds silly, but often something will fit through a hole one specific magical way, when it won't fit any other way. At a certain point, all you've got left are obstacles that can't be moved.
You've got quite a bit of stuff out of the way, it might help if you tied back the trans cooler lines tight against the oil pan, or remove that valve cover gasket that seems to be getting in the picture, not that those things really make a difference, but it might give you a clearer focus on what's happening if you dont have to keep moving them out of the way.
Looks like you need to feed more of the header through the hole between the block and crossmember, before bringing the flange level. You might also try looking at the problem from the bottom while a helper feeds the header in from the top. Or try slipping the header in from the bottom.
TL, DR... Keep trying. Kudos for sticking with it, doesn't sound like you're reached the throwing tools in frustration stage yet, so that's good.
I looked at it last night before bed. Those 2 lines (I think you said transmission cooler lines) are what could be causing it to not slip in. They are somewhat hard to move... But I'll try ziptying them together and try tieing them to whatever underneath.
I ALSO CONSIDERED calling a local muffler shop (one we have nearby that opened in the 80s), and seeing if I could take the car over to have them install the header. But that's if I can't get it in... How much do you think they would charge me for just the header install?
Before I paid a shop to do anything, I'd head over to Harbor Freight and invest in an engine hoist to lift the engine up a hair while you slip the header in. Just an educated guess, but shop labor is probably around $80/hr if not more, and it's probably not something that's in the rate book, figure they're going to charge at least an hour, probably more because hey who's gonna stop them? That money could go towards a tool that you could use again, or sell down the line. Because here's the thing... Aside from knowledge, experience, and tools, it's not like a shop is magically any better equipped to deal with the problem than you. You gain tools by acquiring them, same as experience and knowledge. If you hire someone to do the job, you don't learn, and the money just blows away like smoke in the wind.
Side Note - Disposable rubber gloves will keep all the crap off your hands and save you a small fortune in hand cleaner.
An engine crane? I was at harbor freight and they had them for 200-400. I could invest In one for sure.
As for the muffler shop, I'll have to call them tomorrow. I'm hoping they can give me advice of what to do. Taking another look at the header might just turn me crazy again lol I'll try my best to wiggle it around until it slides back in (either from top or bottom.). I could also record it again in case I've missed something you guys didn't!
Thanks for all the help! I greatly appreciate it!! The camaro is so incredibly close to being "done". Would love to take it to local meets and meet other 3rd gen fans..
Should be able to pick up a basic folding hoist or crane or cherry-picker (all terms for the same tool) for about $180. Dig around a bit for a coupon or hit a sale right, might even be less. HF always has coupons.
An engine crane? I was at harbor freight and they had them for 200-400. I could invest In one for sure.
As for the muffler shop, I'll have to call them tomorrow. I'm hoping they can give me advice of what to do. Taking another look at the header might just turn me crazy again lol I'll try my best to wiggle it around until it slides back in (either from top or bottom.). I could also record it again in case I've missed something you guys didn't!
Thanks for all the help! I greatly appreciate it!! The camaro is so incredibly close to being "done". Would love to take it to local meets and meet other 3rd gen fans..
Chelsea, you have already done all the hard work. Give it another try and it will probably "pop" right in. I can't see your video on this computer, but if you have the large diameter HEI, the distributor cap is nearly right up against the firewall. Be careful as you jack or lift the engine so you don't crack the distributor cap.
You should be able to just undo the cap retainers and move it aside without disconnecting anything else.
UPDATE!
After I pulled out chunks of my hair and stress ate some fries... I got it in. It did indeed "pop" right in. I was able to lower the engine, rebolt the motor mount. My main issue now is fitment... (I was praying it wasn't this...)
I'll add some pictures. But I did manage to get 1 bolt in (after lots of pushing/pulling/shoving /crying/eating/and procrastinating (I acually was able to Clean up a bit and now have a tub full of camaro /car stuff I might give away on here)) but wasn't able to get another one in. The holes wouldn't line up. I tried lifting and lowering just to get the holes to line up but when they do line up...the screw still won't go in because the header screw hole is too far off to the left which makes the screw miss the hole by a hair or two..
What should I do? PLEASE HELP. I'm so close but sooo farrr
I'm not sure how you're going about it, but..... Start near the middle, start one bolt with your fingers just far enough that the threads start to engage, it only needs to not fall out, no tighter. Then move on to the next bolt and do the same. Get all the bolts started and then go back to the first bolt and tighten a bit more, move to the next one and tighten a little, keep going working your way out from the middle, until they're all snug.
You might find that one or more holes may need to be coerced to line up. While a 1pc solid flange should line up, we are talking about bargain basement Chinese headers. You might have to bust out a grinding bit and oval out a hole or two, or use a rat tail file, go slow. Once the headers are on, you should probably plan on re-torquing the bolts after a heating and cooling cycle. Headers like to get loose over time, heating/cooling cycles and the resulting expansion/contraction cycles tend to let the bolts back out. Just keep an eye on em.
Oh yeah one more thing, an up/down misalignment like your photo might be from one of the tubes binding against the body/crossmember. Look for where it might be touching. If it it's touching anything aside from the head, that's where dimpling the header comes in. Mark where its touching, pull the header (I know) and tap a small dimple in the tube just large enough so it won't rub, then slide it back in. Repeat until it fits.
Just think of it this way, now you know you can get it to go in there. So the next time it'll be easier. It's all part of the fun.
Instead of hammering it to cause a dent, could I buy one of those $30 blow torches (the handheld ones), heat it up and bend it? So it won't hit the body/crossmember of the car? Or would it be best/easier to dent it? Because I'm imagining it to be a pretty big dent...
Here are some pics
The circled bits are where the hitting is happening. Which I think would be a big dent... Like a fist sized
Dimpling the headers is usually the best method of getting around obstacles. You can certainly use heat to make it easier to dimple (and prettier for that matter - no creasing, etc). I don't know that I'd recommend bending the header, though. If you tweak it enough it'll probably make it hard to get your Y-Pipe (if you're planning on using the one that came with the kit) connected. If you're not planning on using it and you plan on fabbing up your own, or having the exhaust shop do it, then you're probably okay.
That being said, if you care at all about the performance aspect, Engine Masters did a back to back dyno test at Westech with a pair of headers. First brand new and then bashed to hell via a hammer. It didn't change the performance of the engine at all.
If you're more worried about the aesthetics of the headers, you'll probably have to make concessions somewhere. If it's any consolation, the likelihood of seeing the dimples once everything is reassembled is less likely for anyone that doesn't know they're there. lol
That being said, if you care at all about the performance aspect, Engine Masters did a back to back dyno test at Westech with a pair of headers. First brand new and then bashed to hell via a hammer. It didn't change the performance of the engine at all.
I wish those videos were still public. That episode was one you had to see to believe.
I called around... Muffler shop said to bring it in and it would be around $350 for one header
I called my mechanic shop, he said $180 for the one side
...Gonna give it one more go this weekend, its raining and dark out so theres not much lighting for me unfortunately
You either have to grind some of the control arm mounting pocket (if it won't severely weaken the area), dent a header tube, or a little of both. It's just the way it is.
Probably machining tolerances. I had the exact same problem with my Doug's headers. I was pretty upset since it took me days getting the damn thing down there in the first place. I ended up just muscling it over far enough to get it started and then wrenching it in. If it wouldn't have been such a nightmare getting it in there to begin with, I would've taken it out and just cut the flange to allow some additional wiggle room, which is probably the smarter way to do it, and the way I'd recommend doing it in your case.
Probably machining tolerances. I had the exact same problem with my Doug's headers. I was pretty upset since it took me days getting the damn thing down there in the first place. I ended up just muscling it over far enough to get it started and then wrenching it in. If it wouldn't have been such a nightmare getting it in there to begin with, I would've taken it out and just cut the flange to allow some additional wiggle room, which is probably the smarter way to do it, and the way I'd recommend doing it in your case.
I have a real crappy dremel I can grind the holes and hopefully have them match the engine holes? Or how do you recommend I make them fit?
You can either try and elongate the holes like you're describing or you can cut the flanges so each primary tube can move independently. Elongating the holes is probably easier if you don't have something to cut the flange in between the tubes. Probably less dangerous too if you're unaccustomed to doing things like this. You might even be able to do it with the headers slipped into the car if you have enough space for your dremel. I didn't have enough space with my die grinder, unfortunately. A carbide burr would be best for this, but a grinding stone would probably work in a pinch (but it'll likely take longer and maybe even multiple stones).
You can either try and elongate the holes like you're describing or you can cut the flanges so each primary tube can move independently. Elongating the holes is probably easier if you don't have something to cut the flange in between the tubes. Probably less dangerous too if you're unaccustomed to doing things like this. You might even be able to do it with the headers slipped into the car if you have enough space for your dremel. I didn't have enough space with my die grinder, unfortunately. A carbide burr would be best for this, but a grinding stone would probably work in a pinch (but it'll likely take longer and maybe even multiple stones).
This may be a dumb question... But if I grind the holes to be bigger, it'll cause friction. Sense there is gasoline near by... Would it be safe to grind the holes bigger? Or should I just take the headers off and grind them somewhere else?
Assuming there aren't any fuel lines close by (Fuel lines should be on the driver side on fuel injected models) and there's no raw fuel seeping out anywhere, you should be fine. If it's easier to take the headers out and it gives you peace of mind, by all means do what makes you feel more comfortable.
 06-26-2019, 05:59 PM