
Decal Placement


Thread Starter
Junior Member
Joined: Mar 2014
Posts: 24
Likes: 5
From: Chicago
Car: 1989 Firebird T-Top model
Engine: 305
Transmission: 700R4
Decal Placement
Is there a template available or any precise measurements needed to properly reapply 2 sail panel Firebird decals and 1 decal for the front nose of an 89? Also regarding the 3pc body side moldings; does anybody know if they are placed dead center over the body character line or just above or below it?
Last edited by lsirg22; Sep 29, 2021 at 06:27 PM.


Joined: Oct 2001
Posts: 12,214
Likes: 1,140
From: Il
Car: 1989-92 FORMULA350 305 92 Hawkclone
Engine: 4++,350 & 305 CIs
Transmission: 700R4 4800 vig 18th700R4 t56 ZF6 T5
Axle/Gears: 3.70 9"ford alum chunk,dana44,9bolt
Re: Decal Placement
Think there are a few threads about this on here and I have measured one of my cars for it but may have to do a google search to find them (search feature here isn't good).
Long story short, the side didn't have a locating backing paper and seem to be a bit random..
I've seen the body moldings fudged to the top, on center and fudged low. I've seen them different from side to side, same with the sail panel bird decals.
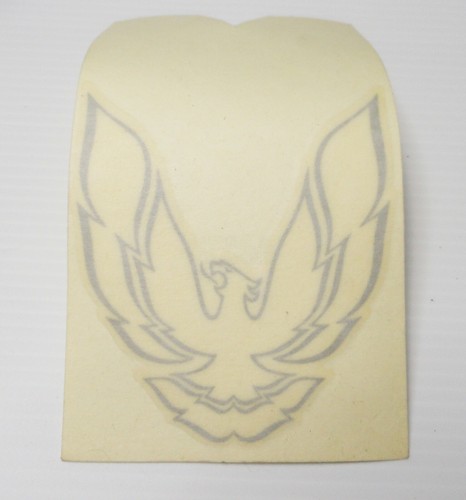
The NOS front nose decal is located with the backing paper. The V at the top locates the center and the top edge lines up with the bumper across the top.
Long story short, the side didn't have a locating backing paper and seem to be a bit random..
I've seen the body moldings fudged to the top, on center and fudged low. I've seen them different from side to side, same with the sail panel bird decals.
The NOS front nose decal is located with the backing paper. The V at the top locates the center and the top edge lines up with the bumper across the top.
Thread Starter
Junior Member
Joined: Mar 2014
Posts: 24
Likes: 5
From: Chicago
Car: 1989 Firebird T-Top model
Engine: 305
Transmission: 700R4
Re: Decal Placement
Thanks TTOP. Ill do some research on this. I wonder if the decals got applied at the dealer or at some end of line QC check at the factory.
Joined: Oct 2001
Posts: 12,214
Likes: 1,140
From: Il
Car: 1989-92 FORMULA350 305 92 Hawkclone
Engine: 4++,350 & 305 CIs
Transmission: 700R4 4800 vig 18th700R4 t56 ZF6 T5
Axle/Gears: 3.70 9"ford alum chunk,dana44,9bolt
Re: Decal Placement
They were done at the factory but I'm not exactly sure when


Supreme Member
iTrader: (3)
Joined: Jul 2005
Posts: 1,062
Likes: 71
From: New York
Car: 1989 Firebird Formula 350
Engine: 5.7
Transmission: 700R4
Axle/Gears: Stock
Re: Decal Placement
I used this for my Formula 350
The factory door decals use the paper as a locator is why I asked.
Here are some measurements from my original paint 92 formula (factory stuff does vary soooo)
Front bumper, bird wing tips to upper front bumper edge is 2 1/2 inches
Door, 4 1/4 from leading edge of door to middle of decal and 6 3/4 up to decal bottom from bottom of the door
B-pillar bird, 3 1/4 over from door glass to decal middle and 1 1/2 up to bottom of the bird from the middle of the outward curving body line
Rear bumper, the middle of the A is in line with the right hatch/quarter and its 2 1/2 inches up to decal bottom from the body line below it.
The b-pillar birds, door decals and rear decal are not all placed the same from the factory. So use these measurements as a general guideline.
I installed all of the decals AFTER everything was sanded and buffed. I wipe everything down afterwards with a Wizard's Mist And Shine. Then I use RIGHT ON for the decal application. It's a spray on product that you spray on the place you're applying the decal to, and I also spray it right on the sticky side of the decal. Put the decal on, use a squeegee to remove all air bubbles, remove the sticky paper transfer tape, and wipe it clean. Perfection, every single time.
Last edited by Hawkeye1980; Oct 3, 2021 at 12:52 PM.
Thread Starter
Junior Member
Joined: Mar 2014
Posts: 24
Likes: 5
From: Chicago
Car: 1989 Firebird T-Top model
Engine: 305
Transmission: 700R4
Re: Decal Placement
Thanks Hawkeye. These rough measurements are very helpful as well as diagrams provided by mantaguy. Im gonna locate some of this Wizard Mist an Shine an use it as described to apply these decals.
Trending Topics
Supreme Member
iTrader: (3)
Joined: Jul 2005
Posts: 1,062
Likes: 71
From: New York
Car: 1989 Firebird Formula 350
Engine: 5.7
Transmission: 700R4
Axle/Gears: Stock

Thread
Thread Starter
Forum
Replies
Last Post