
Custom Double Din Journey-New Faceplate Finally


Thread Starter
Member
Joined: Aug 2006
Posts: 484
Likes: 0
From: Tampa, FL
Car: 1988 Iroc-Z Red T-tops
Engine: 305 TPI LB9 55k miles
Transmission: Auto 700r4
Axle/Gears: 2.73 posi
Custom Double Din Journey-New Faceplate Finally
Pulled my center console. It was pretty beat up. Faded, no carpet, rusted nuts. So I sanded it down, plastic promotion primer then a flat black krylon plastic black.
Then I am using my 3d printer to custom fab the face plate and brackets. So far I have the din unit mounted with brackets and it works well and is pretty solid
Not sure why these pic suck so bad it is brand new phone. I will retake but


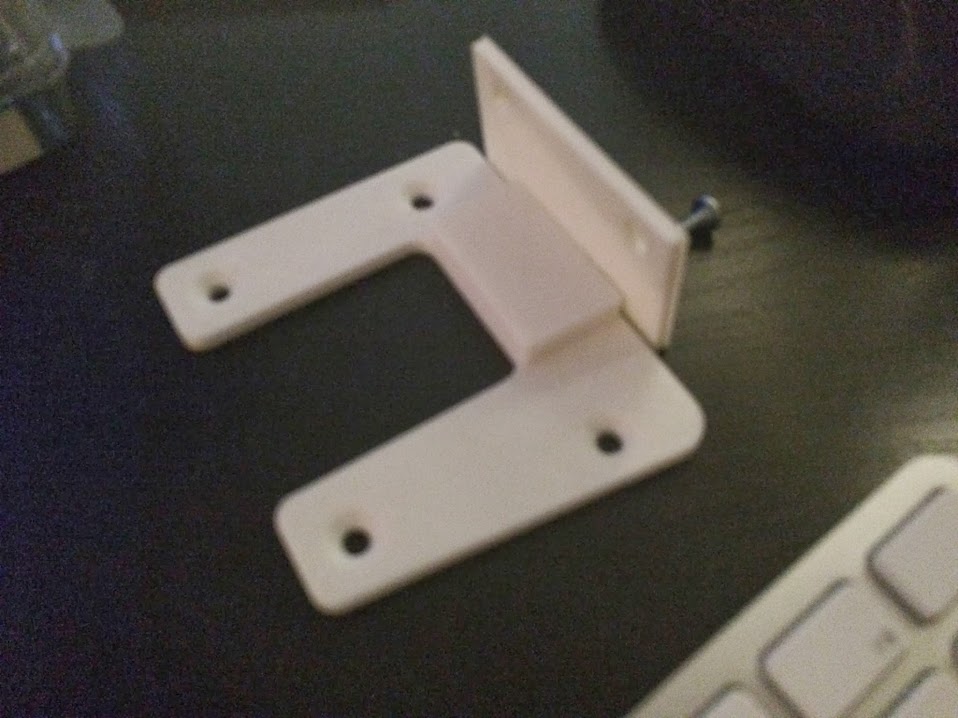
Then I am using my 3d printer to custom fab the face plate and brackets. So far I have the din unit mounted with brackets and it works well and is pretty solid
Not sure why these pic suck so bad it is brand new phone. I will retake but
Last edited by jjcuff1; Apr 28, 2014 at 02:32 PM. Reason: New Photos

Joined: Feb 2007
Posts: 1,092
Likes: 18
From: Newburg, MD
Car: '89 RS, '89 Iroc
Engine: L03, LB9
Transmission: 700r4, T5
Axle/Gears: 2.73, 3.08
Re: Custom Double Din Journey
subbed
interested in seeing a video of the 3d printer at work on the faceplate
once they become an everyday item i can see 3d printing revolutionizing resto projects on cars
interested in seeing a video of the 3d printer at work on the faceplate
once they become an everyday item i can see 3d printing revolutionizing resto projects on cars
Thread Starter
Member
Joined: Aug 2006
Posts: 484
Likes: 0
From: Tampa, FL
Car: 1988 Iroc-Z Red T-tops
Engine: 305 TPI LB9 55k miles
Transmission: Auto 700r4
Axle/Gears: 2.73 posi
Re: Custom Double Din Journey
I have made many parts and have videos of it in action. It is very cool and I used to make a patent device that I made. (which is so cool and gets tons of interest)
But I wouldnt recommend it to the weak hearted just to think you can draw, print and use as a tool yet yet. IT was another hobby that took a lot of time, calibration and tweaking to get right and troubleshoot when it breaks and then you still have to know how to 3d model and work through all the engineering of of the right parts, shapes, 3d curves surfaces etc.
I have a solidoodle.com 6" system. The only off teh shelf one for under $600. the others all have to be built by you and purchased parts from various places. Now that I have one I would venture there for a bigger, better more reliable system but they will cost $1500+
I probably have about $1000 in to my setup but I can pretty much sit down draw and turn it on 99% confidence and hit print now. These parts for example: took about 1 hour to print all 4 pieces but I made several samples to get the holes and thickness and strength right.
Material is fairly cheap though. I bet these brackets are cost like 30 cents in plastic
Member
Joined: Jul 2011
Posts: 184
Likes: 0
From: Athens, Ohio
Car: 1992 Z28 Heritage Edition
Engine: 305
Re: Custom Double Din Journey
I've really been interested in them for quite awhile but never bought one, I would think that I could handle it because I am pretty good with stuff like that but I am really just looking around, thanks for the information it really gives me some insight on the whole 3d printing process


Thread Starter
Member
Joined: Aug 2006
Posts: 484
Likes: 0
From: Tampa, FL
Car: 1988 Iroc-Z Red T-tops
Engine: 305 TPI LB9 55k miles
Transmission: Auto 700r4
Axle/Gears: 2.73 posi
Re: Custom Double Din Journey
Well I cut the bezel last night and fabbed up new trim pieces for the left and right gap and the top. I am looking to make a simple kit for others to follow.
So far the only cutting was removing about 5" section on the bottom of the trim plate and right along the curve of the middle portion. It slides rioght over the pioneere no problem.
I started to plan to cut the trim piece right in have so the top was stock and bottom was fabbed but leaving it alone gives it more strength and still uses the stock 4 bolts to hold it tight.
I then made a left and right trim piece that sits over the gap and lines of flush to the edge of the stock trim piece and covers the pioneer gap and sides with a nice angle. the edges are rounded and it sits flush on top of the pioneer.
Now I will print a flat trim piece that sits on top of the pioneer to cover the small 1" of metal that is is exposed and I will wrap it with a nice bevel over the existing middle stock trim piece to cover up my uneven cut. The top trim piece will blend to the left/right hand pieces and have a small #4 scree on each side to bolt together and pull it in tight and snug to the radio and hold the middle trim piece down.
So far unpainted it looks clean and probably more like an OEM crutchfield kit then a total OEM looking piece but I think once painted it will look pretty clean and pretty simple install. 2 brackets, 3 trim pieces, 2 simple cuts on the stock trim, a few screws and all bolts in no metal cuts.
Trending Topics

Thread Starter
Member
Joined: Aug 2006
Posts: 484
Likes: 0
From: Tampa, FL
Car: 1988 Iroc-Z Red T-tops
Engine: 305 TPI LB9 55k miles
Transmission: Auto 700r4
Axle/Gears: 2.73 posi
Re: Custom Double Din Journey
Og course, my printer heater died last night before I could finish trim pieces lo. I hope parts come in by Sat. But for this technology I am am expert now on my Solidoodle but ou have to be willing to explore and find parts from 3rd party since the OEM is super expeisne slow and ownt tell you there part# and sually are crap anyway.
So I found some good sources and every time it fails I get upgraded beefier electronics that have improved my reliability and print speed normally.
My Stepper drives and motors I went to hi troque and made a huge differance . No more crashes or missed servo steps and failed prints.
No my heater heats the plastic it is a cheap resistor heater I am going to reliable cartridge heater and quick change assembly so I can swap out on the fly if it fails or clogs again and it means I can print at higher temps therefore different materials now.
I will just get this trim piece up and running to confirm fit and finsih. Nice thing about what I did I can complete, install, and easily upgrade and reprint the trim piece to whatever shape I want and swap out in few mintes once in the car.
I am thinking of adding USB ports and few switches along the side by the gaps and use the cigarette lighter pocket as a small area for the usb input and usb charger as well

Supreme Member
iTrader: (1)
Joined: Apr 2005
Posts: 1,165
Likes: 1
From: Valdosta, GA
Car: 1991 Trans Am GTA
Engine: L98(5.7 L TPI)
Transmission: 700r4(A4)
Axle/Gears: G80 RPO, 3:23s, Auburn Racer's Diff
Re: Custom Double Din Journey
Since you already went through the trouble of mapping brackets in the 3d printer, would you be willing to sell me a pair?

Thread Starter
Member
Joined: Aug 2006
Posts: 484
Likes: 0
From: Tampa, FL
Car: 1988 Iroc-Z Red T-tops
Engine: 305 TPI LB9 55k miles
Transmission: Auto 700r4
Axle/Gears: 2.73 posi
Re: Custom Double Din Journey
Hello, I was cross posting in another thread. PM or email me offline I will make brackets for sure. I have a new bezel I will install and post pics this weekend but I am going to jump all in and reprint a complete new face plate top and bottom. It will be all bolt in to the original 4 holes (will be in a few pieces that will bolt together paint then bolt over the HU) but once printed it should a plug n play kit with 3 parts. the 2 brackets and 1 face plate
and no cutting required
I will get brackets out to a few people, with some feedback and what they think,comments suggestions
and no cutting required
I will get brackets out to a few people, with some feedback and what they think,comments suggestions
Thread Starter
Member
Joined: Aug 2006
Posts: 484
Likes: 0
From: Tampa, FL
Car: 1988 Iroc-Z Red T-tops
Engine: 305 TPI LB9 55k miles
Transmission: Auto 700r4
Axle/Gears: 2.73 posi
Re: Custom Double Din Journey
i replied the PM. Yes I will sell the brackets just 1-2 with expectations to try review post pic here. I will modify fix replace yours as needed to fit your head unit just cover some plastic and shipping and design time
I am working on the new faceplate now I want it to blend old but retro with newer Camaro cues give it modern look with maybe a USB port on the side
Painted black probably be $100 unit with brackets for small volumes
I am working on the new faceplate now I want it to blend old but retro with newer Camaro cues give it modern look with maybe a USB port on the side
Painted black probably be $100 unit with brackets for small volumes
Thread Starter
Member
Joined: Aug 2006
Posts: 484
Likes: 0
From: Tampa, FL
Car: 1988 Iroc-Z Red T-tops
Engine: 305 TPI LB9 55k miles
Transmission: Auto 700r4
Axle/Gears: 2.73 posi
Re: Custom Double Din Journey
Just update. I have been getting many request to make brackets and kits. Which I can easily do and turn around brackets within 1 day. Faceplates probably 2-3 to start with. I am traveling this week but over next few weeks I will create a web site so all can read and buy the parts they want.
Some otehr items I already have and and I think work well/better then whats out there. The Trunk pull down slides, made a USB power port or the ashtray location. I am going to add port to the faceplate and LED light spots that will light HVAC and floor board area instead of the current foot well ones. Center valve cover wire grommet holders that lay down the side. And going to try a TPI TB plate.
Some otehr items I already have and and I think work well/better then whats out there. The Trunk pull down slides, made a USB power port or the ashtray location. I am going to add port to the faceplate and LED light spots that will light HVAC and floor board area instead of the current foot well ones. Center valve cover wire grommet holders that lay down the side. And going to try a TPI TB plate.
Thread Starter
Member
Joined: Aug 2006
Posts: 484
Likes: 0
From: Tampa, FL
Car: 1988 Iroc-Z Red T-tops
Engine: 305 TPI LB9 55k miles
Transmission: Auto 700r4
Axle/Gears: 2.73 posi
Re: Custom Double Din Journey
Bump
I am finally back at home after several weeks of travel for work and some pleasure. Sorry for the delays. I am back in the office htis week and will start to model a new faceplate and some revised brackets and print them out this week.
I started a Web Page too. I will post pics and hopefully some ordering through it as needed.
Another item that I will make is the rear hatch guide plates for the electric trunk. I know I have bought some for like $20 or something and they are just hand machined nylon. I can make for a few less. Might be as smooth but I am sure will work and cheap enough to replace if needed.
Same goes for the hatch gear motor, but that will be later after stereo mod.
Thread Starter
Member
Joined: Aug 2006
Posts: 484
Likes: 0
From: Tampa, FL
Car: 1988 Iroc-Z Red T-tops
Engine: 305 TPI LB9 55k miles
Transmission: Auto 700r4
Axle/Gears: 2.73 posi
Re: Custom Double Din Journey
Update Bump:
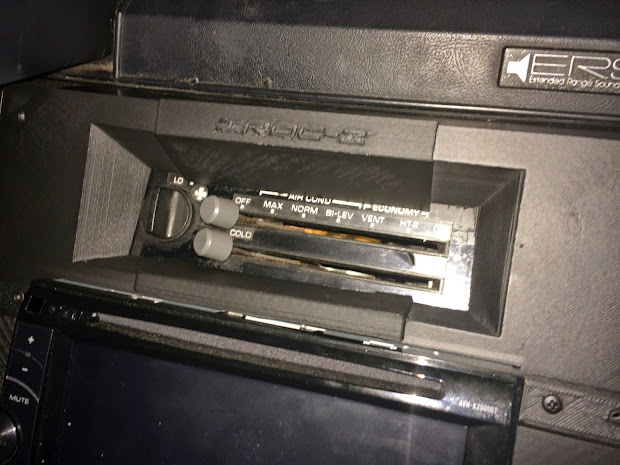
Started modding the top bracket: On my 3rd revision hard ot get all the angles correct but I am 99% close and it fits well. What the faceplate will be is this piece (shown), a lower piece below it to cover flush next to the headunit, They will be joined togetehr underneath with screw and possible decorative plate on top visible to give it some small detail
This will be mirrored on the opposite side. Then in the middle top/bottom of the AC controls will be a gap. I will bridge with a slightly larger square piece top/bottom to give it some detail. On the square face top piece I will put a IROC logo. These pieces will be bolted with visible bolt heads to the side part to give it some style/detail and also removable so if I want to change the logo later (or add lights)
Thread Starter
Member
Joined: Aug 2006
Posts: 484
Likes: 0
From: Tampa, FL
Car: 1988 Iroc-Z Red T-tops
Engine: 305 TPI LB9 55k miles
Transmission: Auto 700r4
Axle/Gears: 2.73 posi
Re: Custom Double Din Journey
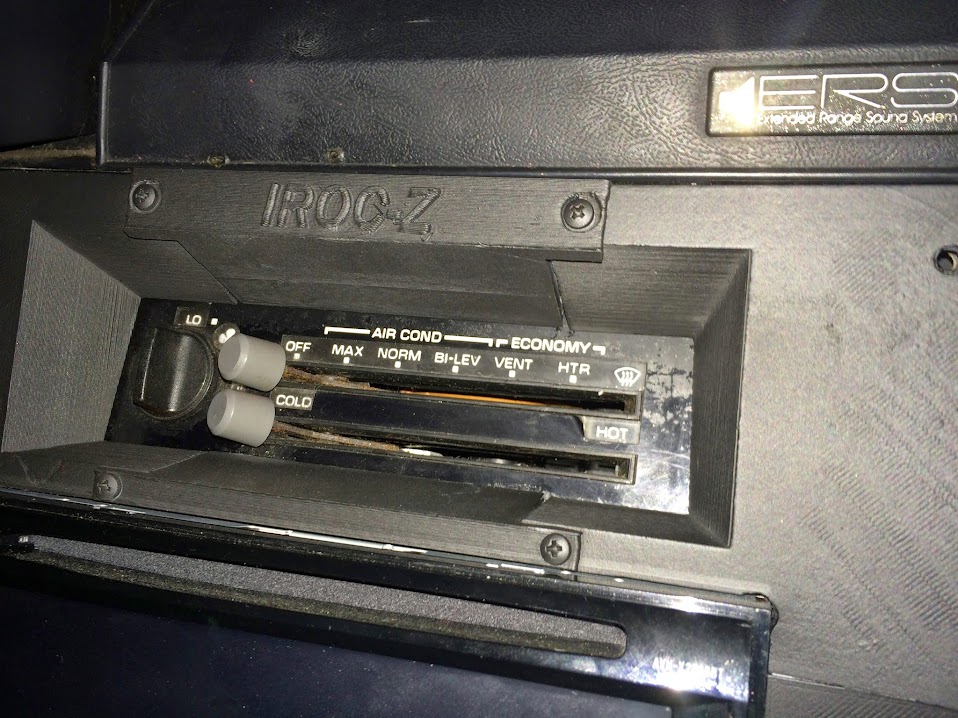
Ignore the AC controls angle. It is not the part but the way I mounted the AC controls. They never seem to site square to the dashboard metal bracket. I have to force adjust and tighten down straight
Thread Starter
Member
Joined: Aug 2006
Posts: 484
Likes: 0
From: Tampa, FL
Car: 1988 Iroc-Z Red T-tops
Engine: 305 TPI LB9 55k miles
Transmission: Auto 700r4
Axle/Gears: 2.73 posi
Re: Custom Double Din Journey
Bump-Update:
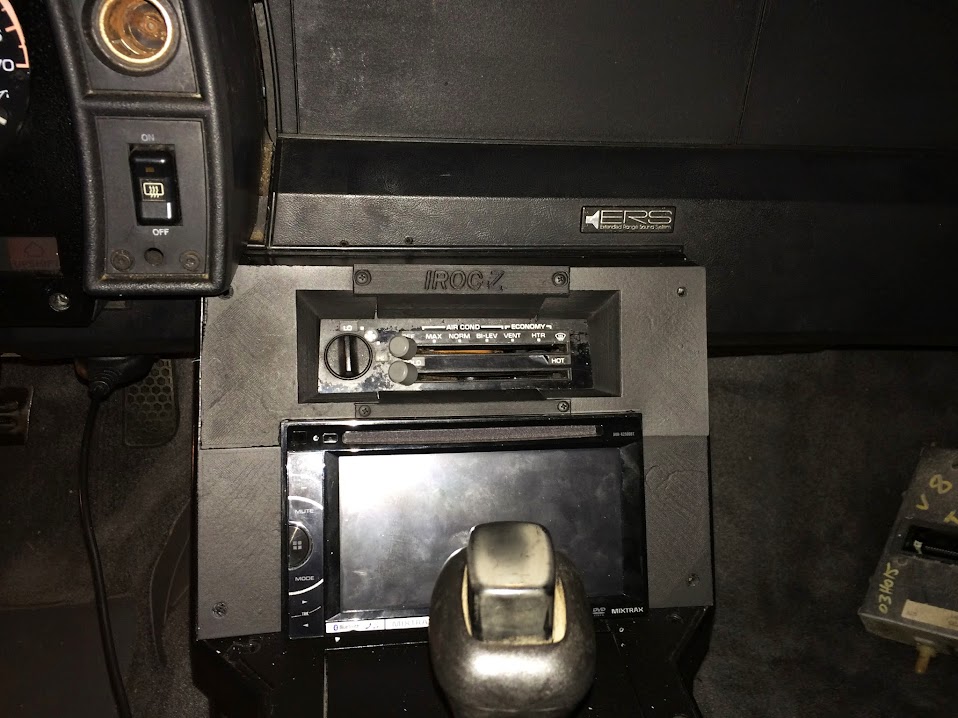
Well printed a full face this weekend, revision 1. The dash is so flexible it is hard to get accurate angels that mate up. Little push either way and it can shift 1/4". But I got it with some sanding on the parts. I do not like the multiple pieces but it came together better then I thought for a prototype and I just primed and painted with rattle can, no sanding and it looks ok although flat black is too much need a semi.
Over all the I do not like teh seem on the sides and I will make lip to over it with a bolt so it looks better and no seam. Then the IROC bolts and the angle seam do not look bad at all in the car (THE FLASH IS HORRIBLE) exposes the flaws but inside the car it looks a lot better. But I will also make a new middle that bolts behind the face plate and then slides in a groove so it blends evenly on the gap.
What about the IROC-Z logo remove it? look tacky?
Also the finish, when done will be sanded and probably use some filler to smooth out areas. Man the HVAC controls look like crap now. Anyone havce a printed black vinyl replacement I can buy?
Also what size screws are stock for the face plate bolts?

Junior Member
Joined: Sep 2013
Posts: 17
Likes: 0
From: Chester County, PA
Car: 1986 Chevy Camaro IROC-Z28 (t-tops)
Engine: 305ci TPI (LB9), 150K miles
Transmission: Auto 4-speed with OD
Axle/Gears: Stock - 9.5 posi
Re: Custom Double Din Journey-New Faceplate Finally
What about the IROC-Z logo remove it? look tacky?
Senior Member
Joined: May 2011
Posts: 549
Likes: 1
From: Houston,Texas
Car: 1992 Camaro (Z28 Clone)
Engine: LB9|TPI
Transmission: 700R4
Axle/Gears: 2.73
Re: Custom Double Din Journey-New Faceplate Finally
This is awesome! Great work dude....
Once you finally get all the kinks worked out I definitely want to buy one....
How hard do you think it would be to make a plate to cover the Headunit? To prevent thieves from seeing there is a screen in the car? I might be getting a little to ahead of myself here lol but just throwing the idea out there.
Thread Starter
Member
Joined: Aug 2006
Posts: 484
Likes: 0
From: Tampa, FL
Car: 1988 Iroc-Z Red T-tops
Engine: 305 TPI LB9 55k miles
Transmission: Auto 700r4
Axle/Gears: 2.73 posi
Re: Custom Double Din Journey-New Faceplate Finally
Well I am printing a new deisgn where the logo center piece top and bottom have no screws. They will slip fit into groove then pinned from behind so it sits more flushed and beveled edges. it will be raised still but at least appear in design
The sides I created a lip with a bevel as well that will go over the top piece so no seam is seen and 2 counter screws on each side will fasten the top/bottom pieces together for a solid fit.
when all done just 6 screws should make it a complete solid faceplate, some sanding, maybe a little filler to smooth out ridges and small gapes and prime and paint. I should have it doen ina day or too then bolt it up.
The brackets are done. I reprinted new parts, little stronger and they allow the head unit to shift left to right with slots about 1/4" for some adjustment before you tighten down.
I know what you are saying about the IROC logo, but I do not know the font type? anyone? Otherwise it is hand drawn and measure. PITA for now. get the rest complete then it is easy to reprint and replace the center piece (good reason to have it fastened, can make various logos)
Thread Starter
Member
Joined: Aug 2006
Posts: 484
Likes: 0
From: Tampa, FL
Car: 1988 Iroc-Z Red T-tops
Engine: 305 TPI LB9 55k miles
Transmission: Auto 700r4
Axle/Gears: 2.73 posi
Re: Custom Double Din Journey-New Faceplate Finally
As for the cover idea. I thought of that also. I think the design will be eays to mod without reprinting. The lower middle plat that is bolted above the HU now, I can readily design and replace with some hinge or slip on mechanism to hold a cover.
The cover is large though and be waste to print a large square, Probably easier to use plexiglas cut with some corner brackets to wrap around the sides and top, printed.
As for fastening. I would print the middle part with some magnets inside of it so you can just snap the face plate cover in place then remove when you do not need it.
Junior Member
Joined: Sep 2013
Posts: 17
Likes: 0
From: Chester County, PA
Car: 1986 Chevy Camaro IROC-Z28 (t-tops)
Engine: 305ci TPI (LB9), 150K miles
Transmission: Auto 4-speed with OD
Axle/Gears: Stock - 9.5 posi
Re: Custom Double Din Journey-New Faceplate Finally
That's a good point about fonts. I'd think your best bet would be to scale down an image in Photoshop or something, but you might need to take a picture of the logo yourself to get a good enough image without a skewed perspective or anything. Of course, a 3D scanner would make that so much easier. Gotta love those things.
If there's a font out there for the third gen logos, I haven't found it. I've been keeping an eye out for a font like the one that's used to write "Camaro" on the grille areas of some third gens. I had an idea about a custom external third brake light.
If there's a font out there for the third gen logos, I haven't found it. I've been keeping an eye out for a font like the one that's used to write "Camaro" on the grille areas of some third gens. I had an idea about a custom external third brake light.
Thread Starter
Member
Joined: Aug 2006
Posts: 484
Likes: 0
From: Tampa, FL
Car: 1988 Iroc-Z Red T-tops
Engine: 305 TPI LB9 55k miles
Transmission: Auto 700r4
Axle/Gears: 2.73 posi
Re: Custom Double Din Journey-New Faceplate Finally
Yes not sure what tools PS has to get it into a line drawings to scale. Otherwise wouldnt be anything to import into solidworks. I need a 2d sketch to scale with dimensions and points in a dwg type file. It is only 4 letters I can get my calipers and draw it in solidworks.
Turning into an endeavor. LOL.
now I need a better black pain tot match the dash. Semi gloss worked on repainting the existing black parts but too glossy on the ABS printed parts. I heard landau SEM black is better.
Turning into an endeavor. LOL.
now I need a better black pain tot match the dash. Semi gloss worked on repainting the existing black parts but too glossy on the ABS printed parts. I heard landau SEM black is better.
Junior Member
Joined: Sep 2013
Posts: 17
Likes: 0
From: Chester County, PA
Car: 1986 Chevy Camaro IROC-Z28 (t-tops)
Engine: 305ci TPI (LB9), 150K miles
Transmission: Auto 4-speed with OD
Axle/Gears: Stock - 9.5 posi
Re: Custom Double Din Journey-New Faceplate Finally
I admittedly don't know that much about solidworks or 3D printers. This is an insanely cool project, though. I can't wait to see the final product!
Thread Starter
Member
Joined: Aug 2006
Posts: 484
Likes: 0
From: Tampa, FL
Car: 1988 Iroc-Z Red T-tops
Engine: 305 TPI LB9 55k miles
Transmission: Auto 700r4
Axle/Gears: 2.73 posi
Re: Custom Double Din Journey-New Faceplate Finally
The ORAMAC FONT looks pretty close?


Junior Member
Joined: Sep 2013
Posts: 17
Likes: 0
From: Chester County, PA
Car: 1986 Chevy Camaro IROC-Z28 (t-tops)
Engine: 305ci TPI (LB9), 150K miles
Transmission: Auto 4-speed with OD
Axle/Gears: Stock - 9.5 posi
Re: Custom Double Din Journey-New Faceplate Finally

Not too far off. Either way, that's a damn cool font.
Thread Starter
Member
Joined: Aug 2006
Posts: 484
Likes: 0
From: Tampa, FL
Car: 1988 Iroc-Z Red T-tops
Engine: 305 TPI LB9 55k miles
Transmission: Auto 700r4
Axle/Gears: 2.73 posi
Re: Custom Double Din Journey-New Faceplate Finally
You have the font name/type for that one?
Junior Member
Joined: Sep 2013
Posts: 17
Likes: 0
From: Chester County, PA
Car: 1986 Chevy Camaro IROC-Z28 (t-tops)
Engine: 305ci TPI (LB9), 150K miles
Transmission: Auto 4-speed with OD
Axle/Gears: Stock - 9.5 posi
Re: Custom Double Din Journey-New Faceplate Finally
Just Google, sorry. I posted it for a comparison. I'll keep looking, though. For both that and the font for the later years.

*edit*
Dunno if this will help or not. Like I said, I don't know much about solidworks. Hope it does, though.
http://seeklogo.com/tag.html?q=Iroc-Z
*edit*
Dunno if this will help or not. Like I said, I don't know much about solidworks. Hope it does, though.
http://seeklogo.com/tag.html?q=Iroc-Z
Last edited by spencerific93; Apr 29, 2014 at 02:38 PM. Reason: Added link.
Thread Starter
Member
Joined: Aug 2006
Posts: 484
Likes: 0
From: Tampa, FL
Car: 1988 Iroc-Z Red T-tops
Engine: 305 TPI LB9 55k miles
Transmission: Auto 700r4
Axle/Gears: 2.73 posi
Re: Custom Double Din Journey-New Faceplate Finally
Tried out the new font, still needs some tweaking to print right since it is more angled.
But I removed the screws using dove joints and it fits well, the flash of course makes the flat primer black look ugly but this version sits flush and is a full assembled faceplate I just popped on. I am printing a newer clean version with small revisions tonight and will fasten it all together and try to find better shade of black.
My new version has small opening along the top of the AC controls so the middle doesn't cover the words as much. and the upper left side is sitting a little crooked/down in the photo since it wasn't fully bolted in place.
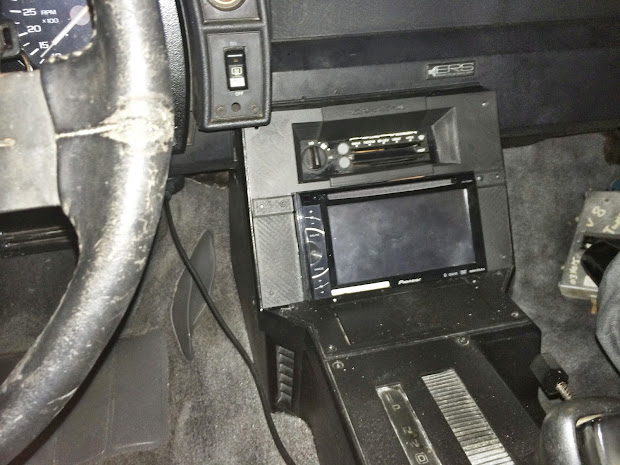
Joined: May 2013
Posts: 218
Likes: 2
From: Illinois
Car: 1987 Firebird Formula
Engine: 355
Transmission: Borg Warner 5 spd
Axle/Gears: 3:43
Thats sick you should also make one for the cars like mine where the heating and air are removed so its just the radio
Thread Starter
Member
Joined: Aug 2006
Posts: 484
Likes: 0
From: Tampa, FL
Car: 1988 Iroc-Z Red T-tops
Engine: 305 TPI LB9 55k miles
Transmission: Auto 700r4
Axle/Gears: 2.73 posi
Re: Custom Double Din Journey-New Faceplate Finally
I have a dumb question: What screw size, length and head type are used for the faceplate. Mine were all missing and I just have pile of assorted crap...
Thread Starter
Member
Joined: Aug 2006
Posts: 484
Likes: 0
From: Tampa, FL
Car: 1988 Iroc-Z Red T-tops
Engine: 305 TPI LB9 55k miles
Transmission: Auto 700r4
Axle/Gears: 2.73 posi
Re: Custom Double Din Journey-New Faceplate Finally
Anyone replace there AC control with new vinyl face? And not a tacky white one. just original. Can these be printed on home printer with vinyl paper?
Joined: Feb 2007
Posts: 1,092
Likes: 18
From: Newburg, MD
Car: '89 RS, '89 Iroc
Engine: L03, LB9
Transmission: 700r4, T5
Axle/Gears: 2.73, 3.08
Re: Custom Double Din Journey-New Faceplate Finally
Two bottom screws and the top right one are the same as the ones for the shifter plate, the top left is a shorty one, I think there is a short one on the shift plate that is the same size, all have the same head as the shifter plate/headlight **** bezel etc.
Thread Starter
Member
Joined: Aug 2006
Posts: 484
Likes: 0
From: Tampa, FL
Car: 1988 Iroc-Z Red T-tops
Engine: 305 TPI LB9 55k miles
Transmission: Auto 700r4
Axle/Gears: 2.73 posi
Re: Custom Double Din Journey-New Faceplate Finally
I had some #8 screws lying around. I painted them black and they look fine.
I just printed my 2nd face plate set with brackets and it came out great looks complete all tweaks and direct drop in fit. now just find better black paint, anyone want to buy?
I just printed my 2nd face plate set with brackets and it came out great looks complete all tweaks and direct drop in fit. now just find better black paint, anyone want to buy?
Thread Starter
Member
Joined: Aug 2006
Posts: 484
Likes: 0
From: Tampa, FL
Car: 1988 Iroc-Z Red T-tops
Engine: 305 TPI LB9 55k miles
Transmission: Auto 700r4
Axle/Gears: 2.73 posi
Re: Custom Double Din Journey-New Faceplate Finally
I am starting to print my brackets after my latest install. Please PM if interested for price and details. To TGO: Where is the proper place to post these type of service?
I do have a new Faceplate I am printing now that I can sell as well
I do have a new Faceplate I am printing now that I can sell as well

Joined: Oct 2012
Posts: 143
Likes: 2
From: Montreal, QC, Canada
Car: 1987 GTA, Digital Dash
Engine: L98 TPI
Transmission: 1994 LT1 T56
Axle/Gears: 9 bolt, 3.27
Re: Custom Double Din Journey-New Faceplate Finally
Hi JJcuff,
Are you still making the double din mounting brackets? if not, would you be able to post your solidworks part files for others to use? Thanks!
Are you still making the double din mounting brackets? if not, would you be able to post your solidworks part files for others to use? Thanks!

Thread
Thread Starter
Forum
Replies
Last Post
Hotrodboba400
Firebirds for Sale
3
Dec 10, 2019 07:07 PM
Hotrodboba400
Firebirds for Sale
0
Sep 2, 2015 07:28 PM