
Completed R134 Retro. Pressure low?

Thread Starter
Senior Member

Joined: Oct 2006
Posts: 829
Likes: 2
From: California
Car: 1989 Chevy Camaro RS
Engine: L30 TBI 5.0L Vortec
Transmission: 700R4
Axle/Gears: Stock
Completed R134 Retro. Pressure low?
Quick back story. In 2006 the compressor, orifice, and accumulator were replaced due to leaking all the R12. Compressor was oiled with pag oil. Then charged with Freeze 12 and accompanying Freeze 12 ester oil charge.
Fast forward to 2014. All the freeze 12 is leaked out again. Today I bought a set of gauges, vacuum pump, and R134 retro valves. I pulled a vacuum on it for about 15 mins and it held -29 with the pump off for 30 mins. I charged the system with 2.25 cans of 134a and pushed 39-40� temps at the center vents in 70-80 degree ambient air.
Gauges read a low side of 24ish and a high of 150ish. Air feels cold but my question is, aren't the pressures a little off and indicate undercharge? First DIY ac job for me.
Side note. On low fan pushing 39� temps, the clutch seems to engage and disengage rapidly within about half a second. This stops if I kick the fan to high. Compressor going out?
Also any feedback on what I could do better next time.
Senior Member
iTrader: (7)
Joined: Jan 2012
Posts: 531
Likes: 2
From: On TGO
Car: 88 GTA
Engine: Built 355 to install
Transmission: Built turbo 350
Re: Completed R134 Retro. Pressure low?
Yes your undercharged, You should be running around 35 on the low and around 250 on the high......


Joined: May 2004
Posts: 5,340
Likes: 73
From: Lexington, SC
Car: 1987 SC/1985 TA
Engine: 350/vortec/fitech
Transmission: T56
Axle/Gears: 3.27 9-bolt
Re: Completed R134 Retro. Pressure low?
The conversion requires less r134 than r12. 40 oz for 134. 48 for R12.
Last edited by naf; Apr 10, 2014 at 12:02 PM. Reason: backwards
Senior Member
iTrader: (7)
Joined: Jan 2012
Posts: 531
Likes: 2
From: On TGO
Car: 88 GTA
Engine: Built 355 to install
Transmission: Built turbo 350
Re: Completed R134 Retro. Pressure low?
Pay no mind to the temps, Add slowly until you reach around the 250 mark on the high side.....
Thread Starter
Senior Member
Joined: Oct 2006
Posts: 829
Likes: 2
From: California
Car: 1989 Chevy Camaro RS
Engine: L30 TBI 5.0L Vortec
Transmission: 700R4
Axle/Gears: Stock


Trending Topics


Joined: Jan 2005
Posts: 10,452
Likes: 510
From: Hurst, Texas
Car: 1983 G20 Chevy
Engine: 305 TPI
Transmission: 4L60
Axle/Gears: 14 bolt with 3.07 gears
Re: Completed R134 Retro. Pressure low?
R134a charge should be roughly 80-85% of a R12 charge. Headpressure should be roughly 2 times the ambient temp + 50 psi. If it is 80*F outside in front of your condenser, rule of thumb should be 210 PSI, however this is just a guideline.
Condenser surface area and airflow will dictate pressure more than anything (assuming same ambient temps), but evaporator loading will also change the pressure as will engine rpm.
I had a Ram that properly charged would bump the compressor safety shut-off constantly at 425 PSI on a hot day and this was with a clean condenser that had its own dedicated electric fan. It was a black truck and the factory condenser was poorly sized. On the otherhand my Titan and 1997 Chevy Express with with their massive condensors and lots of airflow do not even run 250 PSI on a 105*F day. With a heat soaked cabin the pressures will be elevated, as the interior cools off the heat load on the evaporator becomes less and less, which will reduce the pressures.
This was my 2012 Titan last summer on a 95*F evening without sunload. Only reading 150/25 psi. Air was blowing 34-36*F with the fan on high. On a 105*F day the a/c would get so cold on 30+ minute drives that it would cause the drivers knuckles to start hurting unless you took it off recirculate.

Personally I would have changed the orifice tube to a ford red with R134a as it would help idle cooling in hot weather. If you run mostly on the highway the blue ford will generally outperform the red. The red orifice tube dominates around town. The GM orifice is .072", the blue ford .067 and the red is .062. It works by reducing the suction side pressure, creating a greater pressure differential in the system, increasing the efficiency of the system.
Condenser surface area and airflow will dictate pressure more than anything (assuming same ambient temps), but evaporator loading will also change the pressure as will engine rpm.
I had a Ram that properly charged would bump the compressor safety shut-off constantly at 425 PSI on a hot day and this was with a clean condenser that had its own dedicated electric fan. It was a black truck and the factory condenser was poorly sized. On the otherhand my Titan and 1997 Chevy Express with with their massive condensors and lots of airflow do not even run 250 PSI on a 105*F day. With a heat soaked cabin the pressures will be elevated, as the interior cools off the heat load on the evaporator becomes less and less, which will reduce the pressures.
This was my 2012 Titan last summer on a 95*F evening without sunload. Only reading 150/25 psi. Air was blowing 34-36*F with the fan on high. On a 105*F day the a/c would get so cold on 30+ minute drives that it would cause the drivers knuckles to start hurting unless you took it off recirculate.
Personally I would have changed the orifice tube to a ford red with R134a as it would help idle cooling in hot weather. If you run mostly on the highway the blue ford will generally outperform the red. The red orifice tube dominates around town. The GM orifice is .072", the blue ford .067 and the red is .062. It works by reducing the suction side pressure, creating a greater pressure differential in the system, increasing the efficiency of the system.
Last edited by Fast355; Apr 11, 2014 at 01:33 PM.
Joined: Jan 2005
Posts: 10,452
Likes: 510
From: Hurst, Texas
Car: 1983 G20 Chevy
Engine: 305 TPI
Transmission: 4L60
Axle/Gears: 14 bolt with 3.07 gears
Re: Completed R134 Retro. Pressure low?
On an orifice tube/accumulator system like a GM it is very easy to tell when you hit a point that the system is fully charged or very close. Crank the blower to high, move the temp lever to coldest setting, and turn on the recirculate, let it run a couple of minutes, and feel the liquid line after the orfice tube and the outlet line from the evaporator. If both are cold and close to the same temperature you are close. If the evaporator exit/accumulator are noticeably warmer to the touch it is still too low. Remember this test is only accurate on high fan speed.
Supreme Member
Joined: Jun 2011
Posts: 2,036
Likes: 6
From: knoxville tn
Car: 86 IROC
Engine: 5.0 TPI
Transmission: 700-R-4
Axle/Gears: 2.73 open
Re: Completed R134 Retro. Pressure low?
Quick back story. In 2006 the compressor, orifice, and accumulator were replaced due to leaking all the R12. Compressor was oiled with pag oil. Then charged with Freeze 12 and accompanying Freeze 12 ester oil charge.
Fast forward to 2014. All the freeze 12 is leaked out again. Today I bought a set of gauges, vacuum pump, and R134 retro valves. I pulled a vacuum on it for about 15 mins and it held -29 with the pump off for 30 mins. I charged the system with 2.25 cans of 134a and pushed 39-40� temps at the center vents in 70-80 degree ambient air.
Gauges read a low side of 24ish and a high of 150ish. Air feels cold but my question is, aren't the pressures a little off and indicate undercharge? First DIY ac job for me.
Side note. On low fan pushing 39� temps, the clutch seems to engage and disengage rapidly within about half a second. This stops if I kick the fan to high. Compressor going out?
Also any feedback on what I could do better next time.
Fast forward to 2014. All the freeze 12 is leaked out again. Today I bought a set of gauges, vacuum pump, and R134 retro valves. I pulled a vacuum on it for about 15 mins and it held -29 with the pump off for 30 mins. I charged the system with 2.25 cans of 134a and pushed 39-40� temps at the center vents in 70-80 degree ambient air.
Gauges read a low side of 24ish and a high of 150ish. Air feels cold but my question is, aren't the pressures a little off and indicate undercharge? First DIY ac job for me.
Side note. On low fan pushing 39� temps, the clutch seems to engage and disengage rapidly within about half a second. This stops if I kick the fan to high. Compressor going out?
Also any feedback on what I could do better next time.
Joined: Jan 2005
Posts: 10,452
Likes: 510
From: Hurst, Texas
Car: 1983 G20 Chevy
Engine: 305 TPI
Transmission: 4L60
Axle/Gears: 14 bolt with 3.07 gears
Re: Completed R134 Retro. Pressure low?
R152a works great, readily available, amd cheap too....Blows ice cubes.
Thread Starter
Senior Member
Joined: Oct 2006
Posts: 829
Likes: 2
From: California
Car: 1989 Chevy Camaro RS
Engine: L30 TBI 5.0L Vortec
Transmission: 700R4
Axle/Gears: Stock
Re: Completed R134 Retro. Pressure low?
are you aware that r134a and r12 work differently? as explained to me by my AC guy our condensers are too small to effectively work .he says that in a conversion one can only expect 60-70% effecientcy. when converting to 134. I am researching r406 a. as a replacement for r12. "autofrost" its called . check in to it
I want to replace the O-rings on the back of the compressor where the lines connect but don't know what they are called. Also debating on draining the oil and filling with PAG (which is supposedly already in it). Anything else need to be done?
Supreme Member
Joined: Jul 2009
Posts: 2,328
Likes: 10
From: Kitchener, ON
Car: 1988 GTA
Engine: LB9
Transmission: T5
Axle/Gears: 3.45
Re: Completed R134 Retro. Pressure low?
Unless you are in a very dry enviornment, your accumulator will be damaged if you left it open for 2 days.
You can buy a complete "O" ring kit for about $20. Four Seasons part #26735.
You can buy a complete "O" ring kit for about $20. Four Seasons part #26735.
Thread Starter
Senior Member
Joined: Oct 2006
Posts: 829
Likes: 2
From: California
Car: 1989 Chevy Camaro RS
Engine: L30 TBI 5.0L Vortec
Transmission: 700R4
Axle/Gears: Stock
Little update. After having the system open for about a week during the engine swap, I replaced all seals, and the drier. I rebolted the compressor (which sat open with a rag on the hose ports) and charged the system.
It was running great! As we know the compressor was on its way out, this was evidenced by it making a ton of noise and flapping the belt around anytime it was running.
The other day on my commute home, in about 85 degree ambient, the AC was running great! It hit 36 degree vent temps at highway speed and was freezing me out! Then it happened, compressor seized. I turned AC off and the clutch disengaged making it a free spinning pulley.
I think a couple things were at play, compressor was already shot, and through both my rebuilds, I never added any oil.
So now I bought a brand new compressor from oreilly, not reman, a new accumulator/drier, new orifice, and new orings. What should I now before doing this job? Also any tips on getting the orifice out? Its way into the line.
Joined: Jan 2005
Posts: 10,452
Likes: 510
From: Hurst, Texas
Car: 1983 G20 Chevy
Engine: 305 TPI
Transmission: 4L60
Axle/Gears: 14 bolt with 3.07 gears
Re: Completed R134 Retro. Pressure low?
Little update. After having the system open for about a week during the engine swap, I replaced all seals, and the drier. I rebolted the compressor (which sat open with a rag on the hose ports) and charged the system.
It was running great! As we know the compressor was on its way out, this was evidenced by it making a ton of noise and flapping the belt around anytime it was running.
The other day on my commute home, in about 85 degree ambient, the AC was running great! It hit 36 degree vent temps at highway speed and was freezing me out! Then it happened, compressor seized. I turned AC off and the clutch disengaged making it a free spinning pulley.
I think a couple things were at play, compressor was already shot, and through both my rebuilds, I never added any oil.
So now I bought a brand new compressor from oreilly, not reman, a new accumulator/drier, new orifice, and new orings. What should I now before doing this job? Also any tips on getting the orifice out? Its way into the line.
It was running great! As we know the compressor was on its way out, this was evidenced by it making a ton of noise and flapping the belt around anytime it was running.
The other day on my commute home, in about 85 degree ambient, the AC was running great! It hit 36 degree vent temps at highway speed and was freezing me out! Then it happened, compressor seized. I turned AC off and the clutch disengaged making it a free spinning pulley.
I think a couple things were at play, compressor was already shot, and through both my rebuilds, I never added any oil.
So now I bought a brand new compressor from oreilly, not reman, a new accumulator/drier, new orifice, and new orings. What should I now before doing this job? Also any tips on getting the orifice out? Its way into the line.
Make sure you run a chemical flush through the system. After removing the orfice, remove the flush the system out thoroughly. I like to use mineral spirits until the black death is flushed out, then follow up with denatured alcohol. You want to remove all the old oil and compressor fragments from the hoses, condenser, and evaporator. Then blow the system out with compressed air until the denatured alcohol has evaporated. The denatured alcohol removes any residue left behind by the mineral spirits. With the oil removed and the system cleaned out, I first add oil to the compressor while turning the pulley with a ratchet on the clutch. The system capacity is 8oz according to the books and GM no longer recomeends Pag 150, they specify Pag 46 in a TSB. Turn the compressor over and add oil until it comes out of the discharge port. With the remaining oil I add about 2oz of Pag 46 to the accumulator. Then 2oz to the evaporator. If there is a little extra add it to the accumulator. Then get everything sealed as quickly as possible with the new green o'rings. Once its all assembled, pull a good long vacuum on it. IMO the longer the better. I pull atleast a 30 minute vacuum in weather that is 80*F and above, but prefer a solid hour. If its below 80*F I recomeend a 2 hour pumping. Add your first can of refrigerant into a vacuum. Next jumper the cycling switch and start the car. With the windows up and the a/c on recirculate, high fan speed, start to add refrigerant slowly. As your system starts to blow cool air, start to taper off the charge rate. Slowly charge until the accumulator starts to feel cold. Once it starts to get cold, STOP, it is easy to overcharge.
If you are doing your own a/c work, I would have a hard time using R134a. R152a...AKA canned air duster is a much better refrigerant and is a drop in for R134a.
Thread Starter
Senior Member
Joined: Oct 2006
Posts: 829
Likes: 2
From: California
Car: 1989 Chevy Camaro RS
Engine: L30 TBI 5.0L Vortec
Transmission: 700R4
Axle/Gears: Stock
They make an orifice tube extractor tool, but I have had better luck removing them with a pair of needle nose pliers. I think you will have the best luck replacing it with a Ford "RED" .062" orifice. Should pull up as an option for say a 93 Ford Taurus 3.0L.
Make sure you run a chemical flush through the system. After removing the orfice, remove the flush the system out thoroughly. I like to use mineral spirits until the black death is flushed out, then follow up with denatured alcohol. You want to remove all the old oil and compressor fragments from the hoses, condenser, and evaporator. Then blow the system out with compressed air until the denatured alcohol has evaporated. The denatured alcohol removes any residue left behind by the mineral spirits. With the oil removed and the system cleaned out, I first add oil to the compressor while turning the pulley with a ratchet on the clutch. The system capacity is 8oz according to the books and GM no longer recomeends Pag 150, they specify Pag 46 in a TSB. Turn the compressor over and add oil until it comes out of the discharge port. With the remaining oil I add about 2oz of Pag 46 to the accumulator. Then 2oz to the evaporator. If there is a little extra add it to the accumulator. Then get everything sealed as quickly as possible with the new green o'rings. Once its all assembled, pull a good long vacuum on it. IMO the longer the better. I pull atleast a 30 minute vacuum in weather that is 80*F and above, but prefer a solid hour. If its below 80*F I recomeend a 2 hour pumping. Add your first can of refrigerant into a vacuum. Next jumper the cycling switch and start the car. With the windows up and the a/c on recirculate, high fan speed, start to add refrigerant slowly. As your system starts to blow cool air, start to taper off the charge rate. Slowly charge until the accumulator starts to feel cold. Once it starts to get cold, STOP, it is easy to overcharge.
If you are doing your own a/c work, I would have a hard time using R134a. R152a...AKA canned air duster is a much better refrigerant and is a drop in for R134a.
Joined: Jan 2005
Posts: 10,452
Likes: 510
From: Hurst, Texas
Car: 1983 G20 Chevy
Engine: 305 TPI
Transmission: 4L60
Axle/Gears: 14 bolt with 3.07 gears
Re: Completed R134 Retro. Pressure low?
R152a is also known as Diflorethane. It has similar pressure/temperature curves to R12 and uses the same Pag oil as R134a. I have it in my Express Van and Nissan Titan.
I tested this at 2,200 rpm with the van stationary and both a/c blowers on high.
On a 95*F day the Titan actually fogged the outside of the glass.
Last edited by Fast355; Jun 3, 2014 at 05:42 PM.
Thread Starter
Senior Member
Joined: Oct 2006
Posts: 829
Likes: 2
From: California
Car: 1989 Chevy Camaro RS
Engine: L30 TBI 5.0L Vortec
Transmission: 700R4
Axle/Gears: Stock
If you simply hold the vacuum for 30 minutes you are really not pulling the moisture out of the system. You want 30 minutes of continuous pumping.
R152a is also known as Diflorethane. It has similar pressure/temperature curves to R12 and uses the same Pag oil as R134a. I have it in my Express Van and Nissan Titan.
I tested this at 2,200 rpm with the van stationary and both a/c blowers on high.
On a 95*F day the Titan actually fogged the outside of the glass.
My concern is that in the future if a minor leak develops this stuff might be hard to find therefore requiring yet another conversion.
How do you like it? Is it flammable?
Joined: Jan 2005
Posts: 10,452
Likes: 510
From: Hurst, Texas
Car: 1983 G20 Chevy
Engine: 305 TPI
Transmission: 4L60
Axle/Gears: 14 bolt with 3.07 gears
Re: Completed R134 Retro. Pressure low?
I literally use 3 packs from Sams Club. I think they were $9.99 for 3 cans. Charge is roughly 61% of R134a. R134a is roughly 85% of R12. The R152a charge will be roughly half of the factory R12.
Never have tried mixing with R134a.
R134a is likely the one that will be hard to find soon.
I like it, cools much better than R134a, is cheap and runs less headpressure.
Thread Starter
Senior Member
Joined: Oct 2006
Posts: 829
Likes: 2
From: California
Car: 1989 Chevy Camaro RS
Engine: L30 TBI 5.0L Vortec
Transmission: 700R4
Axle/Gears: Stock
Its actually due to be phased in soon in place of R134a. It is very mildly flameable, in that I could get it to burn when exposed to direct flame, but as I increased flow it actually blew the fire out. Compared to brake parts cleaner or spray paint that lights up like flame thrower....no comparison.
I literally use 3 packs from Sams Club. I think they were $9.99 for 3 cans. Charge is roughly 61% of R134a. R134a is roughly 85% of R12. The R152a charge will be roughly half of the factory R12.
Never have tried mixing with R134a.
R134a is likely the one that will be hard to find soon.
I like it, cools much better than R134a, is cheap and runs less headpressure.
Also got some flush in a aerosol can with a hose. Should make flushing it easier.
Joined: Jan 2005
Posts: 10,452
Likes: 510
From: Hurst, Texas
Car: 1983 G20 Chevy
Engine: 305 TPI
Transmission: 4L60
Axle/Gears: 14 bolt with 3.07 gears
Re: Completed R134 Retro. Pressure low?
So fast I got the compressor right now and it says it ships with ICE32 oil additive and to add half of the system oil capacity to the compressor and the rest to accumulator etc. Just to confirm capacity is 8oz of pag 46 correct? Not pag 100? Anything else I should know?
Also got some flush in a aerosol can with a hose. Should make flushing it easier.
Also got some flush in a aerosol can with a hose. Should make flushing it easier.
Thread Starter
Senior Member
Joined: Oct 2006
Posts: 829
Likes: 2
From: California
Car: 1989 Chevy Camaro RS
Engine: L30 TBI 5.0L Vortec
Transmission: 700R4
Axle/Gears: Stock
Pag 150 is what was recomeended in the last of the R4 compressors that had R134a and is a thick oil, Pag 46 is thinner. From what I can tell GM superceeded Pag 150 with Pag 46. If you were to buy a bottle of Pag oil for say a 94 Chevy 1500 truck from GM you would actually get Pag 46. By my way of thinking, the thicker oil must not have traveled through the system as well. I have been using Pag 46 in everything GM for some time now.
To begin with, as we know the AC was initially done by my old friend back in 06. Well during disassembly I found that the orifice tube was installed BACKWARDS! Great! So when trying to remove it with a very thin needle nose, it broke into pieces. The entire section of it tube up to the O ring separated. An hour an a half later I got it out with some picks.
Flushed the hoses, hard line, evap, and condenser using a aerosol type AC flush from O'Reilly. Worked well but its expensive.
While flushing the hoses I immediately noticed metal shavings in the bucket. Looks like the old reman compressor imploded.
Put everything back together, added 4 oz of Pag 46 to the comp, and 4 to the drier as per instructions that came with the new compressor. The hard line at the condensor feels weird. I tightened it down as much as I could. Any more and it will flex the hose and bend it, but I feel like its not tight enough.
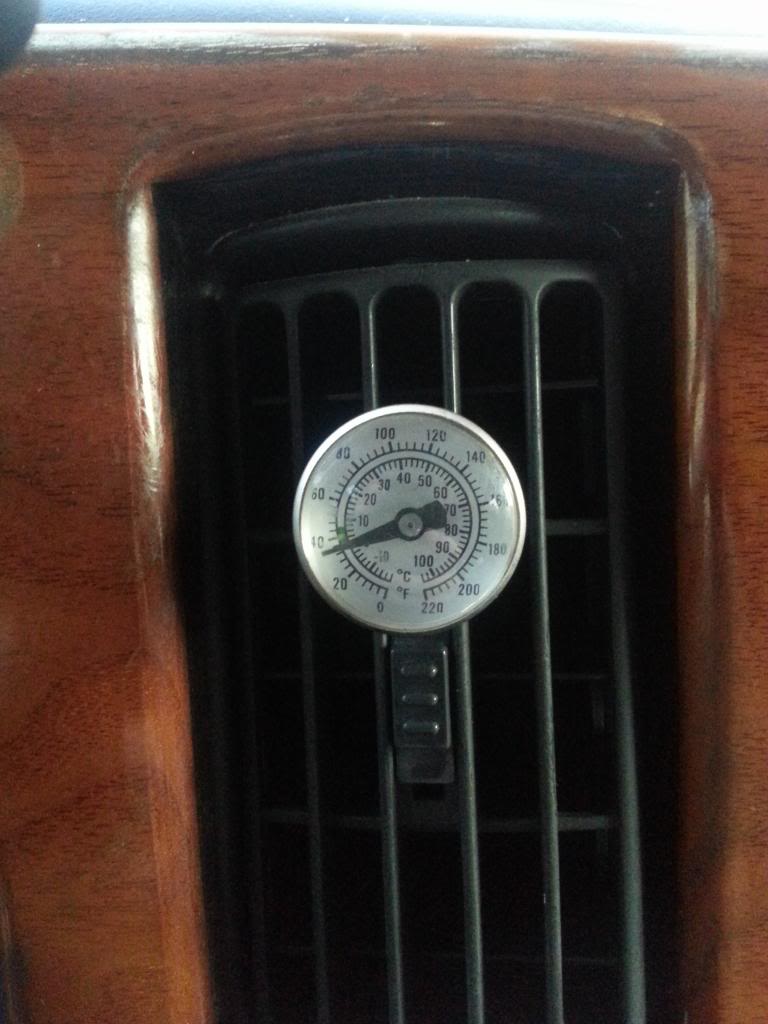
Put the vacuum on it at 29 for 30mins then held it for 10. At first I thought it might have moved a little from 29 but not to 28. So i revacuumed and it held fine from what I can tell. Charged with 36oz of R134a. Got low side of 27 and high of 155 psi at ambient of 80. Blew cold at idle with vent temps at 39.
Later at ambient temps of 73 the temps came down to 37ish and here's what I got at the drier
This NEW compressor is sooooo much quieter than the old reman. I can't even tell its running! The old one used to make a hell of a lot of noise when running and damn near stall the motor. Sounds like a freight train when it would kick on.
So Fast, how'd I do?


Last edited by RS-Chevy-SS; Jun 5, 2014 at 01:29 AM.
Joined: Jan 2005
Posts: 10,452
Likes: 510
From: Hurst, Texas
Car: 1983 G20 Chevy
Engine: 305 TPI
Transmission: 4L60
Axle/Gears: 14 bolt with 3.07 gears
Re: Completed R134 Retro. Pressure low?
OK Fast, I overhauled the entire AC today. First off I did end up putting Pag 46 in it as you recommended.
To begin with, as we know the AC was initially done by my old friend back in 06. Well during disassembly I found that the orifice tube was installed BACKWARDS! Great! So when trying to remove it with a very thin needle nose, it broke into pieces. The entire section of it tube up to the O ring separated. An hour an a half later I got it out with some picks.
Flushed the hoses, hard line, evap, and condenser using a aerosol type AC flush from O'Reilly. Worked well but its expensive.
While flushing the hoses I immediately noticed metal shavings in the bucket. Looks like the old reman compressor imploded.
Put everything back together, added 4 oz of Pag 46 to the comp, and 4 to the drier as per instructions that came with the new compressor. The hard line at the condensor feels weird. I tightened it down as much as I could. Any more and it will flex the hose and bend it, but I feel like its not tight enough.
Put the vacuum on it at 29 for 30mins then held it for 10. At first I thought it might have moved a little from 29 but not to 28. So i revacuumed and it held fine from what I can tell. Charged with 36oz of R134a. Got low side of 27 and high of 155 psi at ambient of 80. Blew cold at idle with vent temps at 39.
Later at ambient temps of 73 the temps came down to 37ish and here's what I got at the drier
Attachment 278514
This NEW compressor is sooooo much quieter than the old reman. I can't even tell its running! The old one used to make a hell of a lot of noise when running and damn near stall the motor. Sounds like a freight train when it would kick on.
So Fast, how'd I do?
Attachment 278516
Attachment 278515
Thread Starter
Senior Member
Joined: Oct 2006
Posts: 829
Likes: 2
From: California
Car: 1989 Chevy Camaro RS
Engine: L30 TBI 5.0L Vortec
Transmission: 700R4
Axle/Gears: Stock
It is in fact 89 degrees right now with a dew point of 23. I was just driving it around and was getting about 39 vent temp on highway, 45 ish in city when moving, but a lousy 48-55 ish at dead stop idle.
Also notice voltage going low at stop lights. The CS130 alt can't keep up with the demand of the Taurus monster fan and sound system.
Seems like it should be colder don't you think? Am I under charged? I put 36 oz of r134 and 8 oz of pag
Thread Starter
Senior Member
Joined: Oct 2006
Posts: 829
Likes: 2
From: California
Car: 1989 Chevy Camaro RS
Engine: L30 TBI 5.0L Vortec
Transmission: 700R4
Axle/Gears: Stock
So fast what's the verdict
Joined: Jan 2005
Posts: 10,452
Likes: 510
From: Hurst, Texas
Car: 1983 G20 Chevy
Engine: 305 TPI
Transmission: 4L60
Axle/Gears: 14 bolt with 3.07 gears
Re: Completed R134 Retro. Pressure low?
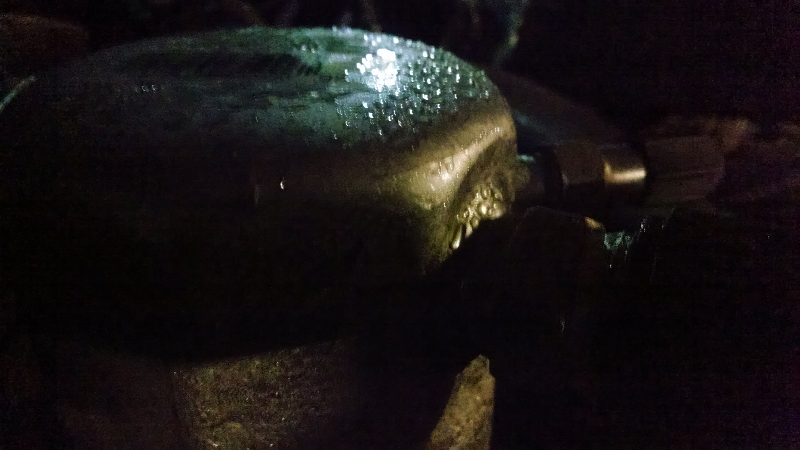
Here's what I got a few hours later in ambient air of 81. Idle vent temp at around 39-40 with the sun setting. Accumulator started to sweat again. I love that.
So fast what's the verdict
Attachment 278571
Attachment 278572
So fast what's the verdict
Attachment 278571
Attachment 278572
Thread Starter
Senior Member
Joined: Oct 2006
Posts: 829
Likes: 2
From: California
Car: 1989 Chevy Camaro RS
Engine: L30 TBI 5.0L Vortec
Transmission: 700R4
Axle/Gears: Stock
If it take RPM up to about 1k it gets a little better. Just to add, it only blows at around 45, when ambient is above 90f. Other than that, 40-42F at the vents idle and a constant 37-39 at highway speeds. Highway is with the fan switch off and just using the newly installed air dam.
Also I did feel the line after the orifice and the line out from the evap and they feel really close in temperature.
Last edited by RS-Chevy-SS; Jun 6, 2014 at 07:44 PM.

Thread
Thread Starter
Forum
Replies
Last Post
Terrell351
Engine/Drivetrain/Suspension Parts for Sale
5
Jun 13, 2021 01:13 PM