
Wire Your Fan Right and Gain 1 Horsepower!


Wire Your Fan Right and Gain 1 Horsepower!
OK, anybody that knows anything about performance and wiring will know that this is absolute nonsense. The title was to prove a point. Tell someone that they will gain an insignifcant ammount of horsepower by a mod and they will break their necks to find out about it. However, if you tell them that their electrical system needs proper protection to prevent damage and possibly bursting into flames, they will fight you kicking and screaming like a three year old forced to brush his teeth. You will be one of those paranoid types just going along with this hoax portrayed on car owners by maunfacturers to sell these unreliable relays and other circuit protection devices.
The Reason For This Thread
Every Summer we have dozens of threads with people wanting to wire their fans direct to a switch to do away with these "problematic relays controlled by the computer". Frankly, I am tired of seeing the same thing on a daily basis. Someone explaining how to wire a system and debating the merits of doing it properly while someone who knows no better jumps in and says "You don't need no relay or fuse, you can just wire yer fan to a toggle". You can also motorcycle without a helmet and waterski without a life vest. This is no smarter. The fact of the matter is these systems when properly wired are much more reliable, don't forget to turn the fan on or off and keep your engine at a preset temperature range, even when you loan your car to someone that has no idea of where everything is. I will be covering system components and function, wiring your own automated fan system and a manual switch you can add to it yet still have the automatic system in place.
Last edited by Joe Tag; Aug 19, 2014 at 01:26 PM.
The System
The System
The system consists of a relay with a fused power supply, a temperature sensing switch, and your fan(s). The switch tells the relay when to turn the fans on and off. A manual switch can be added to the system and the switch left in place as well to automatically operate the fans.
The system consists of a relay with a fused power supply, a temperature sensing switch, and your fan(s). The switch tells the relay when to turn the fans on and off. A manual switch can be added to the system and the switch left in place as well to automatically operate the fans.

Relays
The Relay
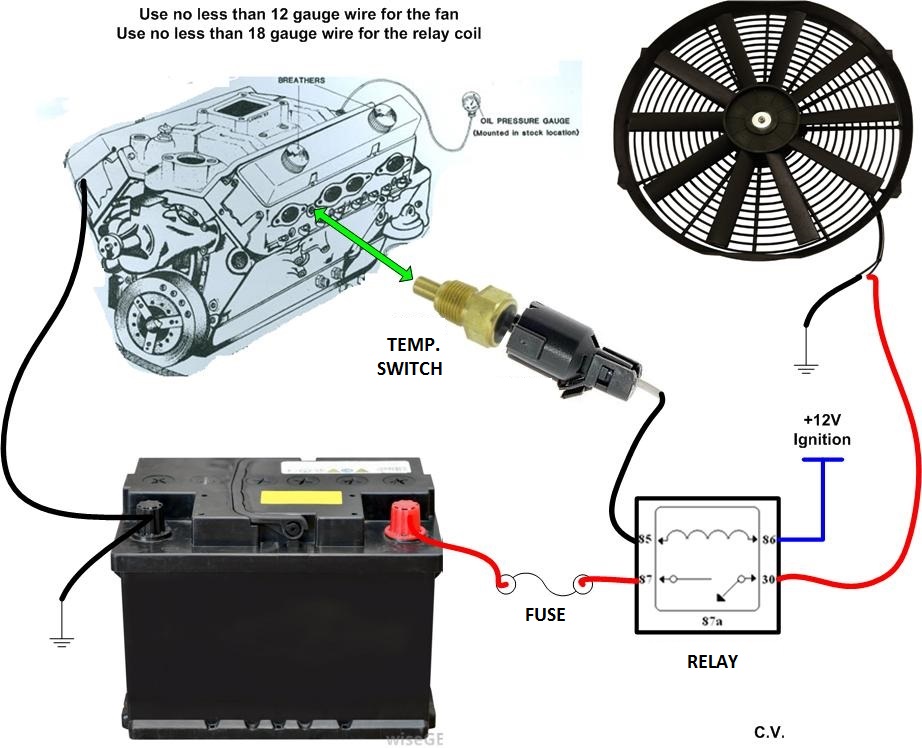
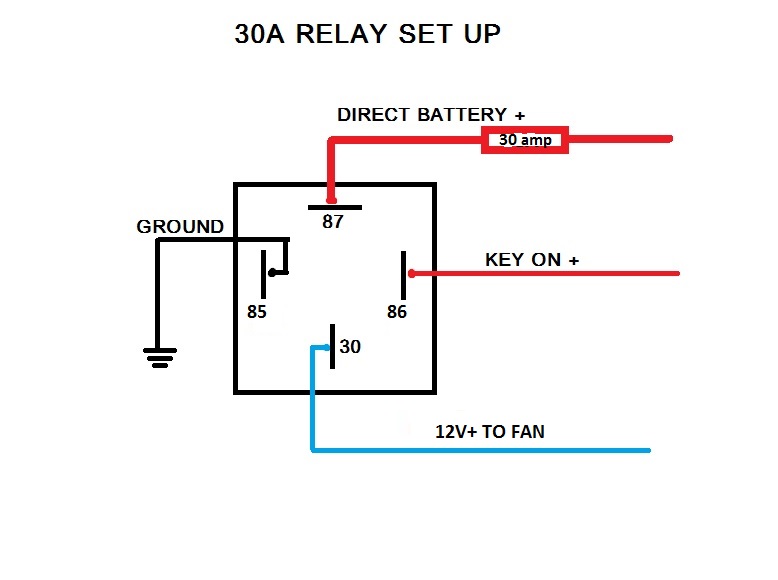
First off, let's discuss how this works. I wil dive right in to the most dreaded part of the system so you can see it really is not that complicated. The relay, this is nothing more than a switch that is actuated by and electromagnet. These are best to mount around the battery area to keep the length of the supply and load lines short. It's purpose is to switch a high load device with a low load signal. Relays must be rated for 30 amps or more and fuses should not exceed 30 amps. These figures are adequate for a stock fan, if you are using an aftermarket fan, check the amp draw and selct a relay that is rated 5-10 amps higher than it. You have a FUSED (and I can't stress this enough) 12v+ battery source, the 12v+ supply to the fan,a 12v+ to the electromagnet which is on an "ignition on" only circuit and a signal ground from the temperature sensing switch and/or a manual switch. Not all that scary once you realize how it functions, is it? If you have a dual fan, you will need to use two relays with separate wiring for the source and load of each. The battery source and supply to the fan should be no smaller than 12 gauge wire, the signal and ignition hot should be no smaller than 18 gauge. These can be wired to the same circuits for dual fans. For those that don't know, as gauge number gets lower, the wire gets larger. All connections are best made by soldering and insulating with heat shrink tubing, but you can use crimp connecters if you are intimidated by soldering. I will strongly advise soldering. The diagram shows pinouts for a standard square relay available at any parts store.
Factory relays GM used (both square and oval) are pinned out to:
A) 12ga, Black/Red wire, Fan Power, This wire goes to fan positive.
B N/A
C N/A
D) 18ga, Brown wire, Relay Coil Power, This is the 12v trigger for the relay coil.
E) 12ga, Orange wire, Battery Power, This wire goes to a fuse, then battery positve.
F) 18ga, Green/White wire (some may be black), Relay Coil Low, This is the low (ground) trigger for the relay coil.

Last edited by Joe Tag; Aug 26, 2014 at 08:45 PM.
The Switch
The Switch
You have a temperature sensing switch. This is best placed in the head between cylinders 6 & 8 spark plugs, but can be placed in the intake coolant crossover BEFORE the thermostat. You can buy them in different temperature ranges for on and off function. These are one wire connections that send a ground to the relay electromagnet. Most of you with later model third gens, dual fans and TBI engines already have one in the passenger side head. If you want a manual switch to augment this sensor, you can wire a switch with one leg to ground and the other to this wire going to the relay(s) signal ground.
You have a temperature sensing switch. This is best placed in the head between cylinders 6 & 8 spark plugs, but can be placed in the intake coolant crossover BEFORE the thermostat. You can buy them in different temperature ranges for on and off function. These are one wire connections that send a ground to the relay electromagnet. Most of you with later model third gens, dual fans and TBI engines already have one in the passenger side head. If you want a manual switch to augment this sensor, you can wire a switch with one leg to ground and the other to this wire going to the relay(s) signal ground.
Fans
The Fan(s)
The fan(s) are wired to the load side of the relay on the positive terminal and grounded on the negative side. For dual fans, you will need to have a separate ground for each screwed to the core support separately. Ground wires should be no smaller than 12 gage.
The fan(s) are wired to the load side of the relay on the positive terminal and grounded on the negative side. For dual fans, you will need to have a separate ground for each screwed to the core support separately. Ground wires should be no smaller than 12 gage.
In Closing
And there you have it. Simple, safe, reliable, informative and to the point with explainations of all of the functions of the components. You can buy a premade harness for about three times the price and less work, but what's the fun in that. Plus, how cool is it to be able to say I made it myself?
Joined: Oct 2013
Posts: 2,620
Likes: 159
From: Louisville, KY
Car: 1983 Z28
Engine: 385 Fastburn
Transmission: T-5
Axle/Gears: BorgWarner 9-bolt posi, 3.27 gears
Re: Wire Your Fan Right and Gain 1 Horsepower!
Joe Tag - Thanks for posting this. At some point I will be going electrical and was going to be in need of this information.
I'm posting in here simply to say thanks and so I can find it later when needed.

I'm posting in here simply to say thanks and so I can find it later when needed.
Trending Topics
Re: Wire Your Fan Right and Gain 1 Horsepower!
You're welcome. I figured I could have a thread to toss at someone coming in asking about it and save a lot of debate. Anybody with part numbers for sensors in certain temp ranges, I encourage to post here.

Senior Member
iTrader: (1)
Joined: Jun 2014
Posts: 538
Likes: 0
From: Southeast VA
Car: 91 Camaro RS T-Top
Engine: 5.0 Tbi
Transmission: 700r4
Axle/Gears: 3.42
Re: Wire Your Fan Right and Gain 1 Horsepower!
https://www.thirdgen.org/forums/cool...tched-pns.html
Here's the important post
All these part numbers are from the manufacturer wells. I hope this helps someone.
Common sensors for the thirdgen are
SW555
SW505
SW500
SW502
They can use the PT308 or PT770 pigtail
Common sensors for the thirdgen are
SW555
SW505
SW500
SW502
They can use the PT308 or PT770 pigtail
Code:
Cooling Fan Switch Terminal No. Terminal Type Thread Size Normal State Specification SW1009 2 Male Blade Terminal M10 x 1.25 SW1010 2 Male Blade Terminal M16 x 1.5 Closed Breaks 185f � 8 Makes 176f SW1011 1 Male Blade Terminal 3/8 x 18 Open Makes 225f � 8 SW1012 2 Male Blade Terminal M16 x 1.5 Open Makes 209f � 8 SW1120 2 Male Blade Terminal M16 x 1.5 Open Makes 194f � 10% SW1121 2 Male Blade Terminal M17 x 1.30 Closed Breaks 239f � 10% SW1122 2 Male Blade Terminal 3/8 - 19 BSPT Open Makes 221f � 10% SW1123 2 Male Blade Terminal M16 x 1.5 Open Makes 185f � 10% SW1422 3 Male Blade Terminal M22 x 1.5 Open Dual-Makes 174f � 8 Makes 248f � 8 SW1423 3 Male Blade Terminal M22 x 1.5 Open Dual-Makes 231f � 8 Makes 259f � 8 SW1425 2 Male Blade Terminal M16 x 1.5 SW1426 2 Male Blade Terminal M16 x 1.5 SW1428 3 Male Blade Terminal M22 x 1.5 Operating range - 83/87 SW1429 3 Male Blade Terminal M22 x 1.5 SW1431 2 Male Blade Terminal M16 x 1.5 100f -1020? - 220f -163? SW1433 2 Male Blade Terminal M16 x 1.5 Closed Breaks 209f � 8 SW1434 2 Male Blade Terminal M16 x 1.5 SW1435 2 Male Blade Terminal M16 x 1.5 Closed Breaks 204f � 8 SW1436 1 Male Blade Terminal M16 x 1.5 Open Makes 204f � 8 SW1437 2 Male Blade Terminal M16 x 1.5 Closed Breaks 210f � 8 SW1438 2 Male Blade Terminal M16 x 1.5 Open Makes 215f � 8 SW1440 2 Male Pin Terminal M16 x 1.5 Open Makes 195f � 8 SW1441 2 Male Blade Terminal M16 x 1.5 SW1442 2 Male Blade Terminal M16 x 1.5 Open Makes 203f � 8 SW1443 2 Male Blade Terminal M16 x 1.5 SW1444 2 Male Blade Terminal M18 x 1.5 SW1445 2 Male Blade Terminal M14 x 1.5 SW1460 2 Female Terminal M16 x 1.5 SW1502 4 Male Blade Terminal Open Dual-Makes 229f � 10 - Makes 210f � 10 SW1510 4 Male Blade Terminal M22 x 1.5 Open Dual-Makes 231f � 10 - Makes 238f � 10 SW1515 1 Male Blade Terminal 3/8 x 18 Open Makes 211f � 8 SW1630 1 Male Blade Terminal M10 x 1.0 SW1632 2 Male Blade Terminal M16 x 1.5 Open Makes 217f � 8 SW1634 4 Male Blade Terminal Open/closed Closed-Breaks 250f �8 -- Open-Makes 240f � 8 SW1635 2 Male Blade Terminal M10 x 1.00 Open Makes 235f � 8 SW1636 2 Male Blade Terminal M18 x 1.5 Open 95c - Close 100c SW1637 2 Male Blade Terminal M10 x 1.00 Closed Breaks 100f � 8 SW1638 1 Male Blade Terminal M10 x 1.00 Open Makes 202f � 8 SW1645 2 Male Blade Terminal M16 x 1.5 SW1799 2 Male Blade Terminal M10 x 1.00 Open Makes 185f Breaks 176 SW1801 2 Male Blade Terminal SW1802 2 Male Blade Terminal M14 x 1.5 Open Makes 200f Breaks 185f SW1803 2 Male Blade Terminal SW1820 2 Male Pin Terminal M22 x 1.5 Range: 95/90 SW1821 3 Male Blade Terminal M22 x 1.5 SW1822 2 Male Blade Terminal M22 x 1.5 SW1824 3 Male Blade Terminal M22 x 1.5 SW1825 3 Male Blade Terminal M22 x 1.5 SW1828 2 Male Blade Terminal M22 x 1.5 Range:96c/91c SW1829 3 Male Blade Terminal M22 x 1.5 SW1833 2 Female Terminal 5/8 x 18 SW1834 2 Female Terminal M16 x 1.5 SW1842 1 Male Blade Terminal M16 x 1.5 Closed Breaks 120f � 8 SW1887 2 Male Blade Terminal M16 x 1.5 Open Makes 93c � 3 SW1888 2 Male Blade Terminal M18 x 1.5 Open Makes 199f Breaks 190f SW1895 2 Male Blade Terminal M16 x 1.5 SW1902 2 Male Blade Terminal M12 x 1.5 Closed Breaks 221f Makes 210f SW1957 2 Male Blade Terminal M22 x 1.5 Open Makes 197f Breaks 188f SW1958 3 Male Pin Terminal M22 x 1.5 Open Dual-Makes 197f Breaks 188 -- Makes 222f Breaks 213f SW2021 1 Male Blade Terminal 3/8 NPT Open Makes 224f Breaks 218f SW2022 1 Male Blade Terminal 3/8 NPT Open Makes 234f Breaks 228f SW2032 1 Male Blade Terminal M21 x 1.5 SW2164 1 Male Blade Terminal M16 x 1.5 SW2378 2 Male Blade Terminal SW2379 2 Male Blade Terminal M18 x 1.5 SW2380 2 Male Blade Terminal M15 x 1.00 SW2400 2 Male Blade Terminal M16 x 1.5 SW2883 2 Male Pin Terminal M16 x 1.5 SW2902 2 Male Blade Terminal M15 x 1.00 SW3009 2 Male Blade Terminal M16 x 1.5 SW3011 3 Male Pin Terminal M14 x 1.5 Range 91/104c SW3012 3 Male Pin Terminal M14 x 1.5 Range 91/99c SW3013 SW3014 2 Male Blade Terminal SW3016 2 Male Terminal M16 x 1.5 Stamped 115� Off SW3017 2 Male Blade Terminal M16 x 1.5 SW3156 2 Male Blade Terminal M22 x 1.5 SW3157 2 Male Blade Terminal M22 x 1.5 SW3375 1 Male Blade Terminal M17 x 1.25 SW3376 2 Male Pin Terminal M22 x 1.5 SW3459 2 Male Blade Terminal ID .375-25UNF SW3696 2 Male Blade Terminal SW3721 2 Male Blade Terminal SW3729 3 Male Blade Terminal M22 x 1.5 102�/95� SW4075 2 Male Blade Terminal M22 x 1.5 95� SW4088 2 Male Blade Terminal M10 x 1.5 SW4139 2 Male Pin Terminal ID M10 x1.5 SW4244 2 Male Blade Terminal M16 x 1.5 SW4247 3 Male Pin Terminal M14 x 1.5 80�/88�c SW4248 3 Male Pin Terminal M14 x 1.5 80�/88�c SW4293 M16 x 1.5 SW4374 3 Male Blade Terminal M22 x 1.5 Open Dual-Makes 101c Breaks 93c--Makes 213c Breaks 200c SW4376 2 Male Blade Terminal M10 x 1.0 SW500 1 Recessed Post 3/8 x 18 Open Makes 230f � 8 SW501 1 Male Bullet Terminal 3/8 x 18 Open Makes 222-239 f SW502 1 Recessed Post 3/8 x 18 Open Makes 238f � 8 SW503 1 Male Bullet Terminal M16 x 1.5 Open Makes 208f � 14 SW504 2 Male Blade Terminal M16 x 1.5 Open Makes 204f � 8 SW505 1 Recessed Post 3/8 x 18 Open Makes 221f � 8 SW506 2 Male Blade Terminal M16 x 1.5 Open Makes 194f � 8 SW507 1 Male Bullet Terminal M16 x 1.5 Open Makes 204f � 8 SW508 1 Blade Terminal M16 x 1.5 Open Makes 190f � 9 SW509 3 Male Blade Terminal M22 x 1.5 1) Opens 185f Closes 203f 2) Opens 188f Closes 215f SW510 1 Male Bullet Terminal 3/8 x 18 Open Makes 210f �10 Opens 185 SW511 1 Male Blade Terminal M16 x 1.5 Open Makes 194 � 3 SW512 1 Blade Terminal M16 x 1.5 Closed Breaks 201f � 8 SW513 1 Blade Terminal M16 x 1.5 Open Makes 238f � 8 SW514 2 Male Blade Terminal 1/2 x 14 Open Makes 200f � 10 Opens 170f SW515 1 Male Blade Terminal M16 x 1.5 Open Makes 105c � 10 SW516 1 Blade Terminal M16 x 1.5 Open Makes 105c � 3 Opens 98c � 4 SW517 2 Male Blade Terminal M16 x 1.5 Closed Breaks 90c � 3 Makes 83c � 4 SW518 2 Male Blade Terminal M16 x 1.5 Open Makes 90c � 3 Breaks 83c � 4 SW519 2 Male Blade Terminal M16 x 1.5 Open Makes 95c � 5 Breaks 90c � 5 SW520 1 Male Bullet Terminal M16 x 1.5 Closed Breaks 97c � 3 Makes 92c SW521 2 Male Blade Terminal M16 x 1.5 Open Makes 90c � 3 Breaks 83c � 4 SW522 2 Male Blade Terminal M16 x 1.5 Open Makes 90c �3 Breaks 83c � 4 SW523 2 Male Blade Terminal M16 x 1.5 Open Makes 90c �3 Breaks 83c � 4 SW524 2 Male Blade Terminal M16 x 1.5 Open Makes 90c �3 Breaks 83c � 4 SW525 2 Male Blade Terminal M16 x 1.5 Open Makes 92c � 3 Breaks 82c �4 SW526 2 Male Blade Terminal M16 x 1.5 Open Makes 90c � 3 Breaks 83c � 4 SW527 2 Male Blade Terminal M16 x 1.5 Open Makes 90c � 3 Breaks 83c � 4 SW528 2 Male Blade Terminal M16 x 1.5 Open Makes 105c � 3 Breaks 98c � 4 SW530 2 Male Blade Terminal 1/2 x 14 Open Makes 184f � 7 Breaks 159c SW531 2 Male Blade Terminal 1/2 x 14 Open Makes 210f � 10 Breaks 185 f SW532 2 Male Blade Terminal 1/2 x 14 Open Makes 212f � 5 Breaks 192 f SW533 2 Male Blade Terminal M22 x 1.5 Open Makes 203f � 5 Breaks 194f � 5 SW535 1 Male Bullet Terminal M16 x 1.5 Closed Breaks 203f � 6 Makes 194f � 6 SW536 2 Male Blade Terminal M16 x 1.5 Open Makes 190f � 6 Breaks 174f � 6 SW539 1 Blade Terminal M16 x 1.5 Closed Breaks 206f � 8 SW541 1 Male Bullet Terminal 1/4 x 19 Open Makes 218f � 9 Breaks 209f � 9 SW542 2 Male Blade Terminal M16 x 1.5 Open Makes 170f � 8 SW543 M16 x 1.5 SW544 2 1 Male 1 Female Bullet M22 x 1.5 Open Makes 210f � 8 SW546 M16 x 1.5 Open Makes 198f � 9 Breaks 189f � 9 SW547 1 Blade Terminal 3/8 x 18 Closed Breaks 122f � 9 Makes 113f � 9 SW548 M16 x 1.5 Closed Breaks 194f � 9 Makes 185f � 9 SW551 1 Blade Terminal M16 x 1.5 Closed Breaks 203f � 9 Makes 194f � 9 SW552 2 Male Blade Terminal M22 x 1.5 Open Makes 199f � 8 SW553 2 Male Blade Terminal M22 x 1.5 Open Makes 217f � 9 Breaks 208f � 9 SW554 2 Male Blade Terminal M16 x 1.5 Open Makes 203f � 5 Breaks 194f � 5 SW555 1 Female Terminal 3/8 x 18 Open Makes 210f Breaks 205f SW556 2 Male Blade Terminal M22 x 1.5 Open Makes 197f-208f Breaks 177f-188f SW557 1 Blade Terminal Open Makes 212f � 9 Breaks 203f SW560 1 Male Bullet Terminal Open Makes 198f � 8 SW562 2 Male Blade Terminal M16 x 1.5 Open Makes 204f � 8 SW563 2 Male Blade Terminal 3/8 x 18 Open Makes 63f � 8 SW565 2 Male Blade Terminal M22 x 1.5 Open Makes 224f � 6 Breaks 210f � 6 SW566 2 Male Blade Terminal M16 x 1.5 Open Makes 190f � 8 SW567 2 Male Blade Terminal M22 x 1.5 Open Makes 198f � 5 Breaks 180 � 5 SW568 2 Male Blade Terminal 1/4 x 19 Closed Breaks 147f � 8 SW569 2 1 Male 1 Female Blade 3/8 x 18 Closed Breaks 128f � 8 SW571 1 Male Pin Terminal Open Makes 226f � 8 SW572 2 Male Blade Terminal M14 x 1.5 Open Makes 99c SW576 2 Male Blade Terminal M16 x 1.5 SW577 2 Male Blade Terminal Closed Breaks 174f � 8 SW578 3 Male Pin Terminal M22 x 1.5 Open Dual-Makes 92c Breaks 82c - Makes 96c Breaks 82c SW580 13/16 x 14 unc Open Makes 228f � 8 SW581 2 Female Pin Terminal M22 x 1.5 Closed Breaks 210f � 8 SW583 1/2 x 14 Open Makes 224f � 8 SW585 2 Male Blade Terminal M22 x 1.5 Open Makes 203f � 6 Breaks 194f � 6 SW586 2 Male Blade Terminal M22 x 1.5 Open Makes 198f � 5 Breaks 189 � 5 SW587 2 Male Blade Terminal M16 x 1.5 Open Makes 90c Breaks 85c SW588 2 Male Blade Terminal M22 x 1.5 Open Makes 140f � 9 Breaks 122f � 9 SW589 2 Male Blade Terminal M16 x 1.5 Open Makes 210f � 8 SW590 2 Male Blade Terminal M16 x 1.5 Open Makes 185f � 9 Breaks 176f � 9 SW591 2 Male Blade Terminal 3/8 x 18 Open Makes 185f � 8 SW592 2 Male Pin Terminal M16 x 1.5 Open Makes 194f Breaks 185f SW593 2 Male Blade Terminal M22 x 1.5 Open Makes 110c � 5 Breaks 115c � 5 SW594 2 Female Pin Terminal M22 x 1.5 Open Makes 198f � 9 SW595 2 Male Pin Terminal Open Makes 198f � 6 Breaks 189f � 6 SW611 1 Male Blade Terminal M16 x 1.5 Open Makes 194f � 9 Breaks 185f � 9 SW648 2 Male Blade Terminal M18 x 1.5 Open Makes 216f � 8 Breaks 206f � 8 SW649 1 Male Blade Terminal 3/8 x 18 Open Makes 223f � 8 SW650 3 Male Blade Terminal M22 x 1.5 Open Dual-Makes 189f �8 Breaks 170f �8 Makes 198f �8 Brea SW651 2 Male Blade Terminal M16 x 1.5 SW652 1 Male Blade Terminal M16 x 1.5 Closed Breaks 197f � 8 SW653 1 Male Blade Terminal M16 x 1.5 Closed Breaks 200f � 8 SW740 2 Male Blade Terminal M16 x 1.5 Open Makes 216f � 5 Breaks 206f � 5 SW741 2 Male Pin Terminal M16 x 1.5 Closed Breaks 234f � 5 Makes 224f � 5 SW940 3 Male Pin Terminal M14 x 1.5 SW956 2 Male Blade Terminal M14 x 1.5 TU192 2 Male Pin Terminal M16 x 1.5 Closed Breaks 158 � 8 Makes 137f min TU244 1 Male Blade Terminal 3/8 x 24 Open Makes 140f � 8 TU269 2 Male Blade Terminal M16 x 1.5 Open Makes 220f � 8 TU325 1 Male Blade Terminal M10 x 1.0 TU342 2 Male Blade Terminal M15 x 1.00 TU344 2 Male Pin Terminal M14 x 1.25 TU367 1 Male Blade Terminal M16 x 1.5

Junior Member
Joined: Jan 2014
Posts: 25
Likes: 0
From: Cleveland, OH
Car: '89 GTA
Engine: 383
Transmission: T5
Re: Wire Your Fan Right and Gain 1 Horsepower!
Great post Joe, I have been putting off wiring up my fans this way in the hopes that I can track down the issue that is causing my fans not to work. If you have time please take a peek at my thread and offer any thoughts or opinions you can think of.
https://www.thirdgen.org/forums/elec...e-no-fans.html
https://www.thirdgen.org/forums/elec...e-no-fans.html


Joined: Jul 2011
Posts: 744
Likes: 5
From: Davison, MI
Car: 89 Camaro
Engine: Dart SHP 400-Holley Terminator EFI
Transmission: Tremec T56 Magnum F
Axle/Gears: Strange S60 3.55:1
Re: Wire Your Fan Right and Gain 1 Horsepower!
Joe, I'm not sure what you're so worried about, even when they screw it up with too small wire, under-rated controls and unprotected circuits the Help! section of your local parts store always has a few dozen cases of this:


This is a great thread and applies to so much more than cooling fans. Posts like this are great resources for anyone willing to learn how to do it right.

I'd like to point out to those reading this thread that the wire gauges Joe listed are a minimum size, if you're using higher current devices or travelling greater differences you will need a larger gauge wire to avoid damaging your vehicle and potentially yourself.
This is a great thread and applies to so much more than cooling fans. Posts like this are great resources for anyone willing to learn how to do it right.
I'd like to point out to those reading this thread that the wire gauges Joe listed are a minimum size, if you're using higher current devices or travelling greater differences you will need a larger gauge wire to avoid damaging your vehicle and potentially yourself.
Re: Wire Your Fan Right and Gain 1 Horsepower!
You're welcome Cheeto, glad you took the time to find the thread.
Always sold out of that stuff around here. Haven't been able to get my harnesses to smoke in years.
I tried to stress with every gauge I stated "no smaller than", also to keep the relays next to the battery. Longer wires have more resistance and heavier load as a result. You can't tell some people the important stuff enough though.
I tried to stress with every gauge I stated "no smaller than", also to keep the relays next to the battery. Longer wires have more resistance and heavier load as a result. You can't tell some people the important stuff enough though.

Member
iTrader: (1)
Joined: Jul 2008
Posts: 204
Likes: 1
From: Fox Lake, Illinois
Car: 1991 RS
Engine: 350 TBI
Transmission: 700r4
Axle/Gears: 3.08 lt. slip
Re: Wire Your Fan Right and Gain 1 Horsepower!
I guess I am one of the few that has a functioning automatic fan with ZERO need for a manual switch junking up the interior. I still think many are missing the air deflector underneath the car and try to compensate with continuous fan. Also have found that cleaning radiator and condenser with hose also does wonders.
Re: Wire Your Fan Right and Gain 1 Horsepower!
Air dam is a big part of it I think as well. Another part is most are running the 195* factory op temp. 'stat and have the 235* fan kick on point which looks very high but what these cars are designed to run for an emissions band aid.
Junior Member
Joined: Jun 2014
Posts: 87
Likes: 0
Car: 1987 Chevrolet Camaro Iroc Z28
Engine: 383 Stroker supercharged.
Transmission: 5 speed manual transmission
Axle/Gears: 3.45 posi rear
Re: Wire Your Fan Right and Gain 1 Horsepower!
If I want to run a toggle switch off the wire going to the fan switch in my block, to be able to manually turn the fan on and off, what gauge wire should I use for the power side and for the ground?
Re: Wire Your Fan Right and Gain 1 Horsepower!
If you have a working relay all you need is a ground to the signal (green/white or black) wire. It only needs to be 18 gauge, but larger wire never hurts, and a single wire going through the firewall. The ground can be inside the car near the switch.

Supreme Member


Joined: Oct 2004
Posts: 4,528
Likes: 240
From: Henrietta NY
Car: 1984 Trans Am L69
Engine: Sniper EFI Powered 355
Transmission: WC T5 w/ Steel Support Plate
Axle/Gears: 3.42 10 Bolt Posi
Re: Wire Your Fan Right and Gain 1 Horsepower!
Nice to see someone getting some use out of my diagram and list. great post
Supreme Member
Joined: Oct 2004
Posts: 4,528
Likes: 240
From: Henrietta NY
Car: 1984 Trans Am L69
Engine: Sniper EFI Powered 355
Transmission: WC T5 w/ Steel Support Plate
Axle/Gears: 3.42 10 Bolt Posi

Joined: Dec 2005
Posts: 6,499
Likes: 31
From: Macon, GA
Car: 1992 Camaro RS
Engine: Vortec headed 355, xe262
Transmission: T56
Axle/Gears: 9-bolt 3.70
Re: Wire Your Fan Right and Gain 1 Horsepower!
I used an autometer 3246 as a temperature switch for my relay.
http://www.summitracing.com/parts/at...FQwV7AodAUgAwg
It's a little different than the factory version, not quite as elegant since it needs two wires (it just completes the circuit across both terminals). But I was able to put it right in the intake by the thermostat and it turns on at 200F and off at 170F. Perfect for a fan switch if you're like me and want your fan on as soon as the car warms up. It's working great so far.

Thread
Thread Starter
Forum
Replies
Last Post
eightsixseven
Tech / General Engine
2
Dec 16, 2024 01:50 PM