When you click on links to various merchants on this site and make a purchase, this can result in this site earning a commission. Affiliate programs and affiliations include, but are not limited to, the eBay Partner Network.
10si alternator internals - drop some knowledge on me
My alternator started acting up again (voltage varying, sometimes dropping off completely) and I decided to try a new voltage regulator. That did NOT fix the problem, and long story short I ended up tearing down two alternators and rebuilding one of them with a kit off Ebay. This fixed my alternator issues.
In the process of tearing them apart, I noticed neither was quite the same internally. I spend a lot of time Googling and searching the internet for answers, but could not find an explanation for some of the internals I found and could not figure out why there are two noticeably different voltage regulators available. The two alternators pictured are both 10si, 109 amp aftermarket (probably Chinese) from DB Electrical on Ebay. They were NEW, and are 10si clones and not original Delco. On a side note, the first one I installed lasted all of 4 years before crapping out. The second one lasted only 2 years before exhibiting weird voltage regulation issues. I'm not sure I would recommend DB Electrical as a good aftermarket source for 10si or 12si alternators. See pictures below. Hover over the picture to see the #.
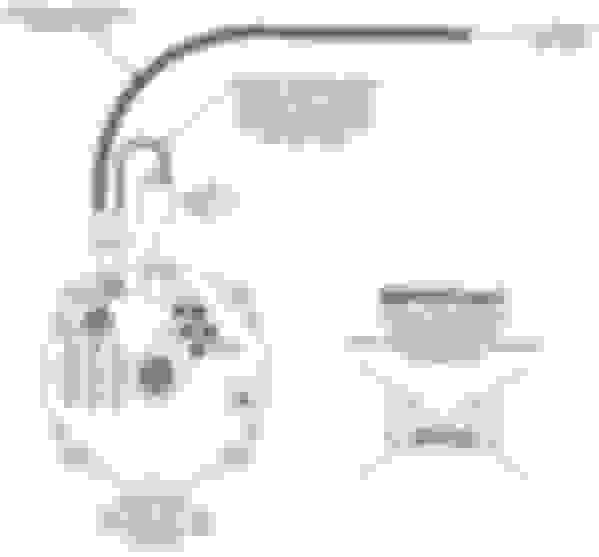
Picture #1.
This is the rebuilt alternator being assembled, with the new parts in their correct positions. From researching the internet, this seemed to be the most common internal assembly. I found very few pictures showing different internal assembly, and NO explanations for any differences.
Picture #2. This is exactly how the first (4 year) alternator was assembled. Note it is identical to picture #1, EXCEPT for the fuse looking thing connecting an insulated screw to the non-insulated screw. The red straw points to it.
Picture #3 and #4. This is the second (2 year) alternator. This is exactly the way I found it internally and it did work for 2 years like this. It is significantly different inside, noting both red wires and their connecting places. It is also interesting to note the two insulated screws are in different positions vs the non-insulated screw.
Picture #5 and #6. This shows the difference in the two different regulators used. As you can see, the one on the left has an extra post that is shown in-use in pictures #3 and #4. Also, the regulator on the left has the spade terminals connected by a metal bar between them (pic #6).
I'm trying to figure out why they were assembled so differently inside, when the common rebuild kits and You-tube videos seem to only show a rebuild like picture #1. Also, I managed to find a new Delco regulator with extra post like the one pictured and did install it in that alternator. The alternator completely stopped working, and only worked again when I swapped the old (also extra post) regulator back in. Of course with the old regulator back in it went back to having voltage regulation problems. I tested the new voltage regulator using ohm specifications I found online and by grounding the ground tab on it (to bypass the regulation function). The new regulator tested good but the alternator still would not put out any voltage, leading me to believe that even though the new regulator looked identical to the old (Chinese) regulator it must have been different internally and could not function with the way the other internals were assembled.
Re: 10si alternator internals - drop some knowledge on me
The regulator with the pins shorted together is an aftermarket or marine one, designed to make a "one-wire" alt. This is of course very easy to connect... it doesn't require any connection at all, except the big wire that charges the batt... but suffers from many shortcomings. Notably, one of the 2 connections is the "sense" lead, which is the one that the regulator tries to maintain the same voltage on at all times; it's usually, but not always, hooked up to some central distribution point well downstream of the batt, to allow the alt to maintain the voltage at that point constant, rather than letting it be affected by voltage drops in wiring, connections, etc. The other pin is the "idiot light" pin, which also serves as the "excite" or "command" connection. It receives power from the switched side of the ign sw, through the "Alt" or in these cars the "Choke" light bulb, with the bulb connected in such a way that when the ign sw is On but the alt is not producing power, the bulb lights up. One side of the bulb is connected to switched power, and the other to that pin; when the alt is charging, it puts 12V on that pin, which makes the bulb go out since it then has the same voltage on both sides of it; but when the bulb is powered from the ign sw and the alt is NOT charging, either because it's dead somehow or because it's not turning (engine is not running, belt is broken, etc.), that pin is grounded, in which case there's 12V across the bulb, so that it lights. Additionally it carries a small amount of current into the field winding of the alt, starting it up before it begins to charge, in case there's no permanent magnetism built up in the core iron of the rotor... since the field gets its power from the alt output via the diode trio, if the alt never starts producing power on its own, it will … never start, which is why it usually needs that little bit of external "starting" excitation. Which is why often your batt will go dead when the bulb burns out: the alt never "knows" that the ign is turned on, and therefore never charges. Not all cars have a bulb; some have a resistor instead, and some have both. In the ones of our cars with a carb there's also a relay in that circuit that controls the choke heater, connected such that the choke heater does not receive power unless the ign is on AND the alt is charging. If the alt is NOT charging, the choke heater will NOT get power, meaning it will stay on, meaning the car will have VERY high emissions, which apparently the factory or maybe da gummint thought was a more important failure to warn the driver about, than the batt not being charged and being about to die within a matter of a few minutes. Priorities.
The extra red wires and the extra screw inside the one in #3 & #4 are also not "factory". Not sure what all that is about. Ignore all that. Don't bother trying to decipher or duplicate it. Throw everything in that setup that isn't EXACTLY like #2 into the trash and don't look back.
The setup with the resistor - the object in #2 with the red straw pointing toward it - is the most common "correct" one. The aluminum assy inside it with the fins and the 3 winding terminal connections and the stud for the big red wire is the main rectifier. The alt itself is a 3-phase Y-connected AC generator, and that rectifier has 6 large diodes inside it, that convert the AC coming from the windings to DC. The small black thing with 3 leads that also connect to the 3 alt winding terminals, and the one lead that goes to the regulator, is the "diode trio"; it has 3 much smaller diodes, that also of course convert AC to DC, and the result of that powers the regulator and the field (rotor) winding.
If your car is still wired as it came from the factory, you need an alt like photo #2. If you go the parts store and buy a new regulator, brush set, diode trio, and bearings for it, esp the front bearing (part # 6203, with whatever suffix and or prefix whichever mfr uses to indicate 2 rubber seals), you will have, in essence, a brand-new alt. You could replace the rectifier as well if you felt like it but those almost never go bad. Most often the rear bearing is fine and you can just clean it up and put some grease in it, but it's also available to buy if you want. Obviously you should get good quality parts, the best you can find; NOT the cheeeeeepest thing you can find off ebay that claims it will "fit". There's no reason to specifically seek out AC/Delco, nor any reason not to; Standard Ign, B-W, and a couple of other such brands are every bit as good. Pay more attention to the part inside the box than to the name printed on it. Changing out the front bearing is a hassle because you have to (a) unbolt the bearing retainer from the case somehow while the rotor is still installed in it, and (b) pull the bearing off the shaft without damaging anything; neither of these is a trivial act, and if the bearing is OK (runs smooth and doesn't make any grinding noises or anything when the rotor is turned) you can just leave all that alone. The rotor and the case front can stay together in that event. You can undo the 3 nuts holding the winding terminals to the rectifier, and remove the entire stator assy (windings and iron core) from the case back, to clean it all up, if you want.
Your car should have a plug with 2 wires going to the alt; one will be brown and will connect to the regulator pin closer to the big output terminal, and the 2nd wire, farther from the output stud, will usually be red and will lead either to some point inside the car (can't recall exactly how it was done in 85) or may be just a short wire going over to the big output terminal and connecting there along with the big fat wire that goes to the batt. The brown wire comes from the "Choke" light, and the other wire is the "sense" connection.
Last edited by sofakingdom; Feb 1, 2020 at 06:24 PM.
Re: 10si alternator internals - drop some knowledge on me
I would add also, not all windings are the same; not the field (rotor) one, nor the stator ones. When you build your new alt, use the stator with the thickest wire, out of all the ones you have on hand; and use the rotor with the most turns of the largest wire. Those 2 things determine the alt's "rating", completely independent of the number stamped on the case... the part that the "number" is stamped on is not involved in determining the actual alt capacity to generate power. Once an alt has been rebuilt it's entirely possible that 63 amp guts got put into a case that says 140 amps, or vice-versa; or that any random parts of any random "ratings" might have got all mixed up together which is actually the most likely thing to have happened. Go visit a rebuilder sometime and watch the process, you'll see why.
Looks to me like the stators in #2 and #3 / 4 have about the same size wire, and are larger (higher output potential) than the one in #1. Don't trust your (or my) eyeball though, use a caliper on the wire to select the largest.
Re: 10si alternator internals - drop some knowledge on me
FYI: the internal schematic of the alt, drawn in typical inscrutable indecipherable auto mfr style that just sort of throws all the parts onto the page without arranging them in a commonsensical, pleasing, and logical pattern of functional blocks; something that can be interpreted easily, like, with power at the top and ground at the bottom, and input at the left and output on the right.
Green is the main rectifier; magenta is the stator (output) windings; gold is the rotor (field) winding; blue is the diode trio; red is the resistor in photo #2. All the rest of it - the transistors, diodes, resistors, capacitor, etc. - is inside the voltage regulator. The brushes - the ONE PART that wears out/fails the most, and that therefore needs the most to be visible to the "mechanic" - aren't even shown on the diagram (!); they connect to the 2 ends of the field winding, allowing the electrical connection while the rotor is spinning. All in all a pitiful schematic but it's all I've got ATM.
GRD is ground, the case; the lower "2", near the center of the thing vertically, is the stud for the big red wire, which is in effect, the battery; "25" is the brown wire from the light etc. circuit. Note that this alt schematic was taken from a vehicle schematic (83 Camaro) in which the sense terminal (the upper "2", in the same plug with the "25") is connected by the short red wire to the output stud (the "2" near the middle on the right). Not all cars are wired like that, in fact it's not really the "best" way to wire one, but that's what they did in this particular application, so w/e, it is what it is. It works OK enough, even if it could have been made MUCH better with the addition of one more wire... probably a "value engineering" thing... another wire would have added perhaps as much as 3.62� to the cost of building the car, so the bean counters probably zeroed in on it and slashed it out. The "sense" lead is the point that the regulator attempts to adjust the current in the field winding, to hold the voltage at that point constant, at 14.2 V more or less. It does this by varying the current in the field winding, in effect turning the alt up or down like a light dimmer, according to the load placed on it as sensed by the voltage at the "sense" terminal. Part of the load is of course related to the battery's state of charge.
Alternator Internal Schematic
Last edited by sofakingdom; Feb 1, 2020 at 06:33 PM.
Re: 10si alternator internals - drop some knowledge on me
"Book" seems to be particularly short in detailed explanation of anything electrical. Which isn't hard to understand; the majority of car people, esp hobbyists, have got into their head somehow, that electricity is "hard". Like "math" or something (which is what civilians call common arithmetic). For something so inherently easy and simple, as car electrical systems are, there sure does seem to be alot of pointless mystery maintained in the world around it.
I'd also be happy to explain how the regulator works, if anybody wants to know. Not that it matters all that much, but you know what They say about "enquiring minds".
Re: 10si alternator internals - drop some knowledge on me
I see so many people that have lack ofmoney problems and when you talk to them you see that it is because they have a mental block because of the math involved.
Oh well, these people are destined to remain money deficient.
Re: 10si alternator internals - drop some knowledge on me
Hoping it ain't a dead thread yet....SOMEONE here seems to actually understand GM's old Delco electrical accessories.
.....if the resident expert (SofaKingdom) is still available.....what I really wish to know is "what is the purpose of wire wound external resistor OCCASSIONALLY bolted across two post of the internal VR????" Been tilting at this windmill for a while, found no definitive answer...."used on some models" is not exactly information I'd can use. All rebuild kits have them, no kits deign to include instructions anymore. Some alternators got 'em, some don't. Nobody selling the parts to rebuild them knows why anymore.....heck, it takes weeks just to GET a rebuild kit.
If it's only for an idiot light function somewhere, please so state and I can throw it out away while rebuilding 3-wire harnessed alternator in AMMETER equipped GM car. If it's for something else in some of the many versions of the 10si family, I'd appreciate "enlightenment". I do already know the ammeter is really a miniscule differential voltage gage, reporting the difference between voltage at the horn relay and the alternator. There are no "warning" lights except the parking brake.
Please, no anecdotes. If someone knows what that danged component actually does, please just chime in. Thx in advance.
Last edited by Dragnfly; Jan 23, 2021 at 05:39 PM.
Reason: spelling and description
Re: 10si alternator internals - drop some knowledge on me
That resistor provides the base current for the transistor that drives the field winding, which is the one my little red box just touches. Without it, the only base current flowing into it, is leakage from collector to base.
Always put one in.
An ammeter isn't really a "voltage" gauge. It's a current gauge. After all, magnetism (the effect that produces the force that moves the pointer around) is produced by current, not voltage. see https://en.wikipedia.org/wiki/Hans_Christian_�rsted, particularly the little video under Electromagnetism. In a car with an ammeter, all of the current flowing into or out of the batt, except for the starter, passes between the car and the batt through that meter. If it's flowing one way, let's say out of the batt and into the car i.e. discharging, the magnetism created by the current in the meter pulls the pointer one way (negative); if flowing the other way, which then would be from the car into the batt i.e. charging, the magnetism pulls it the other way.
Voltage is analogous to pressure, in a fluid system; current is analogous to flow.
Re: 10si alternator internals - drop some knowledge on me
Originally Posted by sofakingdom
That resistor provides the base current for the transistor that drives the field winding, which is the one my little red box just touches. Without it, the only base current flowing into it, is leakage from collector to base.
Always put one in.
An ammeter isn't really a "voltage" gauge. It's a current gauge. After all, magnetism (the effect that produces the force that moves the pointer around) is produced by current, not voltage. see https://en.wikipedia.org/wiki/Hans_Christian_�rsted, particularly the little video under Electromagnetism. In a car with an ammeter, all of the current flowing into or out of the batt, except for the starter, passes between the car and the batt through that meter. If it's flowing one way, let's say out of the batt and into the car i.e. discharging, the magnetism created by the current in the meter pulls the pointer one way (negative); if flowing the other way, which then would be from the car into the batt i.e. charging, the magnetism pulls it the other way.
Voltage is analogous to pressure, in a fluid system; current is analogous to flow.
That answer was really definitive, which is why I like it. ("Always put one in"). Unfortunately, a large variety of forum/other sites turn up diagrams like this, which looks hauntingly familiar (aka, in the style and manner of GM shop manuals of the times, circa 1969). Lastly, I have an aftermarket 140 amp 3 wire 10si (I know, not the correct 1969 or 10si normal range ) which I got 10 years ago from DB Electronics, still a reliable provider of after market/OEM replacements/rebuilt starters/alternators. It has never had that resistor in it.
Your description, which I do not follow, makes the resistor sound essential....so how can there be any guidance like the picture I desperately hope uploads properly here below.
looks like a really official repair/mx document....just grabbed it off the web, unverified source.
Last edited by Dragnfly; Jan 24, 2021 at 11:02 AM.
Reason: forgotten content
Re: 10si alternator internals - drop some knowledge on me
It's not a question of "essential", as in, it won't work without it; rather, it's one of the ways they cheeeeeeeped out on the lower rated ones, when they thought it wouldn't matter so much whether the alt worked up to its max possible capability or not. What it does is, instantly boosts the drive to the field winding, by a factor of 3 or 4, particularly when the voltage is only "a little bit" below the setpoint. It makes the alt turn on HARD when it needs to charge or drive large loads (think, rear window defogger), instead of lazily ramping up. Wouldn't be surprised if you could cut the batt recharge time to � of what it was, by adding one; or prevent the voltage when you turn on the RWD from dropping half a volt, and it only drop a tenth.
Any of them will work better with it than without it.
Re: 10si alternator internals - drop some knowledge on me
okay, this is fun....thanks again for not making me follow an "electrical" explanation. Not sure going from my 63 amp original to 140 amp "upgrade" led me to suspect I'd be getting one of the cheeeeeper "lower rated ones." I still accept your reply.
Nonetheless, given the "used on some" manual extract, mightn't there have been an "application" reason for this...well, resistor enhancement? ( we know it wasn't AC Delco's drive for excellence of yore) What if I threw in an off the wall instruction page I found, that's a little off topic......but intriguing in the case of the mystery resistor.....there are some interesting variations here, but the one I'm interested in obviously involves the "Important" note about resistors and single wire versions....
Re: 10si alternator internals - drop some knowledge on me
Originally Posted by Dragnfly
okay, this is fun....thanks again for not making me follow an "electrical" explanation. Not sure going from my 63 amp original to 140 amp "upgrade" led me to suspect I'd be getting one of the cheeeeeper "lower rated ones." I still accept your reply.
Nonetheless, given the "used on some" manual extract, mightn't there have been an "application" reason for this...well, resistor enhancement? ( we know it wasn't AC Delco's drive for excellence of yore) What if I threw in an off the wall instruction page I found, that's a little off topic......but intriguing in the case of the mystery resistor.....there are some interesting variations here, but the one I'm interested in obviously involves the "Important" note about resistors and single wire versions....
Re: 10si alternator internals - drop some knowledge on me
Making "one-wire" alternators might be why there are so many around out there nowadays missing it. After all there are AHELLUVALOT of those around, that we never see; boats, generators, winches, pumps, ... there's A SHIPLOAD of applications for internal combustion engines besides cars, where starting battery charging is needed.
I can't really decipher every decision that was made in some smoke-filled gin-lubricated back room by people I didn't know 50 yrs ago. I'm just an electronic engineer. (sometimes) all I can do is talk about THE PARTS and what they do. For better or worse, take it or leave it.
Re: 10si alternator internals - drop some knowledge on me
For a conventional automotive application, where there are accessories that will be powered by 12v, and dash gauges/indicator lights..... I don't see any reason for a one-wire alternator. For equipment that is only charging a battery I can see the use case. Should be more of a special order for equipment than it seems to be. WAY too many of them in-use by Skeeter and his cousin Skillet.
Re: 10si alternator internals - drop some knowledge on me
Rats.....
okay I didn't want to go off on one wires. Personally, I am a fan of three wires, for reasons unrelated to my current (sic) interest in this resistor. Just wondering why such resistor might be a problem in a one wire.
BECAUSE.... I suspect I know what MAY have happened to me. Bought the alternator from vendor's ONE wire ad....told them I wanted to maintain three wire configuration to preserve stock ammeter and OEM harnesses. I actually can find that written on the invoice from 10 years back...."customer requests three wire configuration......etc", so I know they GOT the message. I am beginning to think, along the lines of SofaKingom's disclaimer, that they simply failed to put in the resistor in complying with my request. I can only ASSUME they put in the right regulator in so doing, as the number on it in no way searches out as a 1 vs 3 wire device. I have been told there is a VR difference for 1 vs 3. Explains why many of the 1's have "SE" in the numbers for "self excite", and this alternator was listed as 10SiSE. Unfortunately, most VR parts numbering schemes aren't so friendly and logical (the SE part) so I have no clue about the current regulator. The missing reisistor is a matter of fact, and makes me wonder if it was in any way related to my erratic ammeter. Ditto VR suspicions. Clearly the alternator "worked"....no problems running everything available, whenever. The mean fluctuation stayed above zero.
Which leads me to my next and final (promise) question....since all we can see in 10SI is the white wafer shaped two blade, three-holed VR, and they ALL look the same (no visual difference in a 1 wire vs 3), how do I know what kind of VR I have, short of having a parts number list that would tell me?(or now suspicious invoice). What IS the actual internal difference in the self excite vs three wire version? What would happen if the wrong one was in an alternator? What would happen if those morons forgot/kissed off the resistor and/or provided an "incorrect" VR? Okay, a lot of questions, but just for clarity of overall purpose here.
Out of kindness, I will reveal I actually put in a "new" 105 amp 10SI, three wire. Everything works swimmingly now, including proper ammeter indications.....stable and pretty close to a needle width from zero with normal charge/discharge observations. (yes, I also figured out I had no need for a REALLY high output alternator over the years.) The fact that the car is driven infrequently, and stays on a battery tender may have masked noticing some problems long term....car was never hard to start, and seemed to run fine. But with onboard computer, electric fan, solid state ignition/coil, and MPFI, I did not like watching crazed ammeter bouncing all over the plus side and wondering what it might be doing to my engine management system if it reflected reality. Okay, and I confess, I'm afraid of electricity.
It's embarassing to admit how easily we become part of "remove and replace" trouble shooting...😉....or people who use emojis.... };^ )
Re: 10si alternator internals - drop some knowledge on me
Yes old thread but fits my situation like a glove.
so my late daughters car has been dormant for awhile and its not charging. I decided to rebuild the alternator and ordered a kit that comes with rectifier, brushes, bearings and regulator etc. everything seems super easy to install but i am confused as the regulator has a post like the original person of this post showed in one of his pics. Can I make this work?
the car is a 72 C-10 straight six 250. It has a voltage regulator by the radiator, unsure if it does anything if i unplug it while ignition is on it clicks BUT the previous owner i think did something because it has a 10si wired from the back to the positive post of the battery the 10dn seems what came in these pickups, the 10si i think came in the v8s.
Its Been a pain because the first order i received a rebuild kit for a 10dn and now i get this regulator without the extra post..
sorry fellas, again, i am sorry this is an old post but cant really find any answers and this thread seems to have what i need
Re: 10si alternator internals - drop some knowledge on me
While not a 3rd gen F-body, I'll fill you in.
FORGET the stuuuuuuuupid 1-wire alternator setup you have now. Among all the other shortcomings of the 1-wire setup, it doesn't support the vehicle's idiot light, which ... can easily leave somebody sitting by the side of the road with a dead batt someday. Throw EVERY BIT OF that stuuuuuuuupid crap in the trash. Put the normal regulator you now have into it, with the resistor as described and pictured above, and assemble completely. DO IT RIGHT instead of that ... other.
The truck should have a harness going from the regulator to the original alternator. Should have blue & white wires if memory serves, with a plug that has 2 parallel slide terminals. Find it. Verify the colors and correct my memory if I don't have them remembered right. I'm sure about the blue butt not so much about the other.
Go to the store and get a plug for the 10SI. Disconnect the batt. Either cut the old plug off and solder the new one onto the wires, with electronic solder and adhesive-line heat shrink tubing; red wire in the new plug to the blue wire, and the brown or white in the new to the white (or whatever it was) in the old.
Remove the old regulator. It has a big flat plug with abuncha wires. 2 of them are the blue & white (or whatever) mentioned above. 1 other goes to the idiot light, can't recall the color. Obviously it won't be the blue, the other to the alternator, or the red, which goes to somewhere that it can pick up battery from, which varies from one vehicle to another; the horn relay was a common place.
Either: cut the old regulator plug off and solder the red wire to the blue, as above; and the other alt wire to the one going to the idiot light. Or, make 2 short jumpers with male slide terminals on both ends, and plug them into the regulator connector, connecting the various wire colors the same as the soldering instructions. Reconnect the batt. Verify that the light comes on when you turn the key to Run, and goes out when you start the car, and that the alt is putting out the correct voltage (14.3 or so).
Et voil�! your vehicle is now PROPERLY wired for the PROPER more nearly modern alternator to work PROPERLY.
Re: 10si alternator internals - drop some knowledge on me
Originally Posted by sofakingdom
While not a 3rd gen F-body, I'll fill you in.
FORGET the stuuuuuuuupid 1-wire alternator setup you have now. Among all the other shortcomings of the 1-wire setup, it doesn't support the vehicle's idiot light, which ... can easily leave somebody sitting by the side of the road with a dead batt someday. Throw EVERY BIT OF that stuuuuuuuupid crap in the trash. Put the normal regulator you now have into it, with the resistor as described and pictured above, and assemble completely. DO IT RIGHT instead of that ... other.
The truck should have a harness going from the regulator to the original alternator. Should have blue & white wires if memory serves, with a plug that has 2 parallel slide terminals. Find it. Verify the colors and correct my memory if I don't have them remembered right. I'm sure about the blue butt not so much about the other.
Go to the store and get a plug for the 10SI. Disconnect the batt. Either cut the old plug off and solder the new one onto the wires, with electronic solder and adhesive-line heat shrink tubing; red wire in the new plug to the blue wire, and the brown or white in the new to the white (or whatever it was) in the old.
Remove the old regulator. It has a big flat plug with abuncha wires. 2 of them are the blue & white (or whatever) mentioned above. 1 other goes to the idiot light, can't recall the color. Obviously it won't be the blue, the other to the alternator, or the red, which goes to somewhere that it can pick up battery from, which varies from one vehicle to another; the horn relay was a common place.
Either: cut the old regulator plug off and solder the red wire to the blue, as above; and the other alt wire to the one going to the idiot light. Or, make 2 short jumpers with male slide terminals on both ends, and plug them into the regulator connector, connecting the various wire colors the same as the soldering instructions. Reconnect the batt. Verify that the light comes on when you turn the key to Run, and goes out when you start the car, and that the alt is putting out the correct voltage (14.3 or so).
Et voil�! your vehicle is now PROPERLY wired for the PROPER more nearly modern alternator to work PROPERLY.
thank you so much for your response very valuable. If you look at the regulator I posted the new one has no wire post. I assembled everything already and I had to call the guy who sold me the parts and he advised to just throw the one wire set up. Thing is, i am with you on that one wire thing, i have read its not good.
so the previous owner of this truck had it as a one wire set up. The truck has a volt gauge and before doing the swap the gauge would fluctuate when turning on an accessory or reving the engine. Now that everything is in place it stays at dead center.
the regulator was left in place by the previous owner not sure it does anything hut does click if unplugged while ignition is in the on position.
i will definitely convert it to the three wire set up like you stated. Would the dash gauge make a difference in what regulator goes inside the alternator? I will post some before and after pics.
i show volts of 13.5V at the rear of the alternator, not sure if thats good?
Re: 10si alternator internals - drop some knowledge on me
Gauge does not matter.
13.5 is typical for a 1-wire alt. Adequate (barely) for recharging a batt in an electrical system whose only functions are starting and ignition, and that runs for a long time between restarts. Not enough for a reliable car.
Re: 10si alternator internals - drop some knowledge on me
Originally Posted by sofakingdom
Gauge does not matter.
13.5 is typical for a 1-wire alt. Adequate (barely) for recharging a batt in an electrical system whose only functions are starting and ignition, and that runs for a long time between restarts. Not enough for a reliable car.
I am going to tackle this wiring during the week. If you dont mind I might pick your brain. Again, I appreciate your help!!


 Not that it matters all that much, but you know what They say about "enquiring minds".