
Step by Step Overhead Console Installation Guide


Thread Starter
Senior Member
iTrader: (1)
Joined: Oct 2006
Posts: 558
Likes: 0
From: Pittsburgh, PA
Car: 1992 Pontiac Firebird
Engine: 3.1
Transmission: 700R4
Axle/Gears: 3.42 Auburn Posi
Step by Step Overhead Console Installation Guide
Installing an Overhead Console in a Third Generation F-Body Car with T-Tops.
Written by: Noah Purdy

The overhead console was an addition to your Camaro or Firebird available for $50.00. They contained a jubilee of neat little features for your car:
- A removable flashlight that had either a �Firebird� or �Camaro� emblem on it.
- A small pleather pouch used to store various things. (It's great for cell-phones.)
- A Ball-swivel map light.
- Reminder/selector roller wheels, used to indicate various things.
- Two buttons, one for the map light, and one for all interior lights.
- The car's dome light.
Parts Needed:
- The overhead console. (Please see note at the bottom of the list.)
- The mounting screws X 4.
- Dome light mounting screws X 2.

In this pictures, the T-Top version of the console is shown on top, while the coupe version is on the bottom. Make sure you have the right one!
Okay, down to business!
Step 1: Take your overhead console and trace an outline of it on cardboard. Cut the outline out, and punch holes where the dome light mount pillars are.
Step 2: Using the following diagram, cut your template to match mine, this will assist you in the cutting of the headliner.

Remember to line everything up by punching holes where the dome light screw's go, and then lining the rest up with the mounting pillars. The large box starts 2�s from the edge of the console.
Step 3: Time to go out to the car! First thing's first, DISCONNECT YOUR BATTERY! You'll be working with wires in the interior of your car, and I'm sure you don't want to pop a fuse.
Step 4: Remove your stock dome light. The screws for it may be held in with little clips, those are easily removed with a flat blade screwdriver.
Step 5: Once everything is removed from the headliner, take you're template, and using the holes you punched for your dome light screw posts, line it up on your headliner, and then use masking tape to hold it up.
Time to get your trusty razor blade.
Cutting the headliner can be very intimidating, but it's a lot easier than you think. Remember, patients is the key here, start slow, go slow! Start with the two smaller rear boxes, cut each edge along the template with the razor and start to peel layers of the headliner out, until you have a remotely clean looking hole, rinse wash and repeat for the second smaller box. Watch for the dome light wires when cutting!
Step 6: Now it's time to cut the larger square, don't rush into this! This square gets cut a certain way to keep the headliner upholstery looking nice and tight after the installation. Follow the instructions in the following diagram:


Step 8: Time to splice some wire!
If you got the wiring harness with your overhead console, this'll allow you to do a neater installation. Cut the plug that goes into the console with about 3� of slack after the plug. You'll have three color wires to worry about, Black, Orange, and White/Purple. You splice these wires into the stock dome light wires, which are tucked under the headliner, in my case, on the left side. Pull them into view, strip a bit on each of them, and solder your wires to them. Patch up with electrical tape, and tuck the wires back into place. Note: Do this as neat as possible, there's not a lot of free space up there and you'll need as much as you can get to slide the console in.
Note: If you console did not come with the wiring harness, then simply get about 3� of slack from the plug on your console, cut behind it, and splice from there.
My end result was a nice and neat little plug:

Step 9: Take those four mounting screws and screw them into the pre-drilled holes. Pretty simple step, right? One thing to look for here is a ground wire screwed into one of the mounting screw holes, simply unscrew it, and screw it into one of the spare holes. Another issue was the drilled holes not being threaded, easy fix to that: Take that ground screw, and screw it into the mounting holes a few times, problem solved!
Step 10: Before sliding the console into place, grab your dome light bulb, make sure it works, and hook up the battery, and test that everything in the console works, map light, dome light, buttons, etc. Once you're good to go hold up your console, and begin to slowly, but sternly push back and up, it's a bugger to get on. Eventually it'll clip onto the mounting screws and your dome light screw pillars will line up.
Note: Right here! Test to make sure the buttons still work, you may have issues with the headliner not being cut enough and the buttons sticking, if this happens take the console off and clear out the headliner. Be careful when doing this, because the console can rip up your headliner.
Once one and you are satisfied, screw in the two screws for the dome light, put your bulb in, clip the white plastic piece in and marvel in your new interior centerpiece! Good job.
Just some other notes:
The dome light bulb clips in the overhead consoles tend to be weak, and can not even properly clip the bulb in at times. Best thing to do here is to JB weld them into place, as we had to do:

Special Thanks To:
JamesC of the ThirdGen forums, for your great help, and coupe / T-Top version pictures.

Very thorough write up. Thanks for taking the time to inform others.
I bought a HT O/H for my son's car but haven't installed it yet. I don't have the mounting brackets, just the console.
I bought a HT O/H for my son's car but haven't installed it yet. I don't have the mounting brackets, just the console.
Supreme Member
iTrader: (21)
Joined: Dec 2005
Posts: 4,075
Likes: 1
Car: 04 Silverado
Engine: 4.8
Transmission: auto
At first glance I was going to break your ***** because this topic has been covered so many times, but after seeing the post, you deserve a sticky because this is by-far the best I have seen. 

Just a note, I substituted the original article in the Tech Articles section with this newer article.
Direct link: https://www.thirdgen.org/step-by-ste...e-installation
Pictures are also hosted here on TGO.
Thanks.
Direct link: https://www.thirdgen.org/step-by-ste...e-installation
Pictures are also hosted here on TGO.
Thanks.
Thread Starter
Senior Member
iTrader: (1)
Joined: Oct 2006
Posts: 558
Likes: 0
From: Pittsburgh, PA
Car: 1992 Pontiac Firebird
Engine: 3.1
Transmission: 700R4
Axle/Gears: 3.42 Auburn Posi
WOW! THANKS JT!
I sent you a PM regarding the steps 2 and 6 images not loading correctly on the one in the tech articles, thanks again, it's an honor!
I sent you a PM regarding the steps 2 and 6 images not loading correctly on the one in the tech articles, thanks again, it's an honor!


Joined: May 2009
Posts: 4,915
Likes: 40
From: Far West
Car: 1986 Camaro Z28 IROC-Z
Engine: 350 Tuned Port Injection, for now.
Transmission: 700R4
Axle/Gears: Posi - 3.23
Re: Step by Step Overhead Console Installation Guide
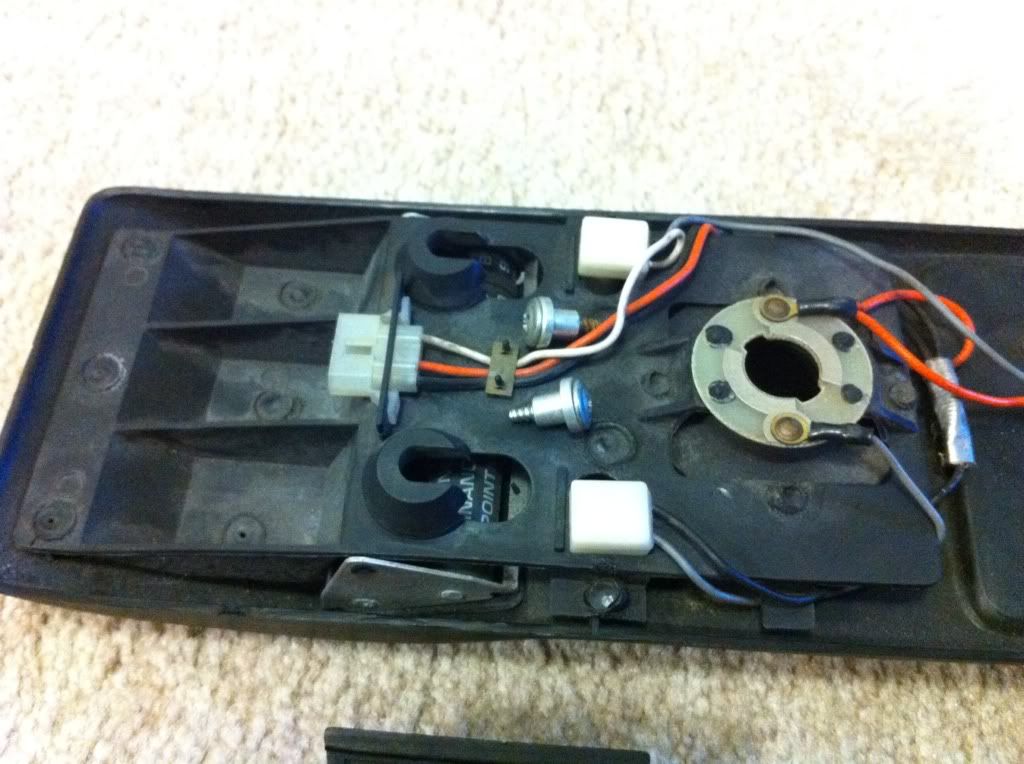
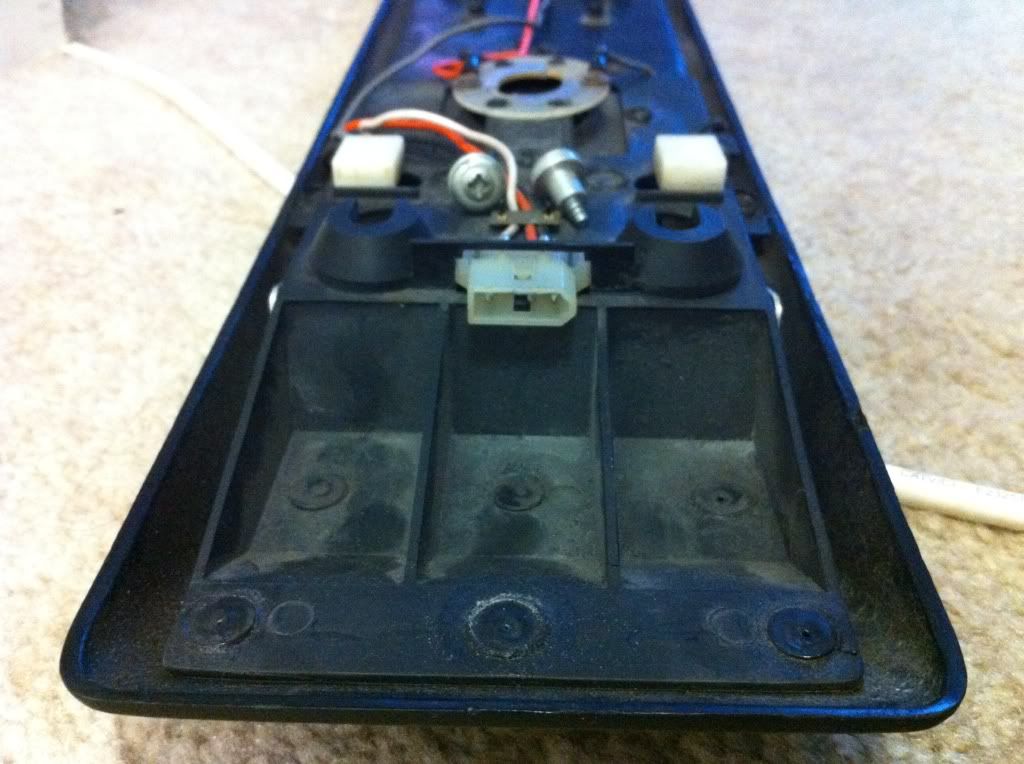
Big question here. My overhead console is currently just the small black dome light housing with 2 wires, white and orange. On the t-top overhead that I just got, there is a connector with 3 male prongs that are associated with colored wires, black, white, and orange (pict below). How and what must I do to connect these 3 wires to my existing white and orange wire?
a9e492d1.jpg?t=1342825769
f769d80a.jpg?t=1342825777
a9e492d1.jpg?t=1342825769
f769d80a.jpg?t=1342825777
Trending Topics
Joined: May 2009
Posts: 4,915
Likes: 40
From: Far West
Car: 1986 Camaro Z28 IROC-Z
Engine: 350 Tuned Port Injection, for now.
Transmission: 700R4
Axle/Gears: Posi - 3.23
Re: Step by Step Overhead Console Installation Guide
Big question here. My overhead console is currently just the small black dome light housing with 2 wires, white and orange. On the t-top overhead that I just got, there is a connector with 3 male prongs that are associated with colored wires, black, white, and orange (pict below). How and what must I do to connect these 3 wires to my existing white and orange wire?

Joined: Feb 2004
Posts: 1,942
Likes: 30
From: Levittown Pa
Car: 89 Iroc Convertible
Engine: 305 TPI
Transmission: 700R4
Axle/Gears: 3.27 Posi 9 bolt PBR
Re: Step by Step Overhead Console Installation Guide
Did you get the other end of the connector?If not I have a bunch of them available
Joined: May 2009
Posts: 4,915
Likes: 40
From: Far West
Car: 1986 Camaro Z28 IROC-Z
Engine: 350 Tuned Port Injection, for now.
Transmission: 700R4
Axle/Gears: Posi - 3.23
Re: Step by Step Overhead Console Installation Guide
Joined: Feb 2004
Posts: 1,942
Likes: 30
From: Levittown Pa
Car: 89 Iroc Convertible
Engine: 305 TPI
Transmission: 700R4
Axle/Gears: 3.27 Posi 9 bolt PBR
Re: Step by Step Overhead Console Installation Guide
Yeah I should have a spare bulb socket.Id take 6 dollars shipped for the harness pigtail
Joined: Feb 2004
Posts: 1,942
Likes: 30
From: Levittown Pa
Car: 89 Iroc Convertible
Engine: 305 TPI
Transmission: 700R4
Axle/Gears: 3.27 Posi 9 bolt PBR
Re: Step by Step Overhead Console Installation Guide
Pic of the pigtail and socket

Junior Member
Joined: Jul 2013
Posts: 53
Likes: 0
From: Tukwila, WA
Car: 1985 Pontiac Trans Am
Engine: 305 V8 5.0L
Transmission: Hydra-Matic 4spd Automatic
Re: Step by Step Overhead Console Installation Guide
Ok, calling this back from the dead for help. I've got an upper console that has a 4th purple wire, so I'm really confused. My 2 wire dome light has 2 white wires, so I spliced 1 to white and 1 to orange on the upper console molex plug.
My upper console molex also has a purple and a black ground. I've grounded the black to the car, but I'm confused what to do with the purple. Currently it only turns on the map light, the dome light does nothing. Any tips?
My upper console molex also has a purple and a black ground. I've grounded the black to the car, but I'm confused what to do with the purple. Currently it only turns on the map light, the dome light does nothing. Any tips?

Junior Member
Joined: Sep 2013
Posts: 37
Likes: 0
From: Northern AZ
Car: 1996 Firebird
Engine: 3800 Series II
Transmission: 4-speed Manual w/ OD
Axle/Gears: 3.73
Re: Step by Step Overhead Console Installation Guide
Ok, calling this back from the dead for help. I've got an upper console that has a 4th purple wire, so I'm really confused. My 2 wire dome light has 2 white wires, so I spliced 1 to white and 1 to orange on the upper console molex plug.
My upper console molex also has a purple and a black ground. I've grounded the black to the car, but I'm confused what to do with the purple. Currently it only turns on the map light, the dome light does nothing. Any tips?
My upper console molex also has a purple and a black ground. I've grounded the black to the car, but I'm confused what to do with the purple. Currently it only turns on the map light, the dome light does nothing. Any tips?
Your console was taken from a Berlinetta. The PURPLE / WHITE striped wire acts as the switched ground wire ( WHITE on regular cars - from door switches. ) The other 2 wires are the orange ( power ) and black ( ground )
The Berlinetta had additional wiring because it has a special timed relay for the switched ground signal. Once switched ground was tripped by the door switch - the relay would hold the switched ground for a minute or 2.
.

Joined: Aug 1999
Posts: 5,268
Likes: 466
From: RI
Car: 1984 Camaro Berlinetta
Engine: LT1
Transmission: T56 6-speed
Axle/Gears: 4.11 LS1 Rear End
Re: Step by Step Overhead Console Installation Guide
The "regular" and the Berlinetta style connectors are shown here.

The PURPLE/WHITE wire acts as the switched ground from the door switches...... ( or the WHITE wire on 'regular' thirdgens.) The SOLID PURPLE wire was used for the 'timed' courtesy circuit.
Funny thing,... The picture at the top of this page shown my Z28,... my 95 Z28. If anyone ever decides to install a thirdgen roof console in thier 4th gen T-Top car than it's GOT to be a T-Top style roof console. ( I am not SURE, but I think 4th gen hardtops need a thirdgen T-Top console too.) Also be advised that you've got to cut a small hole in the roof metal to allow room for the light bulb to sit inside the roof frame.
Last edited by John in RI; Oct 24, 2013 at 01:35 AM. Reason: Added pic
Joined: Aug 1999
Posts: 5,268
Likes: 466
From: RI
Car: 1984 Camaro Berlinetta
Engine: LT1
Transmission: T56 6-speed
Axle/Gears: 4.11 LS1 Rear End
Re: Step by Step Overhead Console Installation Guide
You might want to check the dome bulb to be sure it's good.
Did you check first to be sure what one of your 2 original white wires was the power and what one was ground ?? (You might have the 2 white wires reversed. )
Junior Member
Joined: Jul 2013
Posts: 53
Likes: 0
From: Tukwila, WA
Car: 1985 Pontiac Trans Am
Engine: 305 V8 5.0L
Transmission: Hydra-Matic 4spd Automatic
Re: Step by Step Overhead Console Installation Guide
Lots of good info, thanks guys. I tried to match the wires based on which wire was going to which pole on the original and on the new console, so I think I have it right, it was only when trying to figure out what the hell the purple wire was where I think I broke stuff :/
Managed to pop a fuse, so gotta pick up a new one and give it another shot with this info tonight.
Managed to pop a fuse, so gotta pick up a new one and give it another shot with this info tonight.
Junior Member
Joined: Sep 2013
Posts: 37
Likes: 0
From: Northern AZ
Car: 1996 Firebird
Engine: 3800 Series II
Transmission: 4-speed Manual w/ OD
Axle/Gears: 3.73
Re: Step by Step Overhead Console Installation Guide
Funny thing,... The picture at the top of this page shown my Z28,... my 95 Z28. If anyone ever decides to install a thirdgen roof console in thier 4th gen T-Top car than it's GOT to be a T-Top style roof console. ( I am not SURE, but I think 4th gen hardtops need a thirdgen T-Top console too.) Also be advised that you've got to cut a small hole in the roof metal to allow room for the light bulb to sit inside the roof frame.
.
Junior Member
iTrader: (2)
Joined: Nov 2006
Posts: 94
Likes: 0
From: Snellville, GA
Car: '88 Iroc-Z
Engine: LS1
Transmission: 4L60E
Axle/Gears: 3.23 posi 10 bolt
Re: Step by Step Overhead Console Installation Guide
Made reference to this thread when installing my console today. It was very helpful. I'd like to add that with the different mounting locations for the non-t-top console, I had to move the small holes in the template forward one inch. Therefore, the distance between the large hole & small holes is 2" instead of 3" as referenced on the template for t-top consoles shown earlier in the thread.
Junior Member
Joined: Jan 2014
Posts: 57
Likes: 0
From: Sherwood, OR
Car: 1984 Camaro
Engine: V6 2.8
Transmission: 700r4
Re: Step by Step Overhead Console Installation Guide
the templates dont show up? can anyone that has them pm me with it? ive got 2 consules that id love to install!
Joined: Aug 1999
Posts: 19,282
Likes: 103
From: Lawrence, KS
Car: Met. Silver 85 IROC/Sold
Engine: 350 HO Deluxe (350ci/330hp)
Transmission: T-5 (Non-WC)
Axle/Gears: Limited Slip 3.23's
Re: Step by Step Overhead Console Installation Guide

Junior Member
iTrader: (2)
Joined: Nov 2000
Posts: 99
Likes: 0
From: Virginia Beach, VA
Transmission: 700R4
Axle/Gears: 2.73
Re: Step by Step Overhead Console Installation Guide
So if i am putting in a 4 wire console in a 92 Trans Am with 3 wires, i just take the purple wire and ground it?

Thread
Thread Starter
Forum
Replies
Last Post