
Interior restoration - 1984 Trans Am

Thread Starter
Senior Member
Joined: Sep 2008
Posts: 588
Likes: 2
From: France
Car: 1984 Pontiac Firebird Trans Am
Engine: V8 5.0L HO (L69)
Transmission: B&W T5
Axle/Gears: 3.73 limited slip
Interior restoration - 1984 Trans Am
Hi,
I will share the process of the restoration/customisation of the interior of my 1984 Trans Am. It was originally a Light Sand Gray deluxe interior with the uncommon Lear Siegler seats and split rears. The seats fabric was in terrible condition, but the seats and foams are fine. Needless to say good parts in this specific trim is impossible to find. Yet I decided to keep this color as I much prefer light interiors, but with newer materials.
Here's the car, the exterior is mostly finished (needs decals) :

In 2012 I had the opportunity to buy two excellent upholstery leather hides in the shade I wanted (with a 15" laptop for size comparison).

Later last year I bought an industrial sewing machine, a vintage Pfaff 141-6 compound feed.

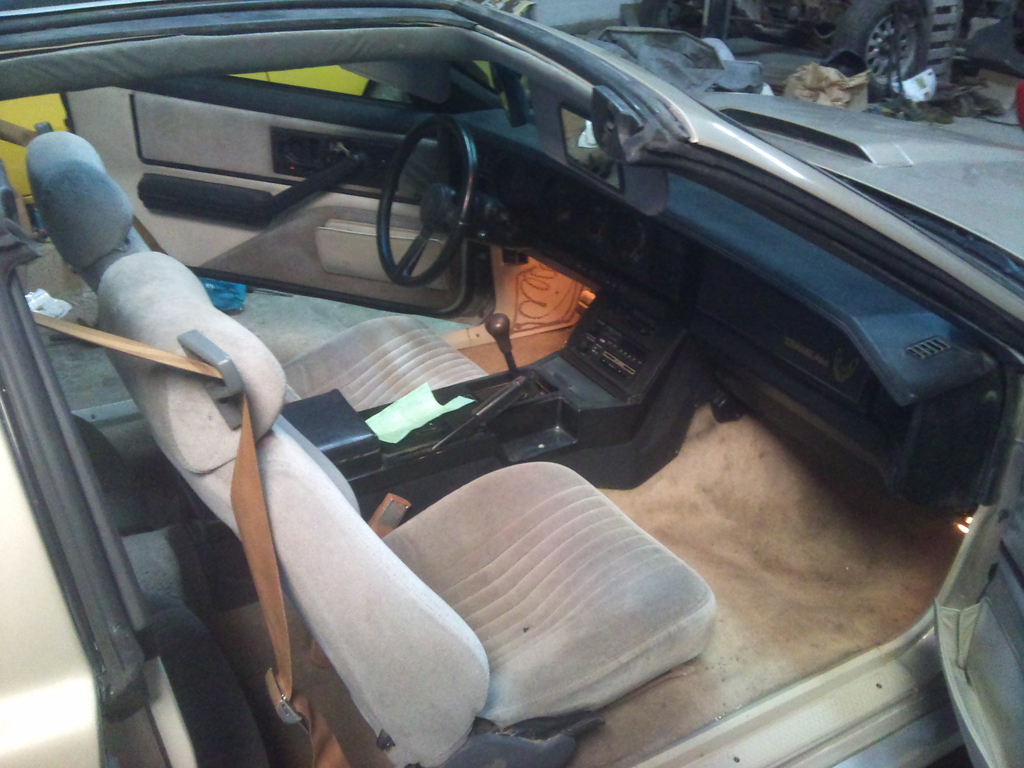
Here's the interior prior to the work, with '89 base seats from my parts car, 1980 Camel Tan seat belts from another parts car, a 1991-92 sagging headliner and '89 hard top sunvisors and speakers covers, some missing stuff, not very good looking :


I will share the process of the restoration/customisation of the interior of my 1984 Trans Am. It was originally a Light Sand Gray deluxe interior with the uncommon Lear Siegler seats and split rears. The seats fabric was in terrible condition, but the seats and foams are fine. Needless to say good parts in this specific trim is impossible to find. Yet I decided to keep this color as I much prefer light interiors, but with newer materials.
Here's the car, the exterior is mostly finished (needs decals) :

In 2012 I had the opportunity to buy two excellent upholstery leather hides in the shade I wanted (with a 15" laptop for size comparison).

Later last year I bought an industrial sewing machine, a vintage Pfaff 141-6 compound feed.

Here's the interior prior to the work, with '89 base seats from my parts car, 1980 Camel Tan seat belts from another parts car, a 1991-92 sagging headliner and '89 hard top sunvisors and speakers covers, some missing stuff, not very good looking :


Last edited by SolarGoldRaptor; Apr 14, 2015 at 05:41 PM.
Thread Starter
Senior Member
Joined: Sep 2008
Posts: 588
Likes: 2
From: France
Car: 1984 Pontiac Firebird Trans Am
Engine: V8 5.0L HO (L69)
Transmission: B&W T5
Axle/Gears: 3.73 limited slip
Re: Interior restoration
It's only last week that I started the actual work on the interior after receiving the materials (cloth, glue, thread and foams).
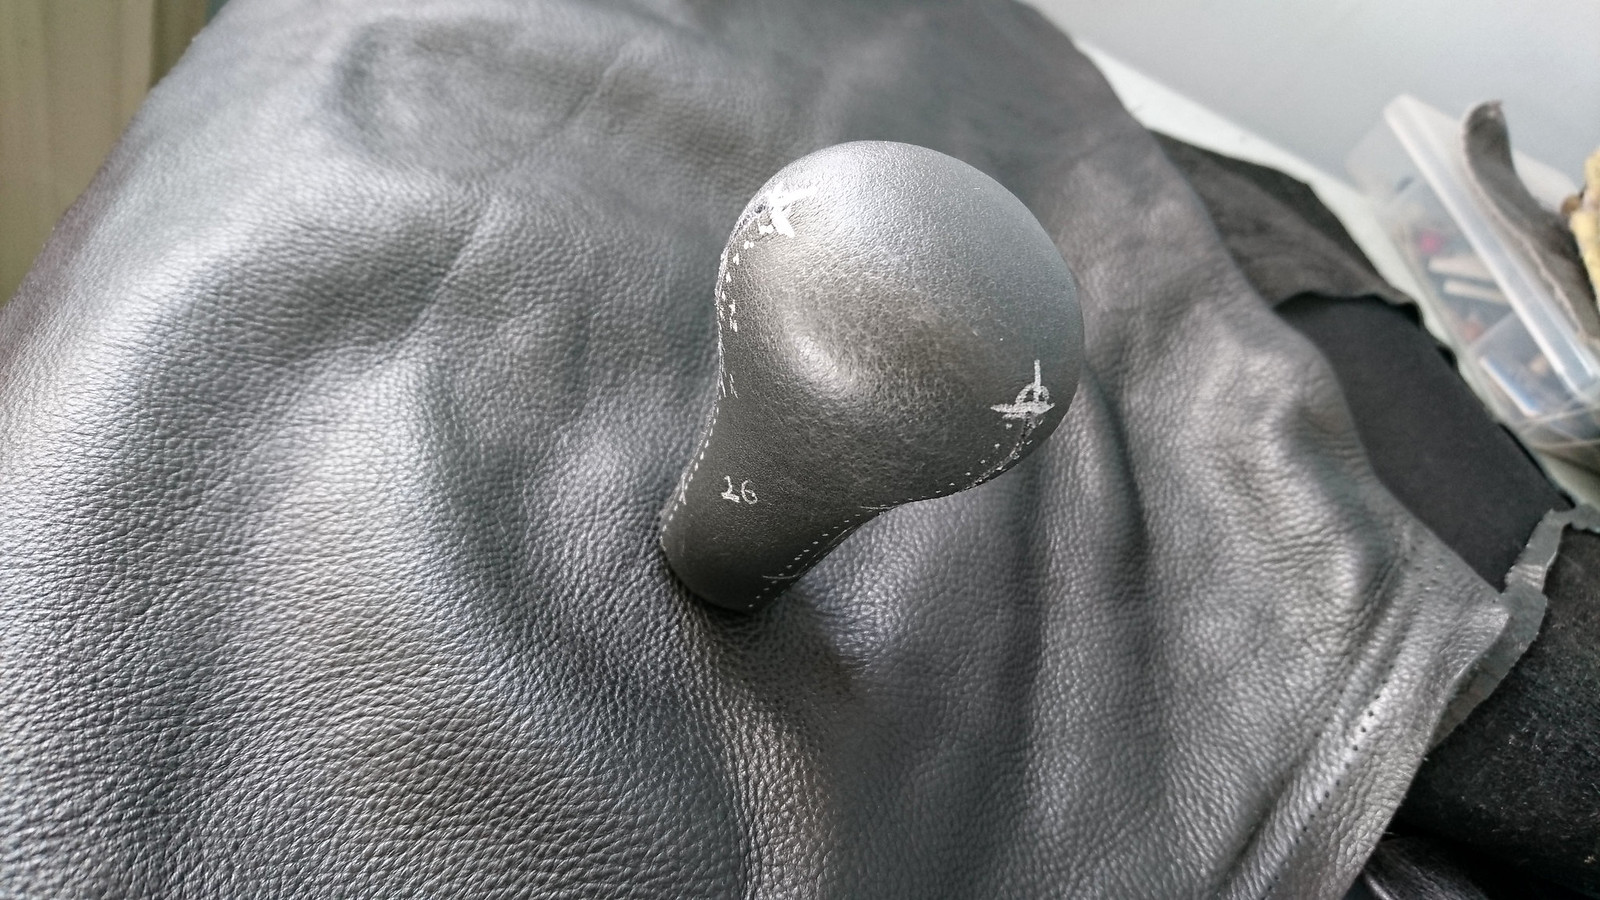
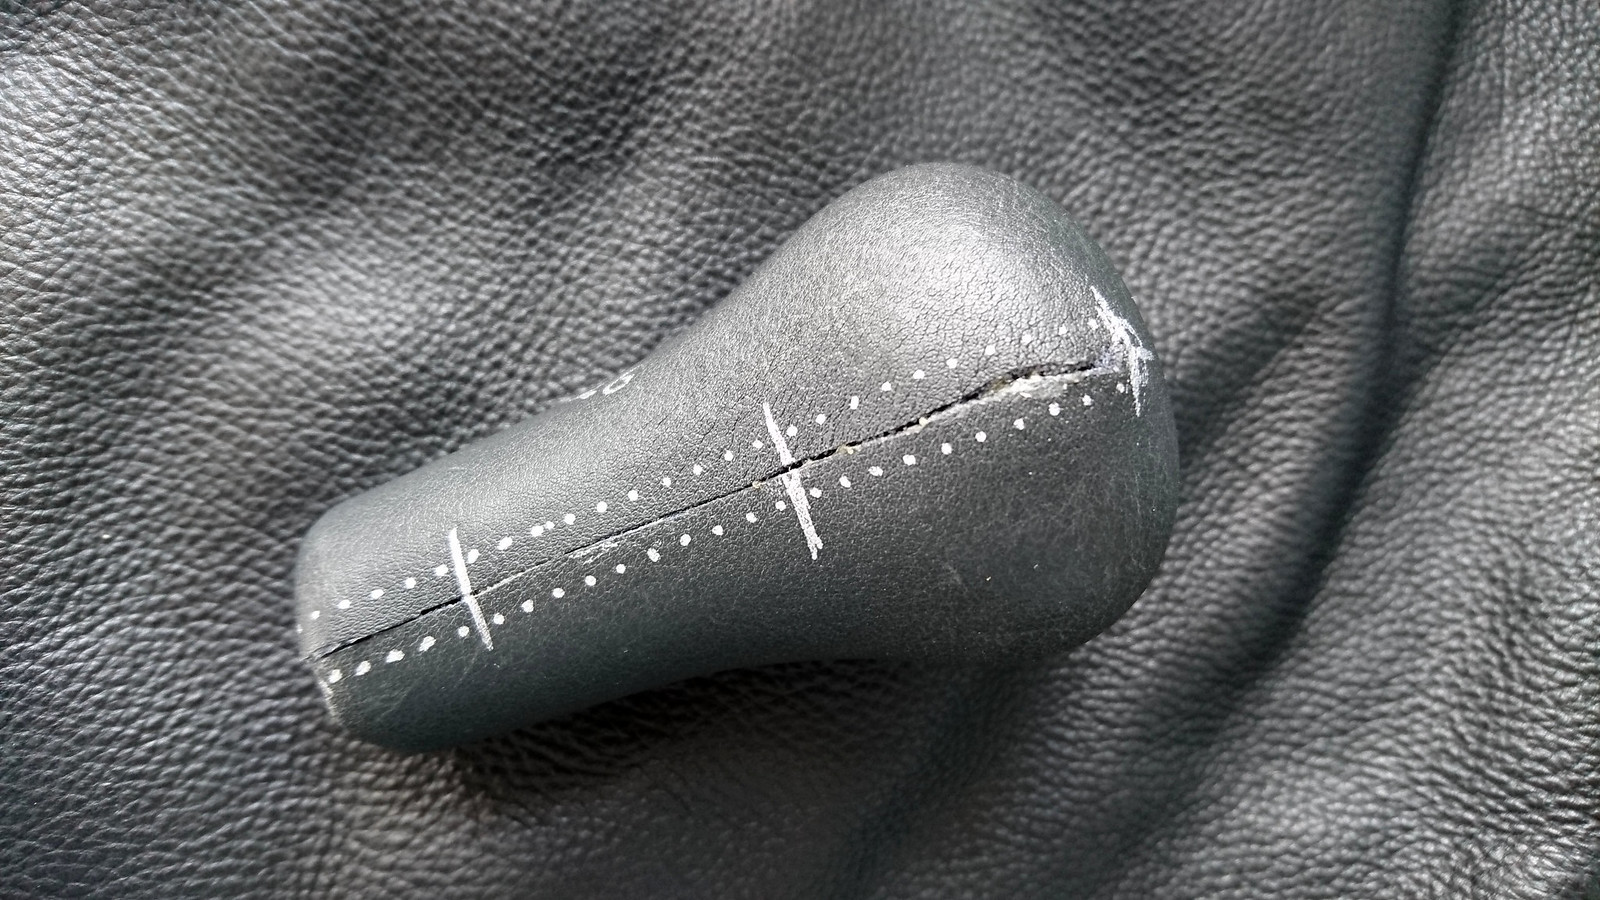
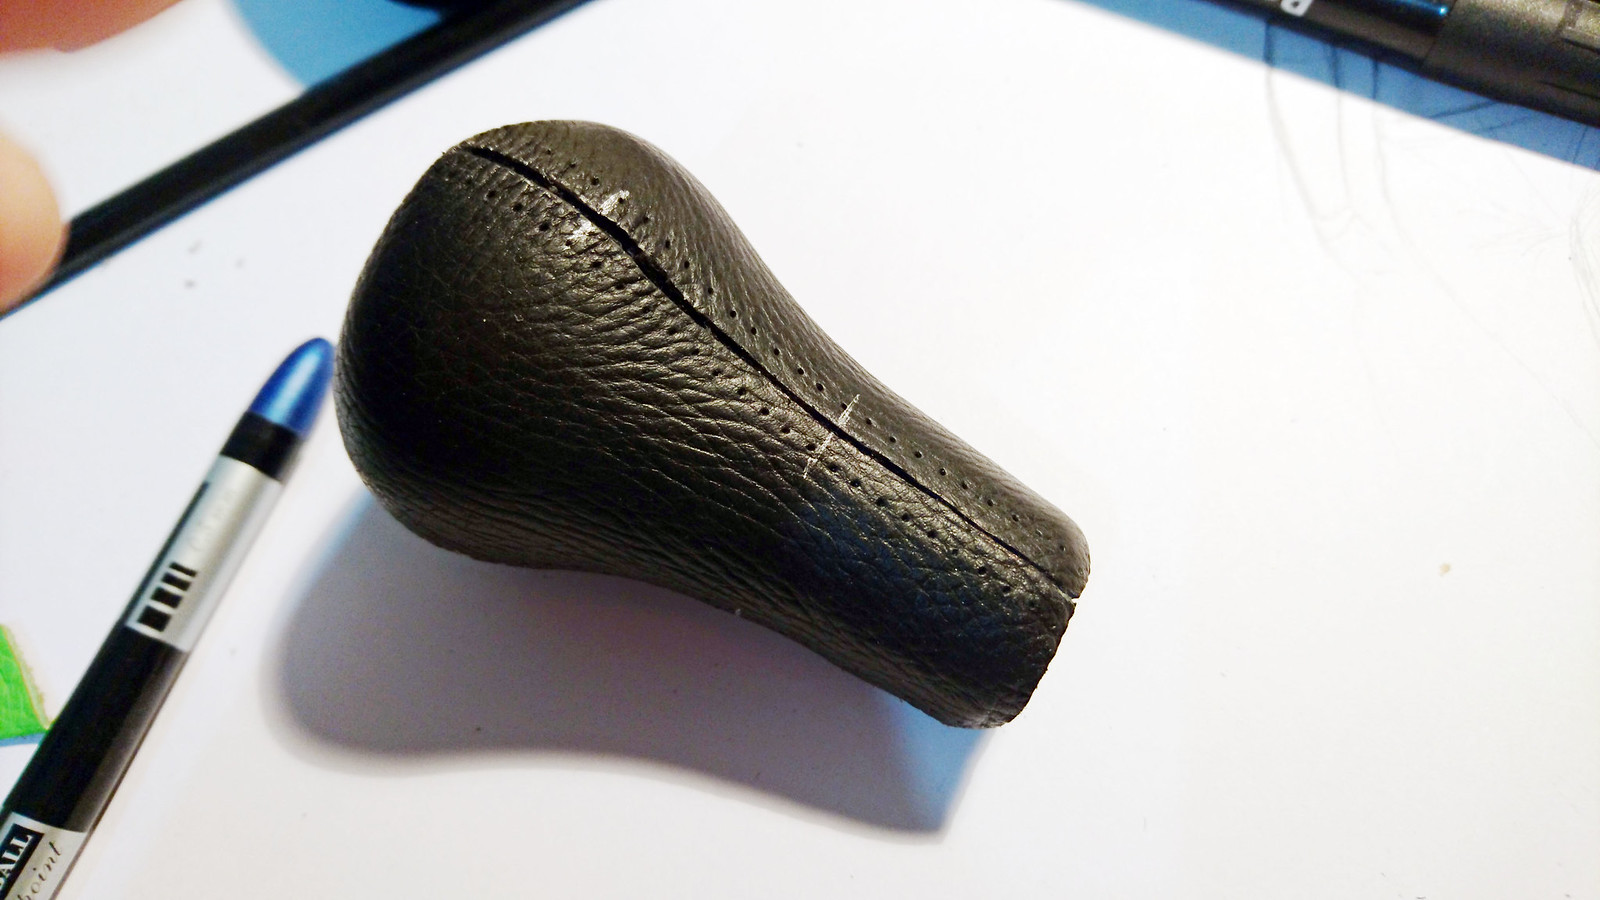
The first thing I did was the shifter boot, since it's a pretty simple part and would help me get used to my sewing machine. Yes the leather comes from the sleeve of an old perfecto jacket that was modified for a show costume.
We start with the leather laid down :

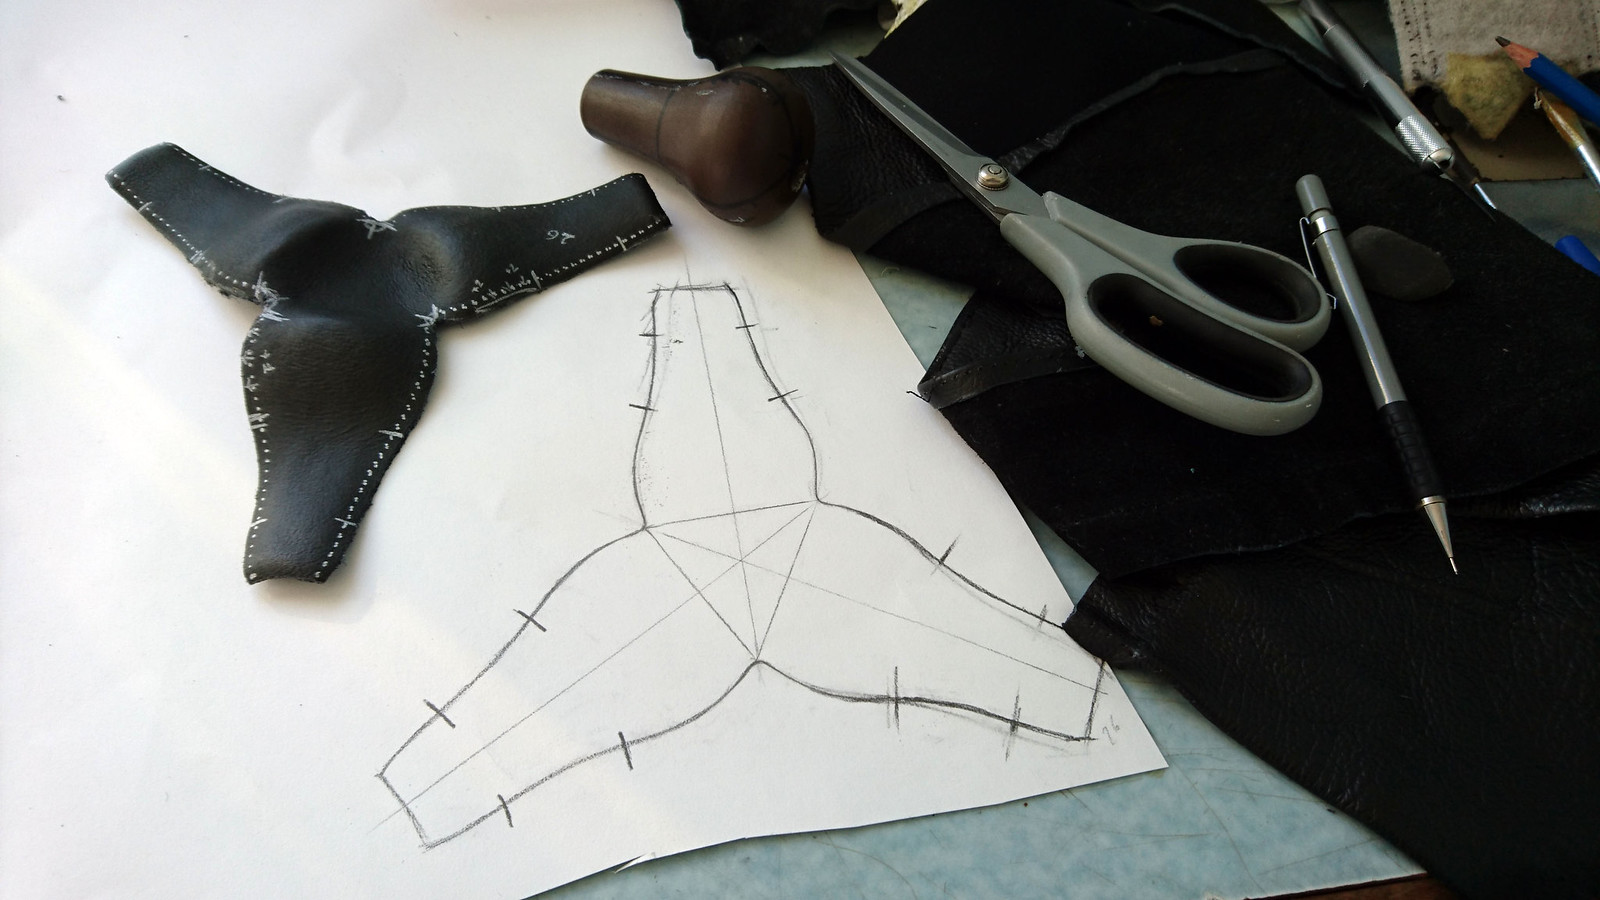
Then place the two pieces of the original boot to know where to place the pattern so it fits :

Pattern used to mark the wrong side of the leather prior to cutting :

Then sewing :

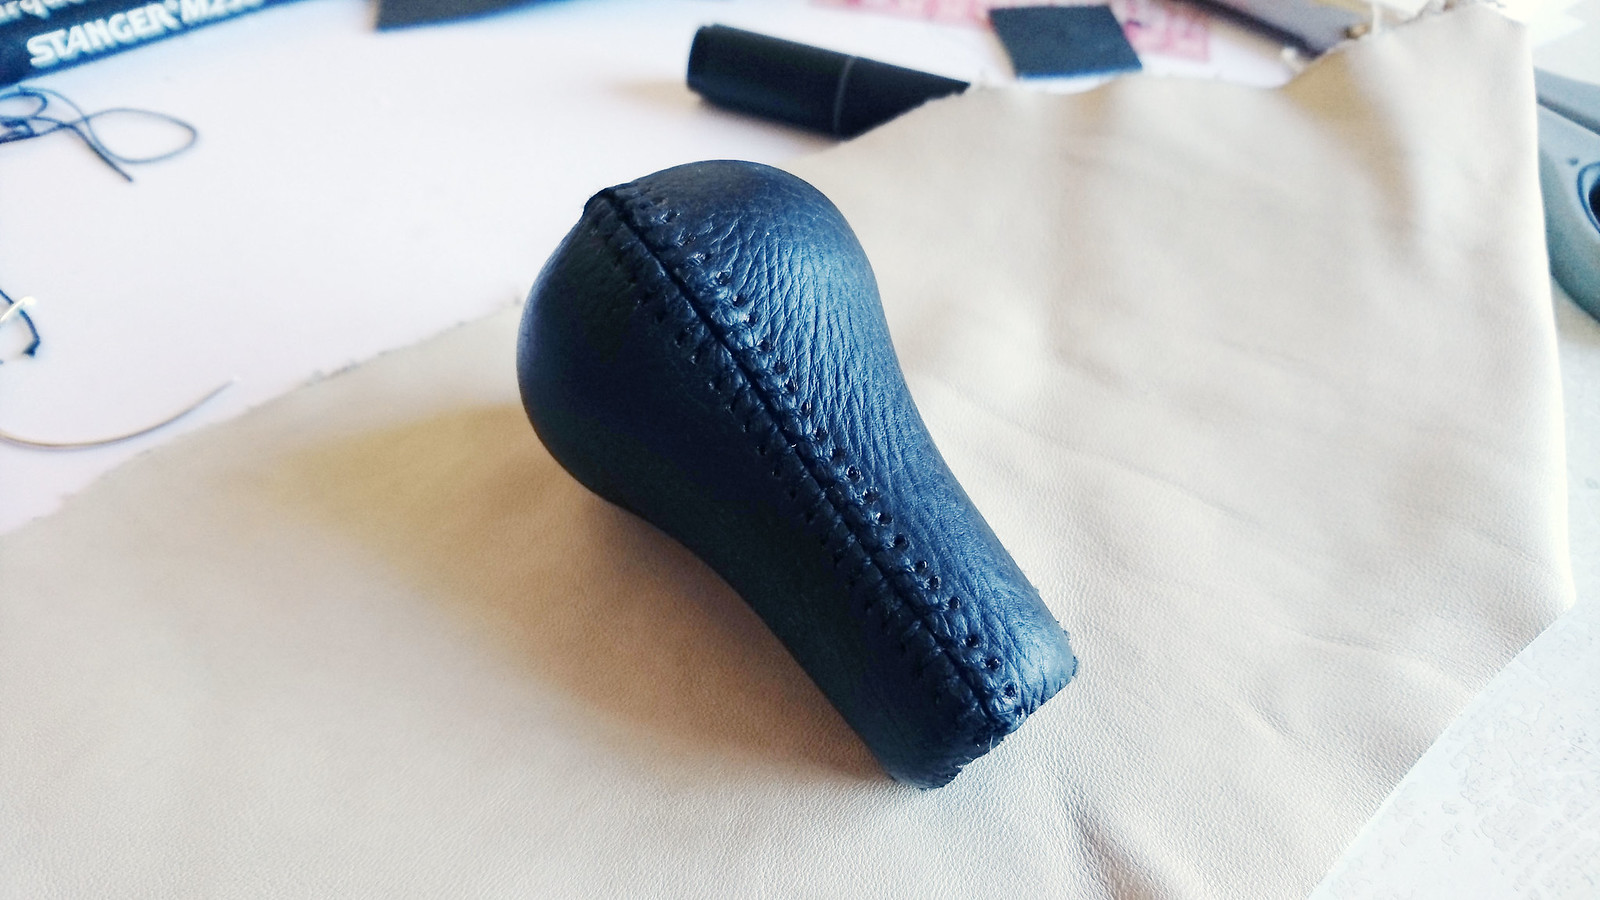
And done ! :

In the car, looks and feels a lot better without the big hole there was previously :

The first thing I did was the shifter boot, since it's a pretty simple part and would help me get used to my sewing machine. Yes the leather comes from the sleeve of an old perfecto jacket that was modified for a show costume.
We start with the leather laid down :

Then place the two pieces of the original boot to know where to place the pattern so it fits :

Pattern used to mark the wrong side of the leather prior to cutting :

Then sewing :

And done ! :

In the car, looks and feels a lot better without the big hole there was previously :

Thread Starter
Senior Member
Joined: Sep 2008
Posts: 588
Likes: 2
From: France
Car: 1984 Pontiac Firebird Trans Am
Engine: V8 5.0L HO (L69)
Transmission: B&W T5
Axle/Gears: 3.73 limited slip
Re: Interior restoration
Here's a simple sketch of the interior concept. I want something that looks like it came out of the 80's, a retro tech inspiration, mixed with the screaming eagle "grandeur". Just one color, as it's already a bit over the top. I changed my mind later about the door panels :

This is the new cloth for the headliner and other parts of the interior. It a very light beige, suede like foam backed fabric of excellent quality :

The same cloth sewn to the sunvisors cardboard,

I had to use a thick cloth on the back to keep an even tension otherwise it was just too loose as the thread didn't go back in the cardboard. And even with the cloth it's still a bit loose :

And done. I kinda screwed up the surrounding seam on bottom one. But it's really hard to sew that many thicknesses (foam backed fabric x 4, cardboard x 2, orange backing fabric x 2 ) :
Headliner is done as well as the speaker covers. As you can see, I had to add a couple piece on each side of the center part as the cloth, while great, just wouldn't stretch enough for the complex shape of the headliner. It looks acceptable, just not what I wanted at first. I made it so it matches the angular shape of the seats design :


This is the new cloth for the headliner and other parts of the interior. It a very light beige, suede like foam backed fabric of excellent quality :

The same cloth sewn to the sunvisors cardboard,

I had to use a thick cloth on the back to keep an even tension otherwise it was just too loose as the thread didn't go back in the cardboard. And even with the cloth it's still a bit loose :

And done. I kinda screwed up the surrounding seam on bottom one. But it's really hard to sew that many thicknesses (foam backed fabric x 4, cardboard x 2, orange backing fabric x 2 ) :

Headliner is done as well as the speaker covers. As you can see, I had to add a couple piece on each side of the center part as the cloth, while great, just wouldn't stretch enough for the complex shape of the headliner. It looks acceptable, just not what I wanted at first. I made it so it matches the angular shape of the seats design :


Thread Starter
Senior Member
Joined: Sep 2008
Posts: 588
Likes: 2
From: France
Car: 1984 Pontiac Firebird Trans Am
Engine: V8 5.0L HO (L69)
Transmission: B&W T5
Axle/Gears: 3.73 limited slip
Re: Interior restoration - 1984 Trans Am
Today I replaced the old faded and dirty Pallex cloth of the door panels with the new cloth. It looks nearly white in the pics but it's the same cloth as the headliner :


And I covered the trim piece in leather, which is a little bit lighter than the original plastics :

Next :
- seats
- knee pad
- shifter **** and brake lever handle
- carpet


And I covered the trim piece in leather, which is a little bit lighter than the original plastics :

Next :
- seats
- knee pad
- shifter **** and brake lever handle
- carpet


Joined: Aug 2013
Posts: 4,815
Likes: 906
From: MICHIGAN
Car: 1988 Trans Am
Engine: L03
Transmission: 700R4
Axle/Gears: 10 Bolt 2.73 Open


Trending Topics
Supreme Member
Joined: Nov 2009
Posts: 1,255
Likes: 54
From: Lincoln, NE.
Car: '87 IROC
Engine: 5.7 Vortec w/ factory TPI
Transmission: WC T-5
Axle/Gears: 3.45 Posi
Re: Interior restoration - 1984 Trans Am
Very nice job so far! I take it you have some experience sewing because that does not look like a first time attempt.
Thread Starter
Senior Member
Joined: Sep 2008
Posts: 588
Likes: 2
From: France
Car: 1984 Pontiac Firebird Trans Am
Engine: V8 5.0L HO (L69)
Transmission: B&W T5
Axle/Gears: 3.73 limited slip
Re: Interior restoration - 1984 Trans Am
Thanks everyone !
I actually have a degree in fashion design/pattern drafting and have sewn a lot to get it But I haven't done much in the past couple years.
I actually have a degree in fashion design/pattern drafting and have sewn a lot to get it
But I haven't done much in the past couple years. Senior Member
iTrader: (3)
Joined: Jan 2012
Posts: 877
Likes: 2
From: Clark NJ
Car: 1988 Pontiac Transam GTA Notchback
Engine: 2003 Chevy 5.3 Vortec (325 cu)
Transmission: 4L60E
Axle/Gears: 3.27
Re: Interior restoration - 1984 Trans Am
very nice, keep up the good work
Thread Starter
Senior Member
Joined: Sep 2008
Posts: 588
Likes: 2
From: France
Car: 1984 Pontiac Firebird Trans Am
Engine: V8 5.0L HO (L69)
Transmission: B&W T5
Axle/Gears: 3.73 limited slip
Re: Interior restoration - 1984 Trans Am
I didn't find the time to to much on my car since then. But this week I did the shifter **** and parking brake handle and started making the patterns for the front seats. :
First step, I took a piece of cheap bycast leather to shape the pattern. You need contact cement for this. I used pictures of an original **** to know how it's supposed to be cut and sewn :
I made marks to be sure I could glue it back properly. I marked the stitching holes. :
I removed the leather and made the pattern :
Then I cut the final leather, made the holes or the stitching with my machine and glued it back on. It's rather tricky here.
And finally, I did the baseball stitch :

The e-brake handle :
Sadly the original is in poor condition :

It's even worse once the leather is removed :

So I had an idea : use the '89 parts car handle. The shape is different an much more angular, I prefer it, but it's not a direct fit as it a good bit longer in the back. Thankfully, these are made of thick plastic, so I just cut what was in the way and it dropped right in and the screw hole is perfectly aligned !
I rounded off the corners and sanded the surface. No regret, it wasn't in great condition, lots of scratches, the plastic had yellowed and I dropped some thinner on it by mistake :

I cleaned the hole afterwards :

Then again, cover the part in leather to get the pattern :

First step, I took a piece of cheap bycast leather to shape the pattern. You need contact cement for this. I used pictures of an original **** to know how it's supposed to be cut and sewn :
I made marks to be sure I could glue it back properly. I marked the stitching holes. :
I removed the leather and made the pattern :
Then I cut the final leather, made the holes or the stitching with my machine and glued it back on. It's rather tricky here.
And finally, I did the baseball stitch :
The e-brake handle :
Sadly the original is in poor condition :
It's even worse once the leather is removed :
So I had an idea : use the '89 parts car handle. The shape is different an much more angular, I prefer it, but it's not a direct fit as it a good bit longer in the back. Thankfully, these are made of thick plastic, so I just cut what was in the way and it dropped right in and the screw hole is perfectly aligned !
I rounded off the corners and sanded the surface. No regret, it wasn't in great condition, lots of scratches, the plastic had yellowed and I dropped some thinner on it by mistake :
I cleaned the hole afterwards :
Then again, cover the part in leather to get the pattern :
Thread Starter
Senior Member
Joined: Sep 2008
Posts: 588
Likes: 2
From: France
Car: 1984 Pontiac Firebird Trans Am
Engine: V8 5.0L HO (L69)
Transmission: B&W T5
Axle/Gears: 3.73 limited slip
Re: Interior restoration - 1984 Trans Am
And done ! :


Here's the result.


Here's the result.
Joined: Nov 2002
Posts: 6,649
Likes: 405
From: Oyth
Car: 89RS vert
Engine: Erod
Transmission: 4L65e
Axle/Gears: BW, 3.27
Re: Interior restoration - 1984 Trans Am
Impressive, I love it.
What type of tool did you use to make the stitching holes?
What type of tool did you use to make the stitching holes?
Thread Starter
Senior Member
Joined: Sep 2008
Posts: 588
Likes: 2
From: France
Car: 1984 Pontiac Firebird Trans Am
Engine: V8 5.0L HO (L69)
Transmission: B&W T5
Axle/Gears: 3.73 limited slip
Re: Interior restoration - 1984 Trans Am
Thanks !
I simply used the sewing machine.
I simply used the sewing machine.
Thread Starter
Senior Member
Joined: Sep 2008
Posts: 588
Likes: 2
From: France
Car: 1984 Pontiac Firebird Trans Am
Engine: V8 5.0L HO (L69)
Transmission: B&W T5
Axle/Gears: 3.73 limited slip
Re: Interior restoration - 1984 Trans Am
Thanks guys !
I'm back on the drawing board, those patterns are getting complicated but I'm nearly done with them. I need to finish the backs of the front seats, make sure all the measurements are good and I'll start cutting the leather. I've ordered an hog ring plier.

The seat frames will need some work. The driver side is very rusty, and I'll have to make new springs out of piano wire.
I'm back on the drawing board, those patterns are getting complicated but I'm nearly done with them. I need to finish the backs of the front seats, make sure all the measurements are good and I'll start cutting the leather. I've ordered an hog ring plier.
The seat frames will need some work. The driver side is very rusty, and I'll have to make new springs out of piano wire.
Joined: Jul 2006
Posts: 1,279
Likes: 512
From: Rochester NY
Car: 1984 TA (1 stock / 1 custom)
Engine: LG4 / turbo LQ4
Transmission: 700R4 / 4L80E
Axle/Gears: Stock / 3:50 Moser 9"
Re: Interior restoration - 1984 Trans Am
Thanks for sharing. Cool project and it's turning out great.
I have a '84 TA with saddle tan interior so I feel your pain about not being able to find interior pieces.
I have a '84 TA with saddle tan interior so I feel your pain about not being able to find interior pieces.
Thread Starter
Senior Member
Joined: Sep 2008
Posts: 588
Likes: 2
From: France
Car: 1984 Pontiac Firebird Trans Am
Engine: V8 5.0L HO (L69)
Transmission: B&W T5
Axle/Gears: 3.73 limited slip
Re: Interior restoration - 1984 Trans Am
The patterns for the front seats are done. The measurements have been checked, it's all good, the leather is ready to be cut. There just one piece I'm not sure if I'll do it in leather or keep the original fabric : it's the carpet on the back of the front seat bottom. I fear it won't match with the future new carpet.
Here the pieces for the rear seats all cut and waiting to be sewn :

A rear seat bottom I had started earlier. It's a bit experimental, I'll do some things differently for the rest :


Here the pieces for the rear seats all cut and waiting to be sewn :
A rear seat bottom I had started earlier. It's a bit experimental, I'll do some things differently for the rest :

Senior Member
Joined: Jun 2013
Posts: 746
Likes: 24
From: Atlantic Canada
Car: 87 Trans Am
Engine: LS1
Transmission: T56
Re: Interior restoration - 1984 Trans Am
How do you get the valleys in the leather? I'm guessing the foam is grooved and you glued the fabric to it?
I'm in my textile portion of my aircraft structural tech course (we also paint, machine, do sheet metal, composites etc etc), finding this impressive!
I'm in my textile portion of my aircraft structural tech course (we also paint, machine, do sheet metal, composites etc etc), finding this impressive!
Thread Starter
Senior Member
Joined: Sep 2008
Posts: 588
Likes: 2
From: France
Car: 1984 Pontiac Firebird Trans Am
Engine: V8 5.0L HO (L69)
Transmission: B&W T5
Axle/Gears: 3.73 limited slip
Re: Interior restoration - 1984 Trans Am
No I just sew through the foam, with a thin fabric on the back so the thread doesn't cut through it. I made some tests with different thicknesses, and found the 20mm (13/16") thick foam was good with the leather I use and the effect I want from the top stitches. But you need an adequate machine. I have a needle feed Pfaff 141-6 industrial machine which works great for this but a walking foot machine would be better, those are quite a bit more expensive though.
There are a few different techniques for making pleats with foam, but since mine aren't straight, it's the only one that works.
You should have a look at the Youtube channel "Cechaflo", he makes excellent tutorials on car upholstery techniques.
After a few tries, I realised I couldn't sew the pieces together properly. I cut the foam smaller so it's not in the seam allowance. The problem comes from the presser foot that doesn't apply pressure evenly, the top thread won't catch the bottom one. It's a standard foot and isnt appropriate for sewing with so much thickness on one side. So I've just ordered a bunch of zip presser feet that apply pressure only on one side of the fabric. The foam won't be in the way and it should sew properly.
At first, I had done the foam as large as each piece, like it is originally, but the foam being so thick made it extremely hard to sew, and even worse, the seam allowance became very thick and it looked ugly and hard to manipulate.

Senior Member

Joined: Jan 2006
Posts: 726
Likes: 1
From: League City, TX
Car: 90 Formula -- tot resto in progress
Engine: 350
Transmission: 700R4 w/ 2500 stall, by Owen @ ARD
Axle/Gears: 3.23 posi disc
Re: Interior restoration - 1984 Trans Am
First off, awesome work so-far. 
I'm currently in the midst of seat cover fabrication, and the biggest lesson
learned (and is consistent with everything else I've every built over the
years) is that the first one usually gets thrown away/re-built. This can be
particularly bothersome, if the materials involved are ... expensive.
Best decision I made on this project, was to do one complete seat in
cheapo material. Then I tweaked the patterns slightly, & then the real
set came out much better.
(And a walking foot machine is also very useful. I picked up a small
capacity Thompson 10 yr's ago, for $400. )
)
Keep us posted, love to see how it progresses.
I'm currently in the midst of seat cover fabrication, and the biggest lesson
learned (and is consistent with everything else I've every built over the
years) is that the first one usually gets thrown away/re-built. This can be
particularly bothersome, if the materials involved are ... expensive.
Best decision I made on this project, was to do one complete seat in
cheapo material. Then I tweaked the patterns slightly, & then the real
set came out much better.
(And a walking foot machine is also very useful. I picked up a small
capacity Thompson 10 yr's ago, for $400.
)Keep us posted, love to see how it progresses.
Senior Member
Joined: Jan 2006
Posts: 726
Likes: 1
From: League City, TX
Car: 90 Formula -- tot resto in progress
Engine: 350
Transmission: 700R4 w/ 2500 stall, by Owen @ ARD
Axle/Gears: 3.23 posi disc
Re: Interior restoration - 1984 Trans Am
Looking back at the shifter, & parking brake cover:
(Again, awesome work...) Is the "baseball stitch" done by hand?
Sun-visor covers: were they sewn together ON the masonite panel?
If so, how close to the panel, is the cover seam?

(Again, awesome work...) Is the "baseball stitch" done by hand?
Sun-visor covers: were they sewn together ON the masonite panel?
If so, how close to the panel, is the cover seam?
Supreme Member
iTrader: (1)
Joined: May 2015
Posts: 1,154
Likes: 89
From: Temecula, CA
Car: 1989 Pontiac Formula 350
Engine: L98
Transmission: 700R4
Axle/Gears: BorgWarner 3.27 Posi
Re: Interior restoration - 1984 Trans Am
Your parts car seats look great, hah. Wish the ones in my DD were in half as good of shape.
Your seat design will complete the look. Keep up the good work!
Your seat design will complete the look. Keep up the good work!
Thread Starter
Senior Member
Joined: Sep 2008
Posts: 588
Likes: 2
From: France
Car: 1984 Pontiac Firebird Trans Am
Engine: V8 5.0L HO (L69)
Transmission: B&W T5
Axle/Gears: 3.73 limited slip
Re: Interior restoration - 1984 Trans Am
Yes they're in decent condition, but the fabric is starting to tear on the back of the front bottoms so they're not that great.
I didn't pay a lot for both hides, only �25 each in 2012 ! that's about $30, a steal for leather of that quality. But I don't want to waste it.
Yes the baseball stitch is done by hand, but the leather has to be perforated first with a machine or a punch tool.
The sun visors covers were indeed sewn with the cardboard and backing fabric together. It required a lot of trial and error to find the proper combination of fabrics and thread tension. I don't recall exactly how much seam allowance I put around the fabric, I think it was 1cm as usual. The seam allowance needs to be glued back first, then the piece is wrapped over the sunvisor base (some kind of very thick cardboard) with a bit of glue, and only then can the surrounding top stitch be done. It's tricky, as it's thick and there are several thicknesses of very different materials to go through. You can see on the picture that the stitching isn't exactly straight on the bottom one...
I received my new presser feet...and they don't fit my machine I had to grind a bit of material to make them fit.
It does work a lot better, but damn is it still tough to sew. The leather is strong but easy to sew even with several thicknesses, but with the addition of foam, it makes a somewhat complete cover extremely hard to manipulate. It's no big deal to sew a few pieces together but past a certain point it's too hard to make a proper stitch. I need to take a step back and rethink some of the process. The foam is likely the main problem, it's very thick.
The 2cm thick foam makes the pleats look just right but I guess it's too thick for the other, more simple pieces. I think I'll order some 1cm thick foam before going any further.
First off, awesome work so-far.
I'm currently in the midst of seat cover fabrication, and the biggest lesson
learned (and is consistent with everything else I've every built over the
years) is that the first one usually gets thrown away/re-built. This can be
particularly bothersome, if the materials involved are ... expensive.
Best decision I made on this project, was to do one complete seat in
cheapo material. Then I tweaked the patterns slightly, & then the real
set came out much better.
(And a walking foot machine is also very useful. I picked up a small
capacity Thompson 10 yr's ago, for $400.)
Keep us posted, love to see how it progresses.
I'm currently in the midst of seat cover fabrication, and the biggest lesson
learned (and is consistent with everything else I've every built over the
years) is that the first one usually gets thrown away/re-built. This can be
particularly bothersome, if the materials involved are ... expensive.
Best decision I made on this project, was to do one complete seat in
cheapo material. Then I tweaked the patterns slightly, & then the real
set came out much better.
(And a walking foot machine is also very useful. I picked up a small
capacity Thompson 10 yr's ago, for $400.
)Keep us posted, love to see how it progresses.
The sun visors covers were indeed sewn with the cardboard and backing fabric together. It required a lot of trial and error to find the proper combination of fabrics and thread tension. I don't recall exactly how much seam allowance I put around the fabric, I think it was 1cm as usual. The seam allowance needs to be glued back first, then the piece is wrapped over the sunvisor base (some kind of very thick cardboard) with a bit of glue, and only then can the surrounding top stitch be done. It's tricky, as it's thick and there are several thicknesses of very different materials to go through. You can see on the picture that the stitching isn't exactly straight on the bottom one...
I received my new presser feet...and they don't fit my machine
I had to grind a bit of material to make them fit.It does work a lot better, but damn is it still tough to sew. The leather is strong but easy to sew even with several thicknesses, but with the addition of foam, it makes a somewhat complete cover extremely hard to manipulate. It's no big deal to sew a few pieces together but past a certain point it's too hard to make a proper stitch. I need to take a step back and rethink some of the process. The foam is likely the main problem, it's very thick.
The 2cm thick foam makes the pleats look just right but I guess it's too thick for the other, more simple pieces. I think I'll order some 1cm thick foam before going any further.

Thread
Thread Starter
Forum
Replies
Last Post
1992 Trans Am
History / Originality
27
May 10, 2023 07:19 PM
colton_carlson
Firebirds for Sale
7
Mar 8, 2019 12:21 PM