When you click on links to various merchants on this site and make a purchase, this can result in this site earning a commission. Affiliate programs and affiliations include, but are not limited to, the eBay Partner Network.
LTX and LSXPutting LT1s, LS1s, and their variants into Third Gens is becoming more popular. This board is for those who are doing and have done the swaps so they can discuss all of their technical aspects including repairs, swap info, and performance upgrades.
yup, specifically this part : Otherwise if you are running an ls1, etc... without the 'correct' ls1 ecu (as mine is a GTO ECU) you cannot run the canister vent valve, So you can remove the ls1 tank charcoal can & vent valve, and set it up for the GTO charcoal can which doesn't use a vent valve to atmosphere.
Same as yours just an lt1, the lt1 runs the engine purge valve via the ecu then remove the ls1 firebird charcoal can off the tank and the vent valve, convert it to the GTO charcoal can and your done. No vent valve required.
Picture like so with the GTO Charcoal Canister fitted. [/QUOTE]
I plan on running the return line from the fuel rail so I won't have that same set up on the fuel pump that you do. The center line that comes out of the pump assembly connects with the same hose that yours does and goes to the canister.
The top hose on the picture that comes out of the canister on yours goes where? Mine goes to the purge solenoid valve. Is this the hose that would go to the LT1 purge solenoid valve on the intake manifold or is it the red hose?
Thats fine if you require to run a fuel sender and return line for your application.
On the pump assembly, looking at the pic, the left is the 'return', the middle is the fuel vapor, the right is the fuel out from pump. I'm presuming your removing the regulator from inside the pump assembly. (from the left line on the fuel pump assembly)
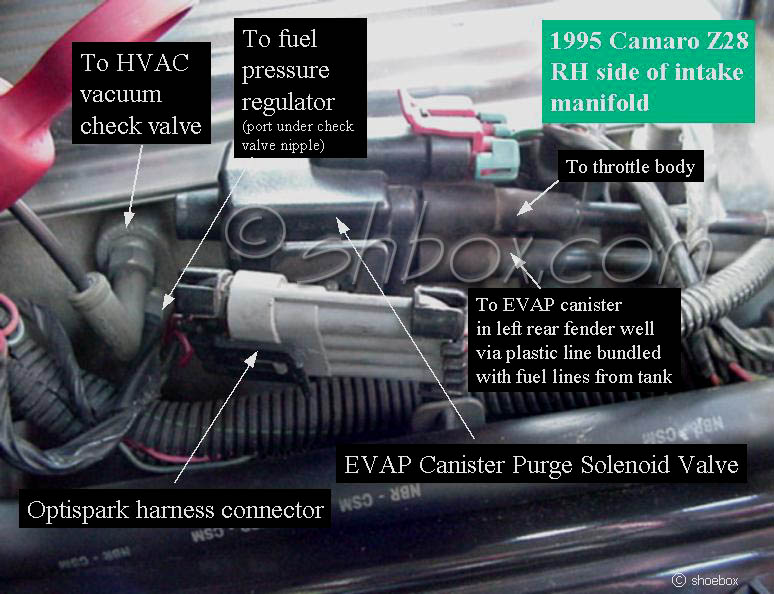
From the top line down on the charcoal can, the 1st line is the new vent to atmosphere where the vent valve would have been located, its not needed for the GTO can. The red line is your emissions line which runs to your engine, i.e evap purge solenoid. The 3rd line is the fuel tank vapor in.
Thats fine if you require to run a fuel sender and return line for your application.
On the pump assembly, looking at the pic, the left is the 'return', the middle is the fuel vapor, the right is the fuel out from pump. I'm presuming your removing the regulator from inside the pump assembly. (from the left line on the fuel pump assembly)
From the top line down on the charcoal can, the 1st line is the new vent to atmosphere where the vent valve would have been located, its not needed for the GTO can. The red line is your emissions line which runs to your engine, i.e evap purge solenoid. The 3rd line is the fuel tank vapor in.
Okay, can you buy the GTO canister from the dealer or is there a better place to buy it? One more question, what about the wiring to the purge valve, just N/A?
Okay, can you buy the GTO canister from the dealer or is there a better place to buy it? One more question, what about the wiring to the purge valve, just N/A?
Don't know, im not a resident of the US.
However looking at the gto ones on ebay, its possible that unit may be different than Aust vs US version.
The US version looks very similar to the firebird/camaro can that i removed off the tank with a minor mounting difference.
The Aus version is smaller slightly and also has the outlets in different positions & sizes.
You can see in my pic, that i run a different unit. None the less you would require the Holden VY SS Charcoal Can.
There also wouldn't be any issue retaining your existing unit (if you wanted to fit it on the tank that may be another issue of size). Remember its just a fuel vapor line that goes to the can, and from there the requirements are that of the particular can your using. You would have to check if the GTO in the US uses a vent valve, i don't have general access to this knowledge.
Us version = http://www.ebay.com/itm/04-05-06-PONTIAC-GTO-CHARCOAL-CANISTER-VAPOR-VAPO-EVAP-EVAPORATOR-OEM-/230928992456?fits=Model%3AGTO&hash=item35c470c8c8&vxp=mtrAus version =
^^^^^ Good information detailing how it works to a degree.
The purge canister solenoid can only be controlled by the relevant model ecu, be it camaro/firebird with that feature (as they are the donor for the tank), it takes various inputs from tps, maf and lots of other details and opens/closes it accordingly.
You can't run this from the lt1/ls1 ecu that does NOT have purge canister vent valve output, the evap purge is a different item all together.
Short of having a funky micro-controller that takes the inputs from the same devices a standard plastic tank ecu does and know what values it adjusts at, the simplest way to do this, is to get yourself a charcoal canister from a pontiac gto 04-06, remove the purge solenoid as the gto's have a direct to air purge without solenoid, then hook it up as you would normally do, it will still have the tank purge line into it and the line to the engine to purge, as well as an atmospheric vent.
Picture like so with the GTO Charcoal Canister fitted.
Hopefully my understanding of the Camaro EVAP system control is incorrect and this can be done easily. From my research the LS1 Camaro PCM must have two vital inputs for proper operation which some swaps are not able to provide. The PCM watches for fuel level between 15 and 85 percent fill and proper operation of the vent valve. The latter it verifies by closing the vent valve and watching the tank pressure sensor for the proper drop in atmospheric pressure. To allow the PCM to watch the fuel level swappers have to convert their cars to use the 4th gen F-body dash. The LS1 PCM provides the 4th gen dash with fuel level information via serial data. They cannot connect the tank fuel level sensor directly to their 3rd gen gauge or aftermarket gauge they may be running. Without either or both of these inputs a diagnostic is set and EVAP operation is disabled. Can these either or both of these test routines be tuned out of the PCM for EVAP functioning?
I dont know the 4th gen much, but what i gathered from the ecu diagrams the fuel level sensor input (ecu pin) goes to the fuel tank sender unit, not the gauge. The 4th gen fuel gauge runs off the data link wiring rather than a fuel sender input. (looking through the factory 99 firebird ls1 service manual diagrams).
My setup makes the vent valve irrelevant as it is non existent whilst still using all the emissions controls from the '04 vy ss ls1 thats available in Australia. (which gives me full emissions control)
Not sure how relevant this is for the US guys, however i imagine if you have a lt1 in your car and the factory charcoal can doesn't use a vent valve, you still can retain the factory can or swap to a vy ss can (appears the GTO can is different). This is an alternative method to get around not being able to control the vent valve.
Or even if you have a LS1 with the relevant ecu, you could get the emissions to work correctly with the firebird/camaro can, however as to if you can simply tap off the sender(not the data link) without messing with the ecu fuel readings or not for a fuel gauge i'm not too sure, probably to counter this is why most who maybe do that swap also use the 4th gen dash/cluster as it reads the fuel gauge via the data link wiring.
Most of my 4th gen knowledge is best guess with looking through diagrams, i don't have those parts locally available nor access to any vehicles to test etc...
Hopefully my understanding of the Camaro EVAP system control is incorrect and this can be done easily. From my research the LS1 Camaro PCM must have two vital inputs for proper operation which some swaps are not able to provide. The PCM watches for fuel level between 15 and 85 percent fill and proper operation of the vent valve. The latter it verifies by closing the vent valve and watching the tank pressure sensor for the proper drop in atmospheric pressure. To allow the PCM to watch the fuel level swappers have to convert their cars to use the 4th gen F-body dash. The LS1 PCM provides the 4th gen dash with fuel level information via serial data. They cannot connect the tank fuel level sensor directly to their 3rd gen gauge or aftermarket gauge they may be running. Without either or both of these inputs a diagnostic is set and EVAP operation is disabled. Can these either or both of these test routines be tuned out of the PCM for EVAP functioning?
M
Do you have the part numbers for those blue fittings?
So correct me if I'm wrong here but if using the 4th Gen tank with 3rd Gen dash you can either have EVAP or fuel gauge working but not both? I'm going to need to pass California emissions but don't want to change out the dash also.
So correct me if I'm wrong here but if using the 4th Gen tank with 3rd Gen dash you can either have EVAP or fuel gauge working but not both? I'm going to need to pass California emissions but don't want to change out the dash also.
From everything I've read about it, You have to have the 4th gen ecm and dash to properly use the 4th gen tank evap system.
So correct me if I'm wrong here but if using the 4th Gen tank with 3rd Gen dash you can either have EVAP or fuel gauge working but not both? I'm going to need to pass California emissions but don't want to change out the dash also.
Just focus your efforts on the EVAP. Fuel gauge is not a challenge....
1. Change the sender in the fuel tank to work with your stock fuel gauge, or
From everything I've read about it, You have to have the 4th gen ecm and dash to properly use the 4th gen tank evap system.
Hi Ozzi, Go to my thread on how the EVAP system works and how to set up the system. The info is in my thread 83 Camaro/95 Caprice LT1/transplant. Look at #272 on the thread.
Hi Ozzi, Go to my thread on how the EVAP system works and how to set up the system. The info is in my thread 83 Camaro/95 Caprice LT1/transplant. Look at #272 on the thread.
oh that's good stuff....
I will need to read on this more after work today...but quick look, I like what I"m seeing.
I know you can change the resistor...there is actually one you can buy that will physically fit and work...that isn't for our cars, but works because if fits. Can't recall which exactly. But the evap from what I understood required the dash with the ECM because of what it was looking for. So this is neat...
Hey guys so I am working on my fuel lines right now and I thought the return quick disconnect on the fuel pump bulkhead (one closest to black sensor on top of the bulkhead if I'm correct) was a 5/16" line but my Russell screw-on fittings that I got for feed and return nipples on the bulkhead won't work correctly. I got a 3/8" and a 5/16" fitting and the 5/16" fitting will only go onto the middle nipple (which is Evap, correct?) and the 3/8" will fit on the feed and return... could anyone tell me if I do actually need 3/8" for both or do I have the nipples mixed up? Thanks in advance, Jeremy
Just a hint, if you use the non-swivel fittings then the hose will package a lot better. The swivel fittings are longer and make it just a tad difficult for the hose to turn the corner. No need for a swivel fitting at the fuel tank since there is no correct orientation.
Just a hint, if you use the non-swivel fittings then the hose will package a lot better. The swivel fittings are longer and make it just a tad difficult for the hose to turn the corner. No need for a swivel fitting at the fuel tank since there is no correct orientation.
thanks! I already have another fitting ordered for the bulkhead. And I am using Russell fittings on the bulkhead with the screw-in, about 1-1.5" long, and I will be using Jeg's hard line to AN fittings attached to them, and making stainless hard line on the tank like in the first picture of this thread.
Sorry to bump an old thread but my head is spinning right now with all the info I just read!
I've spent a lot of time lurking and reading through several threads on 4th gen tank swaps. I've searched. If I ask a question that you think I can find the answer to by searching... I'm dumb and I cant!
Now that we have *that* out of the way!
Just picked up a complete tank setup from a 2002 Camaro SS. I am going to be installing this in my bone stock 1991 5.0L Z28. If I don't care about emissions, what are my main hurdles going to be?
- Fuel Lines
- Wiring
- Fuel Level Gauge
I think I have a decent handle on the fuel lines. I'm very comfortable with making wiring changes and I think I am set with modifying my fuel gauge to work with the 2002 SS sender.
The whole EVAP system has me confused though. Like I said, I don't have to do emissions. It seems like most people in this thread have LS1/LT1 engines with a 4th gen ECM. What do I have to worry about when trying to put this tank in a car with a stock 3rd gen engine and ECM?
Thanks very much for your time. I plan on documenting this swap with tons of pictures and info to help people in the future.
I would think if you are not worried about emissions then you should not have any issues.
If you have chosen what way to go with your fuel lines and I would think you are going to use the 3gen stock return setup and the 3gen regulator then you just have to remove the stock LS1 regulator that is on the fuel pump hanger.
As far as the wiring 4th and 3rd both use the same basic concept for running the fuel pump and prime just match the correct wires and the gauge you can modify your gauge or change the part on the LS1 hanger to work with your current gauge.
In my LS1 swap I hung a small carbon filter on the vent line back by the tank similar to what the 3rd gen setup has now.
Hopefully replacing my stock tank with a plastic unit this weekend but I wanted to make sure I have all my ducks in a row.
If I'm utilizing the factory style regulator at the rail and my factory return line...
- I can just disable/remove the regulator on the return line of the 4th gen tank
- I don't need to use a T-junction like I've seen in some of these pictures
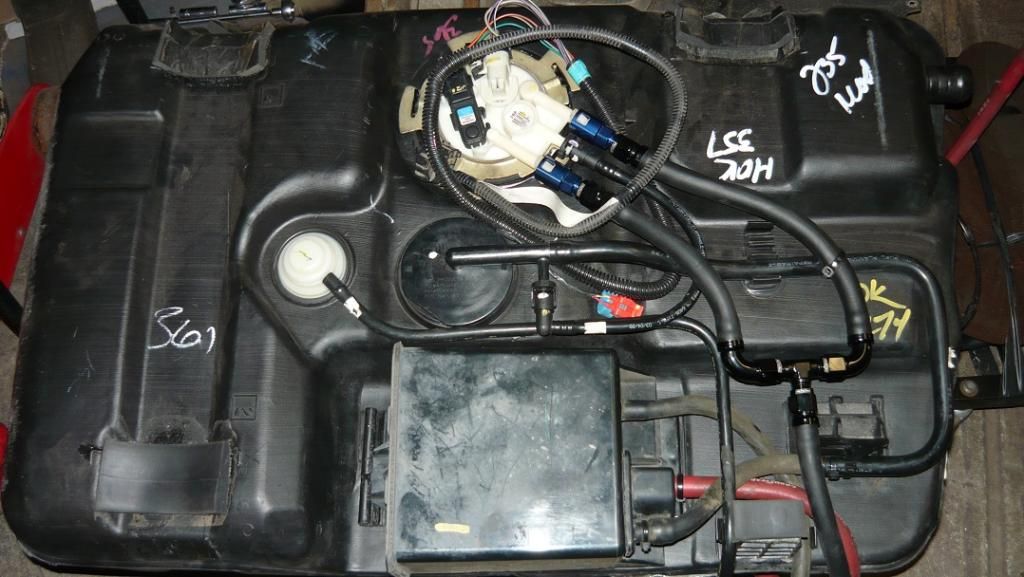
The tank I bought is complete. The lines coming off the sending unit are like 2 feet long, they have the quick connect fittings and like 3 inches of metal line that has been cut.
What is my best plan of action for connecting the quick connect fittings on the end of the plastic lines to my hard lines on the car? What parts/tools will be required?
Hopefully replacing my stock tank with a plastic unit this weekend but I wanted to make sure I have all my ducks in a row.
If I'm utilizing the factory style regulator at the rail and my factory return line...
- I can just disable/remove the regulator on the return line of the 4th gen tank
- I don't need to use a T-junction like I've seen in some of these pictures
Are you talking about using a 4th gen LS1 plastic tank with a TPI? If so, you are correct.
Originally Posted by Legdiian
The tank I bought is complete. The lines coming off the sending unit are like 2 feet long, they have the quick connect fittings and like 3 inches of metal line that has been cut.
What is my best plan of action for connecting the quick connect fittings on the end of the plastic lines to my hard lines on the car? What parts/tools will be required?
If I'm picturing correctly what you're talking about, I would add quick disconnect male fittings to your factory metal lines. You might be able to splice the cut metal 4th gen lines to your 3rd gen metal lines, but I'm not sure if the sizes are close enough to do that. Perhaps someone else knows.
Too bad they cut the metal lines, you can screw them directly to the 3rd gen stuff, well sort of. If you have a flaring tool you could make something that could plug into the plastic connector.
On the feed you could go-> metal push connect (what the plastic line is) to a -6 male -> -6 female to (I think it is) M16 O ring into the stock 3rd gen fuel filter.
The return would be similar.
Honestly it is as easy as getting the proper resistor board. I think it took me all of 5 minutes to swap the board into the tank since I already had it out. With enough time you can make almost anything work but I doubt anyoine has bothered. If you have a 4th gen cluster you may be able to adapt the gauge to work in the 3rd gen cluster but depending on the sweep from the factory in the 4th gen cluster it may not be an accurate reading anymore
wrong!!!? I know this is a super old thread but I just did this swap and it's way easier and cheaper to change resistors in the gauge... I paid.30 cents for a 1w240 ohm and a 1w40 ohm resistor.. It took about an hour to remove the gauge and replace the resistors and now it's a permanent situation no matter if I have to replace the pump in the future... That Grand Prix sender is 170 bucks.. I challenge anyone to do the math..
The resistors are 15 cents a piece at the electronics parts depot in Houston..
Were you able to get the EVAP system working with this setup I have an LS1 with the plastic tank in my 89 Camaro and I would like to get my factory 3rd gen gas gauge working but I am in California so I need to have the EVAP working when I get this all going and that's a little bit more important than knowing how much fuel I have I don't want to switch over to the 4th gen Dash so yeah if you have any pics or maybe if you could do a write-up on this I'd be awesome thank you in advance
wrong!!!? I know this is a super old thread but I just did this swap and it's way easier and cheaper to change resistors in the gauge... I paid.30 cents for a 1w240 ohm and a 1w40 ohm resistor.. It took about an hour to remove the gauge and replace the resistors and now it's a permanent situation no matter if I have to replace the pump in the future... That Grand Prix sender is 170 bucks.. I challenge anyone to do the math..
The resistors are 15 cents a piece at the electronics parts depot in Houston..
You're calling me out on a 8 year old post? Listen JO, STFU, not everyone knows how to solder, nor have the want to figure out how to remove the cluster and figure out what to change out. And the sender is NOT $170, or at the time it wasn't.
And it is ACTUALLY easier to change the sender than to change the resistors in the gauge cluster so more STFU, you are DEFINITELY wrong on that. I'll give you "cheaper"
The new fuel bucket assembly that Rock Auto sells has another modification. The fuel level sensor attaches horizontally instead of vertically.
This is a redesign of the Delphi module, so the board swap is not really an option any longer. It will only work for the original pump module.
That is, unless someone can find another resistor board that will work in the module with the proper resistance
This is a redesign of the Delphi module, so the board swap is not really an option any longer. It will only work for the original pump module.
That is, unless someone can find another resistor board that will work in the module with the proper resistance
I used the sender from this thread to work on the MU1730. IIRC I had to solder old out and new in and carefully grind some plastic and to get it to work. May have done some swaping on the arm hinge.
That's all I had in hand when I needed a tank to go back in, I'm sure there is a better solution.
I used the sender from this thread to work on the MU1730. IIRC I had to solder old out and new in and carefully grind some plastic and to get it to work. May have done some swaping on the arm hinge.
That's all I had in hand when I needed a tank to go back in, I'm sure there is a better solution.
The board in the replacement Delphi (I am being very specific here, not just any replacement module), the board was different, it would not work in the Delphi, it was a different size and orientation. Other replacement modules may retain the original design for everything, but I could not wait to try other stuff, it is my daily driver. I plan on just putting new resistors in the cluster fuel gauge, but that won't be for a while. Right now I will just fill up every 250 miles or so since the gauge never moves
I used the board https://herko.com/Retail/new-herko-f...le-e3978m.html from the AC DELCO unit aka "99-02 fuel bucket" in the revised DELPHI ("DELCO") MU1730 unit. Just the board. I can't remember which float hinge (the thing that has the fingers on the board) I used. It is not plug and play and requires unsoldering both boards, disassembling both (fuel level senders) completely and a little plastic whittling. The only thing that isn't the MU1730 unit is the board. Time for completion 5-10 minutes.
Last edited by camarotucker; Mar 4, 2018 at 08:07 PM.
Reason: link fix
OK, so looking for more clarification about the GTO vs Camaro charcoal can. From what I understand, the solenoid vent on the Camaro can opens to vent to atmosphere sometimes, and stays closed at others to capture fumes when the car is off and some other functions while it's on (anyone have more clarification on this)? Whereas the GTO can is just vented to atmoshpere 100% of the time - is this correct? From the design of both canisters, they look extremely similar... providing my limited understand above is correct, couldn't one just disconnect the vent solenoid on the camaro can and have it vent to atmosphere 100% of the time just like the GTO can? So far as I can tell, there are no electronics or mechanic functions internal to the Camaro can, just that external vent, so what are you truly gaining with the GTO can (which also has no internal electronics or mechanical functions)?
I will try to be simple, and this is general automotive theory not specific to the GTO or Camaro. The OEMs can never vent to atmosphere.
There are two solenoids. One solenoid is on the intake and one is on the tank, they connect via a hose. Only one can open at a time. The system will use vacuum from the intake to charge the system. If vacuum doesn't hold CEL turns on, aka the system isn't 100% sealed.
I did a lot of research on this topic since I began my 95 LT1 into a 83 Camaro. Around #270 or so, I did a piece on how the OBD1 and OBDII work when it comes to the plastic tank install and the EVAP system. The thread is called "83 Camaro/95Caprice LT1/transplant" here on thirteen.org.(might be below) It tells of what I was trying to do and how I got to my solution. But basically I finished with a OBD1 set up using some of the parts from the gen 4 plastic tank assembly. OBDII runs tests on the system and OBDII doesn't. I didn't use the test function which leaves everything set for OBD1 operations.
The EVAP box helps remove fuel vapor. You don't have to hook it up... it depends on if you want to be smog legal or not, or if you don't want to directly vent to atmo. If you want to wire it up, here are the wires from the fuel tank to a 2002 PCM:
EVAP Solenoid:
0.5 Pink (20 awg) - Connect to Eng Ctrl Fuse (15A)
0.35 White (22 awg) - Connect to PCM C2 pin 45 (EVAP Canister Vent Solenoid Control)
Fuel Tank Pressure Sensor:
0.5 Orange/Black - Connect to PCM C1 pin 23 (Low Reference)
0.5 Gray/Black - Connect to PCM C1 pin 46 (5V Reference)
0.5 Dark Green - Connect to PCM C2 pin 64 (Fuel Tank Pressure Sensor Signal)
Apologies for asking a question that may have been answered, but I'm seeing conflicting info. Does the above wiring connections to the PCM work correctly or like some of the others have commented, does the PCM need the 4th gen cluster to complete the circuit with the fuel gauge? (In an application like above - LS1, corresponding PCM, 4th gen plastic tank)
Apologies for asking a question that may have been answered, but I'm seeing conflicting info. Does the above wiring connections to the PCM work correctly or like some of the others have commented, does the PCM need the 4th gen cluster to complete the circuit with the fuel gauge? (In an application like above - LS1, corresponding PCM, 4th gen plastic tank)
I finally just got my car to pass the Evap test today without the 4th gen cluster, hopefully it will continue to pass the rest of the tests, I'm fairly confident it will.
Is the following true? I read @Strick1's post also on his LT1 swap w/ LS1 plastic tank.
I just want to verify, is the following true?
1. F-body purge solenoid at the tank is only used during OBDII emissions testing and is always open?
2. If question 1 is true, non-OBDII LT1 with evap solenoid at engine, f-body purge solenoid can be left on the tank?
3. If question 2 is true, GTO canister not required?
4 If question 2 is true, couldn't the f-body purge solenoid just be removed?
5. LS1 engine, evap solenoid at the engine, without wiring for purge solenoid at the tank, GTO canister required?
6. LS1 engine, evap solenoid at the engine, has wiring for purge solenoid at the tank, f-body purge solenoid is then wired up?
1. the purge solenoid at the tank or at the intake (as in LT1s) open when the computer directs it. Usually the computer opens it when not in idle and a few other conditions. The purge valve solenoid is not part of the OBDII test function. It just allows fuel vapors to be burned instead of being vented into the atmosphere.
2. The f-body purge valve (to the best of my knowledge) can be physically left on the tank. Just bypass it or don't do anything to it and the vapors will go to the atmosphere out of the canister. You may have that musty stall gas smell when parked.
3. If you want to completely disable the evaporation system, the canister is not needed as there would be no need for storing the fuel vapors and sending them to be burned.
4. Again if you want to disable the EVAP system, there would be no need in the purge valve solenoid
5&6. I'm only knowledgeable about LT1 and not LS1 purge valve locations.
I wrestled with this system for quite awhile and the more I learned about it the more I chose to use it. Now the big difference between OBDI and OBDII when it comes to EVAP is testing. The f-body tank is set up to utilize the OBDII EVAP testing (looks for leaks) and the OBDI doesn't test so some of the items on the f-body tank are not needed. I know clear as mud.
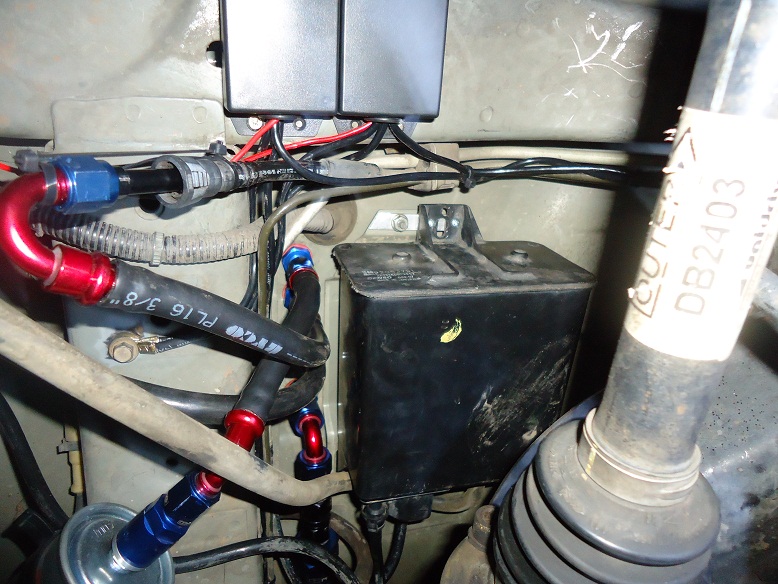
I think I have a plan. (as far as the EVAP system goes) The fuel pressure line and the return line is easy. Just run the lines to the fuel rail. Now to the 2002 fuel tank connections. The wiring harness first. I won't need the fuel tank pressure sensor as the 95 system doesn't utilize one. That's 3 wires gone from the harness. I also won't need the 2 wires going to the fuel canister vent valve solenoid as it is open (the 2002 system closes it under certain conditions for testing/monitoring). So, the only wires I'll need are for the fuel pump and fuel level. Next is the fuel lines: The 2 running to the fuel rails are a no brainer, just have to put a fuel filter in the pressure line. The other line coming out of the canister runs up to the fuel canister purge valve solenoid that is on the intake of the LT1 which is wired to the 95 PCM.
2002 fuel tank
As of right now, this is my plan. I'll let you know if it works later in the swap. If you see any flaws in my plan or theory, please let me know. Thanks guys
Strick1 - your plan should work. I have a 95 LT1 with the plastic tank. I left the charcoal canister and solenoid on the plastic tank. I'm using the evap solenoid on the engine side. I started working on my car again and I just wanted to make sure I didn't have to drop my tank to remove the solenoid for some reason. You say you need to add a fuel filter. One thing I did was swap the entire fuel lines from the tank to the engine with some from a junkyard fuel injected thirdgen.
I had read entired posts, but some of it is confusing and doesn�t make any sense. There�re people had asked the same questions about hooking up LS1 plastic fuel tank along its EVAP canister, but no one really didn�t answer his/her questions nor explained step by step procedures. Anyway, I have installed a LS1 plastic fuel tank, plastic fuel lines, LS fuel pump, and its EVAP canister to my both 95 Camaro LT1 and 91 Camaro V6. By doing some experiments with it, this is my results and hope to share my info on it.
This is an example of my both Camaros� LS1 fuel tank with its Evap canister hook up.
If you don�t want to use the LS1 EVAP CANISTER, then this is easier way to use your original EVAP canister in the engine bay to hook up to the LS1 Plastic fuel tank and fuel sender unit.
If you want to use the LS1 EVAP canister, then this is another way to hook it up to your engine (for any type of engine) as long you use the purge solenoid to your engine�s EVAP system.
On my 91 Camaro, I had to used compress fittings on the quick disconnect fuel lines for both 3/8 fuel line and 5/16 return line to hook up to the plastic fuel line from the LS1 Plastic fuel tank.
This is the fuel line part to adapt to your 3rd gen fuel lines. Autozone parts store has them.
I hope this can be helpful to those who want to hook up your LS1 Plastic fuel tank and its Evap canister.


 [/QUOTE]