
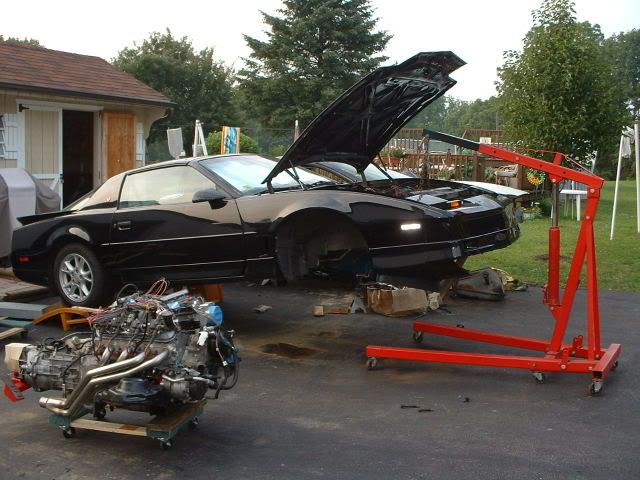
Another LS1 swap is in full swing! Lowered car onto the motor tonight!

Thread Starter
Joined: Sep 2002
Posts: 3,685
Likes: 10
From: PA
Car: 86 Trans AM
Engine: LS1 (not stock...)
Transmission: Built T56
Axle/Gears: Strange 12-bolt w/ 3.73
Another LS1 swap is in full swing! Lowered car onto the motor tonight!
Hey all. Not sure how much I posted about this... but Im well into my swap on my 87 Trans AM. Last night was a big step. I got the motor in, bolted up, hole cut for the shifter, and the tranny bolted up. It was so nice to finally have a motor back in. It was also nice to not have to navigate around the motor and trans in my tiny garage. Here are a couple pics. Couple gripes and comments. First...the SPOHN motor mounts are awsome. Worked great. His trans crossmember seemed to be perfect. Ive heard horror stories of it putting the tail shaft in the wrong spot etc etc... I bolted it right up, used the middle of the three holes in the middle of my trans mount... seemed to line up great! Now...the Hawks headers... I have to say Im alittle disappointed. They look good... but the driverside O2 sensor is against the body..and its tight. There is a ton of room next to the tranny...could have tucked them in a bit more. The y-pipe doesnt even look close to fitting. And I think I have to dismantle the y-pipe and make some modifications so that the two 2.5" pipes arent meeting at a 1.5" opening  Anyway..some pics. This was by far the easiest part of the swap so far! Went smooth as silk!


Drivetrain was pulled out of a wrecked 99 Z28 Vert. Here is the list of goodies and specs on the motor for anyone interested.
Description of the motor:
Shortblock is an ARE shortblock:
Polished Stock Crank
Resized Stock connecting Rods
Ross custom boost pistons (with valve relief's)
Childs and Albert Plasma Moly Rings, but it may have Total Seal rings.
Clevite race bearings
ARP rod bolts
Rotating Assembly Fully balanced
Engine Blueprinted.
ARE ported oil pump
MTI 2e 5.3l ported heads, milled .030 with double springs and new pushrods
228/224 113 +1 Comp XE-R cam (currently installed with another 2* advance)
Cloyes adjustable timing chain
LS6 Valley Cover and PCV system
FAST 90mm Intake and TB (and bellow)
SVO 30lb injectors
SLP 85mm MAF
ASP underdrive crank pulley
Hypertech 160* T-stat
LT Headers w/ 1-3/4” Primaries
QTP Electric Cutout
Description of Trans:
M6, fully upgraded
B&M Ripper Shipper
Spec Stage III Clutch
Aluminum Flywheel
O2 Slave
Adj. Master.
Description of Rear:
Strange 12-bolt
3.73 gears
Disc brakes
Tubular LCAs
Justin
Anyway..some pics. This was by far the easiest part of the swap so far! Went smooth as silk!Drivetrain was pulled out of a wrecked 99 Z28 Vert. Here is the list of goodies and specs on the motor for anyone interested.
Description of the motor:
Shortblock is an ARE shortblock:
Polished Stock Crank
Resized Stock connecting Rods
Ross custom boost pistons (with valve relief's)
Childs and Albert Plasma Moly Rings, but it may have Total Seal rings.
Clevite race bearings
ARP rod bolts
Rotating Assembly Fully balanced
Engine Blueprinted.
ARE ported oil pump
MTI 2e 5.3l ported heads, milled .030 with double springs and new pushrods
228/224 113 +1 Comp XE-R cam (currently installed with another 2* advance)
Cloyes adjustable timing chain
LS6 Valley Cover and PCV system
FAST 90mm Intake and TB (and bellow)
SVO 30lb injectors
SLP 85mm MAF
ASP underdrive crank pulley
Hypertech 160* T-stat
LT Headers w/ 1-3/4” Primaries
QTP Electric Cutout
Description of Trans:
M6, fully upgraded
B&M Ripper Shipper
Spec Stage III Clutch
Aluminum Flywheel
O2 Slave
Adj. Master.
Description of Rear:
Strange 12-bolt
3.73 gears
Disc brakes
Tubular LCAs
Justin

Thread Starter
Joined: Sep 2002
Posts: 3,685
Likes: 10
From: PA
Car: 86 Trans AM
Engine: LS1 (not stock...)
Transmission: Built T56
Axle/Gears: Strange 12-bolt w/ 3.73
Thanks for the compliments.
Yes those are the Hawks/Stainless works Conversion headers. I got them and the ORY. I think with alittle bit of a BFH mod...the clearence issue will be solved. The other issue I have with the headers, is that the number 4 spark plug boot is way up against the primary. Bruce's solution to this...trim the boot "slightly" with a razor. As much as Im sure this will work, Ide have to trim a ton. So Im going to see if I can find some angled boots, and Im going to sleeve them with something heat resistant.
The Y-pipe...I wish I didnt even get it. I would have been able to make somethign on my own that will fit better. Ill probably end up having to cut it and re-weld it as it is... Ill take some pics when it comes down to that. Its getting started with open headers before that time comes
Justin
Oh if anyone has any questions or wants pics of something in particular...now is the time to let me know. Ill take the pics as I go along.
Thread Starter
Joined: Sep 2002
Posts: 3,685
Likes: 10
From: PA
Car: 86 Trans AM
Engine: LS1 (not stock...)
Transmission: Built T56
Axle/Gears: Strange 12-bolt w/ 3.73
Yup... List of mods besides those in the list above... Sphon torque arm, adjustable panhard, sub frame connectors, wonder bar, poly EVERYTHING, BMR lower control arms, eibach pro kit, bilsteins all around, LS1 brakes all around, 17x9.5 polished WS6 wheels, line lock kit, autometer gauges... probably a bunch of other crap Im forgetting.
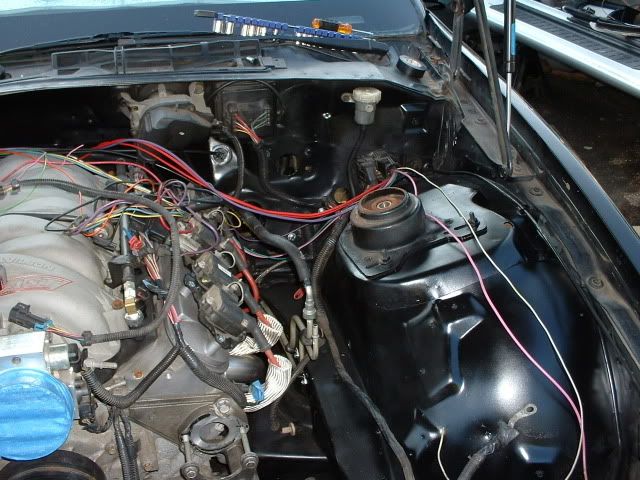
Total amount of stuff Im using from the donor 99... Engine, trans, alum. driveshaft, strange 12-bolt with 3.73s, fuel tank, fuel tank harness, power/fuse boxes from under the hood, radiator, fans, entire A/C system including the evaporator... e-brake, e-brake cables, coolant overflow bottle, washer tank, cruise control, pedal assembly...lots of odds and ends.
Im hoping now that the engine is in...things will move along alittle better. Before getting to this point, I reworked the harness, labeled everything...did as much as I could before hand. Now all I have to do is assemble...FINALLY! THis is the fun part. I have to finish painting the engine bay too. Nothing special, just cleaning it and hitting it with semi-gloss.

Supreme Member

Joined: Jun 2001
Posts: 9,550
Likes: 5
From: Charleston, SC
Car: 91 Camaro Vert
Engine: 02 LS1, HX40
Transmission: 2002 LS1 M6
Originally Posted by ghettocruiser
The other issue I have with the headers, is that the number 4 spark plug boot is way up against the primary. Bruce's solution to this...trim the boot "slightly" with a razor. As much as Im sure this will work, Ide have to trim a ton. So Im going to see if I can find some angled boots, and Im going to sleeve them with something heat resistant.
Trending Topics
Thread Starter
Joined: Sep 2002
Posts: 3,685
Likes: 10
From: PA
Car: 86 Trans AM
Engine: LS1 (not stock...)
Transmission: Built T56
Axle/Gears: Strange 12-bolt w/ 3.73
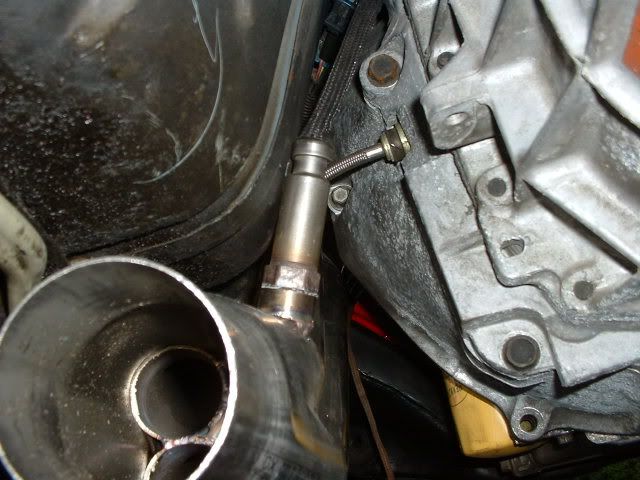
Mr.Dude... Here is a pic of the problem area. All the other plugs clear. They are close...but clear easy. In this pic, I had the boot twisted in a way that it was better...but still up against it.
Do you have a part number off hand for those MSD wires? And what diameter are they? I can probably look them up...but if you have them handy it'll save me some time. The ones I have now are PPC 10.5mm or something like that.
I dont think cutting the boot with a razor is the path I want to take to fix this.


Justin
Do you have a part number off hand for those MSD wires? And what diameter are they? I can probably look them up...but if you have them handy it'll save me some time. The ones I have now are PPC 10.5mm or something like that.
I dont think cutting the boot with a razor is the path I want to take to fix this.
Justin
Thread Starter
Joined: Sep 2002
Posts: 3,685
Likes: 10
From: PA
Car: 86 Trans AM
Engine: LS1 (not stock...)
Transmission: Built T56
Axle/Gears: Strange 12-bolt w/ 3.73
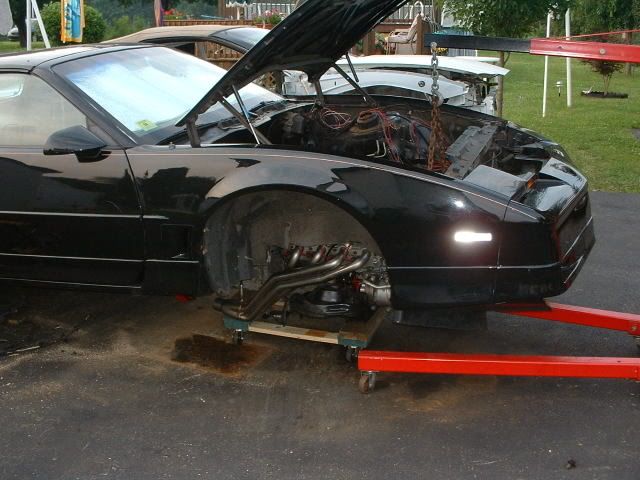
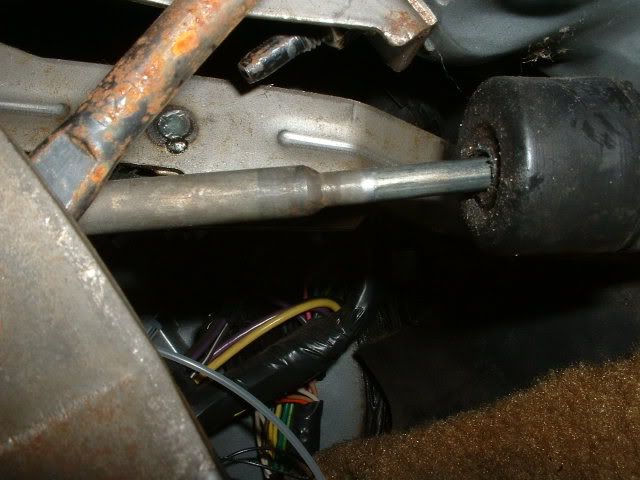
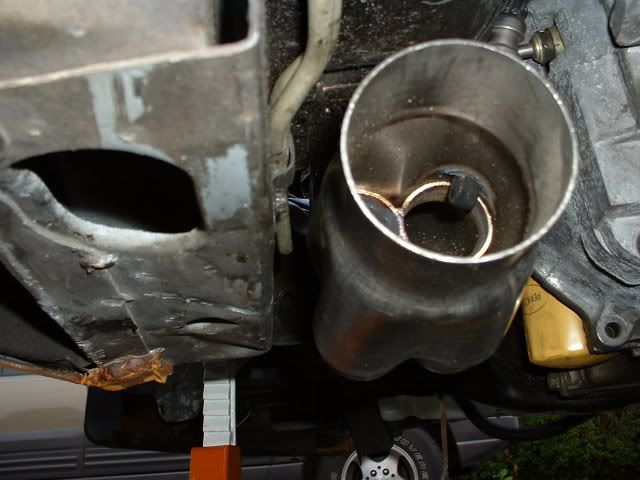
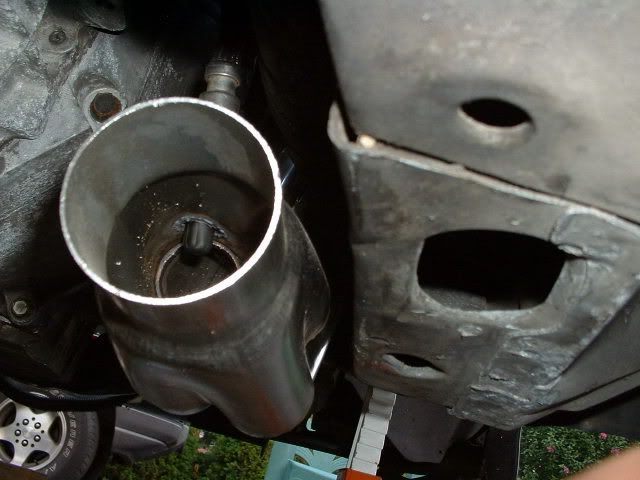
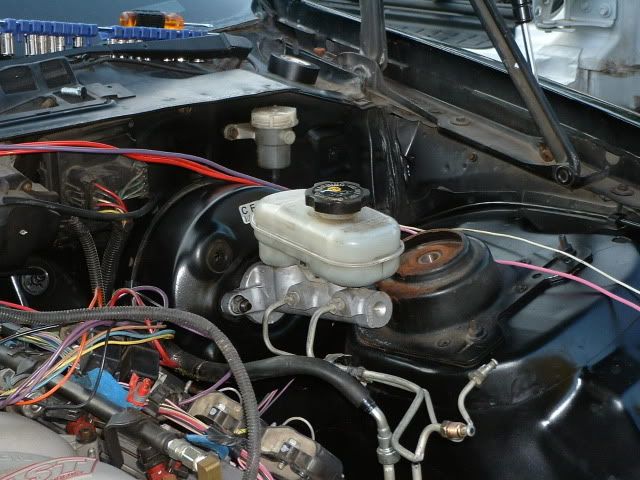
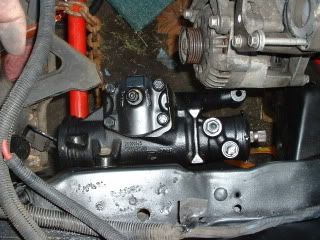
Here are some more pics... mostly of the trouble areas. One is a big problem. Im really kind of ticked off.. The freaking oil pan is pretty much up against the k-member. I knew it would be close...but its actually touching at the corners of the pan. Cant get a piece of thin cardboard in between. I feel if the mounts had the motor situated foward alittle bit, it would not only fix this problem...but would have given more clearence where the O2 sensor was hitting. Oh... thats nother thing. It looks to me like the darn O2 sensor bung was welded wrong. If it was welded perpendicular to the tube that its in, I would have major clearence. But you will see what i mean. Thats $700 some odd dollars...I expected better....even for conversion headers.
On to the pics.
O2 clearance problem.
Pan clearance problem. I have poly motor mounts and tranny mount...so maybe it wont move around much??
Lastly...I dont like the looks of this. My master cylinder fell right into place with the pedal braket. But this angle is weird. Not sure how to go about dealing with this.
Thread Starter
Joined: Sep 2002
Posts: 3,685
Likes: 10
From: PA
Car: 86 Trans AM
Engine: LS1 (not stock...)
Transmission: Built T56
Axle/Gears: Strange 12-bolt w/ 3.73
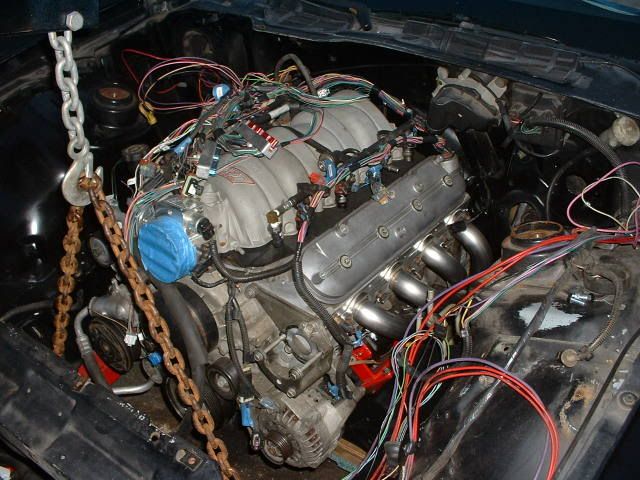
Some not so ugly pics...
What is that little tab with the two holes in it just to the left of the master cylinder push rod. Is there supposed to be a bumper there for the clutch pedal??

What is that little tab with the two holes in it just to the left of the master cylinder push rod. Is there supposed to be a bumper there for the clutch pedal??
Supreme Member
iTrader: (1)
Joined: Feb 2000
Posts: 7,964
Likes: 4
From: Norfolk, VA. USA
Car: 86 Trans Am, 88 Formula
Engine: 95LT4, 305TPI
Transmission: T56, T5
Originally Posted by ghettocruiser
What is that little tab with the two holes in it just to the left of the master cylinder push rod. Is there supposed to be a bumper there for the clutch pedal??
the big black block to the upper left "looks" like the clutch nuetral safety switch.
Member
Joined: Sep 2003
Posts: 243
Likes: 0
From: Los Angeles
Car: 1984 Trans Am
Engine: 2002 LS1
Transmission: 6 speed
Axle/Gears: 3:73
If it makes you feel better- my clutch cylinder is slightly crooked just like yours is, too. It works fine. I have about 800 miles on since my swap.
2002 LS1 engine/ pedals into a 1984 Trans Am...
2002 LS1 engine/ pedals into a 1984 Trans Am...


Joined: Feb 2003
Posts: 1,508
Likes: 63
From: Austin, Tx
Car: 91 Z28
Engine: LS1
Transmission: T-56
Axle/Gears: 3.73 Hawks 8.8
The angle on my clutch master was a bit off too, I just trimmed the hole so i could adjust it to as close as possible. When I had my L98 / T-5 I broke 2 master cylinders because of the angle and wanted to make sure it didnt happen again.
I noticed in your pics of the DS Header that yours are actually farther from the frame rail than mine, I had to wrap my header because it was right up against the brake and fuel lines....
I noticed in your pics of the DS Header that yours are actually farther from the frame rail than mine, I had to wrap my header because it was right up against the brake and fuel lines....
Thread Starter
Joined: Sep 2002
Posts: 3,685
Likes: 10
From: PA
Car: 86 Trans AM
Engine: LS1 (not stock...)
Transmission: Built T56
Axle/Gears: Strange 12-bolt w/ 3.73
Thanks for the replys guys! First...there is a place for the clutch switch already. It looks like the big white insert that is in the brake pedal. I just assumed that was teh clutch switch. That was all that was in the 99... The 99 was actually an automatic and an f-body shop converted it. So I should have all the switches I need. Ill look into that. The pedal comes close to that little tab and might contact it when Im using my leg to push it in. I figured it was just for alittle bumper to keep the impacts down...
Steven K: My headers were pretty much centered between the "rails". I used the middle hole in my trans crossmember, and the middle hole in the bottom of the mount. Lines up pretty good. Now...my fuel lines arent stock. They are the 4th gen lines front to back. I do not have a rear brake line going to the back yet, because I havent decided exactly what Im doing there. however, I plan to put it in line with the fuel/evap lines. It should tuck away just as nice.
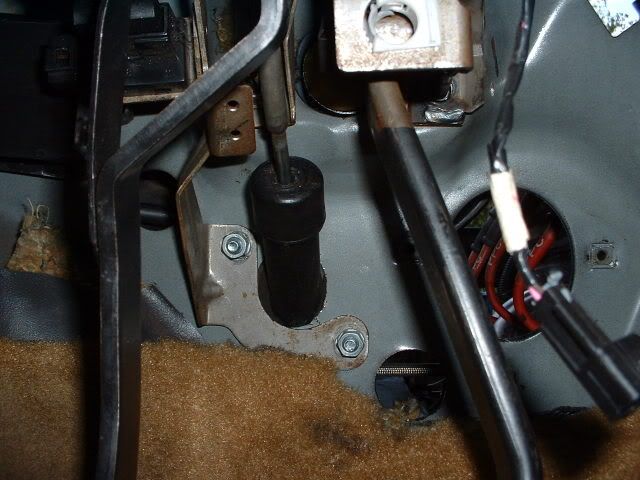
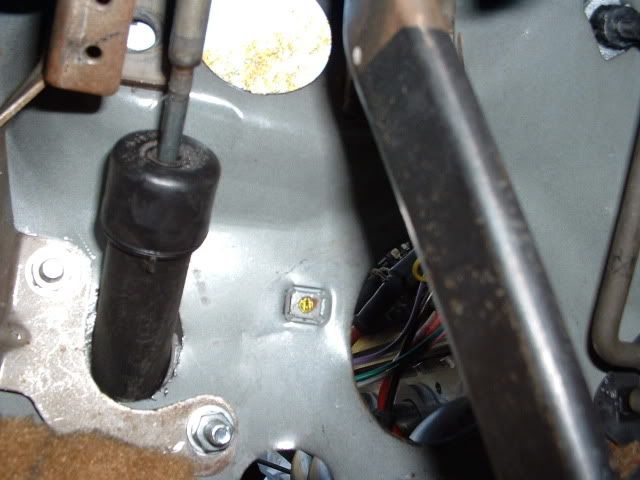
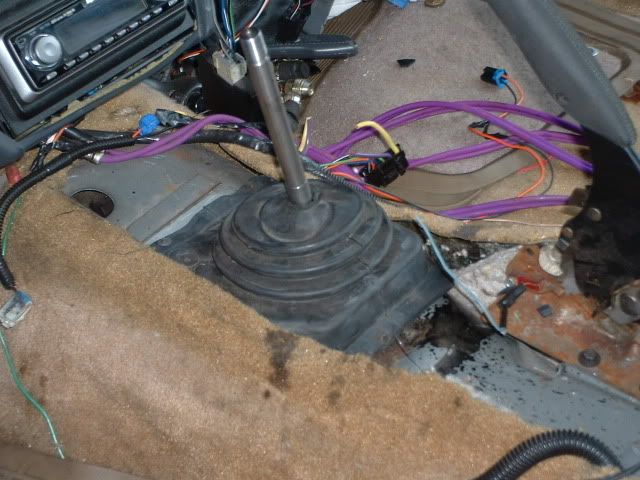
I seem to be pretty centered in the tunnel. I wouldnt mind my shifter being alittle to the left...I was going to try moving the mount over on the crossmember, or lossening some of the mount bolts and just shifting it a bit.

This is my shifter in reverse. Its a B&M ripper...so Im sure if I got a pro 5.0 and had the offset shifter handle I would probably be more centered. It still doesnt contact anything. I want to fiddle with the 4th gen e-brake handle to try to move it some. Same thing I had to do with my 3rd gen handle when fitting the 4th gen console.

Did anyone else have problems with the oil pan touching the crossmember? I remember reading in a post somewhere that someone had the same issue. I was wondering if I used the "preload" plate with the tranny mount, would it tilt everything just enough to make it clear. I didnt use the little preload plate with my energy suspension trans mount because I heard you didnt need it, and it caused more vibrations than without.
Justin
Steven K: My headers were pretty much centered between the "rails". I used the middle hole in my trans crossmember, and the middle hole in the bottom of the mount. Lines up pretty good. Now...my fuel lines arent stock. They are the 4th gen lines front to back. I do not have a rear brake line going to the back yet, because I havent decided exactly what Im doing there. however, I plan to put it in line with the fuel/evap lines. It should tuck away just as nice.
I seem to be pretty centered in the tunnel. I wouldnt mind my shifter being alittle to the left...I was going to try moving the mount over on the crossmember, or lossening some of the mount bolts and just shifting it a bit.
This is my shifter in reverse. Its a B&M ripper...so Im sure if I got a pro 5.0 and had the offset shifter handle I would probably be more centered. It still doesnt contact anything. I want to fiddle with the 4th gen e-brake handle to try to move it some. Same thing I had to do with my 3rd gen handle when fitting the 4th gen console.
Did anyone else have problems with the oil pan touching the crossmember? I remember reading in a post somewhere that someone had the same issue. I was wondering if I used the "preload" plate with the tranny mount, would it tilt everything just enough to make it clear. I didnt use the little preload plate with my energy suspension trans mount because I heard you didnt need it, and it caused more vibrations than without.
Justin
Supreme Member
Joined: Jun 2001
Posts: 9,550
Likes: 5
From: Charleston, SC
Car: 91 Camaro Vert
Engine: 02 LS1, HX40
Transmission: 2002 LS1 M6
i know this sounds like a PITA now.. but, if you intend to drive it alot, its easier to just do this now..
pull the engine back out, and grind the edge tab of the Kmember so that it wont hit... you'll need the clearance.
plug that O2 sensor bung, and have someone make one at a "2 o clock angle" farther back in the collector then that pic.. that bung is waay to close to the primary tubes anyway.. remember its stainless, so you'll want to find a stainless bung, and have someone TIG it on with stainless rod.
slot the holes in your master cyl, and move it UP... trust me on that.. while i do have over 20,000 miles driving it like you have it, moving it up to work better was something i should have done LONG ago... also, if you have the cash, get a Mcleod master cyl.. well worth the money. and while you have the master cyl out.. do the "drill mod"... i HIGHLY reccomend it.
Thread Starter
Joined: Sep 2002
Posts: 3,685
Likes: 10
From: PA
Car: 86 Trans AM
Engine: LS1 (not stock...)
Transmission: Built T56
Axle/Gears: Strange 12-bolt w/ 3.73
It sounds like a MAJOR PITA..haha. I can honestly say that pulling the motor is going to be my last resort at this point. I have a few other tricks that Im going to try first.
The O2 sensor is there to stay for now. I put a dent in the floor board with a piece of wood and a hammer. Plenty of room for that... Im still ticked that it needed to be done. Ill se how things work out. If I get weird readings from the O2 then Ill get them moved.
I think youre right on the master cylinder. But wouldnt I need to move it DOWN??? I wish there was a way just to shim it to a different angle. But Ide feel better with the master sitting flush and not angled. Im not completely happy with the 4th gen pedal assembly. But, its in now, so thats how its going to stay. haha.
Im going to try something today when I get home wtih the oil pan clearance issue. Worse comes to worse, I guess I can lift up on the motor enough to clear, then I can run a angle grinder with a cut off wheel in there to get rid of some material.
Thanks for the suggestions!!! Today is going to be dedicated to figuring out the oil pan clearance and getting the torque arm in place. Ill post new pics tomorrow.
justin
Joined: Feb 2003
Posts: 1,508
Likes: 63
From: Austin, Tx
Car: 91 Z28
Engine: LS1
Transmission: T-56
Axle/Gears: 3.73 Hawks 8.8
No, it definitly needs to move up. think about it, when you move it up, your moving it closer to the pin on the clutch pedal causing the stroke to compress more. Basically you need to make it so when your clutch is on the floor, your getting the maximum travel to release the clutch fully.
And +1 for the Drill mod, I bought a sealed and pre-bleed master, and took it apart and did the drill mod and the bench bleed it again. If you don't drill mod, expect the clutch to stick on the floor if you take it to the track.
And +1 for the Drill mod, I bought a sealed and pre-bleed master, and took it apart and did the drill mod and the bench bleed it again. If you don't drill mod, expect the clutch to stick on the floor if you take it to the track.
Thread Starter
Joined: Sep 2002
Posts: 3,685
Likes: 10
From: PA
Car: 86 Trans AM
Engine: LS1 (not stock...)
Transmission: Built T56
Axle/Gears: Strange 12-bolt w/ 3.73
Hey man thanks for the advice. The only reason I was questioning the direction that I had to move the master cylinder was that I thought I was moving it because of the angle that the push rod is at. I have an adjustable master cylinder, so the throw can be adjusted without moving the master. Right now, I have it set to where the previous owner had it set. There is only alittle tiny bit of freeplay before the master cylinder starts to engage. With the driveshaft in the trans, and the trans in 1st...I cant turn the driveshaft. Duh... WHen I had someoen slowly push in the clutch pedal, they said they moved it less than half way, and I could feel the shaft start to turn... By the time it was on the floor, I was able to turn the shaft pretty freely.
I know thats not an accurate way of measuring engagment... but on the adjustment part of the master, it can be adjusted out A LOT still...
I thought Mr. Dude was referring to the angle, and that moving the master up it would fix the angle... I think I might just run it like it is... Worst comes to worst it wears the master out and Ill have to get a new one... a better one.
Oh and Im pretty sure the previous owner had the drill mod done. He has every other free mod done and he had it to the track a few times... Guess we'll find out when I

Member
Joined: May 2005
Posts: 114
Likes: 0
From: Ooltewah, TN
Car: 87 camaro, 98 Z-28
Originally Posted by ghettocruiser
Mr.Dude... Here is a pic of the problem area. All the other plugs clear. They are close...but clear easy. In this pic, I had the boot twisted in a way that it was better...but still up against it.
Do you have a part number off hand for those MSD wires? And what diameter are they? I can probably look them up...but if you have them handy it'll save me some time. The ones I have now are PPC 10.5mm or something like that.
I dont think cutting the boot with a razor is the path I want to take to fix this.
Justin
Justin, I had the same problem on my 98 Z-28 with the pacesetter LT's. I used the factory metal boot protector that goes around the plug wire boot to insulate it from the header. I'm also running the MSD wires on my LS1 and they are all straight plugs, I've been running it this way for the past year and have not had one problem. I'd buy a set of them, they come stock on the LS1 cars so if that camaro didn't have any I'd buy a set from the dealer. All you really need is that one anyway so it wouldn't cost you a buck or two. I don't think you can see it in this picture but I'll try to snap a better shot and post it on here tomorrow.
Member
Joined: May 2005
Posts: 114
Likes: 0
From: Ooltewah, TN
Car: 87 camaro, 98 Z-28
Can't see it in that picture cause all the junk in the way but I'll take a better shot for you. It should cure your problem without hackin the wire, I've always been kinda iffy about cutting the boot down. Hope that helps!
Mike
Mike
Thread Starter
Joined: Sep 2002
Posts: 3,685
Likes: 10
From: PA
Car: 86 Trans AM
Engine: LS1 (not stock...)
Transmission: Built T56
Axle/Gears: Strange 12-bolt w/ 3.73
Cool man... Ide appreciate a pic... Ive seen the things you are talking about before. That might be a solution. I might still check out the angled boots and put the fiberglass sleeves on them. Im pretty far from firing the motor still though, so I have some time. If you can post the pic of your clearence on the number 3 plug...Ide really appreciate it. Thanks!
Justin
Justin
Thread Starter
Joined: Sep 2002
Posts: 3,685
Likes: 10
From: PA
Car: 86 Trans AM
Engine: LS1 (not stock...)
Transmission: Built T56
Axle/Gears: Strange 12-bolt w/ 3.73
The drill mod is basically getting rid of a restriction in the stock clutch hydraulic line. I believe its in the master cylinder end of the line. Basically you take a drill bit and ream out the little restrictor, and that allows thef luid to flow easier. Its a fix for the "pedal sticking to the floor" syndrome. Do a search for it here and especially over on ls1tech.com. there are a few write ups floating around.
Justin
Justin
Member
Joined: May 2005
Posts: 114
Likes: 0
From: Ooltewah, TN
Car: 87 camaro, 98 Z-28
Here's the pics, I thought it was on the passenger side but it was the drivers side header. Been a while since I put these damn things in there. As you can see they aren't melted or anything, it's worked great since I put that sleeve on there.
Thread Starter
Joined: Sep 2002
Posts: 3,685
Likes: 10
From: PA
Car: 86 Trans AM
Engine: LS1 (not stock...)
Transmission: Built T56
Axle/Gears: Strange 12-bolt w/ 3.73
Hey man thanks for those pics!! I think Im going to grab a set of those. Might as well put them on each one for the heck of it..if they are cheap enough. You dont happen to know the GM part number do you??? If not Im sure I can figure it out. Thanks again for the pics man! Appreciate it!
Justin
Justin
Member
Joined: May 2005
Posts: 114
Likes: 0
From: Ooltewah, TN
Car: 87 camaro, 98 Z-28
The part number is GM P/N: 15336959.  Anytime you need a pic, part number or have a queston just give me a holler. I'll be glad to help you in any way possible! LS1's are my thing, owned several of them and have been through the whole car a time or two. After I get this LT1 running in my 87 camaro I'm going to finish the LS6 which is going in afterwards. The wife, or soon to be ex-wife has been spending all my money lately so I've been tight on cash, otherwise the LS6 would be finished and installed.
  After I get rid of her *** though I'll have financial freedom!
Anytime you need a pic, part number or have a queston just give me a holler. I'll be glad to help you in any way possible! LS1's are my thing, owned several of them and have been through the whole car a time or two. After I get this LT1 running in my 87 camaro I'm going to finish the LS6 which is going in afterwards. The wife, or soon to be ex-wife has been spending all my money lately so I've been tight on cash, otherwise the LS6 would be finished and installed. After I get rid of her *** though I'll have financial freedom! Thread Starter
Joined: Sep 2002
Posts: 3,685
Likes: 10
From: PA
Car: 86 Trans AM
Engine: LS1 (not stock...)
Transmission: Built T56
Axle/Gears: Strange 12-bolt w/ 3.73
Just an update for those of you helping me out... The spark plug boot issue is temp. resolved. I didnt know this, but my local autozone had some of those double layer fiberglass boot sleeves for really cheap... so Im going to try those.
For the pan clearance...Im dropping the k-member. Im leaving the motor where it is...and Im dropping the "k" out. Then Im going to grind the ever loving you know what out of it. I will make SURE there is enough clearance...
As for the clutch master rod alignment...Im going to figure out where it needs to be, then re-weld the stud for the rod. Since my master is adjustable, that should help. All I need to do is get it lined up correctly. I can adjust in alittle or out a lot to help with engagment.
After those few things...its all about suspension and brakes... then wiring and gauges. then.
Thanks again!
Justin
Thread Starter
Joined: Sep 2002
Posts: 3,685
Likes: 10
From: PA
Car: 86 Trans AM
Engine: LS1 (not stock...)
Transmission: Built T56
Axle/Gears: Strange 12-bolt w/ 3.73
Little UPDATE:
Hey all. Well, Im making some progress. The heat is finally down so that I can work outside without having a heat stroke. Clutch master cylinder situation is sorted out. Its almost perfect. Still has a slight angle side to side...but goes straight in. Im happy enough with it. Here is a pic.
I banged out the firewall alittle, bent the bracket on the pedal assembly, and slotted the driver's side hole alittle so I could rotate it down. Viola...perfect fit. No stressing teh pedal bracket either. Just bolts right in.
Here are some other pics... they are self explanitory... Just thought ide show them. Dont mind the rusty old strut mounts...they are going in the trash for some spohn mounts.
Justin
Supreme Member
iTrader: (1)
Joined: Feb 2005
Posts: 2,642
Likes: 2
From: Pleasant Grove, Utah
Car: 1993 GMC Typhoon
Engine: 4.3 Turbo
Transmission: 4L60
Axle/Gears: 3.42

Junior Member

Joined: Jun 2012
Posts: 93
Likes: 7
From: Stewartsville, NJ
Car: 1992 Camaro Z28
Engine: 5.0 TPI
Transmission: auto
Re: Another LS1 swap is in full swing! Lowered car onto the motor tonight!
wow, that a/c job you did is outstanding ! very nice and smart thinking !
Supreme Member
iTrader: (7)
Joined: Nov 2006
Posts: 3,740
Likes: 15
From: Alamogordo, NM
Car: 88 Formula 350
Engine: 5.7
Transmission: T-56
Axle/Gears: 9" 3.89
Re: Another LS1 swap is in full swing! Lowered car onto the motor tonight!
Where did you get the boot to cover the shifter hole? I really need one. The heat/Exhaust fumes are getting old!
What happened to your Blue LsX swapped trans am?
What happened to your Blue LsX swapped trans am?
Thread Starter
Joined: Sep 2002
Posts: 3,685
Likes: 10
From: PA
Car: 86 Trans AM
Engine: LS1 (not stock...)
Transmission: Built T56
Axle/Gears: Strange 12-bolt w/ 3.73
Re: Another LS1 swap is in full swing! Lowered car onto the motor tonight!
Haha wow...blast from the past! Havent even looked at this thread in ages!
Thanks for the props on the A/C. Actually thinking about leaving it out when the motor goes back in and using an heater only box to clean/simplify things.
Bullydawg - This was my first swap car. Had this car a long time. Its wrecked and sitting as a shell in the yard at the moment. The blue car is the newer swap, and its gettinga 6.0 right now. If I ever get enough spare money and time to finish it!
J.

Thread
Thread Starter
Forum
Replies
Last Post
NBrehm
Engine/Drivetrain/Suspension Parts for Sale
1
Aug 25, 2015 11:49 PM