
lt1 with stock 3rd gen radiator pics please


will somebody help me out here? please!!
just want to see how everybody else ran their coolant hoses when using the stock radiator with the lt1 swap.thanks,joe
Last edited by bmfIROC-Z; Sep 29, 2008 at 01:29 PM.
Member
iTrader: (1)
Joined: Feb 2005
Posts: 424
Likes: 0
From: Columbus, OH, USA
Car: '91 Z28, '13 Civic EX-L
Engine: 355 LT1, 1.8 I4
Transmission: T56, 5spd auto
Axle/Gears: 10 bolt 3.42(as long as no breaky)
Re: lt1 with stock 3rd gen radiator pics please
I will try to explain it the best i can. For the upper radiator hose i used one for a 95 Fbody, lower was from a 92 Corvette, you have to do a little cutting to make it fit properly. My radiator was a stock replacement so it had flared screw in fittings on it. If you have those just go by some hard brake line with that fitting on it, bend it up towards your intake, and use the same size rubber line to connect the steam tube to it.
As far as the heater core lines, i took the lower fitting on the passenger side of the WP, ran a hose (sorry i cant remember size, you shoud be able to look at it and know what to get) up to the stock heater valve. Then there should be 2 more fittings on the valve. The bottom one went straight to the heater core, while the top one went down and T'd into a line; of which one side went straight to the heater core, and the other went to the radiator. If you don't have the screw in fittings i mentioned earlier, you can T the steam pipe in here.(the fitting below the one for your overflow resivoir) Sorry i know this probably sounds very confusing. You can kind of see what i did from this pic.
BTW, i see in your sig you have a custom ram air. What did you do? I am in need of a solution to my HAI.
Member
iTrader: (1)
Joined: Feb 2005
Posts: 424
Likes: 0
From: Columbus, OH, USA
Car: '91 Z28, '13 Civic EX-L
Engine: 355 LT1, 1.8 I4
Transmission: T56, 5spd auto
Axle/Gears: 10 bolt 3.42(as long as no breaky)
Re: lt1 with stock 3rd gen radiator pics please
Thirdgen. One you would get from an autozone ect.
Re: lt1 with stock 3rd gen radiator pics please
I will try to explain it the best i can. For the upper radiator hose i used one for a 95 Fbody, lower was from a 92 Corvette, you have to do a little cutting to make it fit properly. My radiator was a stock replacement so it had flared screw in fittings on it. If you have those just go by some hard brake line with that fitting on it, bend it up towards your intake, and use the same size rubber line to connect the steam tube to it.
As far as the heater core lines, i took the lower fitting on the passenger side of the WP, ran a hose (sorry i cant remember size, you shoud be able to look at it and know what to get) up to the stock heater valve. Then there should be 2 more fittings on the valve. The bottom one went straight to the heater core, while the top one went down and T'd into a line; of which one side went straight to the heater core, and the other went to the radiator. If you don't have the screw in fittings i mentioned earlier, you can T the steam pipe in here.(the fitting below the one for your overflow resivoir) Sorry i know this probably sounds very confusing. You can kind of see what i did from this pic.
BTW, i see in your sig you have a custom ram air. What did you do? I am in need of a solution to my HAI.
Last edited by bmfIROC-Z; Sep 28, 2008 at 06:34 PM.
Re: lt1 with stock 3rd gen radiator pics please
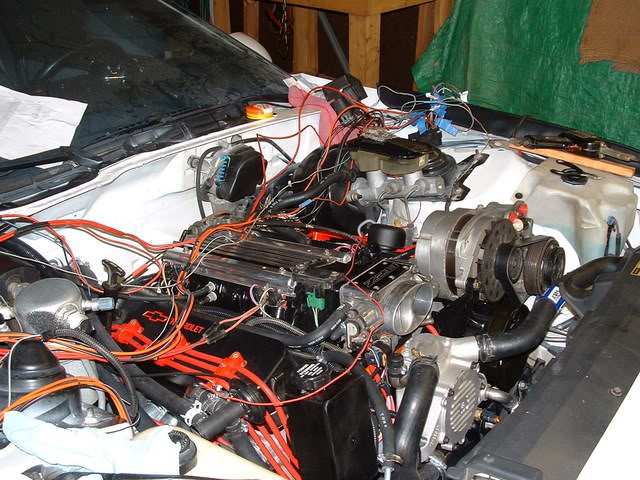
now here is what i got done on the hoses so far:first these show how i spliced in the steam hose to the left/bottom radiator hose,and the third pic also shows where i connected the bottom heater hose, is all this ok?
Last edited by bmfIROC-Z; Sep 28, 2008 at 06:53 PM.
Trending Topics
Re: lt1 with stock 3rd gen radiator pics please
i just need to know where them last to fittings go and if all the other hoses i already connected are where they should be,this is about all i got left to finish up the swap and i wanna make sure i get it right cause i definately dont want it overheating so if somebody could help me out here i would really really appreciate it,thanks in advance,joe
Last edited by bmfIROC-Z; Sep 29, 2008 at 01:36 PM.

Joined: May 2004
Posts: 1,037
Likes: 2
From: Kingsport Tenn
Car: 1992 camaro
Engine: LT1
Transmission: 4L60E
Axle/Gears: 3:73
Re: lt1 with stock 3rd gen radiator pics please
I donno if this pic helps out http://img110.imageshack.us/my.php?i...owoff11vm8.jpg


Supreme Member
Joined: May 2004
Posts: 2,924
Likes: 1
From: Kingston, Tn
Car: 1987 GTA
Engine: LT1
Transmission: T56
Axle/Gears: 9 bolt 3.70 posi
Re: lt1 with stock 3rd gen radiator pics please
How to build a Ram Air induction system for a TPI fuel system
askulte Mar 31 2006 - 4:48pm
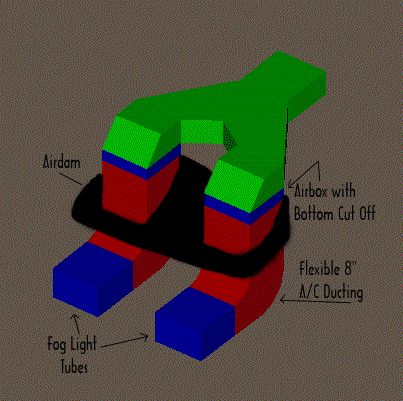 Here are the supplies and tools I used:
 A few feet of flexible 8" airconditioning duct
Hacksaw
Dremel tool w/ cut off disc
Diagonal cutters
7 mm socket wrench (I think)
Chalk
Rough-grit sandpaper or file
Procedure:
Remove stock airboxes and with a hacksaw, cut off the bottom half. I cut just above the stock intake holes. Make sure to leave enough material on the the airboxes so the A/C hose will stay on.
Take the A/C hose out of its insulation (not necessary).
Determine where on the air dam the A/C hoses will pass through. The air dam is the plastic piece that originally separated the front of the engine bay and airboxes from the incoming air from the fog lights. You will see it when the air boxes are removed. Just lay the airboxes in their proper location and notice where the ducts will have to go through the plastic.
Chalk the outline of where the air dam will be cut out so the ducts can pass through.
With Dremel tool and cut off disc, cut along the chalked outline on the air dam and pop out the pieces just cut out
Take sandpaper or file and smooth the freshly cut, sharp edges. You don't want the ducts to get cut.
Install airboxes
Take A/C duct and stretch it from the back of the fog light tubes to the bottom of the airbox. Cut off exess. You do not want exess, as that will decrease the ram air effect. The 8" duct stretched right over the airbox. I bought some clamps to hole it on, but they were unnecessary since it stayed on w/o a problem. The duct sometimes blows off the bottom fog light tubes, so it might be a good idea to clamp that down w/ a large zip tie, or metal hose clamp.
Go for a "spirited" drive and notice that it pulls harder at extreme speeds
Keep that huge smile

I'm considering making a new setup w/ a sheet metal duct, or PVC pipes. If you have any more ideas, let me know.

Last edited by bmfIROC-Z; Oct 1, 2008 at 05:42 PM.
Member
iTrader: (1)
Joined: Feb 2005
Posts: 424
Likes: 0
From: Columbus, OH, USA
Car: '91 Z28, '13 Civic EX-L
Engine: 355 LT1, 1.8 I4
Transmission: T56, 5spd auto
Axle/Gears: 10 bolt 3.42(as long as no breaky)
Re: lt1 with stock 3rd gen radiator pics please
I donno if this pic helps out http://img110.imageshack.us/my.php?i...owoff11vm8.jpg
The problem with that air set up is the stock air box becomes really narrow over the front frame because it needs to fit under the hood. This results in a flow restriction with the higher air demand LT1 engines.
Re: lt1 with stock 3rd gen radiator pics please
yeah i dont have the valve anymore somebody already got rid of it before i got it,and the intake i can see what you mean that was the part i was refering to in my last post that i said would probably be the most restrictive point,will this be a huge restriction?or will this be something i can worry about in the future?what kind of intakes do most lt1 swappers on here run?
Last edited by bmfIROC-Z; Oct 1, 2008 at 09:55 PM.
Member
iTrader: (1)
Joined: Feb 2005
Posts: 424
Likes: 0
From: Columbus, OH, USA
Car: '91 Z28, '13 Civic EX-L
Engine: 355 LT1, 1.8 I4
Transmission: T56, 5spd auto
Axle/Gears: 10 bolt 3.42(as long as no breaky)
Re: lt1 with stock 3rd gen radiator pics please
Right now ive got the 1LE elbow on upsidedown so it points towards the passenger side with a cone filter. I have the vette accessories on the dirvers side and the elbow wont clear the accessories. Im planning on moving the battery to the drivers side and continuing the intake piping down through the current battery tray with the filter on the other side. The way my intake sits right now i find it hard to believe its not robbing me of signifigant power. 200 degree radiator temps arent a good thing.
Junior Member
Joined: Jun 2008
Posts: 42
Likes: 0
Car: 1988 Camaro Conv.
Engine: 96 LT1
Transmission: T56
Axle/Gears: 3:73's
Re: lt1 with stock 3rd gen radiator pics please
the one on the right side i ran to the fitting on the left side of the radiator where the stock heater core return hose used to go,the one on the left i ran to the left heater core line and the one that points up i ran to the right heater core line.
Junior Member
Joined: Jun 2008
Posts: 42
Likes: 0
Car: 1988 Camaro Conv.
Engine: 96 LT1
Transmission: T56
Axle/Gears: 3:73's
Re: lt1 with stock 3rd gen radiator pics please
so you used a lt1 rad? how is this setup working for you rite now? does the heat from your heater core get into the car at all with the heat off?? and btw where is the heater valve and what does it look like? i doubt that i have one on my car??

Supreme Member
Joined: May 2004
Posts: 2,924
Likes: 1
From: Kingston, Tn
Car: 1987 GTA
Engine: LT1
Transmission: T56
Axle/Gears: 9 bolt 3.70 posi
Re: lt1 with stock 3rd gen radiator pics please
Same here, with the 4th gen fans, made the hole in the lower radiator support for the mount and put it in place using the 4th gen upper radiator support
also tucked behind it is a 4th gen a/c condensor
also tucked behind it is a 4th gen a/c condensor
Re: lt1 with stock 3rd gen radiator pics please
no ,i used the stock thirdgen radiator and have had no problems.
Re: lt1 with stock 3rd gen radiator pics please
yes thats the steam pipe,it needs to be connected to the small hose that runs off the side of the top lt1 radiator hose.whatever you do dont block it off.
Last edited by bmfIROC-Z; Feb 18, 2009 at 11:43 PM.
Joined: Jun 2002
Posts: 722
Likes: 6
From: Ottawa, Ontario
Car: 86 IROC
Engine: LQ4 6.0L
Transmission: T56
Axle/Gears: 3.55 8.8
Re: lt1 with stock 3rd gen radiator pics please
This is what I have..
Stock 3rd gen rad. B-Body water pump. Dual 3rd gen fans. I think both are 95 vette hoses..can't remember.
I have now plugged the capped heater hose on the water pump in there pictures, so it looks cleaner. I used the stock hardline on the front passenger frame rail from the heater core.
The cyl. head steam line is tapped into the waterpump neck as shown, so no huge adapter/splice is needed on the lower hose.
Member
iTrader: (1)
Joined: Jun 2008
Posts: 119
Likes: 0
From: Pittsburgh PA
Car: 1986 Camaro IROC-Z
Engine: 357 LTx
Transmission: T-56 6spd
Axle/Gears: GM 7.5 10 bolt with 4.10 richmonds
Re: lt1 with stock 3rd gen radiator pics please
i believe it goes to the upper hose, and if you buy the 95 camaro upper rad hose you dont need to splice anything, the upper hose comes with the 3/8" line coming out of it, all you do is connect the 3/8" hose from the steam line to that branch line with a barbed coupling peice. And there's no tapping into your waterneck involved. The one guy above gave you a pic of my car in the imageshack link and how it looks.
Supreme Member
Joined: May 2004
Posts: 2,924
Likes: 1
From: Kingston, Tn
Car: 1987 GTA
Engine: LT1
Transmission: T56
Axle/Gears: 9 bolt 3.70 posi
Re: lt1 with stock 3rd gen radiator pics please
You can actually hook the steam line up to the one that comes out of the heads to bypass the TB (one of the freebie mods done)


Joined: Oct 2007
Posts: 1,375
Likes: 6
From: Wyoming
Car: 1995 Formula
Engine: LT1 350
Transmission: Built 4L60e
Axle/Gears: 10 bolt, Eaton posi, 3.73's
Re: lt1 with stock 3rd gen radiator pics please
What the heck is the steam line? Can you show a clear underhood pic of your setup please? Thank you 
Last edited by New2Chevy; May 13, 2010 at 02:26 PM.
Joined: Oct 2007
Posts: 1,375
Likes: 6
From: Wyoming
Car: 1995 Formula
Engine: LT1 350
Transmission: Built 4L60e
Axle/Gears: 10 bolt, Eaton posi, 3.73's
Re: lt1 with stock 3rd gen radiator pics please
So the fan setup and upper radiator support fit right into the third gen, or did you have to fabricate or drill anything for it all to fit?

Joined: Jun 2002
Posts: 722
Likes: 6
From: Ottawa, Ontario
Car: 86 IROC
Engine: LQ4 6.0L
Transmission: T56
Axle/Gears: 3.55 8.8
Re: lt1 with stock 3rd gen radiator pics please
The steam line comes form the back of each cylinder head on the LT1's. It's hard to get a picture of as it gets covered by everything else on top. The line is ~3/8" steel. Starts at rear of drivers side head, goes to passenger side head rear, then up between valve cover and intake on passenger side to front of the motor. It just removes the air pocket from the cylinder head to prevent hot spots.
Supreme Member
Joined: May 2004
Posts: 2,924
Likes: 1
From: Kingston, Tn
Car: 1987 GTA
Engine: LT1
Transmission: T56
Axle/Gears: 9 bolt 3.70 posi
Re: lt1 with stock 3rd gen radiator pics please
And it normally went into the water passages on the TB and then comes out to the radiator, you can come right off the steam line straight to the radiator.
As for mounting the LT1 rad, I had to put a hole in the lower support for the mount and then drill the bolt holes in the upper plastic LT1 radiator support to bolt it to the stock 3rd gen metal support.
As for mounting the LT1 rad, I had to put a hole in the lower support for the mount and then drill the bolt holes in the upper plastic LT1 radiator support to bolt it to the stock 3rd gen metal support.
Joined: Oct 2007
Posts: 1,375
Likes: 6
From: Wyoming
Car: 1995 Formula
Engine: LT1 350
Transmission: Built 4L60e
Axle/Gears: 10 bolt, Eaton posi, 3.73's
Re: lt1 with stock 3rd gen radiator pics please
I'll understand it more when I start my swap. I'll figure it out.
Thanks guys.
Thanks guys.
And it normally went into the water passages on the TB and then comes out to the radiator, you can come right off the steam line straight to the radiator.
As for mounting the LT1 rad, I had to put a hole in the lower support for the mount and then drill the bolt holes in the upper plastic LT1 radiator support to bolt it to the stock 3rd gen metal support.
As for mounting the LT1 rad, I had to put a hole in the lower support for the mount and then drill the bolt holes in the upper plastic LT1 radiator support to bolt it to the stock 3rd gen metal support.
Joined: Oct 2007
Posts: 1,375
Likes: 6
From: Wyoming
Car: 1995 Formula
Engine: LT1 350
Transmission: Built 4L60e
Axle/Gears: 10 bolt, Eaton posi, 3.73's
Re: lt1 with stock 3rd gen radiator pics please
So are those four horizontal bolts on the bottom actually "biting" into your 4th gen shroud, too? It looks like they are, in the picture.
I know I'll figure it all out once I start my swap, but I like to know things beforehand.
Also, do the LT4 heads have those steam lines, too? I might have a great deal on a set and was wondering this.
I know I'll figure it all out once I start my swap, but I like to know things beforehand.
Also, do the LT4 heads have those steam lines, too? I might have a great deal on a set and was wondering this.
Joined: Oct 2007
Posts: 1,375
Likes: 6
From: Wyoming
Car: 1995 Formula
Engine: LT1 350
Transmission: Built 4L60e
Axle/Gears: 10 bolt, Eaton posi, 3.73's
Re: lt1 with stock 3rd gen radiator pics please
By "lower support" do you mean the metal frame or the existing lower radiator support bracket? I can't visualize what you did.
And it normally went into the water passages on the TB and then comes out to the radiator, you can come right off the steam line straight to the radiator.
As for mounting the LT1 rad, I had to put a hole in the lower support for the mount and then drill the bolt holes in the upper plastic LT1 radiator support to bolt it to the stock 3rd gen metal support.
As for mounting the LT1 rad, I had to put a hole in the lower support for the mount and then drill the bolt holes in the upper plastic LT1 radiator support to bolt it to the stock 3rd gen metal support.
Junior Member
Joined: Mar 2012
Posts: 3
Likes: 0
From: sellersville
Car: 1988 Iroc-z28
Engine: 96 lt1
Transmission: t5
Axle/Gears: 3.73s
Re: lt1 with stock 3rd gen radiator pics please
i no this is a old thread but im currently doin this swap... just acouple of questions if someone wouldnt mind helping me out. if u use the 94-95 camaro upper rad hose theres that 3/8 line coming out of about the middle ,i read u can make it longer n connect it to some port on pass side intake? idk were n ive been trying to find it but cant could anyone help me? n that vacume line with the blue circles in it wat does that do/go?

Thread
Thread Starter
Forum
Replies
Last Post
1992 Trans Am
Engine/Drivetrain/Suspension Parts for Sale
1
Aug 8, 2015 08:16 PM