When you click on links to various merchants on this site and make a purchase, this can result in this site earning a commission. Affiliate programs and affiliations include, but are not limited to, the eBay Partner Network.
LTX and LSXPutting LT1s, LS1s, and their variants into Third Gens is becoming more popular. This board is for those who are doing and have done the swaps so they can discuss all of their technical aspects including repairs, swap info, and performance upgrades.
One is sensor low reference for the IAT sensor, the other GRD for the MAF heater
Beware both the IAT low ref and AC pressure sensor low ref both go to R57 for 99-03 red/blue PCMs. If you've got the AC sensor and have a terminal at R57 already then you prob just need to hook the two together
97-98 PCMs have a unique pinout and a semi-limited capacity PCM when compared to the 99+ versions. The comment was referring to sourcing a donor harness. The harness is completely disassembled so the original pinout is irrelevant. It will be repinned as needed, 97-98, 99-03 or other years to suit the needs of the combo
Pocket .... you mentioned in original post
"the dreaded 98 loom" what is the issue with these ?
Hey Iroc,
Guessing by the name I'd guess you're in Australia?
If you're doing this swap I'd suggest a VX commodore or later LS1 harness.
I got one and only had to extend the crank position sensor cable, and buy 2 O2 sensor extentions for $10 each. You just have to repin the firing order for the injectors and ignition which is about 8 wires.
I put mine through the firewall instead of extending and rerouting through the driver wheel well to save a lot of hassle.
I also spend hours testing all connections with a multimeter and checking the pinouts for the vx compared to the 4th gen ls1s to make sure it was all the same.
I didn't use the BCM as I had a 97 firebird cluster I'm using, so there's more time there sorting through the wires to find the ones you need, but I can make a colour coded chart to make it easier for you if you'd like.
Mines about a week (always a week) away from firing up, but so far the wiring is probably one of the few things that's been relatively straight forward with my build.
I have a 92 camaro rs originally 3.1 liter w/700r4. Could anyone from this forum tell me what the heavy pink ignition wire from stock 3rd gen harness connects to on the ls1 harness? I cannot figure out where the ign lead wire came from in the post #4 (pocket)! I have coil/inj, ho2, maf, trans solenoid going through c207 to fuse center.
The heavy pink (which is a switched 12 volt) wire should go to Pin number 19 on the big 80 pin blue connector going to the PCM which is a smaller pink wire.
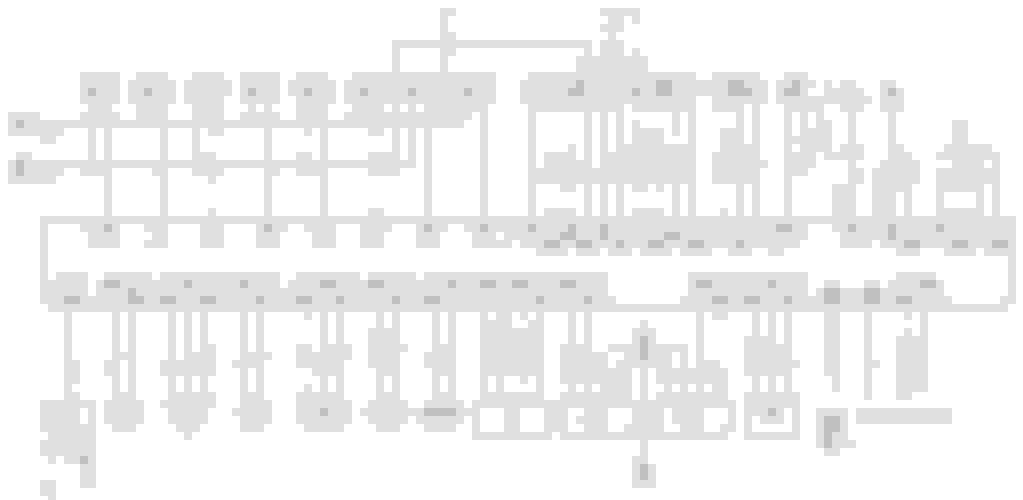
Here is a complete diagram of wiring you need to get your motor running:
Last edited by pg29; Jul 18, 2016 at 03:57 PM.
Reason: included diagram
Post #7 shows the B-19 to be attached to terminal F on the C-207?? Do I connect B-19 to the heavy pink from 3rd gen or do I tee it in with terminal F and the heavy pink?
Post #7 shows the B-19 to be attached to terminal F on the C-207?? Do I connect B-19 to the heavy pink from 3rd gen or do I tee it in with terminal F and the heavy pink?
Please correct me if I'm wrong, but aren't they are both IGN power? And I believe both those wires go through the fuse block, so it shouldn't matter. Just need to make sure you are running the correct amp fuse in that spot?
Just wondering if anyone can tell me exactly what you are connecting from ls1 harness to the heavy pink ignition wire from the 3rd gen harness.
Its unfused directly from the IGN switch. It originally powered the coil. I dont use it for LS harnesses. INJ1/2, PCM, emission, fan fuses cover all the bases. Those are mixed between the C100, C207 and C221 depending on year
If the car had traction control, the IAT low ref wire (purple) will be attached. Remove the traction side of this. Oddly enough the TPS had all 3 wires spliced and ran to the dash connector in addition to the PCM. You need only the PCM side and the splices can be cut out when the wires are lengthened
Originally Posted by Pocket
Low ref is return ground signal for a PCM. If a sensor doesnt ground through the PCM, it will code unless its turned off. IAT for example, cannot be turned off as its a critical function
You dont ground them directly. Sorry for the confusing wording, I meant just for the unused leg of the circuit to get cut out. That way the only thing left is the IAT low strait to the PCM, no tees
Pocket,
First off, thanks for this and all your other wiring threads.
Pocket do you have one pinned out to a 1989 C100/C207 bulkhead? It would be awesome if you have because I got a 89 IROC that I want to put a LS motor into.
Pocket do you have one pinned out to a 1989 C100/C207 bulkhead? It would be awesome if you have because I got a 89 IROC that I want to put a LS motor into.
You may want to PM Pocket He can better serve you that way.
I'm putting a 2003 LS 4.8L into my ****** 1938 pickup truck. Can anyone tell me if pins Blue #32 and #34 can simply be grounded? These are the PNS wires, and I want to use my PN switch in series with the starter key to the starter solenoid.
Will the constant ground on these wires affect the running of the engine?
Thanks redmaroz!
I'm doing that also now. I found a note somewhere that the ECU also uses those pins to determine if it's in gear and to raise the idle rpm a little, but I can live without that!
This is my first time doing a 98 ls1 standalone harness, I have done 5.3's before. The ls1 seems a little different with the connectors. I have a few questions if anyone can help.
1) what exactly is pin 58 for on the blue ecm connector? it says serial data class2, it connects to connector 230-k-purple(output field service enable) according to the chart this is a wire I need
2) does anyone have a list/diagram of the wires from the 6 connectors that you need?
I am working with the 98 ls1 harness
Hello, I have an 88 ta that I did an ls1 twin turbo swap w a turbo 400 trans, and holley dominator ecu. I have an electronic speedo etc, that I'm trying to figure out what I need to do to get my gauges working. And also how to I create a thread in this thirdgen.org site??? Drives me nuts not knowing how to ask a question n get replies. lol. Thanks for any help
Look up your particular C100/C207 pinout for your year 3rd gen. Here is the 90-92
C100 Connections:
Tach to R10
TCC to B33 (4L60E only)
IGN to whatever IGN commons are left on the LS1 harness that are not fused
There should only be one from your IGN common
C207 connections.
B to bank 1 INJ/Coil IGN wire (PNK)
C to R46
D to R50
F to B19
G to bank 2 INJ/Coil IGN wire (PNK)
N to B32 and B34
Depending on the tune the PCM will not allow the engine to start unless either B32 or B34 is grounded. Which is arbitrary but not having it grounded will be difficult to trace. Ground both and dont worry about it anymore Attachment 425261
Finish up the remaining wire leads from the PCM
Relays: if using stock 3rd gen units, the dk grn/wht wire is grounded(fans) or given 12v(fuel pump) for the relays to enable
Fans go to either or both B42 and R33. One PCM pin can control both fans, or the PCM can control each fan independently even at different turn on temps if used separately. The tune can set each's turn on temp
Fuel connects to R9
ALDL must be upgraded from the stock OBDI to OBDII. This can be had from any OBDII GM car. The stock OBDI ALDL does not have to be removed, just be aware it will no longer function
Pinout Attachment 425262
Serial data goes to B58
Splice the battery power to the PCM battery common and attach the runner ground wire from before
VATS must be disabled both in the PCM tune and in the 3rd gen dash harness wiring. Both are quite simple. Locate the starter kill relay behind the drivers kick panel and connect the two heavy wires at the relay. Depending on year, engine and trans type the colors will vary. One wire will ALWAYS be yellow, and the second either dark green or tan/wht
That should wrap up the harness. Loom it and install. Have fun
For the THIRD GEN CAMARO �VATS� DO I TIE THE YELLOW AND GREEN WIRE TOGETHER FROM THE RELAY OR DO I TIE THEM TOGETHER COMING FROM THE WIRE HARNESS?
So I have a 91 firebird that was a 305 tbi 700r4. I've way overspent on this and my budget is all but gone. So I'm scared AF to screw up the old wire harness. I was hoping I could get some advice on what I'll need to keep and what can be cut out. I have the harness out of the car. I have a stand-alone harness for the 6.0 LS I swapped in. I'm keeping the stock 700r4 and the stock gauges. The car has ac and a new compressor that I'd like to use but it's not high on my needs to get it running. Also, the car had cruise control and it would be nice to keep that.
What do I need to keep? Is there anything I need to keep from inside the car? Like the ecu box for the speedometer? Or can all of that get taken out of the old harness? I know I'll need to keep the oil pressure sender and coolant sender, but what about the stuff that went to the break booster and the power steering.
I have the 91 dealer shop manual with all the wiring diagrams but they make my eyes cross trying to read them.
I'd really like to not **** this up and have to spend even more on this project.
Start by reading this entire thread. It's all in here on what to keep and what can go.
A guy that goes by Pocket created the wiring how-to threads that everybody still references today. Here is a map to all the guides he created so you can walk through it in a logical order.
Sep 2009: How to prep a 3rd gen harness https://www.thirdgen.org/forums/ltx-...p-3rd-gen.html
Part I of the wiring guide. Stripping and prepping stock 3rd gen harness for integration with an LS engine swap. Key posts #1-3, 25. The rest is Q&A.
Mar 2010: LS1 harness revisited https://www.thirdgen.org/forums/ltx-...revisited.html
An abridged overview of a "plug & play" harness from beginning to end. Example based on LS1/T56 swap into 89 GTA. Key posts #1, 2.