LS1 swap for my '89 GTA
 06-02-2012, 03:00 PM
#351
Supreme Member

Thread Starter
iTrader: (1)
Join Date: Mar 2007
Location: Apopka, Florida
Posts: 1,237
Likes: 0
Received 7 Likes
on
6 Posts
Car: 1989 Pontiac Trans Am GTA
Engine: cammed LS1
Transmission: Monster SS 4L65E
Axle/Gears: 9 bolt posi w/ 3.70 gears
Re: LS1 swap for my '89 GTA
The pan is about to be removed so that I can change out the rod bolts

I'm testing out my new(ish) high resolution camera too. I have been using my old camera since my pic sizes were much smaller. I want to see if there is any difference from the last pics I put on here
I'm testing out my new(ish) high resolution camera too. I have been using my old camera since my pic sizes were much smaller. I want to see if there is any difference from the last pics I put on here
Last edited by dprest68; 08-20-2012 at 10:36 AM.
 06-02-2012, 03:08 PM
#352
Supreme Member
Thread Starter
iTrader: (1)
Join Date: Mar 2007
Location: Apopka, Florida
Posts: 1,237
Likes: 0
Received 7 Likes
on
6 Posts
Car: 1989 Pontiac Trans Am GTA
Engine: cammed LS1
Transmission: Monster SS 4L65E
Axle/Gears: 9 bolt posi w/ 3.70 gears
Re: LS1 swap for my '89 GTA
It doesn't look any different IMO. Oh well.
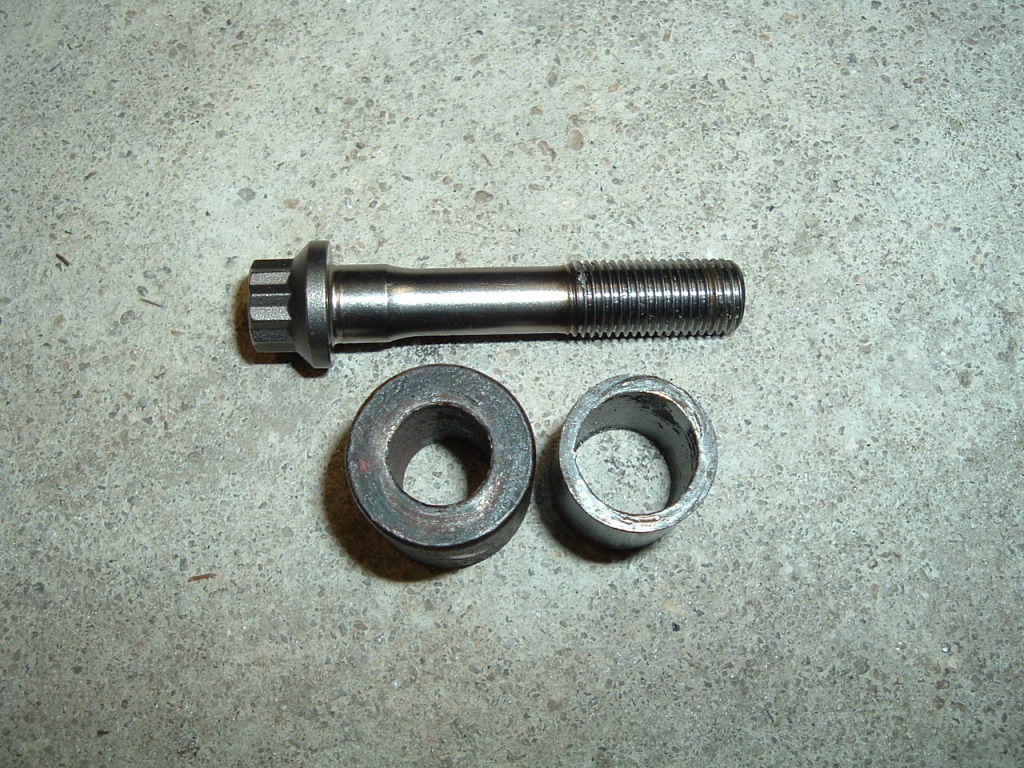
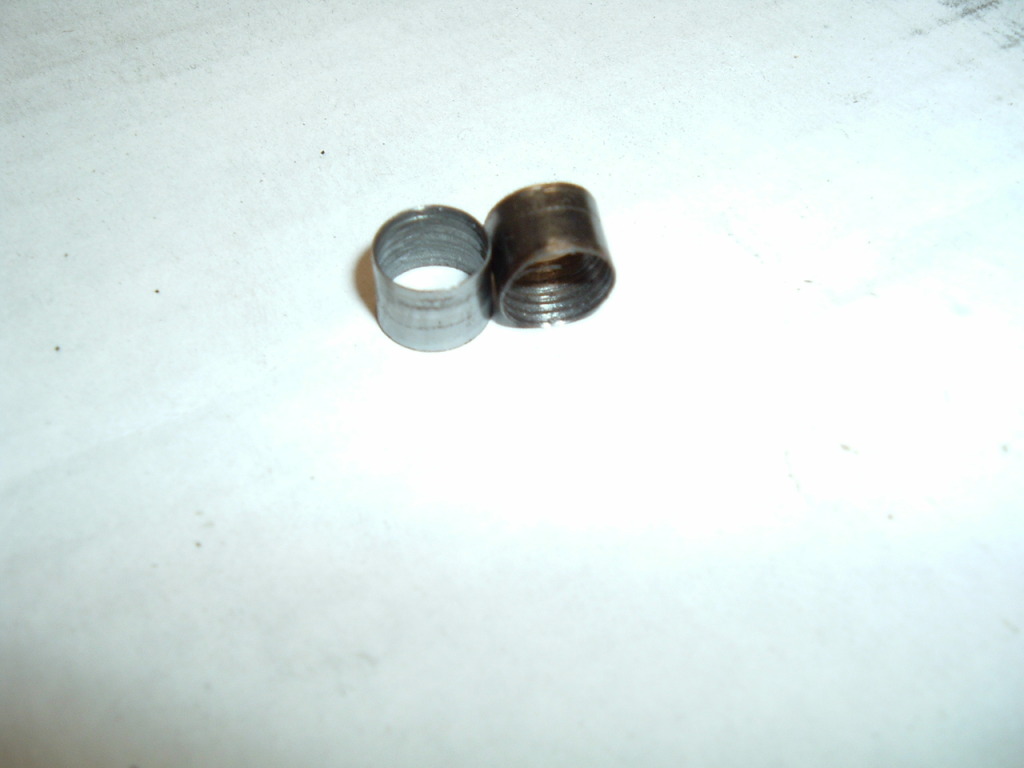
Comparison of the stock rod bolts and ARP 2000 bolts

Looks like I have the rod bolt ferrules.
Now to find that thread that tells how to remove them.
Comparison of the stock rod bolts and ARP 2000 bolts
Looks like I have the rod bolt ferrules.
Now to find that thread that tells how to remove them.
Last edited by dprest68; 08-20-2012 at 10:38 AM.
06-02-2012, 05:11 PM
#353
Supreme Member
Thread Starter
iTrader: (1)
Join Date: Mar 2007
Location: Apopka, Florida
Posts: 1,237
Likes: 0
Received 7 Likes
on
6 Posts
Car: 1989 Pontiac Trans Am GTA
Engine: cammed LS1
Transmission: Monster SS 4L65E
Axle/Gears: 9 bolt posi w/ 3.70 gears
Re: LS1 swap for my '89 GTA
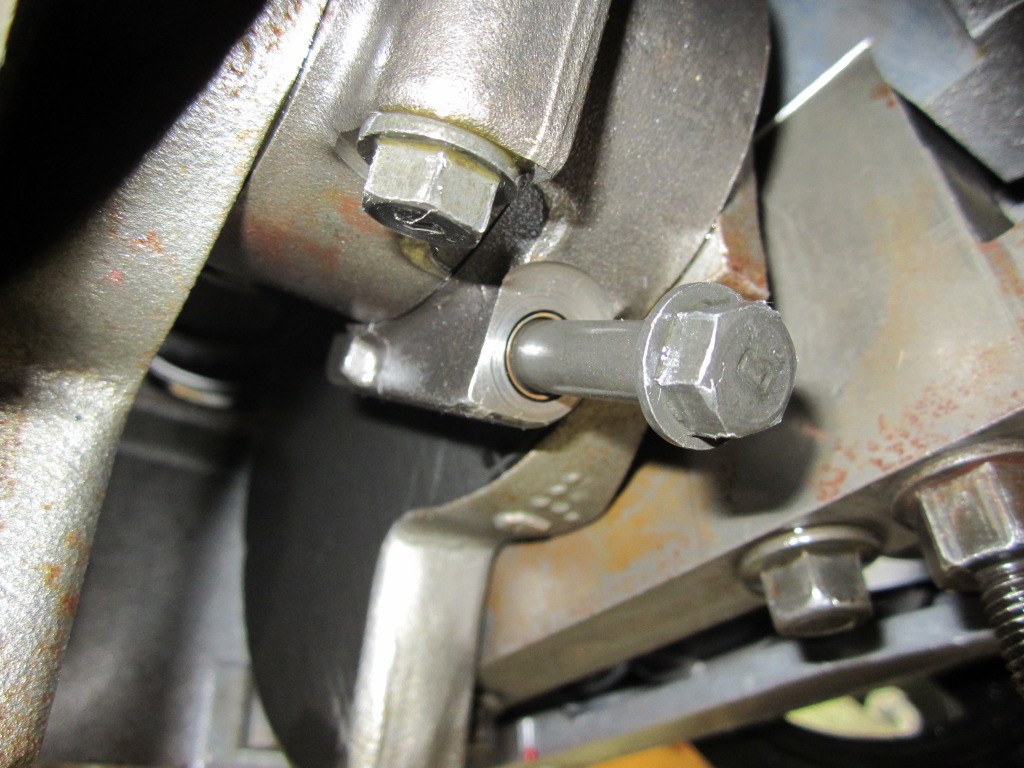
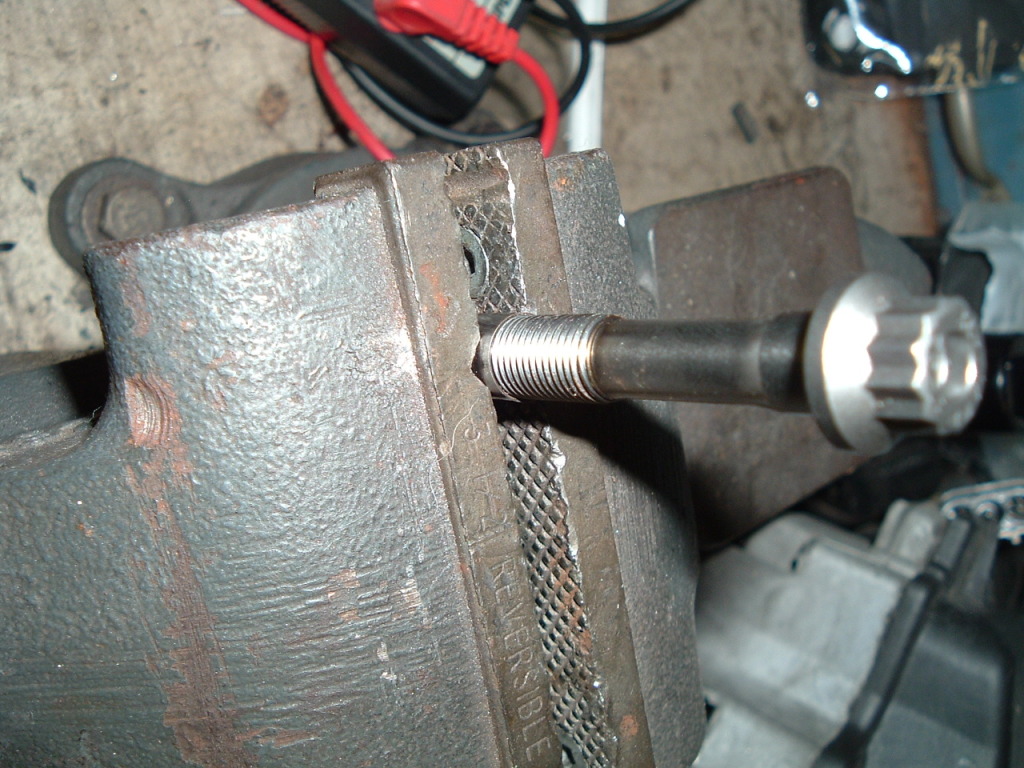
Okay, after some research and thinking about how I was going to get these stinking ferrules out, I came up with this. My own ferrule removal tool.  The spacer against the rod cap has a large enough ID to allow the bolt to pull the ferrule through. I ended up having to use the ARP bolt to do this since the stock rod bolts weren't working.
New tool in action...
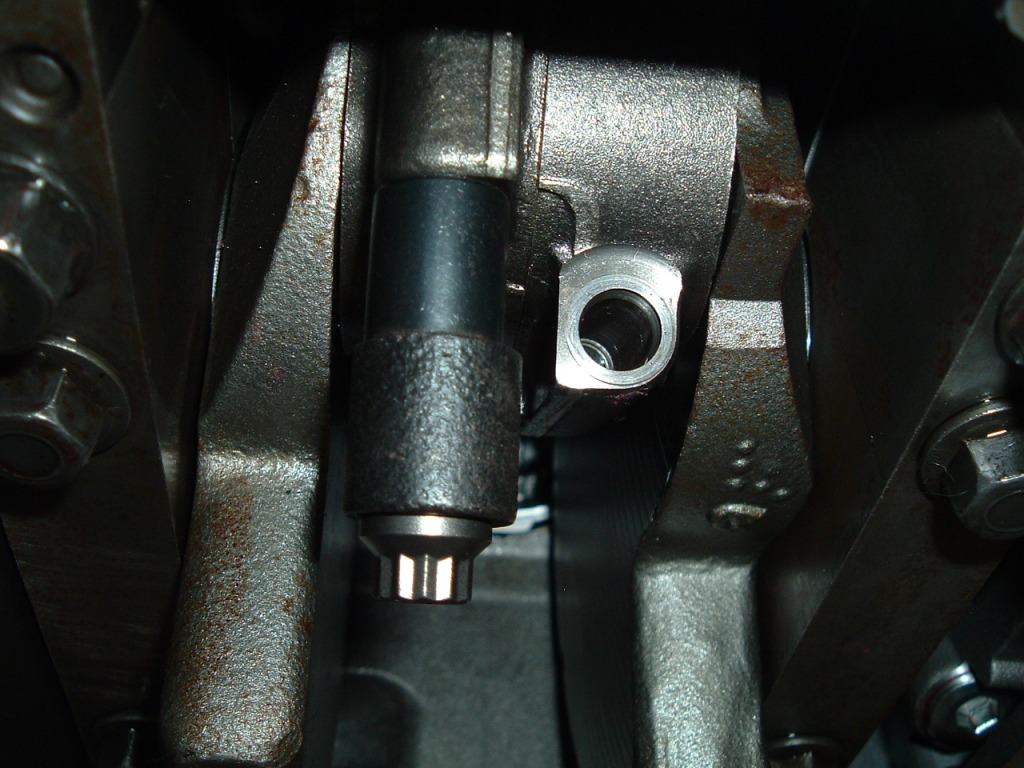
The boltless cap on the right already has the ferrule removed.
I had to lightly clamp the ferrule in the vise to remove it from the bolt. (EDIT: Turns out I didn't actually need the use the vice for this step. I was able to remove most of them by hand)
Two of these little suckers down... 14 more to go!
This is going to take awhile, but should go much faster now that I have a system going.
The spacer against the rod cap has a large enough ID to allow the bolt to pull the ferrule through. I ended up having to use the ARP bolt to do this since the stock rod bolts weren't working.New tool in action...
The boltless cap on the right already has the ferrule removed.
I had to lightly clamp the ferrule in the vise to remove it from the bolt. (EDIT: Turns out I didn't actually need the use the vice for this step. I was able to remove most of them by hand)
Two of these little suckers down... 14 more to go!
This is going to take awhile, but should go much faster now that I have a system going.
Last edited by dprest68; 07-12-2012 at 10:22 AM.
06-02-2012, 07:39 PM
#354
Re: LS1 swap for my '89 GTA
Can you post up the link?
06-02-2012, 07:49 PM
#355
Supreme Member
Thread Starter
iTrader: (1)
Join Date: Mar 2007
Location: Apopka, Florida
Posts: 1,237
Likes: 0
Received 7 Likes
on
6 Posts
Car: 1989 Pontiac Trans Am GTA
Engine: cammed LS1
Transmission: Monster SS 4L65E
Axle/Gears: 9 bolt posi w/ 3.70 gears
Re: LS1 swap for my '89 GTA
Sure. Everything that I read said to remove them. I'll post it later.
I only got 12 of the 16 done. That was a lot of work! I will be glad to get it back together tomorrow.
One thing about the ARP bolts is that they are longer and fully engage in the rod to where you can feel the end of the bolt if you reach up and stick your finger in the hole in the rod. I was unable to feel the end of the bolt with the stock rod bolts. Not sure if that makes any difference, but it can't hurt.
Last edited by dprest68; 06-02-2012 at 11:31 PM.
06-02-2012, 11:19 PM
#356
Supreme Member
Thread Starter
iTrader: (1)
Join Date: Mar 2007
Location: Apopka, Florida
Posts: 1,237
Likes: 0
Received 7 Likes
on
6 Posts
Car: 1989 Pontiac Trans Am GTA
Engine: cammed LS1
Transmission: Monster SS 4L65E
Axle/Gears: 9 bolt posi w/ 3.70 gears
Re: LS1 swap for my '89 GTA
Here are a few links for ya HP...
http://ls1tech.com/forums/generation...rite-up-4.html
http://ls1tech.com/forums/conversion...need-help.html
http://ls1tech.com/forums/generation...ing-wrong.html
There is some discussion about it on GhettoCruiser's thread on page 3 as well...
https://www.thirdgen.org/forums/ltx-...old-new-3.html
http://forums.corvetteforum.com/c5-t...bolt-swap.html
http://lsspeedshop.com/arp8740series...ecengines.aspx
That should keep you busy for awhile
Last edited by dprest68; 06-02-2012 at 11:25 PM.
06-03-2012, 09:39 PM
#358
Supreme Member
Thread Starter
iTrader: (1)
Join Date: Mar 2007
Location: Apopka, Florida
Posts: 1,237
Likes: 0
Received 7 Likes
on
6 Posts
Car: 1989 Pontiac Trans Am GTA
Engine: cammed LS1
Transmission: Monster SS 4L65E
Axle/Gears: 9 bolt posi w/ 3.70 gears
Re: LS1 swap for my '89 GTA
No problem. I hope they helped.
06-03-2012, 11:03 PM
#359
Supreme Member
Thread Starter
iTrader: (1)
Join Date: Mar 2007
Location: Apopka, Florida
Posts: 1,237
Likes: 0
Received 7 Likes
on
6 Posts
Car: 1989 Pontiac Trans Am GTA
Engine: cammed LS1
Transmission: Monster SS 4L65E
Axle/Gears: 9 bolt posi w/ 3.70 gears
Re: LS1 swap for my '89 GTA
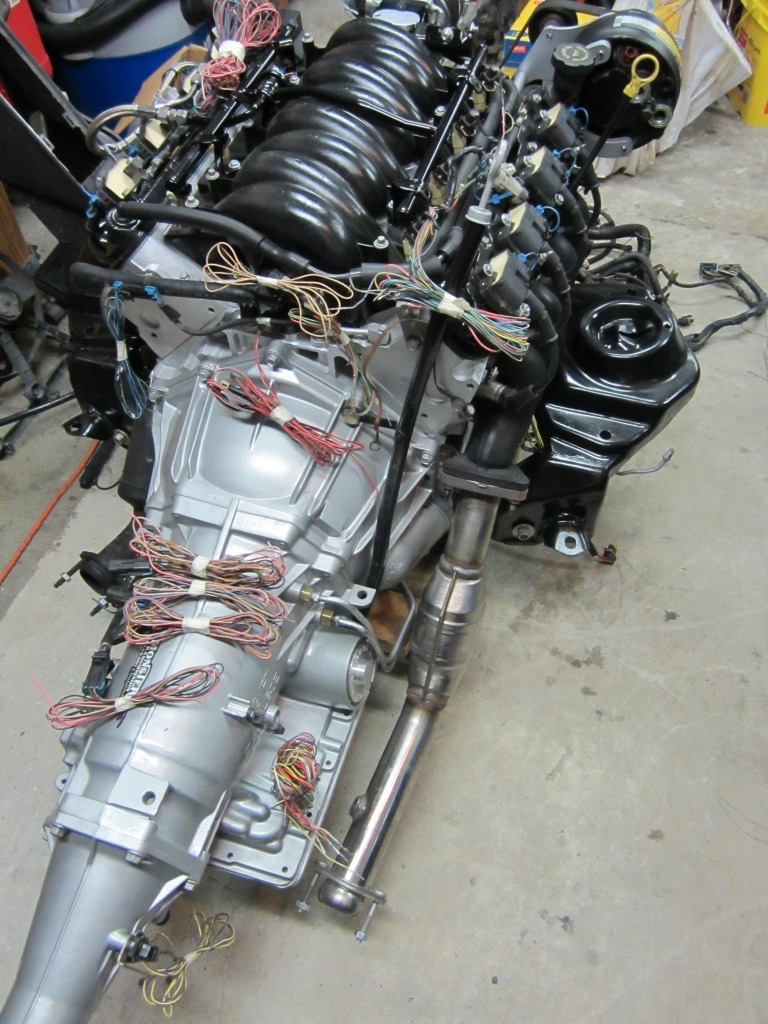
Man, I didn't think this was going to be a two day ordeal. It's finally done and the engine is back on the dolly ready to be installed. All I need now is my harness back from Pocket. Here are a few pics...
ARP rod bolts installed - ferrules removed. Oil pan about to go back on.
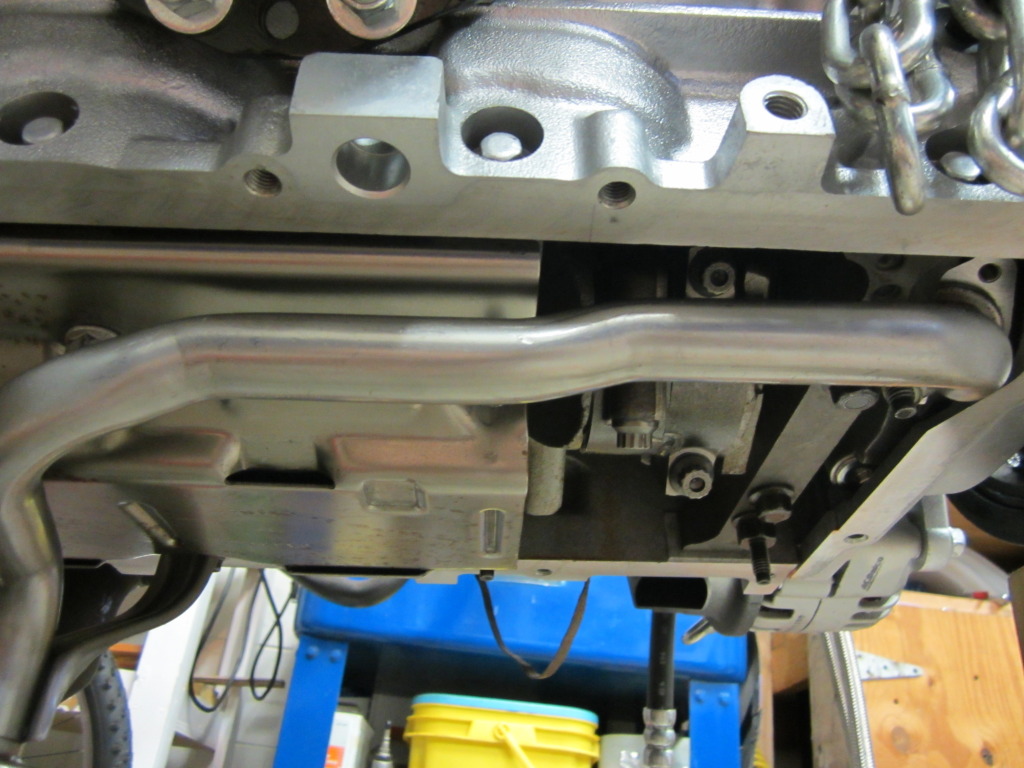
I had to fix a few things I forgot before. I sealed where the front & back covers meet up to the block at the oil pan rail. (I doubt they would have leaked though looking at the way the oil pan gakets is made, but it can't hurt) I also installed my trany cooler lines. I thought the 4L60E & 700R4 trany's were pretty much the same, but that's what I get for thinking! Turns out the outlets for the lines are at different angles. So, more bending & tweaking.
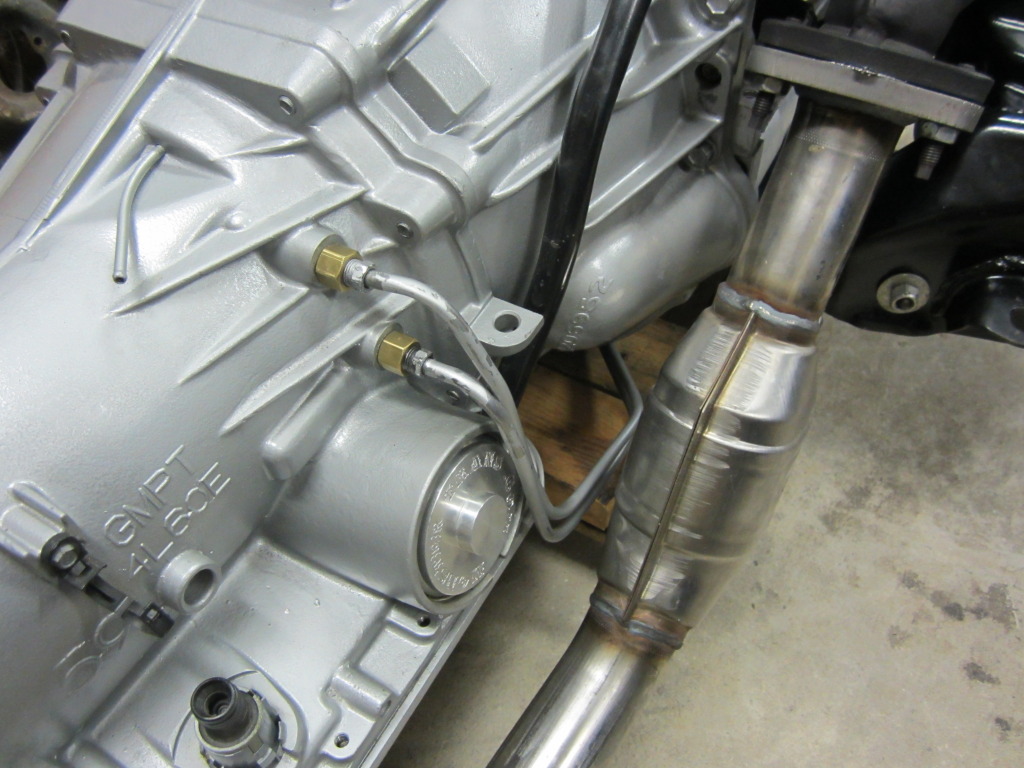
I secured the lines to the block to keep them off the brake line & other stuff. It sure was a PITA to make that hole bigger in the clamp to be able to bolt it to the block. I messed that clamp up! It took me quite awhile to get it back to where I could use it again. I should have taken pics of that!
I don't think there's any way I could have got those lines on there without lifting the engine off of the K-member short of cutting them. I'm just glad this part is done and over with. I'm getting anxious to get it back in the car!
ARP rod bolts installed - ferrules removed. Oil pan about to go back on.
I had to fix a few things I forgot before. I sealed where the front & back covers meet up to the block at the oil pan rail. (I doubt they would have leaked though looking at the way the oil pan gakets is made, but it can't hurt) I also installed my trany cooler lines. I thought the 4L60E & 700R4 trany's were pretty much the same, but that's what I get for thinking!
Turns out the outlets for the lines are at different angles. So, more bending & tweaking.I secured the lines to the block to keep them off the brake line & other stuff. It sure was a PITA to make that hole bigger in the clamp to be able to bolt it to the block. I messed that clamp up! It took me quite awhile to get it back to where I could use it again. I should have taken pics of that!
I don't think there's any way I could have got those lines on there without lifting the engine off of the K-member short of cutting them. I'm just glad this part is done and over with. I'm getting anxious to get it back in the car!
Last edited by dprest68; 06-22-2012 at 06:19 PM.
06-22-2012, 06:05 PM
#360
Supreme Member
Thread Starter
iTrader: (1)
Join Date: Mar 2007
Location: Apopka, Florida
Posts: 1,237
Likes: 0
Received 7 Likes
on
6 Posts
Car: 1989 Pontiac Trans Am GTA
Engine: cammed LS1
Transmission: Monster SS 4L65E
Axle/Gears: 9 bolt posi w/ 3.70 gears
Re: LS1 swap for my '89 GTA
No real update other than I still don't have my harness back yet. I guess I am just going to have him send it back to me and attempt it myself.
I did get a few goodies from the UPS guy this week though.
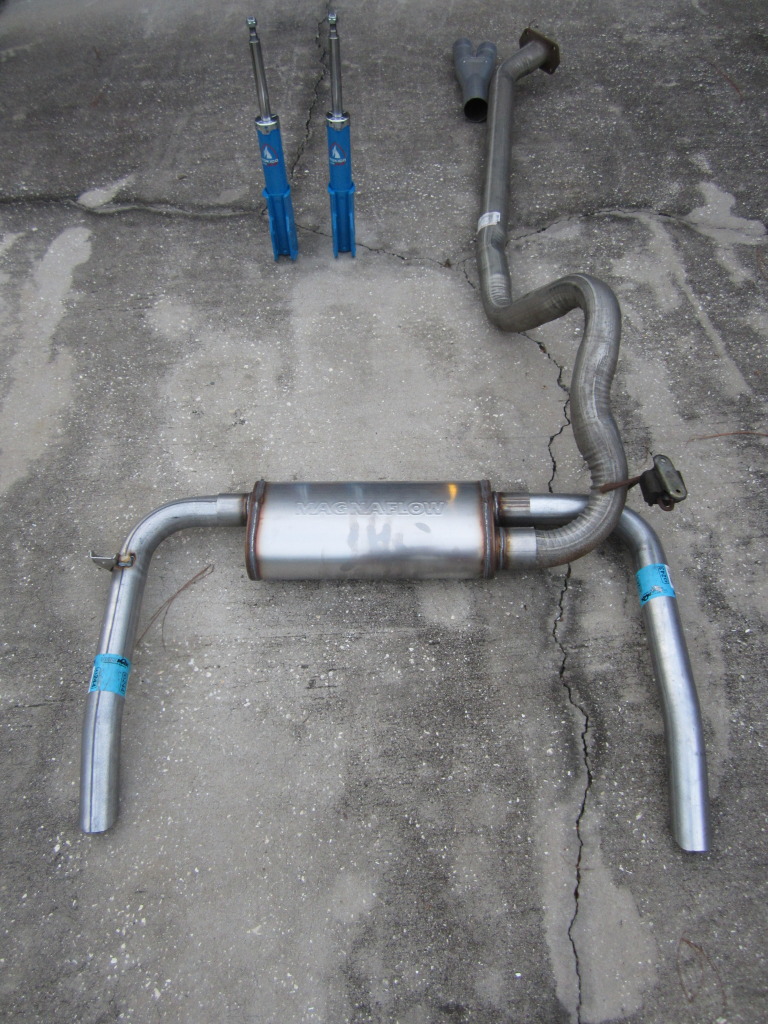
I picked-up a pair of Tokico struts for just a little over $200 with free shipping. I also got my whole cat-back exhaust for around $200 including the Magnaflow muffler! I found the muffler on Amazon.com (3" inlet, two 2-1/2" outlets) in their "warehouse deals" section for $23 AND I got free shipping! Woo hoo. I also got two new premium GM LS1 rotors for around $50. All deals I just couldn't pass up.
I decided to go with the LS1 front brake set-up since I can't afford new wheels & tires at this time.
I did get a few goodies from the UPS guy this week though.
I picked-up a pair of Tokico struts for just a little over $200 with free shipping. I also got my whole cat-back exhaust for around $200 including the Magnaflow muffler! I found the muffler on Amazon.com (3" inlet, two 2-1/2" outlets) in their "warehouse deals" section for $23 AND I got free shipping! Woo hoo. I also got two new premium GM LS1 rotors for around $50. All deals I just couldn't pass up.
I decided to go with the LS1 front brake set-up since I can't afford new wheels & tires at this time.
07-09-2012, 11:09 AM
#361
Supreme Member
Thread Starter
iTrader: (1)
Join Date: Mar 2007
Location: Apopka, Florida
Posts: 1,237
Likes: 0
Received 7 Likes
on
6 Posts
Car: 1989 Pontiac Trans Am GTA
Engine: cammed LS1
Transmission: Monster SS 4L65E
Axle/Gears: 9 bolt posi w/ 3.70 gears
Re: LS1 swap for my '89 GTA
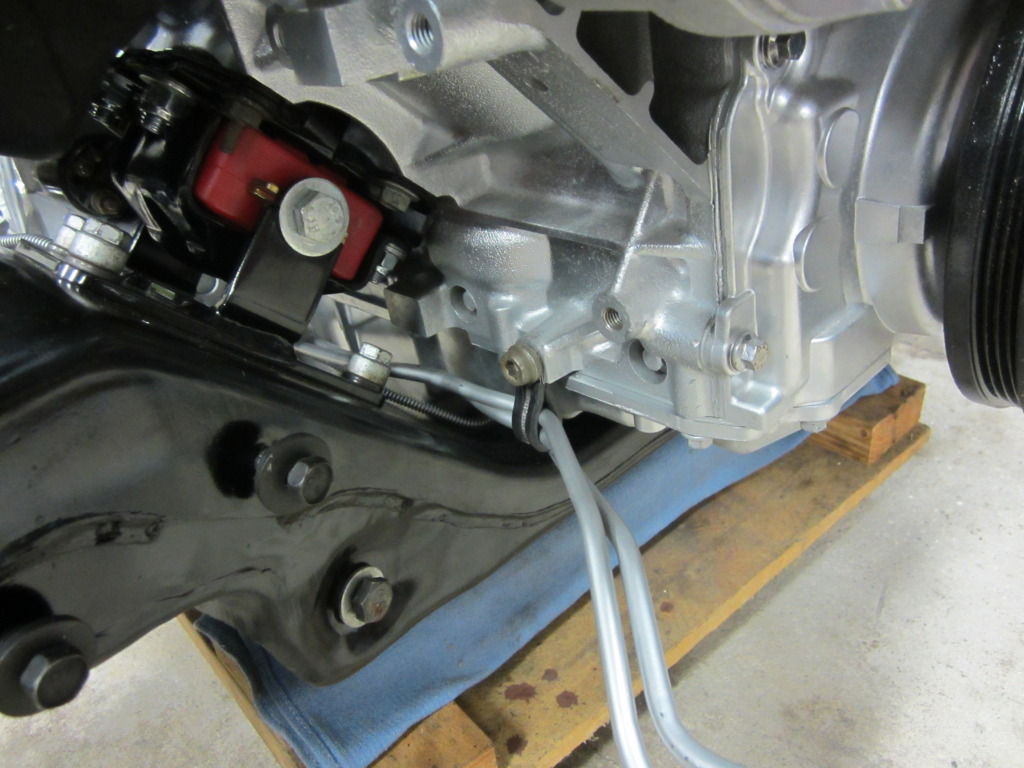
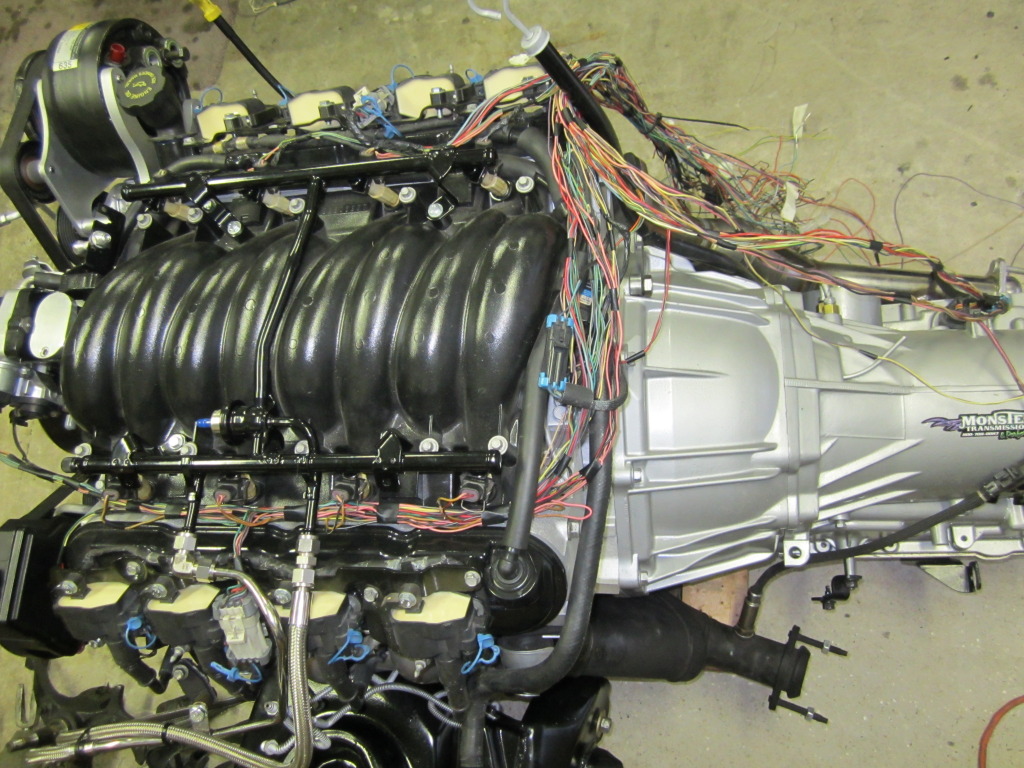
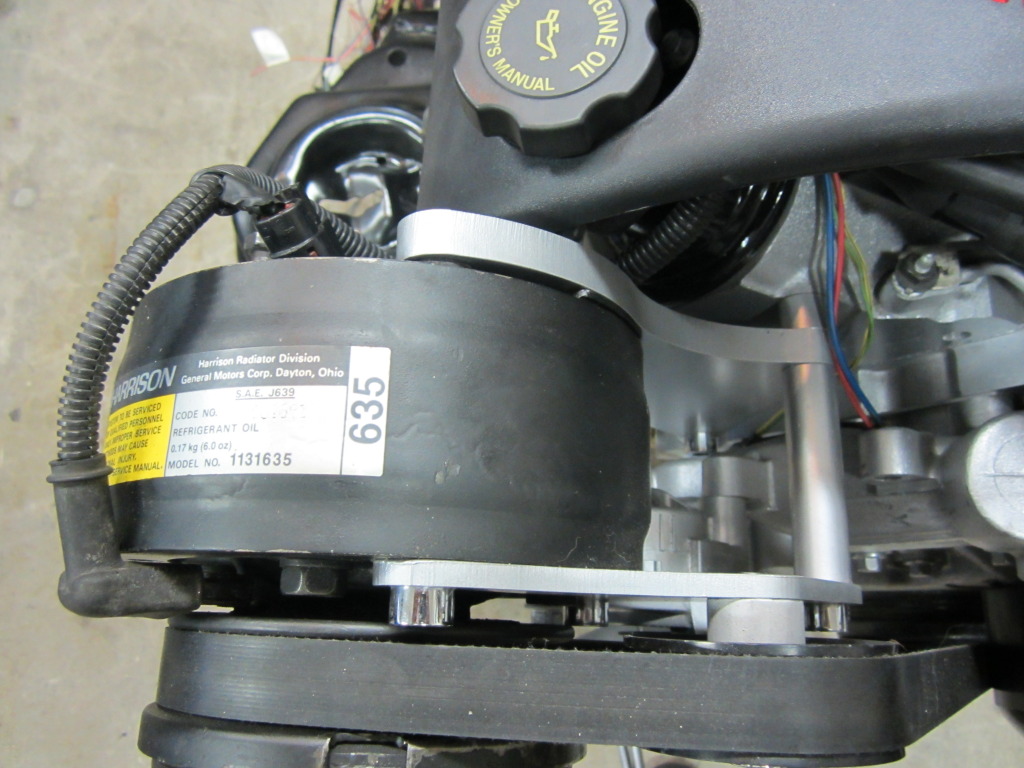
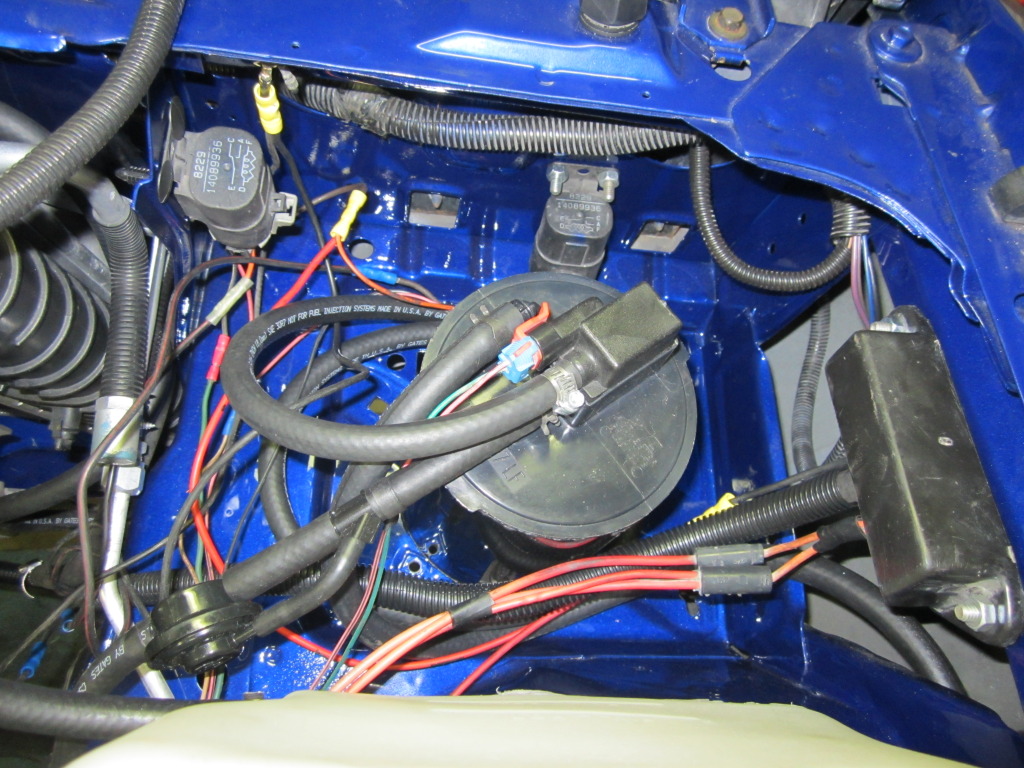
Here's a small update. I got my harness back from Pocket this past weekend. Jon's a nice guy. He had started on my harness, but didn't finish it. So I am working on figuring out where everything goes & getting it labeled. Jon said I should sell the TPI car harness and get a V6 harness. So I am in the process of finding one of those for an '89.
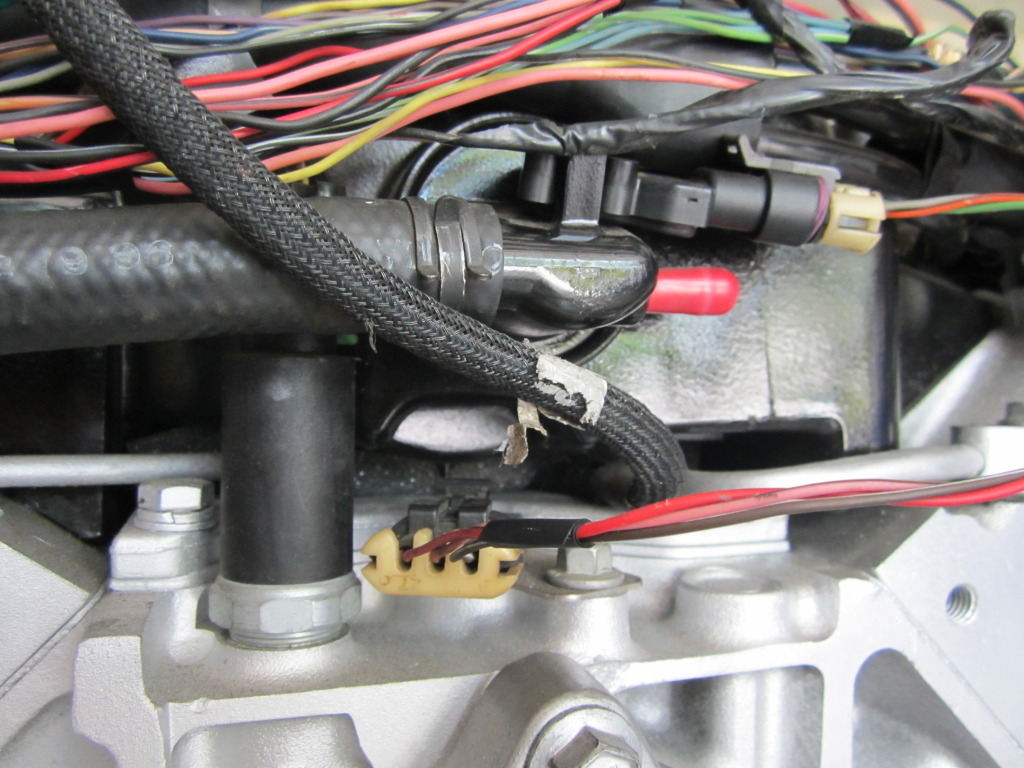
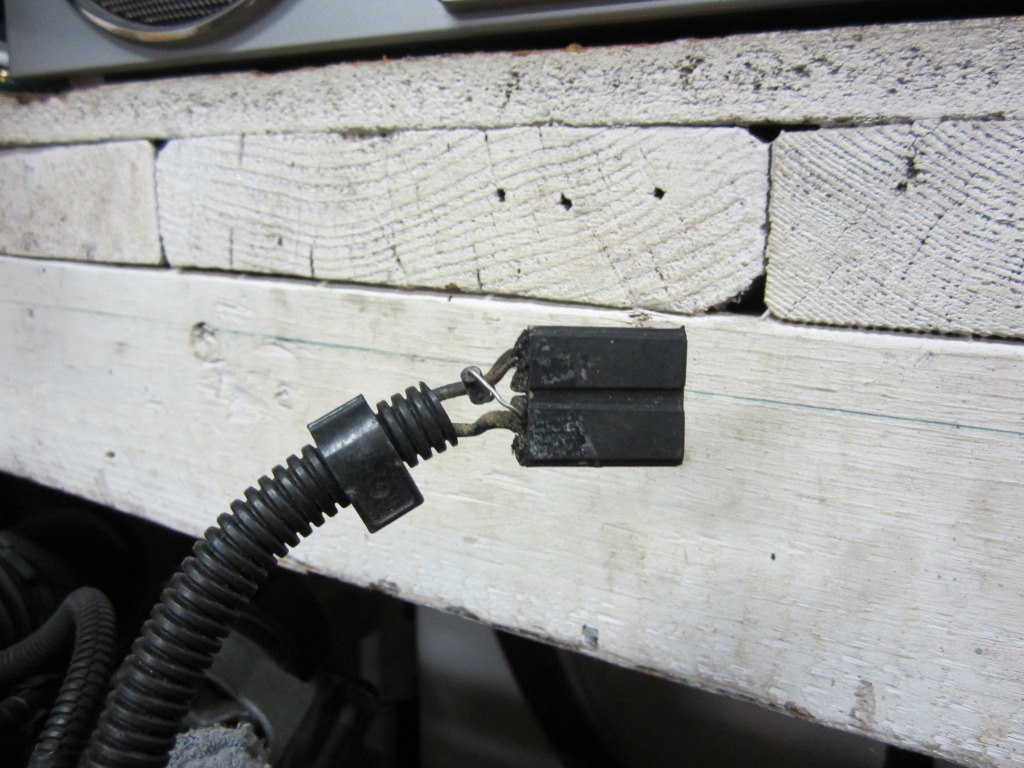
I think I figured all of the pigtails out except for the upper one in this pic.
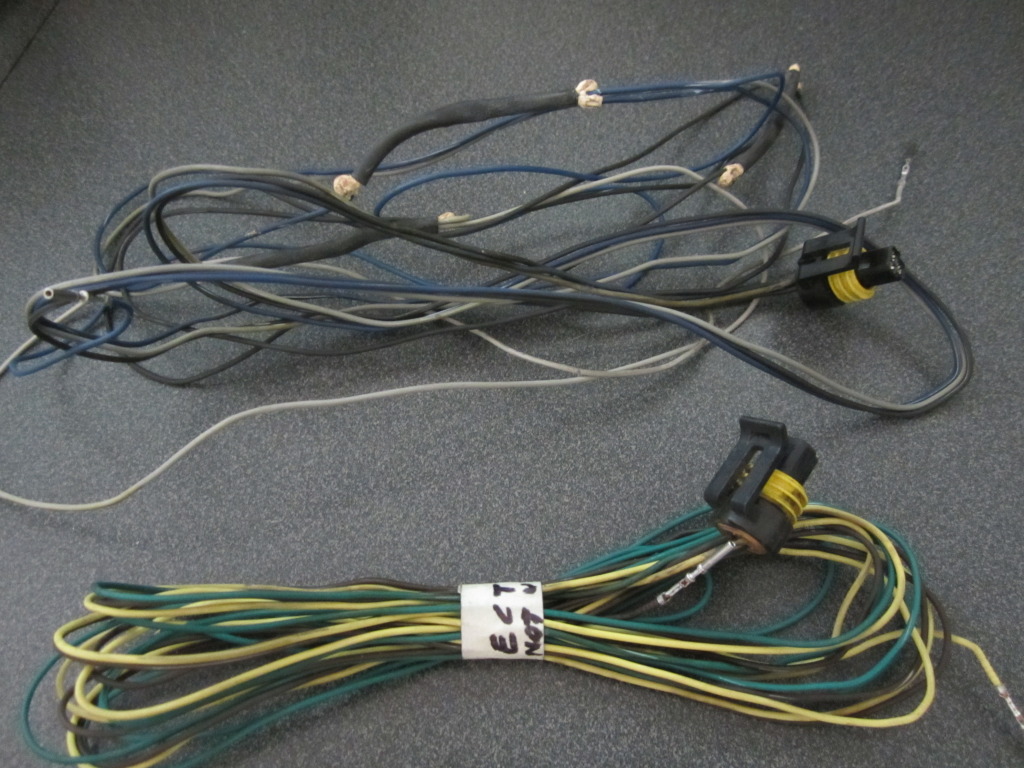
It looks just like the coolant temperature sensor pigtail below it, but I don't see where it goes. The lower one in the pic goes on the front of the driver's side cylinder head. Any ideas? (EDIT: turns out it goes to the throttle position sensor. The pigtail I had on there was too short and the wrong colored wires.)
I went to the JY last week & picked up a pair of LS1 calipers.
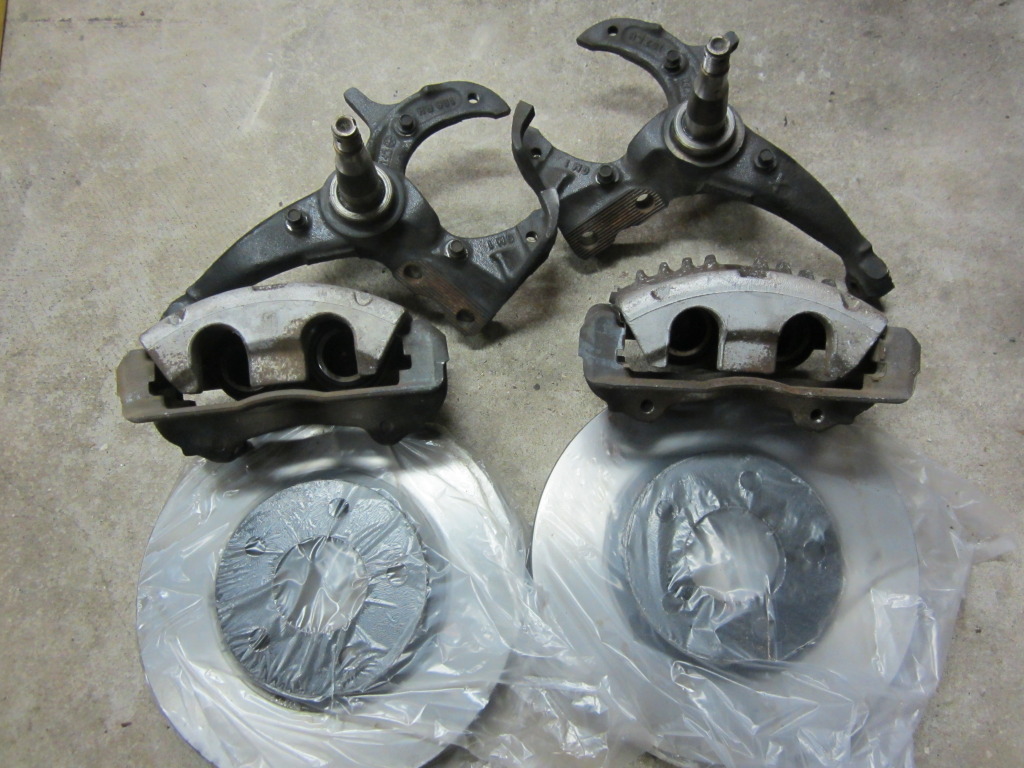
So all I need to do is modify my spindles & hubs and buy some nice pads & that will be one more big item checked off my list. I am considering sending the spindles off to BigBrakeUpgrade.com to have them modified for the LS1 upgrade.
I think I figured all of the pigtails out except for the upper one in this pic.
It looks just like the coolant temperature sensor pigtail below it, but I don't see where it goes. The lower one in the pic goes on the front of the driver's side cylinder head. Any ideas? (EDIT: turns out it goes to the throttle position sensor. The pigtail I had on there was too short and the wrong colored wires.)
I went to the JY last week & picked up a pair of LS1 calipers.
So all I need to do is modify my spindles & hubs and buy some nice pads & that will be one more big item checked off my list. I am considering sending the spindles off to BigBrakeUpgrade.com to have them modified for the LS1 upgrade.
Last edited by dprest68; 07-12-2012 at 08:14 AM.
07-09-2012, 05:41 PM
#362
Senior Member
iTrader: (16)
Join Date: Oct 2005
Location: Crestview, Florida
Posts: 651
Likes: 0
Received 0 Likes
on
0 Posts
Car: 86 IROC-Z, 98 Z28
Engine: 370 LSx, LS1
Transmission: T56's
Axle/Gears: 3.73, 3.42
Re: LS1 swap for my '89 GTA
That plug is for the AC. I think the AC pressure sensor, not really sure as I dont have it hooked up yet and the writing is faded on the label.
As for Scott @BigBrakeUpgrade.com I'd highly recommend him. Great guy to work with, and turn around time is fast.
As for Scott @BigBrakeUpgrade.com I'd highly recommend him. Great guy to work with, and turn around time is fast.
07-09-2012, 06:10 PM
#363
Supreme Member
Thread Starter
iTrader: (1)
Join Date: Mar 2007
Location: Apopka, Florida
Posts: 1,237
Likes: 0
Received 7 Likes
on
6 Posts
Car: 1989 Pontiac Trans Am GTA
Engine: cammed LS1
Transmission: Monster SS 4L65E
Axle/Gears: 9 bolt posi w/ 3.70 gears
Re: LS1 swap for my '89 GTA
Great Rich. Thanks for the input.
07-10-2012, 02:57 PM
#364
Supreme Member
Thread Starter
iTrader: (1)
Join Date: Mar 2007
Location: Apopka, Florida
Posts: 1,237
Likes: 0
Received 7 Likes
on
6 Posts
Car: 1989 Pontiac Trans Am GTA
Engine: cammed LS1
Transmission: Monster SS 4L65E
Axle/Gears: 9 bolt posi w/ 3.70 gears
Re: LS1 swap for my '89 GTA
I found a V6 engine harness in the JY today & brought it home. Going to start tearing into it here shortly. Also talked with one of my electrician buddies today & I think he is going to help me with the harness. 
07-12-2012, 09:12 AM
#365
Supreme Member
Thread Starter
iTrader: (1)
Join Date: Mar 2007
Location: Apopka, Florida
Posts: 1,237
Likes: 0
Received 7 Likes
on
6 Posts
Car: 1989 Pontiac Trans Am GTA
Engine: cammed LS1
Transmission: Monster SS 4L65E
Axle/Gears: 9 bolt posi w/ 3.70 gears
Re: LS1 swap for my '89 GTA
My electrician buddy Steve and I worked on the harnesses all day yesterday & made some pretty decent progress. He worked on cleaning up the V6 harness

He pretty much removed what wasn't needed and anything that had been cut.
I worked on the LS1 harness
Most of the wire routing is about done. Labeling of each wire will be next. And I'm still trying to figure out what a few of these sensors are.
He pretty much removed what wasn't needed and anything that had been cut.
I worked on the LS1 harness
Most of the wire routing is about done. Labeling of each wire will be next. And I'm still trying to figure out what a few of these sensors are.
Last edited by dprest68; 07-12-2012 at 09:23 AM.
07-12-2012, 10:12 AM
#366
Supreme Member
Thread Starter
iTrader: (1)
Join Date: Mar 2007
Location: Apopka, Florida
Posts: 1,237
Likes: 0
Received 7 Likes
on
6 Posts
Car: 1989 Pontiac Trans Am GTA
Engine: cammed LS1
Transmission: Monster SS 4L65E
Axle/Gears: 9 bolt posi w/ 3.70 gears
Re: LS1 swap for my '89 GTA
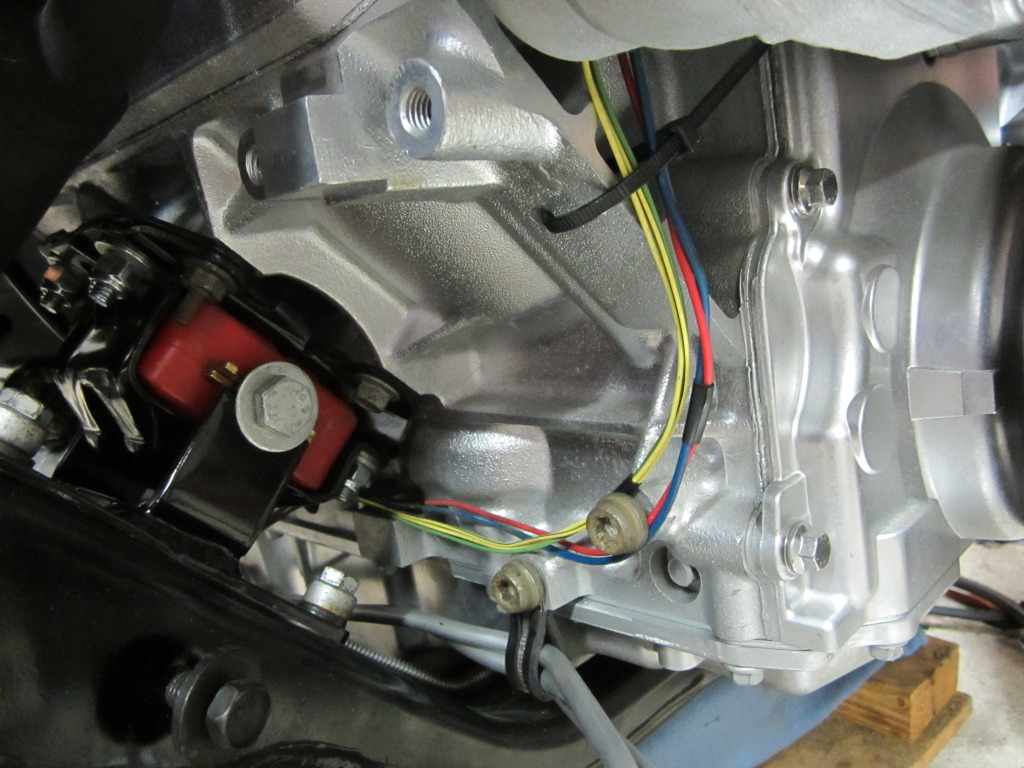
Thanks to this site http://www.chevythunder.com/ls1_page_1.htm I figured out most of the sensors on the engine & trany. The only two that I see that they left out are these two:
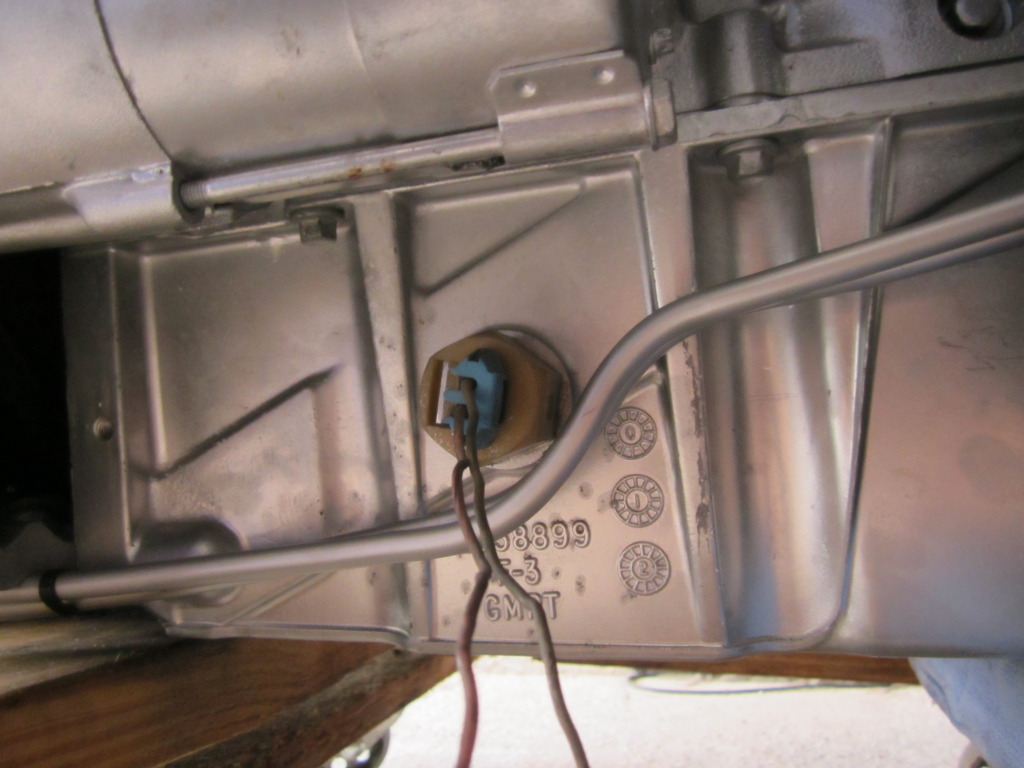
The one on the oil pan. I am assuming this is the oil level sensor.
And the tall one to the left of the cam position sensor. I am assuming this is the oil pressure sensor. Did I guess correctly on both?
The one on the oil pan. I am assuming this is the oil level sensor.
And the tall one to the left of the cam position sensor. I am assuming this is the oil pressure sensor. Did I guess correctly on both?
07-12-2012, 03:50 PM
#367
Senior Member
iTrader: (16)
Join Date: Oct 2005
Location: Crestview, Florida
Posts: 651
Likes: 0
Received 0 Likes
on
0 Posts
Car: 86 IROC-Z, 98 Z28
Engine: 370 LSx, LS1
Transmission: T56's
Axle/Gears: 3.73, 3.42
Re: LS1 swap for my '89 GTA
Nice progress. I'd like to build my own harness someday, it'd be good to have the experience/knowledge.
Correct on both; low oil level, and oil pressure sending unit.
Correct on both; low oil level, and oil pressure sending unit.
07-12-2012, 04:12 PM
#368
Supreme Member
Thread Starter
iTrader: (1)
Join Date: Mar 2007
Location: Apopka, Florida
Posts: 1,237
Likes: 0
Received 7 Likes
on
6 Posts
Car: 1989 Pontiac Trans Am GTA
Engine: cammed LS1
Transmission: Monster SS 4L65E
Axle/Gears: 9 bolt posi w/ 3.70 gears
Re: LS1 swap for my '89 GTA
Thanks Rich. Yeah, it's good experience, but I'll be glad when I'm done with it and the car actually starts
07-12-2012, 07:33 PM
#369
Member
iTrader: (3)
Join Date: Jul 2008
Location: ND
Posts: 385
Likes: 0
Received 0 Likes
on
0 Posts
Car: 1986 Firebird
Engine: 6.0L LSX
Transmission: 4L60E
Axle/Gears: 3.73
Re: LS1 swap for my '89 GTA
.....looks a lot tougher than it is. Keep up the good work.
07-13-2012, 05:19 PM
#370
Supreme Member
iTrader: (24)
Join Date: Jun 2005
Location: NC
Posts: 7,896
Likes: 0
Received 82 Likes
on
53 Posts
Car: 92 Firebird
Engine: Supercharged 6.0
Transmission: T56
Axle/Gears: 8.8 3.73
Re: LS1 swap for my '89 GTA
Good progress
First set of unknown connectors is TPS on top with CTS on bottom. AC pressure sensor also uses the same body, but different wire colors for all 3. As long as the pin locations are correct, it makes no difference which is used
This site is great for info as well
http://www.lt1swap.com/
First set of unknown connectors is TPS on top with CTS on bottom. AC pressure sensor also uses the same body, but different wire colors for all 3. As long as the pin locations are correct, it makes no difference which is used
This site is great for info as well
http://www.lt1swap.com/
07-14-2012, 08:23 AM
#371
Supreme Member
Thread Starter
iTrader: (1)
Join Date: Mar 2007
Location: Apopka, Florida
Posts: 1,237
Likes: 0
Received 7 Likes
on
6 Posts
Car: 1989 Pontiac Trans Am GTA
Engine: cammed LS1
Transmission: Monster SS 4L65E
Axle/Gears: 9 bolt posi w/ 3.70 gears
Re: LS1 swap for my '89 GTA
Thanks Mille. Yeah, I wasn't thinking that way when you posted this, but after working on it all night last night I am starting to feel better about it. It's just a very daunting task when you first start getting into it.
07-14-2012, 08:27 AM
#372
Supreme Member
Thread Starter
iTrader: (1)
Join Date: Mar 2007
Location: Apopka, Florida
Posts: 1,237
Likes: 0
Received 7 Likes
on
6 Posts
Car: 1989 Pontiac Trans Am GTA
Engine: cammed LS1
Transmission: Monster SS 4L65E
Axle/Gears: 9 bolt posi w/ 3.70 gears
Re: LS1 swap for my '89 GTA
Good progress
First set of unknown connectors is TPS on top with CTS on bottom. AC pressure sensor also uses the same body, but different wire colors for all 3. As long as the pin locations are correct, it makes no difference which is used
This site is great for info as well
http://www.lt1swap.com/
First set of unknown connectors is TPS on top with CTS on bottom. AC pressure sensor also uses the same body, but different wire colors for all 3. As long as the pin locations are correct, it makes no difference which is used
This site is great for info as well
http://www.lt1swap.com/
07-14-2012, 09:37 AM
#373
Supreme Member
Thread Starter
iTrader: (1)
Join Date: Mar 2007
Location: Apopka, Florida
Posts: 1,237
Likes: 0
Received 7 Likes
on
6 Posts
Car: 1989 Pontiac Trans Am GTA
Engine: cammed LS1
Transmission: Monster SS 4L65E
Axle/Gears: 9 bolt posi w/ 3.70 gears
Re: LS1 swap for my '89 GTA
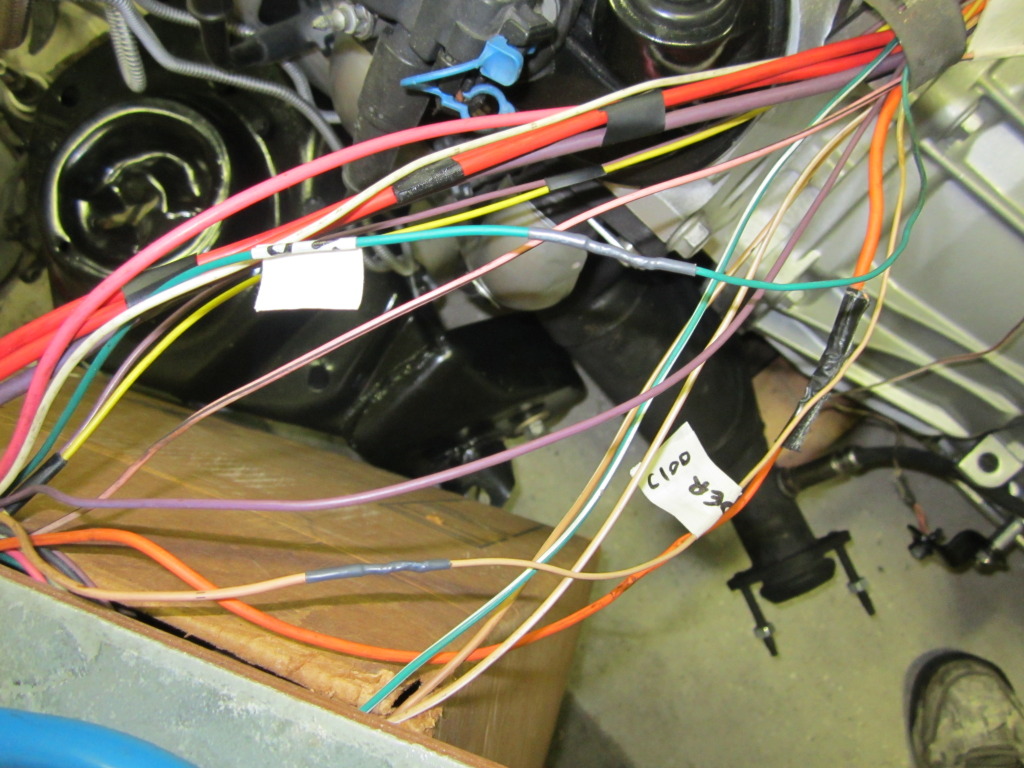
Making progress. I spent all day & night working on it yesterday. Turns out that the C100 on the V6 harness I got from the JY was missing the two VSS pins & the set-up for the fan was for a single fan. Luckily there was a harness at the JY that someone had cut in half & it had the correct C100 pin-out along with almost everything else I needed. I also found (2) two pin fan connectors so that I can recreate my dual fan set-up that was on my TPI harness.
Here's a pic of my wire planning.
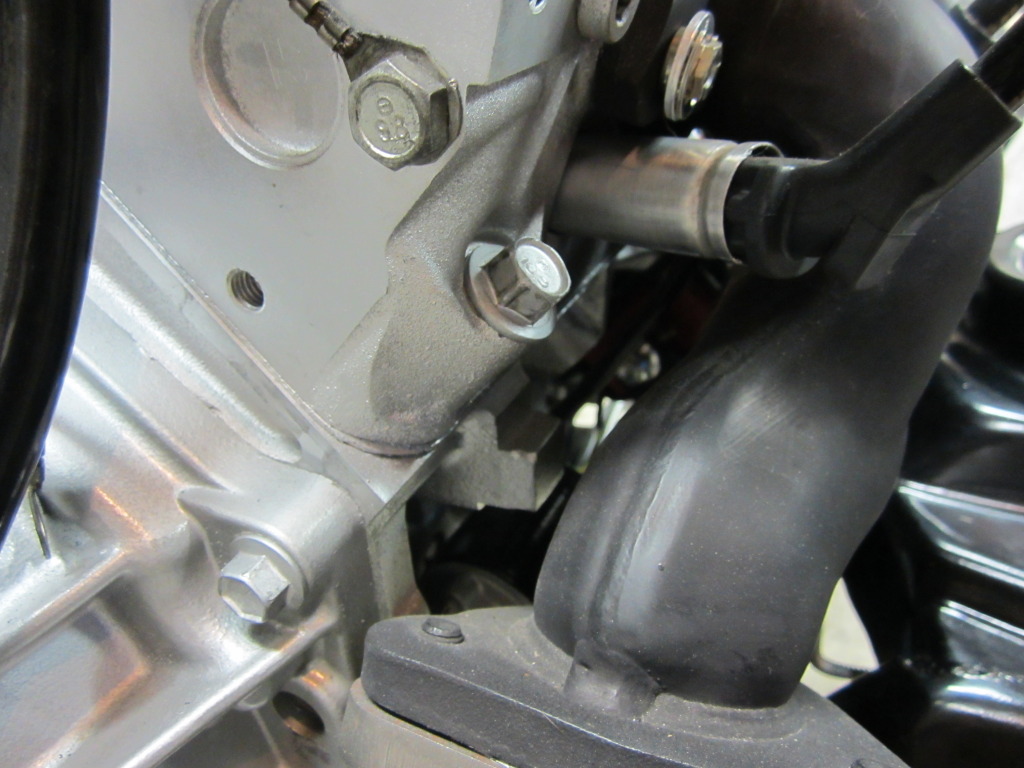
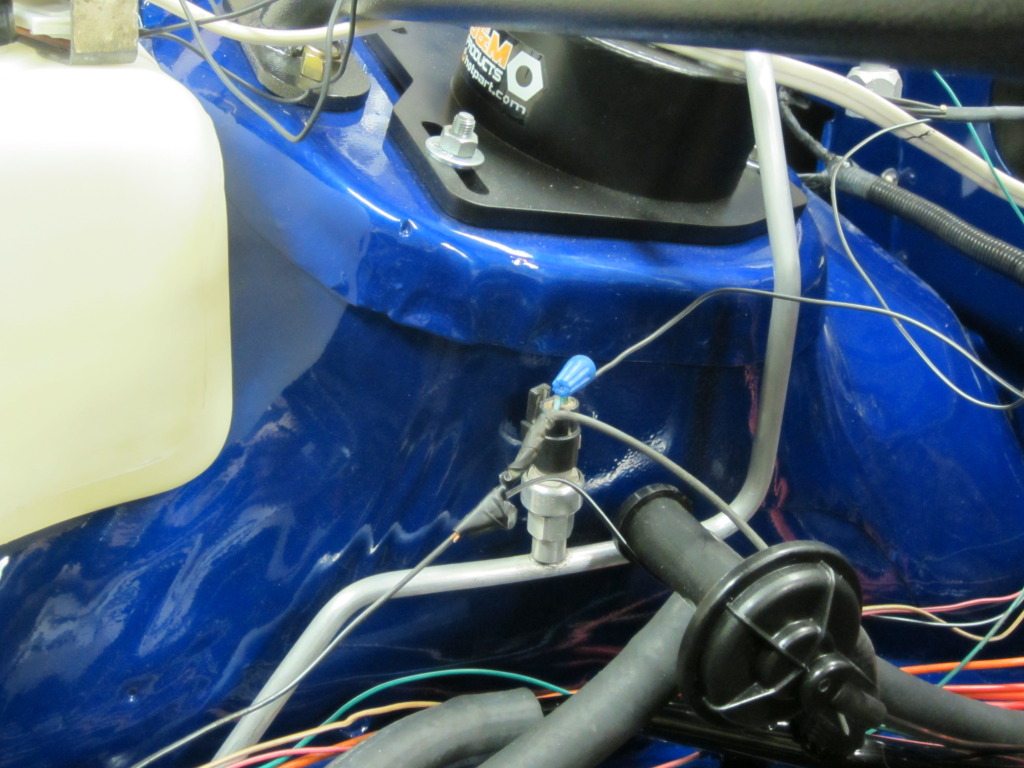
Here's a nifty compressor connector I found at the junkyard on a third gen on the left of the pic. None of my third gens ever had the rubber boot on them. On the right of the pic you can see where I routed my CKP & LOL (Low Oil Level) wires.
A/C connector on TPI harness
Another pic of the CKP & LOL routing. The purple starter wire will be following this route as well.
I considered running the CKP, LOL & starter wire through here, but decided not to because of the excessive heat in this area
Now for a few questions. I can remove the Electronic Spark Control module, right? Will a MAF relay & Burn-off relay be needed for this swap? Are there any wires from anything that will need to connected to both the C100 & ECM?
Here's a pic of my wire planning.
Here's a nifty compressor connector I found at the junkyard on a third gen on the left of the pic. None of my third gens ever had the rubber boot on them. On the right of the pic you can see where I routed my CKP & LOL (Low Oil Level) wires.
A/C connector on TPI harness
Another pic of the CKP & LOL routing. The purple starter wire will be following this route as well.
I considered running the CKP, LOL & starter wire through here, but decided not to because of the excessive heat in this area
Now for a few questions. I can remove the Electronic Spark Control module, right? Will a MAF relay & Burn-off relay be needed for this swap? Are there any wires from anything that will need to connected to both the C100 & ECM?
Last edited by dprest68; 07-14-2012 at 09:41 AM.
07-14-2012, 11:12 AM
#374
Supreme Member
Thread Starter
iTrader: (1)
Join Date: Mar 2007
Location: Apopka, Florida
Posts: 1,237
Likes: 0
Received 7 Likes
on
6 Posts
Car: 1989 Pontiac Trans Am GTA
Engine: cammed LS1
Transmission: Monster SS 4L65E
Axle/Gears: 9 bolt posi w/ 3.70 gears
Re: LS1 swap for my '89 GTA
Okay, here's my revised C100 wiring diagram
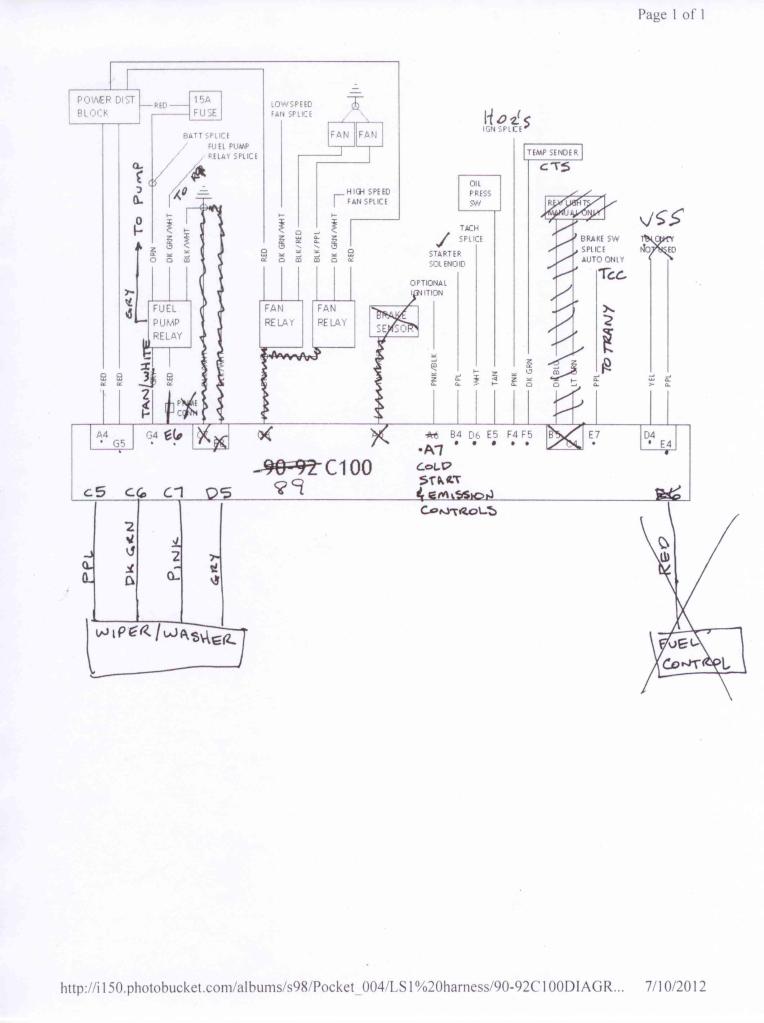
I'll clean it up later once I verify everything and fix it as needed.
I'm confused about what exactly goes to the C207. Does the pink/black wire from pin A7 on the C100 connect to Cavity A on the C207? Does the white Tach wire from pin D6 on the C100 connect to one of these cavities, C, E or F on the C207 or just to the ECM? Does there need to be a wire from the purple TCC wire on the trany to cavity H on the C207? Looks like cavity J will be empty since the MAF goes into the ECM now. And I'm not sure about cavities K, L, M, & N. Sorry for all of the C207 questions. I just want to make sure I get it right.
Do I connect the pink wire (ign) on pin E of the trany pigtail to A7 or F4 of the C100? or somewhere else?
Last edited by dprest68; 07-16-2012 at 12:40 PM. Reason: modified some questions
07-16-2012, 12:58 AM
#375
Supreme Member
Thread Starter
iTrader: (1)
Join Date: Mar 2007
Location: Apopka, Florida
Posts: 1,237
Likes: 0
Received 7 Likes
on
6 Posts
Car: 1989 Pontiac Trans Am GTA
Engine: cammed LS1
Transmission: Monster SS 4L65E
Axle/Gears: 9 bolt posi w/ 3.70 gears
Re: LS1 swap for my '89 GTA
I spent the entire weekend working on this darn harness. It didn't feel like I was making any progress at all, but it all started to come together this evening. I traced all of the circuits from my old harness to make sure the new harness was wired the exact same way. The A/C harness is connected back together. I built my dual fan circuit. I mounted the power block that Pocket gave me. And I even got 8 pins into the ECM connectors. Woo hoo I will post some pics in the morning.
Hopefully I don't need the ESC module, MAF relay or Burn-off relay any more. Otherwise it's back to the drawing board.
Does anyone have any answers to my C207 questions from the previous post?
I will post some pics in the morning.Hopefully I don't need the ESC module, MAF relay or Burn-off relay any more. Otherwise it's back to the drawing board.
Does anyone have any answers to my C207 questions from the previous post?
07-16-2012, 09:52 AM
#376
Supreme Member
Thread Starter
iTrader: (1)
Join Date: Mar 2007
Location: Apopka, Florida
Posts: 1,237
Likes: 0
Received 7 Likes
on
6 Posts
Car: 1989 Pontiac Trans Am GTA
Engine: cammed LS1
Transmission: Monster SS 4L65E
Axle/Gears: 9 bolt posi w/ 3.70 gears
Re: LS1 swap for my '89 GTA
some pics...
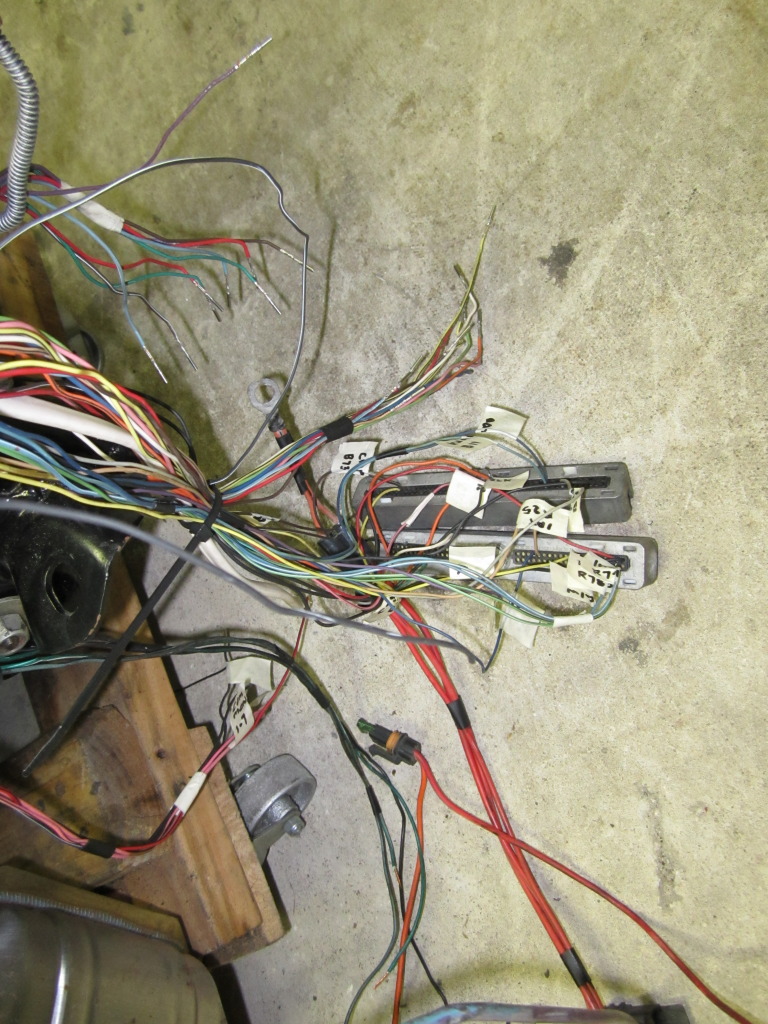
Upper left & middle, dual fan relays. Right side, power distribution block. What a mess.
I traced this A/C connector back to the high speed fan wire on my old harness. So I guess it turns on the high speed fan when the A/C turns on.
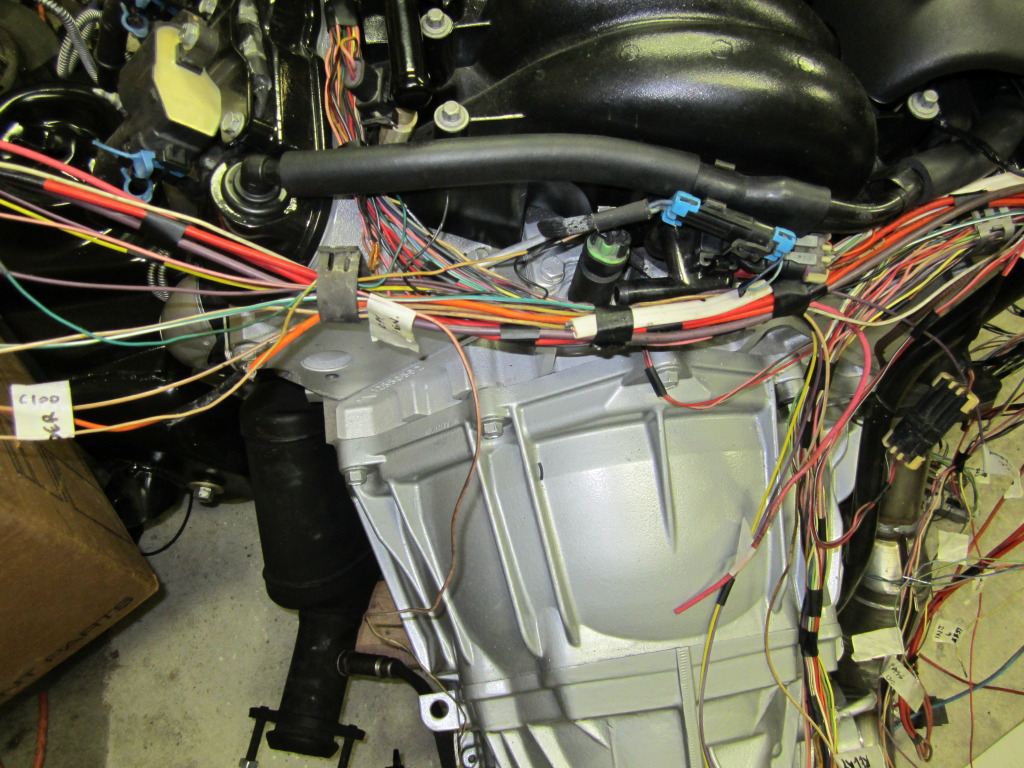
My C100 mess. I think my soldering gun is inadequate since I was having a hard time soldering the fatter wires together. So I switched over to butt connectors on the fatter wires.
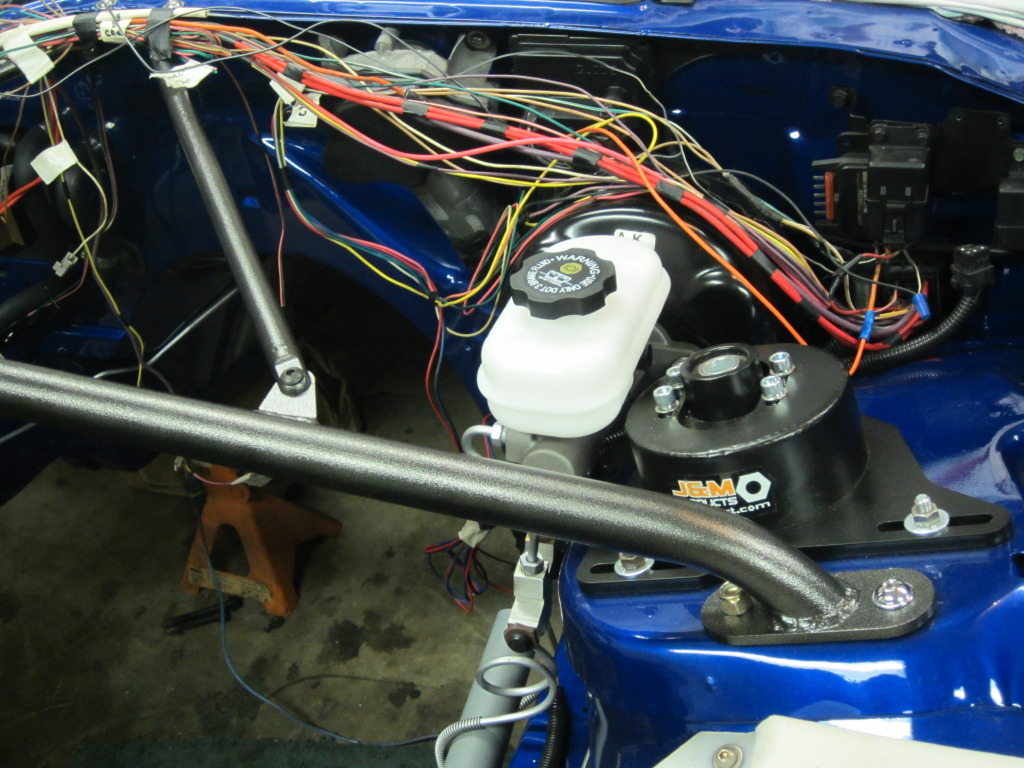
8 wires into the ECM connectors. Only 150 or so more to go
I should be ready to combine the two harnesses together in the next day or two.
Upper left & middle, dual fan relays. Right side, power distribution block. What a mess.
I traced this A/C connector back to the high speed fan wire on my old harness. So I guess it turns on the high speed fan when the A/C turns on.
My C100 mess. I think my soldering gun is inadequate since I was having a hard time soldering the fatter wires together. So I switched over to butt connectors on the fatter wires.
8 wires into the ECM connectors. Only 150 or so more to go
I should be ready to combine the two harnesses together in the next day or two.
Last edited by dprest68; 07-16-2012 at 10:01 AM.
07-16-2012, 12:32 PM
#378
Supreme Member
Thread Starter
iTrader: (1)
Join Date: Mar 2007
Location: Apopka, Florida
Posts: 1,237
Likes: 0
Received 7 Likes
on
6 Posts
Car: 1989 Pontiac Trans Am GTA
Engine: cammed LS1
Transmission: Monster SS 4L65E
Axle/Gears: 9 bolt posi w/ 3.70 gears
Re: LS1 swap for my '89 GTA
I just read through all of Pocket's wiring threads again and I think I came of with some of my C207 answers. Here's what I came up with:
'89 C207
A: no pin
B: INJ1
C:
D: brown/white wire from each fan relay
E:
F: B19 (ign)?
G: INJ2
H: does this need to connect to the trany or C100 E7? (TCC)
J: MAF now goes through the ECM, right?
K: Speedometer
L: no pin
M:
N: B34 (park neutral sw.)?
P: no pin
R:
Does the white Tach wire from pin D6 on the C100 connect to one of these cavities, C, E or F on the C207 or just to the ECM? (Yes. Answered in post 380)
I found a connector up under the dash near the C207 with an orange & two black wires in it. Is that the ALDL?
Last edited by dprest68; 07-18-2012 at 01:07 AM. Reason: changed C207 pin-outs
07-16-2012, 12:36 PM
#379
Supreme Member
Thread Starter
iTrader: (1)
Join Date: Mar 2007
Location: Apopka, Florida
Posts: 1,237
Likes: 0
Received 7 Likes
on
6 Posts
Car: 1989 Pontiac Trans Am GTA
Engine: cammed LS1
Transmission: Monster SS 4L65E
Axle/Gears: 9 bolt posi w/ 3.70 gears
Re: LS1 swap for my '89 GTA
Trust me, I have been taking my time with it. I have over a week into it already and it's still not done!
07-16-2012, 02:39 PM
#380
Member
iTrader: (3)
Join Date: Jul 2008
Location: ND
Posts: 385
Likes: 0
Received 0 Likes
on
0 Posts
Car: 1986 Firebird
Engine: 6.0L LSX
Transmission: 4L60E
Axle/Gears: 3.73
Re: LS1 swap for my '89 GTA
I just read through all of Pocket's wiring threads again and I think I came of with some of my C207 answers. Here's what I came up with:
'89 C207
A: Not used? C100 A7? (cold start & emission controls)
B: INJ1
C:
D: brown/white wire from each fan relay
E:
F: B19 (ign)?
G: INJ2
H: does this need to connect to the trany or C100 E7? (TCC)
J: MAF now goes through the ECM, right?
K: Speedometer?
L:
M:
N: B34 (park neutral sw.)?
Does the white Tach wire from pin D6 on the C100 connect to one of these cavities, C, E or F on the C207 or just to the ECM?
I found a connector up under the dash near the C207 with an orange & two black wires in it. Is that the ALDL?
C- BRN/WHT - MIL
K- BRN - Speedo
L- (Unsure of color) - Fuel Pump
P- PPL - Brake Switch
D6 goes to ECM.
Feel free to PM me and I'll try to help as much as possible. I went through the same issues not too long ago as you may remember. It's frustrating but I promise you will work things out by process of elimination. Hook up the wires you know for sure belong and leave the others for later. You will find that most of those will then "fall into place" on their own.
Last edited by mille_3; 07-16-2012 at 02:42 PM.
07-16-2012, 02:57 PM
#381
Senior Member
Re: LS1 swap for my '89 GTA
Also when you do those splices use bare barrel splices with heat shrink insulation it will be more professional looking and weatherproof. I work in the aviation industry as an avionics tech lead and we use them exclusively. The old Stakon or AMP splices are a no no.
07-16-2012, 03:04 PM
#382
Member
iTrader: (3)
Join Date: Jul 2008
Location: ND
Posts: 385
Likes: 0
Received 0 Likes
on
0 Posts
Car: 1986 Firebird
Engine: 6.0L LSX
Transmission: 4L60E
Axle/Gears: 3.73
Re: LS1 swap for my '89 GTA
Another thing I remembered...to get your tach working (if it doesn't)
http://www.lt1swap.com/lsx_tach.htm
http://www.lt1swap.com/lsx_tach.htm
07-16-2012, 04:26 PM
#383
Supreme Member
Thread Starter
iTrader: (1)
Join Date: Mar 2007
Location: Apopka, Florida
Posts: 1,237
Likes: 0
Received 7 Likes
on
6 Posts
Car: 1989 Pontiac Trans Am GTA
Engine: cammed LS1
Transmission: Monster SS 4L65E
Axle/Gears: 9 bolt posi w/ 3.70 gears
Re: LS1 swap for my '89 GTA
Thanks for the help Mille. I really appreciate it. I know our C207's are different though. For starters, mine doesn't even have a pin P in it.
I just read through your thread again. I found some helpful information. So thanks again! At least if my fuel pump doesn't work I'll know to start by trying pin L first.
I just read through your thread again. I found some helpful information. So thanks again!
At least if my fuel pump doesn't work I'll know to start by trying pin L first.
07-16-2012, 04:33 PM
#384
Supreme Member
Thread Starter
iTrader: (1)
Join Date: Mar 2007
Location: Apopka, Florida
Posts: 1,237
Likes: 0
Received 7 Likes
on
6 Posts
Car: 1989 Pontiac Trans Am GTA
Engine: cammed LS1
Transmission: Monster SS 4L65E
Axle/Gears: 9 bolt posi w/ 3.70 gears
Re: LS1 swap for my '89 GTA
Any help is much appreciated.
07-16-2012, 05:25 PM
#385
Senior Member
Re: LS1 swap for my '89 GTA

Now look at these splices.

You can see the difference; the splice is smaller, environmentally sealed and neater. You can buy bare butt splices from most electrical supply shops and I would buy a small supply of heat shrink tubing in various colors to somewhat match the wire I am splicing. For high temp areas use Teflon heat shrink. and use a heat gun not a Bic lighter to shrink your tubing. Also try to keep to your wire color codes. The black wire from the relay attaching to the red and the orange wires is the red wire to lengthen the black wire going to the power block on the right of the photo. If so it should stay black all the way to the power block. I know it sounds like nit-picking but what if you need to troubleshoot your work; you want it to be simple and not confusing. to work on. Plus you want the car to look like it was built that way, neat, understandable, and professional.
Your build is going great hope you get it on the road soon.
Last edited by 92BLKL98; 07-16-2012 at 07:54 PM.
07-18-2012, 12:15 PM
#386
Supreme Member
Thread Starter
iTrader: (1)
Join Date: Mar 2007
Location: Apopka, Florida
Posts: 1,237
Likes: 0
Received 7 Likes
on
6 Posts
Car: 1989 Pontiac Trans Am GTA
Engine: cammed LS1
Transmission: Monster SS 4L65E
Axle/Gears: 9 bolt posi w/ 3.70 gears
Re: LS1 swap for my '89 GTA
Thanks man! That makes two of us!
Based on your advice, all Stakon & AMP connectors will be removed. I got a better soldering gun with a lot more power and man did that make all of the difference. So now all connections will be soldered & shrink wrapped. One of my neighbors does a lot of wiring at work and he gave me some tips on splicing the wires together. So between your help and his, I might just become a pro at all of this wiring stuff after all
Here is a pic of two of the connections (green & brown wires) I made with my new found knowledge & equipment. The splice on the orange wire was from the factory.
I will fix the wiring issues at the fan relays after I get this harness finished. I want this engine back in the car ASAP!
07-18-2012, 12:32 PM
#387
Supreme Member
Thread Starter
iTrader: (1)
Join Date: Mar 2007
Location: Apopka, Florida
Posts: 1,237
Likes: 0
Received 7 Likes
on
6 Posts
Car: 1989 Pontiac Trans Am GTA
Engine: cammed LS1
Transmission: Monster SS 4L65E
Axle/Gears: 9 bolt posi w/ 3.70 gears
Re: LS1 swap for my '89 GTA
The two harnesses are officially together. Yay!
And I got a bunch of wires labeled & installed in the ECM connectors.
Do I need a wire from the ECM to the C207 for MIL? I'm assuming MIL (Multifunction Indicator Light) is for the "Service Engine Soon" light.
Also, it looks like the alternator wire needs to go to pin R15 on the ECM for '89, correct? Oh Pocket where art thou?
07-18-2012, 08:45 PM
#389
Supreme Member
iTrader: (30)

Join Date: Jul 2000
Location: Fort Myers, FL
Posts: 1,514
Received 17 Likes
on
10 Posts
Car: 91 Firebird
Engine: 6.0
Transmission: T56
Axle/Gears: 3.73
Re: LS1 swap for my '89 GTA
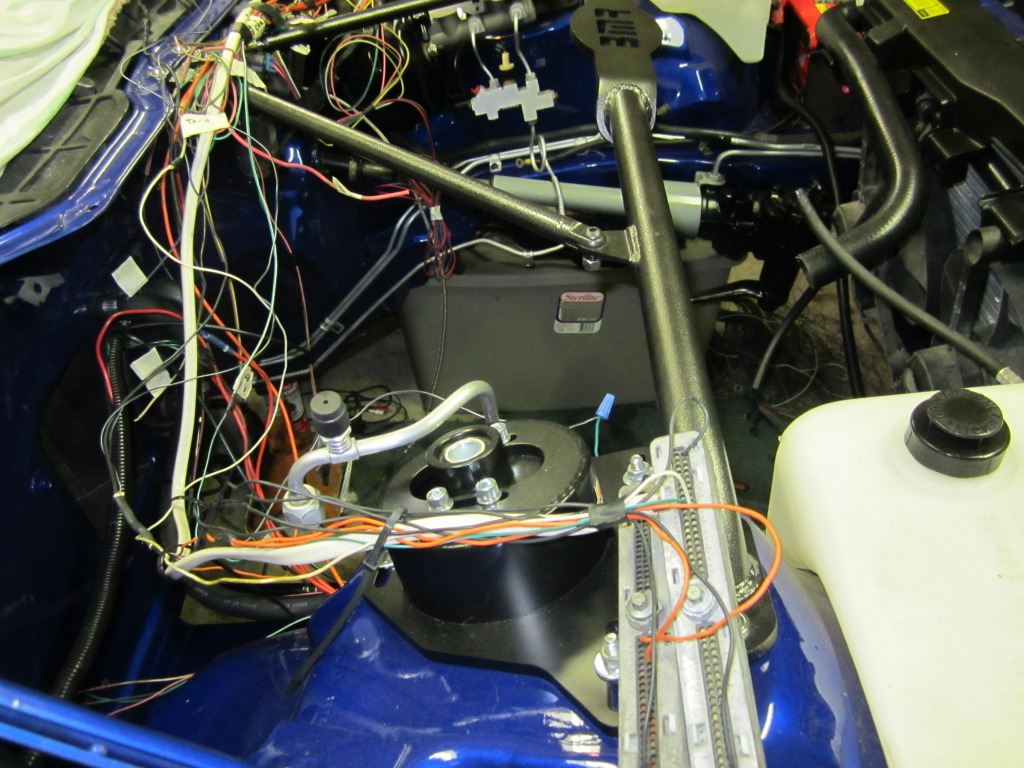
Make sure you put some loom over that spaghetti you got there... hate to see something get all chafed up!
btw, I'll have to make a trip, aka shake down run up to mouse town soon. What week days are you free?
btw, I'll have to make a trip, aka shake down run up to mouse town soon. What week days are you free?
07-18-2012, 11:56 PM
#390
Senior Member
Re: LS1 swap for my '89 GTA
Thanks man! That makes two of us!
Based on your advice, all Stakon & AMP connectors will be removed. I got a better soldering gun with a lot more power and man did that make all of the difference. So now all connections will be soldered & shrink wrapped. One of my neighbors does a lot of wiring at work and he gave me some tips on splicing the wires together. So between your help and his, I might just become a pro at all of this wiring stuff after all
I will fix the wiring issues at the fan relays after I get this harness finished. I want this engine back in the car ASAP!
07-19-2012, 07:36 AM
#391
Supreme Member
Thread Starter
iTrader: (1)
Join Date: Mar 2007
Location: Apopka, Florida
Posts: 1,237
Likes: 0
Received 7 Likes
on
6 Posts
Car: 1989 Pontiac Trans Am GTA
Engine: cammed LS1
Transmission: Monster SS 4L65E
Axle/Gears: 9 bolt posi w/ 3.70 gears
Re: LS1 swap for my '89 GTA
I work from home, so I am almost always home during the week. Just let me know when you are heading this way.
07-19-2012, 07:40 AM
#392
07-19-2012, 09:28 AM
#394
Member
iTrader: (3)
Join Date: Jul 2008
Location: ND
Posts: 385
Likes: 0
Received 0 Likes
on
0 Posts
Car: 1986 Firebird
Engine: 6.0L LSX
Transmission: 4L60E
Axle/Gears: 3.73
Re: LS1 swap for my '89 GTA
The Alternator wire is more specific to which ECM you are using vs. the year of your car. So if the pinout you are using indicates R15 then that's what you will use.
07-19-2012, 11:41 AM
#395
Supreme Member

Join Date: Feb 2002
Location: miami, florida
Posts: 1,843
Likes: 0
Received 0 Likes
on
0 Posts
07-19-2012, 12:44 PM
#396
Supreme Member
Thread Starter
iTrader: (1)
Join Date: Mar 2007
Location: Apopka, Florida
Posts: 1,237
Likes: 0
Received 7 Likes
on
6 Posts
Car: 1989 Pontiac Trans Am GTA
Engine: cammed LS1
Transmission: Monster SS 4L65E
Axle/Gears: 9 bolt posi w/ 3.70 gears
07-19-2012, 12:44 PM
#397
Supreme Member
Thread Starter
iTrader: (1)
Join Date: Mar 2007
Location: Apopka, Florida
Posts: 1,237
Likes: 0
Received 7 Likes
on
6 Posts
Car: 1989 Pontiac Trans Am GTA
Engine: cammed LS1
Transmission: Monster SS 4L65E
Axle/Gears: 9 bolt posi w/ 3.70 gears
Re: LS1 swap for my '89 GTA
The MIL wire can be done either way. You can bypass C207 and go straight from ECM to plug or you can send it through C207 first (preferred)
The Alternator wire is more specific to which ECM you are using vs. the year of your car. So if the pinout you are using indicates R15 then that's what you will use.
The Alternator wire is more specific to which ECM you are using vs. the year of your car. So if the pinout you are using indicates R15 then that's what you will use.
07-19-2012, 02:29 PM
#398
Supreme Member
Thread Starter
iTrader: (1)
Join Date: Mar 2007
Location: Apopka, Florida
Posts: 1,237
Likes: 0
Received 7 Likes
on
6 Posts
Car: 1989 Pontiac Trans Am GTA
Engine: cammed LS1
Transmission: Monster SS 4L65E
Axle/Gears: 9 bolt posi w/ 3.70 gears
Re: LS1 swap for my '89 GTA
Just ordered my 0411 ECM from Rodney over at Spare ECM. I should have it in a week or two. One more step closer.


