
the $12 LT1 balancer install tool, made easy

Thread Starter
Supreme Member
iTrader: (1)
Joined: Feb 2005
Posts: 2,642
Likes: 2
From: Pleasant Grove, Utah
Car: 1993 GMC Typhoon
Engine: 4.3 Turbo
Transmission: 4L60
Axle/Gears: 3.42
the $12 LT1 balancer install tool, made easy
This is purely a "help" for people looking to put the balancer back on correctly, and avoiding the dreaded stripped crank threads. This also saves you from buying a very expensive $150 balancer installer.
"Whats needed??"7/16 - 20 threaded rod grade 8 or higher such as B7.
As you have probably searched around your local Home Depot or Lowes or even AceHardware, you'll be hard pressed to find a bolt long enough in this size. What you actually need is a threaded rod.
"Why a threaded rod??"
Because is long and you can sink the rod all the way to the base of the crank threaded hole.. giving you more thrength to pull the balancer on
"Why not use the balancer bolt to pull it on??"Because if you try and install the balancer with the balancer bolt, you will only be able to get about 2-3 turns of the bolt before you hit the balancer. 2-3 threads is not enough because the force needed to pull the balancer on is strong, and you WILL strip those threads doing this.. dont do it.
Tools needed and where to get them
as stated above, you need a 7/16 -20 threaded rod.. meaning 7/16", 20 thread count, also known as "fine thread".

You can get this rod at www.mcmaster.com or use this link http://www.mcmaster.com/#92580a110/=byahla
cost is only $4.70 for a 3 foot rod. they only sell it in a 3 foot rod. The shipping was only $5.15 so for just under $10 you get a 3 foot rod. Shipping was pretty fast, I ordered it on Friday and it was here via UPS on Tuesday.
2nd, you need only 1, 7/16-20 nut, you can order it there or this actually can be easily found in your local hardware store or Home Depot.
3rd, several washers ranging in size from a small 7/16" all the way to a 3/4" washer. I used about 8 -10 washers.
Cost, i spent $3.28 for the nut and 6 washers, i already had a few at home.
Now that you have your rod, you can place you hub on the end of the crank and insert the rod and screw it all the way in till it stops. Or you can do what i did, and take a cutoff wheel and cut the rod in half, easier to manage but not needed.
Then, place all the washers you have starting with largest 1st against the hub, to smallest against the nut. The outside diameter of the nut is 11/16 and you need a box end wrench.
see picture below on how it should look
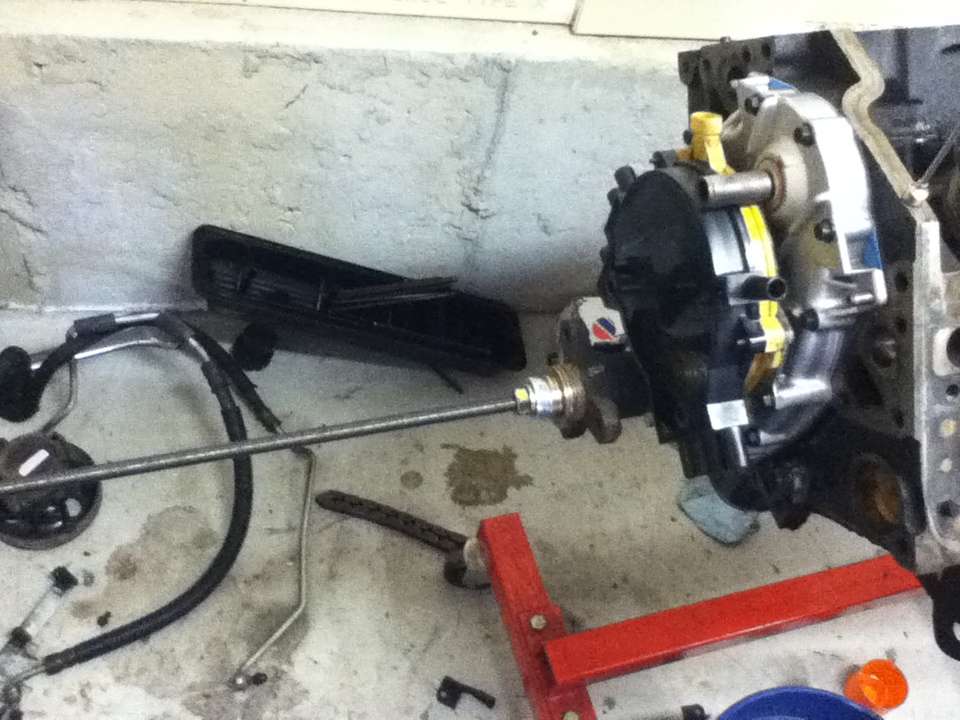
Now you have it set up to push the hub on from the very front, instead of having a short stubby rod and having to use a long 11/16 socket. This also saves you from having to get a certain size washer to fit into the hub.:bang:
Now that you have it set up, start turning the nut clockwise (towards the left), this will push the nut against the washers and starts to slowly push the hub onto crank.
about half way on. you should NOT have to use much force to turn the nut.

Upclose shot of the washers and nut
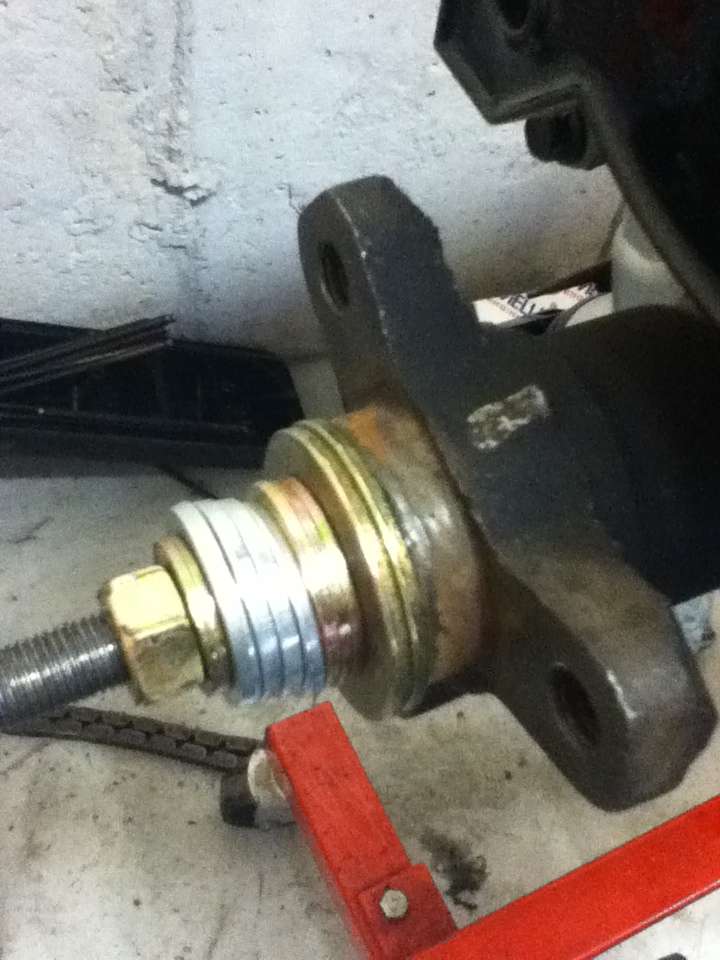
turn the nut until the hub comes to a complete stop. When you have to excert a lot more force than normal, your hub is probably seated now, to make sure, look at the hub and make sure the 1st line in the hub is now into the timing cover.
you're now done with the rod, back off the nut counter clockwise (turn left) and unscrew the rod, you should be able to do this by hand.
Now insert your crank bolt with its washer and torque to 74ftlbs.
Hope this helps.
***disclaimer*** this is purely made as a "help thread". Any damage you do to your vehicle is your responsibility and I am in no way liable for it. User take caution.
"Whats needed??"7/16 - 20 threaded rod grade 8 or higher such as B7.
As you have probably searched around your local Home Depot or Lowes or even AceHardware, you'll be hard pressed to find a bolt long enough in this size. What you actually need is a threaded rod.
"Why a threaded rod??"
Because is long and you can sink the rod all the way to the base of the crank threaded hole.. giving you more thrength to pull the balancer on
"Why not use the balancer bolt to pull it on??"Because if you try and install the balancer with the balancer bolt, you will only be able to get about 2-3 turns of the bolt before you hit the balancer. 2-3 threads is not enough because the force needed to pull the balancer on is strong, and you WILL strip those threads doing this.. dont do it.
Tools needed and where to get them
as stated above, you need a 7/16 -20 threaded rod.. meaning 7/16", 20 thread count, also known as "fine thread".
You can get this rod at www.mcmaster.com or use this link http://www.mcmaster.com/#92580a110/=byahla
cost is only $4.70 for a 3 foot rod. they only sell it in a 3 foot rod. The shipping was only $5.15 so for just under $10 you get a 3 foot rod. Shipping was pretty fast, I ordered it on Friday and it was here via UPS on Tuesday.
2nd, you need only 1, 7/16-20 nut, you can order it there or this actually can be easily found in your local hardware store or Home Depot.
3rd, several washers ranging in size from a small 7/16" all the way to a 3/4" washer. I used about 8 -10 washers.
Cost, i spent $3.28 for the nut and 6 washers, i already had a few at home.
Now that you have your rod, you can place you hub on the end of the crank and insert the rod and screw it all the way in till it stops. Or you can do what i did, and take a cutoff wheel and cut the rod in half, easier to manage but not needed.
Then, place all the washers you have starting with largest 1st against the hub, to smallest against the nut. The outside diameter of the nut is 11/16 and you need a box end wrench.
see picture below on how it should look
Now you have it set up to push the hub on from the very front, instead of having a short stubby rod and having to use a long 11/16 socket. This also saves you from having to get a certain size washer to fit into the hub.:bang:
Now that you have it set up, start turning the nut clockwise (towards the left), this will push the nut against the washers and starts to slowly push the hub onto crank.
about half way on. you should NOT have to use much force to turn the nut.
Upclose shot of the washers and nut
turn the nut until the hub comes to a complete stop. When you have to excert a lot more force than normal, your hub is probably seated now, to make sure, look at the hub and make sure the 1st line in the hub is now into the timing cover.
you're now done with the rod, back off the nut counter clockwise (turn left) and unscrew the rod, you should be able to do this by hand.
Now insert your crank bolt with its washer and torque to 74ftlbs.
Hope this helps.
***disclaimer*** this is purely made as a "help thread". Any damage you do to your vehicle is your responsibility and I am in no way liable for it. User take caution.


Re: the $12 LT1 balancer install tool, made easy
I think I did something similar but it was years ago so its a blurry in memory. Used a somewhat long 7/16-20 bolt though with washers and installed everything while the engine was in the car on both a thirdgen and a 4thgen. I was able to find a long enough bolt at one of the hardware stores. I might have got the information from ls1tech, camaroz28.com or some website like that.
Last edited by Firebat; Apr 27, 2011 at 11:02 AM.
Supreme Member
iTrader: (4)
Joined: Mar 2009
Posts: 3,079
Likes: 4
From: Pepperell, MA
Car: 1987 Trans Am
Engine: LQ9/L92
Transmission: 4L60E
Re: the $12 LT1 balancer install tool, made easy
I think I did something similar but it was years ago so its a blurry in memory. Used a somewhat long 7/16-20 bolt though with washers and installed everything while the engine was in the car on both a thirdgen and a 4thgen. I was able to find a long enough bolt at one of the hardware stores. I might have got the information from ls1tech, camaroz28.com or some website like that.
careful - this method is meant to do away with the longer bolt idea. with a bolt, you run the risk of stripping threads in the crank while trying to install the balancer. this method leaves the threaded rod stationary and puts the stress on the nut - no risk of damaging the crank.
I used the threaded rod method on my LS1 balancers multiple times without issue.
Thread Starter
Supreme Member
iTrader: (1)
Joined: Feb 2005
Posts: 2,642
Likes: 2
From: Pleasant Grove, Utah
Car: 1993 GMC Typhoon
Engine: 4.3 Turbo
Transmission: 4L60
Axle/Gears: 3.42
Re: the $12 LT1 balancer install tool, made easy
careful - this method is meant to do away with the longer bolt idea. with a bolt, you run the risk of stripping threads in the crank while trying to install the balancer. this method leaves the threaded rod stationary and puts the stress on the nut - no risk of damaging the crank.
I used the threaded rod method on my LS1 balancers multiple times without issue.
I used the threaded rod method on my LS1 balancers multiple times without issue.
some people have PM'd me asking
"What if i need to install the balancer while the engine is in the car?"
i cover this earlier in the section, but
what you do is take an eyeball measure.. you can use about 10-12" of the 3 foot rod.. cut it with a cut off wheel. very easy to do. i dont recommend using a manual metal saw, as you will continually jump threads and you move back and forth, damaging the end of the rod.


Joined: Jul 2007
Posts: 358
Likes: 2
From: Waukesha, WI
Car: 86 Camaro Z28
Engine: LT1 200cc Ai heads and cam
Transmission: T56
Axle/Gears: 4.10:1 Zexel Torsen
Re: the $12 LT1 balancer install tool, made easy
obviously what the previous owner of my LT1 should've done. He did end up stripping all the threads out.

Joined: Oct 2007
Posts: 1,375
Likes: 6
From: Wyoming
Car: 1995 Formula
Engine: LT1 350
Transmission: Built 4L60e
Axle/Gears: 10 bolt, Eaton posi, 3.73's
Re: the $12 LT1 balancer install tool, made easy
Hey Killj0y was your hub "keyed?"
Trending Topics
Thread Starter
Supreme Member
iTrader: (1)
Joined: Feb 2005
Posts: 2,642
Likes: 2
From: Pleasant Grove, Utah
Car: 1993 GMC Typhoon
Engine: 4.3 Turbo
Transmission: 4L60
Axle/Gears: 3.42
Re: the $12 LT1 balancer install tool, made easy
good question, cant remember that..
Re: the $12 LT1 balancer install tool, made easy
LT1s use the same crank as 1pc RMS SBCs and are keyed
The long bolt method is acceptable if you truly get a really long bolt with lots of threads. Use the head to hold the bolt from turning while another nut/washers presses the hub on
The long bolt method is acceptable if you truly get a really long bolt with lots of threads. Use the head to hold the bolt from turning while another nut/washers presses the hub on
Last edited by Pocket; Dec 13, 2011 at 11:00 PM.
Joined: Oct 2007
Posts: 1,375
Likes: 6
From: Wyoming
Car: 1995 Formula
Engine: LT1 350
Transmission: Built 4L60e
Axle/Gears: 10 bolt, Eaton posi, 3.73's
Re: the $12 LT1 balancer install tool, made easy
The hub I got from a guy from a 96 Camaro SS isn't keyed. I was kinda bummed. I ordered a Pioneer keyed hub. I'll feel better knowing it won't slip 
At least the balancer was good though
At least the balancer was good though
Supreme Member
iTrader: (35)
Joined: Aug 2006
Posts: 1,470
Likes: 1
From: Mississauga,Ont,Canada
Car: 89 IROC
Engine: LSX 6.0 370, TU2 Cam, Fast intake
Transmission: T56 w/ lots of goodies
Axle/Gears: 8.8, Posi, 4.10, 31 Spline
Re: the $12 LT1 balancer install tool, made easy
I snapped the rod as I forgot to back it out every so often as it bottomed out. trying to get the rod out of the crank was fun tho
Thread Starter
Supreme Member
iTrader: (1)
Joined: Feb 2005
Posts: 2,642
Likes: 2
From: Pleasant Grove, Utah
Car: 1993 GMC Typhoon
Engine: 4.3 Turbo
Transmission: 4L60
Axle/Gears: 3.42
Re: the $12 LT1 balancer install tool, made easy
Yeah come to think of it, my engine is a 96 too, a d I don't remember it being keyed, I remember lining it up manually
Thread Starter
Supreme Member
iTrader: (1)
Joined: Feb 2005
Posts: 2,642
Likes: 2
From: Pleasant Grove, Utah
Car: 1993 GMC Typhoon
Engine: 4.3 Turbo
Transmission: 4L60
Axle/Gears: 3.42
Re: the $12 LT1 balancer install tool, made easy
??? Ummm, you have been doing it wrong, all you do is bottom out the bolt then turn the 1st bolt clockwise, there should be no backing out needed, just make sure to use 5+ washers to reduce friction on the bolt to hub contact.
Supreme Member
iTrader: (35)
Joined: Aug 2006
Posts: 1,470
Likes: 1
From: Mississauga,Ont,Canada
Car: 89 IROC
Engine: LSX 6.0 370, TU2 Cam, Fast intake
Transmission: T56 w/ lots of goodies
Axle/Gears: 8.8, Posi, 4.10, 31 Spline
Re: the $12 LT1 balancer install tool, made easy
i did bottom it out but when it did it didnt want to turn for some reason so I backed it out abit then when I hit the bottom on the last time it decided to snap off. Where it bottomed out looks flattened as the threads are flat. Next time im doin the same thing accept im making the bottom of it a fraction thinner and to a point. Just so it will bottom out properly
Joined: Sep 2004
Posts: 5,906
Likes: 240
From: Chicagoland Suburbs
Car: 1989 Trans Am GTA
Engine: LT1, AFR 195cc, 231/239 LE cam.
Transmission: M28 T56
Axle/Gears: 3.23 10bolt waiting to explode.
Re: the $12 LT1 balancer install tool, made easy
This rod is apparently not as cheap to make any more. And yes, I realize the thread is many years old now.
McMasterCarr no longer sells a grade 8 threaded rod, and i couldn't find one on Fastenal.
Found a place that has it finally.
But then I bought a $12 steel sleeve, and a $4 radial bearing. And All told I think I ended up with about $40 invested.
Ugh. Here's to installing a Hub.

McMasterCarr no longer sells a grade 8 threaded rod, and i couldn't find one on Fastenal.
Found a place that has it finally.
But then I bought a $12 steel sleeve, and a $4 radial bearing. And All told I think I ended up with about $40 invested.
Ugh. Here's to installing a Hub.


Joined: Sep 1999
Posts: 4,353
Likes: 308
From: NJ
Car: 92 Firebird
Engine: 4.8 LR4
Transmission: T56
Axle/Gears: 3.45 9 Bolt
Re: the $12 LT1 balancer install tool, made easy
You don't really need grade 8 for this tool, the grade 5 stuff will work fine

Thread
Thread Starter
Forum
Replies
Last Post
1992 Trans Am
Engine/Drivetrain/Suspension Parts for Sale
1
Aug 8, 2015 08:16 PM