
1989 RS - LS1/T56 Build

Thread Starter
Member
Joined: May 2005
Posts: 247
Likes: 0
From: Monroe, GA
Car: 1989 RS
Engine: LS1 - HP Tuners Enhanced 2Bar OS
Transmission: T56 - Pro 5.0
Axle/Gears: 9 Inch - 31 Spl Tru-Trac - 4.11
Re: 1989 RS - LS1/T56 Build
OD measures 1.765". These are definitely 1-3/4" primaries.
I'm working on a solution for the interference. It looks like there is about 3/4" to 1" of space between the #2 and #6 primary. That means that I should be able to pull the #2 over that far to get rid of the contact with the frame rail. I might just clamp it up, and see if it stays on its own. If it doesn't, I have no problem with welding a small strap/patch on the bottom to hold the #2 to the #6.
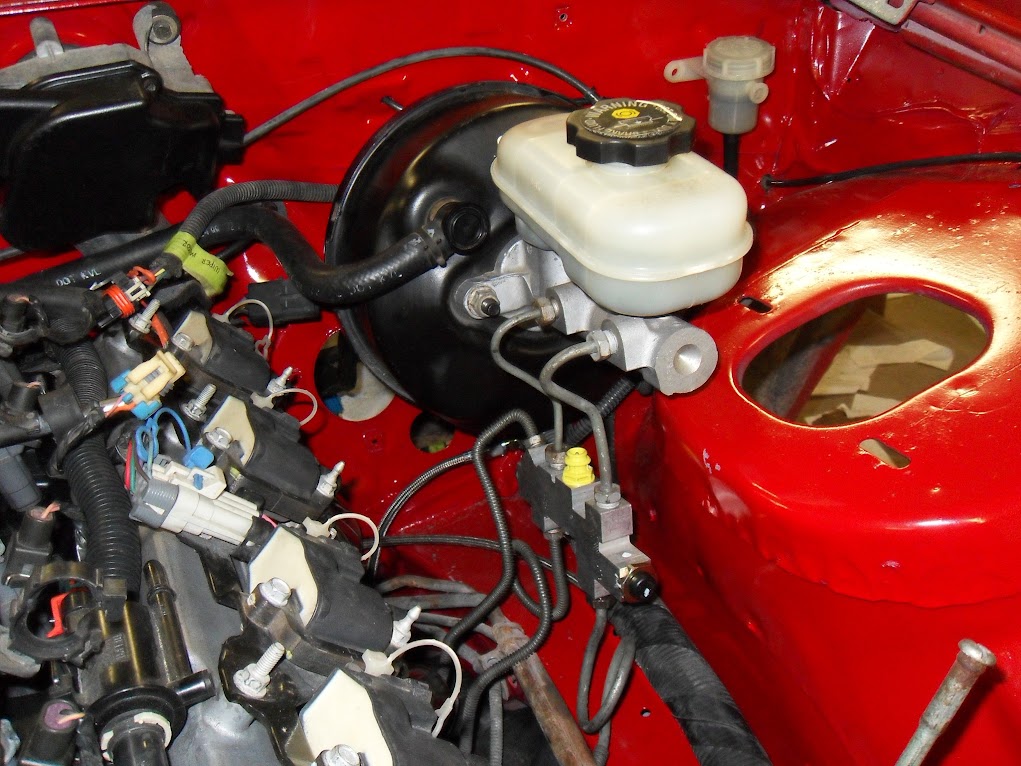
In other news, I installed the 4th gen master and new 3rd gen disc proportioning valve. I really need to blow my fuel lines back into the tank (to stop the siphoning), and cut them off from below. I'll try to get to that Sunday when I'm home again. It's getting to the point that I'm thinking about taking a couple of days off work to wrench on my car.
This 4th gen master reservoir really fits under the hood?
I'm working on a solution for the interference. It looks like there is about 3/4" to 1" of space between the #2 and #6 primary. That means that I should be able to pull the #2 over that far to get rid of the contact with the frame rail. I might just clamp it up, and see if it stays on its own. If it doesn't, I have no problem with welding a small strap/patch on the bottom to hold the #2 to the #6.
In other news, I installed the 4th gen master and new 3rd gen disc proportioning valve. I really need to blow my fuel lines back into the tank (to stop the siphoning), and cut them off from below. I'll try to get to that Sunday when I'm home again. It's getting to the point that I'm thinking about taking a couple of days off work to wrench on my car.
This 4th gen master reservoir really fits under the hood?

Member
Joined: Oct 2011
Posts: 226
Likes: 0
From: Black Hills
Car: 88 rs
Engine: ls1
Transmission: t56
Axle/Gears: moser 4:10
Re: 1989 RS - LS1/T56 Build
I don't know if anyone noticed but the welds on those headers were done twice. The first time in mig and then they made a cover pass with a tig. You can tell because the tig pass is narrow and you can see the mig pass on the edges.
Thread Starter
Member
Joined: May 2005
Posts: 247
Likes: 0
From: Monroe, GA
Car: 1989 RS
Engine: LS1 - HP Tuners Enhanced 2Bar OS
Transmission: T56 - Pro 5.0
Axle/Gears: 9 Inch - 31 Spl Tru-Trac - 4.11
Re: 1989 RS - LS1/T56 Build
My guess was pulsed MIG, and not TIG. The chill pattern on the puddles looks like it starts in the center of every deposit. That would mean that the arc is stopped and a new arc is struck for every new deposit. The chilling of a TIG weld puddle should start from the far edge and lack the radial shrinkage marks.
GMAW, GTAW, SMAW, SAW, or even OFW are all totally acceptable, AWS approved, manufacturing techniques, so long as they are executed according to accepted standards and good practices. The joinery on these pieces were solid and consistent. So, I feel that they have a handle on the process.
I didn't even notice the stringer bead though. Thanks for pointing that out. I was too absorbed by the "shiny"...
But, back on task... does the 4th gen reservoir clear the stock hood?

Senior Member

Joined: Mar 2013
Posts: 556
Likes: 12
From: South Carolina
Car: 92 Vette, 83 Camaro
Engine: 305 going to 95 LT1
Transmission: 5 speed going to T56 6 speed
Axle/Gears: 3.73 posi with disc brakes
Re: 1989 RS - LS1/T56 Build
The position of the reservoir looks like the place where other guys have hung it. For my build, I need to learn what I need and what is involved with changing from a manual linkage to the hydraulic set up. Any advice or help?
Thread Starter
Member
Joined: May 2005
Posts: 247
Likes: 0
From: Monroe, GA
Car: 1989 RS
Engine: LS1 - HP Tuners Enhanced 2Bar OS
Transmission: T56 - Pro 5.0
Axle/Gears: 9 Inch - 31 Spl Tru-Trac - 4.11
Re: 1989 RS - LS1/T56 Build
After a few days off, I'm back at it. Technically, I have been doing things, just not very dedicated to it. But, after a long, cold, wet weekend, I'm ready to hit it again.
I got my hubs turned down and spindles modified to accept the LS1 brake setup. Everything fit together at the machine shop, but when I got them home, one rotor didn’t fit. So, I have them back again today to revisit the OD.
Question: Does anyone have a nominal dimension for the OD of the thirdgen hub? I’m wondering if anyone has a target value, like 5.850” (or something).
Last night the new bushings got pressed into the control arms, and the control arms reinstalled. I need to grab a couple of new ball joints to finish that up. The spindles were also chopped up for the LS1 brake conversion. Everything there went as good as could be expected. I’ll grab some new hardware, and hope to have the front end put back together tonight.
I’ve also worked a bit at reinstalling the dash. I got the dash in last night, and will get to work on finishing up the mounts tonight. The 4th gen steering column is bolted in, and an Astro van intermediate steering shaft is on order. The intermediate shaft should be in on Monday.
In other news, I found out that my two front wheels are out of round. They have approximately 3/8” to 1/2” runout on the inside lip. I contacted a wheel repair place, and they are going to attempt to true them. From what I can see, it shouldn’t be a problem.
The passenger side header is still irritating. I went after it with my Jawhorse and now have about � of clearance between the #2 primary and the frame rail. However, the #4 primary is hitting the frame rail further down. I think I’m going to bolt them securely to head, without a gasket, and use a come-a-long and a chain to pull the #4 off the subframe.
After I get the header tweaked a bit more, I can weld on the V-band flanges and build my Y-pipe. I’m going with a 3” QTP electric cutout, then a cat, then a Flowmaster stainless American Thunder cat back. It would be nice to have the car on the ground and do the rear end and gas tank/fuel line swap this weekend… but I’ll see where I wind up.
Thread Starter
Member
Joined: May 2005
Posts: 247
Likes: 0
From: Monroe, GA
Car: 1989 RS
Engine: LS1 - HP Tuners Enhanced 2Bar OS
Transmission: T56 - Pro 5.0
Axle/Gears: 9 Inch - 31 Spl Tru-Trac - 4.11
Re: 1989 RS - LS1/T56 Build
The hubs wound up being turned down to 5.845", if anyone needs that info in the future.
Thread Starter
Member
Joined: May 2005
Posts: 247
Likes: 0
From: Monroe, GA
Car: 1989 RS
Engine: LS1 - HP Tuners Enhanced 2Bar OS
Transmission: T56 - Pro 5.0
Axle/Gears: 9 Inch - 31 Spl Tru-Trac - 4.11
Re: 1989 RS - LS1/T56 Build
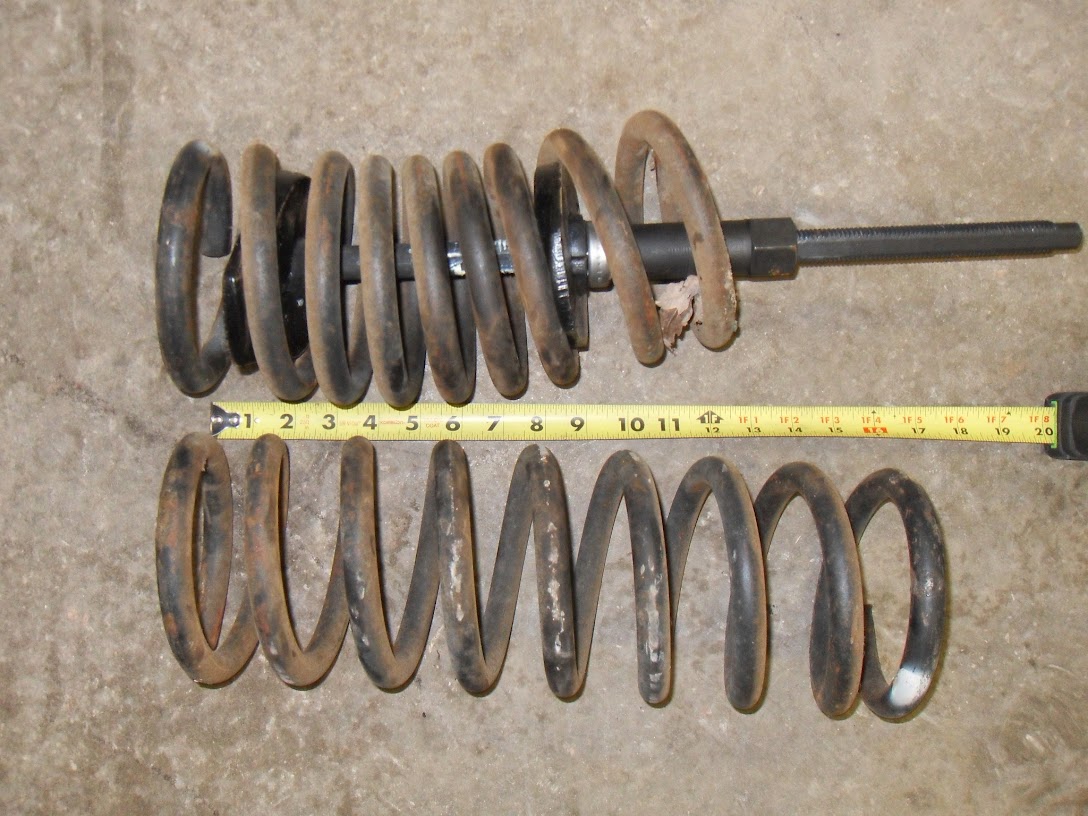
I feel like a noob asking this, but which end of the springs do I cut? I want to take 1/2 a coil off to lower the front down, as even with the iron 305, it sat too high for my liking.
Thread Starter
Member
Joined: May 2005
Posts: 247
Likes: 0
From: Monroe, GA
Car: 1989 RS
Engine: LS1 - HP Tuners Enhanced 2Bar OS
Transmission: T56 - Pro 5.0
Axle/Gears: 9 Inch - 31 Spl Tru-Trac - 4.11
Re: 1989 RS - LS1/T56 Build
I actually got a lot done today. At least it feels like I got a lot done. The front end is back together, with the exception of the the sway bar end links. I had a lapse when I was reinstalling everything, and thought that I could just raise the bar up and over the arms after everything was in place. As it turns, this is not the case. Anyway...
The part that I really dreaded; re-installing the springs. If you have one of the OTC internal spring compressors, it really isn't too bad. Here you can see that you need to compress the spring to about 12.5" OAL. Note the position of the pads on the spring compressor, this is the easiest way to set them so that you can everything back out again once the springs are in.

Then just set the compressor through the hole in the A-arm, and carefully align the spring to the upper pocket.

After that, use your floor jack to lift everything into place. You'll have to compress the spring a little bit, but the bulk of the compression is already done. So, you're not putting too much force on the front of the car.

Got the new brakes on. The LS1 brake package is sitting behind a 1.75" thick spacer. The spacers are really nice pieces. I'm impressed with the quality, tolerance, and finish for the price. (Not sure if I'm too keen on those blue brake pads though...)

And, of course, I had to go ahead and hang one of the new wheels and tires... just because.

That's it for now. Things are really ticking along. I have to order about $1,500 worth of parts tonight, then I'm the home stretch.
The part that I really dreaded; re-installing the springs. If you have one of the OTC internal spring compressors, it really isn't too bad. Here you can see that you need to compress the spring to about 12.5" OAL. Note the position of the pads on the spring compressor, this is the easiest way to set them so that you can everything back out again once the springs are in.
Then just set the compressor through the hole in the A-arm, and carefully align the spring to the upper pocket.
After that, use your floor jack to lift everything into place. You'll have to compress the spring a little bit, but the bulk of the compression is already done. So, you're not putting too much force on the front of the car.
Got the new brakes on. The LS1 brake package is sitting behind a 1.75" thick spacer. The spacers are really nice pieces. I'm impressed with the quality, tolerance, and finish for the price. (Not sure if I'm too keen on those blue brake pads though...)
And, of course, I had to go ahead and hang one of the new wheels and tires... just because.
That's it for now. Things are really ticking along. I have to order about $1,500 worth of parts tonight, then I'm the home stretch.
Thread Starter
Member
Joined: May 2005
Posts: 247
Likes: 0
From: Monroe, GA
Car: 1989 RS
Engine: LS1 - HP Tuners Enhanced 2Bar OS
Transmission: T56 - Pro 5.0
Axle/Gears: 9 Inch - 31 Spl Tru-Trac - 4.11
Thread Starter
Member
Joined: May 2005
Posts: 247
Likes: 0
From: Monroe, GA
Car: 1989 RS
Engine: LS1 - HP Tuners Enhanced 2Bar OS
Transmission: T56 - Pro 5.0
Axle/Gears: 9 Inch - 31 Spl Tru-Trac - 4.11
Re: 1989 RS - LS1/T56 Build
Got a chance to do a little work this weekend. Actually, it feels like I got a lot done... and the end is near. See below...
First up, I got my Astro van intermdiate steering shaft installed. This did not have the thru hole in the center of the intermediate shaft joint for the 4th gen steering shaft. So, I slid it onto the steering shaft, and just ran a drill bit through the hole to make a notch on the 4th gen shaft.

Next up are the heater hoses. I bent the bracket, sliced a bit off the end, and then drilled a new hole in the frame rail to mount it. I also decided that I preferred the 4th gen harness routing, and moved the harness to the fender.
Oh... and, I got underneath and pried on the passenger side header. Something gave, the motor and trans seemed to pop into place, and now I have a 1/2" clearance for everything. I'm not quite sure what was hung up on what, but something was causing the driveline to be tweaked toward the passenger side. It bears noting that I still had to beat the snot out of the headers to get them to fit...

Then I decided to tackle the wiper reinstallation. That went pretty much without a hiccup, but did require readjusting the linkage to get the wiper arms to park where they belong.

The biggest bit of news is most likely the carpet install. I did finish running FatMat throughout the rest of the passenger compartment. So, when my carpet showed up on Saturday, I couldn't resist getting it in the car. The console is just sitting loosely at the moment, and you'll notice the E-brake handle is missing. I'll attack both of those after I get the seats and seat belts installed. That should secure the carpet.

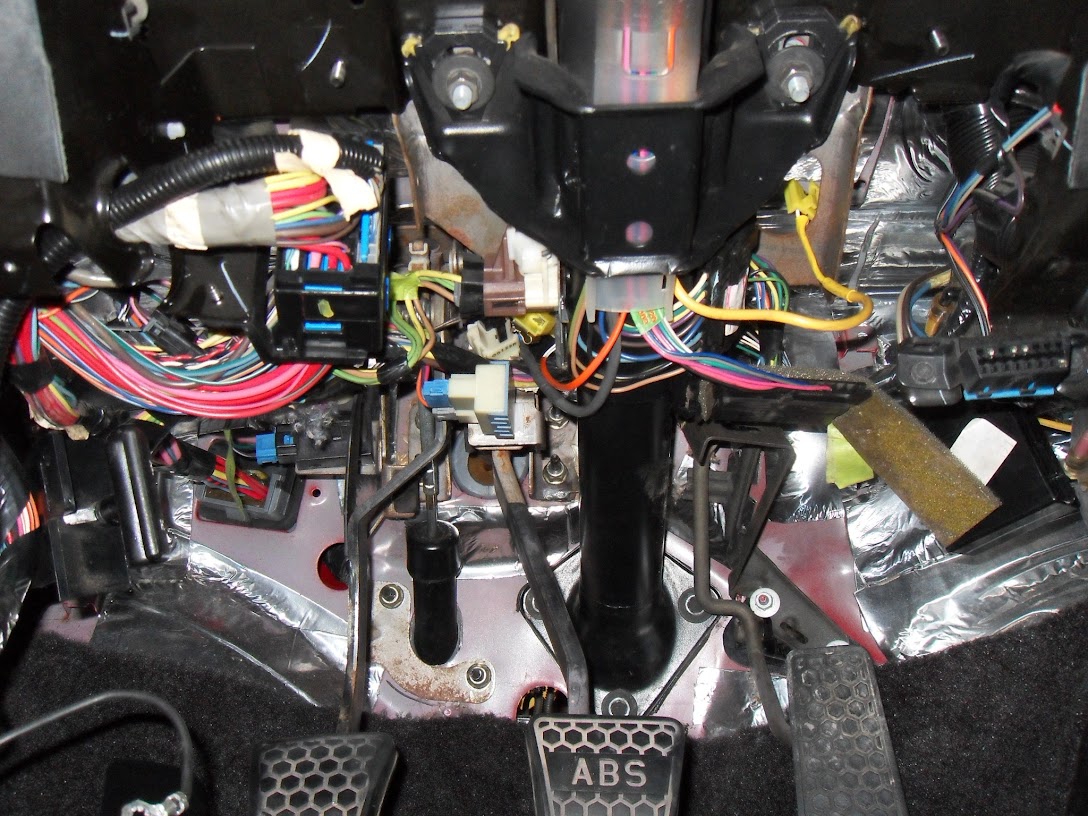
I was really happy with how the under-dash wiring went. Everything just plugged in, and there was absolutely no drama. The only connection left undone is the airbag. Since I'm not going to reinstall the SDM, I don't want to risk a spontaneous/erroneous airbag deployment.
Just another shot of the filled dash. (Note to self: I really need to clean the dash...)

Here's a shot of the passenger's foot well, showing that everything just plugged in. I think I'm going to scrape the areas where GM used tar paper to seal the body, and cover it with patches of FatMat.

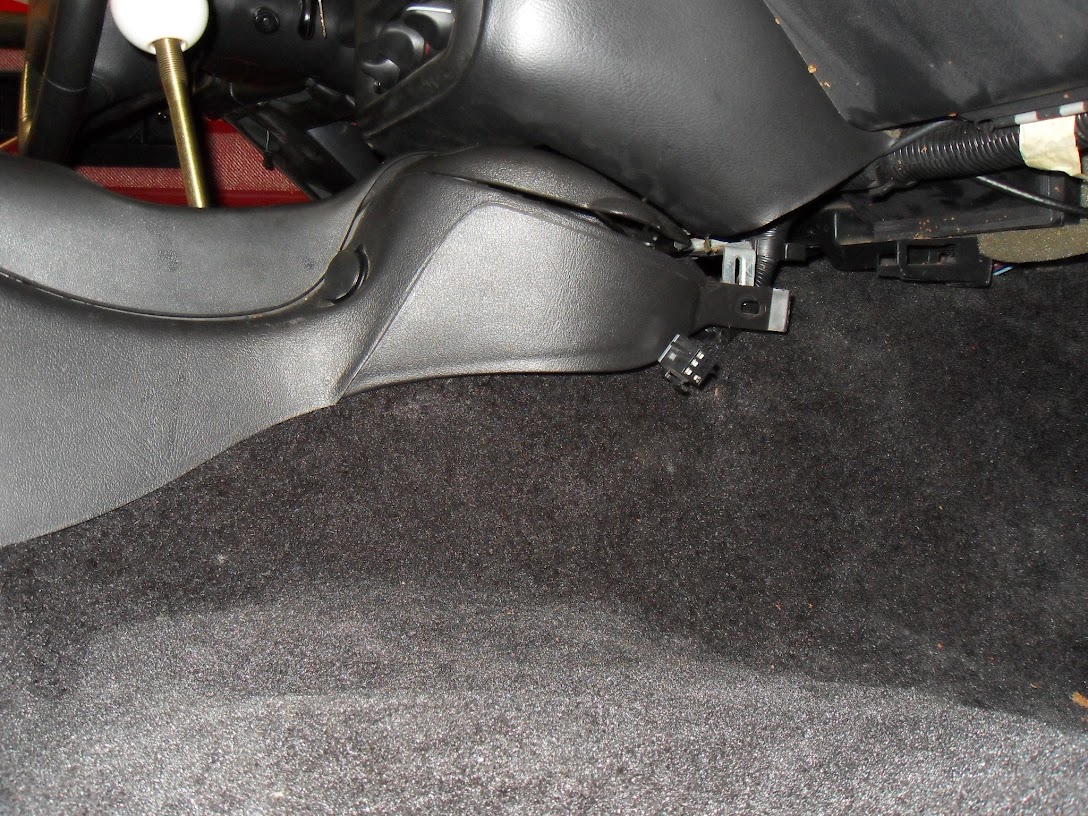
This must be the bulk of the gap that people complain about with the 4th gen consoles. Yeah, I can get a finger under it. But, honestly, with the ebony carpet, everything just kind of blends in. I'm ok with it.
A shot from the passenger's side, showing my horrendously dusty dash. With all of the grinding and sanding that I've done, I'm surprised it's as clean as it is.

A shot showing the fit of the rear of the console. Again, I'm ok with it.

And now for the obligatory, end of post question:
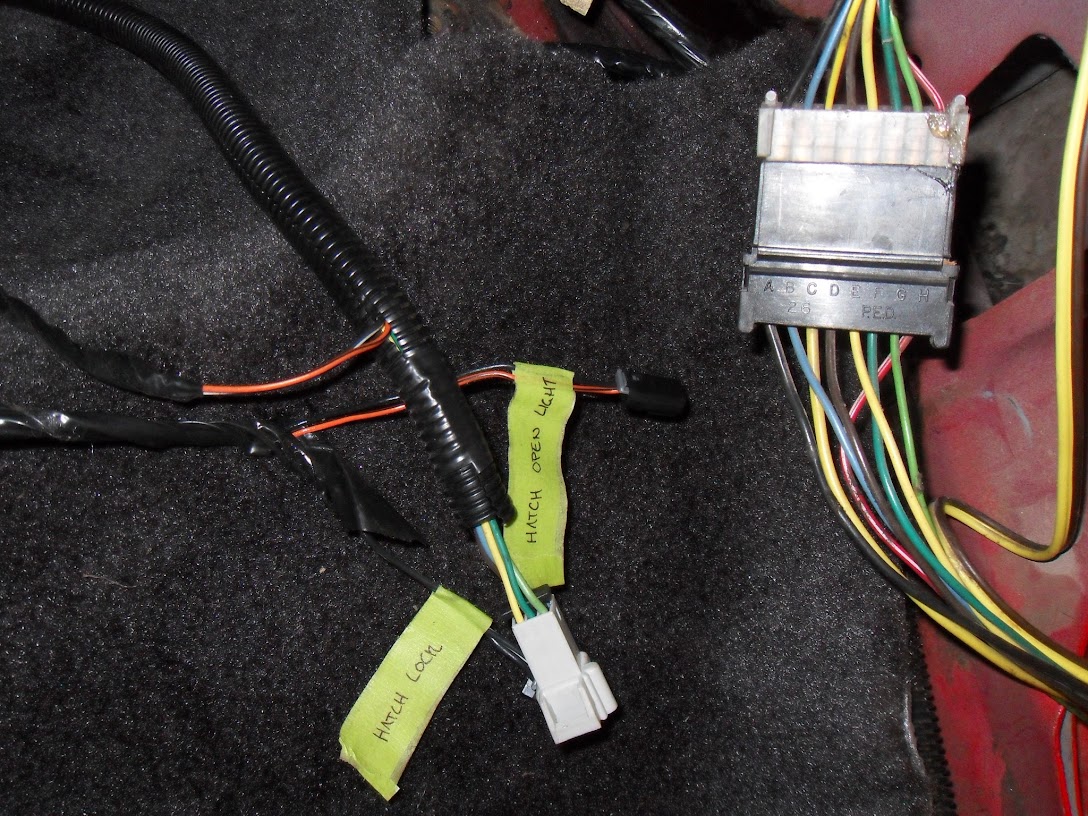
In this last photo, you can see the factory mid-body harness connector (also visible in the upper left hand corner of the photo above). This has what I believe are the taillights and power hatch motor wires. I thinking about splicing the harnesses at this point, as, no matter what I do, I will have to splice the taillight harnesses to get the 3rd gen lights to work with the 4th gen harness. So, the question is, does anyone have a complete body wiring diagram for an '89 and a 2000 Camaro that they would be willing to share? Please?
That's all for now...
First up, I got my Astro van intermdiate steering shaft installed. This did not have the thru hole in the center of the intermediate shaft joint for the 4th gen steering shaft. So, I slid it onto the steering shaft, and just ran a drill bit through the hole to make a notch on the 4th gen shaft.
Next up are the heater hoses. I bent the bracket, sliced a bit off the end, and then drilled a new hole in the frame rail to mount it. I also decided that I preferred the 4th gen harness routing, and moved the harness to the fender.
Oh... and, I got underneath and pried on the passenger side header. Something gave, the motor and trans seemed to pop into place, and now I have a 1/2" clearance for everything. I'm not quite sure what was hung up on what, but something was causing the driveline to be tweaked toward the passenger side. It bears noting that I still had to beat the snot out of the headers to get them to fit...
Then I decided to tackle the wiper reinstallation. That went pretty much without a hiccup, but did require readjusting the linkage to get the wiper arms to park where they belong.
The biggest bit of news is most likely the carpet install. I did finish running FatMat throughout the rest of the passenger compartment. So, when my carpet showed up on Saturday, I couldn't resist getting it in the car. The console is just sitting loosely at the moment, and you'll notice the E-brake handle is missing. I'll attack both of those after I get the seats and seat belts installed. That should secure the carpet.
I was really happy with how the under-dash wiring went. Everything just plugged in, and there was absolutely no drama. The only connection left undone is the airbag. Since I'm not going to reinstall the SDM, I don't want to risk a spontaneous/erroneous airbag deployment.
Just another shot of the filled dash. (Note to self: I really need to clean the dash...)
Here's a shot of the passenger's foot well, showing that everything just plugged in. I think I'm going to scrape the areas where GM used tar paper to seal the body, and cover it with patches of FatMat.
This must be the bulk of the gap that people complain about with the 4th gen consoles. Yeah, I can get a finger under it. But, honestly, with the ebony carpet, everything just kind of blends in. I'm ok with it.
A shot from the passenger's side, showing my horrendously dusty dash. With all of the grinding and sanding that I've done, I'm surprised it's as clean as it is.
A shot showing the fit of the rear of the console. Again, I'm ok with it.
And now for the obligatory, end of post question:
In this last photo, you can see the factory mid-body harness connector (also visible in the upper left hand corner of the photo above). This has what I believe are the taillights and power hatch motor wires. I thinking about splicing the harnesses at this point, as, no matter what I do, I will have to splice the taillight harnesses to get the 3rd gen lights to work with the 4th gen harness. So, the question is, does anyone have a complete body wiring diagram for an '89 and a 2000 Camaro that they would be willing to share? Please?
That's all for now...

Joined: Apr 2002
Posts: 2,029
Likes: 2
From: Ohio
Car: 88' Iroc-Z
Engine: LQ9
Transmission: T-56
Axle/Gears: 3.42
Re: 1989 RS - LS1/T56 Build
I would love to see how you mounted the dash. You seem very thorough with everything else. You did mention that you were moving the wiring to the 4th gen location. I've seen those guys drill a couple holes in the wheel well and route their harnesses over top of the plastic inner fender. It hides the wiring, making it look a lot cleaner . Just an idea if you feel like it.
I should have the wiring in my Chilton manual. If I remember after I wake up tomorrow I'll scan it for you. I took the entire 4th gen harness, I havent made it to the rear of the car yet but I planned on using the 4th gen wiring and swapping pigtails for the rear lights.
I should have the wiring in my Chilton manual. If I remember after I wake up tomorrow I'll scan it for you. I took the entire 4th gen harness, I havent made it to the rear of the car yet but I planned on using the 4th gen wiring and swapping pigtails for the rear lights.
Last edited by 87CIZ; Jun 11, 2013 at 08:38 PM.
Thread Starter
Member
Joined: May 2005
Posts: 247
Likes: 0
From: Monroe, GA
Car: 1989 RS
Engine: LS1 - HP Tuners Enhanced 2Bar OS
Transmission: T56 - Pro 5.0
Axle/Gears: 9 Inch - 31 Spl Tru-Trac - 4.11
Re: 1989 RS - LS1/T56 Build
To be honest, at the moment, I just have two or three screws through the factory mounting holes in the 4th gen dash, and into the factory retainer pieces in the 3rd gen firewall. There are also the two mounting studs that hold the steering column up. The plan is to fit the kick panels, and see how much room I have to play with, then I can fabricate some sort of lower mounting point to the chassis. I will also drill the required holes in the firewall to screw the top of the dash down.
I’ve struggled with how to minimize the wiring mess for a while now. There are places to route the wires in a thirdgen. For example, you could get into the fender next to the battery, and return to the engine compartment behind the wheel well. But, doing that would require extending the harness for sure. I will keep it in mind though.
I’ve struggled with how to minimize the wiring mess for a while now. There are places to route the wires in a thirdgen. For example, you could get into the fender next to the battery, and return to the engine compartment behind the wheel well. But, doing that would require extending the harness for sure. I will keep it in mind though.
Thread Starter
Member
Joined: May 2005
Posts: 247
Likes: 0
From: Monroe, GA
Car: 1989 RS
Engine: LS1 - HP Tuners Enhanced 2Bar OS
Transmission: T56 - Pro 5.0
Axle/Gears: 9 Inch - 31 Spl Tru-Trac - 4.11
Re: 1989 RS - LS1/T56 Build
So, does anyone have a schematic for the third and fourth gen taillight and hatch wiring? I'm not quite sure if I want to splice these behind the driver's side door, or at the lights themselves.

Thread Starter
Member
Joined: May 2005
Posts: 247
Likes: 0
From: Monroe, GA
Car: 1989 RS
Engine: LS1 - HP Tuners Enhanced 2Bar OS
Transmission: T56 - Pro 5.0
Axle/Gears: 9 Inch - 31 Spl Tru-Trac - 4.11
Re: 1989 RS - LS1/T56 Build
We are supposed to have nice weather tomorrow. So, I figured that would be the perfect time to take the day off and get the 2000 up on the concrete and get the rear, fuel tank, fuel lines, and e-brake pulled.
Looking at it realistically, I need to install the fuel tank/pump, fuel lines, and a battery and I can fire this thing up. So close…
Looking at it realistically, I need to install the fuel tank/pump, fuel lines, and a battery and I can fire this thing up. So close…
Senior Member
Joined: Mar 2013
Posts: 556
Likes: 12
From: South Carolina
Car: 92 Vette, 83 Camaro
Engine: 305 going to 95 LT1
Transmission: 5 speed going to T56 6 speed
Axle/Gears: 3.73 posi with disc brakes
Re: 1989 RS - LS1/T56 Build
We are supposed to have nice weather tomorrow. So, I figured that would be the perfect time to take the day off and get the 2000 up on the concrete and get the rear, fuel tank, fuel lines, and e-brake pulled.
Looking at it realistically, I need to install the fuel tank/pump, fuel lines, and a battery and I can fire this thing up. So close�
Looking at it realistically, I need to install the fuel tank/pump, fuel lines, and a battery and I can fire this thing up. So close�
Please take some good pictures along the way. This is one area that I think I'll need all the help I can get on my engine swap. Two more weeks and I'll be free to work on my project.
Thread Starter
Member
Joined: May 2005
Posts: 247
Likes: 0
From: Monroe, GA
Car: 1989 RS
Engine: LS1 - HP Tuners Enhanced 2Bar OS
Transmission: T56 - Pro 5.0
Axle/Gears: 9 Inch - 31 Spl Tru-Trac - 4.11
Re: 1989 RS - LS1/T56 Build
I got the rear, E-brake setup, and fuel tank out of the 2000. The rear was awfully rusty, as was most of the rest of the underside of the 2000. How does someone do that to a sports car?
I remembered that the gas gauge on the 2000 was little wacky toward the low end of the scale, so I pulled the sending unit. I'll get pictures of it up later, but the level sender is junk.
So, I won't be putting the new tank in until my new sender shows up next week. I picked up another bottle of argon and some stainless filler rod yesterday, so I'm going to try to get my V-bands welded on the collectors and have the headers installed tonight. I may or may not be installing the fuel lines tonight, that depends on how the V-bands go.
Thread Starter
Member
Joined: May 2005
Posts: 247
Likes: 0
From: Monroe, GA
Car: 1989 RS
Engine: LS1 - HP Tuners Enhanced 2Bar OS
Transmission: T56 - Pro 5.0
Axle/Gears: 9 Inch - 31 Spl Tru-Trac - 4.11
Re: 1989 RS - LS1/T56 Build
I got a little more work done today. It seems like things are kind of dragging out in the end here.
First up, I pulled the rear out of the 2000 and got it washed up to paint. Nothing too special, just your typical, nasty, rusty rear.

The center section was caked in grease. I'm guessing there was at least 1/4 of grease on that thing. A little industrial and a pressure washer, and we got it all cleaned up.

I noticed that on the 4th gen torque arm that there appeared to be a urethane type coating on the driver's side of it. I would guess that this was to mitigate structure borne noise transmission.

Just a shot of the rusty diff cover.

And here it is, still wet, after a nice coat of POR-15 satin black.

I like the way this stuff dries. In a day or two it will be rock hard.

Another angle.

The center section cleaned up really nice. Don't worry, the caliper abutment brackets are coming off for their own paint job, and I'll likely be replacing the calipers themselves.

First up, I pulled the rear out of the 2000 and got it washed up to paint. Nothing too special, just your typical, nasty, rusty rear.
The center section was caked in grease. I'm guessing there was at least 1/4 of grease on that thing. A little industrial and a pressure washer, and we got it all cleaned up.
I noticed that on the 4th gen torque arm that there appeared to be a urethane type coating on the driver's side of it. I would guess that this was to mitigate structure borne noise transmission.
Just a shot of the rusty diff cover.
And here it is, still wet, after a nice coat of POR-15 satin black.
I like the way this stuff dries. In a day or two it will be rock hard.
Another angle.
The center section cleaned up really nice. Don't worry, the caliper abutment brackets are coming off for their own paint job, and I'll likely be replacing the calipers themselves.
Thread Starter
Member
Joined: May 2005
Posts: 247
Likes: 0
From: Monroe, GA
Car: 1989 RS
Engine: LS1 - HP Tuners Enhanced 2Bar OS
Transmission: T56 - Pro 5.0
Axle/Gears: 9 Inch - 31 Spl Tru-Trac - 4.11
Re: 1989 RS - LS1/T56 Build
I also got some work done on the fuel tank. Well, there really wasn't a lot to do, but I pulled the sending unit.

Here's the 4th gen sending unit.

And here's the problem with my fuel level sender.

Two of the fingers are broken off the lower wiper. I wanted to replace this when I had the tank out, but had a lapse with respect to ordering it. I knew when I pulled the tank that I had forgotten to do so. No big deal. The new one should be here Tuesday or Wednesday.
Also pulled my headers for what I hope is the last time. I straightened out the collectors enough to tap the V-band flanges on.

I'm going to try to "cheat" the joints a tiny bit and angle them in toward the transmission. Hopefully this will help me keep a little more space between the Y-pipe and subframes.

That's all for now folks. It's a busy week here, so I don't know how much I'll be able to get done. I'm kind of disappointed that I forgot about the sending unit, or I could have had this thing fired up this weekend.
Here's the 4th gen sending unit.
And here's the problem with my fuel level sender.
Two of the fingers are broken off the lower wiper. I wanted to replace this when I had the tank out, but had a lapse with respect to ordering it. I knew when I pulled the tank that I had forgotten to do so. No big deal. The new one should be here Tuesday or Wednesday.
Also pulled my headers for what I hope is the last time. I straightened out the collectors enough to tap the V-band flanges on.
I'm going to try to "cheat" the joints a tiny bit and angle them in toward the transmission. Hopefully this will help me keep a little more space between the Y-pipe and subframes.
That's all for now folks. It's a busy week here, so I don't know how much I'll be able to get done. I'm kind of disappointed that I forgot about the sending unit, or I could have had this thing fired up this weekend.
Thread Starter
Member
Joined: May 2005
Posts: 247
Likes: 0
From: Monroe, GA
Car: 1989 RS
Engine: LS1 - HP Tuners Enhanced 2Bar OS
Transmission: T56 - Pro 5.0
Axle/Gears: 9 Inch - 31 Spl Tru-Trac - 4.11
Re: 1989 RS - LS1/T56 Build
I put in an 8-1/2 day on Sunday. The old rear, E-brake, exhaust, fuel lines, and fuel tank are out. The new fuel tank, fuel lines, rear, and E-brake setup are in. I didn’t get too many pictures, as I was thrashing to get stuff done. I can crawl underneath for some shots of the fuel tank and lines. However, if you’ve seen what they look like on a 4th gen, that’s exactly what they look like on my swap. It was pretty cool that everything just plugged right in.
I put my new rear wheels on, and they are a little close. So, I ordered a set of 1” spacers to bring them out to a comfortable position. But, the car is sitting on the ground, on all four wheels, for the first time since March. We’re getting close…
I put my new rear wheels on, and they are a little close. So, I ordered a set of 1” spacers to bring them out to a comfortable position. But, the car is sitting on the ground, on all four wheels, for the first time since March. We’re getting close…
Thread Starter
Member
Joined: May 2005
Posts: 247
Likes: 0
From: Monroe, GA
Car: 1989 RS
Engine: LS1 - HP Tuners Enhanced 2Bar OS
Transmission: T56 - Pro 5.0
Axle/Gears: 9 Inch - 31 Spl Tru-Trac - 4.11
Thread Starter
Member
Joined: May 2005
Posts: 247
Likes: 0
From: Monroe, GA
Car: 1989 RS
Engine: LS1 - HP Tuners Enhanced 2Bar OS
Transmission: T56 - Pro 5.0
Axle/Gears: 9 Inch - 31 Spl Tru-Trac - 4.11
Re: 1989 RS - LS1/T56 Build
Thanks!
I think the ears where the 3rd gen column bolted to the underside of the dash were different, as well the wire routing and connectors. But, you'd really have to scrutinize it to see that.
I think the ears where the 3rd gen column bolted to the underside of the dash were different, as well the wire routing and connectors. But, you'd really have to scrutinize it to see that.
Thread Starter
Member
Joined: May 2005
Posts: 247
Likes: 0
From: Monroe, GA
Car: 1989 RS
Engine: LS1 - HP Tuners Enhanced 2Bar OS
Transmission: T56 - Pro 5.0
Axle/Gears: 9 Inch - 31 Spl Tru-Trac - 4.11
Re: 1989 RS - LS1/T56 Build
I haven't had much time to compile the limited number of photos that I've been taking, as it has been an all out thrash to get this thing wrapped up (I'd like to drive it a couple of time before summer is over).
Anyway, this is the progress from today... it runs!
Anyway, this is the progress from today... it runs!
Thread Starter
Member
Joined: May 2005
Posts: 247
Likes: 0
From: Monroe, GA
Car: 1989 RS
Engine: LS1 - HP Tuners Enhanced 2Bar OS
Transmission: T56 - Pro 5.0
Axle/Gears: 9 Inch - 31 Spl Tru-Trac - 4.11
Re: 1989 RS - LS1/T56 Build
Everything else is 4th gen.
Senior Member
Joined: Aug 2010
Posts: 680
Likes: 2
From: Lincoln, NE
Car: 86 Iroc-Z28
Engine: 5.3
Transmission: 4l60
Re: 1989 RS - LS1/T56 Build
I think this is my last question or at least I hope so are your headlights, turn signals, and side markers wired up and working if so is it simple? Thanks for the help
Thread Starter
Member
Joined: May 2005
Posts: 247
Likes: 0
From: Monroe, GA
Car: 1989 RS
Engine: LS1 - HP Tuners Enhanced 2Bar OS
Transmission: T56 - Pro 5.0
Axle/Gears: 9 Inch - 31 Spl Tru-Trac - 4.11
Re: 1989 RS - LS1/T56 Build
Everything works just like it did in the 4th gen. I'll need to get a little creative with adapting the 4th gen wiring to the lights, but the 4th gen had essentially the number of lamps in the same locations. So, it should be as easy as snipping off the plugs and splicing on the 3rd gen style plugs.
I don't have the ambient light sensor on the dash pad installed yet (mainly because the dash pad isn't installed yet), so it makes the BCM think that it's dark. It's kind of neat that when I turn the ignition on, the front marker lights light up. And then when I release the E-brake, the headlights turn on.
If there's anything that you want pictures of or more info on, just ask.
And, if anyone knows of a 4x6 sealed beam conversion that accepts 9005/9006 T4 base bulbs, I really need a set...
Senior Member
Joined: Aug 2010
Posts: 680
Likes: 2
From: Lincoln, NE
Car: 86 Iroc-Z28
Engine: 5.3
Transmission: 4l60
Re: 1989 RS - LS1/T56 Build
Whys it do that? Never heard of 4th gen doing that
Thread Starter
Member
Joined: May 2005
Posts: 247
Likes: 0
From: Monroe, GA
Car: 1989 RS
Engine: LS1 - HP Tuners Enhanced 2Bar OS
Transmission: T56 - Pro 5.0
Axle/Gears: 9 Inch - 31 Spl Tru-Trac - 4.11
Re: 1989 RS - LS1/T56 Build
It's part of the automatic headlight system. If it's dark outside, the parking lights come on with the ignition. If you start the car with the parking brake set, the parking lights are the only ones illuminated after start-up. As soon as the parking brake switch is made or broken (haven't actually looked to see if it's an NO or NC switch on the 4th gen E-brake), the headlights will turn on. If the ambient light sensor indicates that it's day time, you get the DRL's and the parking lights go out. I can't remember for certain, if the parking lights remain on with the DRL's, but I thought they went out.
The reason that the parking lights are coming on right now, is that I don't have the ambient light sensor connected. Once I do that, it will be automatic headlights as they were intended to operate.
These features were one of the reasons that I elected to keep the 4th gen harness in it's entirety.
Member
iTrader: (2)
Joined: Feb 2010
Posts: 460
Likes: 3
Car: '89 Camaro
Engine: LS1
Transmission: 4L65/70E
Axle/Gears: 9 Inch, 3.70 gears
Senior Member
Joined: Aug 2010
Posts: 680
Likes: 2
From: Lincoln, NE
Car: 86 Iroc-Z28
Engine: 5.3
Transmission: 4l60
Re: 1989 RS - LS1/T56 Build
It's part of the automatic headlight system. If it's dark outside, the parking lights come on with the ignition. If you start the car with the parking brake set, the parking lights are the only ones illuminated after start-up. As soon as the parking brake switch is made or broken (haven't actually looked to see if it's an NO or NC switch on the 4th gen E-brake), the headlights will turn on. If the ambient light sensor indicates that it's day time, you get the DRL's and the parking lights go out. I can't remember for certain, if the parking lights remain on with the DRL's, but I thought they went out.
The reason that the parking lights are coming on right now, is that I don't have the ambient light sensor connected. Once I do that, it will be automatic headlights as they were intended to operate.
These features were one of the reasons that I elected to keep the 4th gen harness in it's entirety.
The reason that the parking lights are coming on right now, is that I don't have the ambient light sensor connected. Once I do that, it will be automatic headlights as they were intended to operate.
These features were one of the reasons that I elected to keep the 4th gen harness in it's entirety.
Thread Starter
Member
Joined: May 2005
Posts: 247
Likes: 0
From: Monroe, GA
Car: 1989 RS
Engine: LS1 - HP Tuners Enhanced 2Bar OS
Transmission: T56 - Pro 5.0
Axle/Gears: 9 Inch - 31 Spl Tru-Trac - 4.11
Re: 1989 RS - LS1/T56 Build
Yep, in the video above, if you watch closely, you can catch the headlight function in the instrument cluster. When I cycle the ignition on, the gauges light up. It's hard to discern with all of the indicator lights lighting up as well, but that's when the parking lights come on. Again this all because I don't have the ambient light sensor hooked up yet. If that sensor was present, the lights would remain off.
Senior Member
Joined: Aug 2010
Posts: 680
Likes: 2
From: Lincoln, NE
Car: 86 Iroc-Z28
Engine: 5.3
Transmission: 4l60
Re: 1989 RS - LS1/T56 Build
Cool nice build by the way. Have you got your headers on yet? Also what are you doing for door panels I'm going to try and mold a pair of 98 firebird panels in
Junior Member
iTrader: (1)
Joined: May 2012
Posts: 63
Likes: 0
From: Milwaukee, WI ; San Bernardino, CA
Car: 1991 Camaro RS
Engine: 305 will be LSX eventually
Transmission: T56
Axle/Gears: Borg Warner
Re: 1989 RS - LS1/T56 Build
Just a suggestion with the rear wiring. Why not just run the 2000 wiring in place of the original 89 wiring, and purchase new connectors from rockauto. That is what I think I'm going to do. If you do that the wires will be 11 years newer, and the connectors will be brand new. Just a thought though.
Great job with the build.
Great job with the build.
Thread Starter
Member
Joined: May 2005
Posts: 247
Likes: 0
From: Monroe, GA
Car: 1989 RS
Engine: LS1 - HP Tuners Enhanced 2Bar OS
Transmission: T56 - Pro 5.0
Axle/Gears: 9 Inch - 31 Spl Tru-Trac - 4.11
Re: 1989 RS - LS1/T56 Build
I started my door panels on Saturday. After I pulled the 3rd gen door cards off, and saw the pristine door shells, I didn't have the heart to chop up the doors. So, I elected to chop up the plastic door panels from the 2000 instead. I wound up trimming the 2000 door panels, and getting them to fit without modifying the door shells at all. I'll get pics up at some point. I still need to do the driver's side...
Thread Starter
Member
Joined: May 2005
Posts: 247
Likes: 0
From: Monroe, GA
Car: 1989 RS
Engine: LS1 - HP Tuners Enhanced 2Bar OS
Transmission: T56 - Pro 5.0
Axle/Gears: 9 Inch - 31 Spl Tru-Trac - 4.11
Re: 1989 RS - LS1/T56 Build
Just a suggestion with the rear wiring. Why not just run the 2000 wiring in place of the original 89 wiring, and purchase new connectors from rockauto. That is what I think I'm going to do. If you do that the wires will be 11 years newer, and the connectors will be brand new. Just a thought though.
I'm currently fighting with the stereo system. I think I can get 6-3/4" coax speakers in the doors, and under the panels...
Thread Starter
Member
Joined: May 2005
Posts: 247
Likes: 0
From: Monroe, GA
Car: 1989 RS
Engine: LS1 - HP Tuners Enhanced 2Bar OS
Transmission: T56 - Pro 5.0
Axle/Gears: 9 Inch - 31 Spl Tru-Trac - 4.11
Re: 1989 RS - LS1/T56 Build
Wow, the lack of udpates here makes it look like progress has stopped. However, the weather has been good, and I've been hard at work. So, a lot has happened.
First up, I did get the 4th gen door panels on without hacking up my door shells. It may have been due to the style of door card that I'm working with, but it really wasn't that bad.

All that was needed was a little trim from the upper rearmost part of the door card.

Here is a comparative shot from the backside.

And another, closer shot.

Questions about that one?
Next up is what I spent 6 hours on last night. I'm not totally satisfied with the fit at the cat-back system. But, it looks really slick, and it fits. So, hooray.

I don't know that I'll ever use mandrel bends again. Stacking miters was so easy. I also made my own 3.00" to 2.50" transitions (basically because I hadn't done that before, so I thought it would be fun).

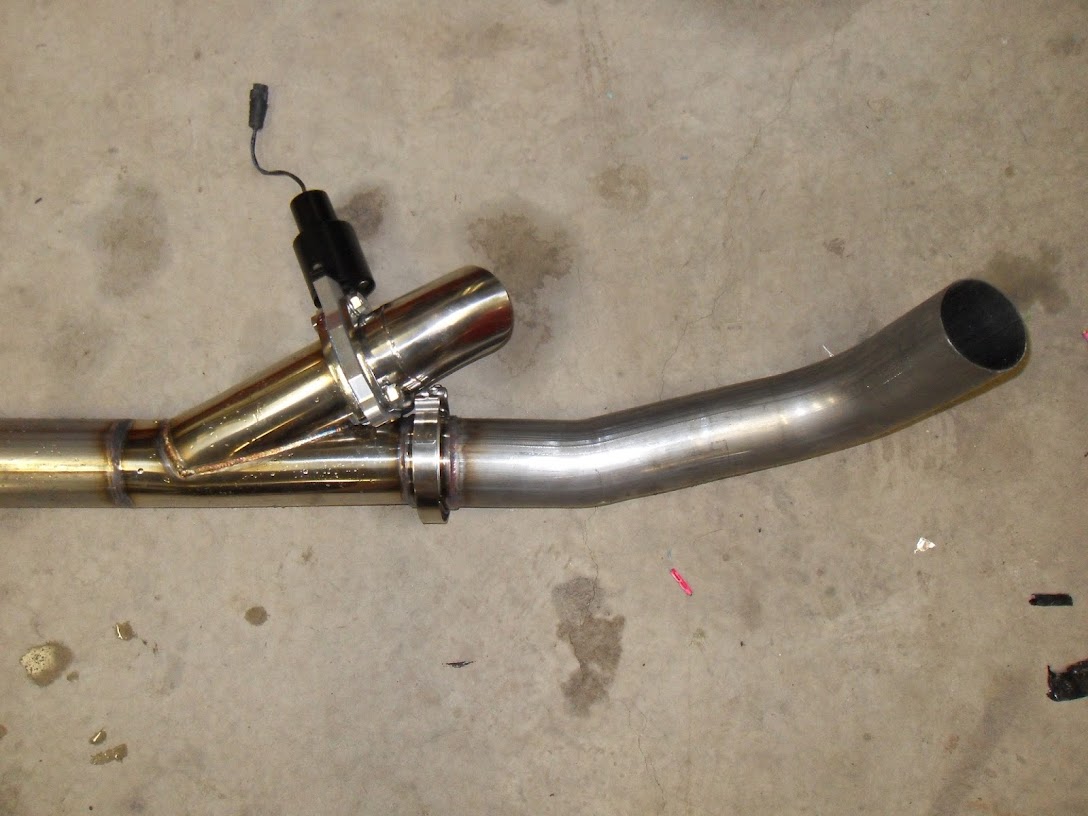
The 3" QTP cutout. It's tucked up in the rear passenger seat area.
That's ll for now. Today is "SEM recoloring day". I have all of the cargo plastics to fix up and spray with SEM Color Coat. I talked with SEM last week, and told them what I was doing. They advised me to go with a custom mixed Ebony color that should match the rest of the 2000's interior parts.
I'll throw some updates up on that one...
First up, I did get the 4th gen door panels on without hacking up my door shells. It may have been due to the style of door card that I'm working with, but it really wasn't that bad.
All that was needed was a little trim from the upper rearmost part of the door card.
Here is a comparative shot from the backside.
And another, closer shot.
Questions about that one?
Next up is what I spent 6 hours on last night. I'm not totally satisfied with the fit at the cat-back system. But, it looks really slick, and it fits. So, hooray.
I don't know that I'll ever use mandrel bends again. Stacking miters was so easy. I also made my own 3.00" to 2.50" transitions (basically because I hadn't done that before, so I thought it would be fun).
The 3" QTP cutout. It's tucked up in the rear passenger seat area.
That's ll for now. Today is "SEM recoloring day". I have all of the cargo plastics to fix up and spray with SEM Color Coat. I talked with SEM last week, and told them what I was doing. They advised me to go with a custom mixed Ebony color that should match the rest of the 2000's interior parts.
I'll throw some updates up on that one...


Thread Starter
Member
Joined: May 2005
Posts: 247
Likes: 0
From: Monroe, GA
Car: 1989 RS
Engine: LS1 - HP Tuners Enhanced 2Bar OS
Transmission: T56 - Pro 5.0
Axle/Gears: 9 Inch - 31 Spl Tru-Trac - 4.11
Re: 1989 RS - LS1/T56 Build
I need to do something for an air filter. It the moment I don't see a CAI working out, as the electrical center is occupying the space that I see the CAI’s routed to. So, I’m thinking about clamping a cone filter onto the throttle body. I know it’s not ideal, but for now it should keep the sand out of the engine.
The problem that I’m running into is where to put the IAT sensor. Does anyone know of a cone filter that has enough meat on the base that I could punch a hole to push the sensor into?
The problem that I’m running into is where to put the IAT sensor. Does anyone know of a cone filter that has enough meat on the base that I could punch a hole to push the sensor into?

Joined: Jun 2006
Posts: 576
Likes: 4
From: Gobles, Michigan
Car: 92 Ttop Z28
Engine: Cammed 6.0
Transmission: T-56
Axle/Gears: Built 10 bolt-3.90s w/ PBR discs
Re: 1989 RS - LS1/T56 Build
Could swap out to the 5 wire truck MAF. Its a little bigger in diameter, and the IAT is incorporated into the MAF as one unit.
Thread Starter
Member
Joined: May 2005
Posts: 247
Likes: 0
From: Monroe, GA
Car: 1989 RS
Engine: LS1 - HP Tuners Enhanced 2Bar OS
Transmission: T56 - Pro 5.0
Axle/Gears: 9 Inch - 31 Spl Tru-Trac - 4.11
Re: 1989 RS - LS1/T56 Build
I didn't know that was an option. I'd like to delete the MAF entirely, as I won't be using it on the future turbo build. I have HP Tuners, and am planning on springing for the 1-Bar Enhanced SD OS for the short term.
Maybe I'm going about this all wrong. Rather than try to cram the IAT sensor into the filter itself, I suppose I could just use an elbow and stick the sensor into that...
I think Summit has some reasonably priced K&N cones right now.
Maybe I'm going about this all wrong. Rather than try to cram the IAT sensor into the filter itself, I suppose I could just use an elbow and stick the sensor into that...
I think Summit has some reasonably priced K&N cones right now.

Joined: Mar 2000
Posts: 43,187
Likes: 45
From: Littleton, CO USA
Car: 82 Berlinetta/57 Bel Air
Engine: L92/LQ4 (both w/4" stroke)
Transmission: 4L80E/4L80E
Axle/Gears: 12B-3.73/9"-3.89
If you're going to use a MAF, don't use a K&N. The oil from the filter will coat the MAF.
I think you're making this too complicated. You'll need to connect the filter and elbow with something, so use a piece of aluminum tube, drill a hole in it, put a grommet in the hole, and put the IAT in the hole.
If you use an LS3 MAF/IAT, it's a card type that can be put in the aluminum tube. You'll need a mounting adapter instead of a grommet, and a different electrical connector (all readily available).
Thread Starter
Member
Joined: May 2005
Posts: 247
Likes: 0
From: Monroe, GA
Car: 1989 RS
Engine: LS1 - HP Tuners Enhanced 2Bar OS
Transmission: T56 - Pro 5.0
Axle/Gears: 9 Inch - 31 Spl Tru-Trac - 4.11
Re: 1989 RS - LS1/T56 Build
Yep. I ordered up an elbow, short tube, and cone filter from Summit. I’m going to ditch the MAF, spring for the enhanced 1-Bar SD OS, and stick the IAT sensor in the elbow.
For what it's worth, "too complicated" is how I operate.
For what it's worth, "too complicated" is how I operate.
Thread Starter
Member
Joined: May 2005
Posts: 247
Likes: 0
From: Monroe, GA
Car: 1989 RS
Engine: LS1 - HP Tuners Enhanced 2Bar OS
Transmission: T56 - Pro 5.0
Axle/Gears: 9 Inch - 31 Spl Tru-Trac - 4.11
Re: 1989 RS - LS1/T56 Build
Got my panels re-colored and cheesy intake put on tonight. Tomorrow I hope to get the carpet glued onto the panels and the panels in the car. I am using the complete Monsoon system from the 2000 as well, and found that I could mount some 4" 2-ways in the cargo panels. It's not the most elegant mounting solution, but once the panels are covered with carpet, it'll look and sound great.
I'll get some pics of that tomorrow... it's too hot right now.
I'll get some pics of that tomorrow... it's too hot right now.
Thread Starter
Member
Joined: May 2005
Posts: 247
Likes: 0
From: Monroe, GA
Car: 1989 RS
Engine: LS1 - HP Tuners Enhanced 2Bar OS
Transmission: T56 - Pro 5.0
Axle/Gears: 9 Inch - 31 Spl Tru-Trac - 4.11
Re: 1989 RS - LS1/T56 Build
I haven't been very good at posting pics lately. If we have some agreeable weather this weekend, I would like to get some finished shots of the car.
The interior is done up to the kick panels and dash cap, and the bumper cover still needs to go back on the front. But, I couldn't resist a quick road test last night. I think I may have made a huge mistake somewhere during the build...
I got onto the blacktop, put it in first gear, and gave it a "little" throttle. The car just broke loose and shot forward. It was amazing coming from the old TBI 305. Although, I really thought that a sport compound 295 tire would grab a little better than that. So, my mistake was thinking that an LS1 wouldn't be enough.
A couple of observations at the end of the build:
1) My Pro 5.0 stops are too short. I had a really hard time getting the car to go into second and third. I drove it all last summer in the 4th gen, so I'm pretty confident the problem lies in the shifter adjustment. Unfortunately, I’m not finding any really solid info on how to set them correctly. I’ve seen everything from � turn interference to 1 turn clearance. So, anyone with a Pro 5.0, how did you set yours?
2) When I did my 3-point turn maneuver to get the car out of the garage and into the driveway, before the blacktop test, it felt like the rear was locked. If you've ever tried to turn a car with a spool, it felt a little like that. My first thought was that something was rubbing or dragging up front. But, I didn't see any rub marks on anything. I haven't had the cover off the diff, but does the fourth gen use the Eaton Posi carrier with the centrifugal weights? I wonder if those are/were locked up for some reason.
3) Using HP Tuners to do a MAF delete tune seems to be the way to go. I had no hesitation or stumble, and it seems like the car can really breath. Dumping the MAF also made it easier to get the air filter sorted out. And with HP Tuners, the only warning lights I have now are from the ABS delete (ABS, Brake, and Service Vehicle). I’ll probably just de-solder those from instrument cluster PCB. Unfortunately, that means no light for the E-brake, but the handle sticking up should serve as a pretty good indicator.
4) The funky sounding exhaust sounds much better when the car is moving. I thought that maybe my merge angle was too big, causing some issues with resonance. But, it may have been reverberation from stuff behind or around the car. I got really used to how the SBC sounded with Headman shorties and a Flowmaster. I was expecting the same or very similar sound from the LS1. I don’t know why I was thinking that, as the Flowmaster on my old 2000 Silverado sounded totally different too. But, I think it sounds decent at least.
5) The brakes finally bled out, and they feel good-ish. I was having a really difficult time pushing fluid to the front right, so I put it on the back burner while I worked on other stuff. After a couple of sessions of moving in and out of the garage, something let go, and the pedal went soft. So, I tried bleeding again, and everything seems just fine.
6) The car NEEDS a good wash and claying and compounding and wax and sealer (even though the awful single stage respray that was done years ago, without my consent, is failing horribly).
Next up is a photo/video shoot…
Joined: Jan 2002
Posts: 757
Likes: 10
From: Middle of MI
Car: 1989 Trans Am GTA
Engine: Stock LS1
Transmission: T56
Axle/Gears: 3.70 9 bolt
Re: 1989 RS - LS1/T56 Build
I can only help with a couple things, but here goes...
On my Pro 5.0, I backed off the stops, then when the shifter was in the 'natural' position for each gear (well, 1,3,5 and 2,4,6) brought the stops up until they just touched. This allows normal shifting when driving sane and then wont let you go 'too far' when you are hammering on it. This set up works great for me at least.
Not sure on this, but did you play with the front end at all? I know on mine when I first set up my front end, I got some camber bolts for the spindle/strut connection, maxed out the camber on those and then fine tuned the setting with the strut mount. The front end skipped horribly and just never felt right. So I took out one camber bolt, used the strut mount for the major adjustment and then fine tuned with the bolt, much better now, very little hopping, it's just how all the angles stack up on these cars.
Definitely a difference from SBC to LS1 exhaust. I think it's about the only down side of the swap, loved the L98, even with stock manifolds going into my Flowmaster catback. Now I have long tubes/ory into the same 3" catback, cool sounding still, but not the same.
About time!
1) My Pro 5.0 stops are too short. I had a really hard time getting the car to go into second and third. I drove it all last summer in the 4th gen, so I'm pretty confident the problem lies in the shifter adjustment. Unfortunately, I�m not finding any really solid info on how to set them correctly. I�ve seen everything from � turn interference to 1 turn clearance. So, anyone with a Pro 5.0, how did you set yours?
2) When I did my 3-point turn maneuver to get the car out of the garage and into the driveway, before the blacktop test, it felt like the rear was locked. If you've ever tried to turn a car with a spool, it felt a little like that. My first thought was that something was rubbing or dragging up front. But, I didn't see any rub marks on anything. I haven't had the cover off the diff, but does the fourth gen use the Eaton Posi carrier with the centrifugal weights? I wonder if those are/were locked up for some reason.
4) The funky sounding exhaust sounds much better when the car is moving. I thought that maybe my merge angle was too big, causing some issues with resonance. But, it may have been reverberation from stuff behind or around the car. I got really used to how the SBC sounded with Headman shorties and a Flowmaster. I was expecting the same or very similar sound from the LS1. I don�t know why I was thinking that, as the Flowmaster on my old 2000 Silverado sounded totally different too. But, I think it sounds decent at least.
About time!
Thread Starter
Member
Joined: May 2005
Posts: 247
Likes: 0
From: Monroe, GA
Car: 1989 RS
Engine: LS1 - HP Tuners Enhanced 2Bar OS
Transmission: T56 - Pro 5.0
Axle/Gears: 9 Inch - 31 Spl Tru-Trac - 4.11
Re: 1989 RS - LS1/T56 Build
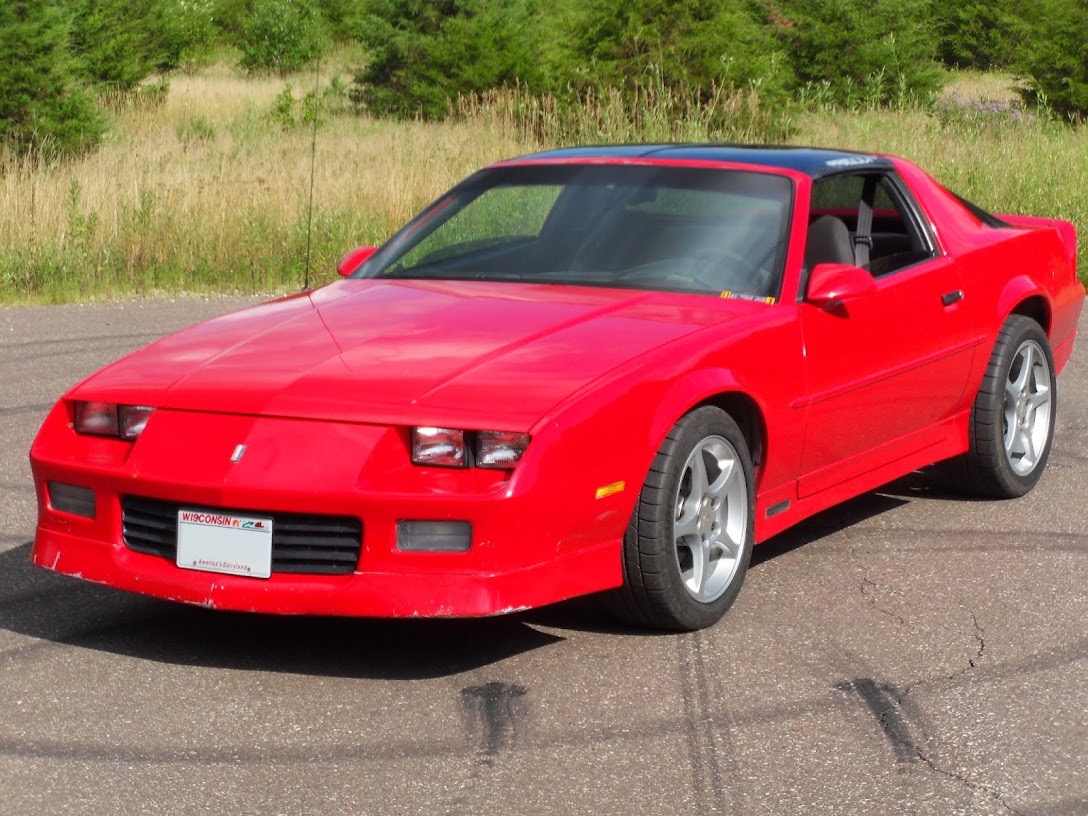
I keep threatening to post the finished pictures. In all honesty, this car will never be "finished". But, here is how it sits today (the paint needs a little buffing).


Continued...
Continued...