
1989 RS - LS1/T56 Build

Thread Starter
Member
Joined: May 2005
Posts: 247
Likes: 0
From: Monroe, GA
Car: 1989 RS
Engine: LS1 - HP Tuners Enhanced 2Bar OS
Transmission: T56 - Pro 5.0
Axle/Gears: 9 Inch - 31 Spl Tru-Trac - 4.11
1989 RS - LS1/T56 Build
I suppose this can serve as my build log. I really wanted to wrap up the bulk of the swap, then post a bunch of photos, but it seems that I have enough questions to warrant just starting the thread already.
The build started two weeks ago with the teardown of a 2000 Z-28 6 speed. On the outside, there appeared to be nothing wrong with the car, but I thought that the price that I paid for it ($5,200) was a little too low for a car with no major issues. No matter, I was never really interested in the car, I just wanted the driveline and interior.
Now, on to the show�
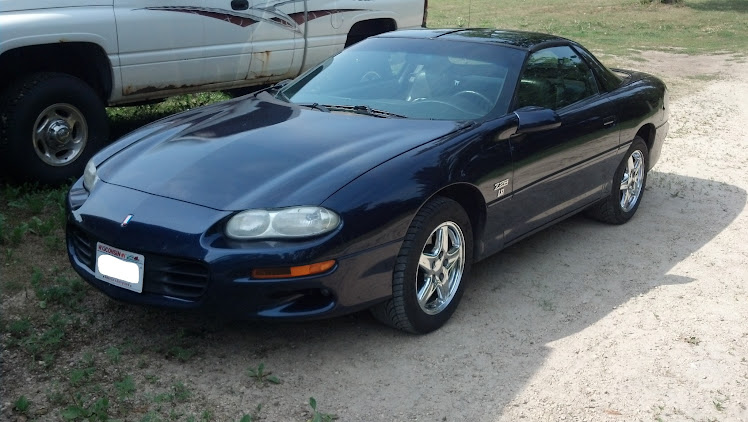
The '89 as it was when I picked it up last October. I had it in storage for the past 6 years.

Found a couple of these guys upon my initial inspection. Can't wait to see what kind of "magic" they've worked on the interior.

This is the 2000 Z-28 that I will be cannibalizing.
The build started two weeks ago with the teardown of a 2000 Z-28 6 speed. On the outside, there appeared to be nothing wrong with the car, but I thought that the price that I paid for it ($5,200) was a little too low for a car with no major issues. No matter, I was never really interested in the car, I just wanted the driveline and interior.
Now, on to the show�
The '89 as it was when I picked it up last October. I had it in storage for the past 6 years.
Found a couple of these guys upon my initial inspection. Can't wait to see what kind of "magic" they've worked on the interior.
This is the 2000 Z-28 that I will be cannibalizing.
Thread Starter
Member
Joined: May 2005
Posts: 247
Likes: 0
From: Monroe, GA
Car: 1989 RS
Engine: LS1 - HP Tuners Enhanced 2Bar OS
Transmission: T56 - Pro 5.0
Axle/Gears: 9 Inch - 31 Spl Tru-Trac - 4.11
Re: 1989 RS - LS1/T56 Build
Wow, there are a lot of wires on the LS engines. Nothing too daunting though.

This is the first engine that I've "pulled" out the bottom. With the exception of completely destroying my $18 furniture dolly, it was pretty smooth.

I guess this is what all the fuss is about?

And, of course, there are the extra parts. Actually, I think I'll be re-using a lot of this stuff.

And here is the empty engine bay. I continued to strip absolutely everything from under the hood.

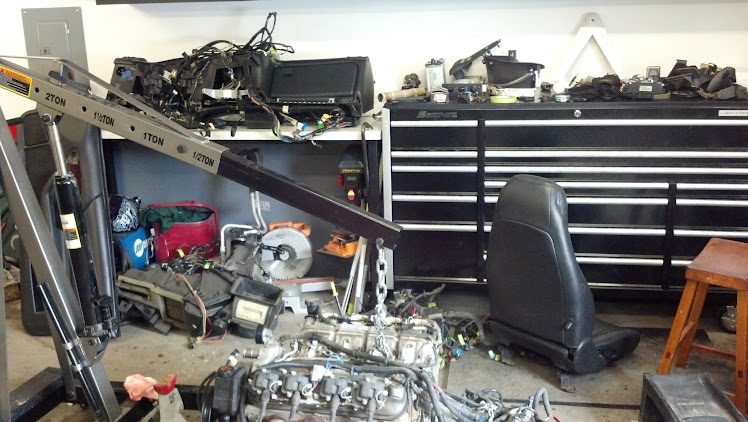
In 5 days I managed to reduce the 2000 Z-28 to this collection of parts.
This is the first engine that I've "pulled" out the bottom. With the exception of completely destroying my $18 furniture dolly, it was pretty smooth.
I guess this is what all the fuss is about?
And, of course, there are the extra parts. Actually, I think I'll be re-using a lot of this stuff.
And here is the empty engine bay. I continued to strip absolutely everything from under the hood.
In 5 days I managed to reduce the 2000 Z-28 to this collection of parts.
Thread Starter
Member
Joined: May 2005
Posts: 247
Likes: 0
From: Monroe, GA
Car: 1989 RS
Engine: LS1 - HP Tuners Enhanced 2Bar OS
Transmission: T56 - Pro 5.0
Axle/Gears: 9 Inch - 31 Spl Tru-Trac - 4.11
Re: 1989 RS - LS1/T56 Build
The '89 has seen some better days. The engine compartment is looking pretty nappy. I can't work like this.
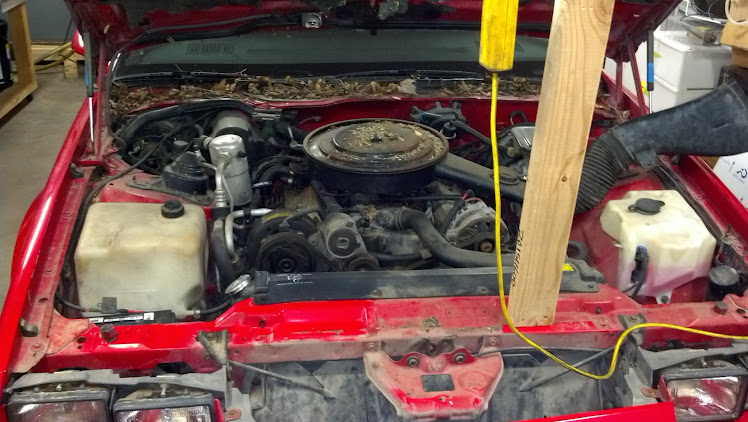
This is better. Now I can tear it down without worrying about catching some infectious, flesh eating disease.

Just wanted to show off my custom centerbolt wire looms one last time.

And it's out. Took me two days working a few hours per evening to pull this thing.

This is better. Now I can tear it down without worrying about catching some infectious, flesh eating disease.
Just wanted to show off my custom centerbolt wire looms one last time.
And it's out. Took me two days working a few hours per evening to pull this thing.
Thread Starter
Member
Joined: May 2005
Posts: 247
Likes: 0
From: Monroe, GA
Car: 1989 RS
Engine: LS1 - HP Tuners Enhanced 2Bar OS
Transmission: T56 - Pro 5.0
Axle/Gears: 9 Inch - 31 Spl Tru-Trac - 4.11
Re: 1989 RS - LS1/T56 Build
Guess that’s it for the moment. I’m currently working at getting the k-member out, a few hours per night as time permits. As a side note, I bought one of those OTC internal spring compressors. I wouldn’t do springs again without one. The brake lines need to be removed, then the k-member should drop right out.
The plan is to get out to the shop tonight, cleanup, put tools away, and then get the k-member out. I already have the Hawk’s LS swap engine mounts and trans cross member. So, I can mark up the member for the notch and get to cutting right away.
Next up, I have two fairly major decisions to make. Decision number one is with respect to the k-member and a-arms. I have some Por-15, and was thinking about just degreasing the k-member and a-arms and brushing the Por-15 on. Alternatively, I could send all three pieces out to have them sand blasted and painted. Since I have the Por-15, it would be a quick and easy process in the garage. I could have it all done within a day. If I send it out for blasting, it will take a t least a week. What do you guys think? Por-15 or blast and paint?
Decision number two is the under-hood paint job. It needs something. Since I plan to completely strip the bay, it would be super easy to rattle can it red again. Alternatively, I have a bunch of PPG acrylic urethane paint. I could mix up some GM Bright Red, and shoot it with that. Of course, to use the PPG stuff, I’d want to epoxy prime first, then shoot the DCC over it. This also means turning my garage into a cocoon, with plastic protecting everything from overspray. It’s a 20 minutes versus 2 days decision.
Anyway, look forward to hearing some comments.
Thread Starter
Member
Joined: May 2005
Posts: 247
Likes: 0
From: Monroe, GA
Car: 1989 RS
Engine: LS1 - HP Tuners Enhanced 2Bar OS
Transmission: T56 - Pro 5.0
Axle/Gears: 9 Inch - 31 Spl Tru-Trac - 4.11
Re: 1989 RS - LS1/T56 Build
I owe some additional pictures, maybe tonight. But, basically what I got done last night was to pull the brake system, k-member, and motor mounts. There isn’t too much grease on the k-member, just a small amount near the driver’s side spring perch. I’m thinking about just scrubbing it up with a strong degreaser, hitting it with a hose, and then POR-15’ing it. This, of course, will have to happen after the notching.
I need to press the control arm bushing and ball joints from my LCA’s. The last set of ball joints I pressed myself with a C-frame press. But, it seems like it would be money well spent to let someone else press everything. Who normally does those? Parts house? General repair shop? (I ask because I never let anyone work on my stuff, so I have no idea where to even look).
I could probably bring them to work and use the 60 ton press in the tool room. I'm just concerned about bending something.
On another note, I just got an e-mail today that my caliper brackets are through the laser. So, I am going to go grab them yet this morning. I’m also going to see if I can find some 0.125” thick CRS drop off to do the notch for the A/C and oil pan on the k-member.
Thread Starter
Member
Joined: May 2005
Posts: 247
Likes: 0
From: Monroe, GA
Car: 1989 RS
Engine: LS1 - HP Tuners Enhanced 2Bar OS
Transmission: T56 - Pro 5.0
Axle/Gears: 9 Inch - 31 Spl Tru-Trac - 4.11
Re: 1989 RS - LS1/T56 Build
Guess I got two sets of caliper brackets. These were blatantly copied from the Luke Skaff CTS-V/LS1 revised design and laser cut from 0.312" thick CRS (I think it's 1045). If they fit like they are supposed to, I'll donate the second set to someone who needs them.

Trending Topics
Thread Starter
Member
Joined: May 2005
Posts: 247
Likes: 0
From: Monroe, GA
Car: 1989 RS
Engine: LS1 - HP Tuners Enhanced 2Bar OS
Transmission: T56 - Pro 5.0
Axle/Gears: 9 Inch - 31 Spl Tru-Trac - 4.11
Re: 1989 RS - LS1/T56 Build
I need to make sure that they fit correctly before I send them to someone. I've got another week to work on this thing, then I will be out of the country for about ten days. If everything goes well, I should be at the brake install by mid-April.
1bad91Z, you've got dibs if they fit.
1bad91Z, you've got dibs if they fit.
Thread Starter
Member
Joined: May 2005
Posts: 247
Likes: 0
From: Monroe, GA
Car: 1989 RS
Engine: LS1 - HP Tuners Enhanced 2Bar OS
Transmission: T56 - Pro 5.0
Axle/Gears: 9 Inch - 31 Spl Tru-Trac - 4.11
Re: 1989 RS - LS1/T56 Build
I've been plugging away at the task that I dread the most... the HVAC. I'm using the complete 4th gen HVAC, box and all. It's been rather interesting trying to fit it to the firewall. I would say that I'm halfway there.
The 4th gen box appears to free up a little room on the passenger side for the coil packs, so relocation "shouldn't" be an issue. I'll let you all know how that one pans out.
I owe lots of pics at this point, so I will definitely try to get something put together tomorrow after the festivities.
The 4th gen box appears to free up a little room on the passenger side for the coil packs, so relocation "shouldn't" be an issue. I'll let you all know how that one pans out.
I owe lots of pics at this point, so I will definitely try to get something put together tomorrow after the festivities.
Thread Starter
Member
Joined: May 2005
Posts: 247
Likes: 0
From: Monroe, GA
Car: 1989 RS
Engine: LS1 - HP Tuners Enhanced 2Bar OS
Transmission: T56 - Pro 5.0
Axle/Gears: 9 Inch - 31 Spl Tru-Trac - 4.11
Re: 1989 RS - LS1/T56 Build
I'm flying back from Japan today, and should have two solid days to get stuff done during the holiday weekend. I'm really looking for the motor to be in the car by Sunday evening...
...before I have to go to Germany.
...before I have to go to Germany.
Thread Starter
Member
Joined: May 2005
Posts: 247
Likes: 0
From: Monroe, GA
Car: 1989 RS
Engine: LS1 - HP Tuners Enhanced 2Bar OS
Transmission: T56 - Pro 5.0
Axle/Gears: 9 Inch - 31 Spl Tru-Trac - 4.11
Re: 1989 RS - LS1/T56 Build
I got back from my Pacific Rim trip on Thursday night, spent the better part of the day on Friday trying to get back on North American time, and was able to put a few hours into the project on Saturday. Below is what I've managed to do...
First, I got the the HVAC box roughly fitted to the firewall. There should be minor plugging and filling to do for the old heater hose and blower wheel holes. But, I think with a coat of paint, it should look pretty factory.
I had to cut into the cowl a bit on the upper right hand side to allow the flange to sit flush. This should be pretty easy to box in.
The box sits very close and tight to the strut tower. I don't think that this will be a long term issue, and once the fitment is final, should fit a tad better.

The dash dropped right in, and the ducting is a perfect match.

I'm not sure that I'm happy with the gap on the driver's side. Did any of you notice that your dash swap seemed to be shifted to the passenger side by about an inch?
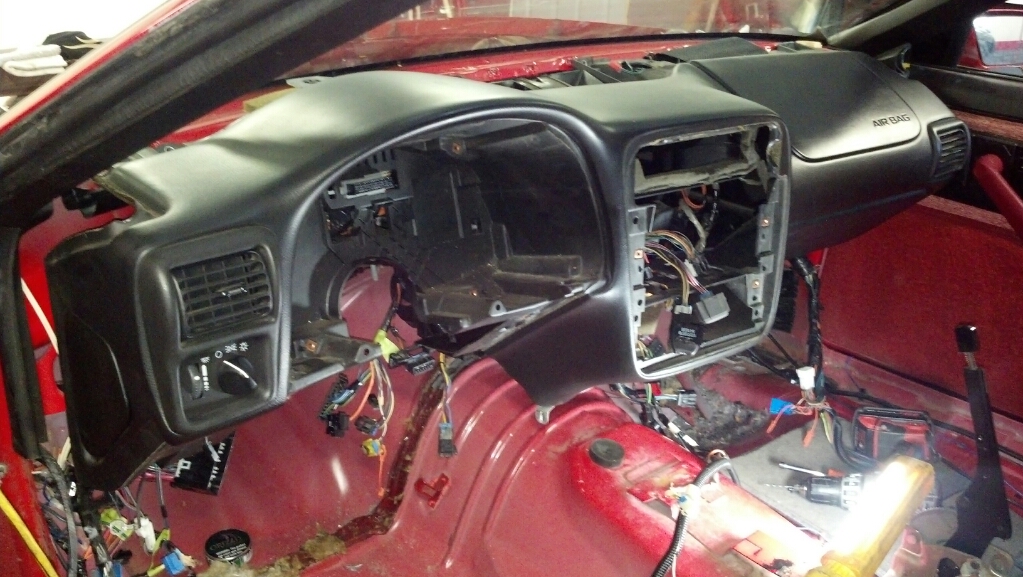
That's all for now. I'm hoping to get back out there and finish up the sheet metal work for the box today. I just wanted to ping those that have installed the dash before, and see if you felt it was perfectly centered or shifted to the passenger side.
Thanks!
First, I got the the HVAC box roughly fitted to the firewall. There should be minor plugging and filling to do for the old heater hose and blower wheel holes. But, I think with a coat of paint, it should look pretty factory.
I had to cut into the cowl a bit on the upper right hand side to allow the flange to sit flush. This should be pretty easy to box in.
The box sits very close and tight to the strut tower. I don't think that this will be a long term issue, and once the fitment is final, should fit a tad better.
The dash dropped right in, and the ducting is a perfect match.
I'm not sure that I'm happy with the gap on the driver's side. Did any of you notice that your dash swap seemed to be shifted to the passenger side by about an inch?
That's all for now. I'm hoping to get back out there and finish up the sheet metal work for the box today. I just wanted to ping those that have installed the dash before, and see if you felt it was perfectly centered or shifted to the passenger side.
Thanks!
Thread Starter
Member
Joined: May 2005
Posts: 247
Likes: 0
From: Monroe, GA
Car: 1989 RS
Engine: LS1 - HP Tuners Enhanced 2Bar OS
Transmission: T56 - Pro 5.0
Axle/Gears: 9 Inch - 31 Spl Tru-Trac - 4.11
Re: 1989 RS - LS1/T56 Build
Does anyone have a shot of the passenger side cowl area with the fender removed? I was wondering if I would get any better access to the area that I need to rebuild with the fender pulled.
If it grants me more access, I'll pull the fender. But, if there is no net gain... why pull it?
Thanks in advance!
If it grants me more access, I'll pull the fender. But, if there is no net gain... why pull it?
Thanks in advance!
Thread Starter
Member
Joined: May 2005
Posts: 247
Likes: 0
From: Monroe, GA
Car: 1989 RS
Engine: LS1 - HP Tuners Enhanced 2Bar OS
Transmission: T56 - Pro 5.0
Axle/Gears: 9 Inch - 31 Spl Tru-Trac - 4.11
Re: 1989 RS - LS1/T56 Build
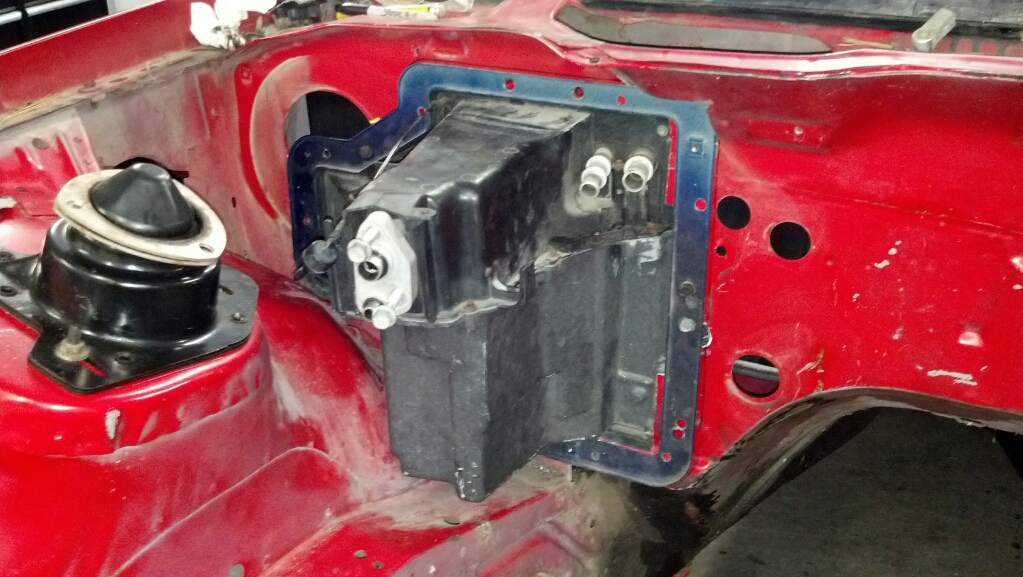
Finally found some time to work on the project last night. I got the mounting flange for the HVAC box welded in. I really wish I had a MIG for that, but the TIG did alright.

Fitment was really good. When I snugged up the screws, it pulled right into place. With a good scuff, seam sealer, and prime, it should look almost factory. Now, there are just a few holes on the firewall that need filling and sealing.

The fresh air/recirc damper tucked up under the windshield nicely.
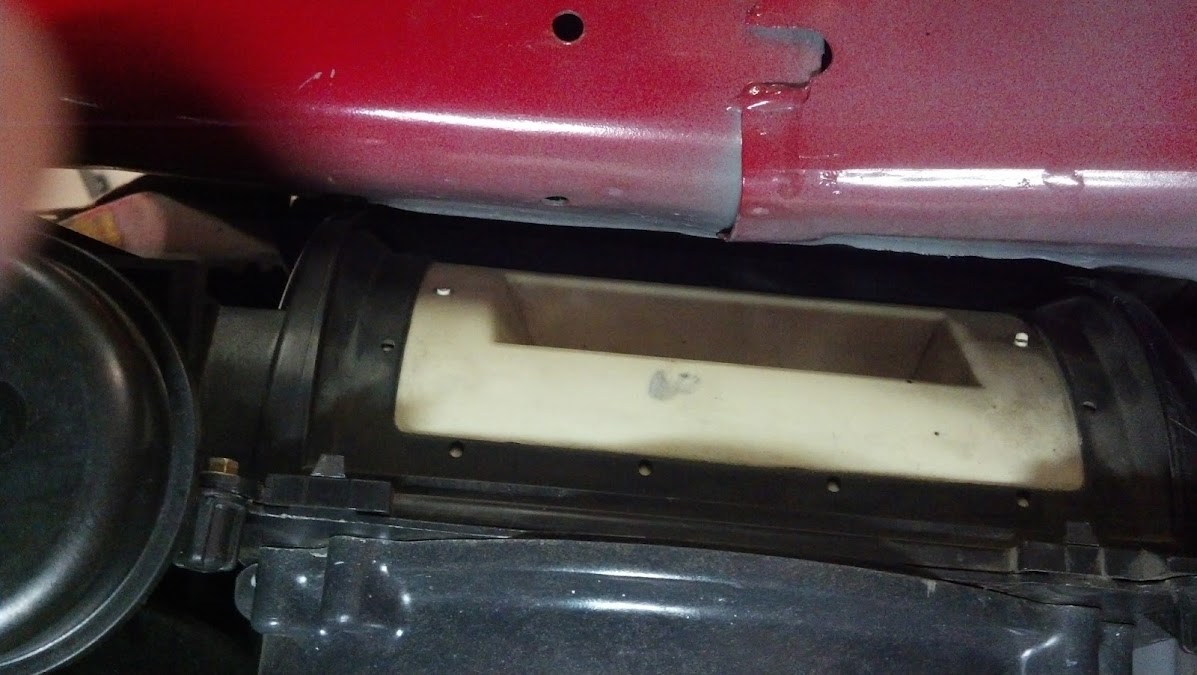
This part I'm not so proud of. I'll need to do a bit more work with sheet metal before I prime and seal it. I did wind up cutting the bottom mounting tab off the HVAC box, as I was having some clearance issues.

This view is a little hard to get a feel for. The upper right hand corner of the flange is barely visible in the lower left of the frame. Basically, what I plan to do is build a flat tray that covers the fresh air intake, and then slope that down into the wiper tray. I will just box off the right side of where the cowl used to drain out behind the passenger front tire, and seal the fresh air intake on the right side. It looks like I can make everything slope to the driver's side, so it should work out alright.

Hope to get out there again tomorrow and really make some progress.
Fitment was really good. When I snugged up the screws, it pulled right into place. With a good scuff, seam sealer, and prime, it should look almost factory. Now, there are just a few holes on the firewall that need filling and sealing.
The fresh air/recirc damper tucked up under the windshield nicely.
This part I'm not so proud of. I'll need to do a bit more work with sheet metal before I prime and seal it. I did wind up cutting the bottom mounting tab off the HVAC box, as I was having some clearance issues.
This view is a little hard to get a feel for. The upper right hand corner of the flange is barely visible in the lower left of the frame. Basically, what I plan to do is build a flat tray that covers the fresh air intake, and then slope that down into the wiper tray. I will just box off the right side of where the cowl used to drain out behind the passenger front tire, and seal the fresh air intake on the right side. It looks like I can make everything slope to the driver's side, so it should work out alright.
Hope to get out there again tomorrow and really make some progress.
Thread Starter
Member
Joined: May 2005
Posts: 247
Likes: 0
From: Monroe, GA
Car: 1989 RS
Engine: LS1 - HP Tuners Enhanced 2Bar OS
Transmission: T56 - Pro 5.0
Axle/Gears: 9 Inch - 31 Spl Tru-Trac - 4.11
Re: 1989 RS - LS1/T56 Build
Ugh... I'm leaving for Germany Saturday night. This work thing is really delaying the progress on my build.
I'm going to get some goodies ordered up while I'm away. So there is a silver lining in that. There is also the fact that I have spent three weekends travelling. So, I have a week's worth of time off to use. Just my frustrations with responsibility getting in the way of fun...
I'm going to try to take a few days the week after next, and a few more the following week.
My Pro 5.0 shifter, the Hyperflex bushing kit, and UMI subframe connectors have all arrived. I talked with OC Auto Carpet, and have settled on the ebony carpet, plus an extra yard to cover the rear hatch panels. I'm going with Fatmat Extreme under the carpet with mass backing and as much of the interior as I can manage. My fiberglass flat hood will be coming from Unlimited Products. I'm going to try the SS long tube headers from Racnig Innovations. I'll weld some v-bands on the collectors and build a Y-pipe out of stainless U-bends. I'm planning to add a single 3" electric cutout before a Magnaflow spun cat and Flowmaster SS cat back exhaust.
I'm sure there's stuff I'm missing here, but that's the gist of it for the moment. Now, it's just a waiting game until I can get out there again.

Member
Joined: Feb 2009
Posts: 185
Likes: 0
From: Commerce Twp, MI
Car: '91 Camaro
Engine: LSx
Transmission: 4l60e
Axle/Gears: posi
Re: 1989 RS - LS1/T56 Build
here is the only passenger side pic i have with a fender off from my current build, this pic is from last yr
Thread Starter
Member
Joined: May 2005
Posts: 247
Likes: 0
From: Monroe, GA
Car: 1989 RS
Engine: LS1 - HP Tuners Enhanced 2Bar OS
Transmission: T56 - Pro 5.0
Axle/Gears: 9 Inch - 31 Spl Tru-Trac - 4.11
Re: 1989 RS - LS1/T56 Build
Thanks Greg,
It looks like puling the fender won't get me what I need. I've got a pretty good idea of how to modify the cowl area from the access that I've got.
I picked up some 0.030" steel sheet yesterday. So, when I get back, I plan to use that to finish up the cowl and plug some of the holes on the firewall. I'll throw up some photos when it's complete.
Then, hopefully, I can get on to actually installing the engine and transmission.
Thanks again!
Member
iTrader: (1)
Joined: Feb 2005
Posts: 424
Likes: 0
From: Columbus, OH, USA
Car: '91 Z28, '13 Civic EX-L
Engine: 355 LT1, 1.8 I4
Transmission: T56, 5spd auto
Axle/Gears: 10 bolt 3.42(as long as no breaky)
Re: 1989 RS - LS1/T56 Build
Looks like you are making good progress! I did a rattle can job on the bay when I had my engine out, I wish I would have done a more professional job. I would use the PPG stuff you have. It will only be a matter of time before your rattle can job would start to chip and look like crap.
Thread Starter
Member
Joined: May 2005
Posts: 247
Likes: 0
From: Monroe, GA
Car: 1989 RS
Engine: LS1 - HP Tuners Enhanced 2Bar OS
Transmission: T56 - Pro 5.0
Axle/Gears: 9 Inch - 31 Spl Tru-Trac - 4.11
Re: 1989 RS - LS1/T56 Build
I've kind of committed to the spray bomb approach for the engine bay, if for no other reason than schedule. My hope is that because I'm going red over red, it shouldn't be too terribly sensitive later on.
I really need to get cracking on this thing... the weather is almost decent.
I really need to get cracking on this thing... the weather is almost decent.


Joined: Jan 2002
Posts: 757
Likes: 10
From: Middle of MI
Car: 1989 Trans Am GTA
Engine: Stock LS1
Transmission: T56
Axle/Gears: 3.70 9 bolt
Re: 1989 RS - LS1/T56 Build
Coming together nicely!! Looks like a great foundation, it's always better to have a plan and do things in the semi right order 
Thread Starter
Member
Joined: May 2005
Posts: 247
Likes: 0
From: Monroe, GA
Car: 1989 RS
Engine: LS1 - HP Tuners Enhanced 2Bar OS
Transmission: T56 - Pro 5.0
Axle/Gears: 9 Inch - 31 Spl Tru-Trac - 4.11
Re: 1989 RS - LS1/T56 Build
I finally got the cowl rebuilt and the paint done. Now, let's hope the progress picks up a little... (Sorry, red doesn't seem to photograph too well under fluorescent lights)

Thread Starter
Member
Joined: May 2005
Posts: 247
Likes: 0
From: Monroe, GA
Car: 1989 RS
Engine: LS1 - HP Tuners Enhanced 2Bar OS
Transmission: T56 - Pro 5.0
Axle/Gears: 9 Inch - 31 Spl Tru-Trac - 4.11
Re: 1989 RS - LS1/T56 Build
I've got the engine and transmission separated, and marking out the location for the notch(es). The A/C notch takes a lot more meat out of the K-member than I thought it would.
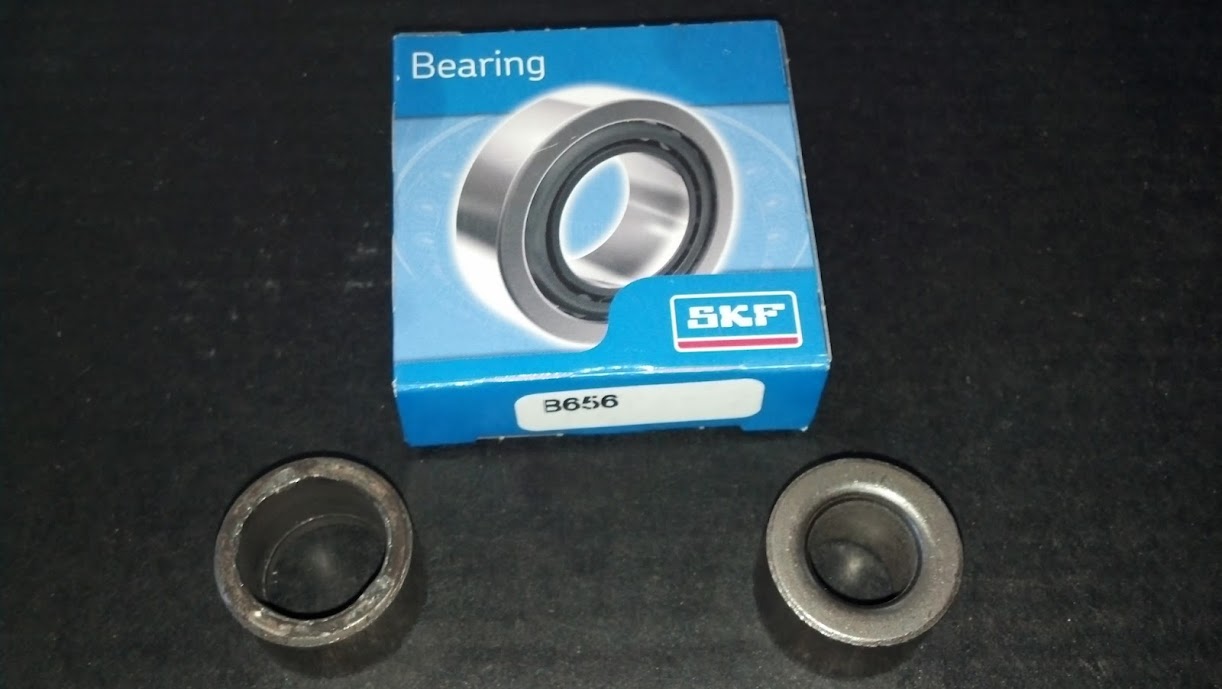
In other news, I found the source of my infrequent drive line shake; a trashed pilot bushing. I kind of knew this was going to be an issue, so I ordered a new one with the new clutch slave. The flywheel, friction disk, and pressure plate all look to be in decent shape.
So, does anyone have some pointers on pulling the trashed pilot bushing?

Joined: Jun 2006
Posts: 576
Likes: 4
From: Gobles, Michigan
Car: 92 Ttop Z28
Engine: Cammed 6.0
Transmission: T-56
Axle/Gears: Built 10 bolt-3.90s w/ PBR discs
Re: 1989 RS - LS1/T56 Build
Go to the local parts store and either rent or buy the propper pilot bearing removal tool. Totally worth the effort and frustration saved over old school methods.
There are slide hammer tools, and a threaded puller. I like the threaded, jaw style puller, but I would think a slide hammer one would also work well.
There are slide hammer tools, and a threaded puller. I like the threaded, jaw style puller, but I would think a slide hammer one would also work well.
Thread Starter
Member
Joined: May 2005
Posts: 247
Likes: 0
From: Monroe, GA
Car: 1989 RS
Engine: LS1 - HP Tuners Enhanced 2Bar OS
Transmission: T56 - Pro 5.0
Axle/Gears: 9 Inch - 31 Spl Tru-Trac - 4.11
Re: 1989 RS - LS1/T56 Build
Sounds like a plan.
As an added bonus this afternoon, I snapped off two of the bolts for the driver's side exhaust manifold. On I can get on with a stud puller, the other is two or three threads inside the head.
Looks like it'll probably be a drill and tap operation on both.
Oh well, at least I'm finally working on the engine and not the firewall.
Thread Starter
Member
Joined: May 2005
Posts: 247
Likes: 0
From: Monroe, GA
Car: 1989 RS
Engine: LS1 - HP Tuners Enhanced 2Bar OS
Transmission: T56 - Pro 5.0
Axle/Gears: 9 Inch - 31 Spl Tru-Trac - 4.11
Re: 1989 RS - LS1/T56 Build
The paint in the engine bay should be setup enough tonight that I can cover it up and do some chopping on the K-member. I'm going to try something a little different on the oil pan notch... I'll keep you posted on that one.
For the A/C notch, I'm still a little concerned about just how much material needs to be removed. I'm using the stock A/C suction and discharge lines from the 2000, so that does add about 3/4" to the depth of the cut. But, using those lines means that I can use the complete 4th gen system. So, it's a trade off I guess.
I'd like to get the cutting and welding completed on that tonight, then get the K-member in paint (POR-15). With any luck I can start putting it back together tomorrow night.
Thread Starter
Member
Joined: May 2005
Posts: 247
Likes: 0
From: Monroe, GA
Car: 1989 RS
Engine: LS1 - HP Tuners Enhanced 2Bar OS
Transmission: T56 - Pro 5.0
Axle/Gears: 9 Inch - 31 Spl Tru-Trac - 4.11
Re: 1989 RS - LS1/T56 Build
Where do you guys have control arm bushings pressed? I just got quoted $100 to remove and replace bushings... if I supply the bushings. That seems kind of high.

Joined: Mar 2000
Posts: 43,187
Likes: 45
From: Littleton, CO USA
Car: 82 Berlinetta/57 Bel Air
Engine: L92/LQ4 (both w/4" stroke)
Transmission: 4L80E/4L80E
Axle/Gears: 12B-3.73/9"-3.89
Thread Starter
Member
Joined: May 2005
Posts: 247
Likes: 0
From: Monroe, GA
Car: 1989 RS
Engine: LS1 - HP Tuners Enhanced 2Bar OS
Transmission: T56 - Pro 5.0
Axle/Gears: 9 Inch - 31 Spl Tru-Trac - 4.11
Re: 1989 RS - LS1/T56 Build
And the C-frame press did alright for you? I'm assuming you just used it to press the new sleeves in, but cut the old ones out?
Joined: Mar 2000
Posts: 43,187
Likes: 45
From: Littleton, CO USA
Car: 82 Berlinetta/57 Bel Air
Engine: L92/LQ4 (both w/4" stroke)
Transmission: 4L80E/4L80E
Axle/Gears: 12B-3.73/9"-3.89
Used it to pop out the old ones and press in the new ones.
Thread Starter
Member
Joined: May 2005
Posts: 247
Likes: 0
From: Monroe, GA
Car: 1989 RS
Engine: LS1 - HP Tuners Enhanced 2Bar OS
Transmission: T56 - Pro 5.0
Axle/Gears: 9 Inch - 31 Spl Tru-Trac - 4.11
Re: 1989 RS - LS1/T56 Build
Found another surprise after I pressure washed the K-member...
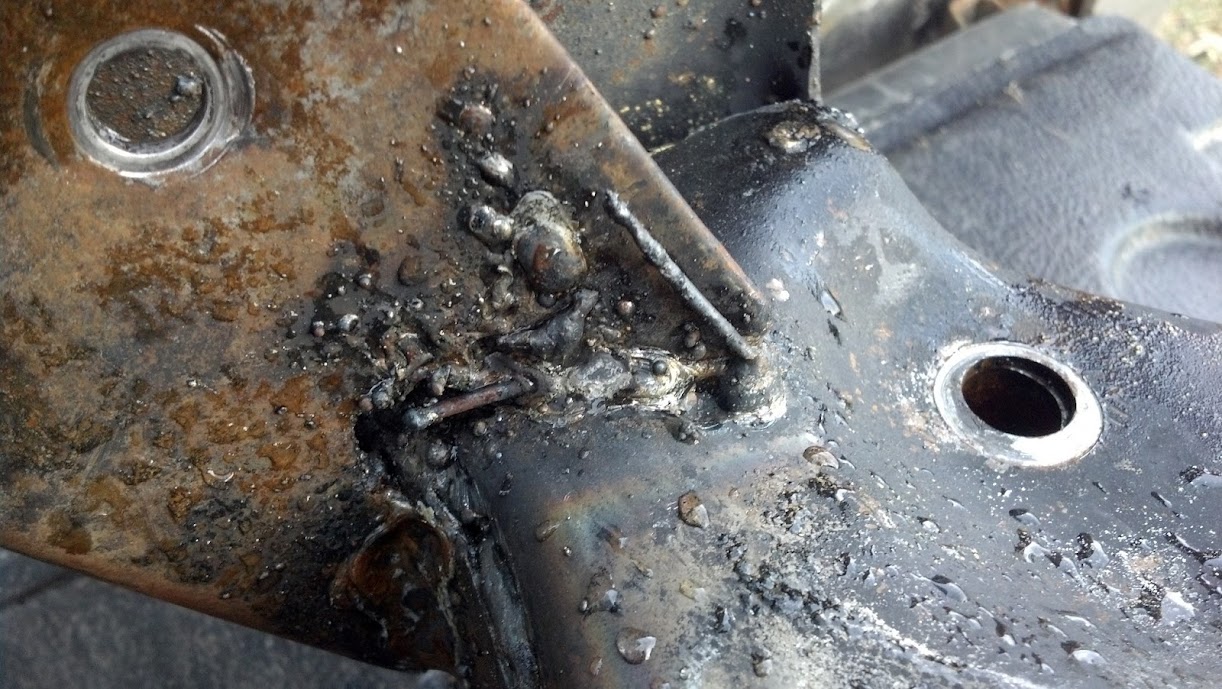


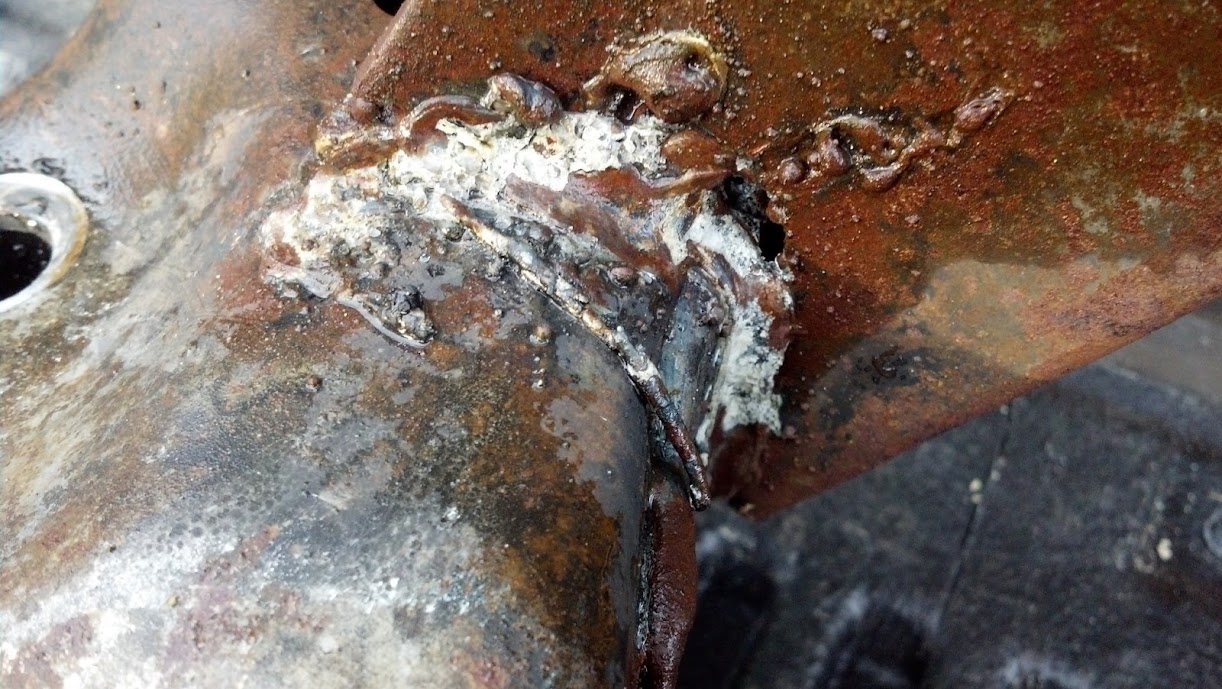
So, uh... WTH is this? Who does this? Why? ...ow, my head hurts.
Almost looks like brazing rod. So, hopefully I can grind it out and MIG it up like it should be.
So, uh... WTH is this? Who does this? Why? ...ow, my head hurts.
Almost looks like brazing rod. So, hopefully I can grind it out and MIG it up like it should be.

Member
Joined: Feb 2013
Posts: 346
Likes: 2
From: Tampa
Car: 1990 IROC-Z/1980 Firebird
Engine: 5.7 TPI
Transmission: 700R4
Axle/Gears: 3.27
Re: 1989 RS - LS1/T56 Build
Why did you use the 2k camaro's A/C box? Just because of the dash swap or because of the A/C compressor and hoses from the 2k camaro?
Thread Starter
Member
Joined: May 2005
Posts: 247
Likes: 0
From: Monroe, GA
Car: 1989 RS
Engine: LS1 - HP Tuners Enhanced 2Bar OS
Transmission: T56 - Pro 5.0
Axle/Gears: 9 Inch - 31 Spl Tru-Trac - 4.11
Re: 1989 RS - LS1/T56 Build
I decided to use the 2000 HVAC box because:
1) The orifice and evaporator are matched to the compressor, condenser, and refrigerant type (I am involved in refrigeration professionally)
2) It appears to provide a bit more room in the engine compartment (I'll verify that when the engine is in place)
3) It fit the dash ducts exactly
4) The wiring and controls would be a direct fit when using the rest of the 2000 parts
We figured out what the crap on the K-member was last night. Turns out the K-member stampings were joined using a process called FCAW, or flux core arc welding, or flux core wire feed. The pieces that looked like brazing rod were 0.050" flux core wire.
So, this was either a Monday or Friday factory job. Some of the other welds were iffy, so we ground them out and laid in some fresh MIG welds. Looks considerably better.
The piece is sitting in the back of my pickup. It go too cold, dark, and wet last night for me to want to take it out and take pictures. I don't think I'll get to smoothing out the welds tonight. But, I'm taking tomorrow off. So, I'll get some pictures of how we made the notches before grinding, some pictures after the welds are smoothed out, and some pictures after paint.
Thread Starter
Member
Joined: May 2005
Posts: 247
Likes: 0
From: Monroe, GA
Car: 1989 RS
Engine: LS1 - HP Tuners Enhanced 2Bar OS
Transmission: T56 - Pro 5.0
Axle/Gears: 9 Inch - 31 Spl Tru-Trac - 4.11
Re: 1989 RS - LS1/T56 Build
Got the notches welded up Wednesday night. We used 3/16" plate, so there was a ton of meat there to grind on. Sorry, I didn't get any photos of the finish after grinding. But, it was the typical process; grinding wheel, flap disk, die grinder with a Roloc.
I'll get some pictures of the K-member up after it dries, and before it goes into the car.
FYE...


Oh, and I got the old pilot bushing out. Here's a shot of "Old" vs. "New" and the P/N, in case anyone needs it.
I'll get some pictures of the K-member up after it dries, and before it goes into the car.
FYE...
Oh, and I got the old pilot bushing out. Here's a shot of "Old" vs. "New" and the P/N, in case anyone needs it.
Thread Starter
Member
Joined: May 2005
Posts: 247
Likes: 0
From: Monroe, GA
Car: 1989 RS
Engine: LS1 - HP Tuners Enhanced 2Bar OS
Transmission: T56 - Pro 5.0
Axle/Gears: 9 Inch - 31 Spl Tru-Trac - 4.11
Re: 1989 RS - LS1/T56 Build
And I got the two broken bolts out of the driver's side head...

Just waiting for paint to dry... how long does POR-15 take to cure anyway? I thought I read that it was a 6 hour process... isn't even out of tack after an hour.
Just waiting for paint to dry... how long does POR-15 take to cure anyway? I thought I read that it was a 6 hour process... isn't even out of tack after an hour.

Senior Member

Joined: Mar 2013
Posts: 556
Likes: 12
From: South Carolina
Car: 92 Vette, 83 Camaro
Engine: 305 going to 95 LT1
Transmission: 5 speed going to T56 6 speed
Axle/Gears: 3.73 posi with disc brakes
Re: 1989 RS - LS1/T56 Build
Nice K-member work. I'm doing a LT1 into an 83 Camaro myself and I am enjoying your progress. (I wish I had a welder and the experience to use it).
I have a question for you: What is POR-15? I planned to paint my engine bay with caliper paint as it is pretty tough after it dries, almost feels like powder coating.
I have a question for you: What is POR-15? I planned to paint my engine bay with caliper paint as it is pretty tough after it dries, almost feels like powder coating.
Thread Starter
Member
Joined: May 2005
Posts: 247
Likes: 0
From: Monroe, GA
Car: 1989 RS
Engine: LS1 - HP Tuners Enhanced 2Bar OS
Transmission: T56 - Pro 5.0
Axle/Gears: 9 Inch - 31 Spl Tru-Trac - 4.11
Re: 1989 RS - LS1/T56 Build
POR-15, or "Paint Over Rust", is a moisture cured urethane paint.

For an engine bay, if you're doing it in a garage and don't don't want to spray the good stuff (base/clear), just use rattle cans of whatever. Most of your enamels will setup rock hard in about 10 days. If the adhesion is good to substrate, you'll have a bullet proof coating. Plus, if it's in a rattle can, touch-ups are easy.
For an engine bay, if you're doing it in a garage and don't don't want to spray the good stuff (base/clear), just use rattle cans of whatever. Most of your enamels will setup rock hard in about 10 days. If the adhesion is good to substrate, you'll have a bullet proof coating. Plus, if it's in a rattle can, touch-ups are easy.
Senior Member
Joined: Mar 2013
Posts: 556
Likes: 12
From: South Carolina
Car: 92 Vette, 83 Camaro
Engine: 305 going to 95 LT1
Transmission: 5 speed going to T56 6 speed
Axle/Gears: 3.73 posi with disc brakes
Re: 1989 RS - LS1/T56 Build
Thanks for the comeback. Do you treat POR-15 like a good primer?
BTW, you job sounds like a UPS pilot job.
BTW, you job sounds like a UPS pilot job.
Thread Starter
Member
Joined: May 2005
Posts: 247
Likes: 0
From: Monroe, GA
Car: 1989 RS
Engine: LS1 - HP Tuners Enhanced 2Bar OS
Transmission: T56 - Pro 5.0
Axle/Gears: 9 Inch - 31 Spl Tru-Trac - 4.11
Re: 1989 RS - LS1/T56 Build
Yep. Clean it, de-grease it, clean it again, and make sure the paint has something to "bite".
I think the way this paint works is that the urethane crosslinks & cures to create an oxygen barrier. No oxygen = no oxidation = no rust.
(On a side note, I'm not a pilot... but I spend enough time on planes that I might as well be)
I think the way this paint works is that the urethane crosslinks & cures to create an oxygen barrier. No oxygen = no oxidation = no rust.
(On a side note, I'm not a pilot... but I spend enough time on planes that I might as well be)
Thread Starter
Member
Joined: May 2005
Posts: 247
Likes: 0
From: Monroe, GA
Car: 1989 RS
Engine: LS1 - HP Tuners Enhanced 2Bar OS
Transmission: T56 - Pro 5.0
Axle/Gears: 9 Inch - 31 Spl Tru-Trac - 4.11
Re: 1989 RS - LS1/T56 Build
I just ran out and snapped a few pictures of the K-member. The pain dried a little funky, but I think it looks like something the factory would have done. The welds blended in pretty nicely, and I think they look decent (for something that most will never see).


I'm shooting to have the engine sitting in the car by this evening. I'm short a clutch alignment tool, or I could have the trans in there too. (Does anyone near La Crosse, WI have an alignment tool?)
FYI - When painting with POR-15, don't use a Solo cup as your container... the bottom melted out.
I'm shooting to have the engine sitting in the car by this evening. I'm short a clutch alignment tool, or I could have the trans in there too. (Does anyone near La Crosse, WI have an alignment tool?)
FYI - When painting with POR-15, don't use a Solo cup as your container... the bottom melted out.
Last edited by abadv8; Apr 27, 2013 at 08:52 AM.
Joined: Jun 2006
Posts: 576
Likes: 4
From: Gobles, Michigan
Car: 92 Ttop Z28
Engine: Cammed 6.0
Transmission: T-56
Axle/Gears: Built 10 bolt-3.90s w/ PBR discs
Re: 1989 RS - LS1/T56 Build
Alignment tools are typically available to buy or borrow from the larger chain stores for just a few dollars. If not, buy a stock replacement cluth set, as it will come with the tool. Use the tool, and return the clutch set for the full refund.
Thread Starter
Member
Joined: May 2005
Posts: 247
Likes: 0
From: Monroe, GA
Car: 1989 RS
Engine: LS1 - HP Tuners Enhanced 2Bar OS
Transmission: T56 - Pro 5.0
Axle/Gears: 9 Inch - 31 Spl Tru-Trac - 4.11
Re: 1989 RS - LS1/T56 Build
Yeah, that's what I thought too. I tried picking one up from two different stores on Wednesday... no dice. Then I asked about a a clutch set... special order.
I'll probably just order one from Amazon. Alternatively, I might take the bike for a ride this afternoon and try a few more places.
I'll probably just order one from Amazon. Alternatively, I might take the bike for a ride this afternoon and try a few more places.
Thread Starter
Member
Joined: May 2005
Posts: 247
Likes: 0
From: Monroe, GA
Car: 1989 RS
Engine: LS1 - HP Tuners Enhanced 2Bar OS
Transmission: T56 - Pro 5.0
Axle/Gears: 9 Inch - 31 Spl Tru-Trac - 4.11
Re: 1989 RS - LS1/T56 Build
I'm putting everything on the firewall today, and have a question about the T56 hydraulics...
Since most of the fluid drained out of the master, is it imperative that I "bench bleed" the slave? I also have the Tick speed bleeder hose, so will that eliminate the need for bench bleeding?
Thanks in advance.
Since most of the fluid drained out of the master, is it imperative that I "bench bleed" the slave? I also have the Tick speed bleeder hose, so will that eliminate the need for bench bleeding?
Thanks in advance.
Thread Starter
Member
Joined: May 2005
Posts: 247
Likes: 0
From: Monroe, GA
Car: 1989 RS
Engine: LS1 - HP Tuners Enhanced 2Bar OS
Transmission: T56 - Pro 5.0
Axle/Gears: 9 Inch - 31 Spl Tru-Trac - 4.11
Re: 1989 RS - LS1/T56 Build
I don't have any DOT3 brake fluid on the shelf, so I elected not to install the clutch master. After having the T56 on my operating table for about 2 1/2 hours, it looks a little more presentable, and the new slave and remote bleeder are installed.

The engine was pretty nasty. I don't think either of the PO's did anything to take care of the 2000 Z28. Oh well, I've put it out of its misery. Here it is before the day's activities...


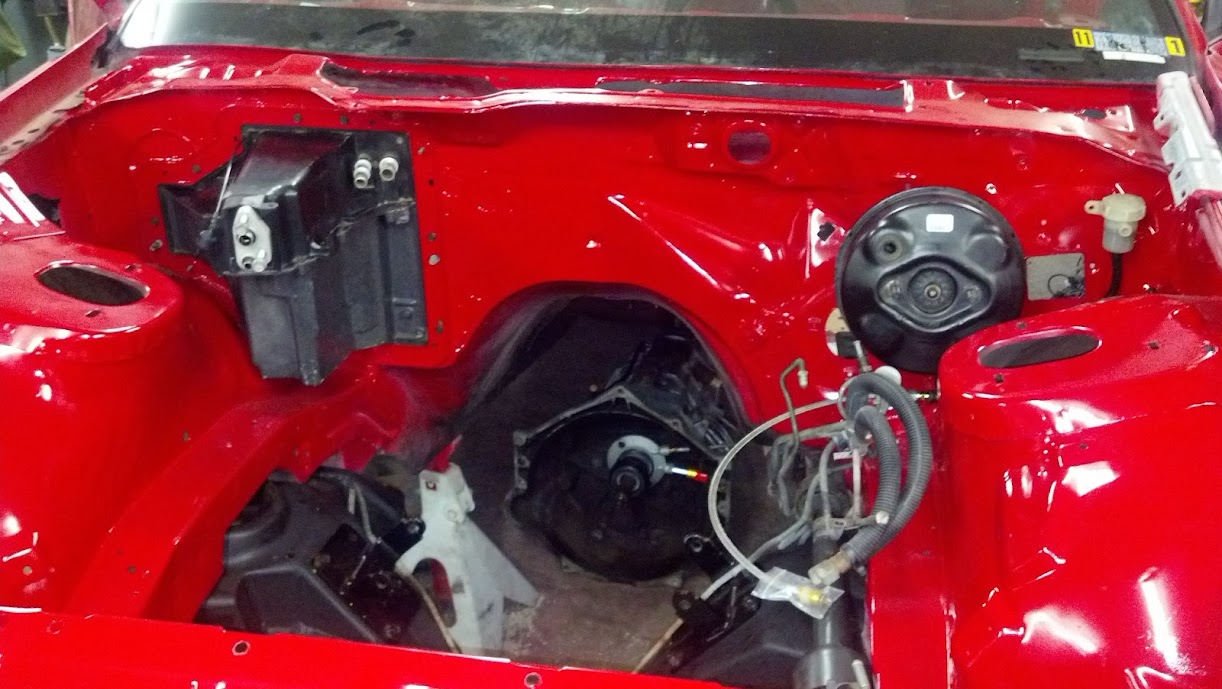
And,as most threads proclaim, "Pics or it didn't happen." Here it is nestled in its new home. The fresh paint in the engine bay really makes the aluminum pop.


I can't wait to get everything back on the firewall, the intake on, and the new headers installed...
The engine was pretty nasty. I don't think either of the PO's did anything to take care of the 2000 Z28. Oh well, I've put it out of its misery. Here it is before the day's activities...
And,as most threads proclaim, "Pics or it didn't happen." Here it is nestled in its new home. The fresh paint in the engine bay really makes the aluminum pop.
I can't wait to get everything back on the firewall, the intake on, and the new headers installed...
Thread Starter
Member
Joined: May 2005
Posts: 247
Likes: 0
From: Monroe, GA
Car: 1989 RS
Engine: LS1 - HP Tuners Enhanced 2Bar OS
Transmission: T56 - Pro 5.0
Axle/Gears: 9 Inch - 31 Spl Tru-Trac - 4.11
Re: 1989 RS - LS1/T56 Build
I guess I got a little over zealous with setting the motor in yesterday. I need to lift it out to attach the passenger side front brake line to the K-member... whoops.
Thread Starter
Member
Joined: May 2005
Posts: 247
Likes: 0
From: Monroe, GA
Car: 1989 RS
Engine: LS1 - HP Tuners Enhanced 2Bar OS
Transmission: T56 - Pro 5.0
Axle/Gears: 9 Inch - 31 Spl Tru-Trac - 4.11
Re: 1989 RS - LS1/T56 Build
Ordered a clutch alignment tool, intake gaskets, and 4 wheel disk brake proportioning valve from Summit. Should all be here Wednesday or Thursday.
In the interim, I can get back to work on the sound deadening, HVAC, firewall components, and interior...
In the interim, I can get back to work on the sound deadening, HVAC, firewall components, and interior...
Thread Starter
Member
Joined: May 2005
Posts: 247
Likes: 0
From: Monroe, GA
Car: 1989 RS
Engine: LS1 - HP Tuners Enhanced 2Bar OS
Transmission: T56 - Pro 5.0
Axle/Gears: 9 Inch - 31 Spl Tru-Trac - 4.11
Re: 1989 RS - LS1/T56 Build
Before I get to tonight's progress, I have a question for those who have done this before...
How are you routing the passenger front brake line on the K-member? And how are you running the lines on the driver's side (inboard or outboard of the steering shaft)?
Anyway, on to the fun stuff...
Pulled the motor again (took 20 minutes). Finished the second layer of the FatMat install on the firewall. I've never played with CLD material, but I'm impressed. It made a tremendous difference in resonant sounds. Put in the HVAC box, brake booster, clutch master, and pedals. Pics below (apologies for the awful pics with fresh, red paint)...
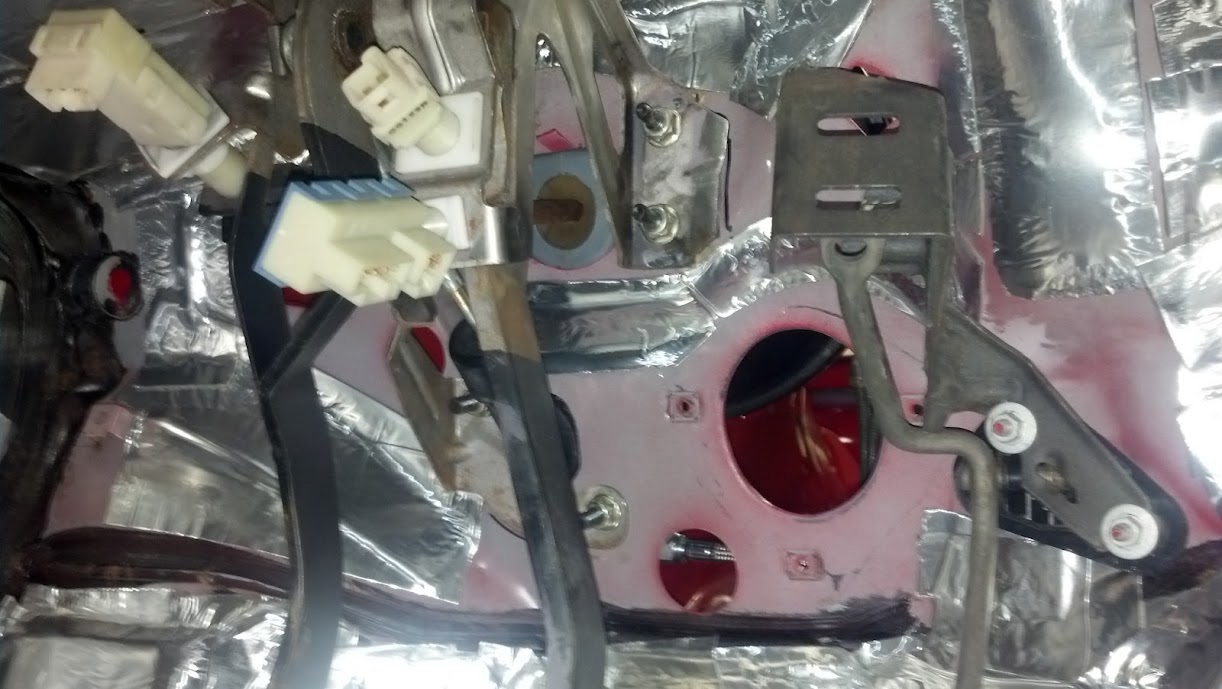
How the bay sits as of now. You can see where I mounted the reservoir for the clutch master, that I used the 4th gen brake booster, the trans sitting underneath and ready to be installed, and the HVAC box.
*Note the brake line position. Good, bad, indifferent?
HVAC box... (why are these red pictures so terrible? Any photo junkies that could tell me how not to do that?)

View from inside...

4th gen clutch and brake pedal with 3rd gen gas pedal...

Upper bolt hole enlarged, slightly, to make them fit...

A different angle...
HVAC box fits like a champ. I'm pretty happy with how it turned out...

That's it for tonight. I've got some parts and tools showing up tomorrow. So, I should be able to get the clutch back on, the engine dropped in, and the trans bolted up.
Things are picking up now!
How are you routing the passenger front brake line on the K-member? And how are you running the lines on the driver's side (inboard or outboard of the steering shaft)?
Anyway, on to the fun stuff...
Pulled the motor again (took 20 minutes). Finished the second layer of the FatMat install on the firewall. I've never played with CLD material, but I'm impressed. It made a tremendous difference in resonant sounds. Put in the HVAC box, brake booster, clutch master, and pedals. Pics below (apologies for the awful pics with fresh, red paint)...
How the bay sits as of now. You can see where I mounted the reservoir for the clutch master, that I used the 4th gen brake booster, the trans sitting underneath and ready to be installed, and the HVAC box.
*Note the brake line position. Good, bad, indifferent?
HVAC box... (why are these red pictures so terrible? Any photo junkies that could tell me how not to do that?)
View from inside...
4th gen clutch and brake pedal with 3rd gen gas pedal...
Upper bolt hole enlarged, slightly, to make them fit...
A different angle...
HVAC box fits like a champ. I'm pretty happy with how it turned out...
That's it for tonight. I've got some parts and tools showing up tomorrow. So, I should be able to get the clutch back on, the engine dropped in, and the trans bolted up.
Things are picking up now!
Senior Member
Joined: Mar 2013
Posts: 556
Likes: 12
From: South Carolina
Car: 92 Vette, 83 Camaro
Engine: 305 going to 95 LT1
Transmission: 5 speed going to T56 6 speed
Axle/Gears: 3.73 posi with disc brakes
Re: 1989 RS - LS1/T56 Build
Did you replace all the foam seals around the Hvac system? Our's looks really old and is crumbling? BTW, the red paint looks great on my computer. I can only hope mine comes out half as good.
Thread Starter
Member
Joined: May 2005
Posts: 247
Likes: 0
From: Monroe, GA
Car: 1989 RS
Engine: LS1 - HP Tuners Enhanced 2Bar OS
Transmission: T56 - Pro 5.0
Axle/Gears: 9 Inch - 31 Spl Tru-Trac - 4.11
Re: 1989 RS - LS1/T56 Build
Nope. The firewall seal and the duct seals are all in great shape. Which was one more reason to use the 4th gen box.
Joined: Mar 2000
Posts: 43,187
Likes: 45
From: Littleton, CO USA
Car: 82 Berlinetta/57 Bel Air
Engine: L92/LQ4 (both w/4" stroke)
Transmission: 4L80E/4L80E
Axle/Gears: 12B-3.73/9"-3.89
Re: 1989 RS - LS1/T56 Build
On the driver side, I routed the lines behind the steering shaft to keep them away from the exhaust.
Thread Starter
Member
Joined: May 2005
Posts: 247
Likes: 0
From: Monroe, GA
Car: 1989 RS
Engine: LS1 - HP Tuners Enhanced 2Bar OS
Transmission: T56 - Pro 5.0
Axle/Gears: 9 Inch - 31 Spl Tru-Trac - 4.11
Re: 1989 RS - LS1/T56 Build
Thanks man. So, what I have in my photo should work?