
Pulling apart my 87 IROC

Member

Joined: Apr 2006
Posts: 216
Likes: 0
From: Bardstown, KY
Car: 99 HOSS 6 Speed
Engine: LS1
Transmission: T56
Axle/Gears: 3.42
Re: Pulling apart my 87 IROC
Nice, did you change intakes again? Thats a Mini Ram in that pic.
A 377 huh? That would make a nice reving motor. I have a 2 bolt 400 block in real nice shape that I am thinking about throwing in mine. I have been looking at rotating assemblies for it. I would like to make a nice solid 500 NA crank hp. Patriot has a nice set of heads that I am looking at as well.
https://www.patriot-performance.com/...&cat=41&page=1
I plan on running a pretty hefty hydraulic roller 292/300 duration .584/.579 lift.
Thread Starter

Joined: Jun 2000
Posts: 5,364
Likes: 51
From: Enschede, Netherlands
Car: 82 TA 87 IZ L98 88 IZ LB9 88 IZ L98
Engine: 5.7TBI 5,7TPI 5.0TPI, 5,7TPI
Transmission: T5, 700R4, T5, 700R4
Axle/Gears: 3.08, 3.27, 3.45, 3.27
Re: Pulling apart my 87 IROC
Different motor, for my buddies 92 GTA.
This is a 377 too, med. race port heads, mech roller.... and all. Should spin to 8K easily.

This is a 377 too, med. race port heads, mech roller.... and all. Should spin to 8K easily.
Last edited by Twin_Turbo; Dec 21, 2009 at 08:03 PM.
Thread Starter
Joined: Jun 2000
Posts: 5,364
Likes: 51
From: Enschede, Netherlands
Car: 82 TA 87 IZ L98 88 IZ LB9 88 IZ L98
Engine: 5.7TBI 5,7TPI 5.0TPI, 5,7TPI
Transmission: T5, 700R4, T5, 700R4
Axle/Gears: 3.08, 3.27, 3.45, 3.27
Re: Pulling apart my 87 IROC
Well, tore the motor apart and decided I needed to take one of my old oil pans and fabricate a drain tube w/ NPT thread so I can use AN hardware. I hate hose clamps.

I have an hoses on most everything, same for the supercharger. I'm going to undo the FMu of all that ugly black quick disconnect fuel hose too


I figured this was the best way to do it, most room for draining right there and angled up and toward the supercharger so there's no horizontal spots in the drain line )especially since it's a rather small ID line, I use -12 stuff on my turbo motor)
I also had to hammer form and reshape the whole deeper sump section because as I suspected it didn't fit with the milodon oil pump and pickup (not a fan of the melling pumps)
All I have to do is blast and powdercoat it now. It's getting there now. Different color, it was supposed to be red. As soon as it hit the engine (primered silver even w/ aluminum epoxy paint) it turned to a shade that's a lot more orange than red... damn! A redder shade of chevy orange. I didn't want it orange but oh well.
I have an hoses on most everything, same for the supercharger. I'm going to undo the FMu of all that ugly black quick disconnect fuel hose too
I figured this was the best way to do it, most room for draining right there and angled up and toward the supercharger so there's no horizontal spots in the drain line )especially since it's a rather small ID line, I use -12 stuff on my turbo motor)
I also had to hammer form and reshape the whole deeper sump section because as I suspected it didn't fit with the milodon oil pump and pickup (not a fan of the melling pumps)
All I have to do is blast and powdercoat it now. It's getting there now. Different color, it was supposed to be red. As soon as it hit the engine (primered silver even w/ aluminum epoxy paint) it turned to a shade that's a lot more orange than red... damn! A redder shade of chevy orange. I didn't want it orange but oh well.
Thread Starter
Joined: Jun 2000
Posts: 5,364
Likes: 51
From: Enschede, Netherlands
Car: 82 TA 87 IZ L98 88 IZ LB9 88 IZ L98
Engine: 5.7TBI 5,7TPI 5.0TPI, 5,7TPI
Transmission: T5, 700R4, T5, 700R4
Axle/Gears: 3.08, 3.27, 3.45, 3.27
Re: Pulling apart my 87 IROC


The problem now is.... I think I need a zz409 cam

Supreme Member
iTrader: (1)
Joined: Jun 2009
Posts: 1,777
Likes: 0
From: Central Connecticut
Car: 91 Trans Am 'vert
Engine: LB9
Transmission: T5
Axle/Gears: 3.45 9 bolt
Re: Pulling apart my 87 IROC
Oh wow, you got some serious ATD man!!! I like how the project is coming along. Do you have a planned time frame as to when the car will be ready?
Thread Starter
Joined: Jun 2000
Posts: 5,364
Likes: 51
From: Enschede, Netherlands
Car: 82 TA 87 IZ L98 88 IZ LB9 88 IZ L98
Engine: 5.7TBI 5,7TPI 5.0TPI, 5,7TPI
Transmission: T5, 700R4, T5, 700R4
Axle/Gears: 3.08, 3.27, 3.45, 3.27
Re: Pulling apart my 87 IROC
It's hard to make a time frame, one has to plan everything ahead, if I miss a part, have something that doesn't fit or change my mind I have to order in the US most likely and it takes weeks to get here. That really does not help a lot....and I have this nasty case of "whileI'matit-itis" and things always get out of hand. I had hoped to have it finished this year as far as putting the engine back in again and having a running car.....looks like it won't pan out that way.
Supreme Member
Joined: Nov 2008
Posts: 1,545
Likes: 10
From: South Carolina
Car: 85 2M6, 87 'Bird 88 'burb
Engine: LX9, LG4, L05
Transmission: F23, 700r4, 700R4
Axle/Gears: 3.63, 2.73, 4.10
Thread Starter
Joined: Jun 2000
Posts: 5,364
Likes: 51
From: Enschede, Netherlands
Car: 82 TA 87 IZ L98 88 IZ LB9 88 IZ L98
Engine: 5.7TBI 5,7TPI 5.0TPI, 5,7TPI
Transmission: T5, 700R4, T5, 700R4
Axle/Gears: 3.08, 3.27, 3.45, 3.27
Re: Pulling apart my 87 IROC
They don't anymore, those are G1 heads (have 2 sets of them now), the G2s have angled intakes and exhausts, these just have angled intakes. They are not canted.
Senior Member
Joined: Apr 2006
Posts: 685
Likes: 0
From: CT
Car: 1988 Iroc
Engine: 5.7L
Transmission: '96 T56, Hurst Shifter, Mech VSS
Axle/Gears: 3.45 9 Bolt
Thread Starter
Joined: Jun 2000
Posts: 5,364
Likes: 51
From: Enschede, Netherlands
Car: 82 TA 87 IZ L98 88 IZ LB9 88 IZ L98
Engine: 5.7TBI 5,7TPI 5.0TPI, 5,7TPI
Transmission: T5, 700R4, T5, 700R4
Axle/Gears: 3.08, 3.27, 3.45, 3.27
Re: Pulling apart my 87 IROC
Meh, didn't get a lot done. Waiting on the zz409 cam so I can't button up the engine and drop it in 
I did install the booster pump. Apparently the procharger instructions tell you to screw the pump to the floor pan and to cut a fuel line and use the supplied rubber hose to plumb it in. That stuff doesn't fly for me, so I came up with this. Some adapters on the short rubber section between tank and body and using AN hardware I routed it to the pump. unfortunately the pump has hose barbs so I had to resort to hose clamps there (I hate those things) but all in all it's a lot cleaner than per the instructions. That Fays 2 sure is handy for hanging stuff off. Still have to zip tie the lines and electrical wiring to the fays2 crossmember

I did install the booster pump. Apparently the procharger instructions tell you to screw the pump to the floor pan and to cut a fuel line and use the supplied rubber hose to plumb it in. That stuff doesn't fly for me, so I came up with this. Some adapters on the short rubber section between tank and body and using AN hardware I routed it to the pump. unfortunately the pump has hose barbs so I had to resort to hose clamps there (I hate those things) but all in all it's a lot cleaner than per the instructions. That Fays 2 sure is handy for hanging stuff off. Still have to zip tie the lines and electrical wiring to the fays2 crossmember
Last edited by Twin_Turbo; Dec 28, 2009 at 01:09 PM.

Thread Starter
Joined: Jun 2000
Posts: 5,364
Likes: 51
From: Enschede, Netherlands
Car: 82 TA 87 IZ L98 88 IZ LB9 88 IZ L98
Engine: 5.7TBI 5,7TPI 5.0TPI, 5,7TPI
Transmission: T5, 700R4, T5, 700R4
Axle/Gears: 3.08, 3.27, 3.45, 3.27
Re: Pulling apart my 87 IROC
What boat intake? The one on that engine? I got it from someone on here, it's a prototype sand cast unit as far as I know. It's not a production casting or a very low volume casting series.
I know Mercruiser had this intake but it's a BBC one. You know what I have here?

What does your friend have? Can you arrange a pic?
I know Mercruiser had this intake but it's a BBC one. You know what I have here?
What does your friend have? Can you arrange a pic?
Thread Starter
Joined: Jun 2000
Posts: 5,364
Likes: 51
From: Enschede, Netherlands
Car: 82 TA 87 IZ L98 88 IZ LB9 88 IZ L98
Engine: 5.7TBI 5,7TPI 5.0TPI, 5,7TPI
Transmission: T5, 700R4, T5, 700R4
Axle/Gears: 3.08, 3.27, 3.45, 3.27
Re: Pulling apart my 87 IROC
I've been meaning to find out what it is, please ask the guy and maybe get a pic.
Thread Starter
Joined: Jun 2000
Posts: 5,364
Likes: 51
From: Enschede, Netherlands
Car: 82 TA 87 IZ L98 88 IZ LB9 88 IZ L98
Engine: 5.7TBI 5,7TPI 5.0TPI, 5,7TPI
Transmission: T5, 700R4, T5, 700R4
Axle/Gears: 3.08, 3.27, 3.45, 3.27
Re: Pulling apart my 87 IROC
Humm....one side has rust behind the ground effects. No wonder, screws thread into bare steel. Probably self tappers too. More stuff to fix

Took the whole wing off because that side needs the door hinge bushed too

Thinking about going with the later GFX, the fake air ducts give it a more modern look
Took the whole wing off because that side needs the door hinge bushed too
Thinking about going with the later GFX, the fake air ducts give it a more modern look
Last edited by Twin_Turbo; Jan 2, 2010 at 05:10 PM.
Member
Joined: Apr 2006
Posts: 216
Likes: 0
From: Bardstown, KY
Car: 99 HOSS 6 Speed
Engine: LS1
Transmission: T56
Axle/Gears: 3.42
Re: Pulling apart my 87 IROC
It looks like you have some of the same rust issues I do. You may want to go ahead and pull the GFX off the rockers. Look at the rocker right in front of the rear wheel. I did some searching and figured out that the water gets in from the LCA bracket on the body. If you unbolt the LCA from the body you can stick your hand in the hole and feel where the water gets in. I made a sheet metal block off plate and tack welded them in the holes, then I will just seam seal around them.
Thread Starter
Joined: Jun 2000
Posts: 5,364
Likes: 51
From: Enschede, Netherlands
Car: 82 TA 87 IZ L98 88 IZ LB9 88 IZ L98
Engine: 5.7TBI 5,7TPI 5.0TPI, 5,7TPI
Transmission: T5, 700R4, T5, 700R4
Axle/Gears: 3.08, 3.27, 3.45, 3.27
Re: Pulling apart my 87 IROC
I have all the GFX off and this is the only rust spot
The area where the rear of the rocker is bolted in from inside the car near the seatbelt retractor is also an area where water collects if the rear inside fender is rusted out, water will run along the edge of the fender lip and end up in the deepest spot being right behind the door
I'm gonna hit every nook and cranny of the rockers and other closed spaces with wax, no more rust for me
Member
Joined: Apr 2006
Posts: 216
Likes: 0
From: Bardstown, KY
Car: 99 HOSS 6 Speed
Engine: LS1
Transmission: T56
Axle/Gears: 3.42
Re: Pulling apart my 87 IROC
I have all the GFX off and this is the only rust spot
The area where the rear of the rocker is bolted in from inside the car near the seatbelt retractor is also an area where water collects if the rear inside fender is rusted out, water will run along the edge of the fender lip and end up in the deepest spot being right behind the door
I'm gonna hit every nook and cranny of the rockers and other closed spaces with wax, no more rust for me
The area where the rear of the rocker is bolted in from inside the car near the seatbelt retractor is also an area where water collects if the rear inside fender is rusted out, water will run along the edge of the fender lip and end up in the deepest spot being right behind the door
I'm gonna hit every nook and cranny of the rockers and other closed spaces with wax, no more rust for me
I had a pretty good size hole on the drivers side. I cut the rocker open and rebuilt it from the inside out. I didnt notice the pass side until I striped the paint off and sprayed epoxy. I started to wonder that if there was rust on the drivers side there had to be some on the pass side. So I went back and took a closer look. Sure enough there was a tiny pin hole just big ehough for a pic. After cutting it out it was actually worse on the inside then the drivers side.
http://solutions.3m.com/wps/portal/3...gl6DBD2W3JX1bl
I bought a 3M schultz gun and wand. I planed on spraying Chassis Saver in there but I am threw with that stuff after having some flaking/peeling issues with it. I will buy the 3m body schultz/wax to spray in there.
Last edited by 96LT4c4; Jan 3, 2010 at 09:07 AM.
Member
iTrader: (6)
Joined: Feb 2008
Posts: 163
Likes: 0
From: Ft. Wayne, IN
Car: 1987 Firebird Formula
Engine: 355
Transmission: 700R4
Axle/Gears: Posi, 3.23
Re: Pulling apart my 87 IROC
Wow, awesome build man. I'm definitely subscribing to this. Looking forward to seeing the finished product.
Thread Starter
Joined: Jun 2000
Posts: 5,364
Likes: 51
From: Enschede, Netherlands
Car: 82 TA 87 IZ L98 88 IZ LB9 88 IZ L98
Engine: 5.7TBI 5,7TPI 5.0TPI, 5,7TPI
Transmission: T5, 700R4, T5, 700R4
Axle/Gears: 3.08, 3.27, 3.45, 3.27
Re: Pulling apart my 87 IROC
Rad mounts (also one for the GTA) almost done...all it needs is some dimple die action. Ready soon!


Thread Starter
Joined: Jun 2000
Posts: 5,364
Likes: 51
From: Enschede, Netherlands
Car: 82 TA 87 IZ L98 88 IZ LB9 88 IZ L98
Engine: 5.7TBI 5,7TPI 5.0TPI, 5,7TPI
Transmission: T5, 700R4, T5, 700R4
Axle/Gears: 3.08, 3.27, 3.45, 3.27
Re: Pulling apart my 87 IROC
No LOL
Joined: Dec 2007
Posts: 1,924
Likes: 12
From: Minnesota
Car: 84 camaro, 88 trans am, 98 camaro
Engine: Modded , stock, LSX modded
Transmission: 700r4, 700r4, t-56
Axle/Gears: 327, 308, 373
Re: Pulling apart my 87 IROC
This is a cool thread all have to take some time to read it, anyways looks great! Thats cool i didnt even know they made "from what i can tell a bolt in parallel linkage setup"

Thread Starter
Joined: Jun 2000
Posts: 5,364
Likes: 51
From: Enschede, Netherlands
Car: 82 TA 87 IZ L98 88 IZ LB9 88 IZ L98
Engine: 5.7TBI 5,7TPI 5.0TPI, 5,7TPI
Transmission: T5, 700R4, T5, 700R4
Axle/Gears: 3.08, 3.27, 3.45, 3.27
Re: Pulling apart my 87 IROC
Took some tweaking to get the mount installed. Since I designed it with the dims off the summit site the top was too wide to fit the core with the rad sitting as offset as it does because of the non direct fit. A little cutting and filing here and there and it's in (it's on the GTA but the same as on the 87).


Didn't get to do a lot more, stripped most of the front end for spraying and fixing some minor issues.


Didn't get to do a lot more, stripped most of the front end for spraying and fixing some minor issues.
Thread Starter
Joined: Jun 2000
Posts: 5,364
Likes: 51
From: Enschede, Netherlands
Car: 82 TA 87 IZ L98 88 IZ LB9 88 IZ L98
Engine: 5.7TBI 5,7TPI 5.0TPI, 5,7TPI
Transmission: T5, 700R4, T5, 700R4
Axle/Gears: 3.08, 3.27, 3.45, 3.27
Re: Pulling apart my 87 IROC
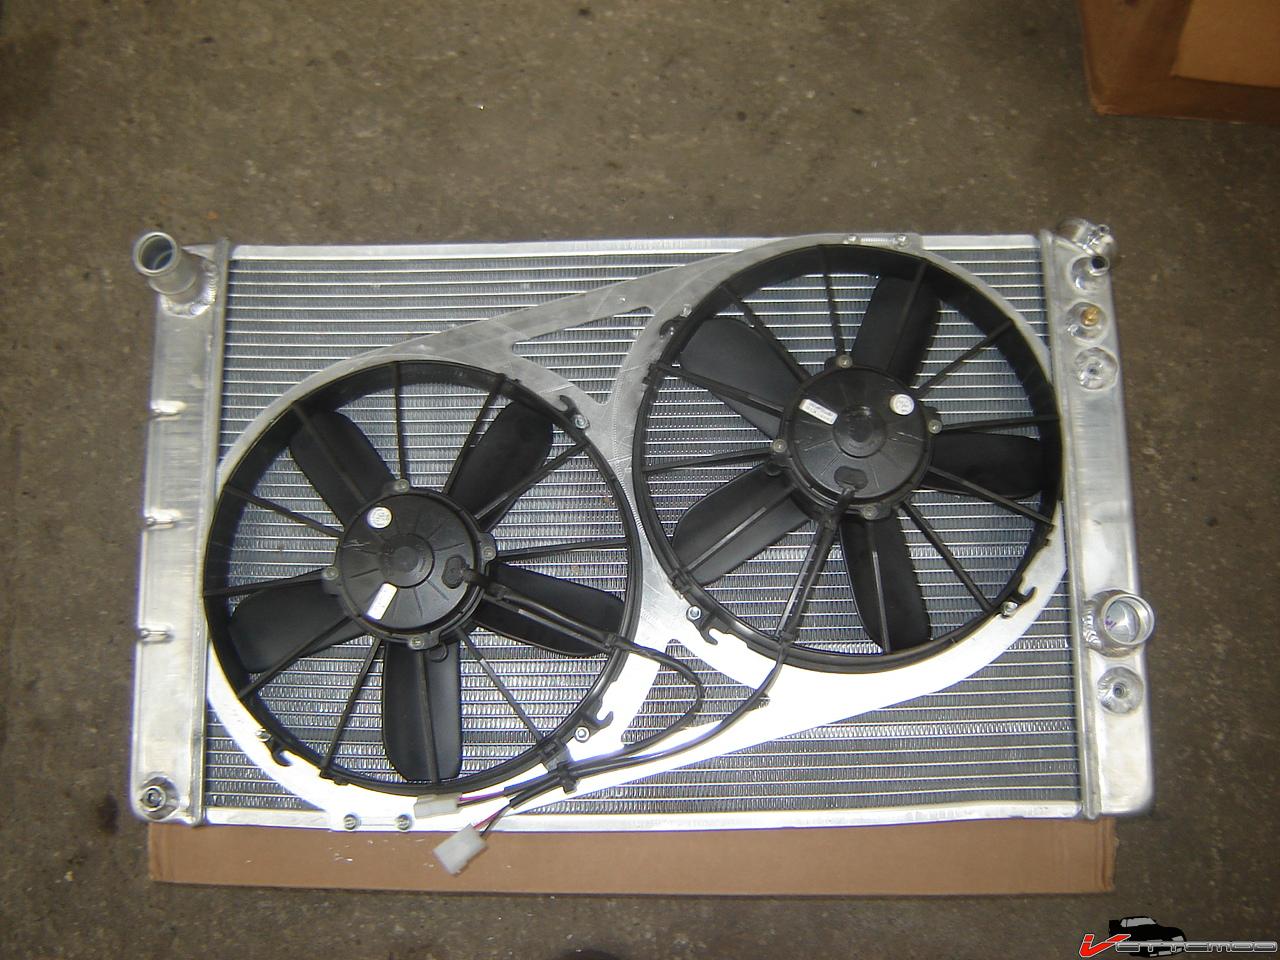
Going to install 2 Spal 12" high perf. puller fans instead of the stock dual fans, problem is I'll have to design a mounting bracket or shroud for them. More custom work to be donie.
Ignore the crookedness of the radiator, that's how we receive our stuff here courtesy of UPS.
Quickly designed a neat mounting bracket. Didn't want to go with a full shroud, the fans will cool plenty as is and I don't want them to mount closer to the engine and with the fans against the core a shroud is useless. It's the yellow part in this design
Last edited by Twin_Turbo; Jan 16, 2010 at 07:17 PM.
Joined: Aug 2006
Posts: 12,812
Likes: 110
From: Central NJ
Car: 86 Trans Am
Engine: 408 stroker sbc
Transmission: TKO600
Axle/Gears: Moser full floater m9, 3:70 trutrac
Re: Pulling apart my 87 IROC
Going to install 2 Spal 12" high perf. puller fans instead of the stock dual fans, problem is I'll have to design a mounting bracket or shroud for them. More custom work to be donie.
Ignore the crookedness of the radiator, that's how we receive our stuff here courtesy of UPS.
Ignore the crookedness of the radiator, that's how we receive our stuff here courtesy of UPS.

Thread Starter
Joined: Jun 2000
Posts: 5,364
Likes: 51
From: Enschede, Netherlands
Car: 82 TA 87 IZ L98 88 IZ LB9 88 IZ L98
Engine: 5.7TBI 5,7TPI 5.0TPI, 5,7TPI
Transmission: T5, 700R4, T5, 700R4
Axle/Gears: 3.08, 3.27, 3.45, 3.27
Re: Pulling apart my 87 IROC
Hey, at least there are no fork lift holes in it LOL
Supreme Member
iTrader: (1)
Joined: Jun 2009
Posts: 1,777
Likes: 0
From: Central Connecticut
Car: 91 Trans Am 'vert
Engine: LB9
Transmission: T5
Axle/Gears: 3.45 9 bolt
Re: Pulling apart my 87 IROC
Its nice to see how you're very consistent with your project lol. You have an muscle car enthusiast's wet dream in that garage, because I always see some cool cars in there behind your IROC (which is an awesome car in its own right). 

Member
iTrader: (12)
Joined: Dec 2005
Posts: 383
Likes: 3
From: NY
Car: 88IROC, 91Z28 + parts cars
Engine: 355, 408
Transmission: T56
Axle/Gears: 3.42 LS1, 9" w/ 4.56 and spool
Re: Pulling apart my 87 IROC
very cool upper radiator mount. Think I'll have to make something similar. Love the build
Member
iTrader: (1)
Joined: Dec 2009
Posts: 188
Likes: 0
From: Phoenix, AZ
Car: 91 Z28
Engine: 350 TPI
Transmission: 700R4
Re: Pulling apart my 87 IROC
If you don't mind me asking, how much has the cost of this build totaled? I've been thinking of doing this to my car for a while.
Thread Starter
Joined: Jun 2000
Posts: 5,364
Likes: 51
From: Enschede, Netherlands
Car: 82 TA 87 IZ L98 88 IZ LB9 88 IZ L98
Engine: 5.7TBI 5,7TPI 5.0TPI, 5,7TPI
Transmission: T5, 700R4, T5, 700R4
Axle/Gears: 3.08, 3.27, 3.45, 3.27
Re: Pulling apart my 87 IROC
Good question, I usually don't add up prices (denial) but it was quite a bit. It was over 10K in Euros for sure but the prices here (once stuff actually gets here w/ taxes and all) is about 1.7-2.0 times the list price in the Summit catalog or wherever. This is the price thus far, and possibly it was even more since I only added the large bits and pieces and not all the small stuff. It gets very costly very quickly here.
The larger bits include:
wheels, supercharger setup (still not 100% complete), new heads, intake, injectors & fuel line stuff (fmu, pumps blablalba), baer brakes, rear pbr brakes, sandblasting and powdercoating, a whole bunch of rebuild parts like complete new susp & steering setup, ball joints and bushings, yellow konis, j&m strut towers, edelbrock stb, summit radiator and a whole bunch of other summit parts, Fays 2 watts linkage, TA rear end girdle, 2 spal 12" fans. I didn't even include all the interior pieces that I bought for it (apart from dash almost everything)
Still leaves the paint job that has to go on it, the stainless exhaust that I have to weld up (I have the mufflers, not included in total). Imagine farming it all out here, it's going to put one in the poor house for sure.
Last edited by Twin_Turbo; Jan 23, 2010 at 01:26 PM.
Senior Member
Joined: Dec 2009
Posts: 702
Likes: 4
From: Texas
Car: 1989 IROC LSX
Engine: Swapped LS6 Forged by LME
Transmission: 4L65E
Axle/Gears: 3.73
Re: Pulling apart my 87 IROC
1st of all DAMN!! What a build!! Great thread!!
2nd, If I may ask about the TFS heads. I have a set of these I aquired for my 383 build and between looking at TFS instructions and listening to what old school people around me are saying. I'm concerned about push rod length. The manual gives you a part# for push rods that are equal length. Some old schoolers around me say that is hog wash and the intake push rods have to be a different length than the exhaust.... Any advice???
Looking foward to the rest of your rebuild!!!
Thread Starter
Joined: Jun 2000
Posts: 5,364
Likes: 51
From: Enschede, Netherlands
Car: 82 TA 87 IZ L98 88 IZ LB9 88 IZ L98
Engine: 5.7TBI 5,7TPI 5.0TPI, 5,7TPI
Transmission: T5, 700R4, T5, 700R4
Axle/Gears: 3.08, 3.27, 3.45, 3.27
Re: Pulling apart my 87 IROC
Yes, the exhaust on the G1s is at a std. angle, the intake not. Use and adjustable length pushrod to find the best geometry where the rocker tip sweeps the center of the stem, not the outsides. That's the only proper way to do it.
Thread Starter
Joined: Jun 2000
Posts: 5,364
Likes: 51
From: Enschede, Netherlands
Car: 82 TA 87 IZ L98 88 IZ LB9 88 IZ L98
Engine: 5.7TBI 5,7TPI 5.0TPI, 5,7TPI
Transmission: T5, 700R4, T5, 700R4
Axle/Gears: 3.08, 3.27, 3.45, 3.27
Re: Pulling apart my 87 IROC
No, I was waiting on my cam from TPIS to show up all this time, the mailman tried to deliver it today after the customs ***** held it hostage for 3 weeks trying to figure out how much to rip me off for this time (the mailman had a nice bill with it for over 140$ in taxes and duties and since we don't have checks here one has to pay in cash, didn't have that in small change on me so it'll be here tomorrow) So, I can put the engine back together, bolt up the tranny and drop it in. Got my fat mat stuff in too so I can apply that on the inside. After the engine/tranny are in and the torque arm is hooked up I will start work on the SFCs and exhaust and also on the intercoolers and ducting. Leaning towards an air to water intercooler so I can stuff it where I have some room.
Fan bracket is ready too, can weld that on this weekend and mount the radiator after dropping the engine in and wire it up. Things should pick up speed from now on.
Fan bracket is ready too, can weld that on this weekend and mount the radiator after dropping the engine in and wire it up. Things should pick up speed from now on.
Re: Pulling apart my 87 IROC
Going to install 2 Spal 12" high perf. puller fans instead of the stock dual fans, problem is I'll have to design a mounting bracket or shroud for them. More custom work to be donie.
Ignore the crookedness of the radiator, that's how we receive our stuff here courtesy of UPS.
Quickly designed a neat mounting bracket. Didn't want to go with a full shroud, the fans will cool plenty as is and I don't want them to mount closer to the engine and with the fans against the core a shroud is useless. It's the yellow part in this design
Thread Starter
Joined: Jun 2000
Posts: 5,364
Likes: 51
From: Enschede, Netherlands
Car: 82 TA 87 IZ L98 88 IZ LB9 88 IZ L98
Engine: 5.7TBI 5,7TPI 5.0TPI, 5,7TPI
Transmission: T5, 700R4, T5, 700R4
Axle/Gears: 3.08, 3.27, 3.45, 3.27
Re: Pulling apart my 87 IROC
Because the spal fans flow a ton more air than the stock things and I don't like welding just a couple of tabs on there. It has to look good & be functional. I'm a sucker for neatness and generally don't like OEM solutions like the stock dual fans. The fan blades are wobbly, they are not perfectly flat and as a result vibrate and are noisy.
I've done the tab welding deal befre:


I like the way I designed it this time better.
I've done the tab welding deal befre:
I like the way I designed it this time better.
Senior Member
iTrader: (7)
Joined: Dec 2007
Posts: 618
Likes: 0
From: Williamstown, NJ
Car: '98 Mustang GT
Engine: '03 4.6L
Transmission: T45
Axle/Gears: DK
Re: Pulling apart my 87 IROC
Thread Starter
Joined: Jun 2000
Posts: 5,364
Likes: 51
From: Enschede, Netherlands
Car: 82 TA 87 IZ L98 88 IZ LB9 88 IZ L98
Engine: 5.7TBI 5,7TPI 5.0TPI, 5,7TPI
Transmission: T5, 700R4, T5, 700R4
Axle/Gears: 3.08, 3.27, 3.45, 3.27
Re: Pulling apart my 87 IROC
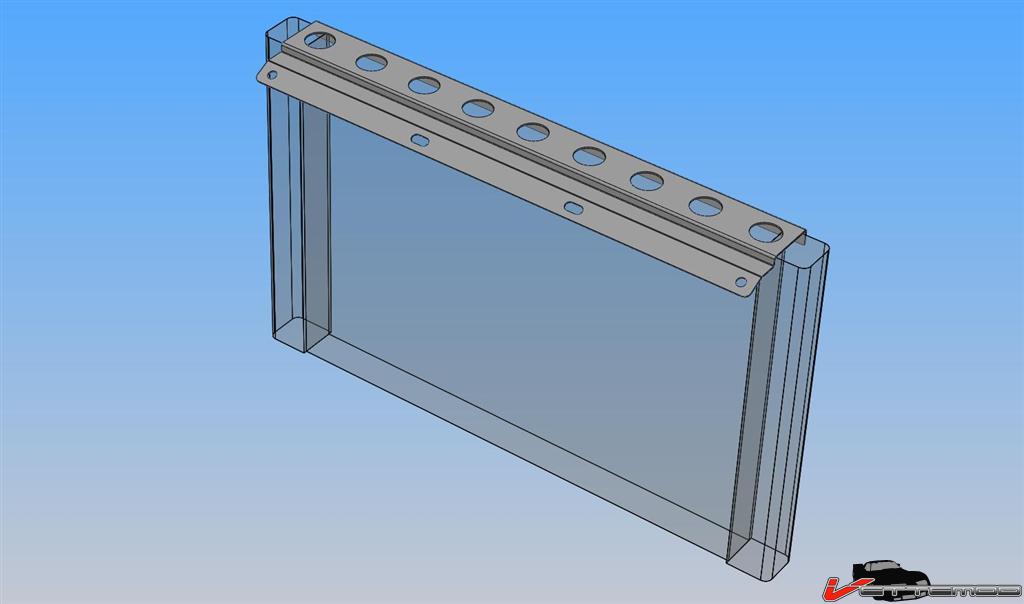
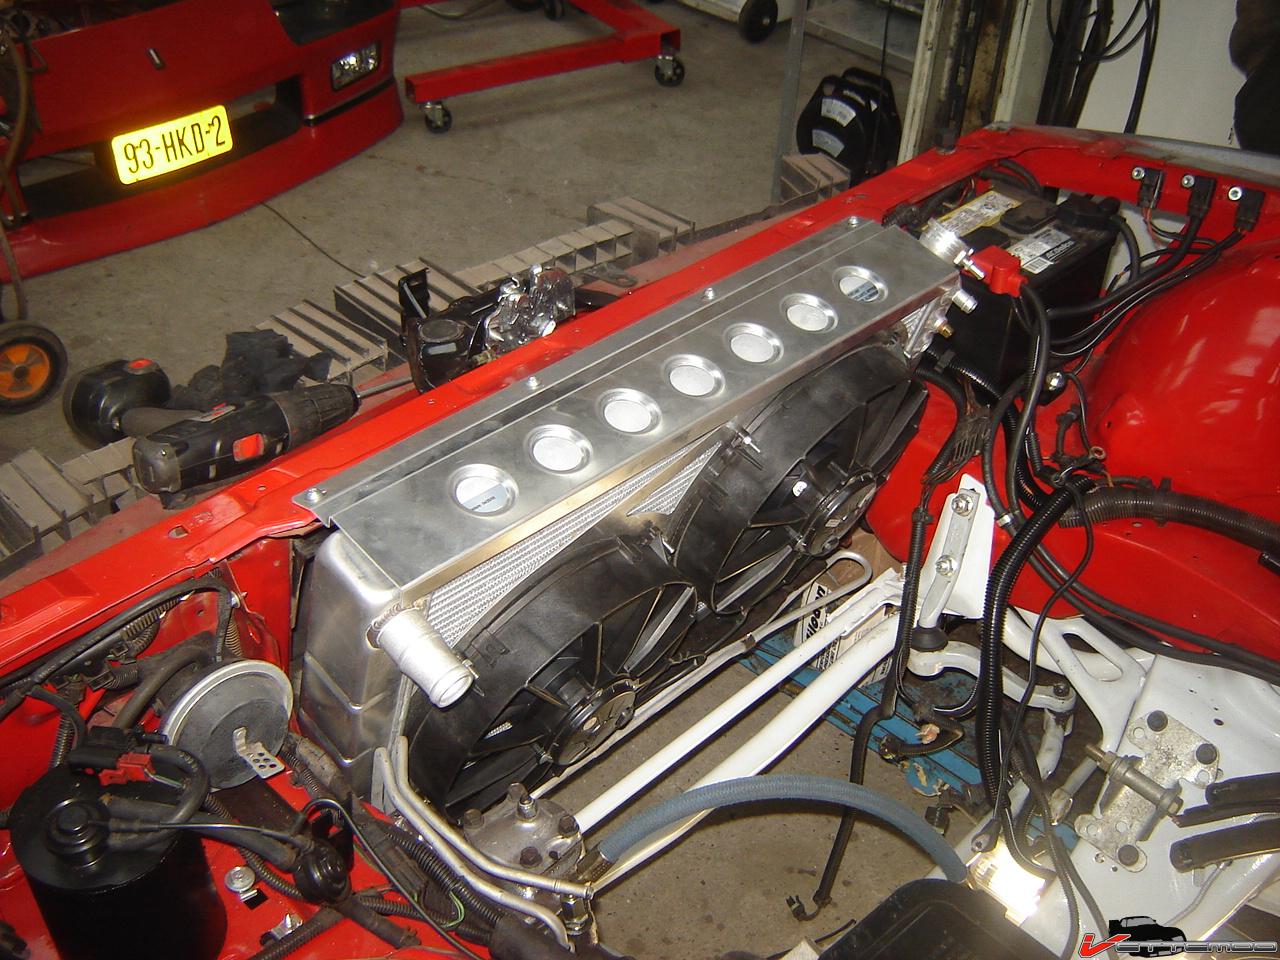
Here's ver 2.0 of the rad mount, this time I can dimple die it. This version fits around the tanks, not just the core.

The fan shroud

Started putting the engine back together after finally getting the zz409 cam (stupid customs here was holding on to it for a couple of weeks). Also visible is my drain hookup for the P600B.

The stock v/flat belt combo pulleys are giving me issues, I'll either have to convert the aluminum spacer thing for the SC pulley into a pulley by having it cut or flat belt grooves or have a new one made with a wider front diameter for a larger pulley. I already have a smaller waterpump & alternator pulley.
The fan shroud
Started putting the engine back together after finally getting the zz409 cam (stupid customs here was holding on to it for a couple of weeks). Also visible is my drain hookup for the P600B.
The stock v/flat belt combo pulleys are giving me issues, I'll either have to convert the aluminum spacer thing for the SC pulley into a pulley by having it cut or flat belt grooves or have a new one made with a wider front diameter for a larger pulley. I already have a smaller waterpump & alternator pulley.
Thread Starter
Joined: Jun 2000
Posts: 5,364
Likes: 51
From: Enschede, Netherlands
Car: 82 TA 87 IZ L98 88 IZ LB9 88 IZ L98
Engine: 5.7TBI 5,7TPI 5.0TPI, 5,7TPI
Transmission: T5, 700R4, T5, 700R4
Axle/Gears: 3.08, 3.27, 3.45, 3.27
Re: Pulling apart my 87 IROC
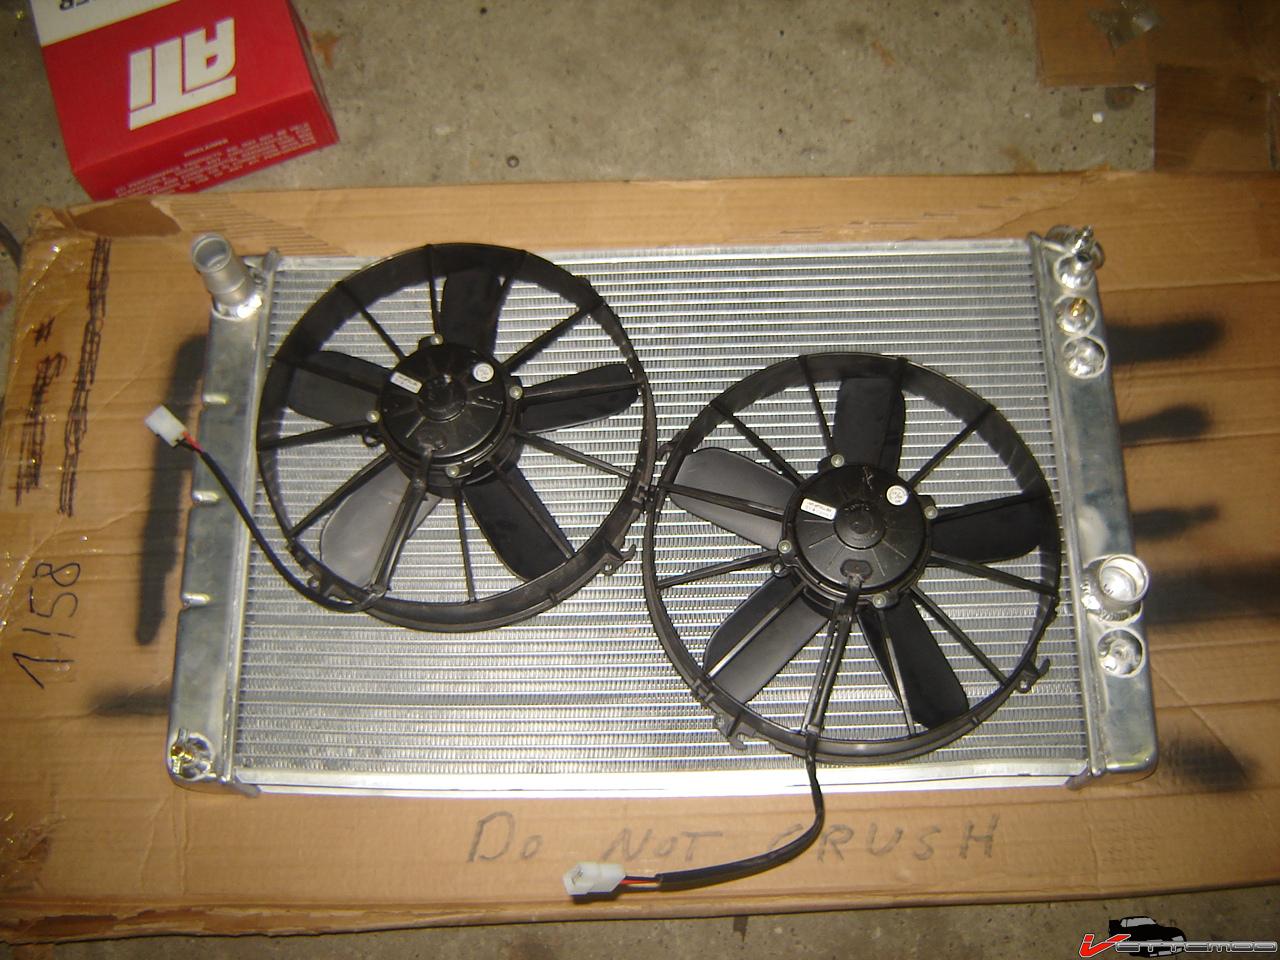
Got the radiator all done:
Fits like a glove

Used carriage bolts, the square below the head is hammered tight into the aluminum so they won't spin

all done, these fans move a lot of air. Gale force winds LOL
Rad mount ver 2.0 now dimple died

The whole shebang installed

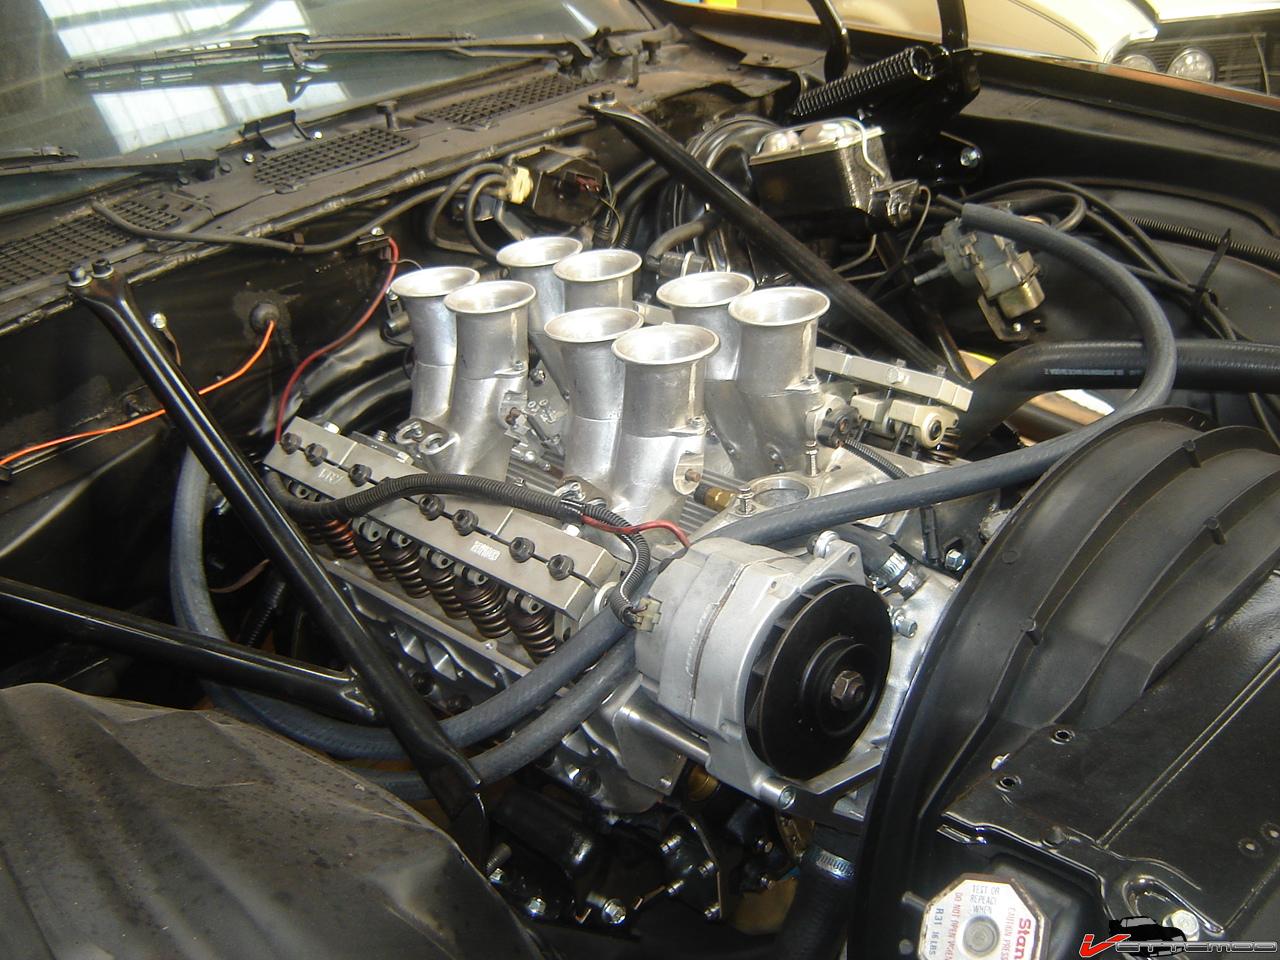
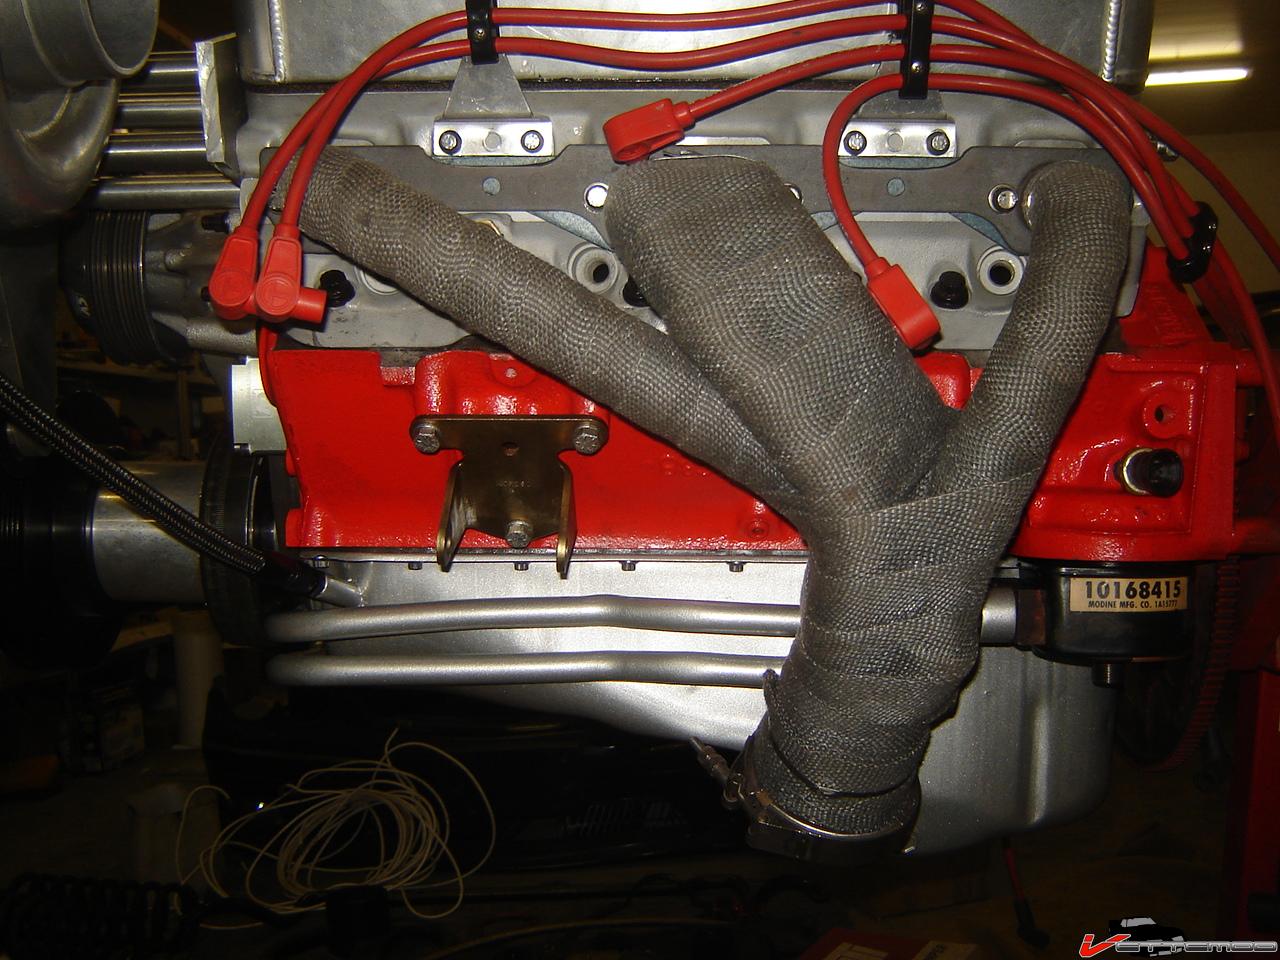
I also made good progress building up the engine. Cam installed and everything buttoned up/dialed in. Mounted the supercharger and made a custom little bracket since I don't have the OEM serpentine drive, it spaces the whole assembly forward about as much as the stock serpentine stuff does. Also, there's an additional hole that corresponds with where normally the bolt goes through the alternator. I'm going to add a 4th bolt & spacer to it since I still have 1 unused hole in the head and bracket. There's a small bolt in there now, adding a longer bolt & spacer only required drilling the supercharger bracket. No big deal. Also have the oiling system & return all hooked up. Going to either cut serpentine grooves in the drive spacer (alu spacer thing) or design a new one, larger diameter. Have to figure out the drive ratios first and see where my KRC pump ends up.


Fits like a glove
Used carriage bolts, the square below the head is hammered tight into the aluminum so they won't spin
all done, these fans move a lot of air. Gale force winds LOL
Rad mount ver 2.0 now dimple died
The whole shebang installed
I also made good progress building up the engine. Cam installed and everything buttoned up/dialed in. Mounted the supercharger and made a custom little bracket since I don't have the OEM serpentine drive, it spaces the whole assembly forward about as much as the stock serpentine stuff does. Also, there's an additional hole that corresponds with where normally the bolt goes through the alternator. I'm going to add a 4th bolt & spacer to it since I still have 1 unused hole in the head and bracket. There's a small bolt in there now, adding a longer bolt & spacer only required drilling the supercharger bracket. No big deal. Also have the oiling system & return all hooked up. Going to either cut serpentine grooves in the drive spacer (alu spacer thing) or design a new one, larger diameter. Have to figure out the drive ratios first and see where my KRC pump ends up.
Supreme Member
iTrader: (1)
Joined: Jun 2009
Posts: 1,777
Likes: 0
From: Central Connecticut
Car: 91 Trans Am 'vert
Engine: LB9
Transmission: T5
Axle/Gears: 3.45 9 bolt
Re: Pulling apart my 87 IROC
That engine looks like its gonna seriously kick. Do you have any estimates as to what it'll be putting out? And forgive me if you already mentioned this, but are those 3 fuel injectors on the plenum above the throttle body?
Supreme Member
iTrader: (7)
Joined: Jun 2008
Posts: 1,468
Likes: 0
From: Minnesota
Car: 89 IROC-Z
Engine: 370 LSX, LS3 Top End
Transmission: Built T-56
Axle/Gears: 9" Aluminum Center 3.89's
Re: Pulling apart my 87 IROC
just courious...is three bolts all it takes to keep the charger bracket from deflecting?
Thread Starter
Joined: Jun 2000
Posts: 5,364
Likes: 51
From: Enschede, Netherlands
Car: 82 TA 87 IZ L98 88 IZ LB9 88 IZ L98
Engine: 5.7TBI 5,7TPI 5.0TPI, 5,7TPI
Transmission: T5, 700R4, T5, 700R4
Axle/Gears: 3.08, 3.27, 3.45, 3.27
Re: Pulling apart my 87 IROC
The 3 injectors are part of a super fueler setup.
Originally only the 2 left bolts hold it to the block, the 3rd one where I have the same long spacer as the other ones originally bolts to the alternator, through the original serpentine setup brackets and some setups have a little additional bracket that bolts to the back of the alternator where the support rod also bolts to it and then to the supercharger bracket.
Once I replace the small bolt on my head bracket with a long bolt and a spacer (and drill an additional hole in the SC bracket) I'll have 4 bolts/spacers holding it up. That should be plenty sturdy but I intentionally left the head mount bracket oversize so that I could add another hole for a support rod on the side.
This is with the stock serpentine setup not a lot to it either:
Senior Member
iTrader: (7)
Joined: Dec 2007
Posts: 618
Likes: 0
From: Williamstown, NJ
Car: '98 Mustang GT
Engine: '03 4.6L
Transmission: T45
Axle/Gears: DK
Re: Pulling apart my 87 IROC
I've attached your pic. of the fuel lines and I've numbered 2 of the lines. Is the fuel line that is marked #2 the fuel return line? #3 would be the evap line?
Last edited by Rich2279; Feb 10, 2010 at 06:22 AM.
Thread Starter
Joined: Jun 2000
Posts: 5,364
Likes: 51
From: Enschede, Netherlands
Car: 82 TA 87 IZ L98 88 IZ LB9 88 IZ L98
Engine: 5.7TBI 5,7TPI 5.0TPI, 5,7TPI
Transmission: T5, 700R4, T5, 700R4
Axle/Gears: 3.08, 3.27, 3.45, 3.27
Re: Pulling apart my 87 IROC
3 = return, 2 = evap
Did some more work. Started doing the inside with sound deadener

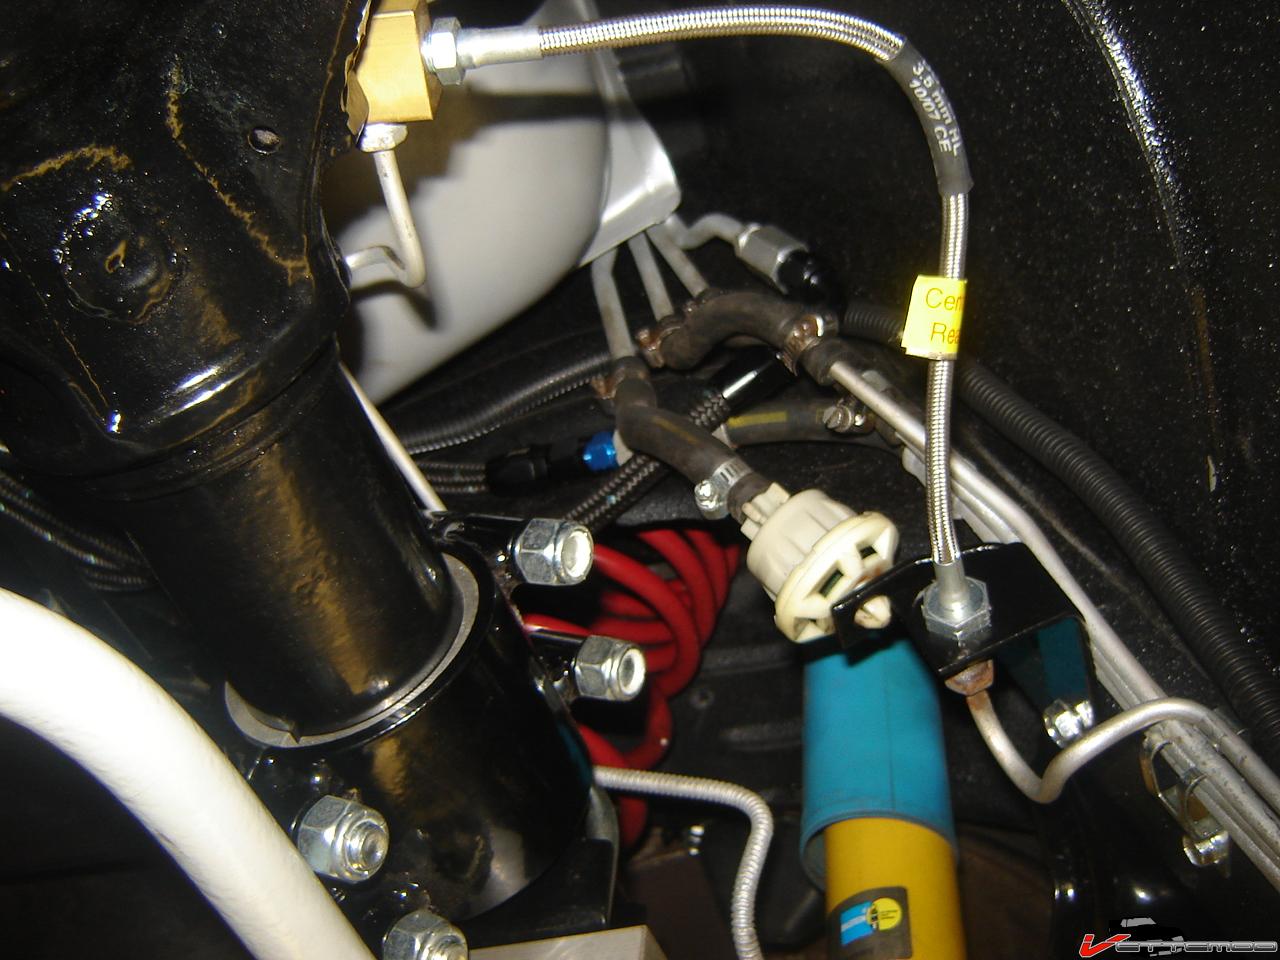
Found a clean way to mount the FPR, only need a 90deg. 3/8 -> 6 AN adapter to clear the valve cover. Also visible is the sandwich plate w/ 3 injectors, part of the superfueler.


Installed a 92 KC4 heat exchanger because of the way it bolts up without using hoses & hose clamps and the lines are aluminum (now powdercoated) It's a real tight fit with the headers. Good thing I have wrap around them.
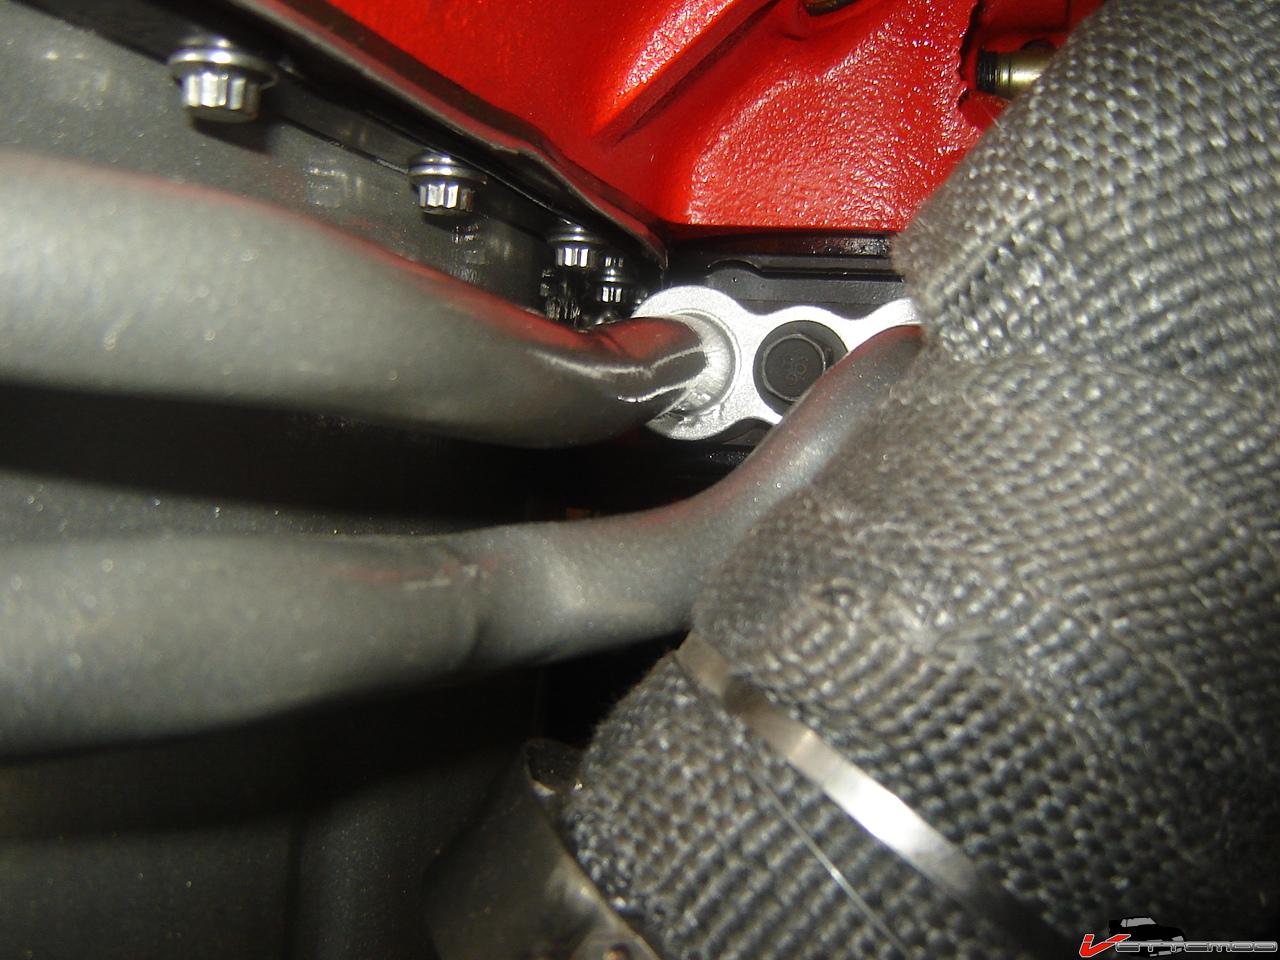
Added the 4th bolt to the SC bracket


Did some more work. Started doing the inside with sound deadener
Found a clean way to mount the FPR, only need a 90deg. 3/8 -> 6 AN adapter to clear the valve cover. Also visible is the sandwich plate w/ 3 injectors, part of the superfueler.
Installed a 92 KC4 heat exchanger because of the way it bolts up without using hoses & hose clamps and the lines are aluminum (now powdercoated) It's a real tight fit with the headers. Good thing I have wrap around them.
Added the 4th bolt to the SC bracket
Senior Member
iTrader: (7)
Joined: Dec 2007
Posts: 618
Likes: 0
From: Williamstown, NJ
Car: '98 Mustang GT
Engine: '03 4.6L
Transmission: T45
Axle/Gears: DK
Thread Starter
Joined: Jun 2000
Posts: 5,364
Likes: 51
From: Enschede, Netherlands
Car: 82 TA 87 IZ L98 88 IZ LB9 88 IZ L98
Engine: 5.7TBI 5,7TPI 5.0TPI, 5,7TPI
Transmission: T5, 700R4, T5, 700R4
Axle/Gears: 3.08, 3.27, 3.45, 3.27
Re: Pulling apart my 87 IROC
On second thought....I'm not 100% sure now.