
Pulling apart my 87 IROC

Senior Member
iTrader: (7)
Joined: Dec 2007
Posts: 618
Likes: 0
From: Williamstown, NJ
Car: '98 Mustang GT
Engine: '03 4.6L
Transmission: T45
Axle/Gears: DK

Thread Starter

Joined: Jun 2000
Posts: 5,364
Likes: 51
From: Enschede, Netherlands
Car: 82 TA 87 IZ L98 88 IZ LB9 88 IZ L98
Engine: 5.7TBI 5,7TPI 5.0TPI, 5,7TPI
Transmission: T5, 700R4, T5, 700R4
Axle/Gears: 3.08, 3.27, 3.45, 3.27
Re: Pulling apart my 87 IROC
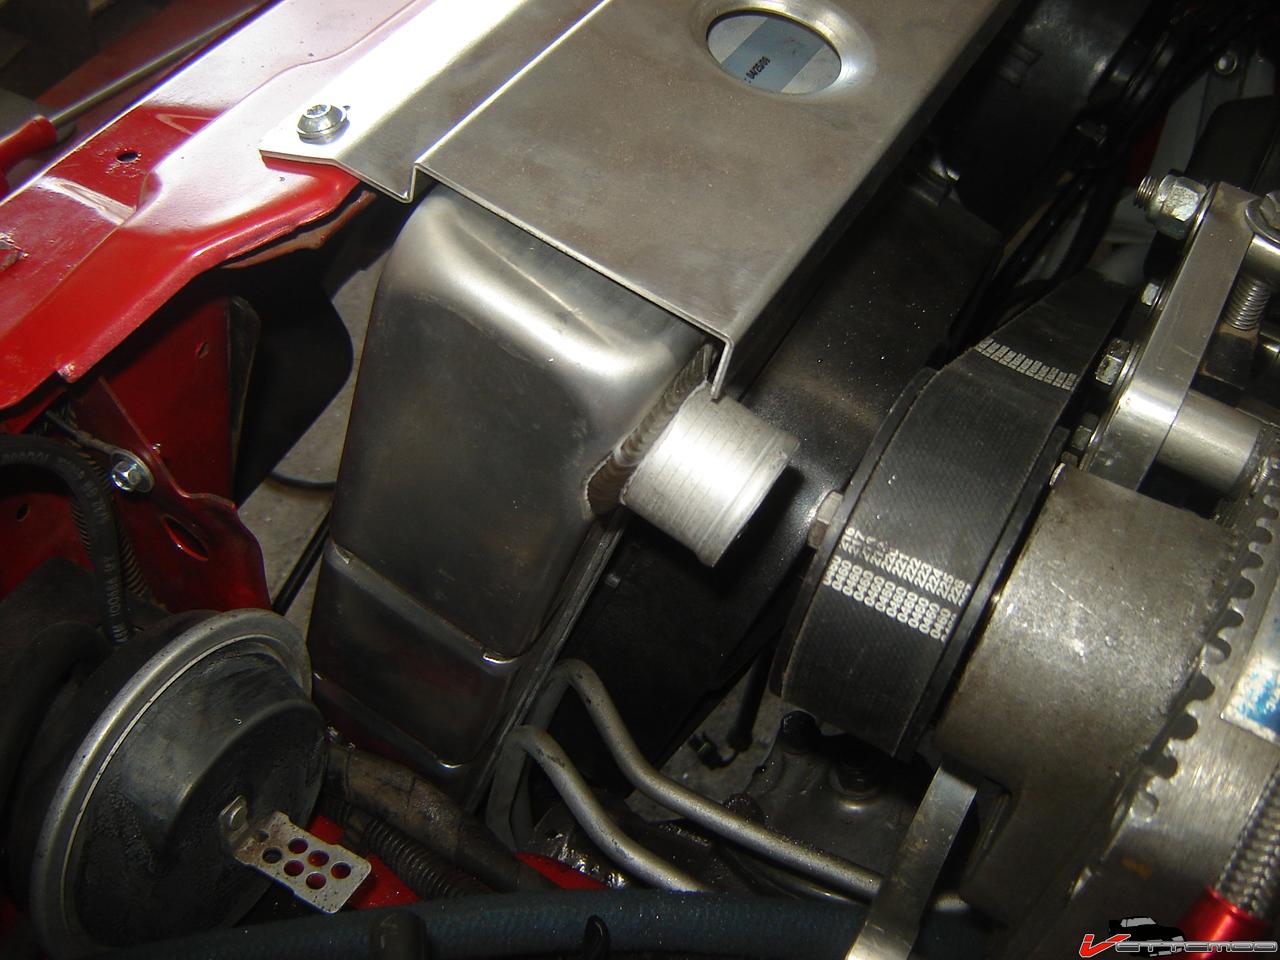
After I'm 100% sure I have all the belt routing and stuff figured out, much easier to do now than in the car. Still need to add the KRC p.st. pump and either have a new supercharger pulley (crank) spacer machined for v grooves or machine it so I can sandwich a water pump pulley on the front of it (modified of course)
Thread Starter
Joined: Jun 2000
Posts: 5,364
Likes: 51
From: Enschede, Netherlands
Car: 82 TA 87 IZ L98 88 IZ LB9 88 IZ L98
Engine: 5.7TBI 5,7TPI 5.0TPI, 5,7TPI
Transmission: T5, 700R4, T5, 700R4
Axle/Gears: 3.08, 3.27, 3.45, 3.27
Re: Pulling apart my 87 IROC
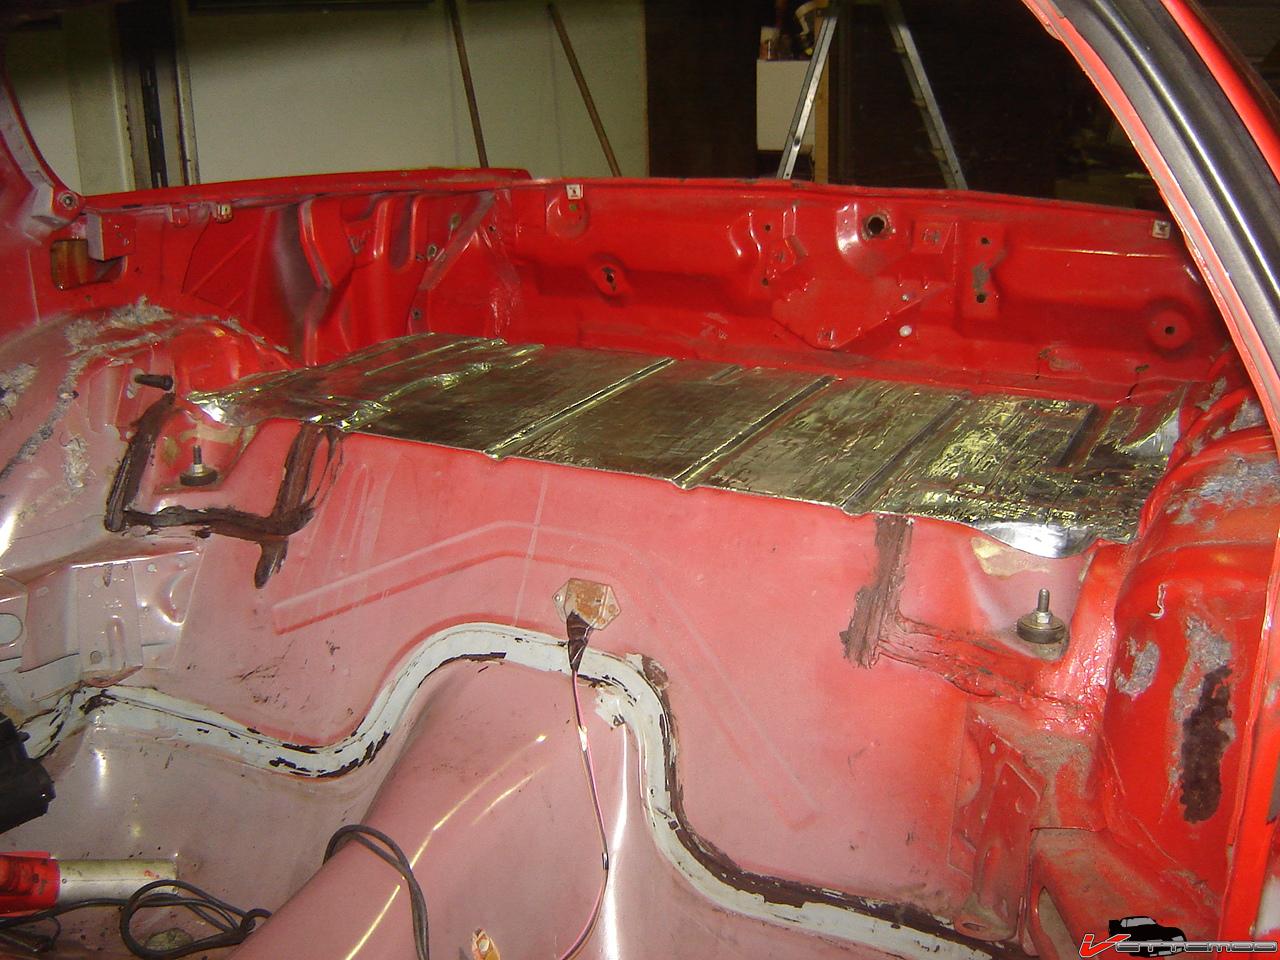
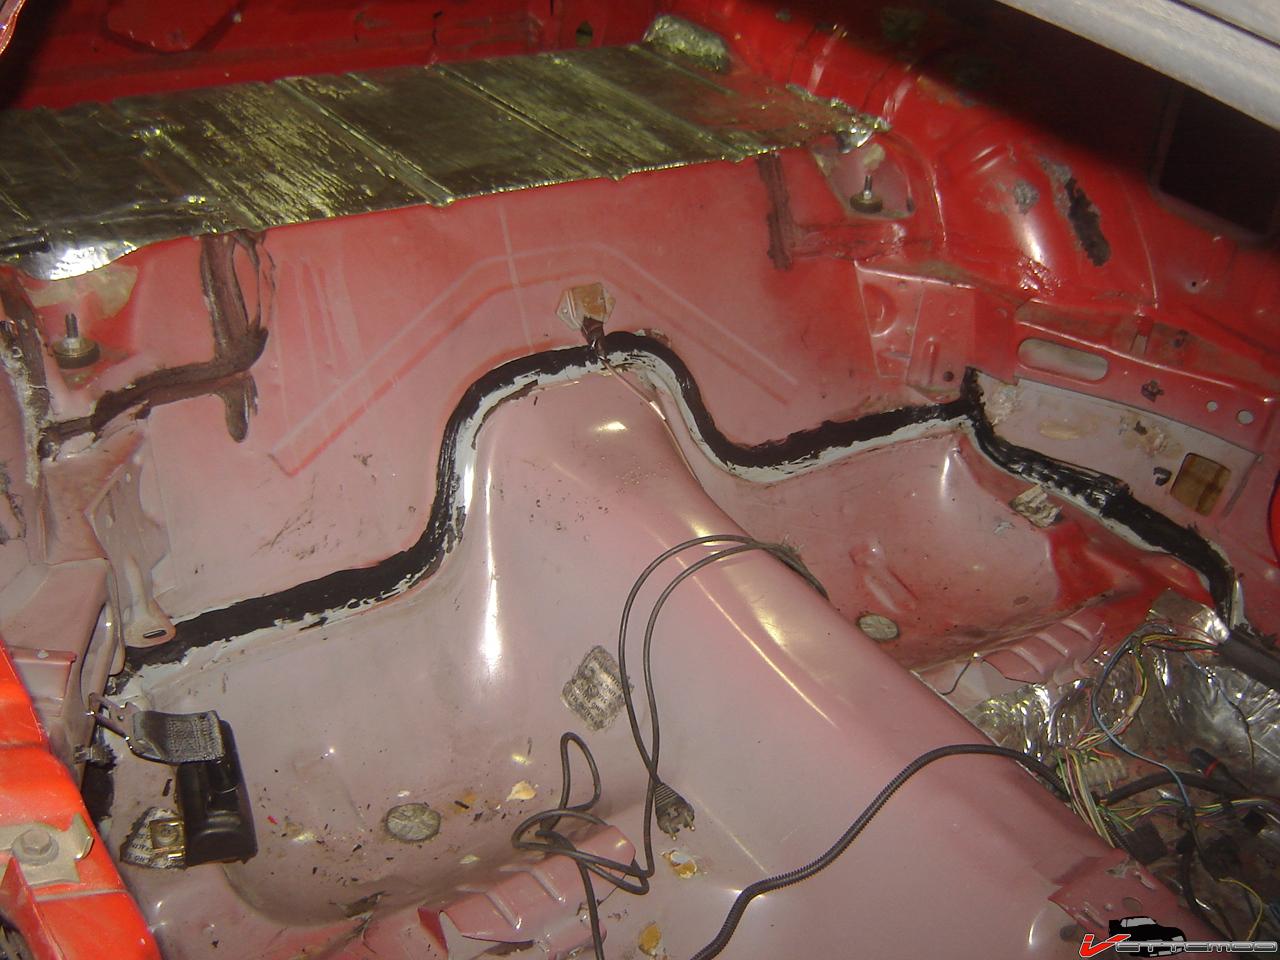
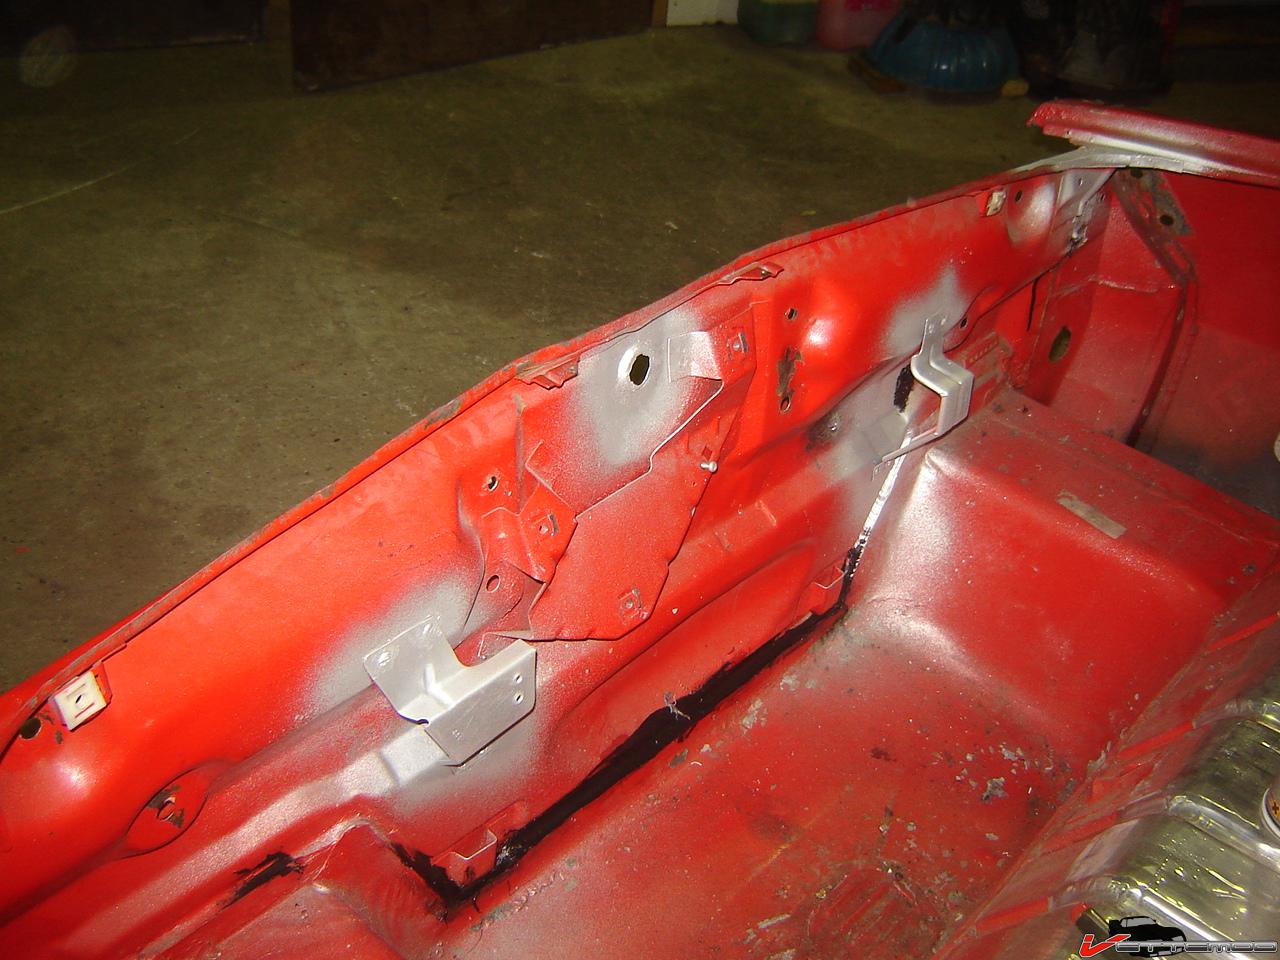
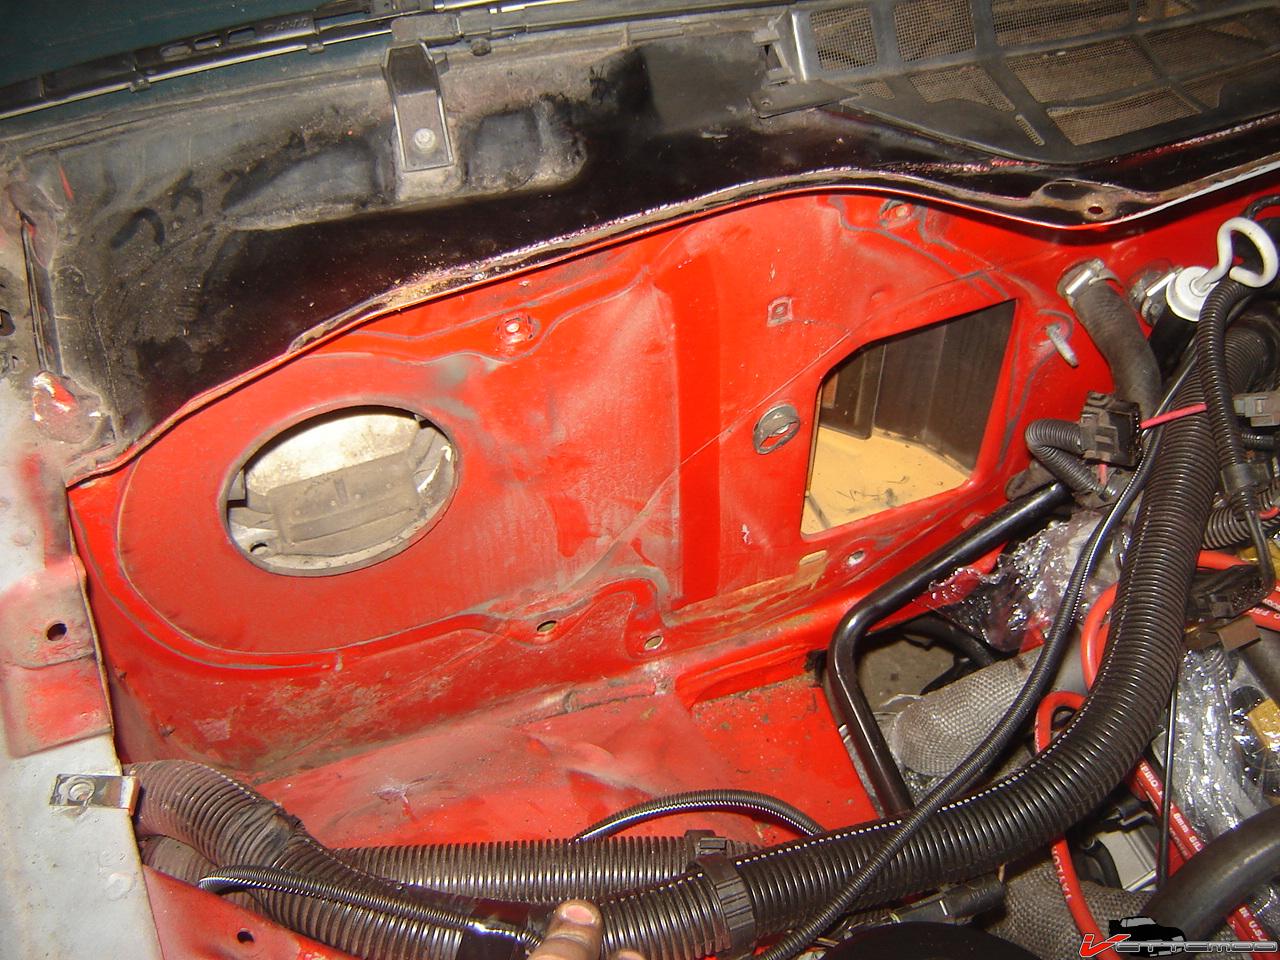
The factory seam sealer really is junk, on the inside it's brittle and just falls off when you pry it a little with a screwdriver. Also, most of the sealer is where the seam isn't located. You can see where there's no red paint, that's where the bulk of the sealer was. I redid them all and made sure I was covering the seam instead of steel
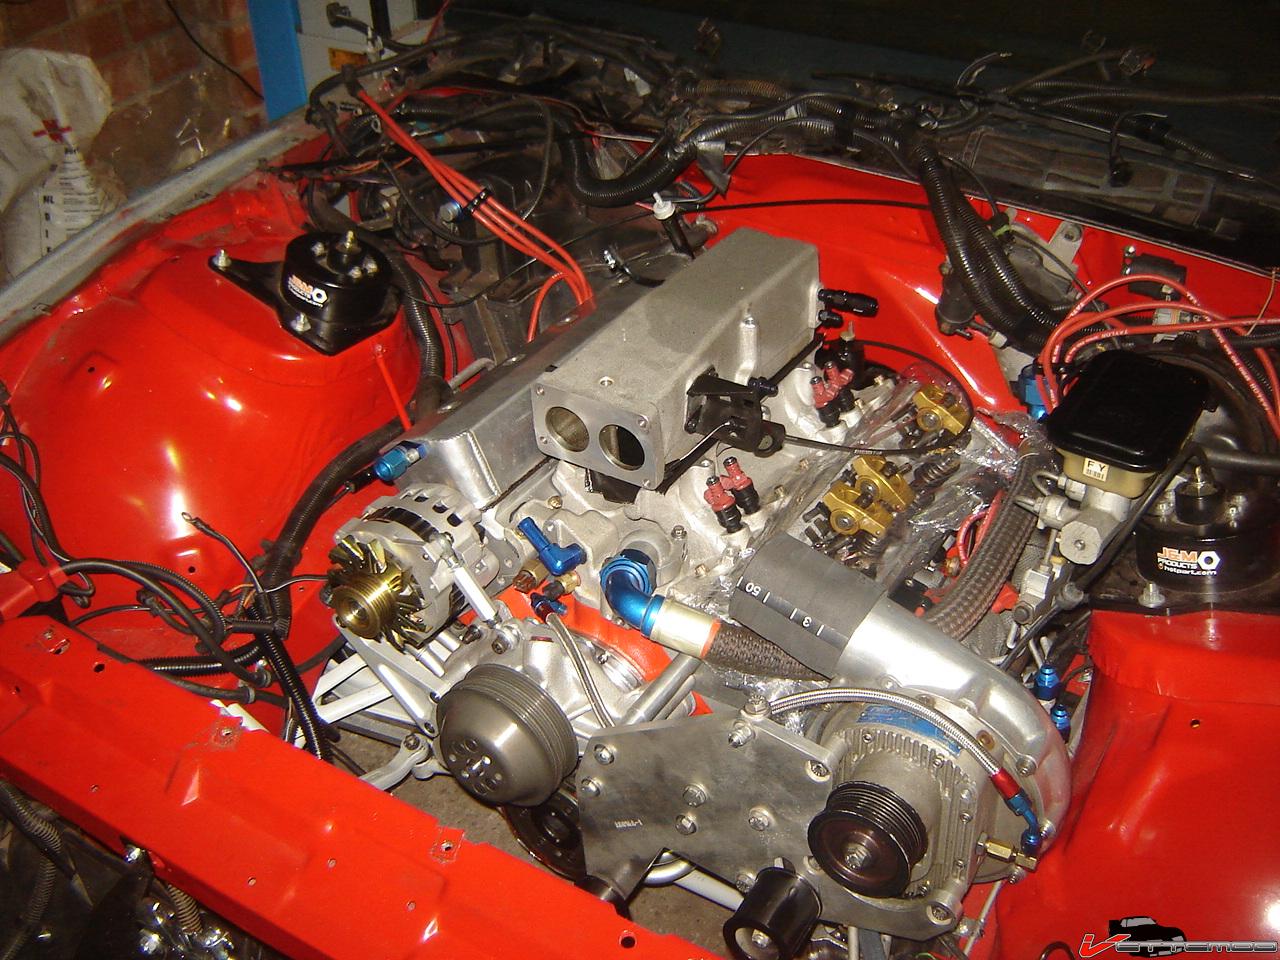
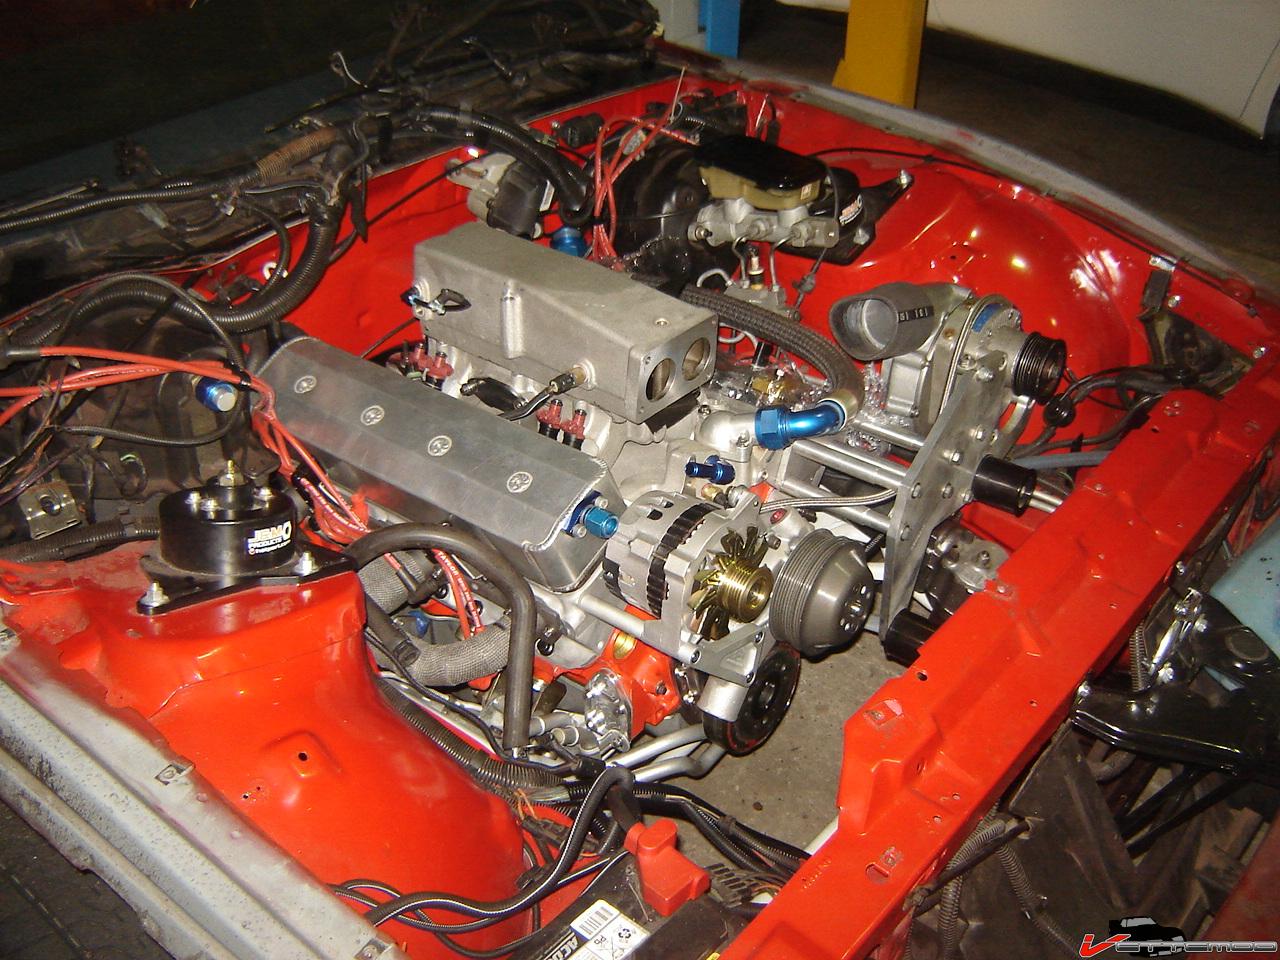
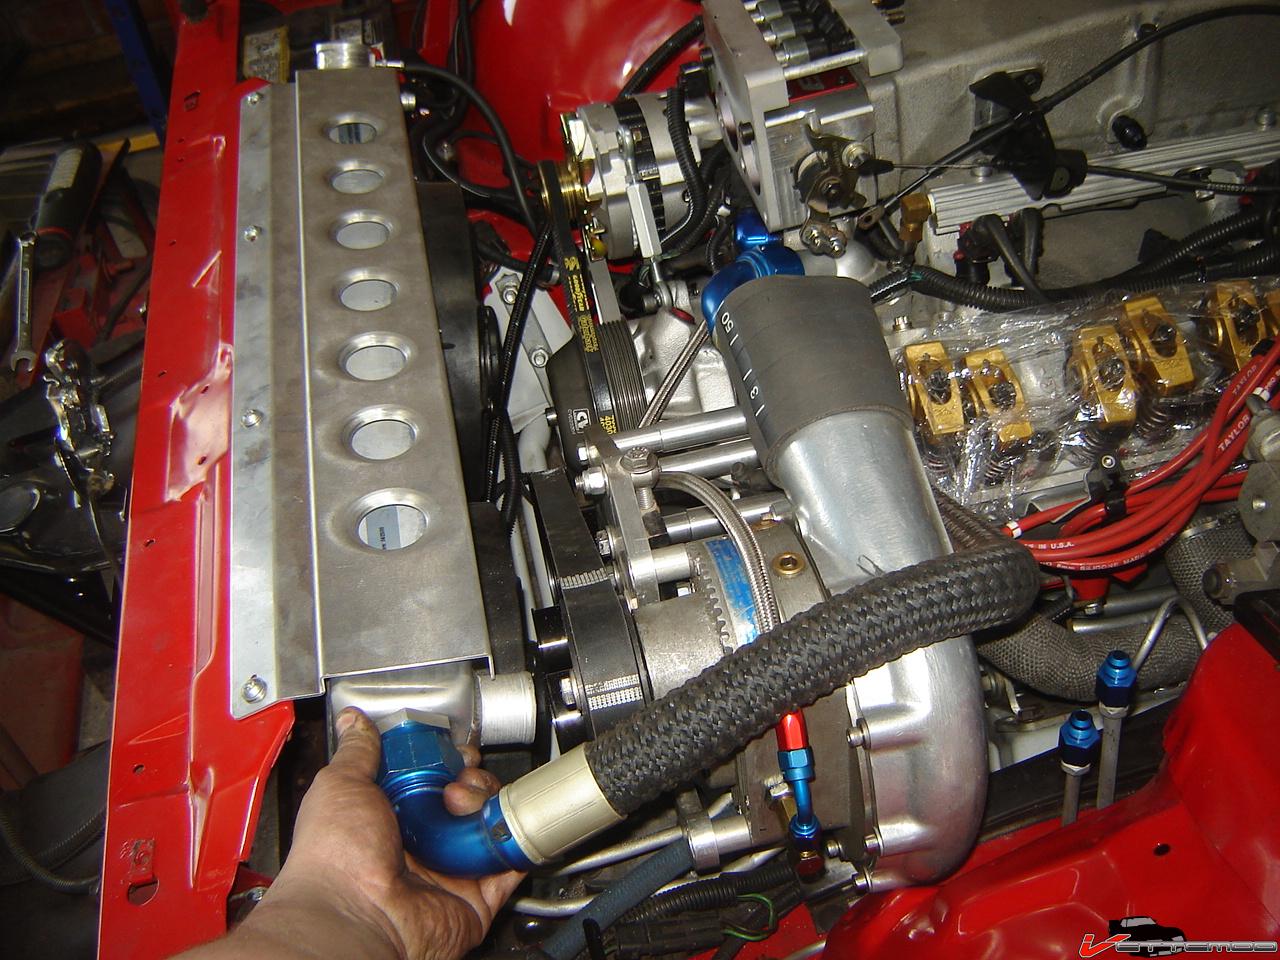
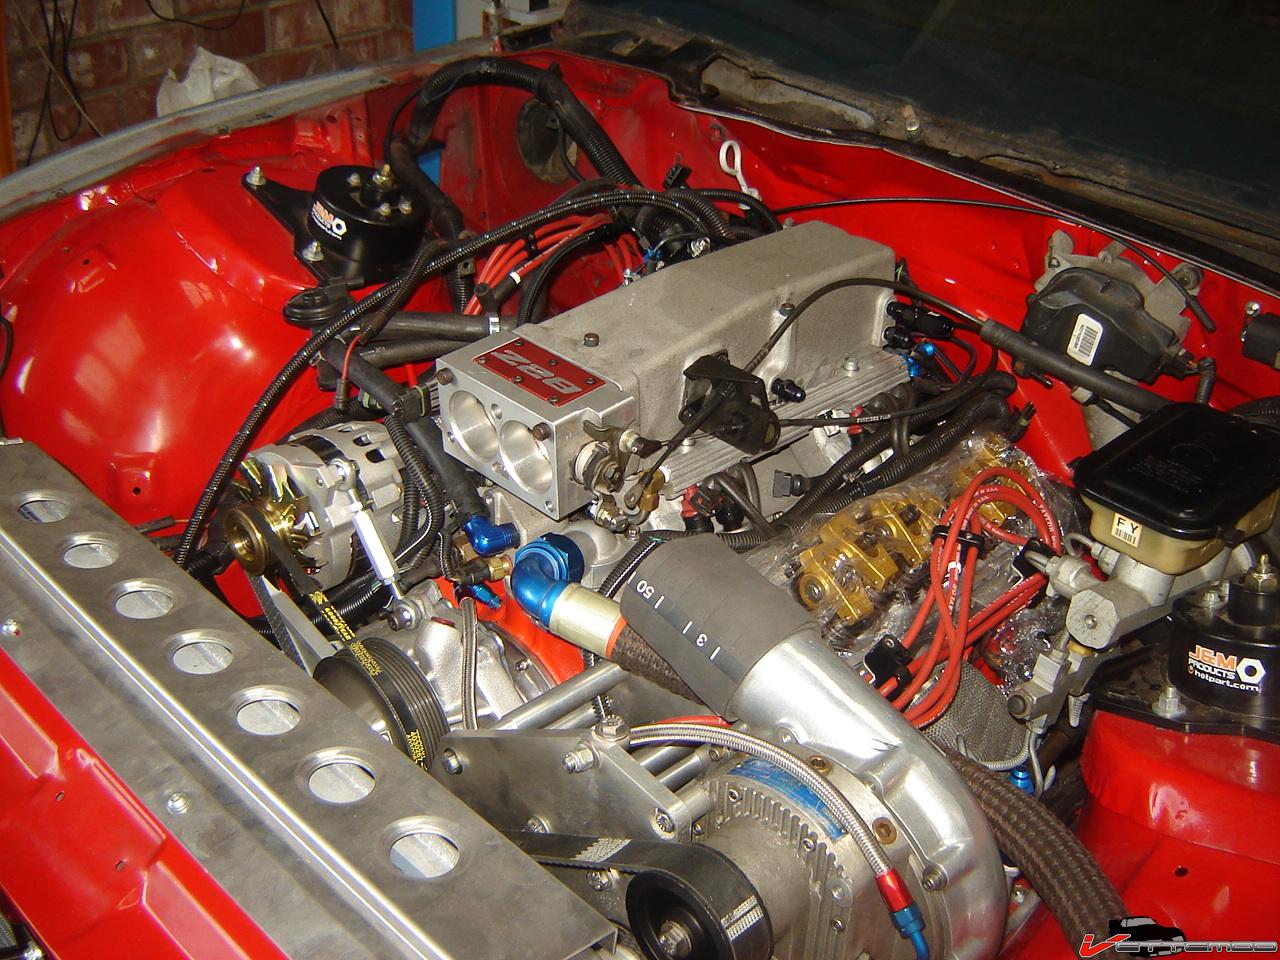
My fuel pressure regulator setup and -4 AN feed to superfueler
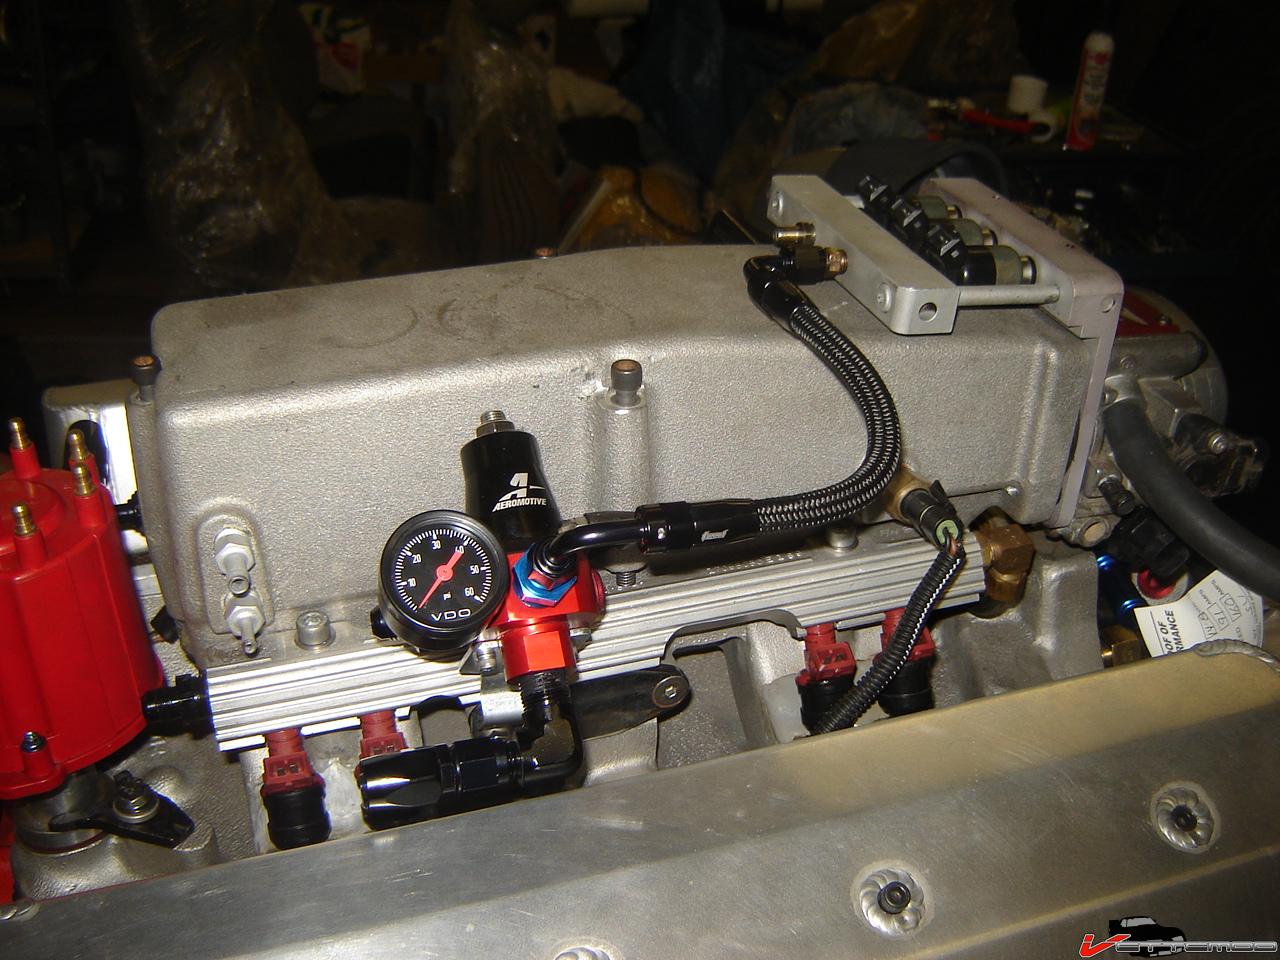
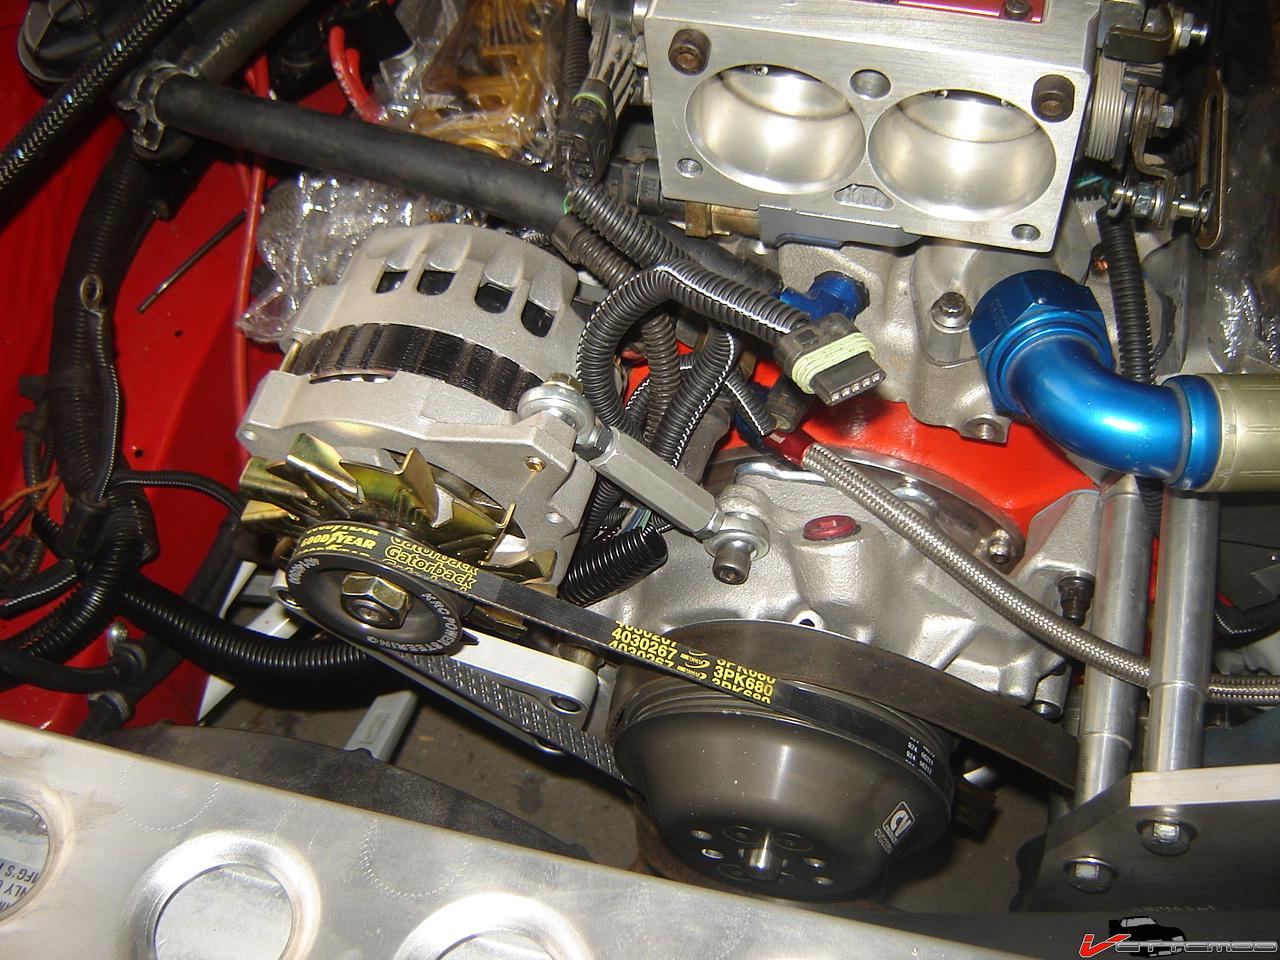
Finalyly got the powermaster alternator
Hard to see but I can run the alternator off the front of the CV Products pulley w/ a 3 rib belt (more than enough)
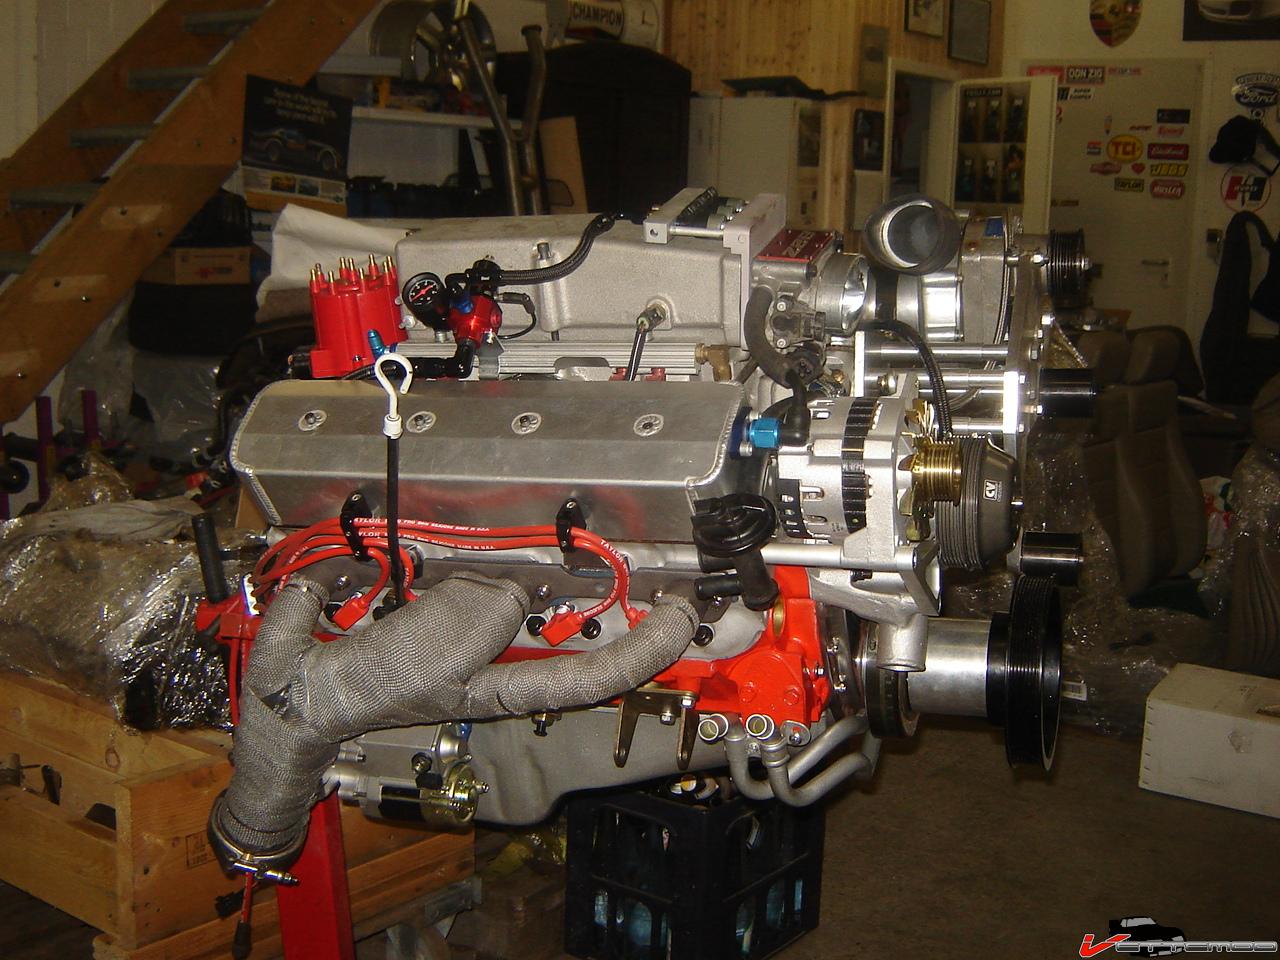
I won't run it over the crank, no need to make it overly complicated.
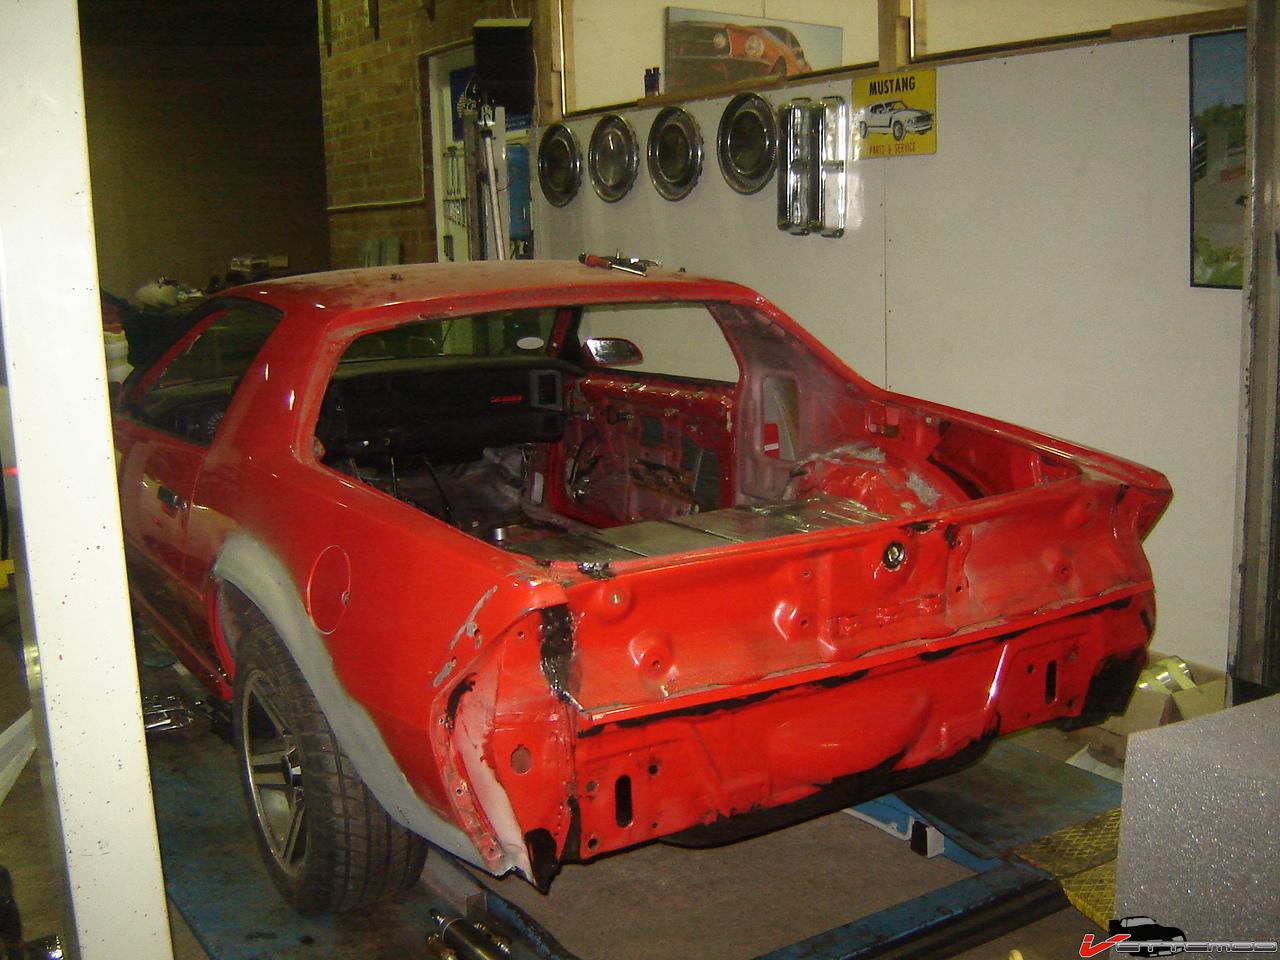
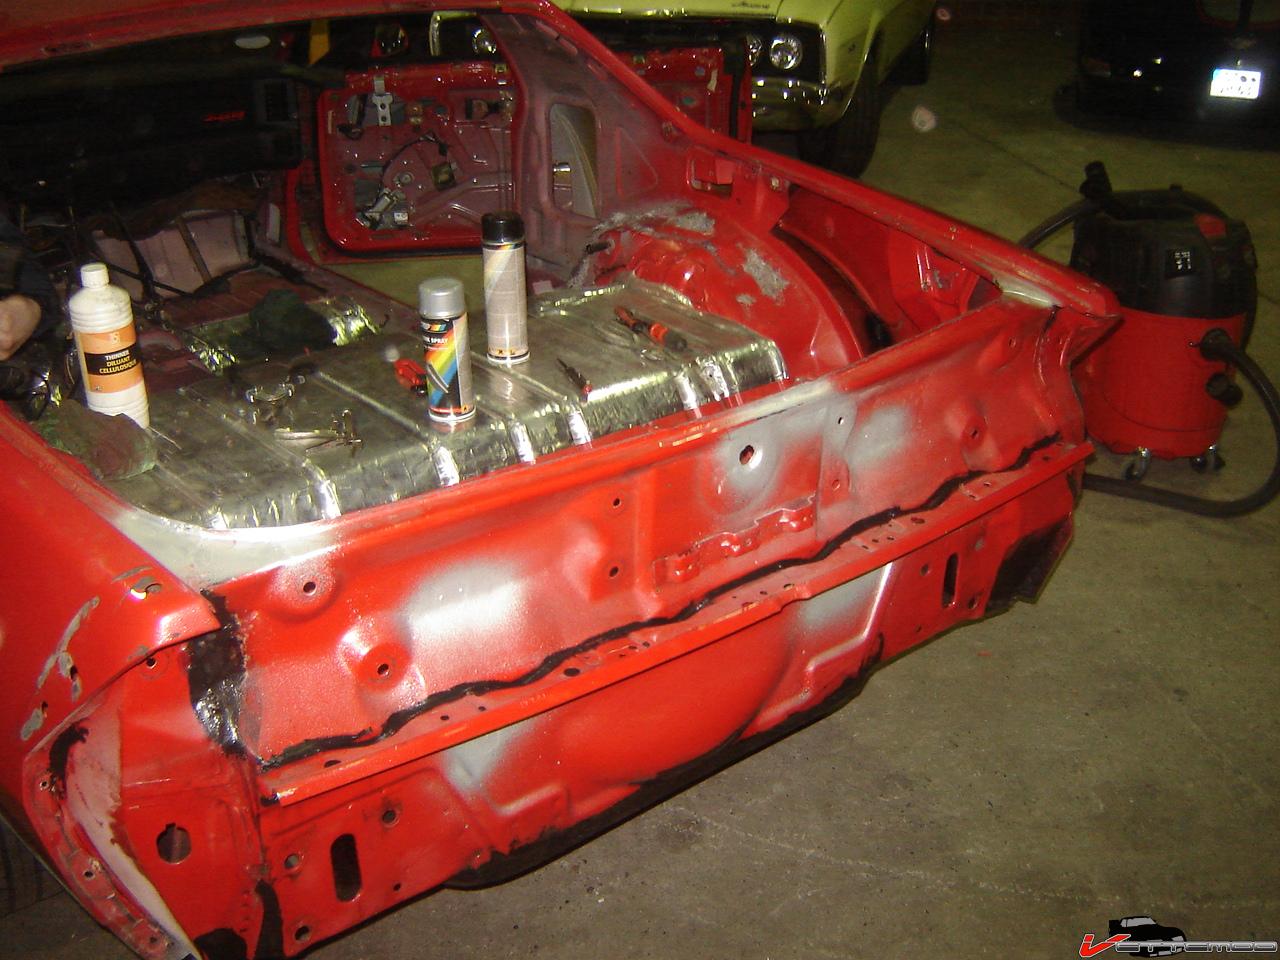
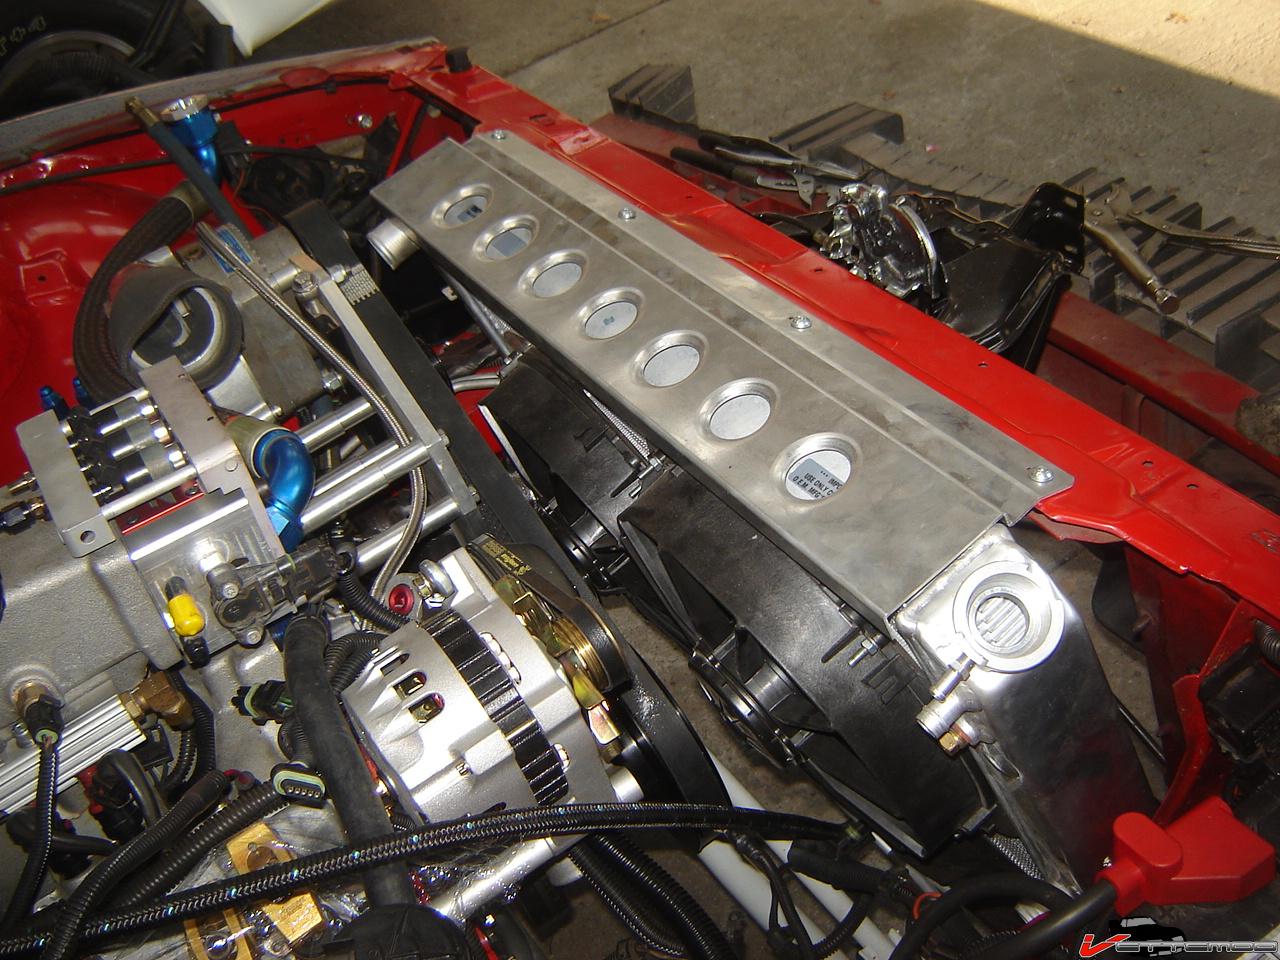
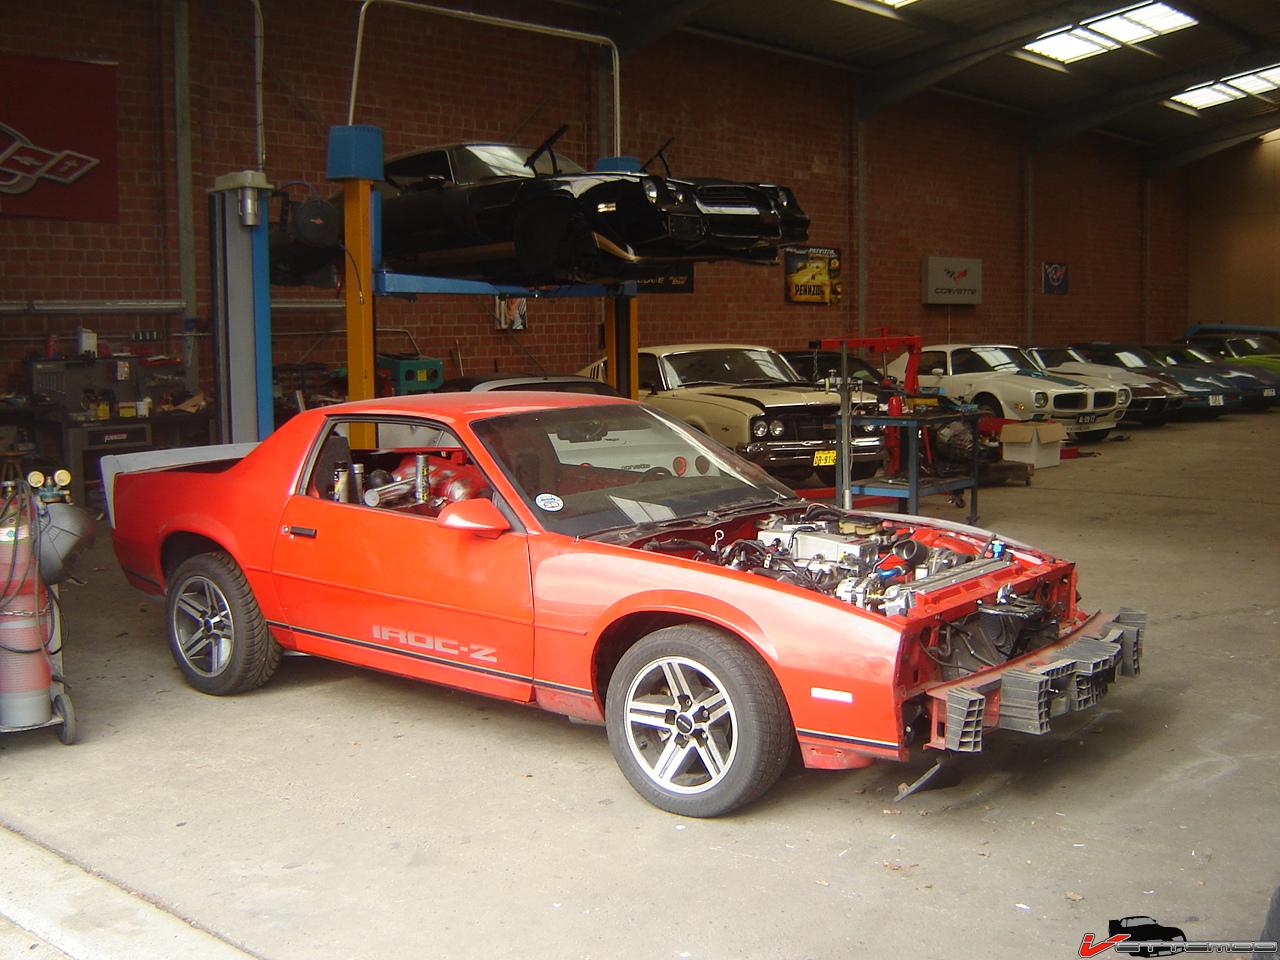
Removed the rear window. Going to weld in the brackets for a locking rear compartment door (have the door, just didn't have the sheet metal for it) and then it's mostly done and it can go to the painters pretty soon
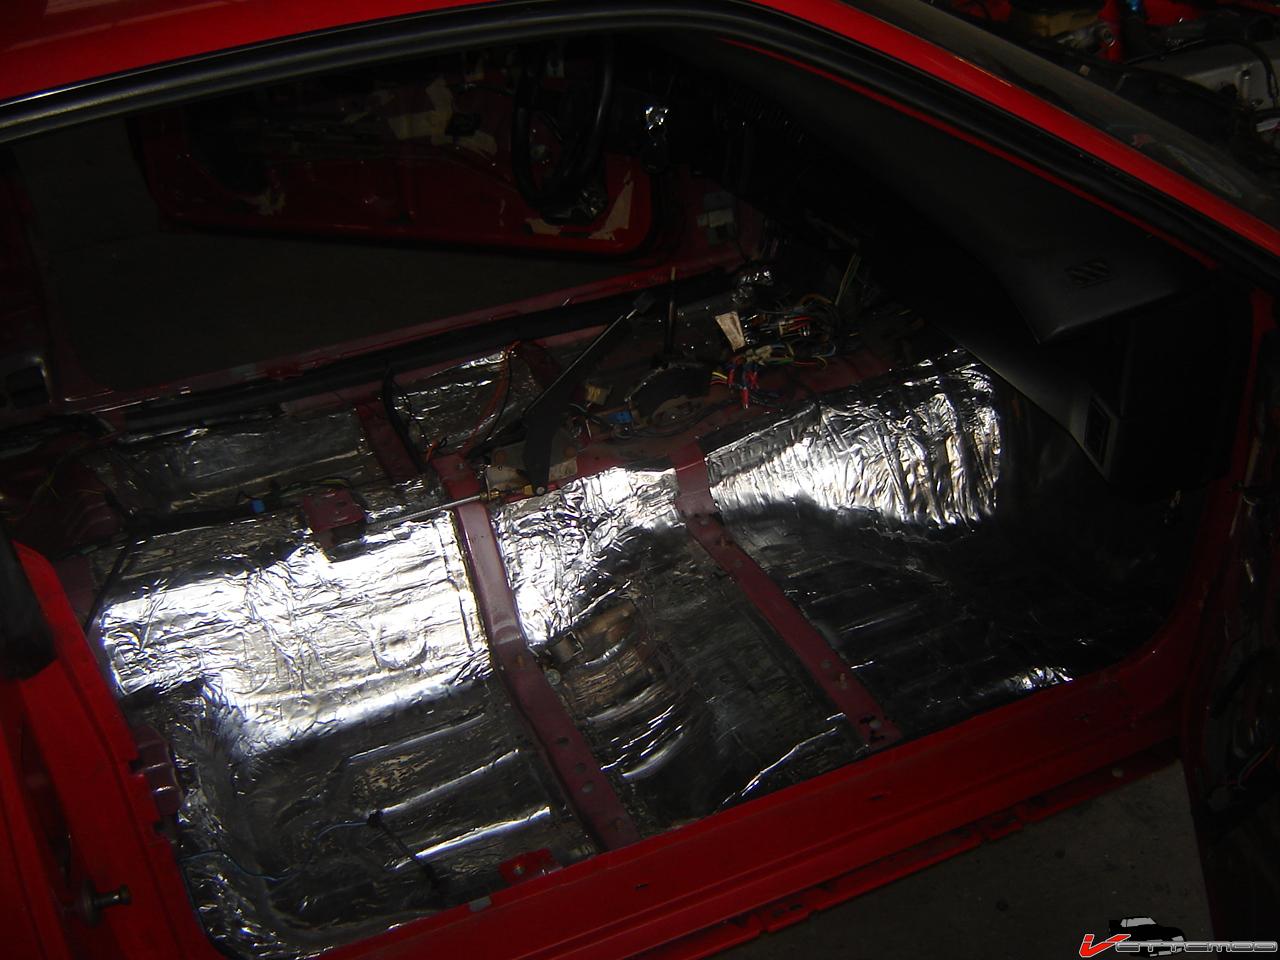
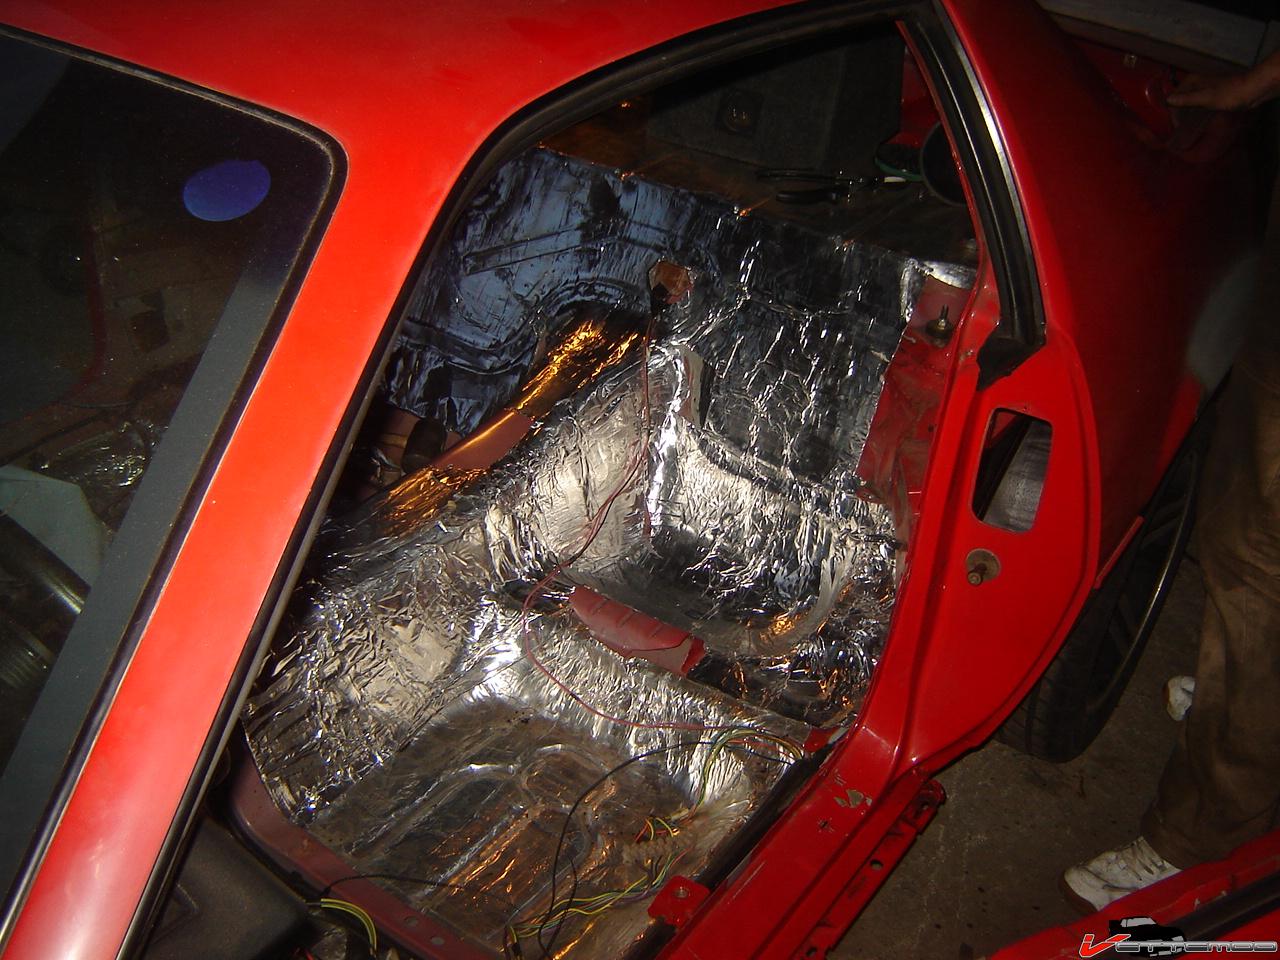
Still have to finish doing the reflectix/dynamat type stuff. I sprayed a bunch of wax in the hollow areas to keep it from rusting again

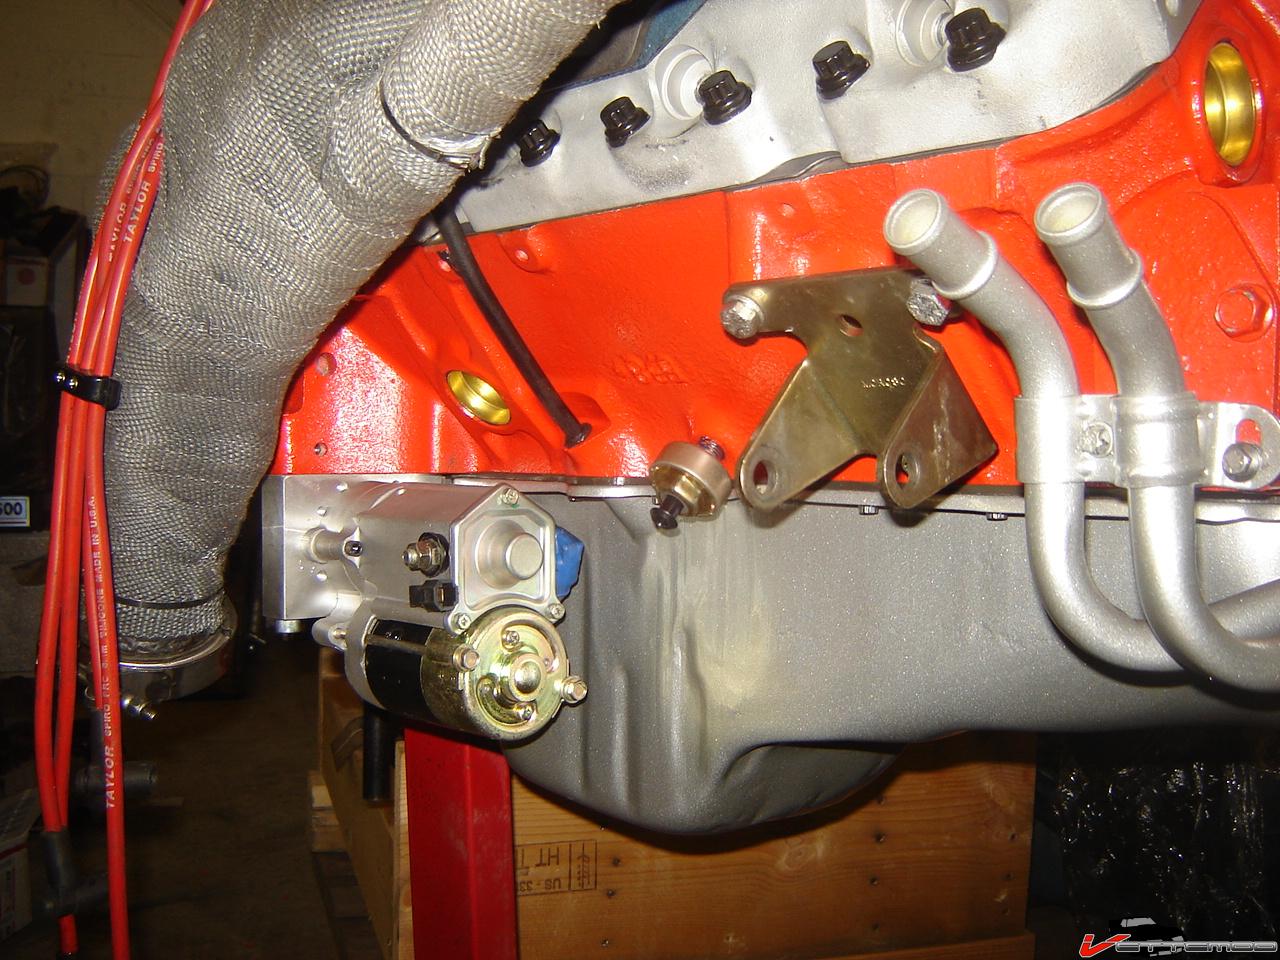
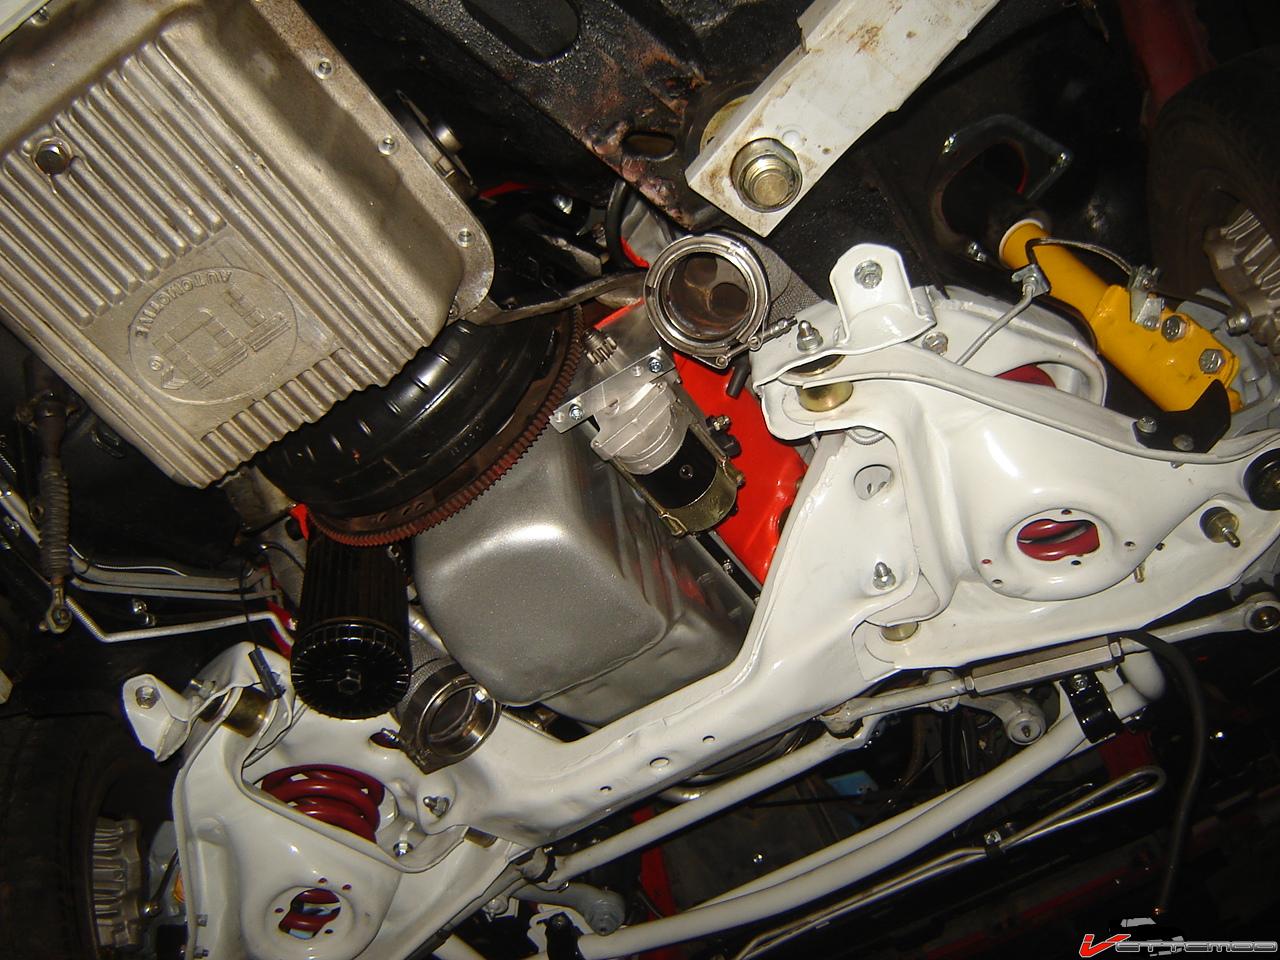
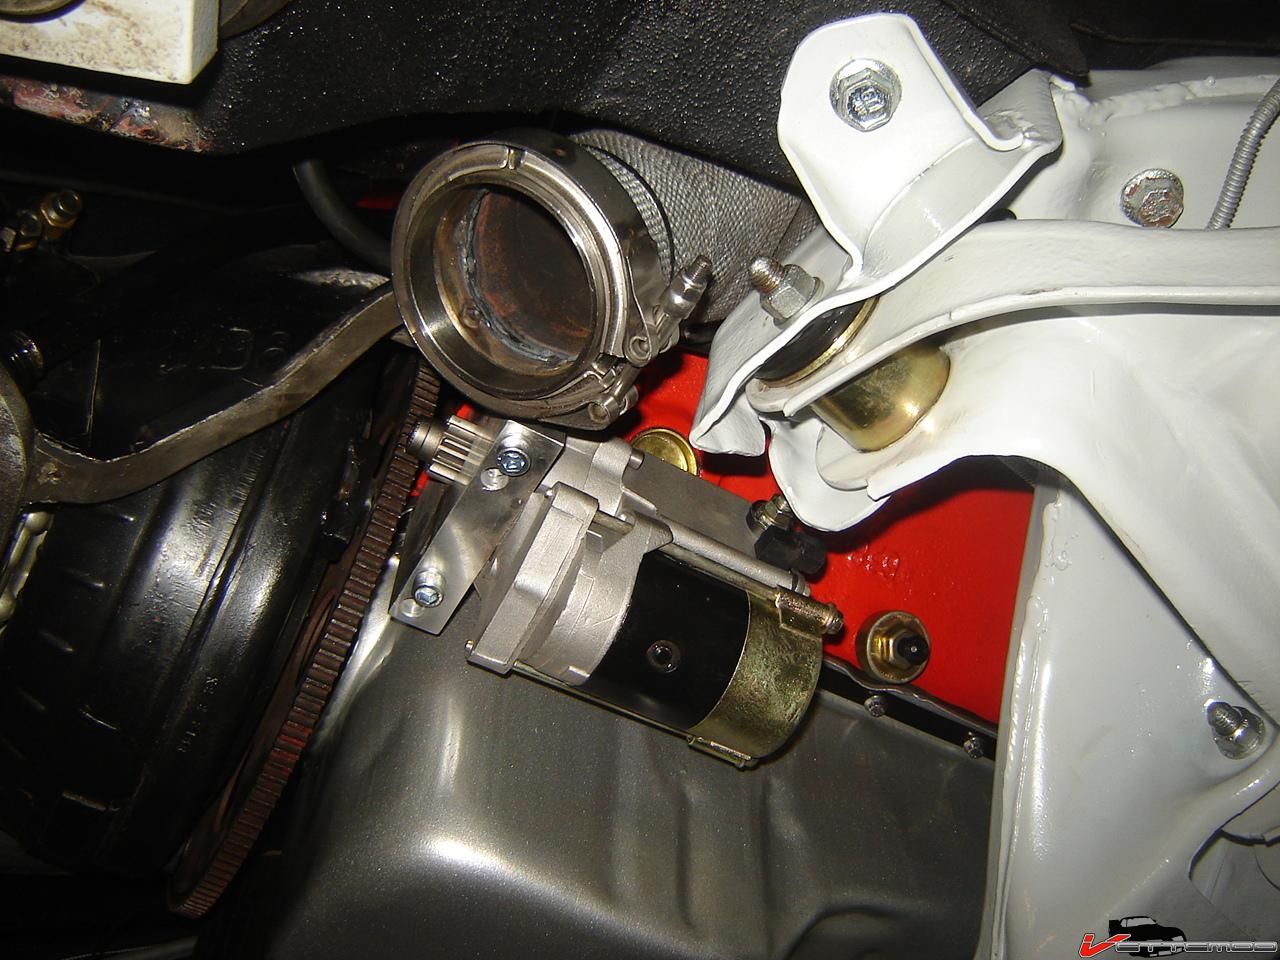
GM mini starter didn't even fit without cutting a small notch in the alu mounting block to clear the pan. Plenty of header clearance
My fuel pressure regulator setup and -4 AN feed to superfueler
Finalyly got the powermaster alternator
Hard to see but I can run the alternator off the front of the CV Products pulley w/ a 3 rib belt (more than enough)
I won't run it over the crank, no need to make it overly complicated.
Removed the rear window. Going to weld in the brackets for a locking rear compartment door (have the door, just didn't have the sheet metal for it) and then it's mostly done and it can go to the painters pretty soon
Still have to finish doing the reflectix/dynamat type stuff. I sprayed a bunch of wax in the hollow areas to keep it from rusting again
GM mini starter didn't even fit without cutting a small notch in the alu mounting block to clear the pan. Plenty of header clearance

Supreme Member
iTrader: (8)
Joined: Dec 2005
Posts: 2,412
Likes: 14
From: Northern CT
Car: 1986 Trans am
Engine: 5.3 LM7
Transmission: T56 6 speed
Axle/Gears: Dana 44 w/ 3.55's
Re: Pulling apart my 87 IROC
Engine is looking great! But those fuel injectors really set it off, hahaha. I havn't checked out your thread in a while. Car is coming along awesome. You have a lot more motivation than me. I just can't get off my butt in the winter, and my garage is small too so trying to work in a small cold garage is not fun! I do have a few pics to add to my restoration thread so be sure to check it out sometime. Keep up the awesome work!


Thread Starter
Joined: Jun 2000
Posts: 5,364
Likes: 51
From: Enschede, Netherlands
Car: 82 TA 87 IZ L98 88 IZ LB9 88 IZ L98
Engine: 5.7TBI 5,7TPI 5.0TPI, 5,7TPI
Transmission: T5, 700R4, T5, 700R4
Axle/Gears: 3.08, 3.27, 3.45, 3.27
Re: Pulling apart my 87 IROC
I'm hoping close to 500 or so, that would do it for me. 400+ would be acceptable.
Thread Starter
Joined: Jun 2000
Posts: 5,364
Likes: 51
From: Enschede, Netherlands
Car: 82 TA 87 IZ L98 88 IZ LB9 88 IZ L98
Engine: 5.7TBI 5,7TPI 5.0TPI, 5,7TPI
Transmission: T5, 700R4, T5, 700R4
Axle/Gears: 3.08, 3.27, 3.45, 3.27
Re: Pulling apart my 87 IROC
The seam sealer on these cars really is junk, I removed it all. It comes off real easy, almost like chipping off chocolate. Also repaired the last small surface rust spots and the rusted out penel edge where the weatherstripping slips over. Also welded the brackets in place for the locking rear compartment. All the rust should be gone now. I also sprayed the hollow areas full with bitumen to keep rust from forming there.
I think I'm gonna spray the lock area where the flip down plate bracket mounts semi flat black and then shoot the rest of the rear panel with some more bedliner, keeps is free from rust and I've always hated the fact that you see body color between the tail lights
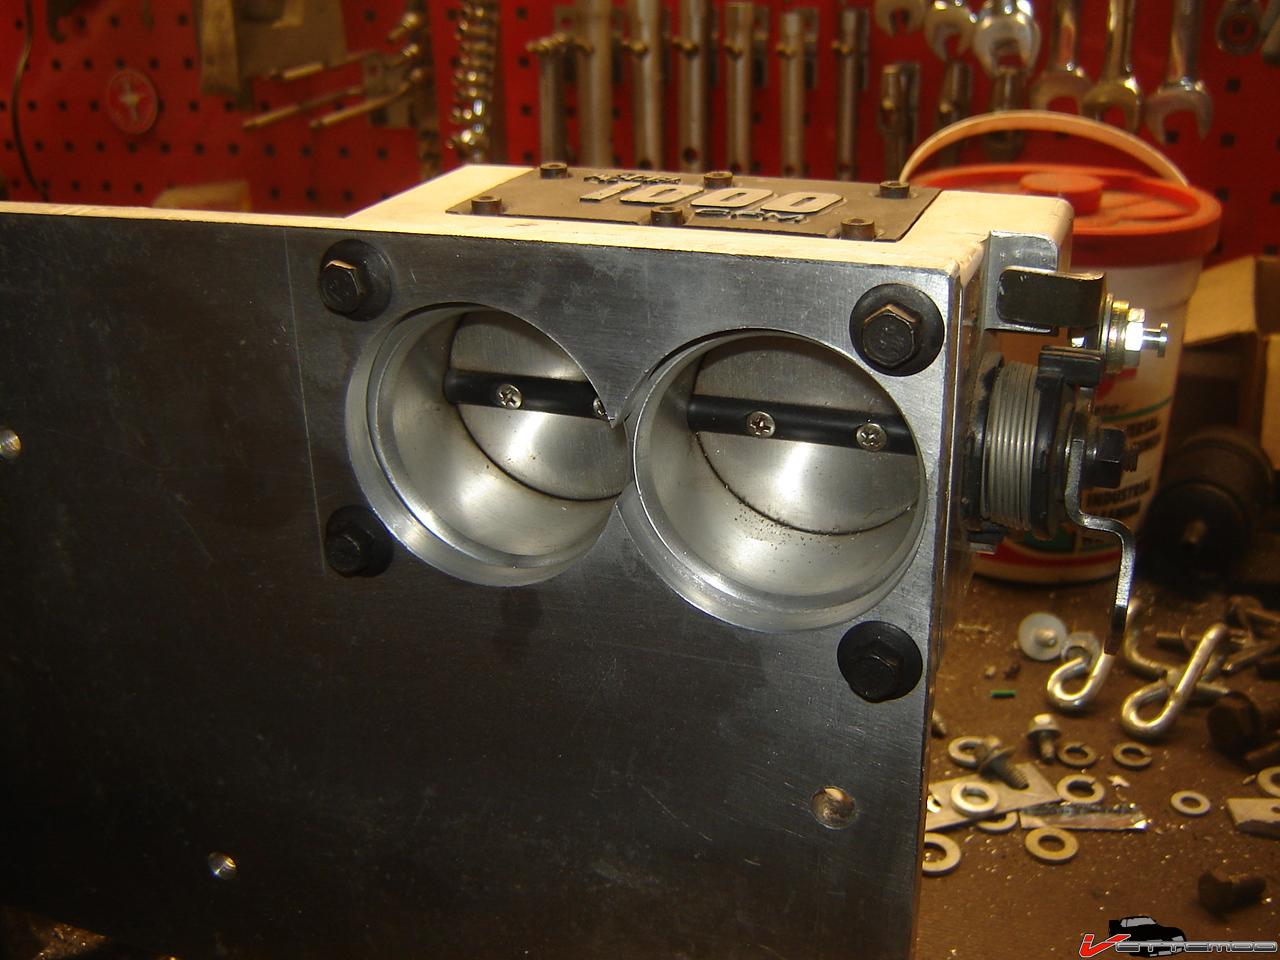
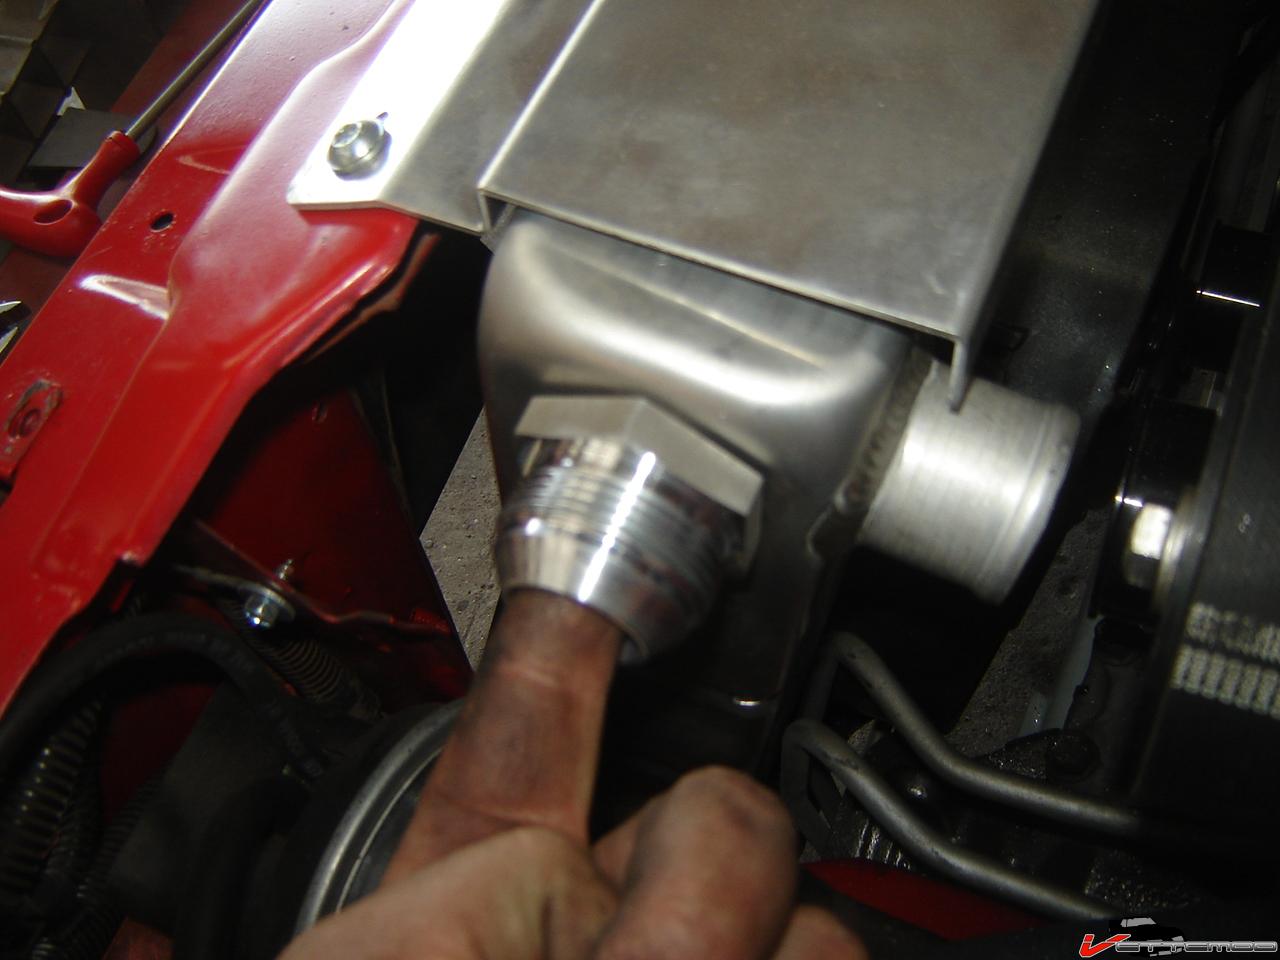
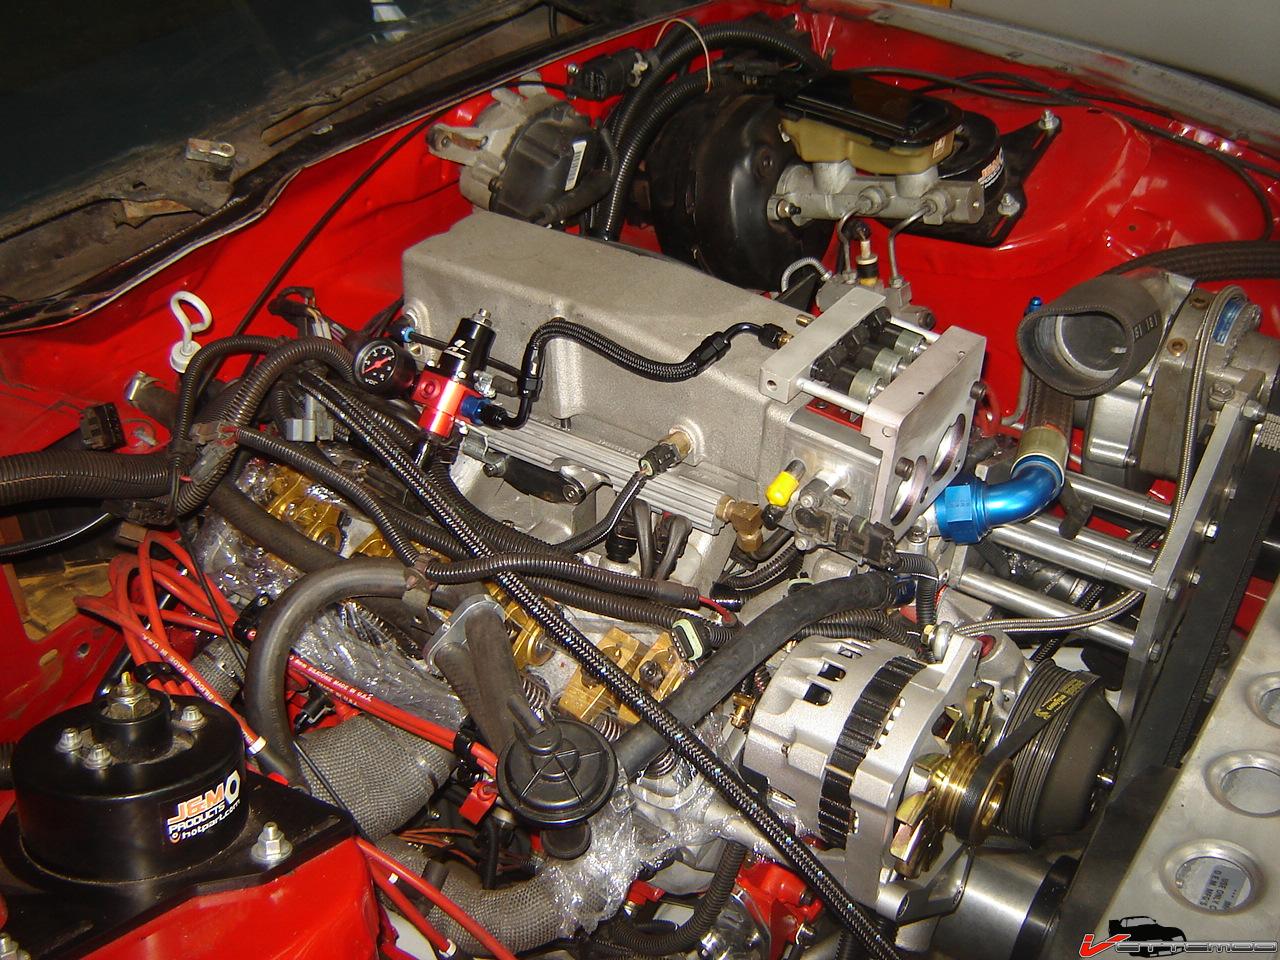
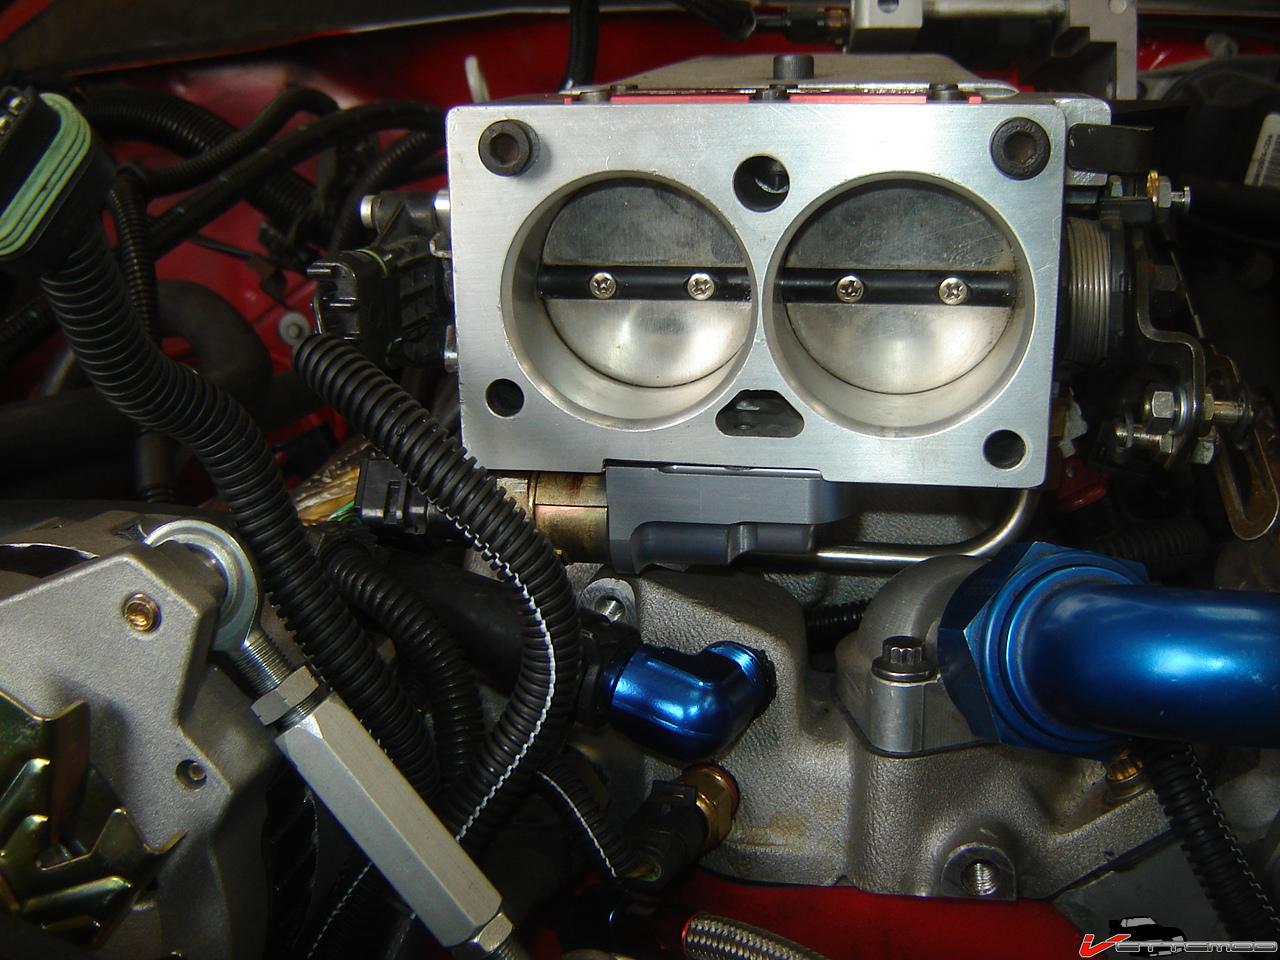
Started fabbing an aluminum elbow/mounting flange for the 58mm TB this so I can do away with a rubber or silicone hose connection there
I think I'm gonna spray the lock area where the flip down plate bracket mounts semi flat black and then shoot the rest of the rear panel with some more bedliner, keeps is free from rust and I've always hated the fact that you see body color between the tail lights
Started fabbing an aluminum elbow/mounting flange for the 58mm TB this so I can do away with a rubber or silicone hose connection there
Last edited by Twin_Turbo; Mar 10, 2010 at 11:03 AM.
Senior Member
iTrader: (1)
Joined: Oct 2005
Posts: 545
Likes: 23
From: IN
Car: 88, 89 & 91 GTA
Engine: 355 Super Ram/350
Transmission: TH-375/700R4
Axle/Gears: Currie Ford 9"/3.70
Re: Pulling apart my 87 IROC
What are you using for seam sealer and where did you get it?
Thread Starter
Joined: Jun 2000
Posts: 5,364
Likes: 51
From: Enschede, Netherlands
Car: 82 TA 87 IZ L98 88 IZ LB9 88 IZ L98
Engine: 5.7TBI 5,7TPI 5.0TPI, 5,7TPI
Transmission: T5, 700R4, T5, 700R4
Axle/Gears: 3.08, 3.27, 3.45, 3.27
Re: Pulling apart my 87 IROC
3m urethane seam sealer.
Thread Starter
Joined: Jun 2000
Posts: 5,364
Likes: 51
From: Enschede, Netherlands
Car: 82 TA 87 IZ L98 88 IZ LB9 88 IZ L98
Engine: 5.7TBI 5,7TPI 5.0TPI, 5,7TPI
Transmission: T5, 700R4, T5, 700R4
Axle/Gears: 3.08, 3.27, 3.45, 3.27
Re: Pulling apart my 87 IROC
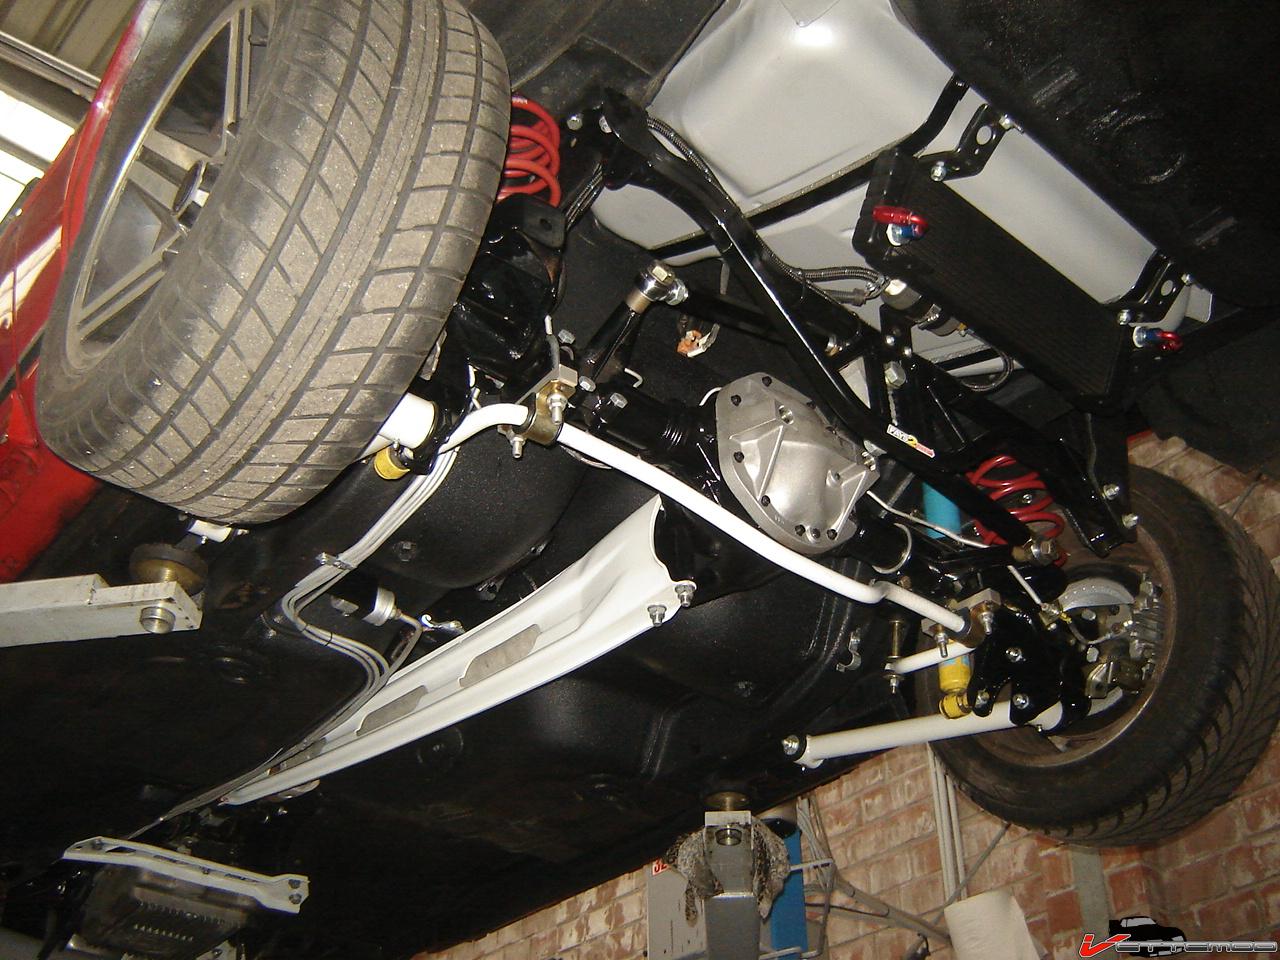
Figured out how to mount my transmission cooler. I figured this would be the best spot. Eliminates a pesky line running to the front and there's plenty of room here and if needed I can either hook up some detmar tunnel blowers w/ 3" brake cooling hose to force cool the core if there's not enough flow there.
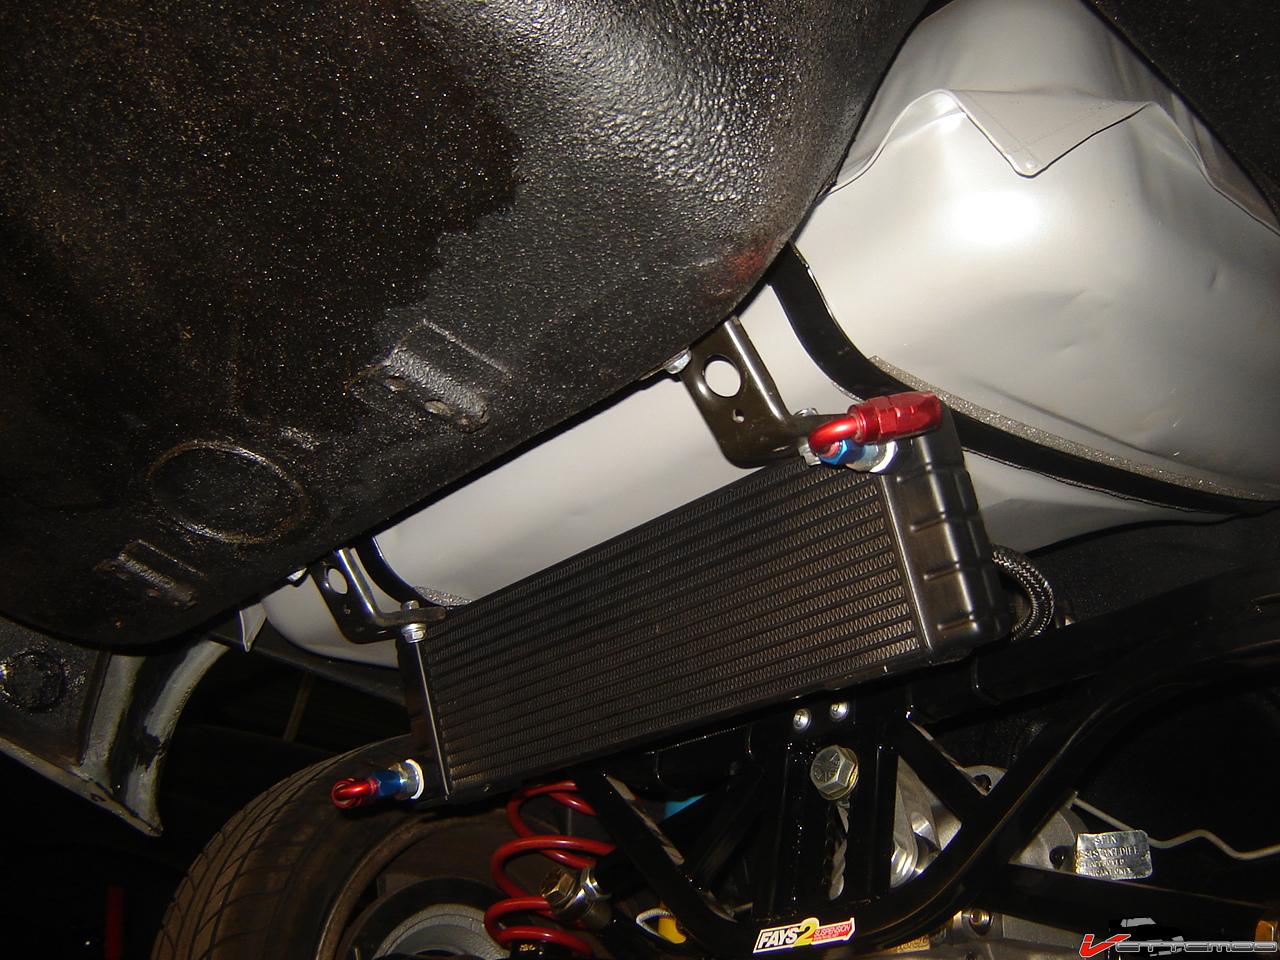
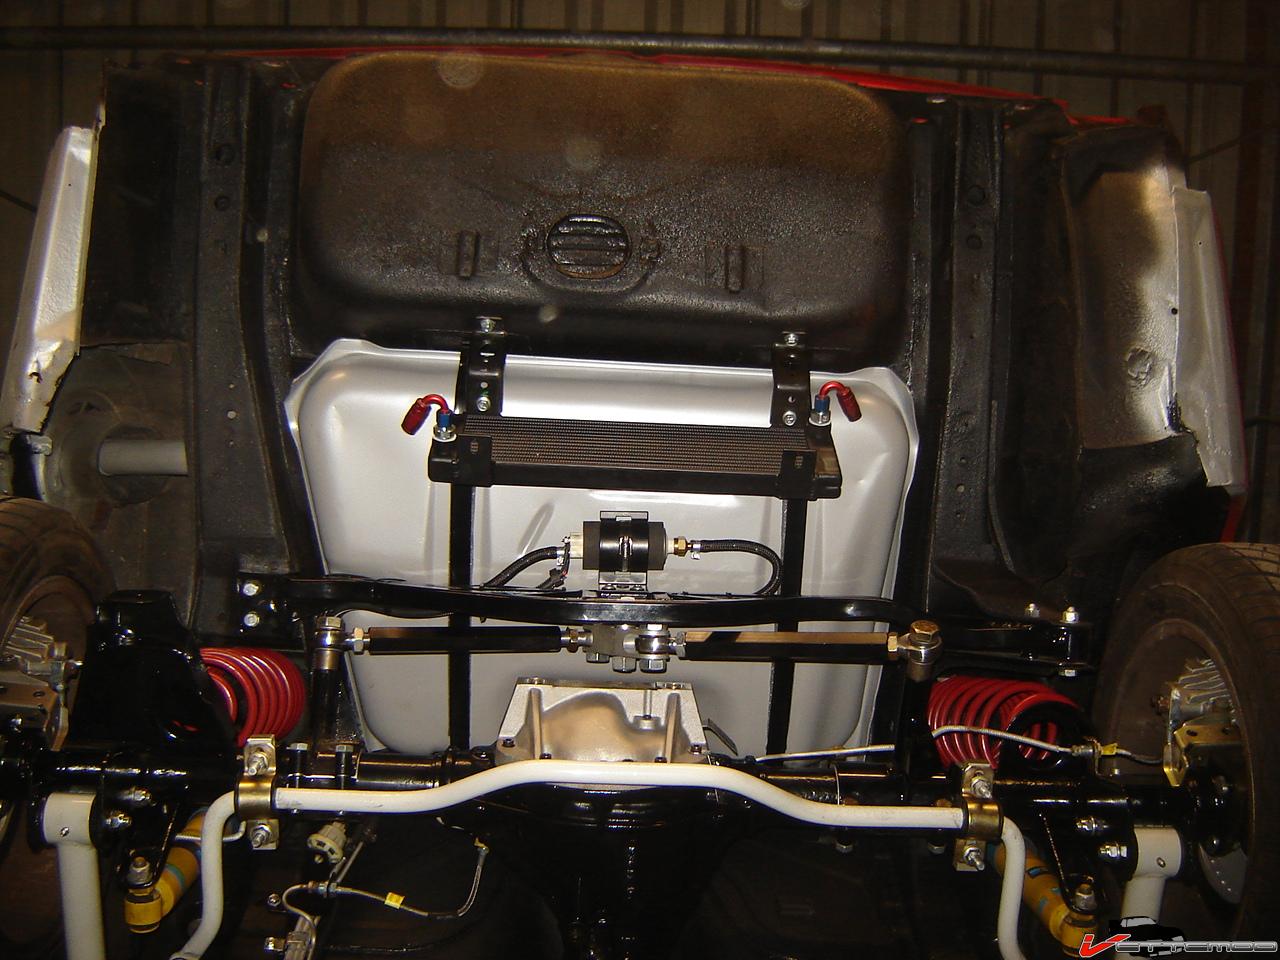
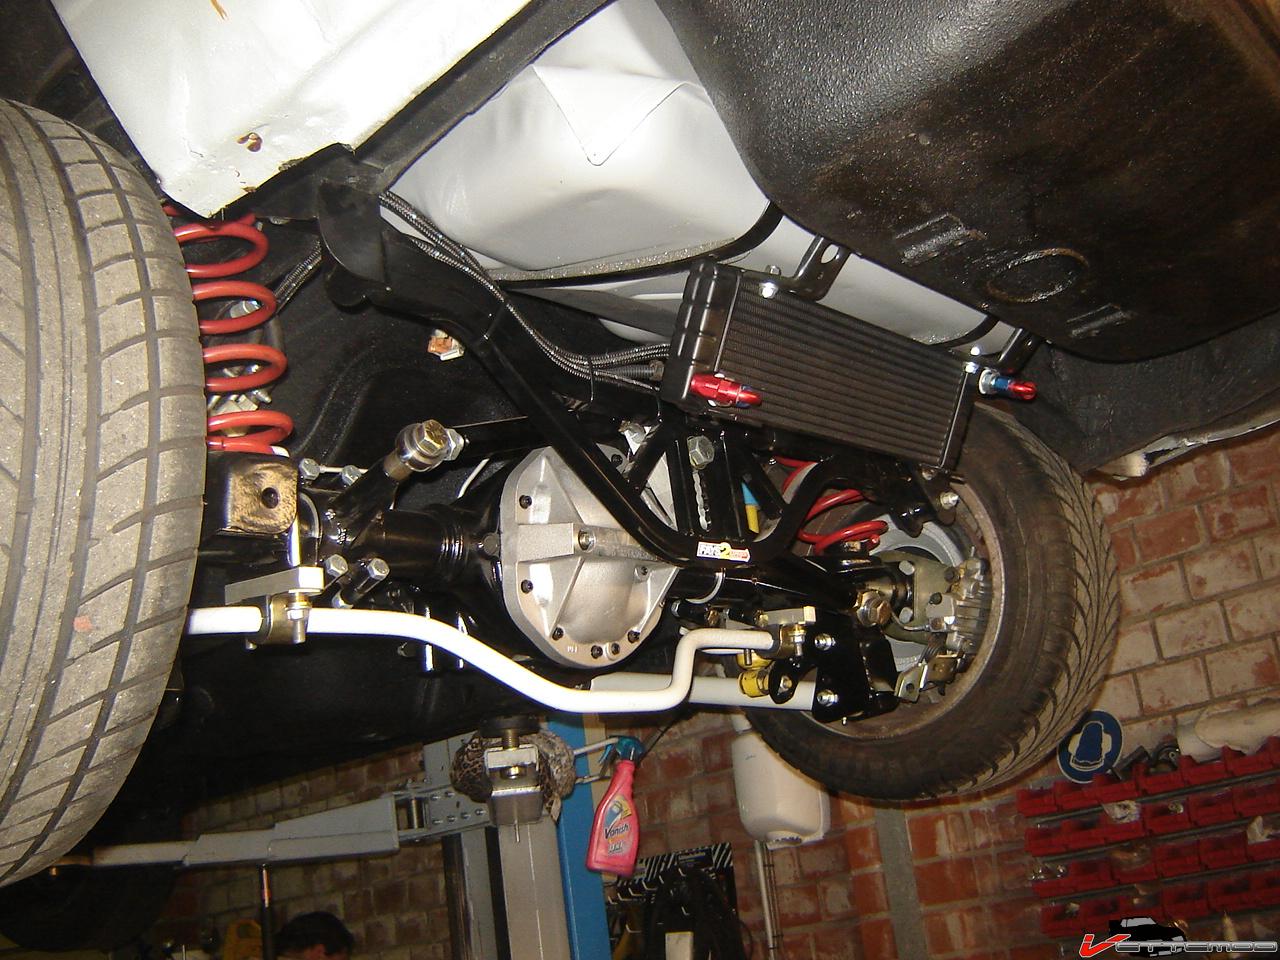
Probably going to add a little duct or scoop that will double as the lower mounts so the cooler doesn't flop around.
Probably going to add a little duct or scoop that will double as the lower mounts so the cooler doesn't flop around.
Supreme Member
iTrader: (1)
Joined: Jun 2009
Posts: 1,777
Likes: 0
From: Central Connecticut
Car: 91 Trans Am 'vert
Engine: LB9
Transmission: T5
Axle/Gears: 3.45 9 bolt
Re: Pulling apart my 87 IROC
Man that's so cool... good job!
And I meant to ask... is this thing gonna be driven as God intended or is she gonna be a garage queen?
And I meant to ask... is this thing gonna be driven as God intended or is she gonna be a garage queen?
Last edited by musclecar70sfan; Mar 13, 2010 at 04:53 PM.
Thread Starter
Joined: Jun 2000
Posts: 5,364
Likes: 51
From: Enschede, Netherlands
Car: 82 TA 87 IZ L98 88 IZ LB9 88 IZ L98
Engine: 5.7TBI 5,7TPI 5.0TPI, 5,7TPI
Transmission: T5, 700R4, T5, 700R4
Axle/Gears: 3.08, 3.27, 3.45, 3.27
Re: Pulling apart my 87 IROC
No muffler there, I'm using 2 smaller mufflers up near the front and a side exit on the passenger side.
This is gonna be my DD I hate trailer queens
This is gonna be my DD I hate trailer queens
Last edited by Twin_Turbo; Mar 14, 2010 at 01:57 AM.
Supreme Member
iTrader: (1)
Joined: Jun 2009
Posts: 1,777
Likes: 0
From: Central Connecticut
Car: 91 Trans Am 'vert
Engine: LB9
Transmission: T5
Axle/Gears: 3.45 9 bolt

Thread Starter
Joined: Jun 2000
Posts: 5,364
Likes: 51
From: Enschede, Netherlands
Car: 82 TA 87 IZ L98 88 IZ LB9 88 IZ L98
Engine: 5.7TBI 5,7TPI 5.0TPI, 5,7TPI
Transmission: T5, 700R4, T5, 700R4
Axle/Gears: 3.08, 3.27, 3.45, 3.27
Re: Pulling apart my 87 IROC
Yes, that's why...and I thought I was finished but found 2 little holes on the a pillar bottom, just in front of the door  The problem there was, with some tool jacking under there the lip that holds the fender was bent and this caused the 2 sections to separate allowing water past the crappy factory seam sealer. A little more welding I guess...oh well.
The problem there was, with some tool jacking under there the lip that holds the fender was bent and this caused the 2 sections to separate allowing water past the crappy factory seam sealer. A little more welding I guess...oh well. 
Thread Starter
Joined: Jun 2000
Posts: 5,364
Likes: 51
From: Enschede, Netherlands
Car: 82 TA 87 IZ L98 88 IZ LB9 88 IZ L98
Engine: 5.7TBI 5,7TPI 5.0TPI, 5,7TPI
Transmission: T5, 700R4, T5, 700R4
Axle/Gears: 3.08, 3.27, 3.45, 3.27
Re: Pulling apart my 87 IROC
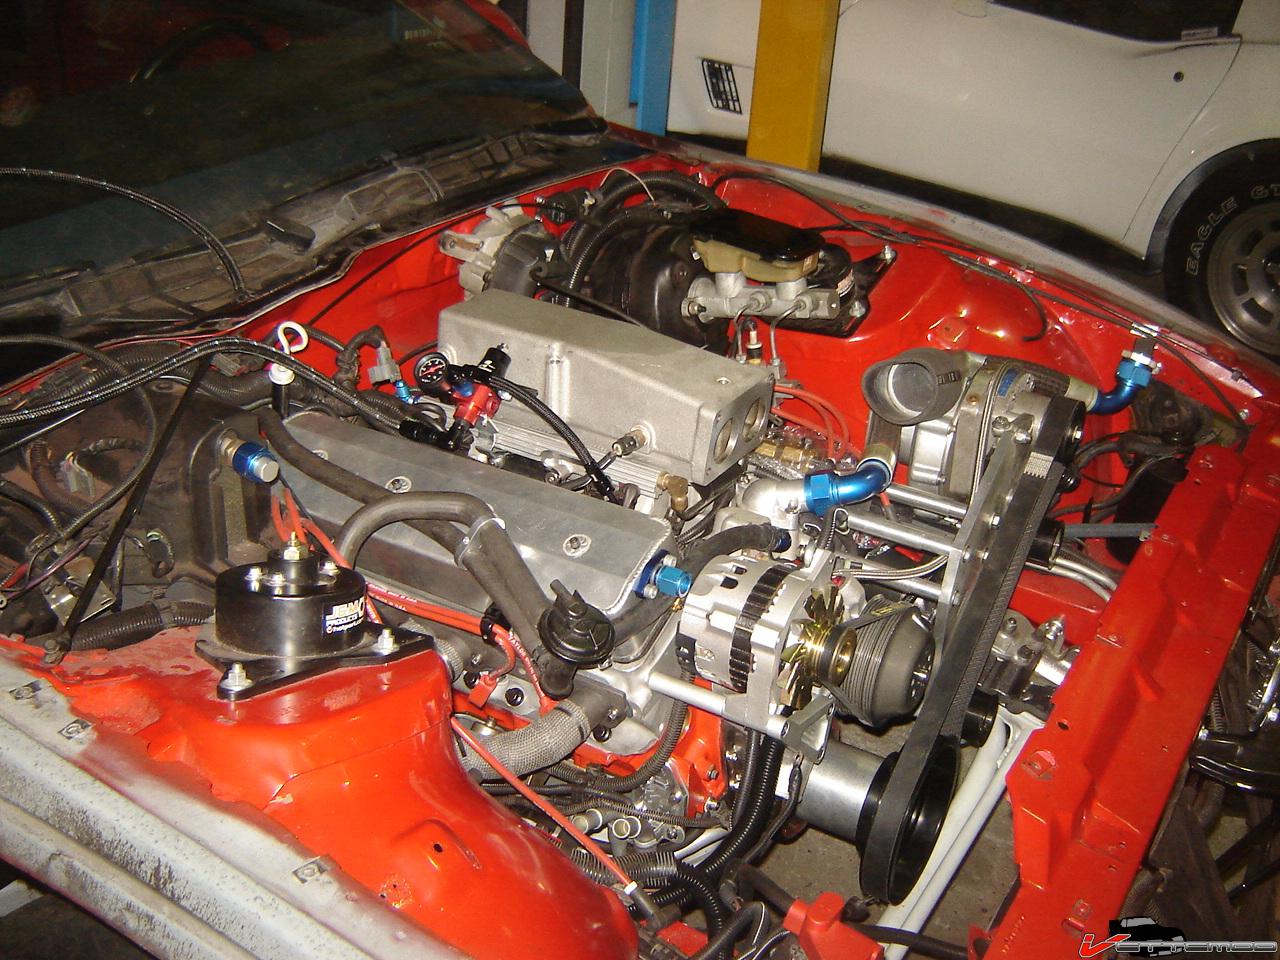
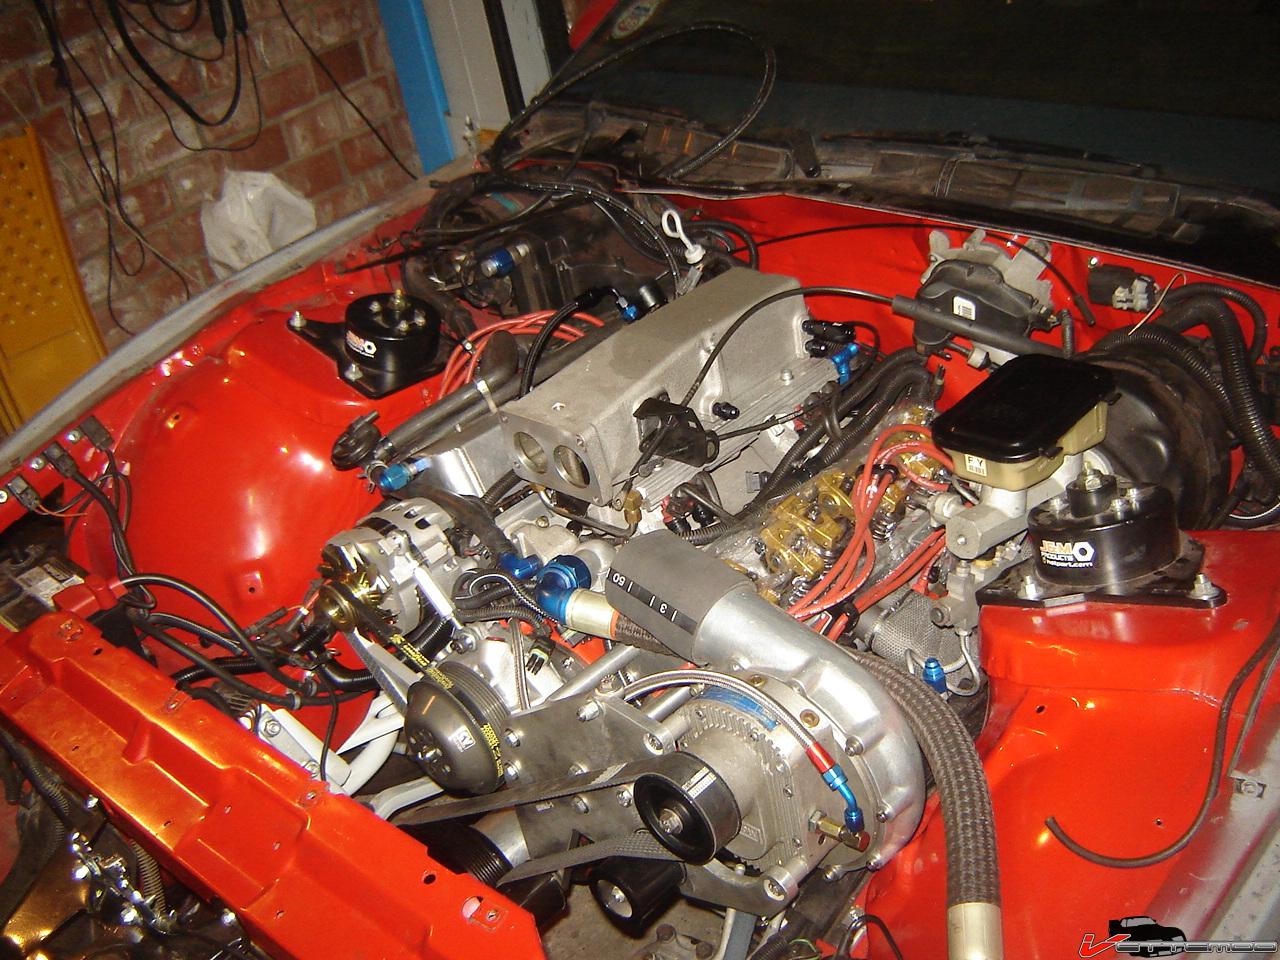
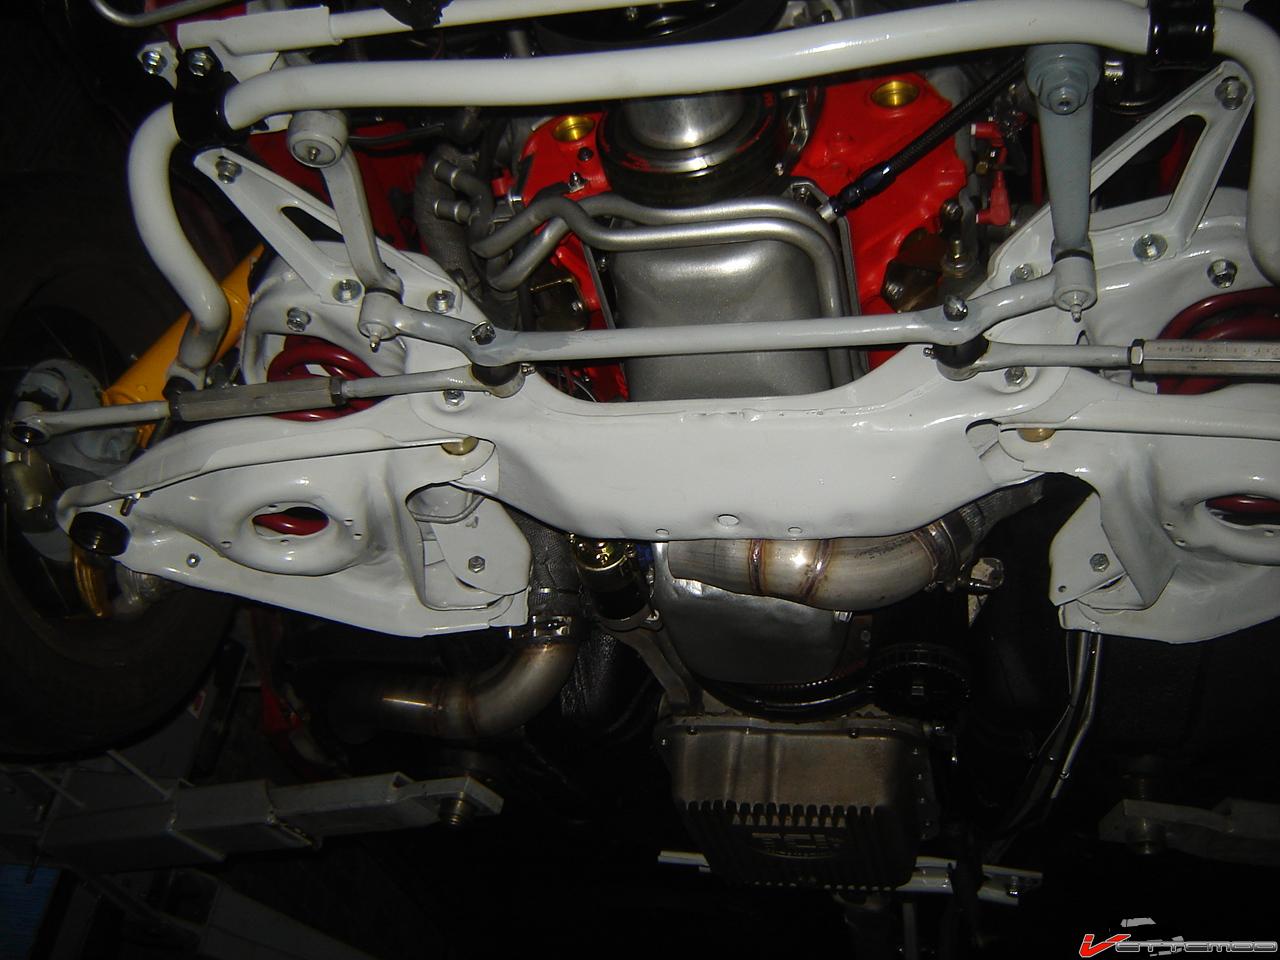
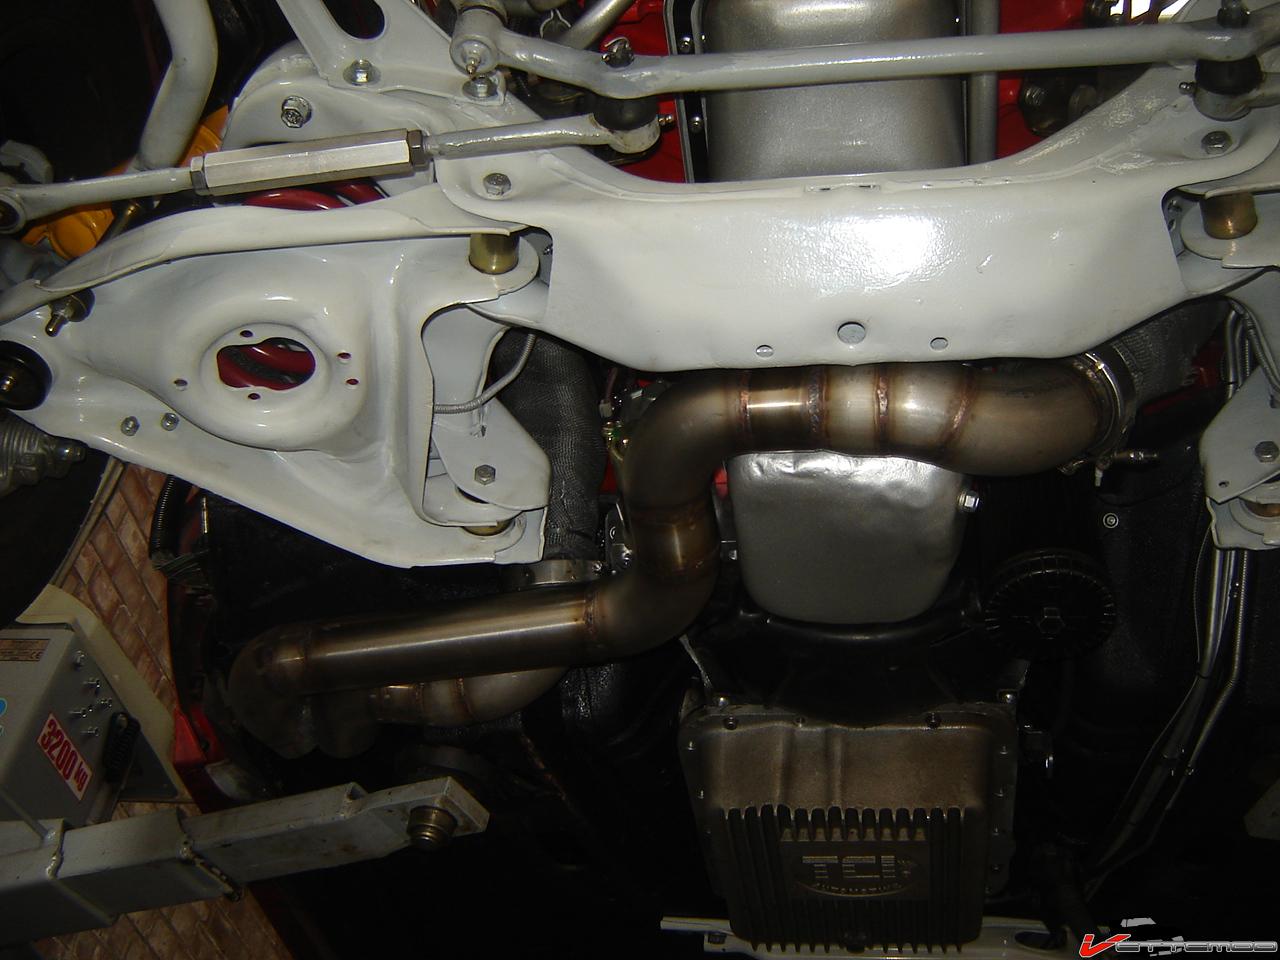
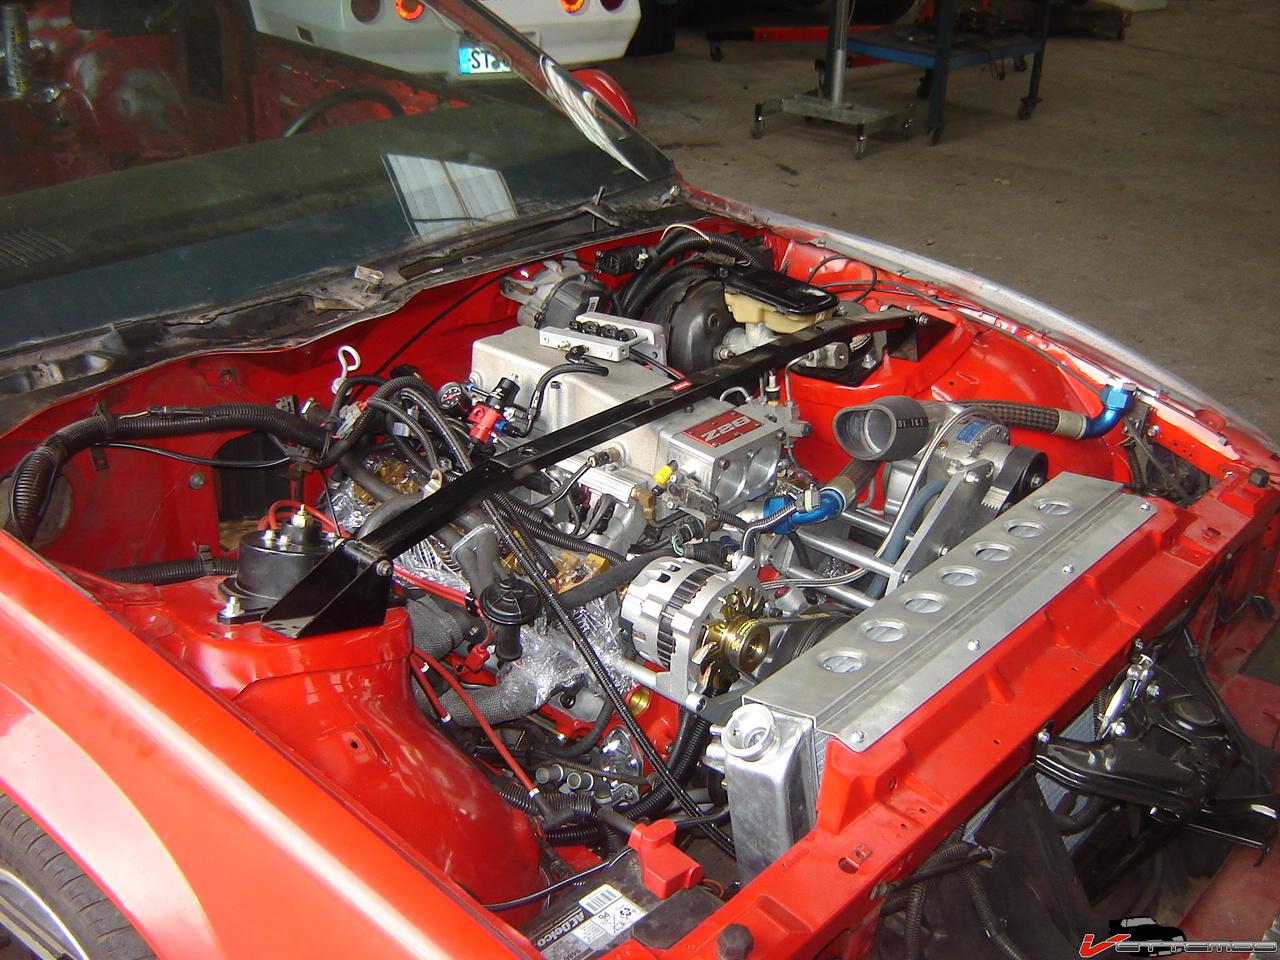
Finally got the engine and tranny in and the driveline buttoned up. Headers were once again a bitch to install and the thick wrap and high cover rails on the heads didn't make it a lot easier. Even had to undo the steering coupler.
Sure feels good to once again make some significant progress instead of fiddling with small stuff. The SC is a super tight fit, in other words...it touches the fender. Oh well, won't move anyway because I have moroso solid mounts.
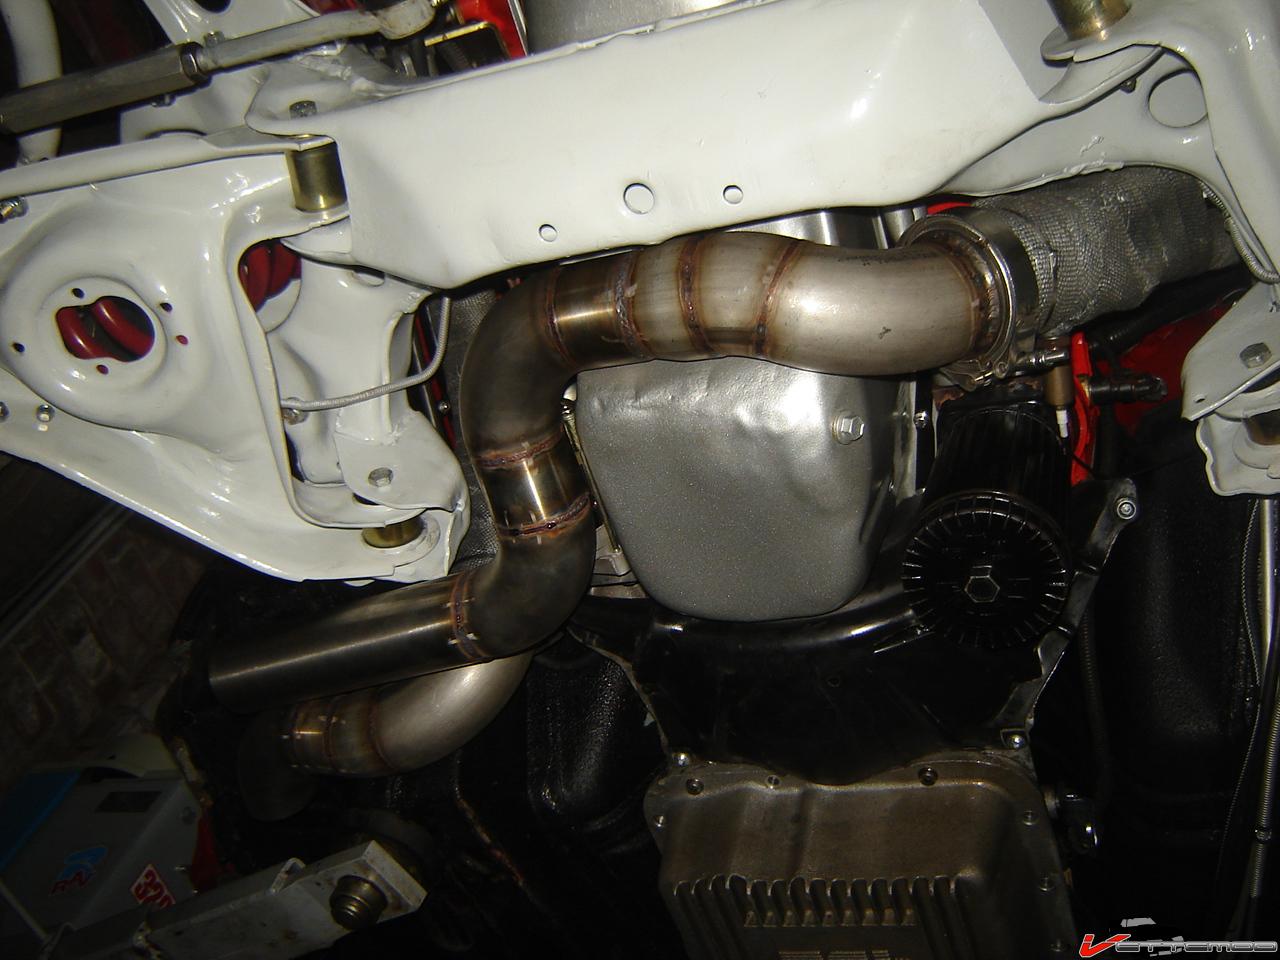
The V band connections are both in a pretty good spot when it comes to accessing them and hooking up the rest of the system. Time to order a boat load of 2.75" stainless pipe and weld els and get cracking on the exhaust. It's going to be a dual no cross over 2 bullet mufflers into a boom tube on the pass side. Prolly going to be stupid loud but that's OK, I'm sitting on the other end of the car LOL
Sure feels good to once again make some significant progress instead of fiddling with small stuff. The SC is a super tight fit, in other words...it touches the fender. Oh well, won't move anyway because I have moroso solid mounts.
The V band connections are both in a pretty good spot when it comes to accessing them and hooking up the rest of the system. Time to order a boat load of 2.75" stainless pipe and weld els and get cracking on the exhaust. It's going to be a dual no cross over 2 bullet mufflers into a boom tube on the pass side. Prolly going to be stupid loud but that's OK, I'm sitting on the other end of the car LOL

Member

Joined: Jan 2010
Posts: 247
Likes: 8
Re: Pulling apart my 87 IROC
Not sure if you already answered this but... why did you paint the subframe, tie rods, ect. white? seems like they will look exptremely dirty all the time haha
Car looks great man cant wait to see it done.
Car looks great man cant wait to see it done.
Thread Starter
Joined: Jun 2000
Posts: 5,364
Likes: 51
From: Enschede, Netherlands
Car: 82 TA 87 IZ L98 88 IZ LB9 88 IZ L98
Engine: 5.7TBI 5,7TPI 5.0TPI, 5,7TPI
Transmission: T5, 700R4, T5, 700R4
Axle/Gears: 3.08, 3.27, 3.45, 3.27
Re: Pulling apart my 87 IROC
It's gray, the flash on the camera makes it turn out white. And yes, it will get dirty but it easily wipes off the powdercoat. It's not painted. I'll admit the coating came out a little lighter than I wanted to but just look at the huge batch that was done, I wasn't going to have it redone. Live & learn I guess. It was supposed to be the color of the pitman arm (on the steering box) .

Junior Member
Joined: Sep 2009
Posts: 18
Likes: 0
From: NJ
Car: 1986 Camaro, 2002 WRX, 2005 STi
Engine: 305ci LG4 4-Barrel
Transmission: 700R4 with Corvette Internals
Axle/Gears: One-Wheel Wonder
Re: Pulling apart my 87 IROC
Wow, awesome job, I will def be following this! Can I send over my '86 Camaro for you to restore?!?! Everything I have in my head, you did already haha.
Thread Starter
Joined: Jun 2000
Posts: 5,364
Likes: 51
From: Enschede, Netherlands
Car: 82 TA 87 IZ L98 88 IZ LB9 88 IZ L98
Engine: 5.7TBI 5,7TPI 5.0TPI, 5,7TPI
Transmission: T5, 700R4, T5, 700R4
Axle/Gears: 3.08, 3.27, 3.45, 3.27
Re: Pulling apart my 87 IROC
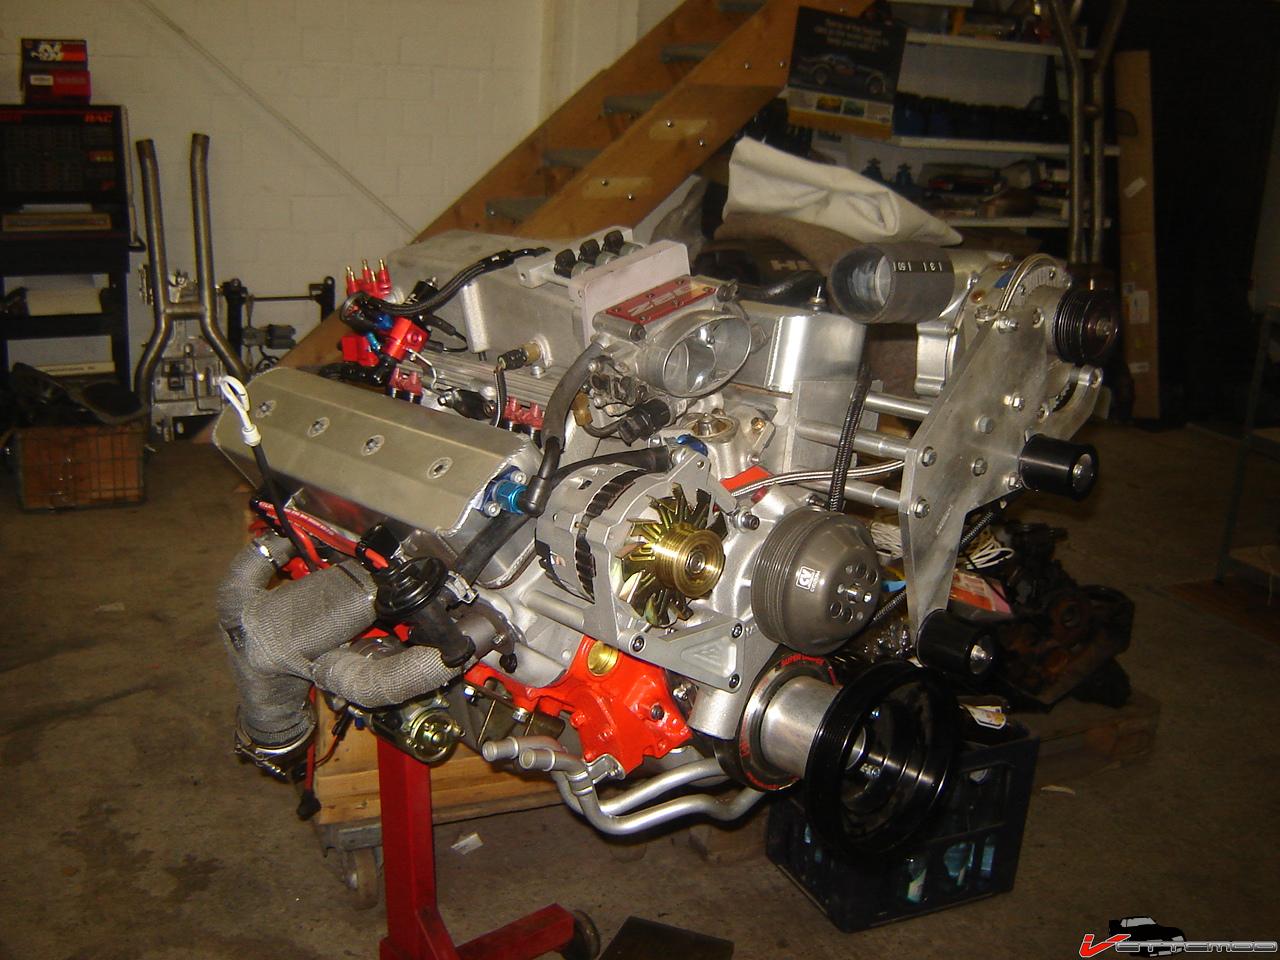
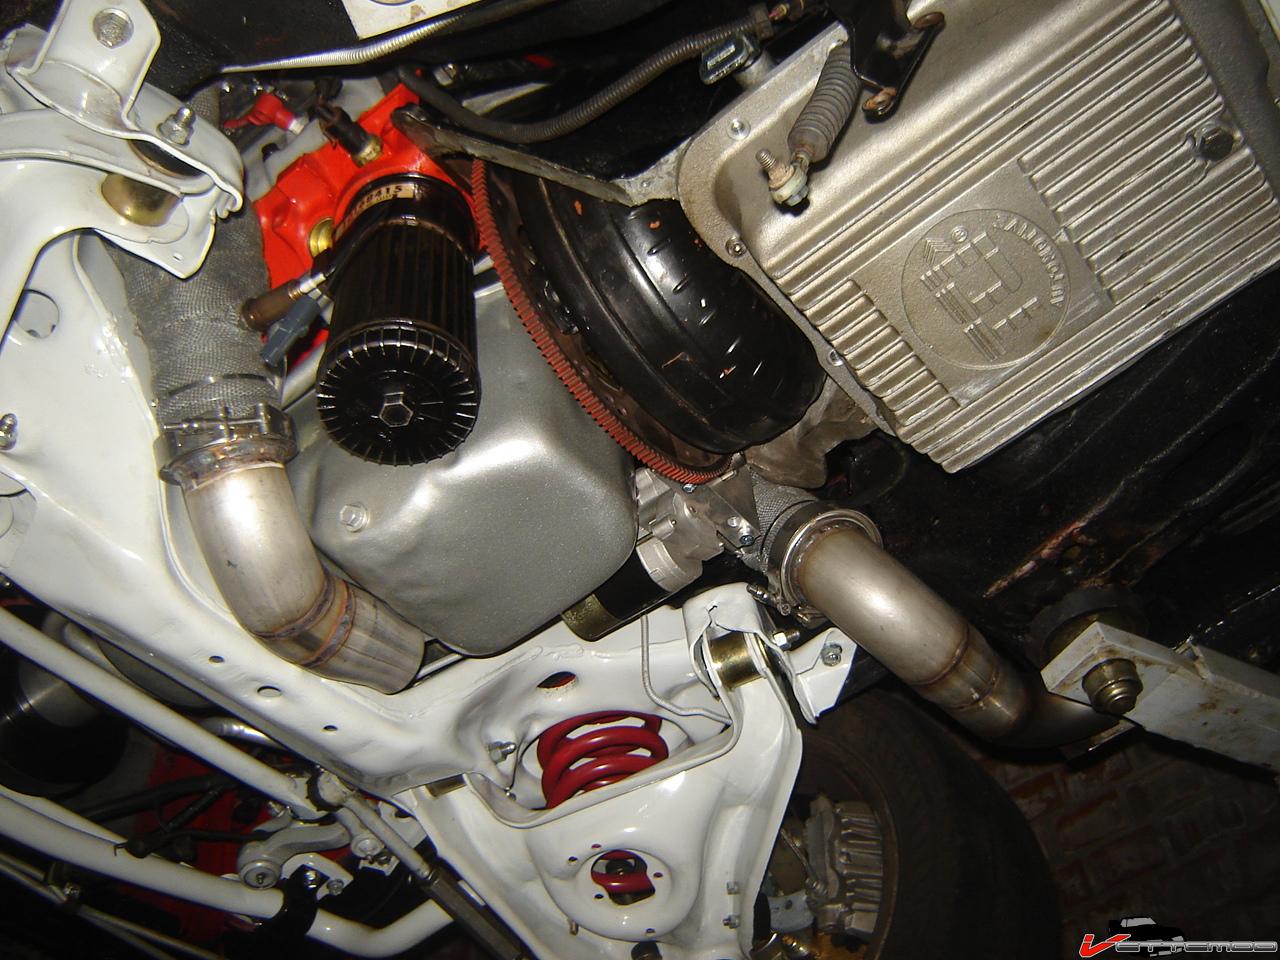
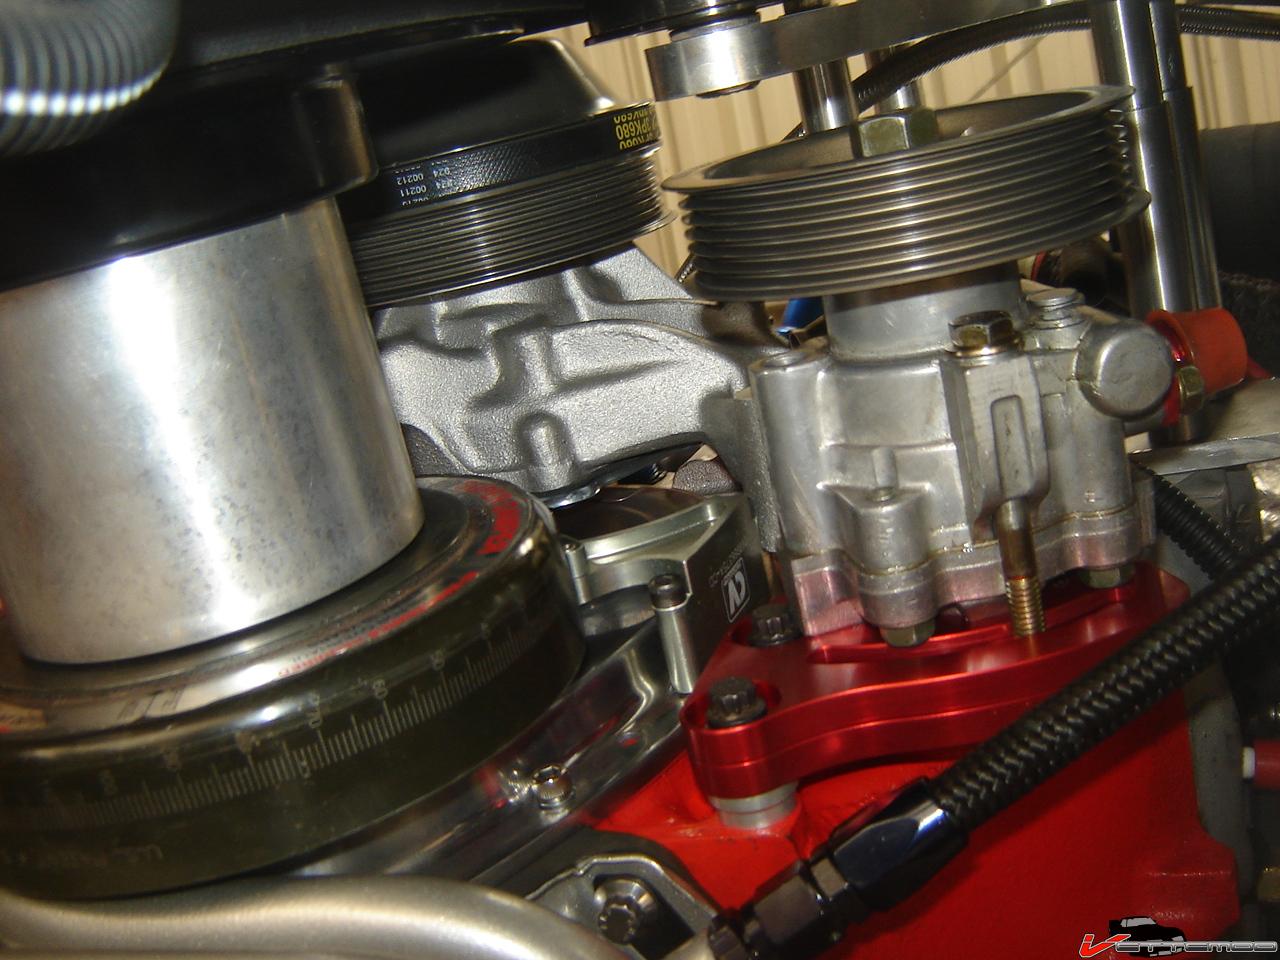
The drive system is working out pretty well, need to add the KRC pump still and add a pulley to the crank. The drive spacer for the procharger is too long as it it, about 1mm. The thickness of the pulley will add to that so I'll have to machine it down but it'll be perfect then
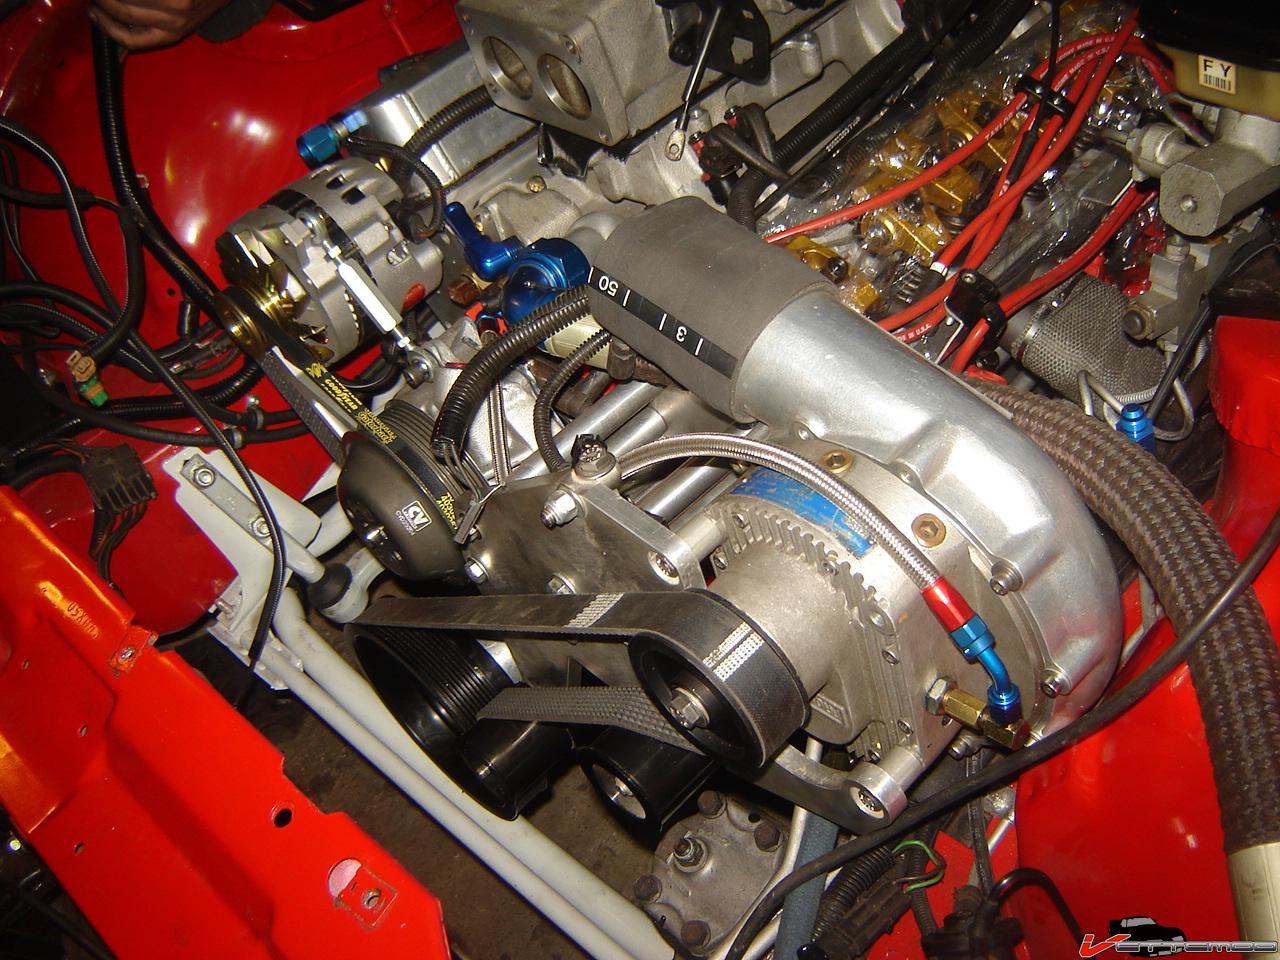
I'm not liking the stock heater hose routing, i'll need to add a longer hose for the one to the core and a shorter one to the tube on the frame
the valve covers don't fit particularly well either It's hitting the heater box but I'm swapping that one out for a non AC one. The other side is a PITA to remove because of the hose nipple on the washer pump hanging down from the wiper motor. I'll have to modify that valve cover. Otherwise there's a good chance I'll break off the hose nipple on the pump.
The gold cad plated alternator pulley is for a 6 rib belt, I'm running a 3 rib and the pulley will be replaced by a KRC 3 rib one, same color gray as the water pump pulley and the still to be installed KRC power steering pulley set. The crank pulley is black but I'm thinking about painting it to match. Powdercoating would add too much thickness to the groove and I'd hate to have a slipping belt.
I'm not liking the stock heater hose routing, i'll need to add a longer hose for the one to the core and a shorter one to the tube on the frame
the valve covers don't fit particularly well either
It's hitting the heater box but I'm swapping that one out for a non AC one. The other side is a PITA to remove because of the hose nipple on the washer pump hanging down from the wiper motor. I'll have to modify that valve cover. Otherwise there's a good chance I'll break off the hose nipple on the pump. The gold cad plated alternator pulley is for a 6 rib belt, I'm running a 3 rib and the pulley will be replaced by a KRC 3 rib one, same color gray as the water pump pulley and the still to be installed KRC power steering pulley set. The crank pulley is black but I'm thinking about painting it to match. Powdercoating would add too much thickness to the groove and I'd hate to have a slipping belt.
Supreme Member
Joined: Nov 2008
Posts: 1,545
Likes: 10
From: South Carolina
Car: 85 2M6, 87 'Bird 88 'burb
Engine: LX9, LG4, L05
Transmission: F23, 700r4, 700R4
Axle/Gears: 3.63, 2.73, 4.10
Re: Pulling apart my 87 IROC
Question for ya TT, how did you go about removing the seam sealer in your car?? I've tried heat, and a couple of chemicals, and haven't had much luck, you didn't sandblast it did you?
Thread Starter
Joined: Jun 2000
Posts: 5,364
Likes: 51
From: Enschede, Netherlands
Car: 82 TA 87 IZ L98 88 IZ LB9 88 IZ L98
Engine: 5.7TBI 5,7TPI 5.0TPI, 5,7TPI
Transmission: T5, 700R4, T5, 700R4
Axle/Gears: 3.08, 3.27, 3.45, 3.27
Re: Pulling apart my 87 IROC
Flat blade screw driver, it was like poking out chocolate. So brittle, there was absolutely no "stick on there-etness" to it.
Thread Starter
Joined: Jun 2000
Posts: 5,364
Likes: 51
From: Enschede, Netherlands
Car: 82 TA 87 IZ L98 88 IZ LB9 88 IZ L98
Engine: 5.7TBI 5,7TPI 5.0TPI, 5,7TPI
Transmission: T5, 700R4, T5, 700R4
Axle/Gears: 3.08, 3.27, 3.45, 3.27
Re: Pulling apart my 87 IROC
more progress. Got the parking brake cables done, these are ACDelco pieces and they didn't fit. I had to substantially enlarge (with a file) the slots that the little lever goes through.
That's all done now, after I adjust the cable I'll know of they work OK. Manually pulling the lever on the calipers sure does hold the disc pretty darn well, better than my old calipers.
Removed my AC heater core, bought a non AC unit. No rust anywhere in sight, just a bunch of sand and crappy seam that I removed and resealed later.
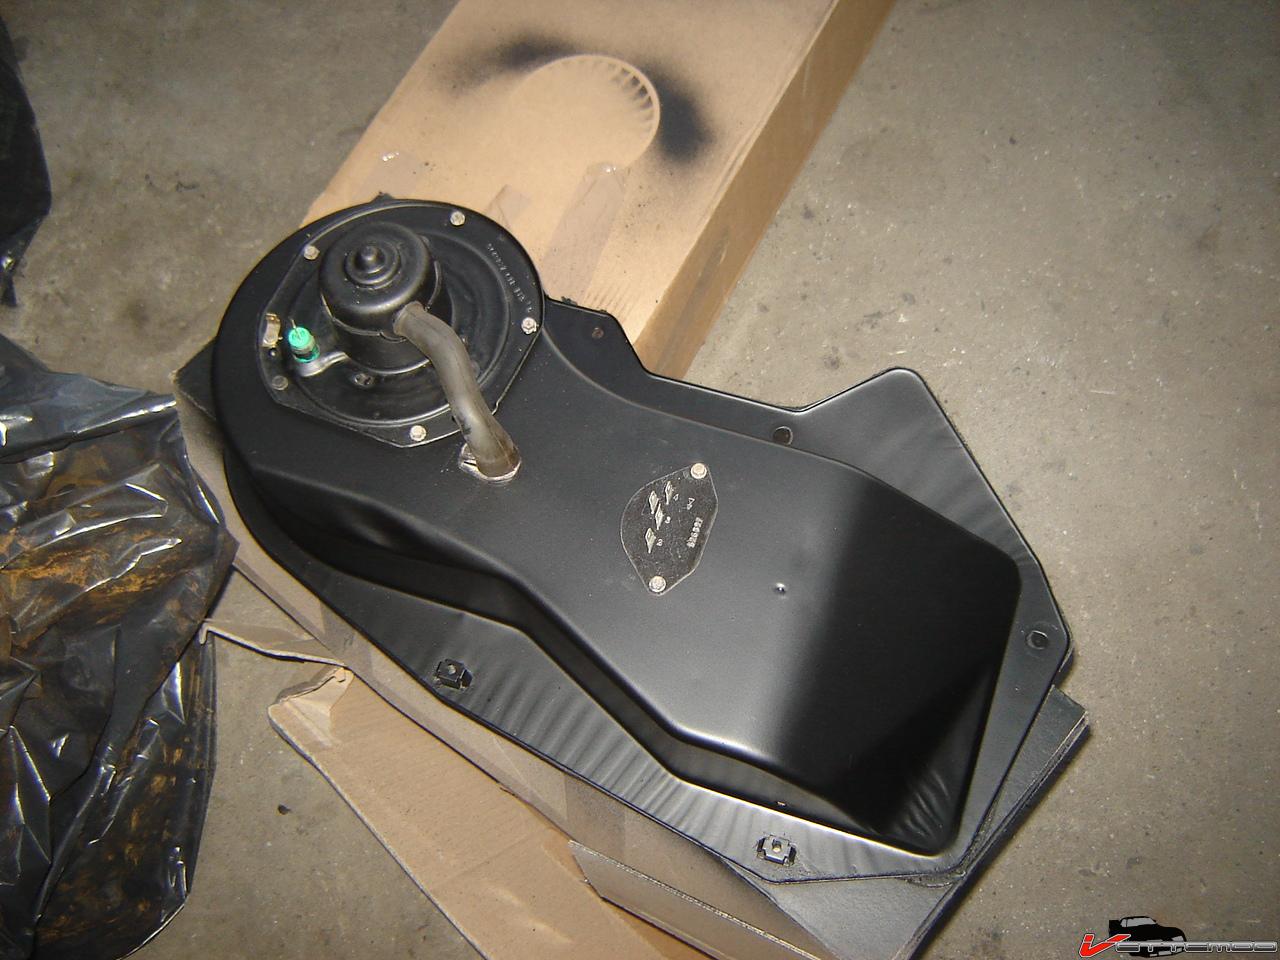
New (to me) heater box, stripped & painted. Unfortunately the old motor does't fit, the squirrel cage is much larger. Explains why the heater in this car used to blow a lot harder than in the 88 (non AC car). Swapped the resistor block for the old one off my AC unit so I don't have to cut wires and retain the relay operated stuff. I'm also going to add the little bracket for the relay that came off the old box. I simply put another brake in the bracket so it is more like a Z now since originally it's mounted with the mounting tab horizontal.
Gotta paint that area red first before I'm going to put the box on.
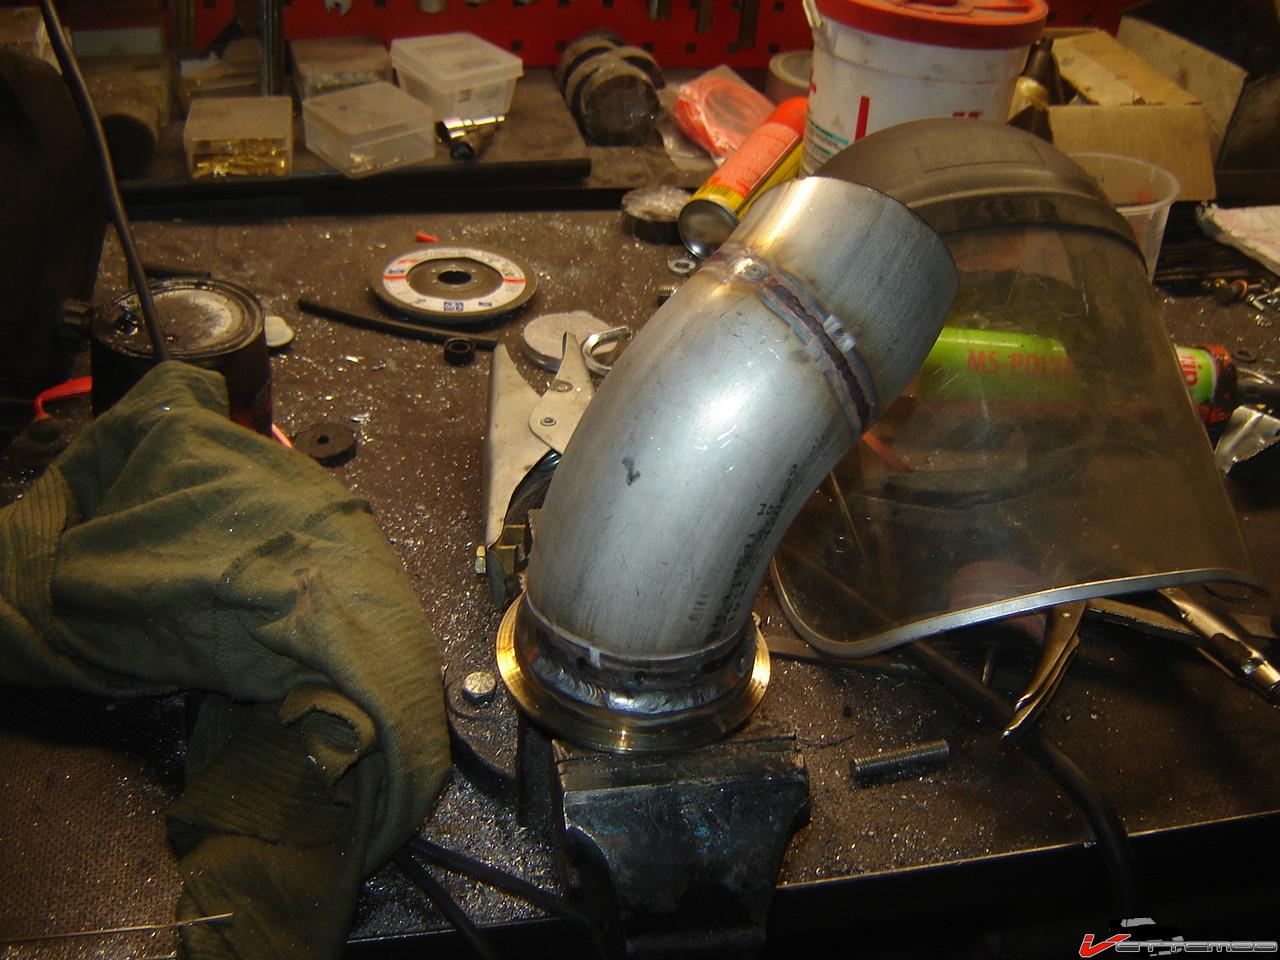
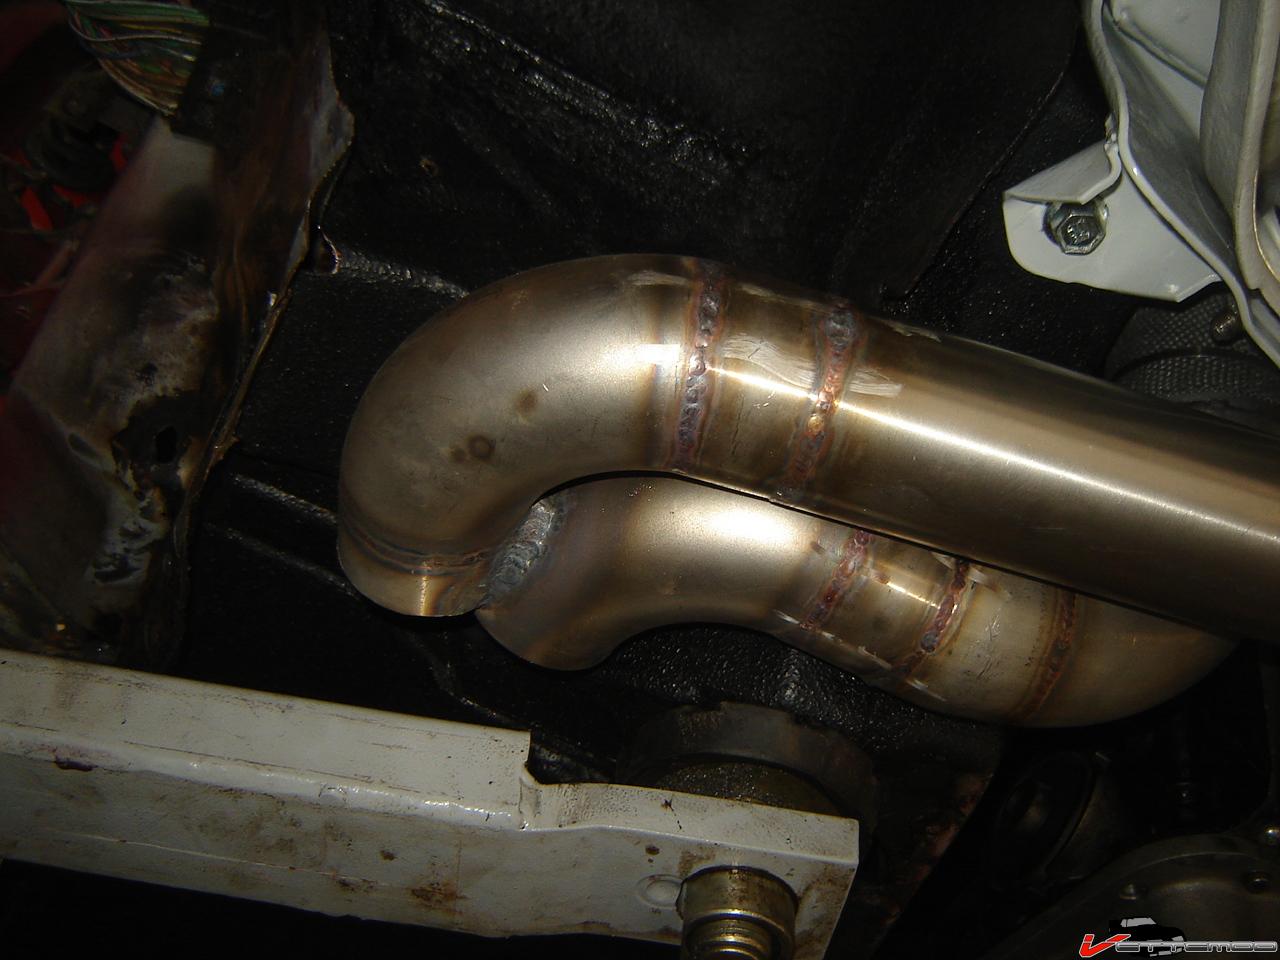
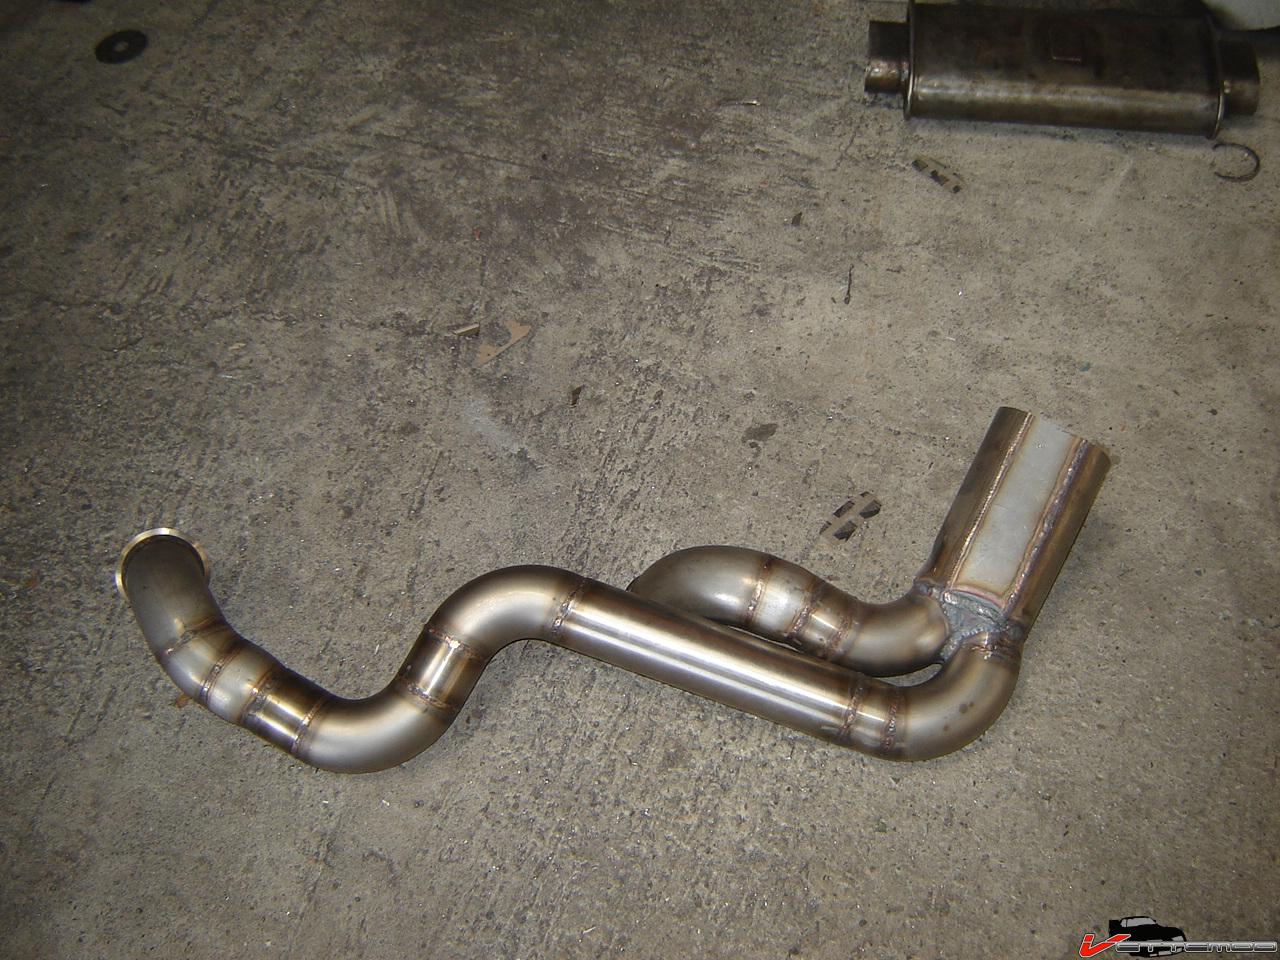
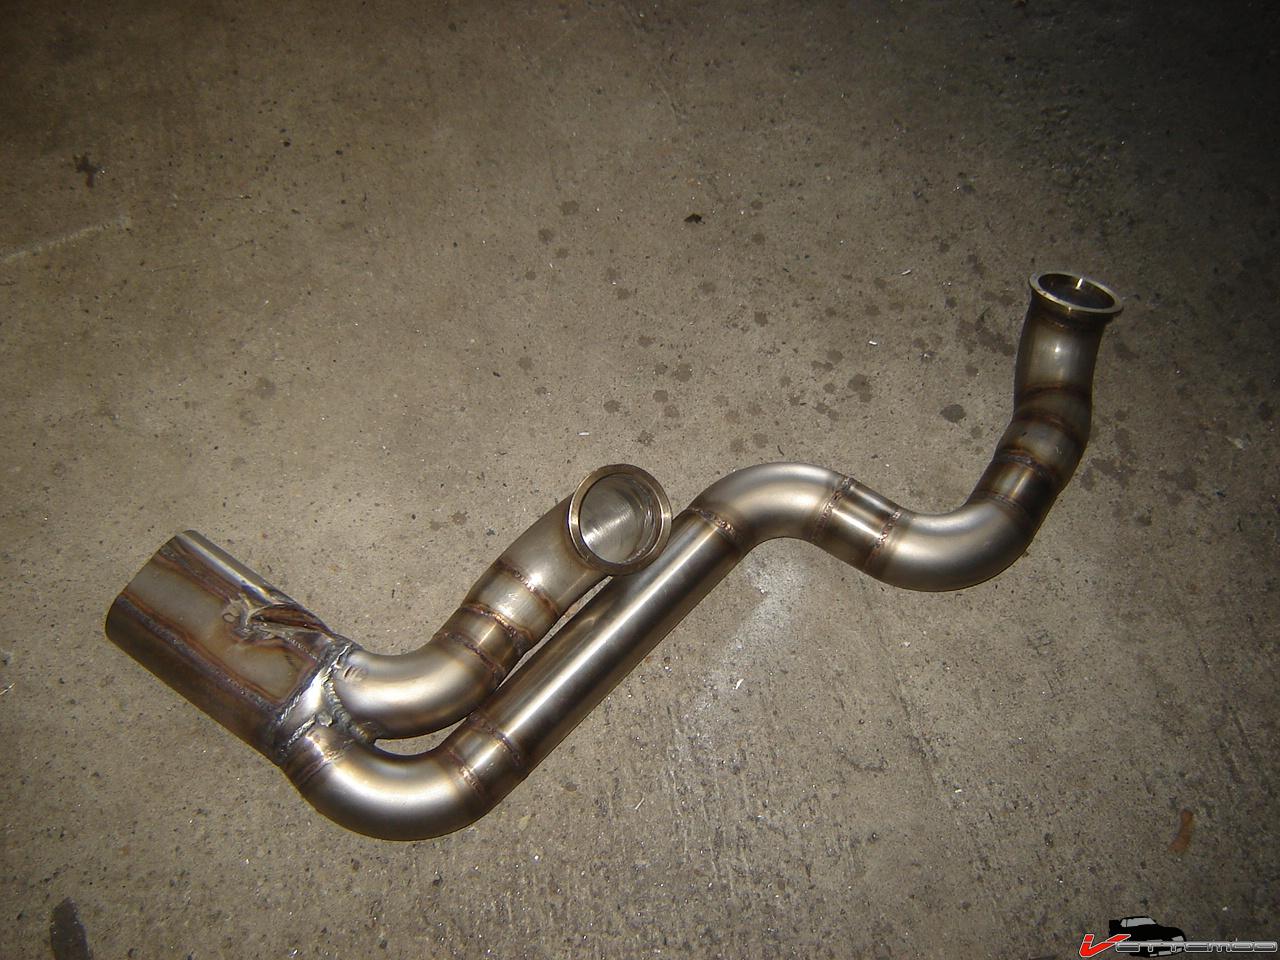
Here's the start of my new exhaust:
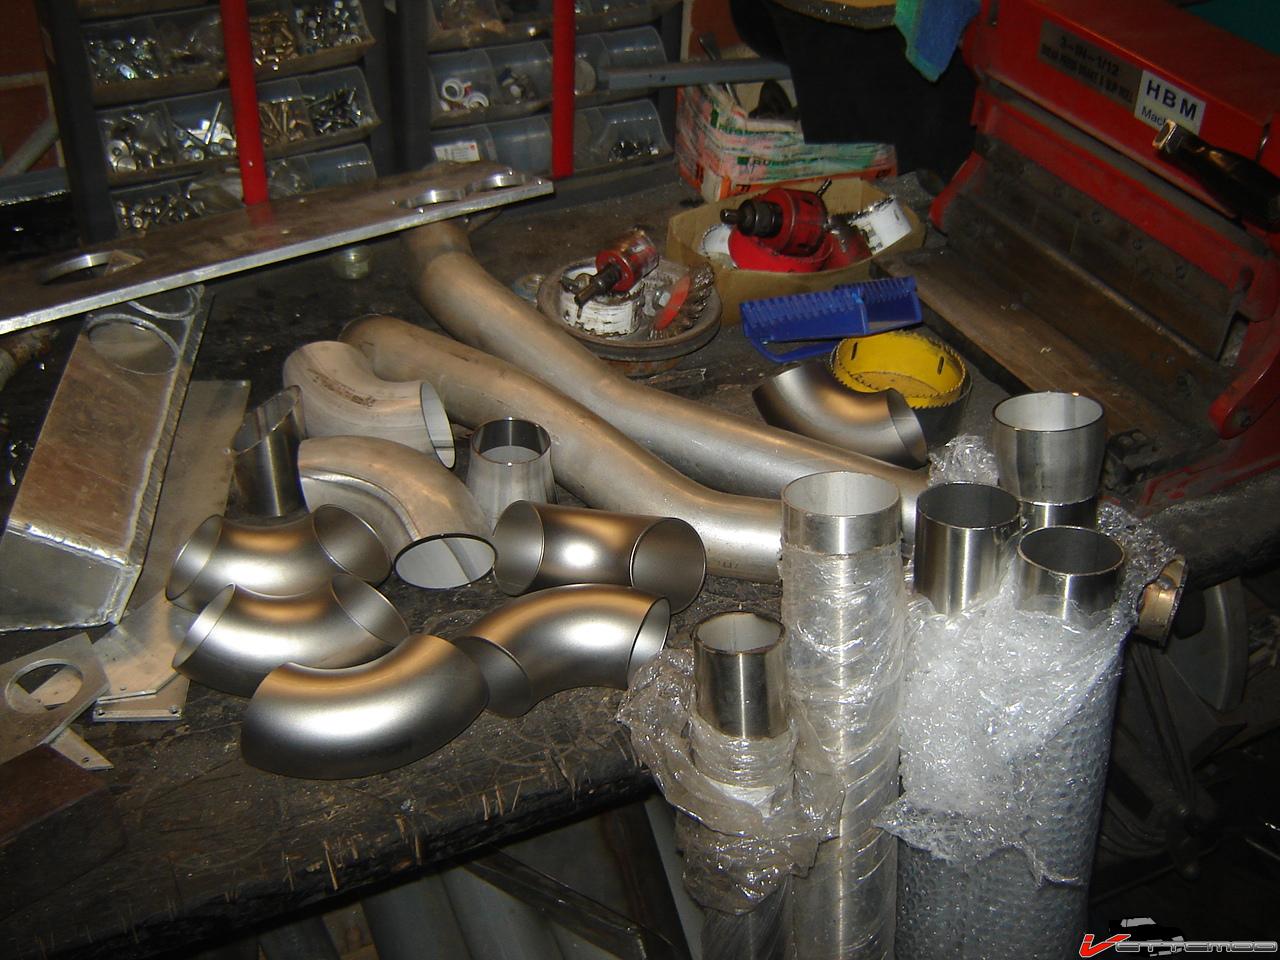
3" bend after the collector steps down to 2.75", the size that the rest will be too.
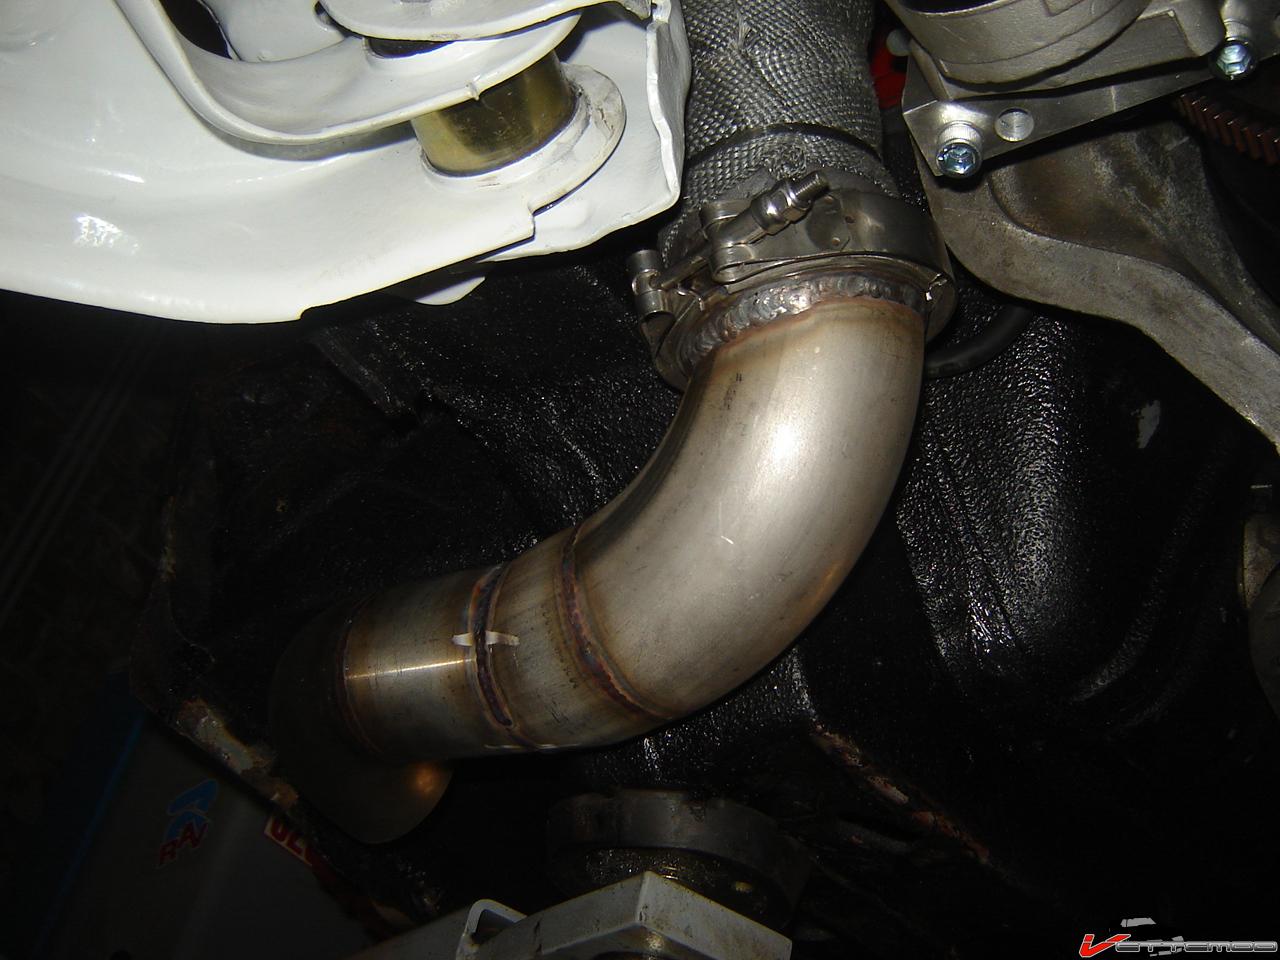
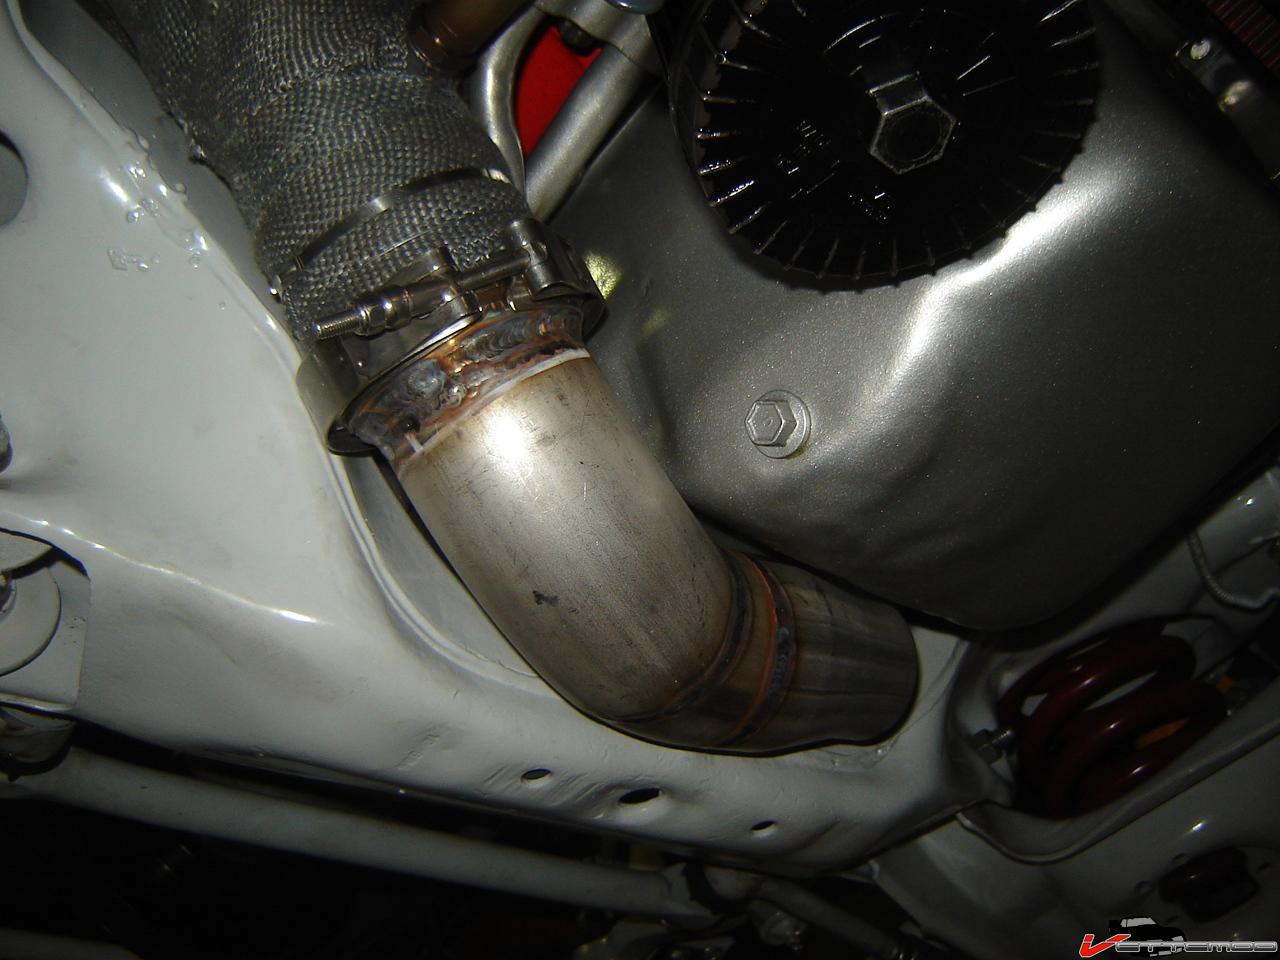
The V bands are for 3" but the 3" here is actually a wee bit smaller since it's a metric size (76mm instead of 76.2) and as such great care has to be taken when welding the V band rings on there so they don't warp.
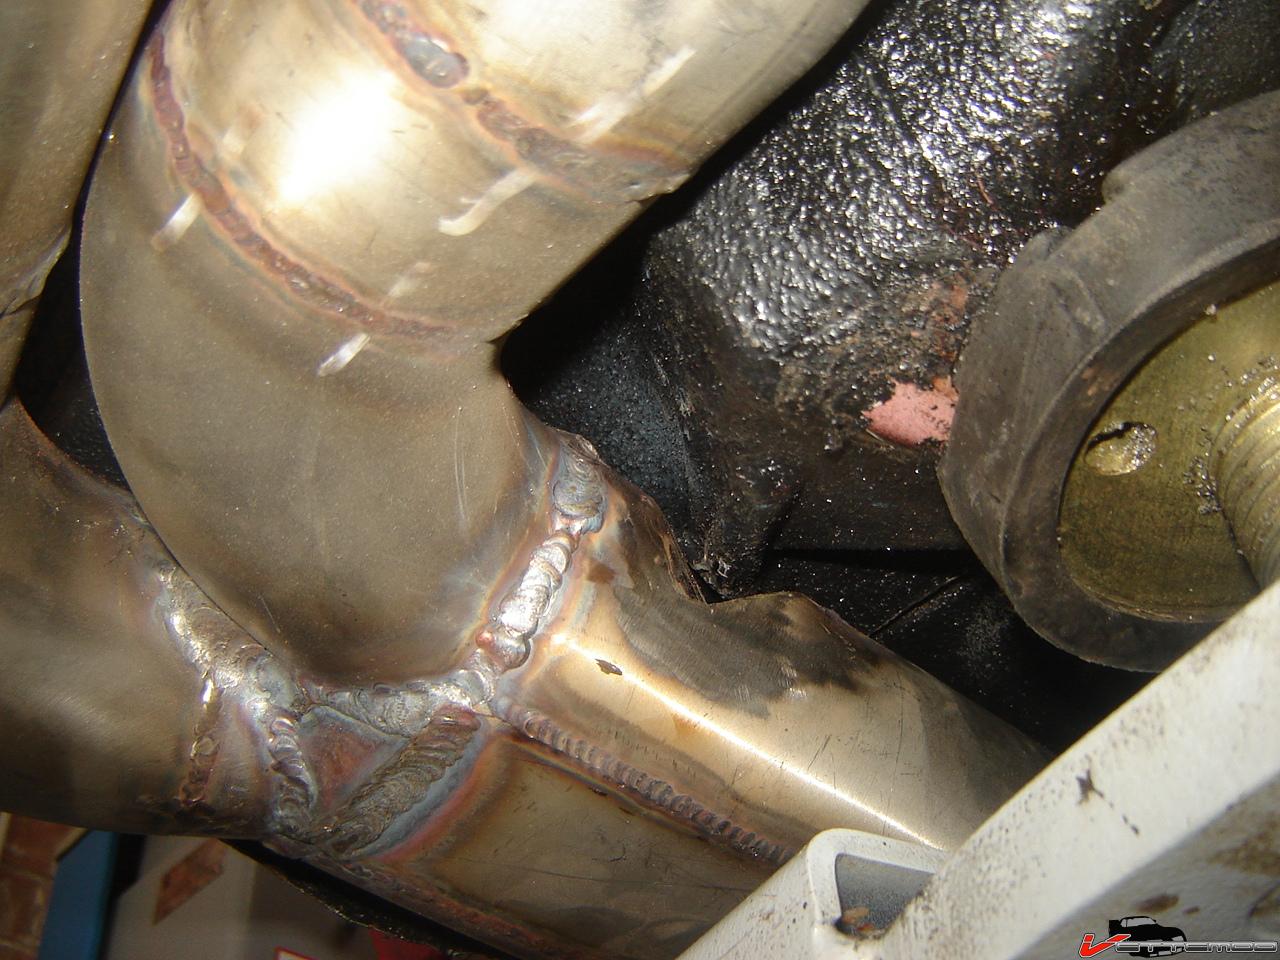
I tucked it up as high as I could without it being so close that it will hammer on the underside of the car
Looks like 2x 2.75" pipes are a no fit on the side, I'm going to make a 2 pipes in 2 pipes out "chamber" that both pipes will run into, so I can fit that as close to the available area there as possible.
That's all done now, after I adjust the cable I'll know of they work OK. Manually pulling the lever on the calipers sure does hold the disc pretty darn well, better than my old calipers.
Removed my AC heater core, bought a non AC unit. No rust anywhere in sight, just a bunch of sand and crappy seam that I removed and resealed later.
New (to me) heater box, stripped & painted. Unfortunately the old motor does't fit, the squirrel cage is much larger. Explains why the heater in this car used to blow a lot harder than in the 88 (non AC car). Swapped the resistor block for the old one off my AC unit so I don't have to cut wires and retain the relay operated stuff. I'm also going to add the little bracket for the relay that came off the old box. I simply put another brake in the bracket so it is more like a Z now since originally it's mounted with the mounting tab horizontal.
Gotta paint that area red first before I'm going to put the box on.
Here's the start of my new exhaust:
3" bend after the collector steps down to 2.75", the size that the rest will be too.
The V bands are for 3" but the 3" here is actually a wee bit smaller since it's a metric size (76mm instead of 76.2) and as such great care has to be taken when welding the V band rings on there so they don't warp.
I tucked it up as high as I could without it being so close that it will hammer on the underside of the car
Looks like 2x 2.75" pipes are a no fit on the side, I'm going to make a 2 pipes in 2 pipes out "chamber" that both pipes will run into, so I can fit that as close to the available area there as possible.
Thread Starter
Joined: Jun 2000
Posts: 5,364
Likes: 51
From: Enschede, Netherlands
Car: 82 TA 87 IZ L98 88 IZ LB9 88 IZ L98
Engine: 5.7TBI 5,7TPI 5.0TPI, 5,7TPI
Transmission: T5, 700R4, T5, 700R4
Axle/Gears: 3.08, 3.27, 3.45, 3.27
Re: Pulling apart my 87 IROC
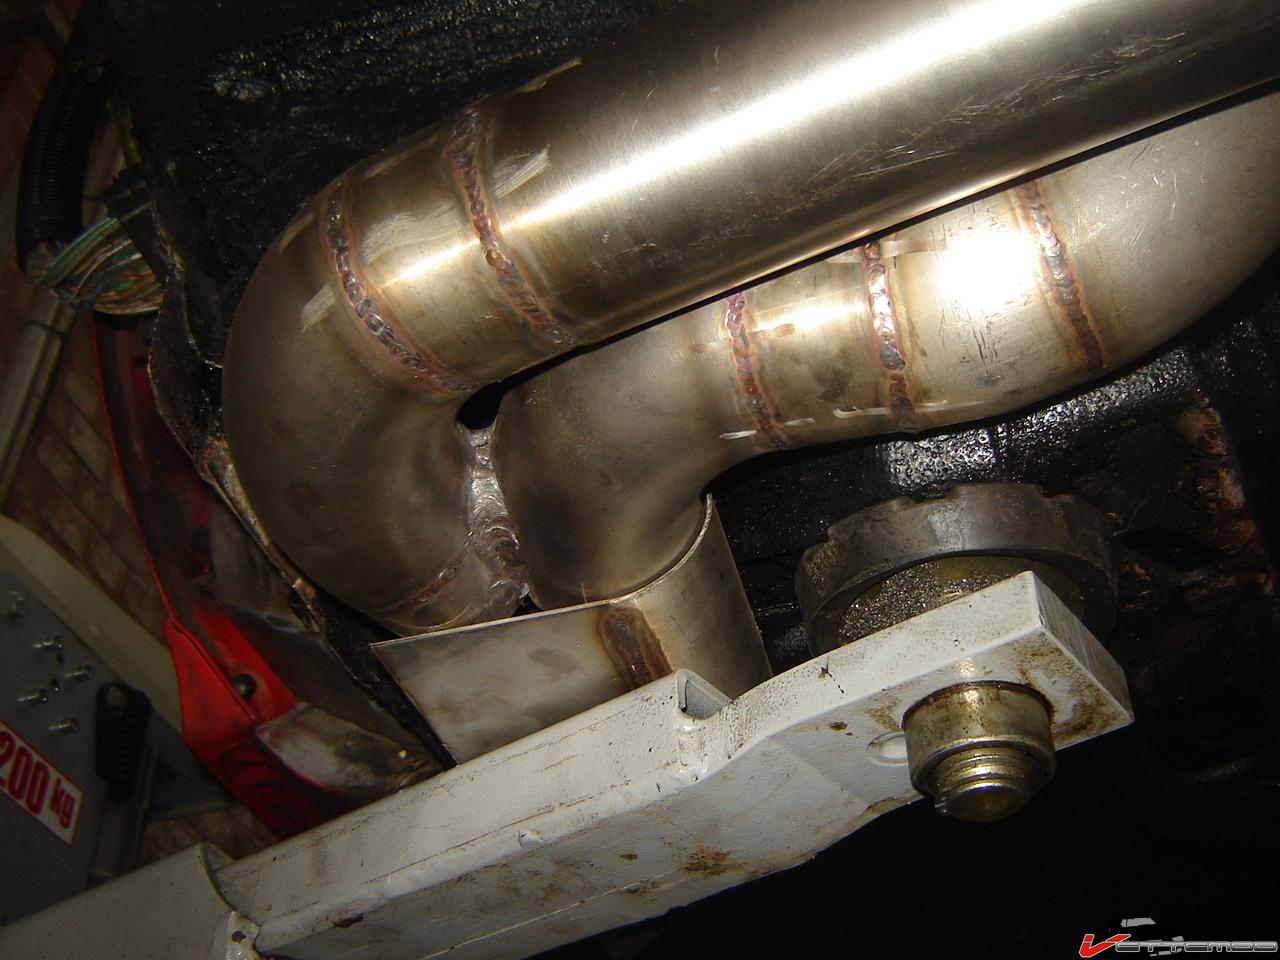
more...
it looks like I have a problem, this will never fit
I'm most likely going to weld that bung closed and weld a -20 AN bung to the side tank
and route the hose like this (might get a shorter one and run it in front of the SC)
The rest fits pretty neatly.
undecided on what to do with the superfueler, I'm not liking this
and the added problem is, my STB won't fit anymore.
enough issues, time to carry on with the exhaust
I'll merge the pipes after the bend down the length of the car and hook it up to a large oval shaped muffler w/ an oval in/out for max ground clearance.
This is where I got, pretty tricky getting it all tucked up in there.
Thread Starter
Joined: Jun 2000
Posts: 5,364
Likes: 51
From: Enschede, Netherlands
Car: 82 TA 87 IZ L98 88 IZ LB9 88 IZ L98
Engine: 5.7TBI 5,7TPI 5.0TPI, 5,7TPI
Transmission: T5, 700R4, T5, 700R4
Axle/Gears: 3.08, 3.27, 3.45, 3.27
Re: Pulling apart my 87 IROC
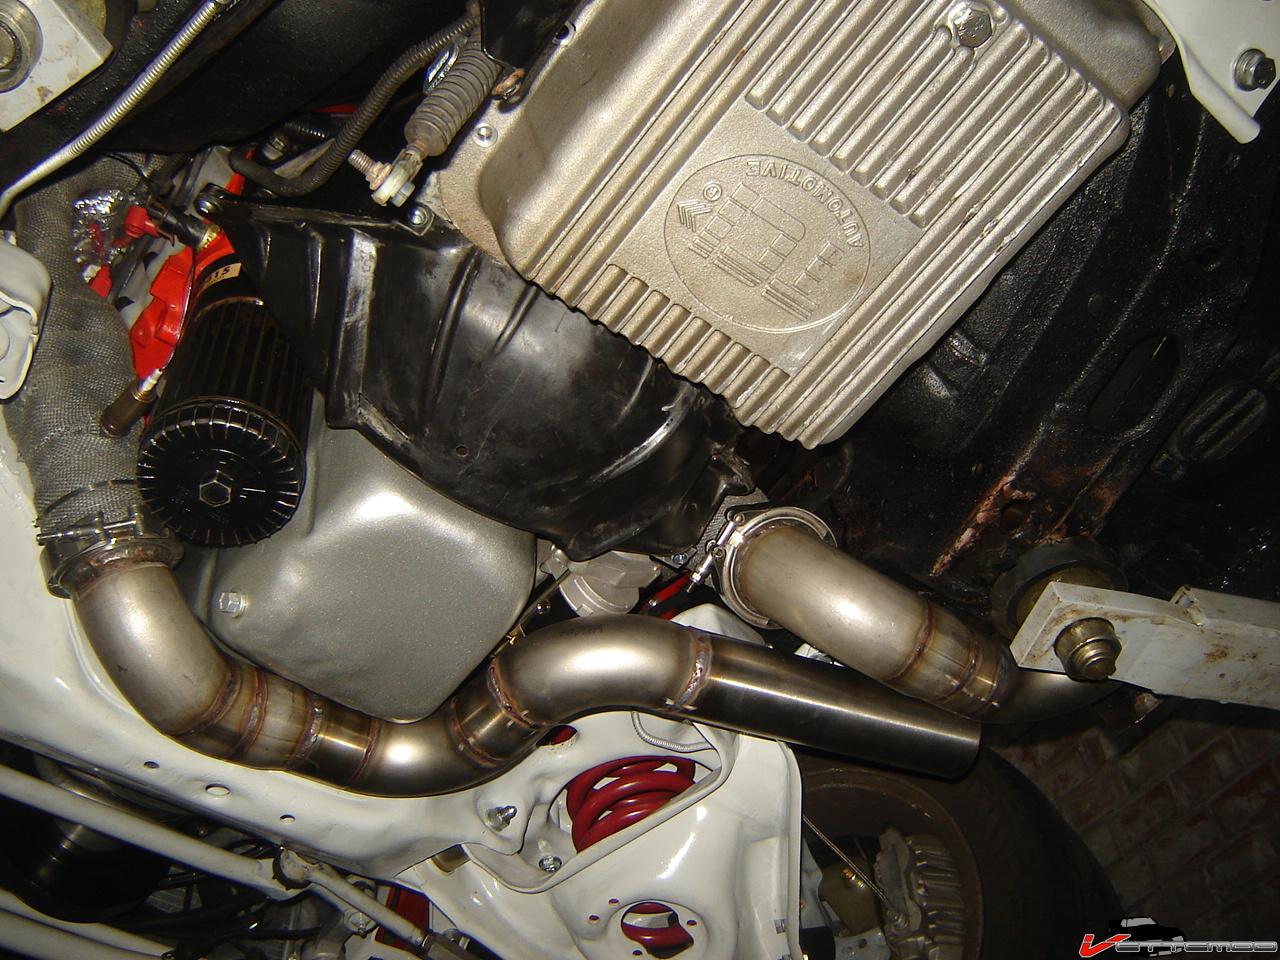
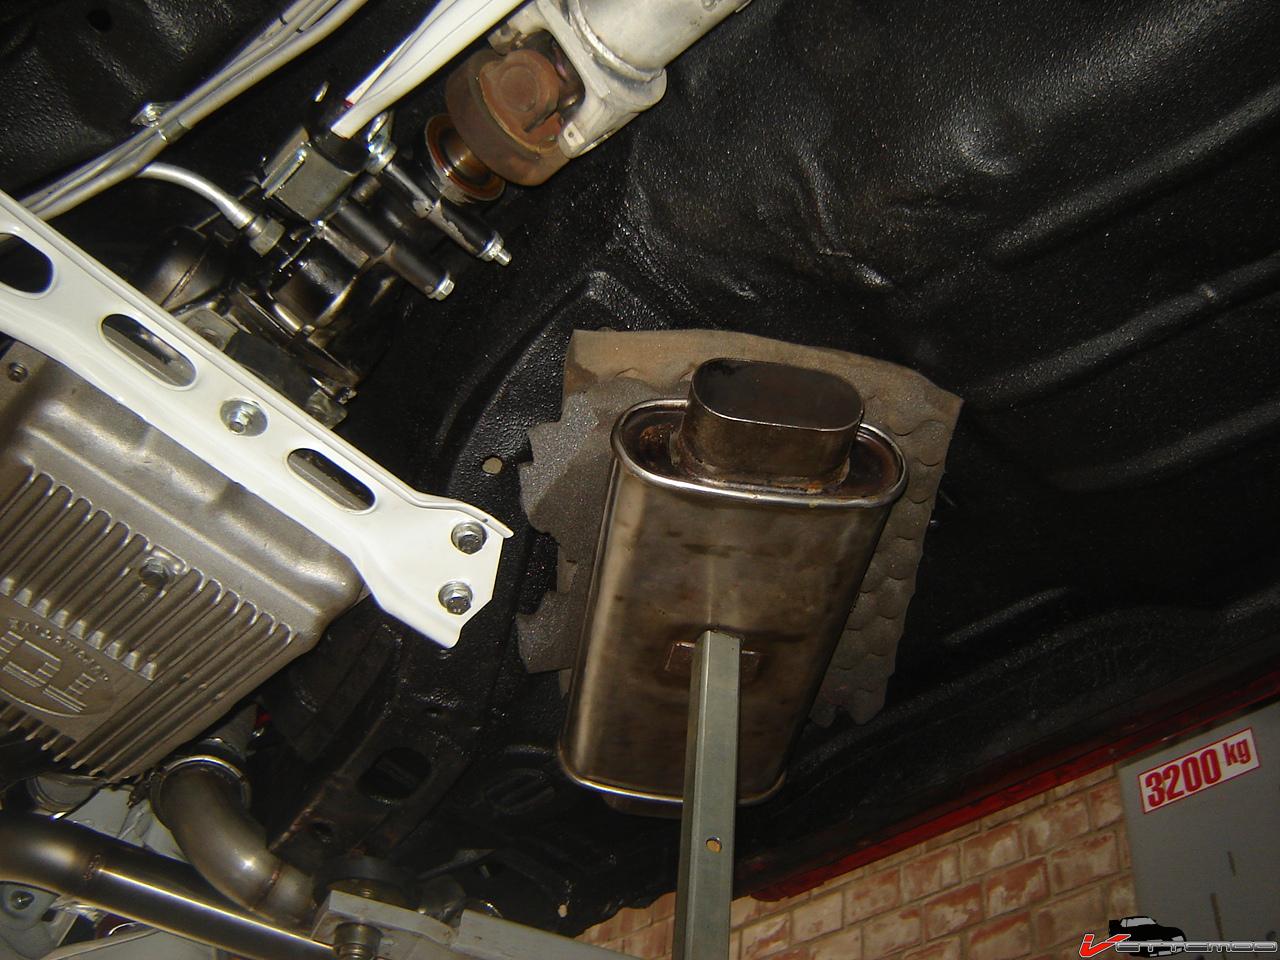
Do you mean the KC4 engine oil cooler/heat exchanger or the actual oil filter (which is a system1 filter) ???
Did some more work on the exhaust. Merged the 2 90 deg bends to flow into a still to be finished oval section to get past the narrow section of the floor there
Problem is, it's tight on the lift, gotta move the car to the 4 post to finish this, this is not going to work like this.
still debating whether to use the 2 separate round mufflers or this one
Last edited by Twin_Turbo; Apr 18, 2010 at 05:00 PM.

Supreme Member
Joined: Apr 2003
Posts: 1,248
Likes: 0
From: Ontario
Car: IROC Z
Engine: 5.7
Transmission: 700R4
Re: Pulling apart my 87 IROC
my 87 iroc has the oil cooler, and it looks nothing like that... mine is a cylindrical block thats between the filter and the engine with coolant lines to it... i dont know what a system 1 filter is... but i was expecting a beer can looking thing not a black metal heatsink looking thing
Thread Starter
Joined: Jun 2000
Posts: 5,364
Likes: 51
From: Enschede, Netherlands
Car: 82 TA 87 IZ L98 88 IZ LB9 88 IZ L98
Engine: 5.7TBI 5,7TPI 5.0TPI, 5,7TPI
Transmission: T5, 700R4, T5, 700R4
Axle/Gears: 3.08, 3.27, 3.45, 3.27
Re: Pulling apart my 87 IROC
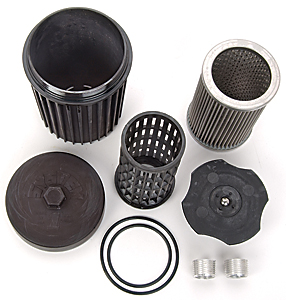
I have the cylindrical oil cooler too, the finned thing is the oil filter, it's a cast housing with a washable stainless element inside
Last edited by Twin_Turbo; Apr 19, 2010 at 04:35 AM.
Thread Starter
Joined: Jun 2000
Posts: 5,364
Likes: 51
From: Enschede, Netherlands
Car: 82 TA 87 IZ L98 88 IZ LB9 88 IZ L98
Engine: 5.7TBI 5,7TPI 5.0TPI, 5,7TPI
Transmission: T5, 700R4, T5, 700R4
Axle/Gears: 3.08, 3.27, 3.45, 3.27
Re: Pulling apart my 87 IROC
You can get it from Summit, Jegs and what not. They're not cheap. I've had that one for over 10 years and the only service it's needed is new o rings before using it on this car because the old ones were getting hard. You can get the o rings from summit/jegs also. This is a long filter, they have short ones too.
I have them on more cars. I swear by them. They aren't cost effective, you can buy a lot of filters for the price of one. The reason I use them is on most cars I run a non bypassing filter adapter and these cases are blow proof.
Secondly I like that you can pull it apart and inspect the element and detect issues before it might get terminal.
Lately there have been other brands coming out with these, pure power is the name I think. They are all spiffy looking but basically the same deal with some added features like magnets in the cage and such.
Thread Starter
Joined: Jun 2000
Posts: 5,364
Likes: 51
From: Enschede, Netherlands
Car: 82 TA 87 IZ L98 88 IZ LB9 88 IZ L98
Engine: 5.7TBI 5,7TPI 5.0TPI, 5,7TPI
Transmission: T5, 700R4, T5, 700R4
Axle/Gears: 3.08, 3.27, 3.45, 3.27
Re: Pulling apart my 87 IROC
Completed the front part of the exhaust. It's going to split to 2 pipes after this but I'll have to fabricate some kind of flange or something to be able to split the entire system or I'll never be able to remove it after welding in some SFCs
Had to notch my oval section to clear the floor. The cut looks worse than it is from the outside, it's not that bad from the inside....compromised compromises

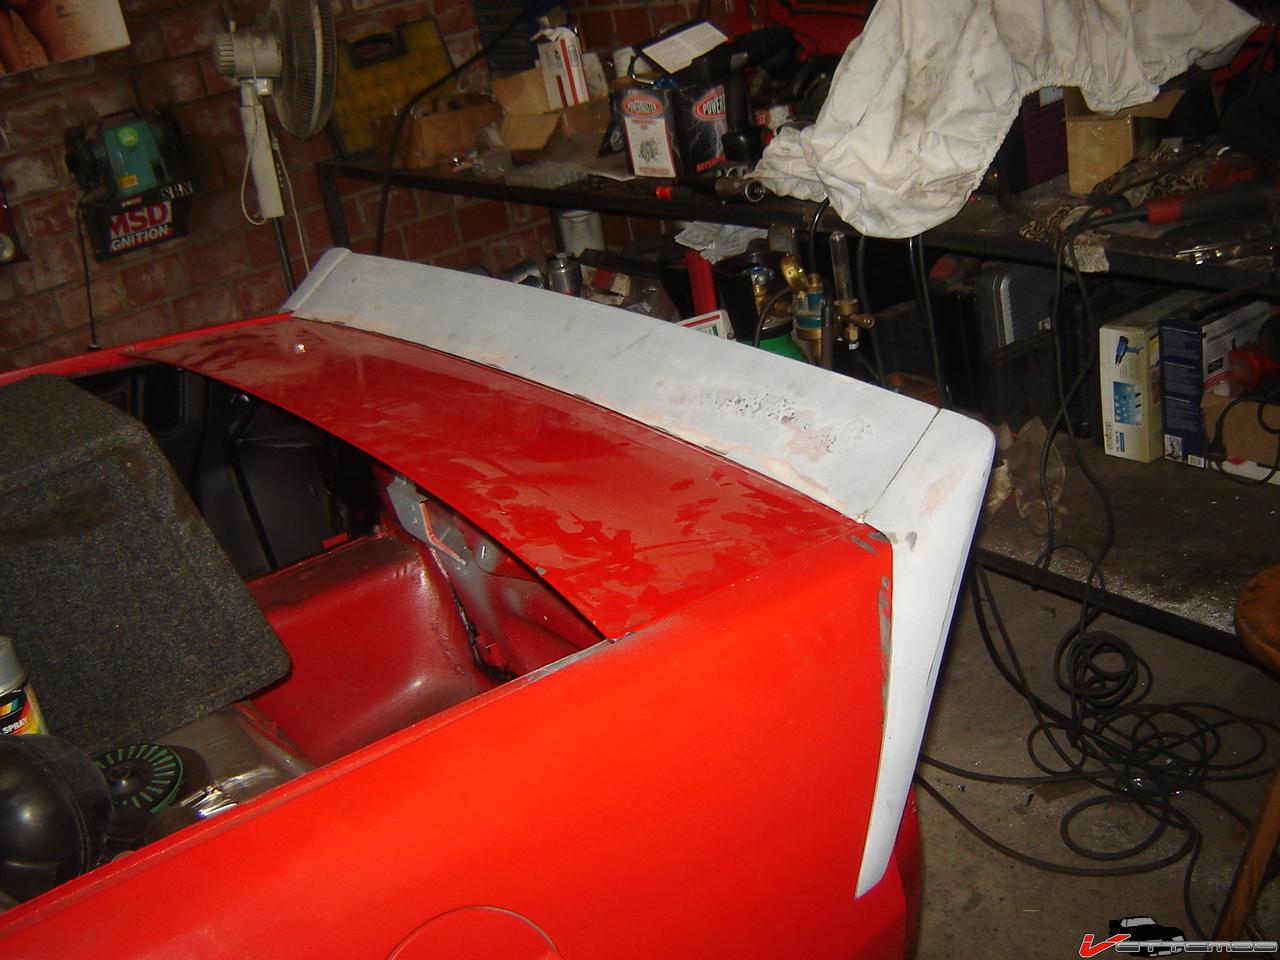
Also got my Hawks tall spoiler, that thing doesn't fit worth a damn. Some studs are crooked, the top ones (vertical) on the side pieces are way too far back, almost 3/4 of an inch. Had to drill a bunch of new holes. Looks like it needs a lot of filling and modding for a smooth fit.
Had to notch my oval section to clear the floor. The cut looks worse than it is from the outside, it's not that bad from the inside....compromised compromises
Also got my Hawks tall spoiler, that thing doesn't fit worth a damn. Some studs are crooked, the top ones (vertical) on the side pieces are way too far back, almost 3/4 of an inch. Had to drill a bunch of new holes. Looks like it needs a lot of filling and modding for a smooth fit.
Thread Starter
Joined: Jun 2000
Posts: 5,364
Likes: 51
From: Enschede, Netherlands
Car: 82 TA 87 IZ L98 88 IZ LB9 88 IZ L98
Engine: 5.7TBI 5,7TPI 5.0TPI, 5,7TPI
Transmission: T5, 700R4, T5, 700R4
Axle/Gears: 3.08, 3.27, 3.45, 3.27
Re: Pulling apart my 87 IROC
Had to modify the Accel billet TB to fit the TPIS billet IAC housing, the ridge is interfering with the IAC housing.
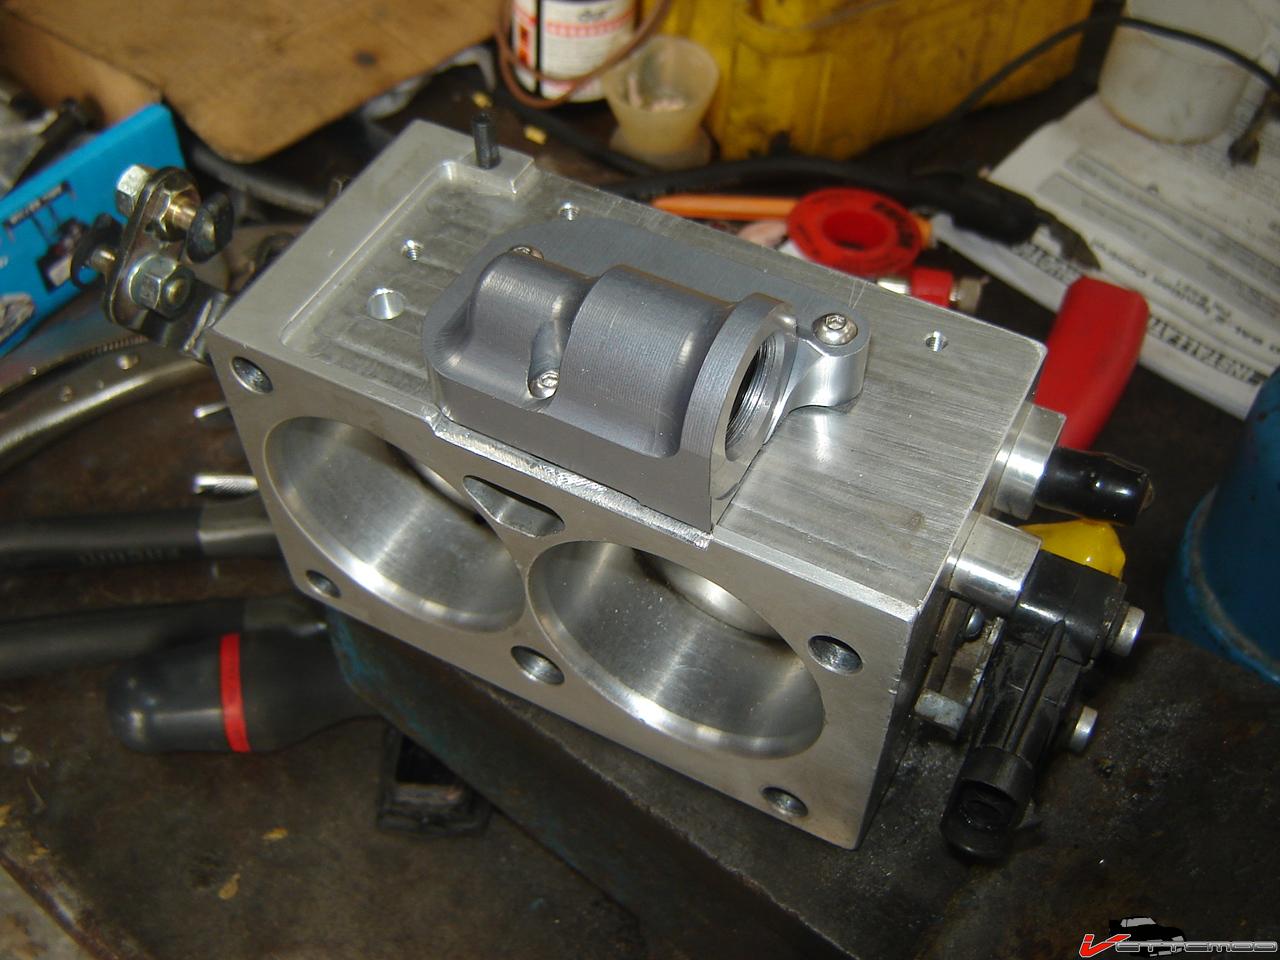
A little filing and it's all fine and dandy
Got the KRC block mount bracket in as well as the serpentine pulley. Only needs a little shimming and it'll be perfect
A little filing and it's all fine and dandy
Got the KRC block mount bracket in as well as the serpentine pulley. Only needs a little shimming and it'll be perfect
Thread Starter
Joined: Jun 2000
Posts: 5,364
Likes: 51
From: Enschede, Netherlands
Car: 82 TA 87 IZ L98 88 IZ LB9 88 IZ L98
Engine: 5.7TBI 5,7TPI 5.0TPI, 5,7TPI
Transmission: T5, 700R4, T5, 700R4
Axle/Gears: 3.08, 3.27, 3.45, 3.27
Re: Pulling apart my 87 IROC
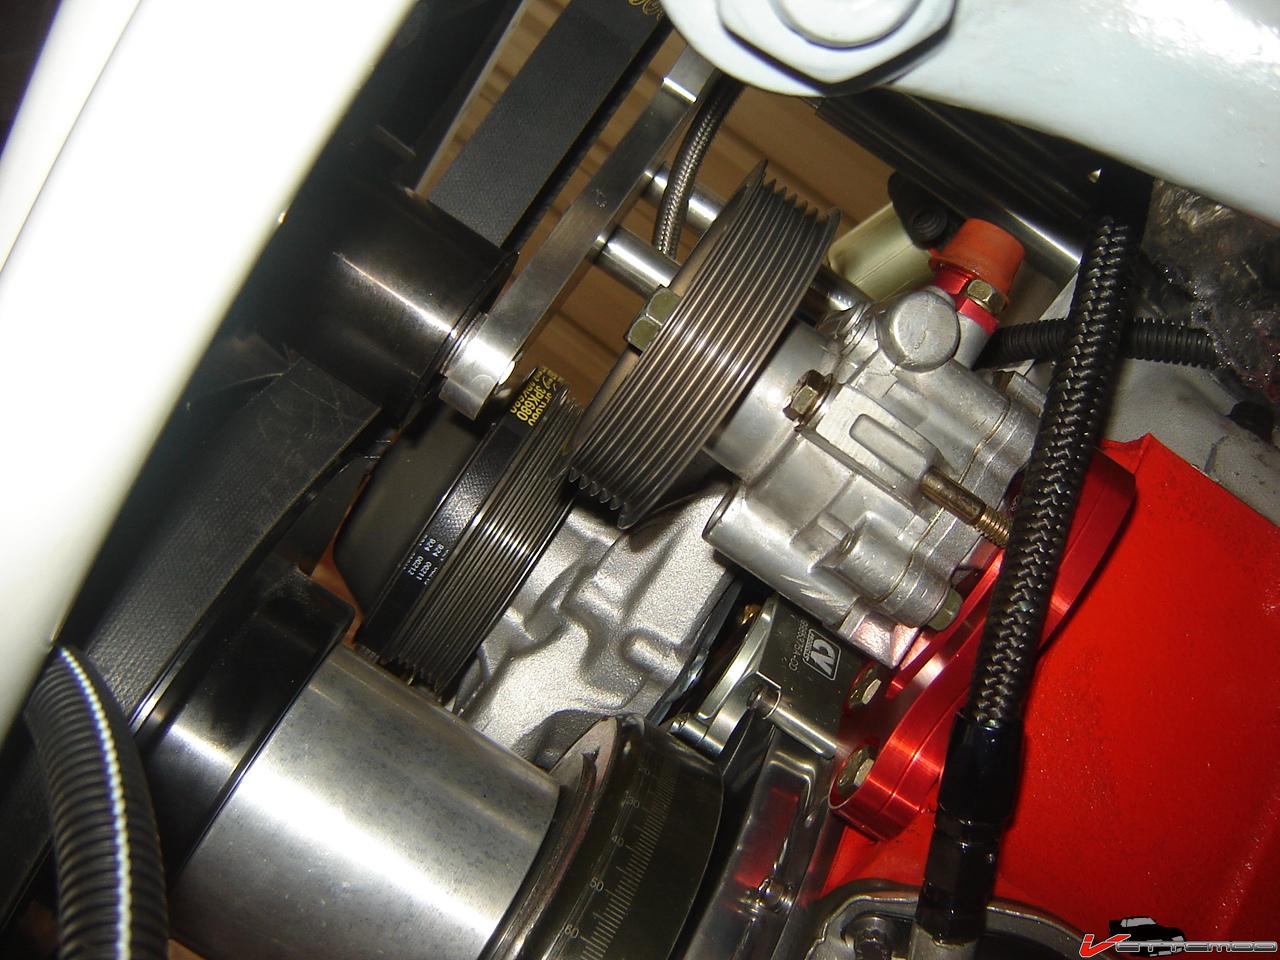
Shimmed the KRC power steering pump, it now lines up perfectly. Also swapped out the alternator pulley and shimmed that too, all I need now is a custom crank pulley. Probably will end up machining an underdrive one I have here, removing a little section from it and welding it back together. As it is, it's too long.
The blue hose is the high pressure power line from pump to box.

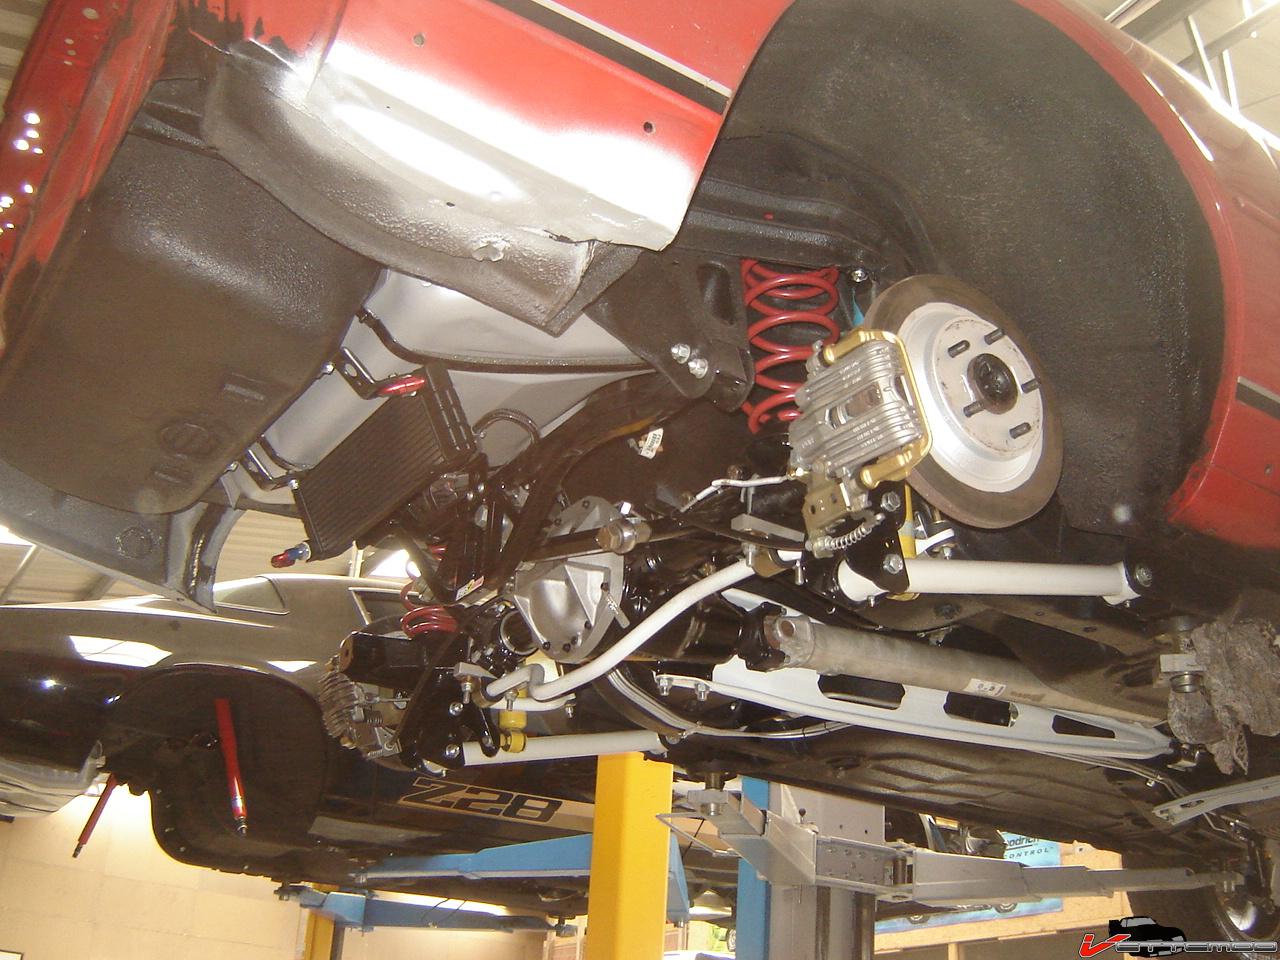
Car isn't sitting very low w/ these sportline springs. Should have bought the ground control weight jacks instead. I'll have to do some spring cutting, it looks like a fricken 4x4

Edelbrock STB interfered w/ allen head bolt on intake
Redoing the seams and applying the dynamat like stuff is done, not a fun job at all
The blue hose is the high pressure power line from pump to box.
Car isn't sitting very low w/ these sportline springs. Should have bought the ground control weight jacks instead. I'll have to do some spring cutting, it looks like a fricken 4x4
Edelbrock STB interfered w/ allen head bolt on intake
Redoing the seams and applying the dynamat like stuff is done, not a fun job at all
Thread Starter
Joined: Jun 2000
Posts: 5,364
Likes: 51
From: Enschede, Netherlands
Car: 82 TA 87 IZ L98 88 IZ LB9 88 IZ L98
Engine: 5.7TBI 5,7TPI 5.0TPI, 5,7TPI
Transmission: T5, 700R4, T5, 700R4
Axle/Gears: 3.08, 3.27, 3.45, 3.27
Re: Pulling apart my 87 IROC
Yes, and nothing is binding, when pushing on the car the suspension compresses just like it should. It must be the springs, front and rear are sitting high. I did use the insulators on the front and rear. Maybe others leave those out? I'll have to see how it looks w/ the 19s under it but from the looks of it I have to yet again tackle the fun job of pulling the susp. apart and putting it back together. I refuse to ride in the 4x4 mode.
Member
Joined: Jan 2010
Posts: 247
Likes: 8
Re: Pulling apart my 87 IROC
I have an 85 IROC with stock springs and it sits way lower than that...Maybe you should try a new lowering spring cause thats just not normal. I would hate cutting brand new springs plus its just more work and im sure you have enough cut out for you
Thread Starter
Joined: Jun 2000
Posts: 5,364
Likes: 51
From: Enschede, Netherlands
Car: 82 TA 87 IZ L98 88 IZ LB9 88 IZ L98
Engine: 5.7TBI 5,7TPI 5.0TPI, 5,7TPI
Transmission: T5, 700R4, T5, 700R4
Axle/Gears: 3.08, 3.27, 3.45, 3.27
Re: Pulling apart my 87 IROC
It sat exactly the same on the old stock springs. I have to admit, the tires are a bit on the small side, the prev. owner threw those on and the aspect ratio is pretty low. My 88 has taller tires.
this is from before I tore it apart

I don't think adding fuel, the rear glass and the rear bumper isn't going to add much weight to significantly lower the rear. The front is only missing the sheet metal and bumper and hood. Nothing else, yes coolant but that's it.
Should have gone with the ground control weight jacks or the koni springs or even the brand I always use, Hyperco. Damned Eibachs! My buddy has the same springs and exact same shocks on his GTA and it's looking fine!!
this is from before I tore it apart
I don't think adding fuel, the rear glass and the rear bumper isn't going to add much weight to significantly lower the rear. The front is only missing the sheet metal and bumper and hood. Nothing else, yes coolant but that's it.
Should have gone with the ground control weight jacks or the koni springs or even the brand I always use, Hyperco. Damned Eibachs! My buddy has the same springs and exact same shocks on his GTA and it's looking fine!!
Last edited by Twin_Turbo; Apr 26, 2010 at 01:18 PM.
Supreme Member
iTrader: (1)
Joined: Jun 2009
Posts: 1,777
Likes: 0
From: Central Connecticut
Car: 91 Trans Am 'vert
Engine: LB9
Transmission: T5
Axle/Gears: 3.45 9 bolt
Re: Pulling apart my 87 IROC
Doesn't the new suspension need time to "settle"? Sorry if somebody already brought that up.
Thread Starter
Joined: Jun 2000
Posts: 5,364
Likes: 51
From: Enschede, Netherlands
Car: 82 TA 87 IZ L98 88 IZ LB9 88 IZ L98
Engine: 5.7TBI 5,7TPI 5.0TPI, 5,7TPI
Transmission: T5, 700R4, T5, 700R4
Axle/Gears: 3.08, 3.27, 3.45, 3.27
Re: Pulling apart my 87 IROC
It's settled, after dropping it from the lift I rolled it around and put weight on it so the susp. would settle. jumping on the bumpers compresses the suspension but it rebounds to this static height
Supreme Member
iTrader: (4)
Joined: Sep 2004
Posts: 2,069
Likes: 5
From: MN
Car: 85 SC, 86 Berlinetta
Engine: V6, V8
Transmission: 700r4, 700r4
Re: Pulling apart my 87 IROC
Mine sits like that with used IROC springs and the Koni Yellows. Don't know if that helps at all. I kind of wondered about the Konis contributing to it.
Re: Pulling apart my 87 IROC
Ive followed quite a few threads here, and i gotta tell ya, this is becoming quite the common problem! Same springs from the same company too. How many inches were those springs supposed to give you? 