When you click on links to various merchants on this site and make a purchase, this can result in this site earning a commission. Affiliate programs and affiliations include, but are not limited to, the eBay Partner Network.
Re: Long time coming AKA My 91 Z28 Vert build thread
The tablet mount I made is made out of Plexi-glass and the "leather" would not adhere to it. I have tried 2 name brand upholstery glues (3m and permatex) and neither hold. Scuffed surface or not. I pulled the leather off and cleaned the glue residue and sprayed it in a bedliner spray for the stock texture. Looks OK. I think I'll be buying some 1/8" ABS in the textured black and remake it or I'll remake it in a 1/8" hardboard, glue sticks to hardboard like nobody's business.
Re: Long time coming AKA My 91 Z28 Vert build thread
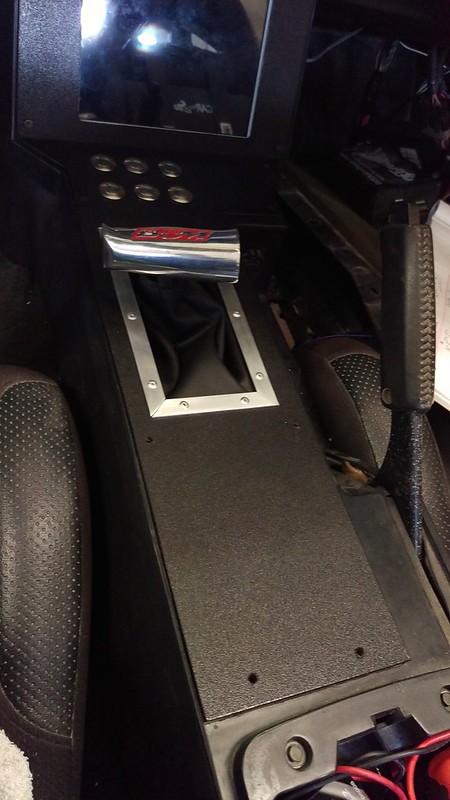
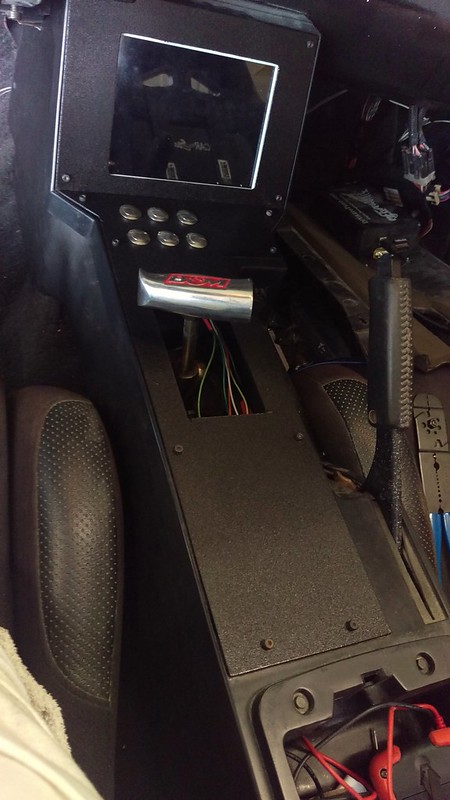
Started working on the interior center console area. I have the top cut and drilled. I moved the switches up to the front of the console and moved the trunk release to the glove box. [/url]
I'm still using the stock fasteners and I think they stick up too much. I'm going to look for some thin round head fasteners. [/url]
I had to make the shifter hole longer so I also need to remake my shifter frame. Luckily it's just small thin aluminum [/url]
Re: Long time coming AKA My 91 Z28 Vert build thread
Originally Posted by QwkTrip
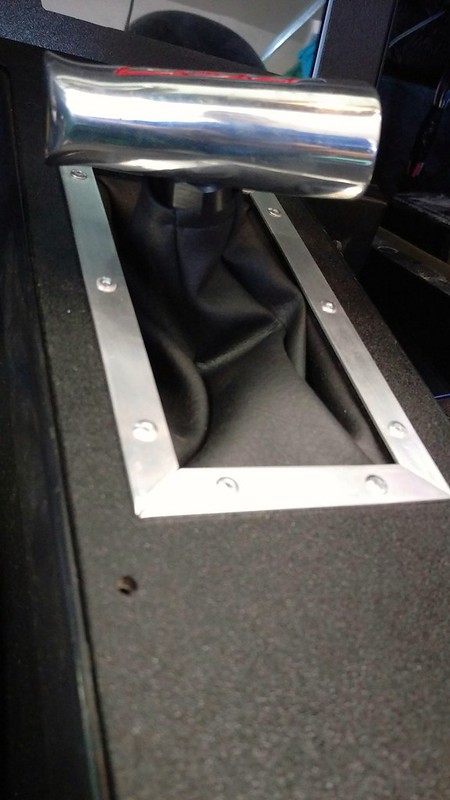
Why is the shifter so short?
I think two reasons, I found out when making the mounts that the engine drive train is 5* down towards the ground at the transmission. When I made the transmission crossmember I didn't have a factory or aftermarket piece to know the exact height of the transmission shifter so I guessed and it turns out I was off 5* or around an inch low. I can remake the engine mounts and transmission crossmember to correct it. I still have lots of tubing and plate steel. Also it's a Pro 5.0 shifter with I believe a short stick. I've google images of it on a fourthgen and it's really short for them too.
Off hand do you know what size bolts the interior uses?
EDIT: The motor mounts that UMI sells have 0* angle front/back and I assume stock is this way. I'll remake the engine and transmission mounts as a future project. The motor mounts that I made have 5* but the shifter base is still fairly close to the tunnel, probably around an inch. That shifter is just very short.
Re: Long time coming AKA My 91 Z28 Vert build thread
Thank for posting that! Do you know if they used a slip collar when welding the tubes together or checked the trueness of the tube after welding? How many miles are on it and have you had any vibration that could be from a warped axle tube movie g the wheel bearing position? Did the TIG, MIG or stick weld the tubes together? I assume they did a stick to weld the torque arm mount to the housing?
Re: Long time coming AKA My 91 Z28 Vert build thread
Originally Posted by Tibo
Thank for posting that! Do you know if they used a slip collar when welding the tubes together or checked the trueness of the tube after welding? How many miles are on it and have you had any vibration that could be from a warped axle tube movie g the wheel bearing position? Did the TIG, MIG or stick weld the tubes together? I assume they did a stick to weld the torque arm mount to the housing?
I sent the welder that worked on my rear while he worked at the shop your post. this is what he said.
"Yeah there's a sleeve inside the tube. No the center was spray arch MIG with a preheat on the case. You can Mig an 8.8 because its cast steel not cast iron. Spray arch just means it was burnt in super hot fyi"
I have about 3k miles on it as i am using it as a summer daily. Ive been driving it up and down the east coast. No vibrations at all.
Re: Long time coming AKA My 91 Z28 Vert build thread
Originally Posted by dennisbernal91z
Random question, but is this all much cheaper than simply buying a ready made 12 bolt from Moser or Strange?
I only have 1500 in this rear. That includes the shop labor to weld the rear, rebuild it with a new gear set and new bearings and set up. As well as the 4thgen backing plates, rotors , and pads, and lines, yoke etc. Im still using the stock driveshaft.
Re: Long time coming AKA My 91 Z28 Vert build thread
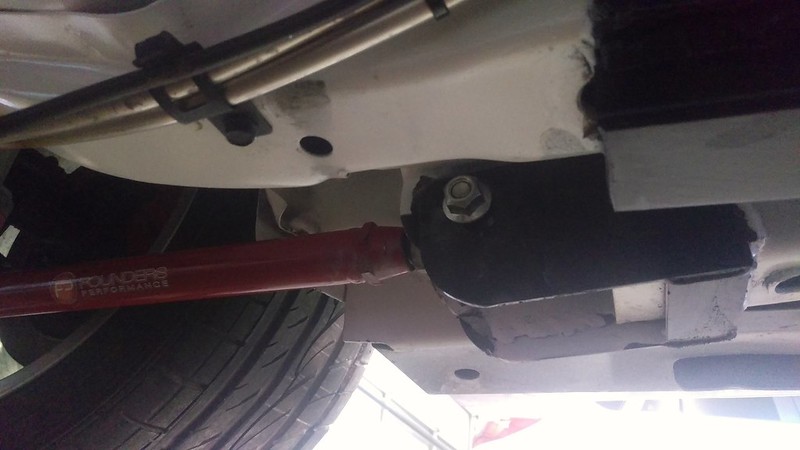
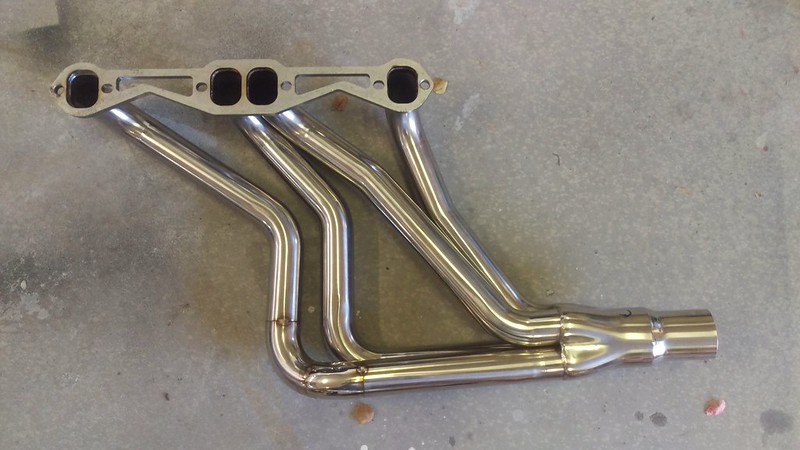
With as low as the car is, the exhaust is just too low. I was lucky enough to buy one of the stainless long tube header sets with y pipe of eBay during that fire sale so I'll be removing the hooker long tubes and putting in the new set with some new exhaust. I hope these headers install as straightforward as other members say. I'll also be remaking the transmission crossmember so the transmission sits without the angle. I'm only raising the transmission by an inch so I may get away without making new motor mounts.
Re: Long time coming AKA My 91 Z28 Vert build thread
I have been wrestling with the installation of these eBay stainless long tube headers for about a week now.
This is the ongoing thread about the headers: https://www.thirdgen.org/forums/exha...longtubes.html
These headers look nicer and will provide me with additional ground clearance but, really(!) the problems they are giving me is so indicitive of cheap chinese quality.
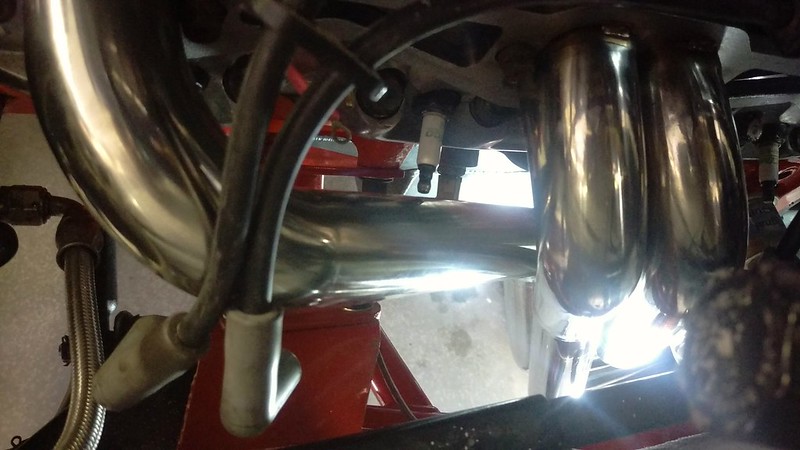
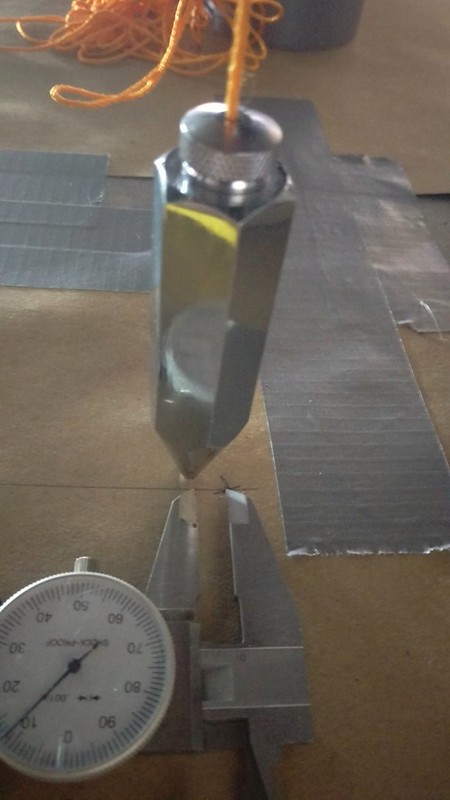
Several things had to be done for these to fit into place. First off the Slave cylinder housing on the T56 had to be slightly trimmed, next the starter's mounting block had to be clearenced just a hair. My entire transmission crossmember had to be remade. Last but not least I found out that the clearance between the number 3 spark plug and the number 1 primary tube is too small to allow for a spark plug wire (I need that don't I?) to attach. Here is a picture of what I mean:
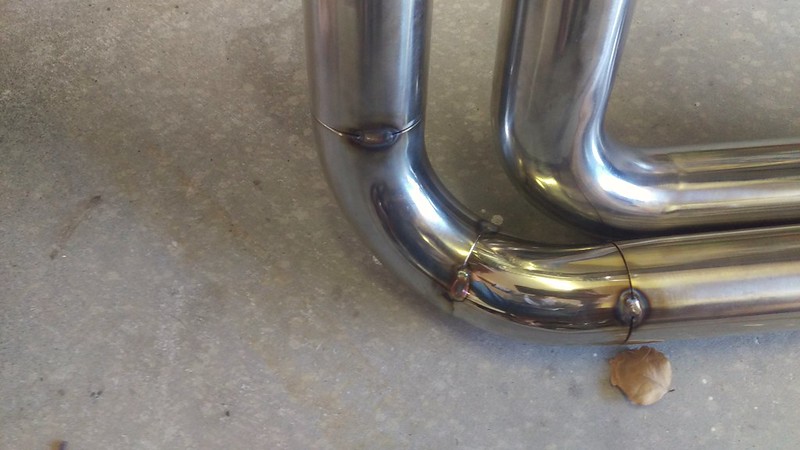
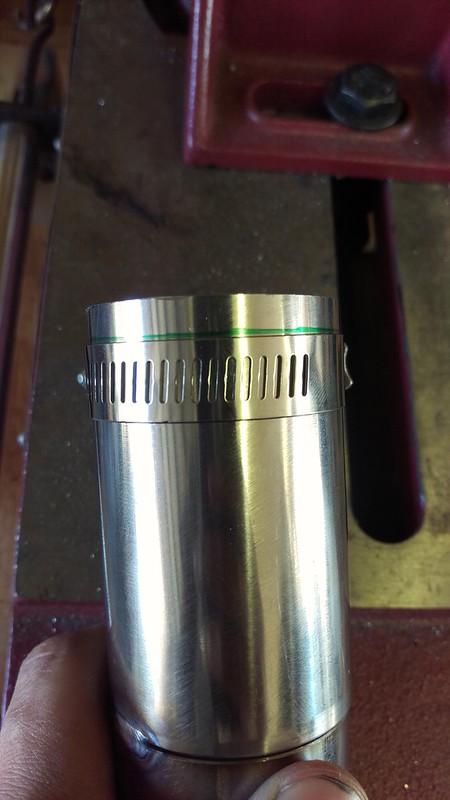
There is a gap of 0.050" between the spark plug tip and tube. I've read that eBay header thread multiple times and while others have experienced a tight clearance in that area no one has reported what I am experiencing. Even the other guys with angle plug AFR heads don't seem to have this issue..... weird. Anyway, my only choice was to buy a short length of polished stainless and modify it.
Here is what I got: https://www.summitracing.com/parts/sum-622106/overview/
It hasn't arrived yet. My plan is to cut the primary tube of cylinder number 1 just before the primary for #3, turn it outboard and then back forward like a dog leg or "S" curve and then reattach it just after the initial turn off the cylinder's header flange. I'm slightly concerned about burning through the tube when welding since it is only 18 gauge. I've practiced on some 18 gauge sheet metal and I do OK but definitely not beautiful beads.
I have been working on the crossmember again. I went with dual 1" round tubes for this one since they are easier to double angle than rectangular tubing. I have the transmission mount and the driver's side tack'd in place. The passenger side should be a bit quicker and easier. This setup gives me a little more exhaust clearance. I like it.
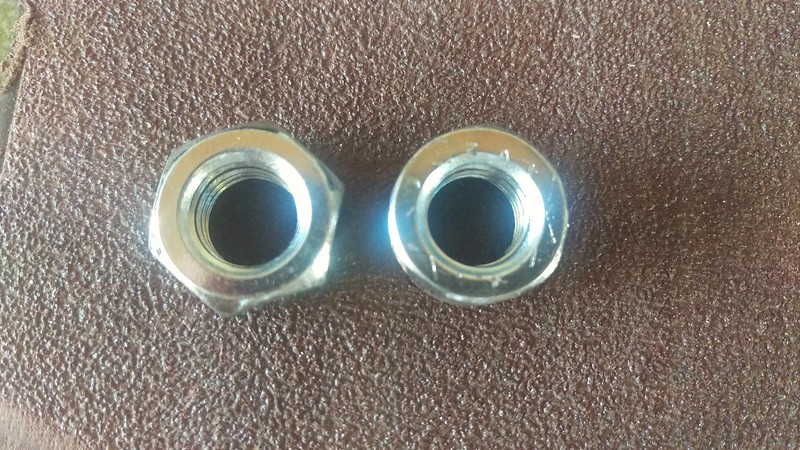
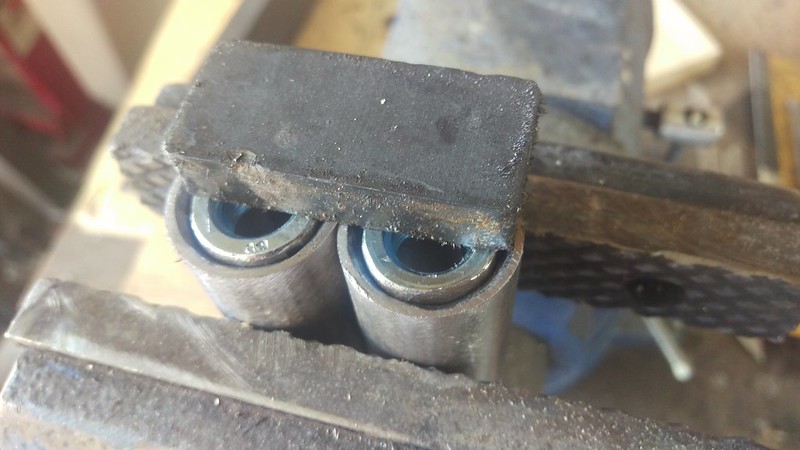
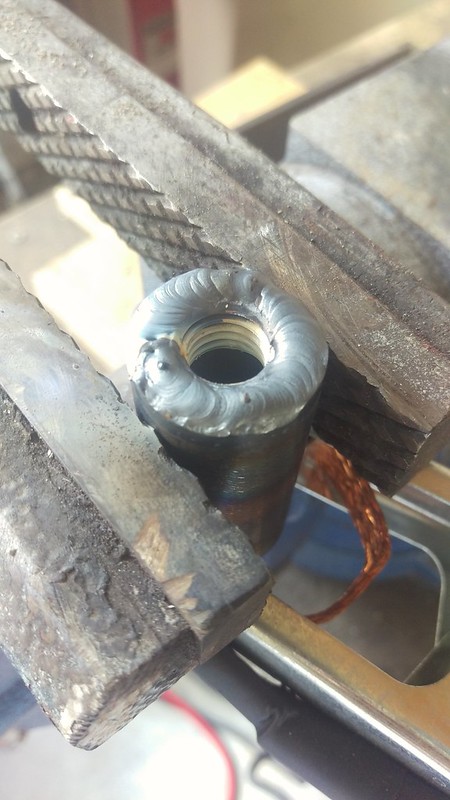
I don't know if I had shown it last time but this is an easy way to make tube nuts. I used a nut that was a hair bigger OD than the ID of the tube. I ground down the shoulders of the nut to slip inside the tube and used a high speed cutter to put a bevel on the inside of the tube for a better root. Then I just held the nuts in place with a magnet. Tack'd in place, removed the magnet and then welded. 3/32 filler rod is called for when welding 1/8" but I think I should have used 1/16 instead. I had to grind just a little of the welded surface for the tube to fit again.
Magnets really fool with the TIG arc when you get too close. The way the arc all of the sudden wants to act is as if your tungsten is dirty and you are welding in the wind.
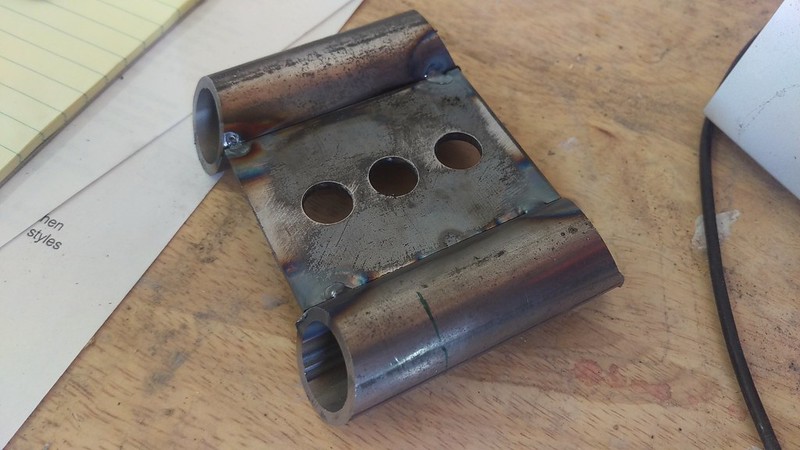
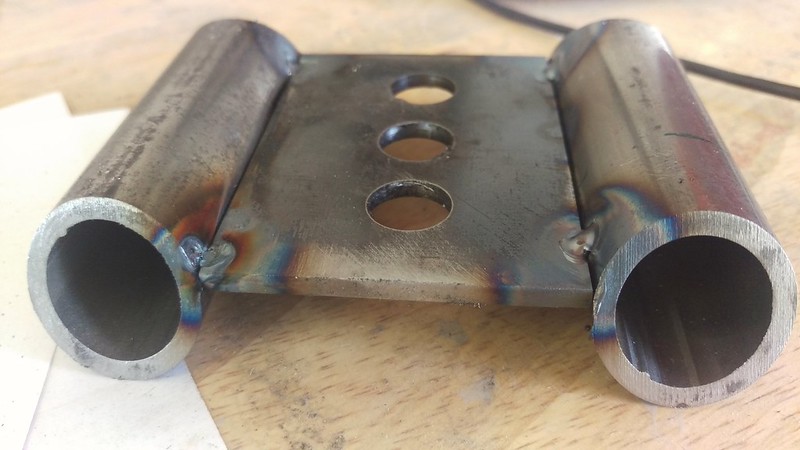
The transmission mounting pad:
Yes, I know the mount is torn. I didn't want to use a new mount when I am constantly bolting an unbolting hot metal to it for mock up, spot weld, mock up.
You can see in that last picture where I had to cut a spot weld or two to shorten a length or change the angle. I'm not perfect.
This coming week I will work on the passenger side of the mount and moving the primary tube o so slightly. Cross your fingers on that one...
Re: Long time coming AKA My 91 Z28 Vert build thread
I had some issues getting the tubing the exact length and angle on the passenger side. I devised a play do method which consists of rolling the playdo to the size of a tube and putting it in place. Use a razor blade to then cut it out and measure the length and angles. Worked well enough.
Spot welded in place and then TIG welded together. Unfortunately I warped it so I have to cut a section back out and weld it back together. That's upsetting.
Re: Long time coming AKA My 91 Z28 Vert build thread
Managed to get the new tubes spot welded in place. I ended up just cutting off the entire passenger side of the crossmember and making a new side. With the piece that warped I only used a single spot weld and then just started welding. This time I'm going to try putting spot welds every 90* and then weld one 90* section flip and weld the other section and then let it cool. It will take a lot longer but that should help prevent the warpage. It was just strange that the warpage was only on one side, it still lined up to the driver's side and then to the transmission mount just fine.
Re: Long time coming AKA My 91 Z28 Vert build thread
Originally Posted by Tibo
Can you be more specific?
You paid bottom dollar on china made junk, and that's what you got. (tough pill to swallow I know)
Thats why they wont even work outta the box. Your over their cutting and welding JUST to make it so they motor will even run on all cylinders.
Also, iv said in the thread on these china headers but NOBODY listened when I said it. Those tubes aren't even equal length. I guess nobody cares.
Re: Long time coming AKA My 91 Z28 Vert build thread
Originally Posted by no new tires
You paid bottom dollar on china made junk, and that's what you got. (tough pill to swallow I know)
Thats why they wont even work outta the box. Your over their cutting and welding JUST to make it so they motor will even run on all cylinders.
You're not totally correct. You've read through the thread so you know that these headers do fit automatic transmission thirdgens. My problems are not the fault of a company because had I not had a manual transmission and these older style pre-eliminator AFR heads I would have no problem with the spark plugs. The guys running newer AFR heads have shown that there is no issue with the spark plug angle. Even though I have a T56 (which sits differently from an automatic) the first crossmember I made would have still worked with the Piping that the header came had I not had a crossmember mounted torque arm. So my situation is very unique.
Originally Posted by no new tires
Those tubes aren't even equal length. I guess nobody cares.
Correct. None of us are competitively drag racing or entering an engine masters challenge. We just want a stainless header that doesn't stick down past the subframe.
Re: Long time coming AKA My 91 Z28 Vert build thread
Are you going to run an oval stainless exhaust tube, or with the shortened up headers that fit under the SF are you going to run circular? I have been thinking about running the oval to tuck everything a bit higher up.
Re: Long time coming AKA My 91 Z28 Vert build thread
Originally Posted by Robbie_S
Are you going to run an oval stainless exhaust tube, or with the shortened up headers that fit under the SF are you going to run circular? I have been thinking about running the oval to tuck everything a bit higher up.
I'll keep it circular. If I were going bigger than the 2.5-->3 I would probably look into the oval.
Re: Long time coming AKA My 91 Z28 Vert build thread
Managed to weld up the rest of the transmission crossmember and bolt it in place without any warpage. So it seems that multiple spot welds (at least three) at every joint along with not welding long stretches top to bottom was they key. Duh. Not going to bother posting pictures of what it looks like since it looks exactly like the other and because I am going to make another one (it will be the third transmission crossmember I've made from scratch) along with making another set of engine mounts. Reason I am remaking all of them is because I finally found the information necessary to map out the chassis's centerline and measure the "frame." I had thought for quite a while that this car was in a wreck because some of the suspension pieces weren't marrying up as nicely as they had on my previous car yet, all of the body panels lines up with acceptable 1980's gaps. Side note: If you want to see one of these 1980's thirdgens with body panel gaps that are up to today's standards, check out RobGuitarGod's thread: https://www.thirdgen.org/forums/memb...ml#post5990388
Re: Long time coming AKA My 91 Z28 Vert build thread
Glad you got the crossmember all solid and straight. Short welds with lots of cooling time in between welds is the best way to do any small part. The car is looking great, and seems to be coming along nice and steady! Thanks for the updates.
Re: Long time coming AKA My 91 Z28 Vert build thread
I had done a fair amount of searching (not just on thirdgen.org) about how to set up a drivetrain in regards to the chassis. The proper way to do it is to find the chassis' centerline and make everything perpendicular or parallel to that. I was able to dig up the chassis/underbody measurements.
Re: Long time coming AKA My 91 Z28 Vert build thread
With the chassis or underbody measurements you can use a tram gauge to easily find out if the subframe is bent, twisted or crumpled. There is no need to go out and buy and expensive tram gauge set because all you need is a straight rod and a pair of 6" rods attached at the ends. Metal electrical conduit or several longer lengths of threaded rod both can work. The other thing you can do with these measurements is finding lines to set up the suspension, which is what I did.
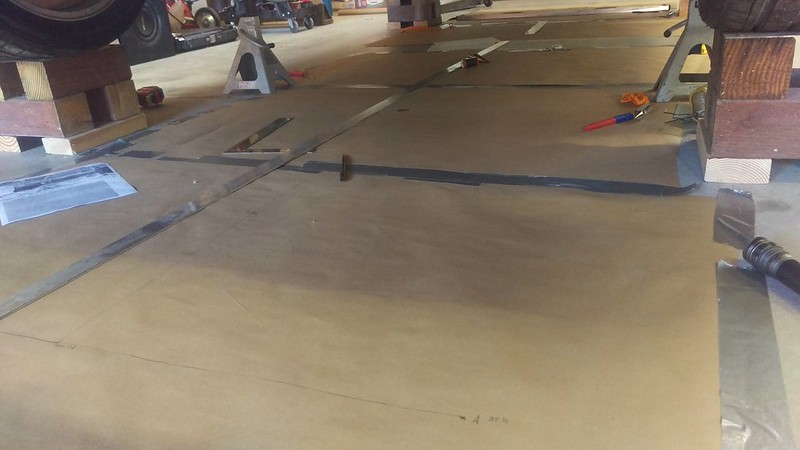
So first things first, Raise the car up on so that it is sitting on the wheels. Lots of good ways to do this. I have a set of weather treated 4x4s that I have glued and toe screwed together and then screwed an 18 gauge metal plate to the top that the wheels then sit on. In the pictures the safety aspect does look slightly questionable since the area that the tires sit on is only twice that of the tire's foot print. I put Jackstands under the subframe so in case the car does move, it should be caught but I can shake and shove the car any direction and it doesn't move.
Next you want to clean the floor below the car really well. Sweep it up, mop it and sweep again. Then go out and buy some of the thick UPS brown wrapping paper, which is also available at Wal-Mart. Tape it down to the floor below the entire car.
Re: Long time coming AKA My 91 Z28 Vert build thread
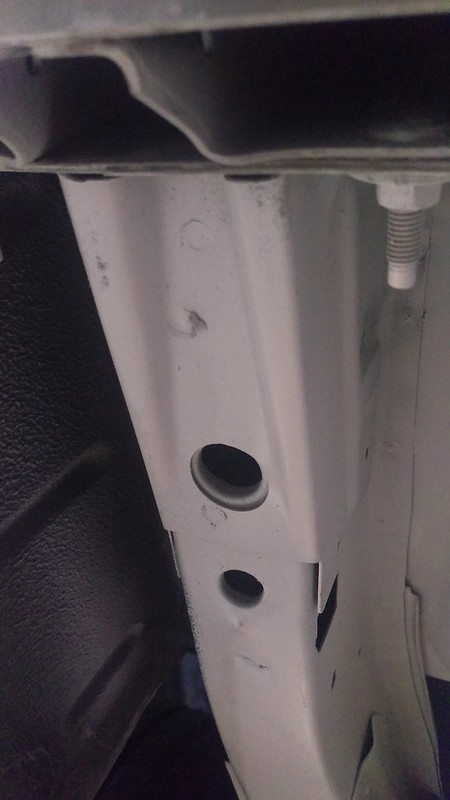
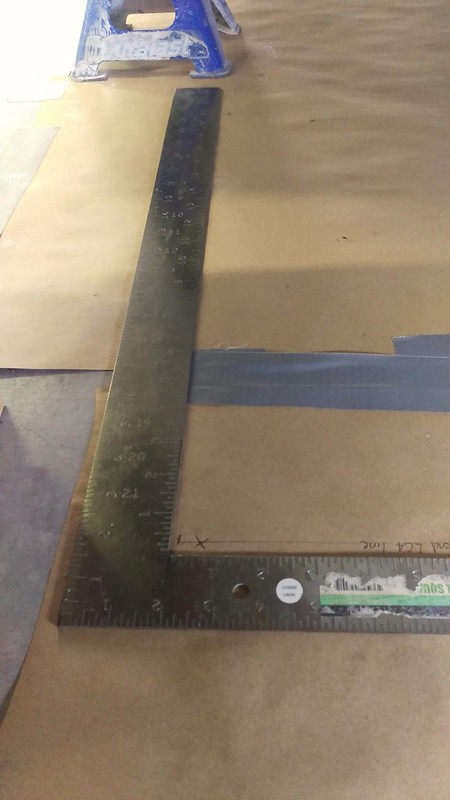
You can see in the above picture that I had already begun mapping out the chassis. The way you map it out is to make sure the chassis is level front to back and side to side. K member, strut tower brace, sway bars and rear end all were nearly dead level with a bubble gauge. Being level front to back isn't as big of a deal but I was pretty close. If you look over the underbody measurements I posted you now know that all of those holes in the bottom of the subframe are actually chassis measurement spots. I had always wondered why they were there. So here are the most easily readable spots that I had used.
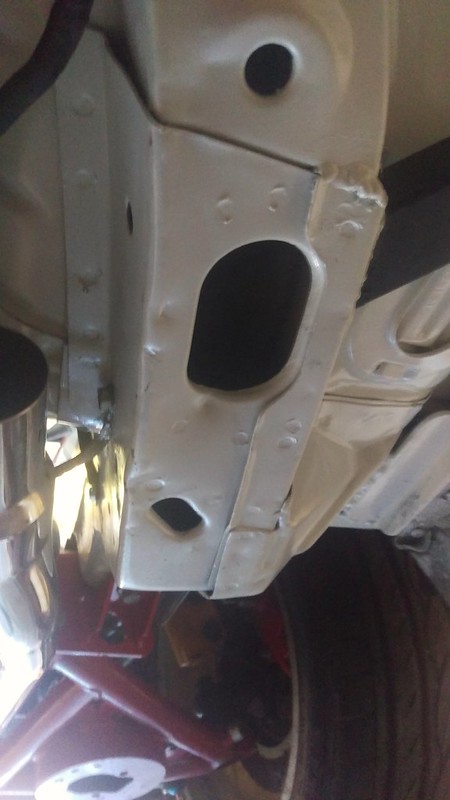
On the front frame horn or rail you measure from the center of the larger hole seen here on the underside.
This is the underside of the passenger side frame rail. On this section you can use both the smaller oval hole and the smaller round hoe. On both you measure from the center of the hole.
This section is just in front of the body mount for the rear lower control arm. Use the small hole that is just inboard and behind the mount. Again, measure from the center of the hole.
This section is just in front of the rear bumper. You use the smaller of the two holes and as always, measure from the center.
There is one more readily available hole, probably. It's the hole just behind the transmission crossmember that is covered up if you have inner subframe connectors. So mine is covered up now.
Re: Long time coming AKA My 91 Z28 Vert build thread
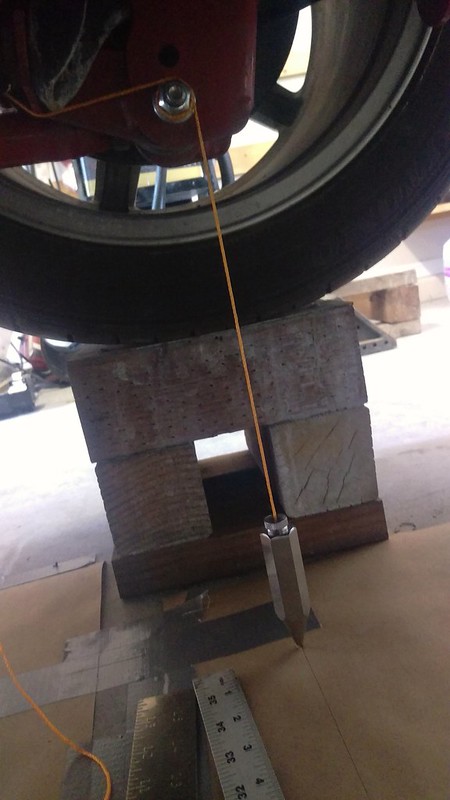
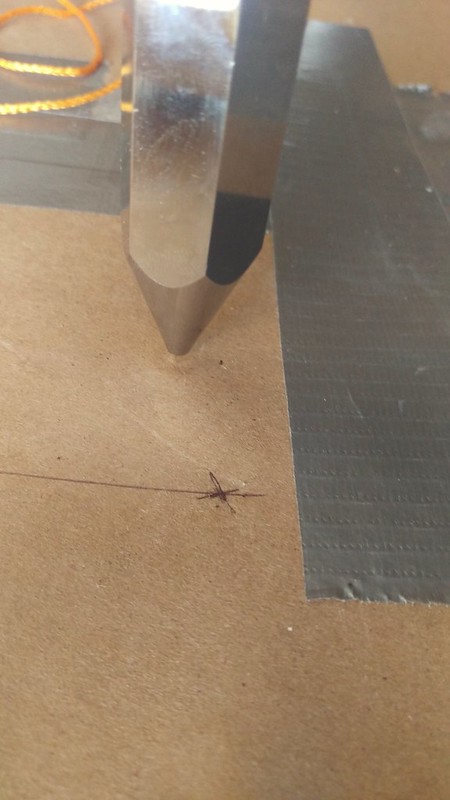
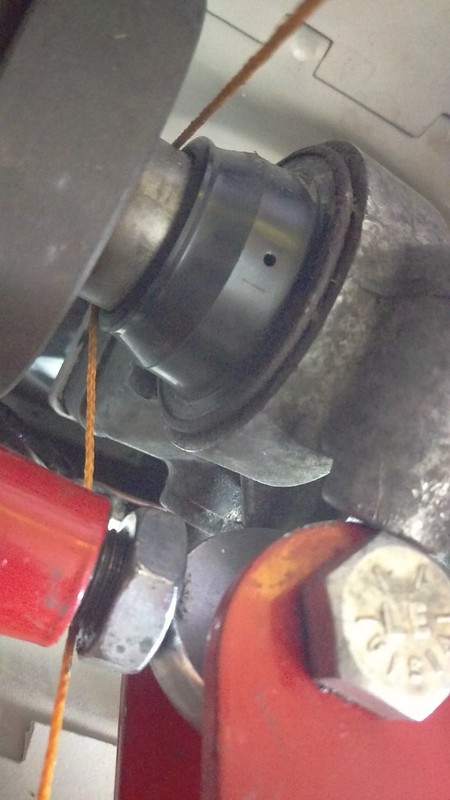
I hung a plumb bob from the center of each hole along with the inside posterior portion of the bolt for both sides of both lower control arms. Then just make a mark where the bob touches the paper. If you aren't familiar with Plum bobs, here is a picture of one being dropped from the inside and back of the axle's side of the LCA.
Once you have the body's holes mapped out on the paper you just use a straight edge to connect the pair and then measure the distance from each mark that the Chassis measurements I posted say to measure. You'll need an array of straight edges, I used two milled levels, an aluminum yardstick, two metal carpenter's angles, a metal T square and an 8' length of 1/8"x1" aluminum. Once you find the center of every pair you take a long straight edge and connect them all. The line you have just made is your chassis' centerline. My centerline fell exactly on every midline mark I had made. If every mark you made falls on the midline it should be safe to say your chassis is up to 1980s GM standards. However if one of the marks is off and you have double checked all your measurements and the diagram, you've been hit.
Re: Long time coming AKA My 91 Z28 Vert build thread
Now with the body's centerline known and the rear ends's long axis plotted out you need to center the rear end to the chassis' subframe. Note how I said to center the rear end and not the driveshaft or how I said center to the chassis's subframe and not the fender wells. It is a widely popular misconception that you center the rearend by centering the wheels in the wheel well or making them perpendicular with the pinch welds or some other way, at best, all of which will only get you in the ball park.
First thing to do is measure the distance between the points that you made that are from the front and back of each side of the LCA to double check that your LCAs are both the same length. Adjust as necessary BUT(!) when adjusting the rear after mapping out the chassis you must do so only with the rear end suspended in mid air. If you do it with the tires on stands the chassis will move and you will have lost all your work. Next you want to make sure that your rear end is straight. You can do this by throwing the bobs over the axle tube in four spots and connecting the corresponding dots, if they all fall in line then the housing is straight. If your housing is straight and the LCAs are equidistant than it follows that the rear end is perpendicular to the chassis midline, but not yet centered. You can double check that it is perpendicular if you have some 3' long carpenter's squares OR you can use some trigonometry and use the point where the chassis centerline and the rear end's centerline meet as two sides of a 90* angle. Measure equidistant from that point and then measure those two mark's hypotenuse and A^2 + B^2 and Bob's your uncle you should get C^2 for a verified 90*!
To center the rear end you want to measure the length from one LCA bolt head to the other LCA bolt head. Divide by two and make your mark. Is it on the chassis centerline? Or was it off like mine was because on this site everyone and their brother tells your to center the rear by centering the tires in the rear wheel wells? Mine was off 5/8" even though it was perfectly centered in the rear wheel wells.
The way to fix this is to drop a plum bob on any part of the rear axle, I stayed on that LCA bolt head. Let the rear end hang in the air so the body doesn't move and then mark it's location. With the rear end suspended in air you will notice that the plum bob is no longer on the same spot, that's the way it works.
Measure over the distance the rear end needs to move and the then turn the adjustable panhard bar until the plum bob hits the new mark. Put the wheels back on the wheel stands and measure from the same previous area to make sure the rear end is now centered.
If your tires are wider than stock and you don't have a mini tub you may now notice that on close inspection the car's driver's side wheel sticks out slightly further than the passenger side. Is what it is.
The bolt head for the LCA's axle side should now be parallel with the Body side. I've already given you two ways to check it. I used a carpenter's square in this picture and the bolt heads make a line that is perpendicular to the rear end now!
Congratulations, your rear end is now centered! Next couple posts will address lineing up the driveshaft, engine and transmission.
Re: Long time coming AKA My 91 Z28 Vert build thread
Next thing you need to do is find out where the center of the pinion's threads are (it's midline) to determine how much GM shifted the drivetrain from the centerline. I threw the the plum bob over the pinion seal since it was nice and round. Mark the corresponding spot. Next measure to OD of what the plum bob was going over and divide that by two. Take that answer and measure in from the mark to see how far off your pinion's centerline is. Mine was off the centerline by 0.400" I've heard time and time again that GM moved the engine and transmission over so finding out this was nothing new. Only thing I found odd was that the estimates I had read were always 1-1.5" but who knows how they came up with that number.....
You also need to plot the midline of the front of the driveshaft. Throw the bob over, measure the OD, divide and measure over to make corresponding mark.
I was pleasantly surprised that even though I had no aftermarket or stock crossmember to base my transmission crossmember off of I was off no more then 1/10"
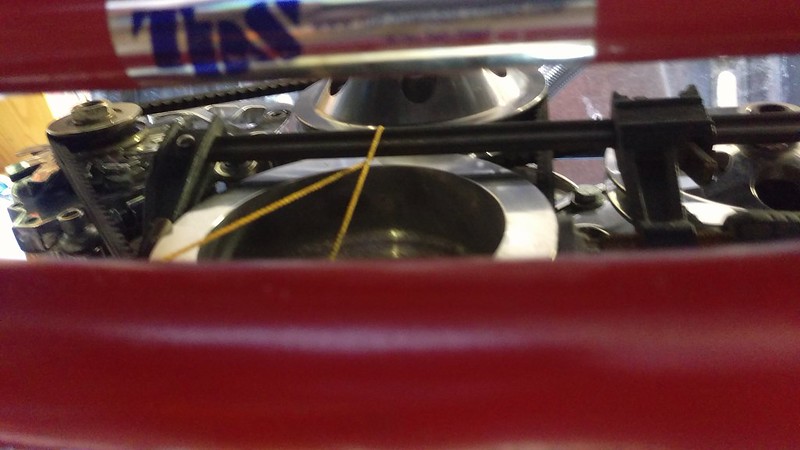
After that I found the center of the front of the engine by measuring the OD of the crank pulley, finding it's center and dropping a line from there. The way I did that was just to clamp a clamp on the sides of the crank pulley and drop the plum bob from that. I would let it settle and then measure with a ruler where the middle of the pulley was and slowly move the line over till it crossed the appropriate mark on the ruler. In my case the pulley was 6.5" so my midline was 3.25" The picture kind of explains it.
Now I had made my own motor mounts and I had only used a tape measure to position the engine..... Turns out the front of my engine was slightly angled, the front of the engine was pointed towards the passenger side. I'm going to measure the distance from the pan to the K member and see if I would also be allowed to lower the engine 1/2" or so. I forget the measurement the crank's centerline was off but it's enough to make me want to remake the mounts. It's OK because I need to raise up the tailshaft of the transmission by 1-1.5" because the tailshaft is at a slight downward angle.
So this coming week I will be making new engine and transmission mounts as well as moving the header primary tubes.
Re: Long time coming AKA My 91 Z28 Vert build thread
Amazingly detailed write-up. Great work. I know I appreciate the time and effort it takes to share this kind of work with the forums. Thank you and keep the post coming.
Re: Long time coming AKA My 91 Z28 Vert build thread
Originally Posted by Nightcruzer
Amazingly detailed write-up. Great work. I know I appreciate the time and effort it takes to share this kind of work with the forums. Thank you and keep the post coming.
Thanks. It does take longer to do it this way. If you know your subframe is straight and you have rod ends on your rear LCAs you would probably be OK aligning your rear end by the fenders. 5/8"-1.5" offset between the pinion and trans output shaft is something the driveshaft and rod ends would take up. But this is something easy to do and can tell you a lot about the subframe and how the driveline and suspension is setup. The UPS brown paper cost me $5 and I bought two more plum bobs for another $5. So $10 and an evening's time to do this, and it is beneficial. Remember that in the 80s and 90s and even early 2000s many places did not have electronic receipts or other things that were recorded for Carfax and other business to log. Very possible for these cars to have been in a bad wreck (affecting the subframe) early on and it never be recorded. I took 8 measurements from the underside of the car and everything fell exactly on the centerline using the GM factory measurements. Next week I'll probably use a tram gauge to measure from diagonal points.
I entered a large car show for Sept 23/24, really hoping to get it done and take home a trophy.
Re: Long time coming AKA My 91 Z28 Vert build thread
This week I was able to cut out, drill and prep the plates for the engine mounts. I started making the new transmission crossmember also. I decided the best way to tackle this project would be to unbolt the motor mounts from the engine side only and then jack up the rear of the transmission to the needed height. I have the transmission up to where the rubber bump stops on the the top of the transmission are nearly touching the tunnel and the shifter is just above the tunnel and inside the cabin. I checked the angle of the crankshaft by putting an angle finder on the balancer and crank pulley and both come out to 88*. I was really hoping for 90* but 88* is darn close. I can't lower the front of the engine because the oil pan would be too close to the steering assembly.
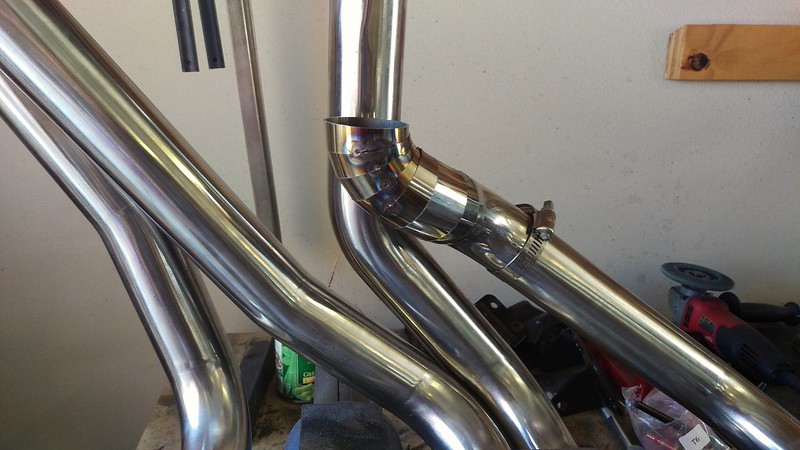
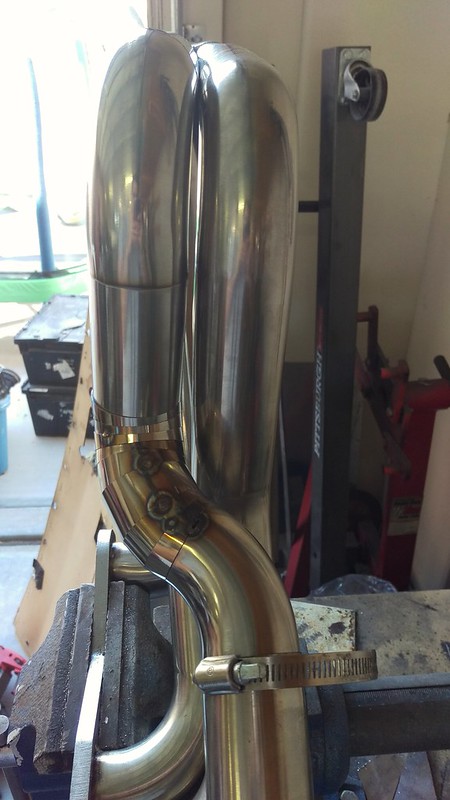
On the header side I was able to finish the passenger side header. I took some pictures of the header installed and went to my friend's classic motorcycle fabrication/restoration shop. Took us two hours but we were able to move the primary tube around. It clears the spark plug beautifully.
The only problem is that it now hits the A arm. Without having the car nearby to check fit up I failed to catch that the A arm is at an angle towards the nose of the car. So even though the tube is in line with the other tube, it hits the A arm. Back to the drawing board, kind of...
Re: Long time coming AKA My 91 Z28 Vert build thread
Originally Posted by Tibo
Back to the drawing board, kind of...
That is very frustrating. I hate when you think you've got something finally figured out, only to find out you don't! But once its done, its done. How much does it hit?
Re: Long time coming AKA My 91 Z28 Vert build thread
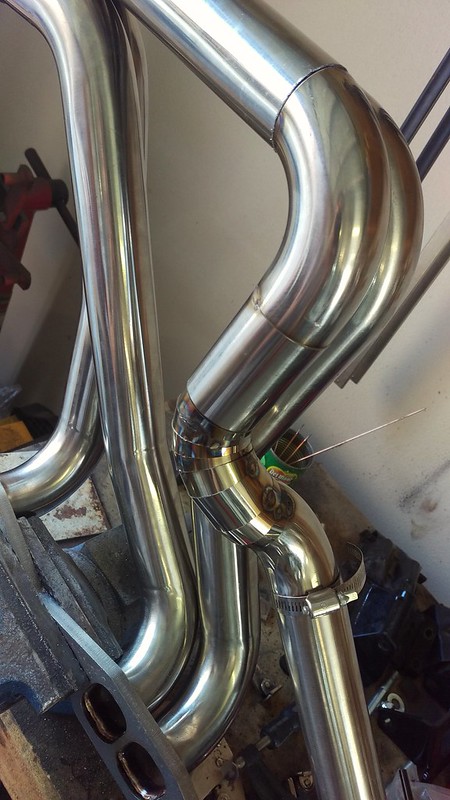
I decided it was easier to work with small pie cuts than mandrel bent tubing for compound curves, so switched to pie cuts and re routed the tube.
If you look close at one of the welds in the above picture you'll notice one of the joints looks like bird poop, I forgot to turn the gas back on. Whoops.
I'll attempt to finish the transmission crossmember this week and with that piece done I can make the engine mounts which should go really fast since I only have to fit one tube per side. I may get lucky and finish the driver's side header also. But you've seen my luck (or just mistakes) so probably not.
*** I'll be welding the curves I made while it is removed from the header so I only have to make to weld two joints with it installed on the header.
Re: Long time coming AKA My 91 Z28 Vert build thread
Another side note on working with round tube. I do have a metal bandsaw but sometimes the tube is too short for the bandsaw's vise to hold. The best way to make a straight 90* cut in that case is to slap on a radiator clamp and trace it's line. Perfect 90* that I can cut freehand now.
The other great use for radiator clamps is for holding the tubes together if you don't want to tack them together yet. You can see the radiator clamp on one of the joints in the above pictures.
Re: Long time coming AKA My 91 Z28 Vert build thread
Originally Posted by Tibo
That is a **** load of welding all by each other. Thats going to take the better part of an afternoon with cooling times... What gas mix are you using? And are you going to run gas on the back side?
Re: Long time coming AKA My 91 Z28 Vert build thread
I hear you. Why short cut it now when everything else is detailed. These are going to be one good set of headers when you're done with them. Especially with making them fit so well. Nothing is a **** me off more than headers blocking that one spark plug in the back...
Re: Long time coming AKA My 91 Z28 Vert build thread
Originally Posted by Robbie_S
That is a **** load of welding all by each other. Thats going to take the better part of an afternoon with cooling times... What gas mix are you using? And are you going to run gas on the back side?
I have spot welds every 90* or so and I'll be welding a 90* section and flip to the other side's 90* section. It will take a while. I'm using straight Argon for the shielding gas and purge gas. I think welding them will be time consuming but not difficult. These headers are 18 gauge and I surprised myself in the control I could still maintain on the penetration. I could easily make spot welds and small stretches of weld without breaking through the back side, AKA not using full penetration welds. If these headers were 16 gauge I would feel comfortable not purging the backside and just not doing full thickness welds.
Re: Long time coming AKA My 91 Z28 Vert build thread
Originally Posted by Robbie_S
Not difficult to weld for sure. But with all that heat build up you'll risk making a keyhole as you're going along.
Jody on weldingtipsandtricks has a good YouTube video on welding thin wall stainless round tubing. I think he was welding 20 or 22 gauge. He gave some pulse settings that I will try if I'm not able to move fast enough.
Re: Long time coming AKA My 91 Z28 Vert build thread
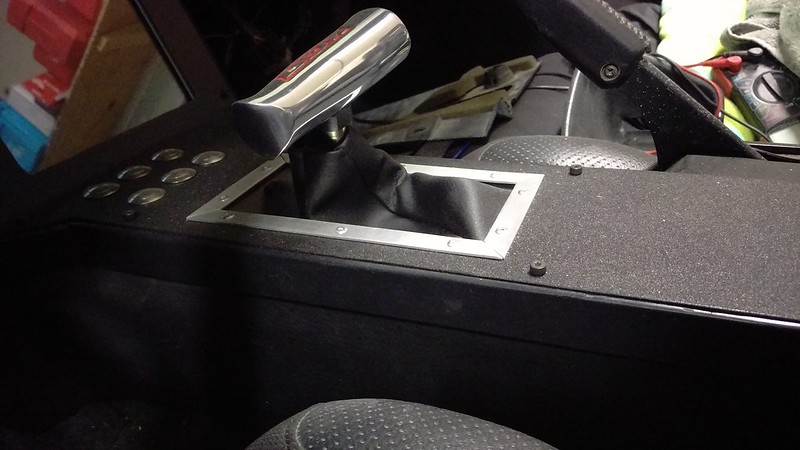
So this first photo is the older photo showing the shifter handle sitting pretty low in the console.
The second photo is of the shifter handle after making a new transmission crossmember at the approximately correct height. I wanted to raise it high enough to where the crankshaft's centerline was parallel with the ground but I stopped at ~88.5* and said good enough because I was within a finger's width of having the bump stops on the top of the transmission touching the tunnel.
Re: Long time coming AKA My 91 Z28 Vert build thread
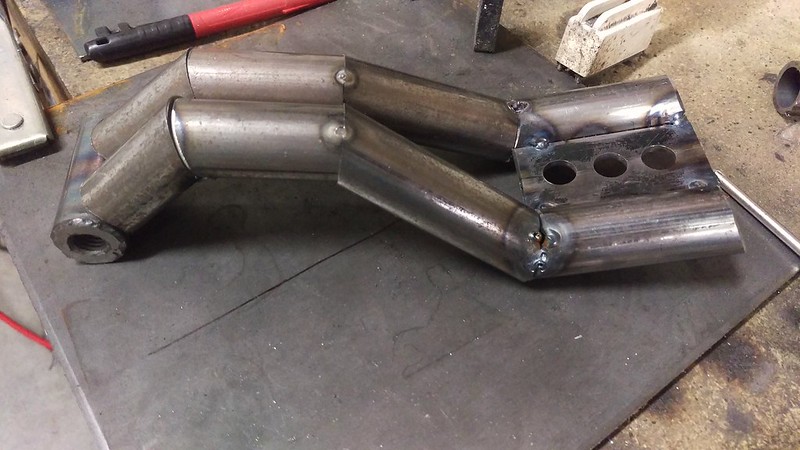
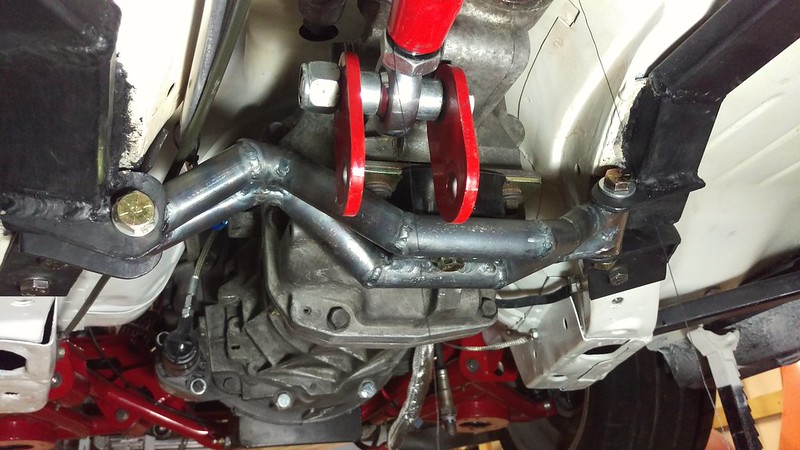
Finished the main part of the transmission crossmember, just need to weld on the mount for the torque arm. Found out the hard way that the best way to weld up these tubular pieces is to start building from the inside and go out. So fit a tube and fully weld it in place and then start on the next tube, this way if there is distortion you can make up for it with the fitment of the next piece. Creating the entire crossmember and only tack welding it as I went and then welding it at the end was resulting in warpage no matter how good the fitup was and only welding 90* at a time.
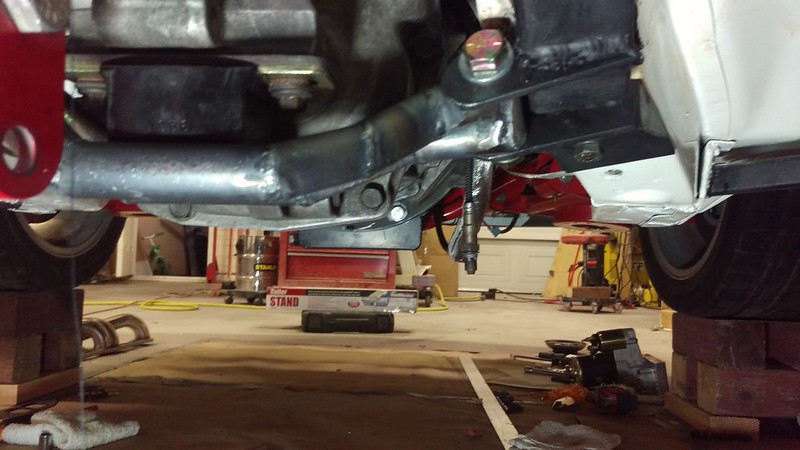
Here a few shots, the headers aren't installed but you can get a decent idea that the clearance will be decent for running exhaust.
No, the TIG welds are not the best. Have you ever tried to TIG weld 1" round tube?? It's tough because your angle is changing with every millimeter of torch travel.
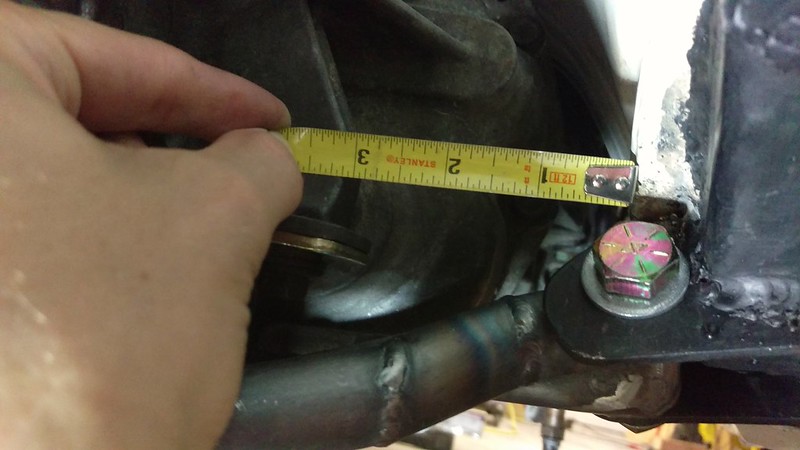
And here is just a crude measurement of the transmission case's pedestal mount to the frame rail. 3". The transmission tailshaft is dead on centered with the rear end which is centered exactly in the car.
After I finished this main part I had an idea for another design I'll try in the winter or next spring.
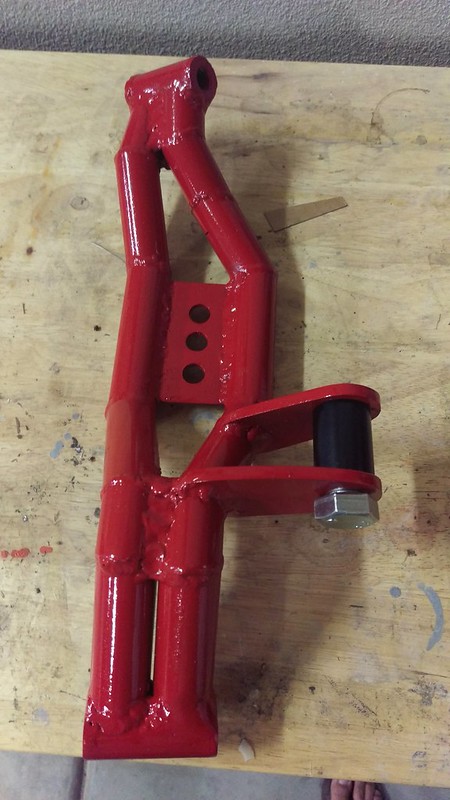
Re: Long time coming AKA My 91 Z28 Vert build thread
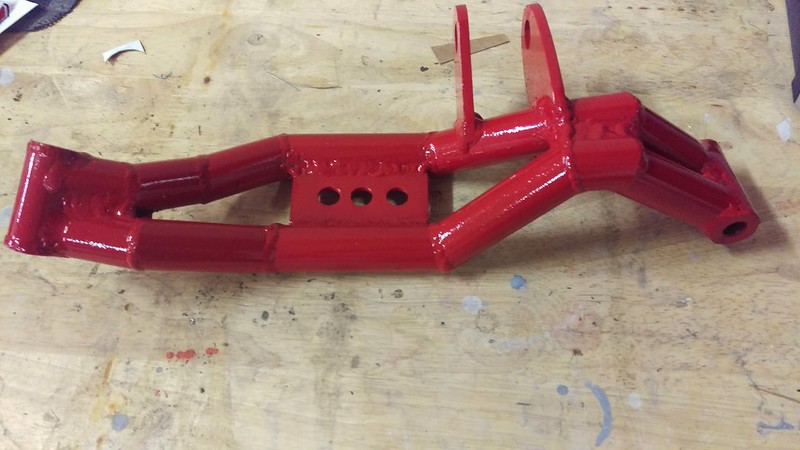
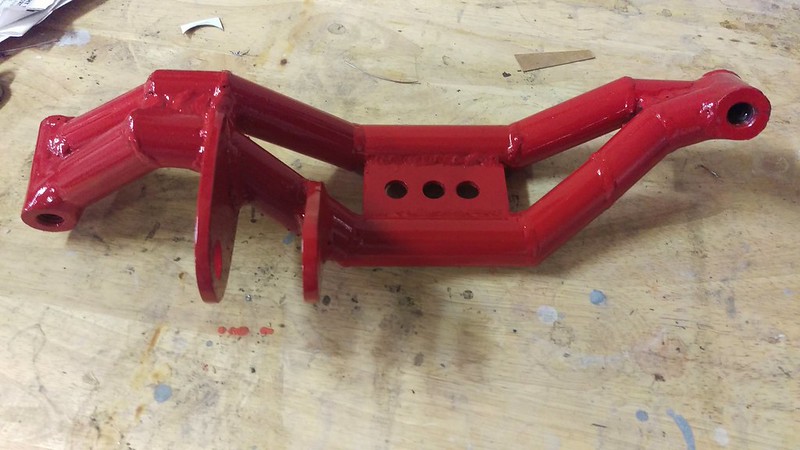
Finished the Transmission crossmember and sprayed the red on it. I made the Torque arm mount's tabs from 3/16" plate steel and I decided against reusing that huge Spohn bearing/mount. I instead made a spacer. The bearing Spohn uses allows the arm to move forward and backward when adjusting the pinion angle which is nice but then reusing that piece and mounting it would have made it stick down at least another inch. This way works fine it just doesn't allow any movement unless you loosen the through bolt which to me isn't a big deal. The car will be up in the air to check the angle anyway. For the angle I went with -2* of pinion preload.
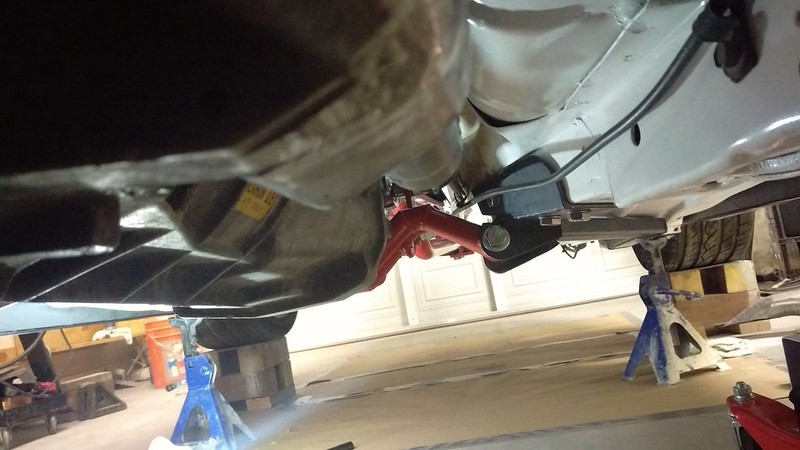
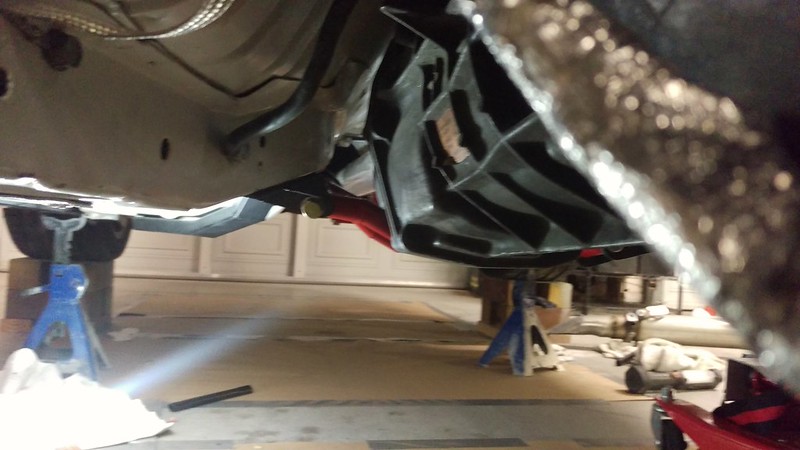
Re: Long time coming AKA My 91 Z28 Vert build thread
Took two shots from the front back showing what I'll have for exhaust clearance. The driver's side is great for clearance, the passenger side, not so much. However the exhaust y pipe that the stainless headers came with fits fine and ground clearance (from what I've read) is good.
The crossmember works and seems quite strong but I wish I had more forethought in the way it attaches to the transmission subframe rails. I have thought of another way of doing making one and attaching it that I'll probably try in the spring. At any rate I think it looks good and it works.
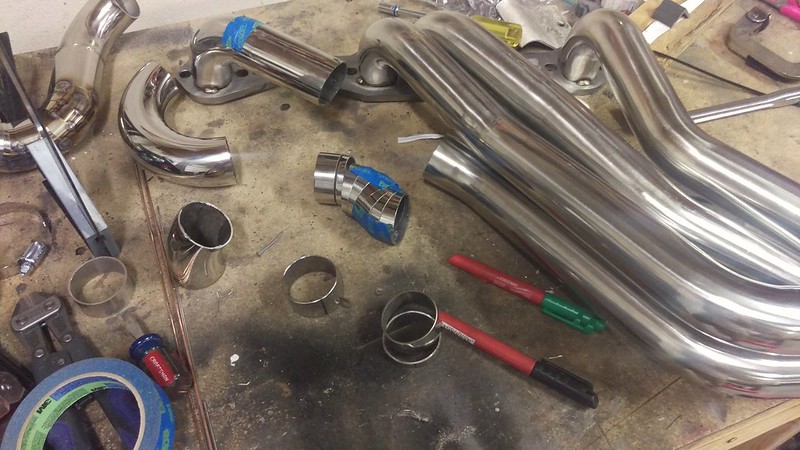
Re: Long time coming AKA My 91 Z28 Vert build thread
Started working on the driver's side header. I think I have all the tubes cut and fitted so on Monday I can pick up a friend's spare tank for back purging the stainless. That seems to be the last thing I have to do on this car before the car can hit the road.
Re: Long time coming AKA My 91 Z28 Vert build thread
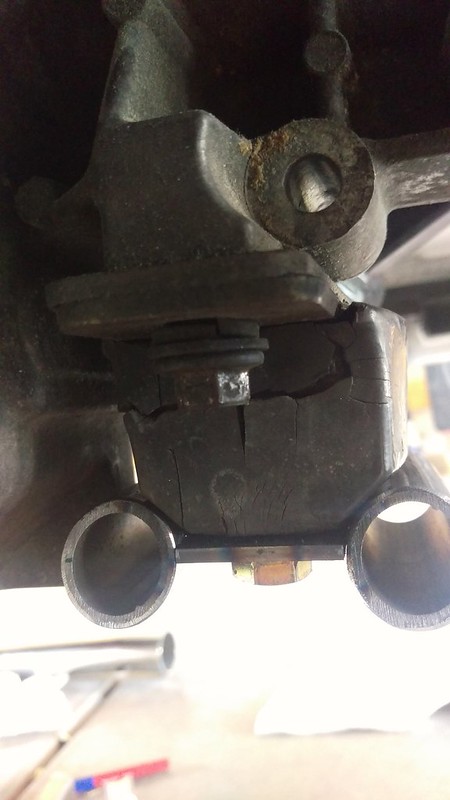
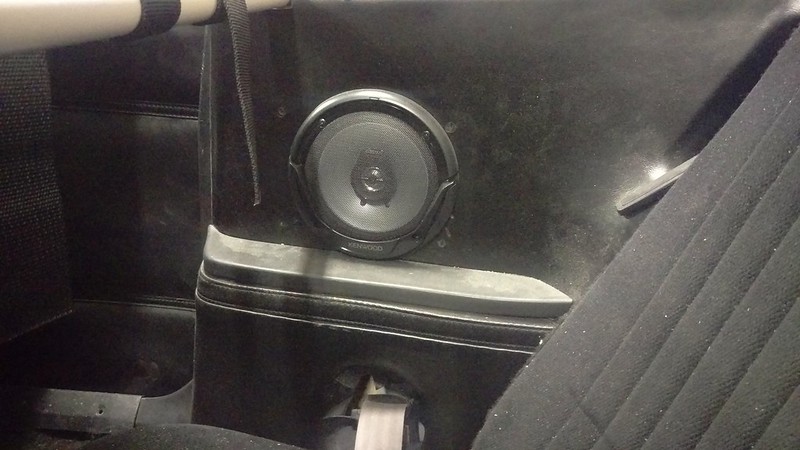
I also never posted about the rear speakers. I went with a 6" round instead of whatever oval shape they originally used. I really scoured the thirdgen archives about what speakers people used and how it worked out. My driver's side speaker went in easily but the passenger side had a cross brace behind it that the speaker's magnet was hitting. I had to cut out a section of the brace and weld in a reinforcement to allow the speaker to fit. The speaker I used also had the shallowest mounting depth I could find. It came out OK. In the picture you can make out the prior speaker's mounting screw locations (where they pierced the vinyl) but another spring time project will be to recover that area in new vinyl.
 07-16-2017, 11:57 AM

 [/url]
 [/url]
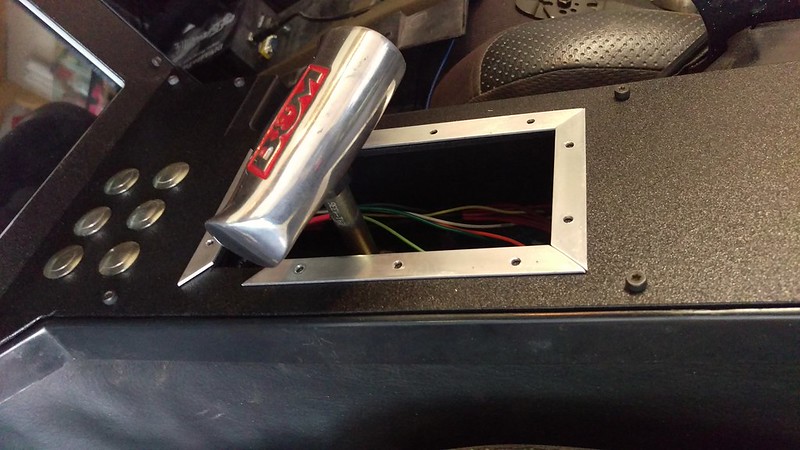 [/url]