


My 'not a project' 89 IROC build


Supreme Member
iTrader: (3)
Joined: Apr 2008
Posts: 3,002
Likes: 64
From: Wittman,Az
Car: 86 IROC-Z, '71 RS
Engine: 305 TPI/ 350
Transmission: 700R4/TH350
Re: My 'not a project' 89 IROC build
Loving it so far. Keep it up! Curious to see how the turbo upgrade looks.
DR.K.
DR.K.

Thread Starter
Joined: Jul 2004
Posts: 769
Likes: 51
From: Zebulon, nc
Car: 1990 GTA/1989 Iroc
Engine: L98/383
Transmission: 700r4/t56 magnum
Axle/Gears: 9"
Re: My 'not a project' 89 IROC build
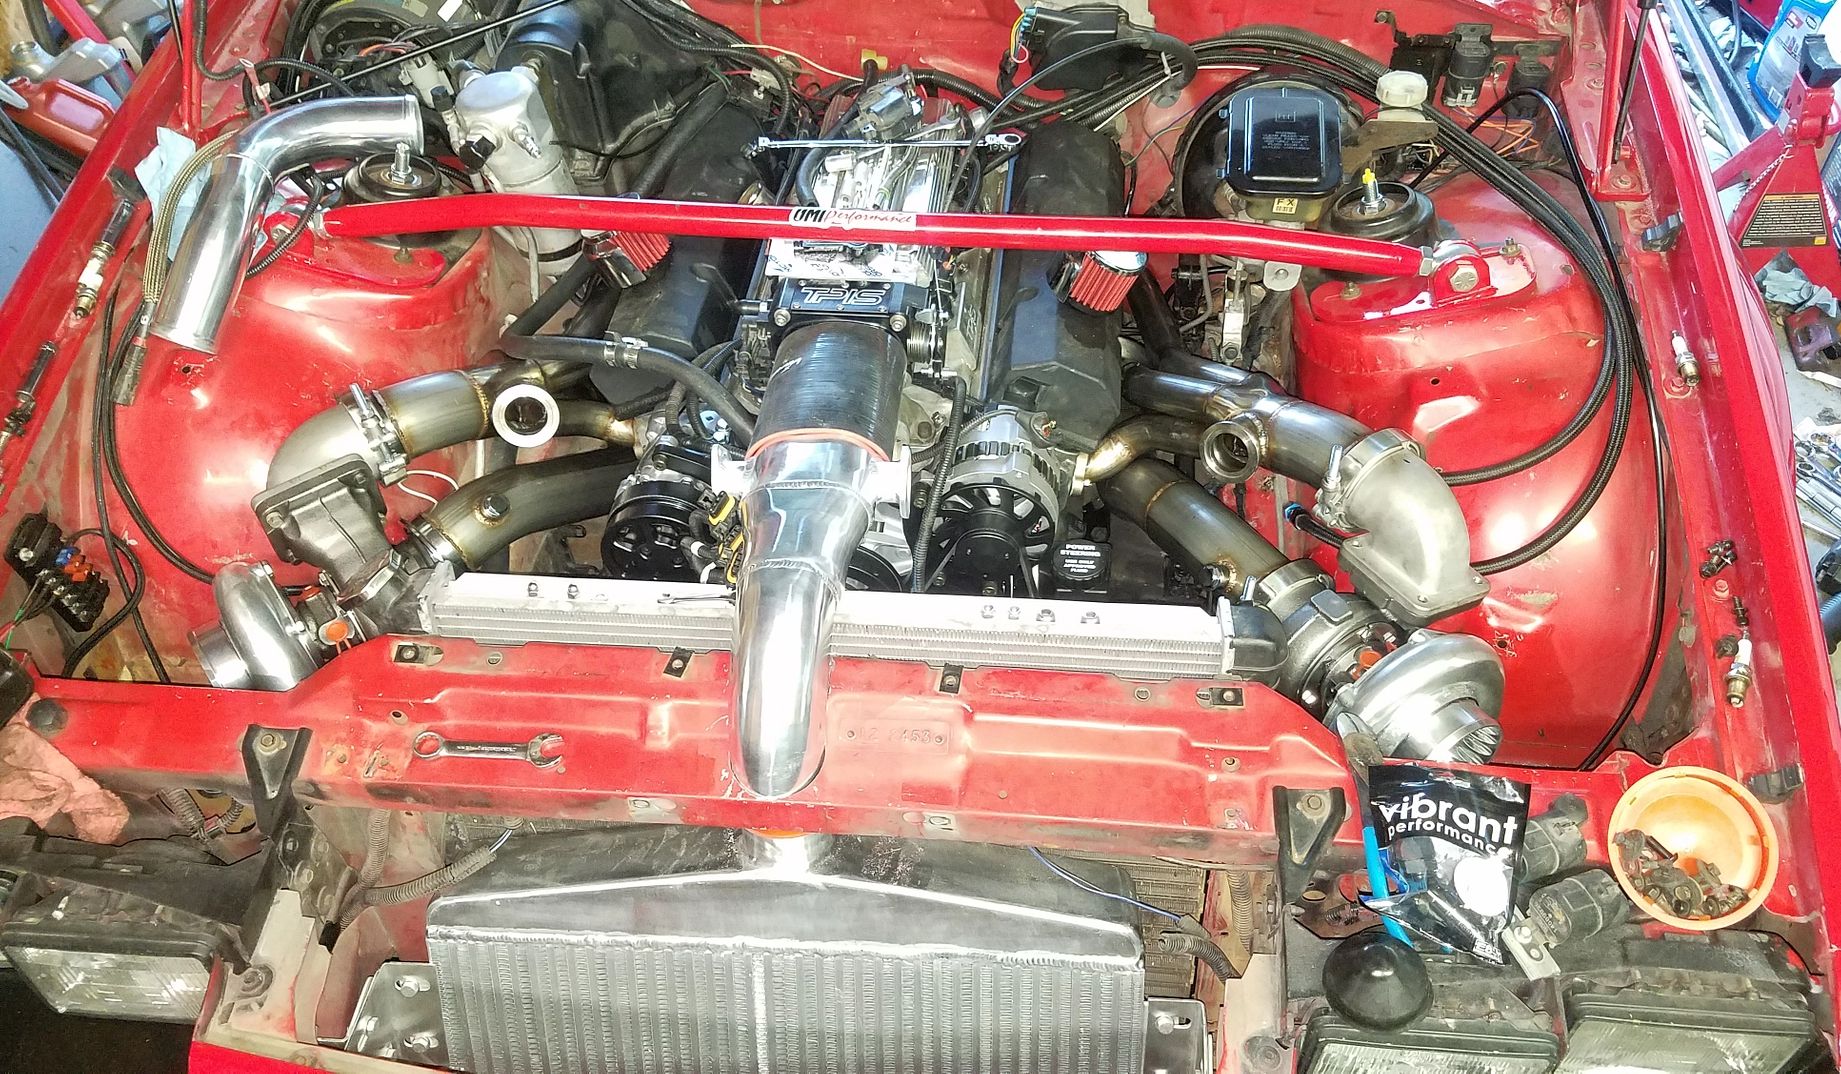
Things are moving along well, ALL of my major parts have arrived. The turbo hot side and cold side, all the ground control parts, the new accessory drive. I started by removing the original accessories and installing the Eddie motorsports setup. Everything went perfectly, and it's a very compact setup, while leaving an opening in front of the throttle body for the intake duct. I went with the satin black finish on the pulleys. My plan through all of this is to retain heat, ac and the stock hood. the way the original ac compressor and lines were would have made that impossible. Next I installed the headers, turbos and down pipes. The quality and fabrication of the parts is actually excellent. The v band clamps are pretty cheap, no surprising. If they become an issue, I'll just replace them with some quality pieces. The exhaust is designed to follow the path of a traditional long tube header, but I'd like to run it like the factory setup, under the oil pan and to my existing 4" exhaust, for ground clearance reasons. It's totally doable, just is going to take a bit of fabrication. Overall very pleased, and things are going well.
Many things are going to have to be relocated, the fuel lines, brake lines, heater hoses, etc.. My driver side coils should be able to stay, I may need to move the passenger coils. Spark plugs look like they may be a chore, but I'll know more for sure once I get things moved around. Battery is going in the back, with a BMR relocation bracket that puts it in the spare tire area. I'll make new ac lines once everything is complete.
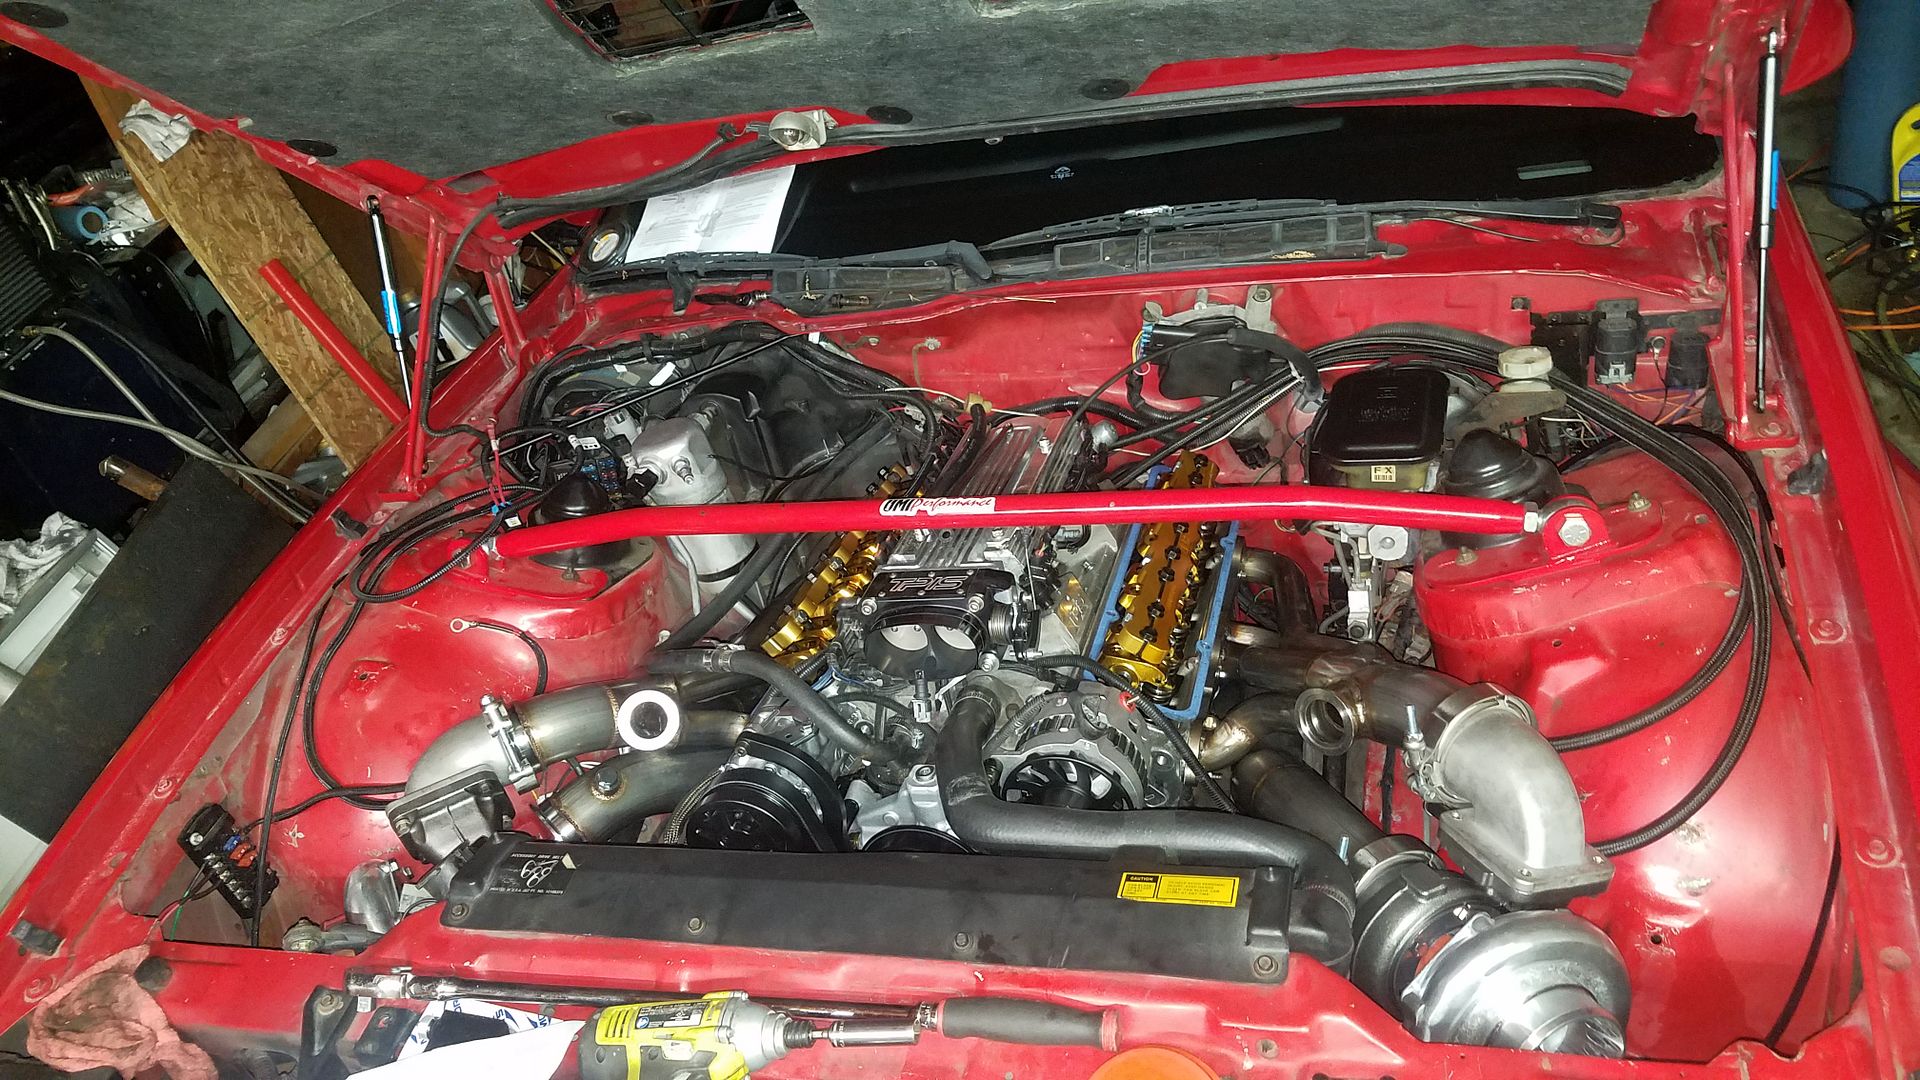

Many things are going to have to be relocated, the fuel lines, brake lines, heater hoses, etc.. My driver side coils should be able to stay, I may need to move the passenger coils. Spark plugs look like they may be a chore, but I'll know more for sure once I get things moved around. Battery is going in the back, with a BMR relocation bracket that puts it in the spare tire area. I'll make new ac lines once everything is complete.


Thread Starter
Joined: Jul 2004
Posts: 769
Likes: 51
From: Zebulon, nc
Car: 1990 GTA/1989 Iroc
Engine: L98/383
Transmission: 700r4/t56 magnum
Axle/Gears: 9"
Re: My 'not a project' 89 IROC build
I'm not sure if I quite knew what I was getting into when I started this mess  There is a LOT involved to keep it a full street car, and have everything look good and function correctly. It also seems like at every turn, I find more work to do. Things I have accomplished: the ground control springs and koni adjustable shocks and struts are installed. No pictures, but everything went smoothly, the rear spring adjusters fit in the pockets of my 9" rear, which was a concern of mine. While I had the front apart, I installed solid engine mounts, as I'm trying to limit engine movement with the turbos and downpipes hanging off the sides now. Honestly, I should have done the mounts long ago, but its not a fun job... Intercooler is mounted, I cut out part of the upper core support to fit the intake pipe. It needs to drop down further for the hood to clear, but I'm waiting for the new radiator. The design of the new radiator may allow juuuust enough room for me to accomplish what I need to do for clearance. Fingers crossed. Made a new power steering pressure hose with some hose and fittings I had left over from other projects, mild victory, a few dollars saved.
The next big thing that will eat up space in the engine bay is the routing of the -10 turbo drain lines to the pan. I'm ordering some fittings and have a pretty good plan for the routing, hoping it works. After that, I'll need to figure out where I can put my coils. Its amazing how much room the things take up when there is no room left, but they will be close to where they were before. The brake lines around the steering shaft have to be moved, they're touching the downpipe. While doing some soul searching for the new routing, I remembered I had a strange manual master cylinder and bracket, already spec'd for 4 piston calipers literally laying around, complete with a linelock solenoid and firewall adapter. It just makes since to ditch the brake booster with the turbos' and it will open up some room under the hood. I'm just not looking forward to drilling a new pivot hole in the brake pedal...
So things left to do: brake master cylinder and lines, turbo drain and feed lines, modify the miniram fuel rails for more flow, radiator, connect downpipes to exhaust, mount coils, make ac lines, wrap headers and downpipes, mount battery and route cables, mount wastegates and weld wastegate pipes to downpipes. I'm sure there's more that I'm forgetting, but that's the big stuff. Trying to tackle one job at a time.

this is where the coils used to be, but there will be a turbo drain line running through the area and going under the motor mount to the oil pan

There is a LOT involved to keep it a full street car, and have everything look good and function correctly. It also seems like at every turn, I find more work to do. Things I have accomplished: the ground control springs and koni adjustable shocks and struts are installed. No pictures, but everything went smoothly, the rear spring adjusters fit in the pockets of my 9" rear, which was a concern of mine. While I had the front apart, I installed solid engine mounts, as I'm trying to limit engine movement with the turbos and downpipes hanging off the sides now. Honestly, I should have done the mounts long ago, but its not a fun job... Intercooler is mounted, I cut out part of the upper core support to fit the intake pipe. It needs to drop down further for the hood to clear, but I'm waiting for the new radiator. The design of the new radiator may allow juuuust enough room for me to accomplish what I need to do for clearance. Fingers crossed. Made a new power steering pressure hose with some hose and fittings I had left over from other projects, mild victory, a few dollars saved. The next big thing that will eat up space in the engine bay is the routing of the -10 turbo drain lines to the pan. I'm ordering some fittings and have a pretty good plan for the routing, hoping it works. After that, I'll need to figure out where I can put my coils. Its amazing how much room the things take up when there is no room left, but they will be close to where they were before. The brake lines around the steering shaft have to be moved, they're touching the downpipe. While doing some soul searching for the new routing, I remembered I had a strange manual master cylinder and bracket, already spec'd for 4 piston calipers literally laying around, complete with a linelock solenoid and firewall adapter. It just makes since to ditch the brake booster with the turbos' and it will open up some room under the hood. I'm just not looking forward to drilling a new pivot hole in the brake pedal...
So things left to do: brake master cylinder and lines, turbo drain and feed lines, modify the miniram fuel rails for more flow, radiator, connect downpipes to exhaust, mount coils, make ac lines, wrap headers and downpipes, mount battery and route cables, mount wastegates and weld wastegate pipes to downpipes. I'm sure there's more that I'm forgetting, but that's the big stuff. Trying to tackle one job at a time.


this is where the coils used to be, but there will be a turbo drain line running through the area and going under the motor mount to the oil pan

Thread Starter
Joined: Jul 2004
Posts: 769
Likes: 51
From: Zebulon, nc
Car: 1990 GTA/1989 Iroc
Engine: L98/383
Transmission: 700r4/t56 magnum
Axle/Gears: 9"
Re: My 'not a project' 89 IROC build
Haven't updated this in a while, but I've been busy on it. However, things are going a little slower then I had hoped, life gets in the way sometimes. From the last time I left off with mocking up the turbos, I pulled the engine out, gapped the rings, installed a slightly thicker set of head gaskets to drop compression to 10.5. It also gave me a chance to look inside the engine, which has 10,000 miles on it now. Bearings and cylinder walls look perfect, so it was out, apart, gap the rings and back together again. Inspected the clutch, which looked great. I'm re-using it for now, but I'll be pushing it past its rated capacity. I'll put a twin disk setup in it when it packs its bags and heads south. With the engine back in. I started building the y-pipe, which will follow the factory style y, under the oil pan on the drivers side, leading back to the existing exhaust system. The turbo feed and drain lines have been run, drivers coils mounted in the same location as before. I have not yet found a spot to put the passenger coils. Literally running out of real estate. Radiator also came in, looks and fits fantastic. There's still quite a bit of tedious work left to go, but I'm slowly starting to see some light at the end of the tunnel.


the hood actually closes!

Spark plug clearance on the drivers side is acceptable. I'm wrapping the down pipes as well. However, I'll have to remake the passenger side pipe, literally zero plug clearance, and the pipe is a little close to the starter as well.

Ran the oil drain lines into existing bungs in the pan. Not 'ideal', but I've seen worse. If they don't drain well, I'll move them to the front of the pan and it will be another lesson learned.


the hood actually closes!

Spark plug clearance on the drivers side is acceptable. I'm wrapping the down pipes as well. However, I'll have to remake the passenger side pipe, literally zero plug clearance, and the pipe is a little close to the starter as well.

Ran the oil drain lines into existing bungs in the pan. Not 'ideal', but I've seen worse. If they don't drain well, I'll move them to the front of the pan and it will be another lesson learned.


Supreme Member
iTrader: (3)
Joined: Apr 2008
Posts: 3,002
Likes: 64
From: Wittman,Az
Car: 86 IROC-Z, '71 RS
Engine: 305 TPI/ 350
Transmission: 700R4/TH350
Re: My 'not a project' 89 IROC build
Just make sure you put a heat shield on the starter. It's looking pretty good!
DR.K.
DR.K.
Thread Starter
Joined: Jul 2004
Posts: 769
Likes: 51
From: Zebulon, nc
Car: 1990 GTA/1989 Iroc
Engine: L98/383
Transmission: 700r4/t56 magnum
Axle/Gears: 9"
Re: My 'not a project' 89 IROC build
I've been slacking on the updates, although from the outside looking in, it probably doesn't appear that I've accomplished much. This latest chapter has taken longer then intended, but I realize it's more work then they show on tv lol. I want to make the car right when its done, no tinkering or oops moments. Also taking measures to make sure the car is serviceable, without taking a lot of effort to do normal maintenance tasks. Wheels finally made it in! 18x11's, wrapped in michelin pilot super sport 295/35's. They fit great and I'm pleased with the look.


next to the old 245's these things look massive!

After getting to know the airflow and cooling characteristic of this ca over the past 2 years, I'm pretty certain that an intercooler, ac condenser and a 100 degree day would lead to a bad time, I decided to add some cooling fans to the intercooler. Its pretty thick and I know getting air to pass through it, and everything else naturally, just won't happen.


Cooling fans are in with millimeters to spare. I also found the last piece of real estate left to mount the passenger coils. Literally bolted the coil bracket to the DSE wonder bar, under the lower radiator hose.


next to the old 245's these things look massive!

After getting to know the airflow and cooling characteristic of this ca over the past 2 years, I'm pretty certain that an intercooler, ac condenser and a 100 degree day would lead to a bad time, I decided to add some cooling fans to the intercooler. Its pretty thick and I know getting air to pass through it, and everything else naturally, just won't happen.


Cooling fans are in with millimeters to spare. I also found the last piece of real estate left to mount the passenger coils. Literally bolted the coil bracket to the DSE wonder bar, under the lower radiator hose.


Thread Starter
Joined: Jul 2004
Posts: 769
Likes: 51
From: Zebulon, nc
Car: 1990 GTA/1989 Iroc
Engine: L98/383
Transmission: 700r4/t56 magnum
Axle/Gears: 9"
Re: My 'not a project' 89 IROC build
Loooong overdue update. Between work, life, side jobs, and working on a 4th gen I bought, I really haven't got a chance to get back on this thing until recently, but I've been hitting it pretty hard lately. I really never realized how much work would go into doing something like this, the internet makes it sound so easy lol. I almost feel silly for thinking I would get it done so quickly at the beginning of the summer... I've learned a lot along the way, and it seems the more I do, the more work I find and the longer the list gets. But it's getting closer to completion.
I mentioned it earlier, but I had my doubts about using the existing threaded holes in the oil pan as return lines for the turbos, as they were below the level of oil in the pan. As it turned out, the fitting on the driver side was in the way of where I wanted the downpipe, so I pulled the pan and welded bungs at the front, where they belong. The oil lines have an ok-ish angle to them. Hard to get a direct shot with the lines since the turbos do sit a little low.

I feel my stainless tig welding has greatly improved, and I decided to scrap the original downpipes I had started on previously. They were a mixture of good pipe, cheap pipe and bad welds. I also decided to add good quality flex pipes, since I know this thing will be vibrating, and expanding/contracting with heat. Hoping to avoid any cracking, but at the same time, I need to minimize underhood heat. I wrapped the headers, and will be wrapping the downpipes once they are finalized. They will still be going into the merge collector located in the factory cat location, feeding into my existing 4" exhaust. The drivers side downpipe is in the factory exhaust location, between the k member and the oil pan. Verrrrrry close to the oil pan. That pipe will of course be wrapped, and I'll put some DEI shielding on the oil pan. If oil temps are too high, I'll add a cooler.


I also made a little bracket to help support the downpipes. I want to take as much stress off the headers and turbos as I can. So far, everything seems pretty solid. I'll make a heat shield for the starter as well, once everything is situated.

The passenger side downpipe is about 3/4 of the way complete, just have to make the turn behind the driver side pipe and into the opening behind the tire. Spent a good amount of timing making sure everything will be easily serviceable, as far as access to the v-bands go. The front part of the downpipes must be removed to access the spark plugs. While I don't anticipate having to remove the plugs often, things happen... I'll be adding a v-band to the drivers side before the merge collector, to make it less awkward to drop the who;e system if needed, but only the front pipes have to come out to pull the plugs, about a 10 minute process.

I'm running the wastegate pipes through the track-spec vents in the hood, I'll cut out part of the louver on each side where they come through. Wasn't room to go down and very little to go into the down pipes. Plus I won't be upset at all if I see a little flame out the pipes under boost...
.jpg?width=1920&height=1080&fit=bounds)

.jpg?width=1920&height=1080&fit=bounds)

Still to do: finish the downpipes, clean up and box in the upper core support where I cut it out. There is room to connect the core support back together under the intercooler pipe. Add heat protection to any wires and hoses that need it, and tidy up the underhood wiring, move the fuel lines to the rear of the engine bay, away from any heat. Still haven't decided on what I'm doing with the fuel system. I have a walbro 450 pump that I'm sticking in it, which should be fine for my low boost goals on gas. I'll probably do a dual pump setup once I get to the point of turning it way up. I probably won't run e85, just because I drive it too much, and finding consistent e85 stations may be a problem. This efi system doesn't have provisions for an ethanol sensor. Once everything is up and running, I'll make the ac lines.
I mentioned it earlier, but I had my doubts about using the existing threaded holes in the oil pan as return lines for the turbos, as they were below the level of oil in the pan. As it turned out, the fitting on the driver side was in the way of where I wanted the downpipe, so I pulled the pan and welded bungs at the front, where they belong. The oil lines have an ok-ish angle to them. Hard to get a direct shot with the lines since the turbos do sit a little low.
I feel my stainless tig welding has greatly improved, and I decided to scrap the original downpipes I had started on previously. They were a mixture of good pipe, cheap pipe and bad welds. I also decided to add good quality flex pipes, since I know this thing will be vibrating, and expanding/contracting with heat. Hoping to avoid any cracking, but at the same time, I need to minimize underhood heat. I wrapped the headers, and will be wrapping the downpipes once they are finalized. They will still be going into the merge collector located in the factory cat location, feeding into my existing 4" exhaust. The drivers side downpipe is in the factory exhaust location, between the k member and the oil pan. Verrrrrry close to the oil pan. That pipe will of course be wrapped, and I'll put some DEI shielding on the oil pan. If oil temps are too high, I'll add a cooler.
I also made a little bracket to help support the downpipes. I want to take as much stress off the headers and turbos as I can. So far, everything seems pretty solid. I'll make a heat shield for the starter as well, once everything is situated.
The passenger side downpipe is about 3/4 of the way complete, just have to make the turn behind the driver side pipe and into the opening behind the tire. Spent a good amount of timing making sure everything will be easily serviceable, as far as access to the v-bands go. The front part of the downpipes must be removed to access the spark plugs. While I don't anticipate having to remove the plugs often, things happen... I'll be adding a v-band to the drivers side before the merge collector, to make it less awkward to drop the who;e system if needed, but only the front pipes have to come out to pull the plugs, about a 10 minute process.
I'm running the wastegate pipes through the track-spec vents in the hood, I'll cut out part of the louver on each side where they come through. Wasn't room to go down and very little to go into the down pipes. Plus I won't be upset at all if I see a little flame out the pipes under boost...
Still to do: finish the downpipes, clean up and box in the upper core support where I cut it out. There is room to connect the core support back together under the intercooler pipe. Add heat protection to any wires and hoses that need it, and tidy up the underhood wiring, move the fuel lines to the rear of the engine bay, away from any heat. Still haven't decided on what I'm doing with the fuel system. I have a walbro 450 pump that I'm sticking in it, which should be fine for my low boost goals on gas. I'll probably do a dual pump setup once I get to the point of turning it way up. I probably won't run e85, just because I drive it too much, and finding consistent e85 stations may be a problem. This efi system doesn't have provisions for an ethanol sensor. Once everything is up and running, I'll make the ac lines.
Last edited by GTA matt; Jan 2, 2021 at 09:24 PM.
Thread Starter
Joined: Jul 2004
Posts: 769
Likes: 51
From: Zebulon, nc
Car: 1990 GTA/1989 Iroc
Engine: L98/383
Transmission: 700r4/t56 magnum
Axle/Gears: 9"
Re: My 'not a project' 89 IROC build
I feel like this exhaust is taking waaaaay longer than it should, but its turning out pretty half decent. Finished up the rest of the passenger side downpipe and started working on the y-pipe. I had originally planned on putting v-bands in front of the y, so everything could be dropped separate, however there is no room for v-bands, so I got these nice band clamps to go between the downpipes and the y. Also started making a mounting bracket for the right downpipe, similar to the one for the left.


Real pleased with how tight I was able to keep the pipes
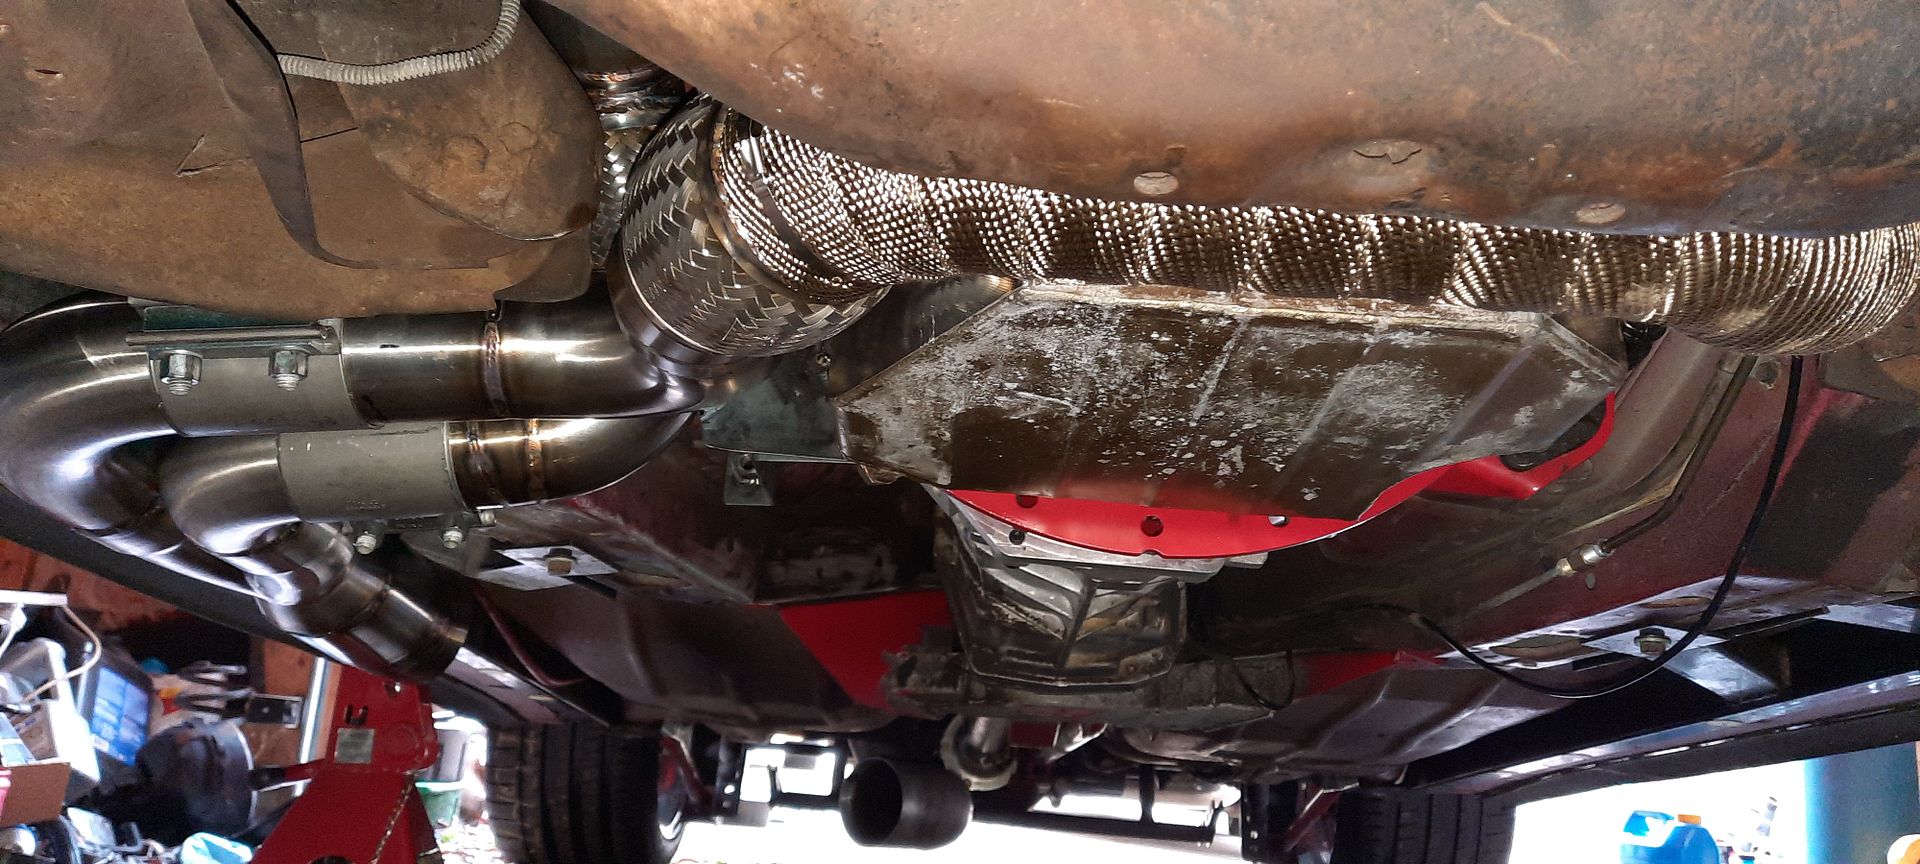


Real pleased with how tight I was able to keep the pipes

Senior Member


Joined: Mar 2014
Posts: 760
Likes: 10
From: NC
Car: 1986 IROC Z-28
Engine: 383 Gen I SBC 11:1
Transmission: Rebuilt TH700R4 for 500+HP
Axle/Gears: 4th Gen 10 bolt Eaton Truetrac 3.23
Re: My 'not a project' 89 IROC build
Holy crap that's some interesting exhaust work! I just noticed they go outside the frame rails. How the heck?!
Thread Starter
Joined: Jul 2004
Posts: 769
Likes: 51
From: Zebulon, nc
Car: 1990 GTA/1989 Iroc
Engine: L98/383
Transmission: 700r4/t56 magnum
Axle/Gears: 9"
Re: My 'not a project' 89 IROC build

Thread Starter
Joined: Jul 2004
Posts: 769
Likes: 51
From: Zebulon, nc
Car: 1990 GTA/1989 Iroc
Engine: L98/383
Transmission: 700r4/t56 magnum
Axle/Gears: 9"
Re: My 'not a project' 89 IROC build
Spent a couple more minutes on it in the last few days, making support brackets for the downpipes. Made standoffs coming off of each cylinder head, to hopefully take some of the turbo weight off of the headers, and also finished the bracket for the right side downpipe under the engine. Tomorrow I'll weld them on.


Thread Starter
Joined: Jul 2004
Posts: 769
Likes: 51
From: Zebulon, nc
Car: 1990 GTA/1989 Iroc
Engine: L98/383
Transmission: 700r4/t56 magnum
Axle/Gears: 9"
Re: My 'not a project' 89 IROC build
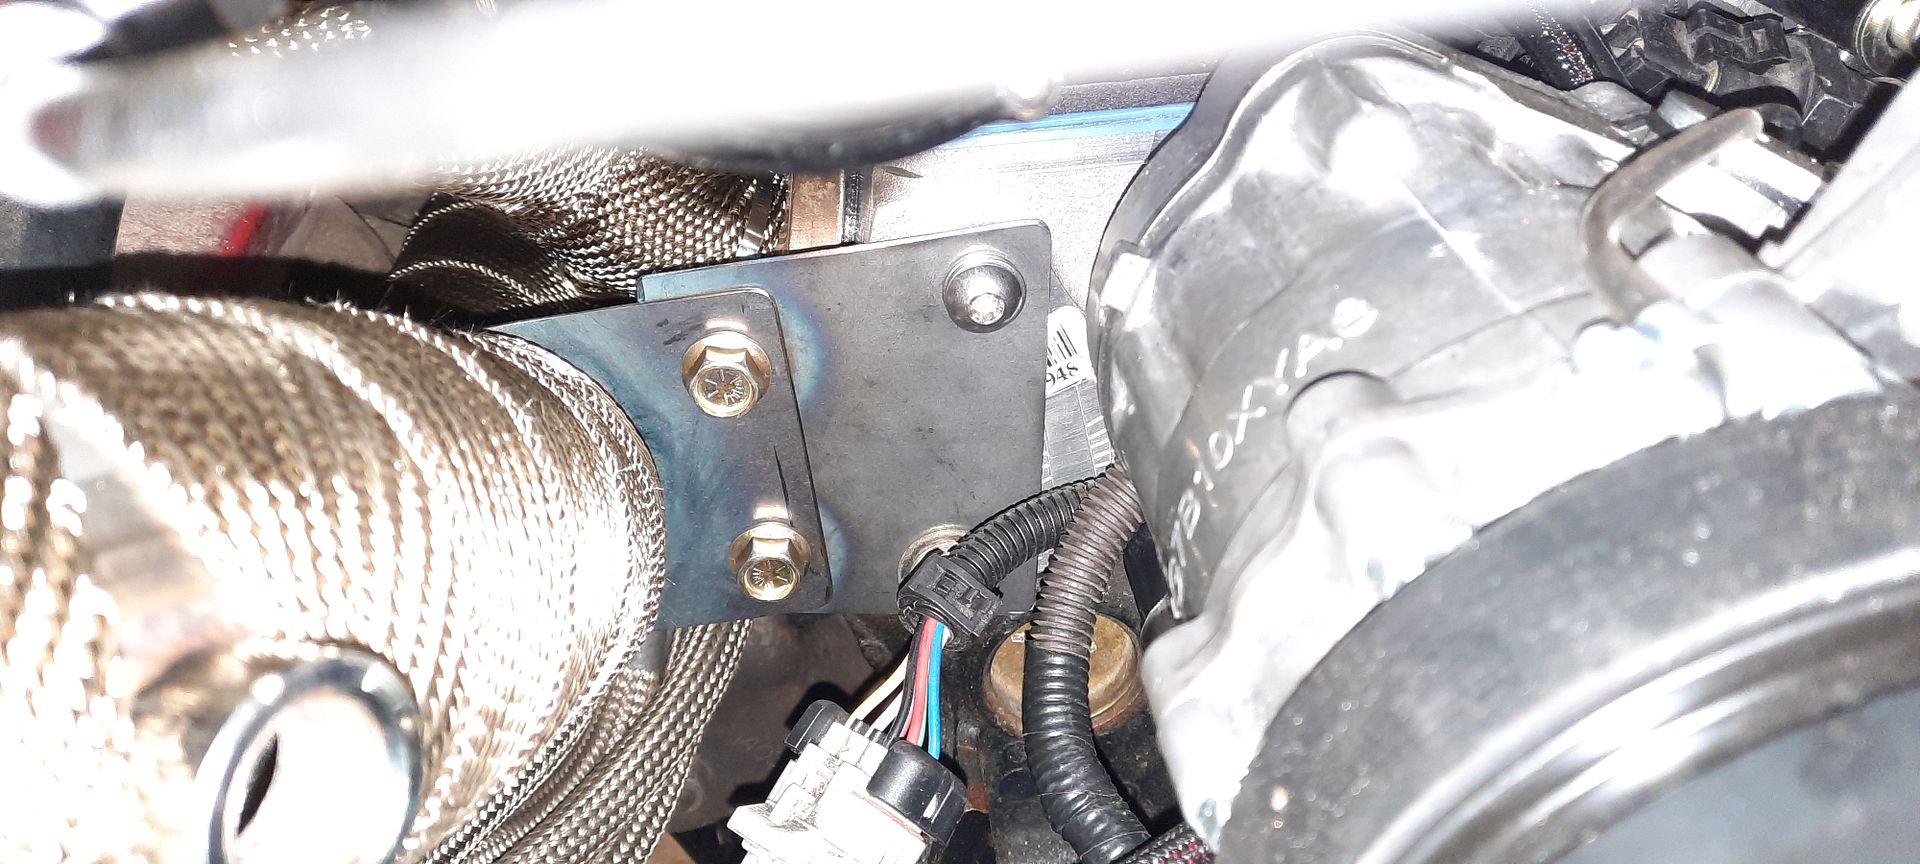
I may have gotten carried away with the exhaust... I got the hangers all welded up and the downpipes completely wrapped, everything turned out great there. I began building the exhaust from the y-pipe to the existing mid pipe. Ground clearance with the 4" pipe was limited, I've scraped over speed bumps, so I wanted to get the exhaust tucked up as high as possible. Also for ease of disassembly, I didn't want the y-pipe and mid pipe all one piece. Soooo I made a bunch of pie cuts and got the exhaust tucked up against the floor in the factory cat location with a v-band clamp. The exhaust is pretty much 100% done. I still have 2 welds on the pipe left and need to make some hangers, but I ran out of argon in my backpurge tank. Also got some more things buttoned up, starter cable, cleaned up some wiring and made a heat shield for the starter. I'm not sure if I'm going overboard on all the heat protection or not, but I've burned up my fair share of crap in the past, not taking any chances here while it's all apart...
Clearance on everything is tiiight. But it all fits, zero contact anywhere


Starter heat shield and the right upper downpipe v-band strategically placed for easy access

Clearance on everything is tiiight. But it all fits, zero contact anywhere
Starter heat shield and the right upper downpipe v-band strategically placed for easy access
Thread Starter
Joined: Jul 2004
Posts: 769
Likes: 51
From: Zebulon, nc
Car: 1990 GTA/1989 Iroc
Engine: L98/383
Transmission: 700r4/t56 magnum
Axle/Gears: 9"
Re: My 'not a project' 89 IROC build
Exhaust is finally 100% done, made up one final hanger after the y-pipe, bolted to the subframe connector. Also rolled it out of the garage to relocate the fuel lines I've been putting off for 2 years. I used the existing AN lines I already had, along with my existing gm fuel line to AN adapters. I cut and flared the original feed and return lines to the gm o-ring style, one more item crossed off the list. It also allowed me to drain the remaining fuel out of the tank, which not only has been in there since may, but an empty tank makes it much easier to drop, so I'll be putting in the new fuel pump the next decent weather weekend we get.
Car really looks great with the wheels, can't wait to get it running and get some good, scenic photos with it

Ground clearance at ride height. Probably the best it can get with a 4" setup. The giant Spohn crossmember is still probably the lowest point on the car...


Final exhaust hanger


Car really looks great with the wheels, can't wait to get it running and get some good, scenic photos with it
Ground clearance at ride height. Probably the best it can get with a 4" setup. The giant Spohn crossmember is still probably the lowest point on the car...
Final exhaust hanger


Joined: Mar 2010
Posts: 538
Likes: 34
From: South FL
Car: 1989 Formula T-Top
Engine: 350 TPI, twin turbo
Transmission: 700R4
Axle/Gears: 3.23
Re: My 'not a project' 89 IROC build
That's a nice build you got going on there. I struggled getting a 3" pipe to the back. I would not tolerate it being the lowest part of the underside. Right now I've settled for the two 3" downpipes emptying under the car on each side of the engine. I know I know I'll asphyxiate myself. Anyways I think you will find the turbo's quiet the exhaust surprisingly well so if you have to run open pipes during tuning or if you scrape off that whole exhaust going over a speedbump you might find the noise tolerable. Until you get into boost that is heh-heh.
Thread Starter
Joined: Jul 2004
Posts: 769
Likes: 51
From: Zebulon, nc
Car: 1990 GTA/1989 Iroc
Engine: L98/383
Transmission: 700r4/t56 magnum
Axle/Gears: 9"
Re: My 'not a project' 89 IROC build
The car is alive and running well. Still got some things to button up of course, but I was able to do some driveway pulls and start tuning it. Turbos come on surprisingly quick, at 37% throttle and 3300 rpm, its already making boost in first gear. Long story short, my air compressor died in the middle of vacuum bleeding my brakes, so its not quite road worthy. I know I could simply do it the old fashion way, but with everything else I have going on, I'm leaving it be for now. Fixing the compressor this week, and then I'll be back at it. Exhaust is extremely loud. Literally zero change from before. Video link is comparing the day I pulled it in the garage NA, and now. The slight difference you hear is most likely due to the otterbox on my new phone muffling the mic vs. my old one.

I realize it's been a while since I've updated this, so I'll give a run down of what I've done. I left off with the exhaust being completed, and started on the intake ducting. Originally I just planned for small filters on the ends of the turbos, but they didn't have the look I was going for, nor did the flow enough. Using leftover 4" stainless from the exhaust, I made ducting off each turbo to go through the battery trays with large filters on the end. I also wanted to make a breather and catch can setup, rather then just venting through the valve covers. The old setup always had residue on the valve covers around the breathers. I made the catch cans again out of leftover stainless, making some baffles for the inside. I routed -10 line that I had from my turbo oil drains to the cans, then made a venturi nozzle of sorts welded into the intake duct before the turbos. The idea is that air rushing past the nozzles will draw through the catch cans, doing a better job at relieving any blow by. If oil starts to get drawn through, I'll change it up, but as of now, it is doing an incredible job at collecting oil and water vapor, with no signs of oil vapor getting to the turbo. I'm only in them for the time and the ebay AN fittings I had to buy.
.jpg?width=960&height=720&fit=bounds)
.jpg?width=960&height=720&fit=bounds)
.jpg?width=960&height=720&fit=bounds)
.jpg?width=960&height=720&fit=bounds)
.jpg?width=960&height=720&fit=bounds)
.jpg?width=960&height=720&fit=bounds)
.jpg?width=960&height=720&fit=bounds)

After some run time, had about a half inch of water in the bottom, oil/water mix in the inlet, outlet had a little water vapor

I realize it's been a while since I've updated this, so I'll give a run down of what I've done. I left off with the exhaust being completed, and started on the intake ducting. Originally I just planned for small filters on the ends of the turbos, but they didn't have the look I was going for, nor did the flow enough. Using leftover 4" stainless from the exhaust, I made ducting off each turbo to go through the battery trays with large filters on the end. I also wanted to make a breather and catch can setup, rather then just venting through the valve covers. The old setup always had residue on the valve covers around the breathers. I made the catch cans again out of leftover stainless, making some baffles for the inside. I routed -10 line that I had from my turbo oil drains to the cans, then made a venturi nozzle of sorts welded into the intake duct before the turbos. The idea is that air rushing past the nozzles will draw through the catch cans, doing a better job at relieving any blow by. If oil starts to get drawn through, I'll change it up, but as of now, it is doing an incredible job at collecting oil and water vapor, with no signs of oil vapor getting to the turbo. I'm only in them for the time and the ebay AN fittings I had to buy.
After some run time, had about a half inch of water in the bottom, oil/water mix in the inlet, outlet had a little water vapor
Thread Starter
Joined: Jul 2004
Posts: 769
Likes: 51
From: Zebulon, nc
Car: 1990 GTA/1989 Iroc
Engine: L98/383
Transmission: 700r4/t56 magnum
Axle/Gears: 9"
Re: My 'not a project' 89 IROC build
The turbos are meant to be water cooled, and although many don't utilize this feature, I plan on putting some miles on them, and I've seen turbos fail in my euro repair world from cooling system problems and would like to avoid it. As it turns out, they have the same thread size and design as bmw's twin turbo v8 'N63' engine coolant pipes, so I got a set of those and ran them from the heater core outlet hose to each turbo, via a 3/8 hardline, returning back to the radiator.

Of course, all of this couldn't possibly happen without problems, and it seems yet again, I've been stuck with a passenger side header with incomplete welds. It was ticking pretty loudly, so I had to remove, unwrap, and reweld the collector. I used an evap smoke machine through the tailpipe to find any leaks before disassembling.


Installed the new 450 pump, tried to put a plan together on what I can do with this tank if a single 450 isn't big enough.


Still left to do: bleed brakes, alignment, finish wastegate pipes and cut hood vents out, make a coolant overflow tank, clean up and trim out rough cut for intake tube in core support. I don't really anticipate too many more problems.....
Of course, all of this couldn't possibly happen without problems, and it seems yet again, I've been stuck with a passenger side header with incomplete welds. It was ticking pretty loudly, so I had to remove, unwrap, and reweld the collector. I used an evap smoke machine through the tailpipe to find any leaks before disassembling.
Installed the new 450 pump, tried to put a plan together on what I can do with this tank if a single 450 isn't big enough.
Still left to do: bleed brakes, alignment, finish wastegate pipes and cut hood vents out, make a coolant overflow tank, clean up and trim out rough cut for intake tube in core support. I don't really anticipate too many more problems.....
Thread Starter
Joined: Jul 2004
Posts: 769
Likes: 51
From: Zebulon, nc
Car: 1990 GTA/1989 Iroc
Engine: L98/383
Transmission: 700r4/t56 magnum
Axle/Gears: 9"
Re: My 'not a project' 89 IROC build
Brakes are bled, finally got to drive it down the road! Still needs some work, and I need to make a few changes, but overall, extremely pleased!. Turbos spool almost immediately. Wastegates open at 6.5 psi, which is perfect for now. I was concerned about noise when the wastegates opened, due to them venting through the hood, but you can't even hear them open. That's a win. Power is amazing, these poor tires don't stand a chance. Now for the not so good things: master cylinder was originally designed for a drag setup and has a small bore, Takes an incredible amount of pedal effort. I'm not surprised, but it was free to try. I'll switch it out for a larger bore mc. Next is coolant temp. It was about a 70 degree evening here, coolant temps seemed to hover right around 190, which isn't bad, but I couldn't get it to drop any lower, which I used to be able to do before. My main concern is when it gets really hot out and I have the ac on. For now I'll work on shrouding and trying to direct air better to the radiator. The car rides a lot stiffer then it did before, which is to be expected, but worth noting. There are no leaks, turbo drains seem to be adequate, oil pressure is great and catch cans seem to be doing there job. I'll get the brakes ironed out, do some datalogging, nail down a tune, then hit the dyno and give it some timing. It is extremely conservative right now.
Senior Member
Joined: Mar 2014
Posts: 760
Likes: 10
From: NC
Car: 1986 IROC Z-28
Engine: 383 Gen I SBC 11:1
Transmission: Rebuilt TH700R4 for 500+HP
Axle/Gears: 4th Gen 10 bolt Eaton Truetrac 3.23
Re: My 'not a project' 89 IROC build
That thing looks so pretty under the hood, you have done some amazing work to piece that beast together!
I'm waiting on my garage extension and lift to be done at the house by this fall and I'll be back working on my IROC.
BTW, I was subscribed to your thread but wasn't notified, I just happened to see if you made any progress. Glad I checked!
I'm waiting on my garage extension and lift to be done at the house by this fall and I'll be back working on my IROC.
BTW, I was subscribed to your thread but wasn't notified, I just happened to see if you made any progress. Glad I checked!
Thread Starter
Joined: Jul 2004
Posts: 769
Likes: 51
From: Zebulon, nc
Car: 1990 GTA/1989 Iroc
Engine: L98/383
Transmission: 700r4/t56 magnum
Axle/Gears: 9"
Re: My 'not a project' 89 IROC build
I've been putting some miles on this thing for the past week, it is an absolute joy to drive around. Honestly couldn't be happier with the cars performance. Well mannered and the power far exceeded my initial expectations. I'm at 22 degrees of timing and 6.5 lbs of boost. NA I was running 34 degrees of timing, going up to 36 degrees above 6000 rpm. Really no reason to go up with boost or play with timing for now, it will knock the tires off easily, just rolling into the throttle in 2nd or 3rd gear. Cooling system has been performing admirably as well. I never took into account that I moved the instrument cluster temp sensor from the front of the drivers head to the rear of the passenger head due to clearance with the downpipe. At 200 degrees on the dash, my computer temp sensor located in the intake manifold is reading about 15 degrees cooler. I had become accustomed to my old setup, where there was usually only about a 2-3 degree difference in temps between the ecu and the dash. Its normal, ran into the same thing a few years ago on a customers monte carlo I built that had the temp sensor in the same location. It cruises down the road at 180-185. Temperature sitting still will drop to whatever I set the fans to. I'll call that another win.
I misspoke in my last post about the master cylinder size. All the forums and reading say to go to a larger bore mc with 4 piston calipers, but that would have caused an even stiffer pedal. What I actually needed was a smaller bore. After doing some research on here, I wound up getting a mc for an 88 dodge daytona ES, 7/8" bore. Pedal now feels like it did with stock vacuum booster.
I also have been talking about cutting out part of the hood louvers and extending the wastegate pipe through, but decided to run it with the pipes just under the louvers to see how it does, and its fine. Louvers and the strut brace do get a little sooted up, and it does have a flame coming out when the wastegates are open, but since I plan on driving the car, I'm going to leave it be. I also don't really want to give the car any outward appearance that its anything other then a 14 second car with shiny paint and nice wheels...


Shot of some flame coming out of the wastegate...

My catch cans are working perfectly, zero oil getting into the turbos or intake, and since its been pretty chilly here lately, I've been collecting a ton of water in them. Which is great. The condensation is being pulled out of the valve covers and not getting into the oil.

I did have my first ever parts 'breakage' with the car. Throttle body gasket blew out about 30 minutes from home. I can't remember if its a new gasket or old gasket, or if it came with the throttle body or if its off my GTA and old enough to drive In any case, I'm replacing it, if the new one blows out, I'll take more action then. Throttle body is very thin in that area.

I misspoke in my last post about the master cylinder size. All the forums and reading say to go to a larger bore mc with 4 piston calipers, but that would have caused an even stiffer pedal. What I actually needed was a smaller bore. After doing some research on here, I wound up getting a mc for an 88 dodge daytona ES, 7/8" bore. Pedal now feels like it did with stock vacuum booster.
I also have been talking about cutting out part of the hood louvers and extending the wastegate pipe through, but decided to run it with the pipes just under the louvers to see how it does, and its fine. Louvers and the strut brace do get a little sooted up, and it does have a flame coming out when the wastegates are open, but since I plan on driving the car, I'm going to leave it be. I also don't really want to give the car any outward appearance that its anything other then a 14 second car with shiny paint and nice wheels...
Shot of some flame coming out of the wastegate...
My catch cans are working perfectly, zero oil getting into the turbos or intake, and since its been pretty chilly here lately, I've been collecting a ton of water in them. Which is great. The condensation is being pulled out of the valve covers and not getting into the oil.
I did have my first ever parts 'breakage' with the car. Throttle body gasket blew out about 30 minutes from home. I can't remember if its a new gasket or old gasket, or if it came with the throttle body or if its off my GTA and old enough to drive
In any case, I'm replacing it, if the new one blows out, I'll take more action then. Throttle body is very thin in that area. Last edited by GTA matt; May 8, 2021 at 10:58 PM.
Thread Starter
Joined: Jul 2004
Posts: 769
Likes: 51
From: Zebulon, nc
Car: 1990 GTA/1989 Iroc
Engine: L98/383
Transmission: 700r4/t56 magnum
Axle/Gears: 9"
Re: My 'not a project' 89 IROC build
I replaced the throttle body gasket today and weighed this tank. It's up 99 pounds, from 3509. Not surprising, between the turbos, intercooler and all the piping, it adds up quickly.


Thread Starter
Joined: Jul 2004
Posts: 769
Likes: 51
From: Zebulon, nc
Car: 1990 GTA/1989 Iroc
Engine: L98/383
Transmission: 700r4/t56 magnum
Axle/Gears: 9"
Re: My 'not a project' 89 IROC build
I have been driving this thing. A lot. And loving every minute of it. Well over 500 miles on it in the past 2 weeks, including a semi-spirited 100 mile trip today that was all windy back roads, where it averaged 13.7 mpg. Steering with the new steering box, springs, struts, and tires is very tight and precise, the car just keeps begging for more. I mentioned a few posts ago that it seemed to be riding very rough, but after turning the adjustment on the struts from full tight to full loose (oops) the ride is better, pretty much as expected, nothing terrible. I drove it to work twice this past week, mostly because it had more gas in it than my other vehicles, but I also did the alignment on it. Got caught in very heavy traffic from accidents, twice, and the cooling system performed flawlessly. The long build time was most definitely worth it.
The panic induced fuel shortage was certainly very real here, but luckily this thing had a full tank, with some left in cans from when I drained the tank to replace the pump. 99% fuel and 173 degrees coolant temp while cruising down the road is a good thing!

Alignment, nothing special. I had eyeballed it at home, drove it for a few days to allow the springs to settle, set the ride height where I wanted, then brought it in to work. Camber is where I want it too, maxed out on the factory adjustment, but I have no desire to roll any more in. I'll obviously keep an eye out for inner edge wear, but I think it be ok.


I got sent a video from a friend of mine that was behind me while sitting in traffic... Small world we live in...

And a glamour shot from a local cars and coffee saturday morning


The panic induced fuel shortage was certainly very real here, but luckily this thing had a full tank, with some left in cans from when I drained the tank to replace the pump. 99% fuel and 173 degrees coolant temp while cruising down the road is a good thing!
Alignment, nothing special. I had eyeballed it at home, drove it for a few days to allow the springs to settle, set the ride height where I wanted, then brought it in to work. Camber is where I want it too, maxed out on the factory adjustment, but I have no desire to roll any more in. I'll obviously keep an eye out for inner edge wear, but I think it be ok.
I got sent a video from a friend of mine that was behind me while sitting in traffic... Small world we live in...
And a glamour shot from a local cars and coffee saturday morning


Thread Starter
Joined: Jul 2004
Posts: 769
Likes: 51
From: Zebulon, nc
Car: 1990 GTA/1989 Iroc
Engine: L98/383
Transmission: 700r4/t56 magnum
Axle/Gears: 9"
Re: My 'not a project' 89 IROC build
I'm still just driving this thing. It runs so well, perfectly mannered and really a pleasure to drive. Odometer clicked past 10,000 miles last week, and keep in mind I didn't install that gauge cluster until 3-4 months after I had the engine completed. I'm still waiting on some back-ordered ac lines and fittings to come in, so I've been avoiding driving it on the blazing hot days. Discovered I can drive through the clutch in 4th gear, which isn't a surprise, so the next big job will be swapping out this clutch for a twin disc. I tried running some e85, about a 40% blend, and could feel an immediate increase in power. However, it is completely out of fuel system, going lean under boost. Again, not surprised, I sized the pump and injectors for the power/boost its currently making.

Ran into another 3rd gen guy and a c4 corvette at my local sonic

I would be the tall guy in this picture...


Ran into another 3rd gen guy and a c4 corvette at my local sonic
I would be the tall guy in this picture...

Joined: Nov 2012
Posts: 672
Likes: 16
From: Michigan
Car: 1988 IROC-Z/G92
Engine: 5.0
Transmission: T-5
Axle/Gears: BW 3.45 Eaton Truetrac
Re: My 'not a project' 89 IROC build
This looks awesome, and I don't typically like red cars..
I am really digging your instrument cluster... Which one is that?
I am really digging your instrument cluster... Which one is that?
Thread Starter
Joined: Jul 2004
Posts: 769
Likes: 51
From: Zebulon, nc
Car: 1990 GTA/1989 Iroc
Engine: L98/383
Transmission: 700r4/t56 magnum
Axle/Gears: 9"
Thread Starter
Joined: Jul 2004
Posts: 769
Likes: 51
From: Zebulon, nc
Car: 1990 GTA/1989 Iroc
Engine: L98/383
Transmission: 700r4/t56 magnum
Axle/Gears: 9"
Re: My 'not a project' 89 IROC build
Some more updates, I took the car on a 550 mile road trip a few weeks ago, where it averaged 19 mpg's. Odometer is now showing just shy of 13,000 miles. Only issue I have run into so far was apparently a header bolt backed out a little, I banged the rev limiter pretty hard and blew out the header gasket. Not a big deal. I also turned the boost up to 12 psi about 2 months ago. The car seems to love it, however injector duty cycle is at 95%... Air fuel ratios are still good, but I'm at the limit of where I'm comfortable with block strength, injector, fuel pump and waaaay beyond the rating of the clutch. I can easily drive through it in 4th gear. But I like to party
On a whim, I took it to the dragstrip on black friday. Found out about it last minute, was going more to help a friend out with his turbo LS car, so I went in complete street trim. I wasn't shooting for any particular et at all, since I knew I wouldn't be able to launch the car at all and would have to be very ginger on the shifts to keep it from stepping out, I was more focused on MPH. I made 2 passes, lots of excuses, but a gentle leave resulted in pretty violent wheel hop, as can be seen in the chatter marks on the track in one of the pictures. I was nervous about the car stepping out on the shifts, so the first pass I short shifted and gently rolled into the throttle, which netted 97 mph in the 1/8th. I coasted through the 1/4 but I was at 111 mph before the 1000 ft mark which was where I lifted. The car and track felt pretty good, and I wanted to beat my friends mph of 110 in the 1/8th and mid 130's in the 1/4 on the next pass. I launched the same and gave it more throttle in first, the 1-2 shift resulted in violent wheel spin, I lifted, got back in it, spun again, and short shifted to 3rd. Third gear pulled amazingly, but when I went to 4th, it drove right through the clutch. I lifted and rolled into the throttle again, which pushed through the clutch as soon as boost came on. I decided to cut my losses and come back next time with clutch, better gears and a tire. All in all I had a blast.

Those chatter marks...


Went to a 80's and 90's themed group meet last saturday and was awarded best 80s car

On a whim, I took it to the dragstrip on black friday. Found out about it last minute, was going more to help a friend out with his turbo LS car, so I went in complete street trim. I wasn't shooting for any particular et at all, since I knew I wouldn't be able to launch the car at all and would have to be very ginger on the shifts to keep it from stepping out, I was more focused on MPH. I made 2 passes, lots of excuses, but a gentle leave resulted in pretty violent wheel hop, as can be seen in the chatter marks on the track in one of the pictures. I was nervous about the car stepping out on the shifts, so the first pass I short shifted and gently rolled into the throttle, which netted 97 mph in the 1/8th. I coasted through the 1/4 but I was at 111 mph before the 1000 ft mark which was where I lifted. The car and track felt pretty good, and I wanted to beat my friends mph of 110 in the 1/8th and mid 130's in the 1/4 on the next pass. I launched the same and gave it more throttle in first, the 1-2 shift resulted in violent wheel spin, I lifted, got back in it, spun again, and short shifted to 3rd. Third gear pulled amazingly, but when I went to 4th, it drove right through the clutch. I lifted and rolled into the throttle again, which pushed through the clutch as soon as boost came on. I decided to cut my losses and come back next time with clutch, better gears and a tire. All in all I had a blast.
Those chatter marks...
Went to a 80's and 90's themed group meet last saturday and was awarded best 80s car

Thread Starter
Joined: Jul 2004
Posts: 769
Likes: 51
From: Zebulon, nc
Car: 1990 GTA/1989 Iroc
Engine: L98/383
Transmission: 700r4/t56 magnum
Axle/Gears: 9"
Re: My 'not a project' 89 IROC build
Haven't updated in a while, I've just been driving the car, going to some shows and events. Its been completely problem free and still a blast to drive.
Some pictures from the Charlotte autofair and a few local shows


Some pictures from the Charlotte autofair and a few local shows
Thread Starter
Joined: Jul 2004
Posts: 769
Likes: 51
From: Zebulon, nc
Car: 1990 GTA/1989 Iroc
Engine: L98/383
Transmission: 700r4/t56 magnum
Axle/Gears: 9"
Re: My 'not a project' 89 IROC build
Finally dyno'd this thing, went to a local shop that was having a dyno day, so no tuning was involved. Was EXTREMELY pleased with the number it laid down, 752 hp, on a dyno that had been breaking hearts and reading perhaps a little low all day. I need to compile some videos and upload the runs to youtube. Had trouble with it spinning on the dyno. I know that power is on the ragged edge of what my fuel pump and injectors can support, but its always maintained 11.8 afr when I log it. I also upgraded from my single disc clutch that I could drive through, to a twin disc clutch. Went with the ram twin disc, rated at 1050hp, and just like their single I had before, driveability and pedal feel is like a stock clutch.

The dip in one of the runs was the tires spinning on the dyno...


Also a new steering wheel, mpi, cleetus edition wheel.

Went to a rainy Charlotte autofair with Nuffnuff on here a few weeks ago


The dip in one of the runs was the tires spinning on the dyno...
Also a new steering wheel, mpi, cleetus edition wheel.
Went to a rainy Charlotte autofair with Nuffnuff on here a few weeks ago

Joined: Aug 2013
Posts: 4,840
Likes: 922
From: MICHIGAN
Car: 1988 Trans Am
Engine: L03
Transmission: 700R4
Axle/Gears: 10 Bolt 2.73 Open
Re: My 'not a project' 89 IROC build
Impressive power. The wheel and plate/frame are awesome. Now we need to see a few laps at the Freedom Factory!

Joined: Mar 2001
Posts: 10,438
Likes: 2,093
Car: '89 Firebird
Engine: 7.0L
Transmission: T56
Re: My 'not a project' 89 IROC build
That will haul the mail. 
That steering wheel is cool. Which Ram clutch is that and how does it drive on the street?
That steering wheel is cool. Which Ram clutch is that and how does it drive on the street?
Thread Starter
Joined: Jul 2004
Posts: 769
Likes: 51
From: Zebulon, nc
Car: 1990 GTA/1989 Iroc
Engine: L98/383
Transmission: 700r4/t56 magnum
Axle/Gears: 9"
Re: My 'not a project' 89 IROC build
The clutch is the concept 10.5. Drives just like stock. No chatter, no harsh engagement, pedal feel is perfect, not stiff at all. I can hold the clutch pedal down at a light for any amount of time. Could not be happier with it.
Thread Starter
Joined: Jul 2004
Posts: 769
Likes: 51
From: Zebulon, nc
Car: 1990 GTA/1989 Iroc
Engine: L98/383
Transmission: 700r4/t56 magnum
Axle/Gears: 9"
Re: My 'not a project' 89 IROC build
Well, it came unglued in the middle of a 4th gear pull one freezing cold night. The timing chain broke. Still not sure why. After taking it apart, there is no visible cause. I was certain, before taking it apart, that the block had broken, or the main caps or main webbing between the cam and crank had cracked, causing the chain to fail, but that doesn't appear to be the case. I was so certain in fact, that I got a line on a Dart SHP block that will be here tomorrow. I'm actually pretty pleased with how this block looks for how I was treating it. Cylinders look perfect, bearings look great, zero signs of the main caps moving around. I'd still get this block sonic checked before re-using, but for now I'm going to wrap it up and save it for something in the future. After seeing how good this block held up, I'm pretty confident I can turn it way up with the new block. The only collateral damage is 6 bent valves. Pistons and cylinder heads took it like a champ. Timing chain was a Cloyes billet double roller. I'll be contacting them to see if they know of a possible cause, something I can do to prevent it from happening in the future, or if there is a stronger setup available.


Thread Starter
Joined: Jul 2004
Posts: 769
Likes: 51
From: Zebulon, nc
Car: 1990 GTA/1989 Iroc
Engine: L98/383
Transmission: 700r4/t56 magnum
Axle/Gears: 9"
Re: My 'not a project' 89 IROC build
It's alive again! I really missed driving this thing, and will be going on a 400 mile trip in it next weekend. Huge thanks to Wilkins racing engines for getting me a block and doing the machine work in a timely manner during his busiest part of the year. I picked up the block March 25th, and after a whirlwind of long days and late nights, its all done and running. I replaced the 6 bent valves, everything else survived unscathed. I went back with a Howards billet roller timing chain, with a torrington bearing setup, and upgraded the rod bolts to arp 2000's. "Supposedly" they rate the rotating assembly at 1500 hp with this setup. I may wind up in the 11-1200 hp range in street trim on e85 in the future. Everything else is the exact same in the engine. I also upgraded the front brakes from wilwoods 4 piston dynalites to their 6 piston big brake setup.

The block was pretty raw, I cleaned up the lifter valley drains, edges of the block, and did a little work to the oil pump/oil filter passages.


The crank was in good shape, but definitely not perfect. I could have run it as is, but decided to polish it myself, It turned out great! I used the shoelace method I saw in a couple youtube videos.
Before

After

My son was super excited about painting the block, so I let him have at it. He was only 2 during the first build, so it was cool having his help on this one.

Now the not so fun stuff... the block comes from Dart supposedly clearanced for a 3.75 crank with steel rods, but my rod bolts hit the bottoms of the cylinders and along the oil pan rail in a few places. I found this out mid-assembly, so it was back apart, die grinder out, then re-doing my whole super meticulous cleaning process.


Back in she goes, fully dressed

And the brakes, old vs new. Old rotors were 12 inches, new are 14. Really fills the wheels up now

The block was pretty raw, I cleaned up the lifter valley drains, edges of the block, and did a little work to the oil pump/oil filter passages.
The crank was in good shape, but definitely not perfect. I could have run it as is, but decided to polish it myself, It turned out great! I used the shoelace method I saw in a couple youtube videos.
Before
After
My son was super excited about painting the block, so I let him have at it. He was only 2 during the first build, so it was cool having his help on this one.
Now the not so fun stuff... the block comes from Dart supposedly clearanced for a 3.75 crank with steel rods, but my rod bolts hit the bottoms of the cylinders and along the oil pan rail in a few places. I found this out mid-assembly, so it was back apart, die grinder out, then re-doing my whole super meticulous cleaning process.
Back in she goes, fully dressed
And the brakes, old vs new. Old rotors were 12 inches, new are 14. Really fills the wheels up now

Supreme Member


Joined: Jan 2004
Posts: 2,322
Likes: 100
From: So. Ohio
Car: 88 Camaro
Engine: L98 350
Transmission: 700r4
Re: My 'not a project' 89 IROC build
Kind of a shame to spray paint that bare block, thing of beauty there. Got some real good stuff in that motor too. Nice to see third gens getting some love!
Joined: Aug 2013
Posts: 4,840
Likes: 922
From: MICHIGAN
Car: 1988 Trans Am
Engine: L03
Transmission: 700R4
Axle/Gears: 10 Bolt 2.73 Open
Re: My 'not a project' 89 IROC build
Now the not so fun stuff... the block comes from Dart supposedly clearanced for a 3.75 crank with steel rods, but my rod bolts hit the bottoms of the cylinders and along the oil pan rail in a few places. I found this out mid-assembly, so it was back apart, die grinder out, then re-doing my whole super meticulous cleaning process.
Nice work though.
Thread Starter
Joined: Jul 2004
Posts: 769
Likes: 51
From: Zebulon, nc
Car: 1990 GTA/1989 Iroc
Engine: L98/383
Transmission: 700r4/t56 magnum
Axle/Gears: 9"
Re: My 'not a project' 89 IROC build


Thread
Thread Starter
Forum
Replies
Last Post
DAVECS1
Transmissions and Drivetrain
27
Mar 1, 2015 05:55 PM
Hirevsjoe
Organized Drag Racing and Autocross
53
Sep 22, 2014 12:58 PM