When you click on links to various merchants on this site and make a purchase, this can result in this site earning a commission. Affiliate programs and affiliations include, but are not limited to, the eBay Partner Network.
I welded in a couple of brackets to the inside of the rear-left quarter panel to mount the amplifier. It should tuck in nice behind the subwoofer.
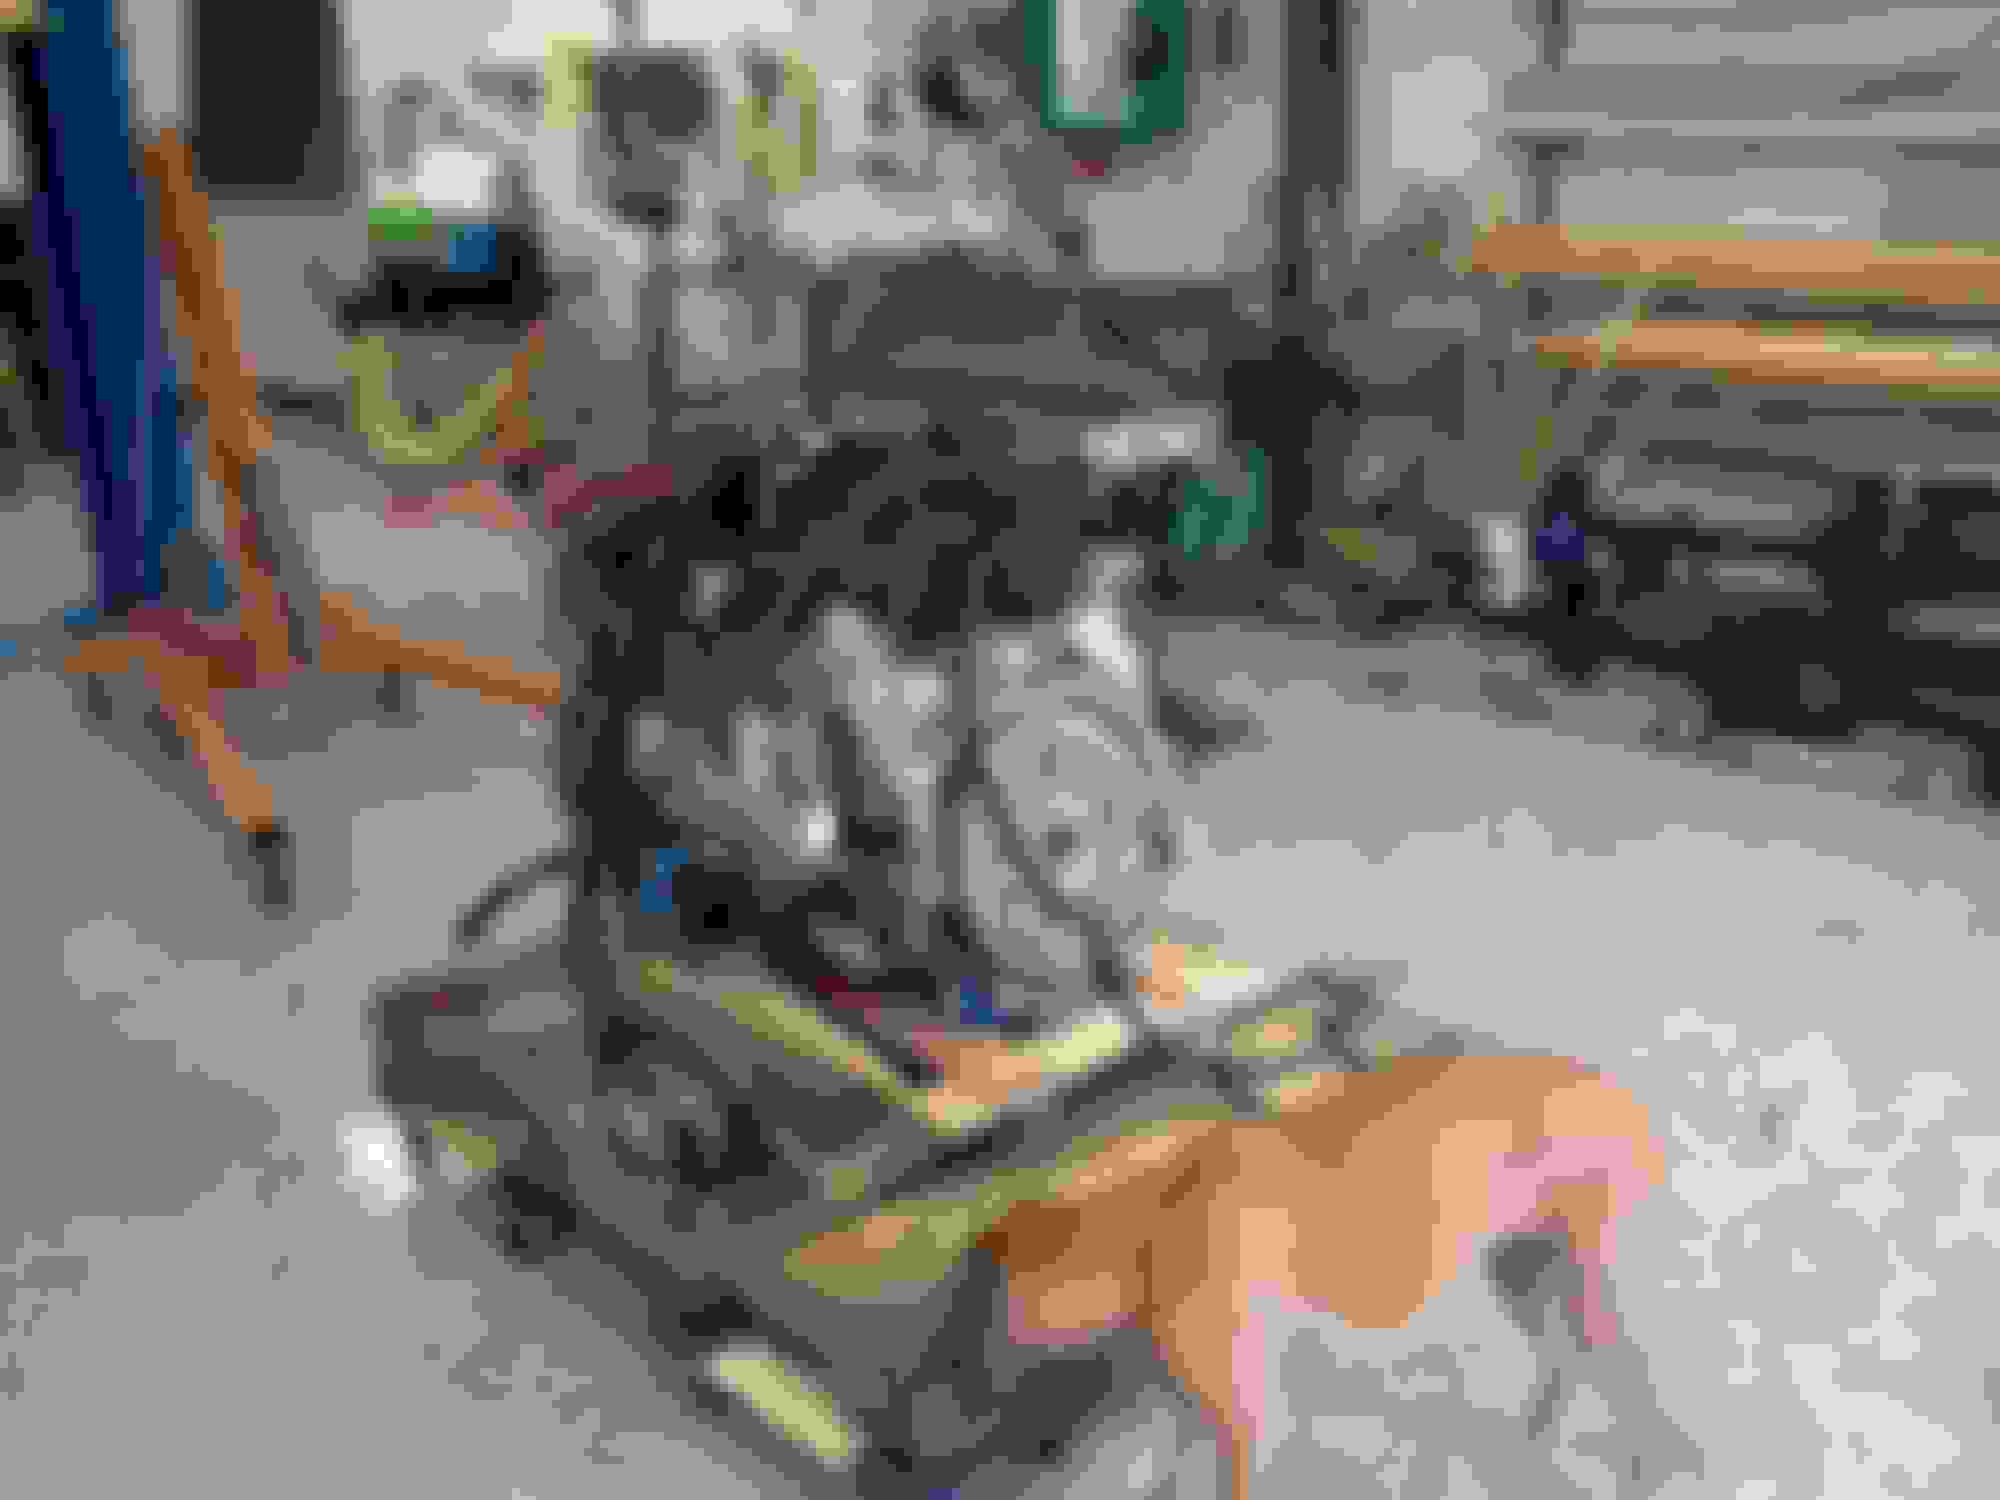
I also put the engine back in, this time with the trans crossmember that arrived this week. I built a cradle for the engine and transmission to wheel it around the shop. The k-member and trans cross member stay attached so I can just drop the car onto it.
Now that most of the driveline is in place, I can finish bending up the fuel and brake lines that will run along side the tunnel.
Last edited by tomsaddy; Nov 13, 2019 at 07:21 PM.
The fuel and brake lines were driving me crazy so I took a break and started the HVAC installation. I bought a universal AC condensor and welded some brackets on. I also tacked a couple of weld nuts to the core support and was able to screw it right in place. I still need to add one more bracket for good measure and then I can finish the routing for the heat and ac lines.
Last edited by tomsaddy; May 20, 2020 at 11:52 AM.
Reason: fixed photobucket pictures
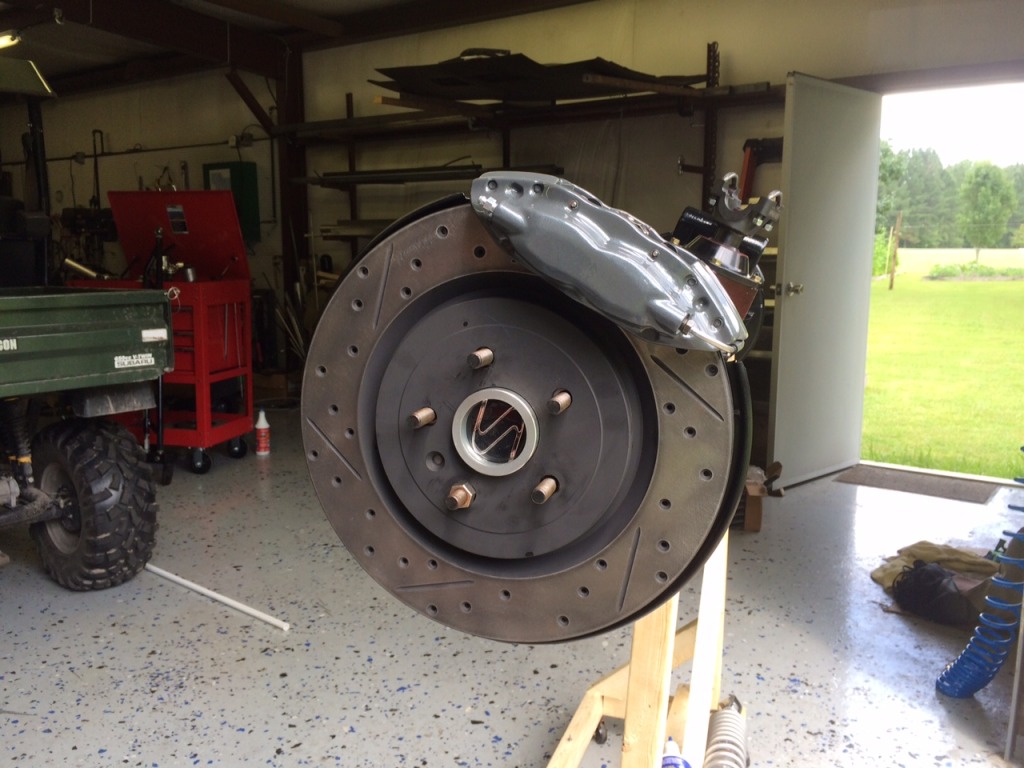
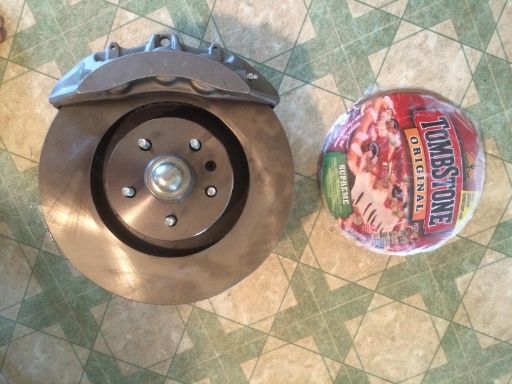
Got some more parts today. I've been working with Scott at BigBrakeUpgrade.com on getting some 09+ CTS-V 6-piston calipers and 14.6" rotors. He did a great job on tweaks to the calipers and supplying the brackets to make them fit. I highly recommend him to anyone looking to upgrade their brakes.
These things are huge! I still need to smooth the calipers and have them powder coated, but I'm glad to get them all mocked up on the car.
This means that I can't keep with the staggered Y2K wheels that I had. These don't fit within the 17" fronts. They do fit within the 18" rear wheels, so I may see if I can find another pair of 18" wheels and just use rears all the way around. Anybody have a pair they're looking to sell/trade?
Last edited by tomsaddy; May 23, 2020 at 12:10 PM.
Reason: fixed photobucket pictures
Looks like it's coming along nicely. I used Scott for my brakes too. Make sure you talk to him about getting the calipers powder coated. He told me there was a special process that needed to be done to make sure they are done correctly. I can't remember what he said the process was. I ended up just having him powder coat mine while he had them. Keep up the nice work
Got some more parts today. I've been working with Scott at BigBrakeUpgrade.com on getting some 09+ CTS-V 6-piston calipers and 14.6" rotors. He did a great job on tweaks to the calipers and supplying the brackets to make them fit. I highly recommend him to anyone looking to upgrade their brakes.
These things are huge! I still need to smooth the calipers and have them powder coated, but I'm glad to get them all mocked up on the car.
This means that I can't keep with the staggered Y2K wheels that I had. These don't fit within the 17" fronts. They do fit within the 18" rear wheels, so I may see if I can find another pair of 18" wheels and just use rears all the way around. Anybody have a pair they're looking to sell/trade?
Could you take a picture of the back of the caliper and adapter bracket? I would really like to see where he modified the caliper. I am in contact with Scott and I am doing the same brake setup! Thanks!
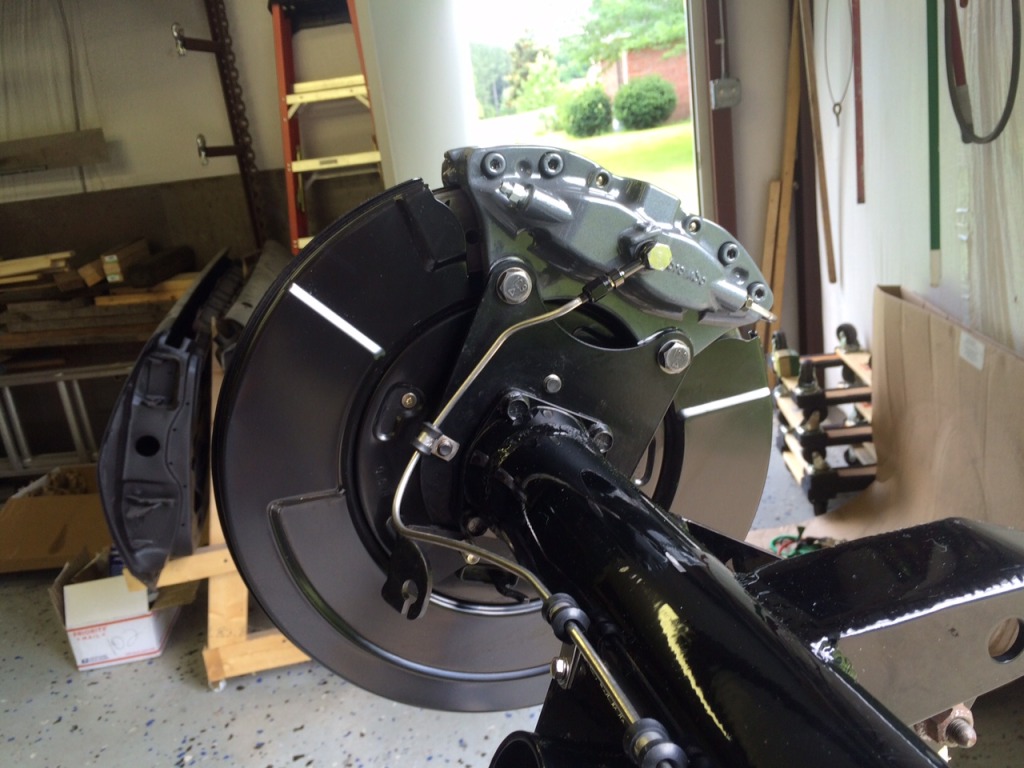
I traded my Y2K wheels for a set of base C6 wheels so that they would fit over the front brakes. I also ordered a set of 1.75 thick adapters for the front. Since nothing's easy, I had to cut out some space for the rears, since they have much more offset than the Y2K (or even other C6 wheels). I cut off the raised stiffeners around the spring pockets, and I cut a section out of the forward portion of the wheel well, leaving an opening into the interior. It basically amounts to a 1.5 inch or so "mini-tub". I still need to complete the closeouts, but the wheels fit. The good news, is that if I go with the wider Z06 wheels, all of the added width is on the outside so no additional surgery should be necessary.
{Passenger Side, Interior}
{Driver Side, Wheel Well}
The adapters I ordered are hub-centric and wheel centric, and they're real high quality pieces. They're custom made from Motorsport Tech. The problem I have, is that the rotor is so thick that it covers all but the smallest fraction of the full hub diameter (the hub tapers almost immediately after it protrudes from the rotor). The edge of the "inlet" on the adapter that is supposed to provide the concentricity to the hub is radiused so it doesn't catch the full diameter lip before the taper. I'll call Motorsport-Tech tomorrow to see if they can make me another set with a hard edge that would pick up the hub. If so, I'll hopefully be able to sell these brand new adapters to someone with thinner rotors.
Last edited by tomsaddy; May 24, 2020 at 11:03 AM.
Reason: fixed photobucket pictures
Finally made some more progress. I've been fighting the heater lines for a couple months to get them just right. I installed bulkhead fittings coming out of the right hand subframe and ran the heater lines inside the frame. I also ran a stainless A/C line up under the upper rail and I installed the drier inside. Now I just need to finish up the lines between these fittings and the VintageAir unit.
Last edited by tomsaddy; May 23, 2020 at 12:29 PM.
Reason: fixed photobucket pictures
It's been pretty slow going, with a number of minor setbacks...
I still don't have the VintageAir unit completely mocked up because I don't have the A/C compressor install mocked up. I can't do that because I don't have the accessory brackets figured out...that's because I'm pretty sure the VVT engines need more offset than the non-vvt engine that I'm using for mockup. I also learned the hard waythat, while a Corvette balancer is supposed to keep the accessories in tightest to the engine, make sure it's not an LS7 balancer because those have a longer crank snout for the dry sump system and the balancer will bottom out on the front cover before it's fully installed over a standard crank. To force some progress in this area, I pulled the trigger on a 2011 LC9 engine with 24,000 miles. It should arrive next week.
I've also fully given up on the idea of rack and pinion steering. While I'm still confident it can be done, it'll add too much additional time to the project. I've also been hearing great results lately that people have had from a well-assembled stock system. I went ahead and rebuilt the recirculating ball unit and ordered new Moog steering components. I've also learned that not all Astro steering shafts are the same length, and the one that I brought home from the junkyard is too short. The arrival of the new idler arm clued me in to what I wish you guys would have told me...the fancy bulkhead fittings installed in the subframe for the heater lines are occupying the real estate needed by the idler arm bracket. This wouldn't have been a problem if I converted to rack & pinion, but now I need to go back to the drawing board on the heater lines.
The steering guts (most of them, I know there's 24 ball bearings around somewhere):
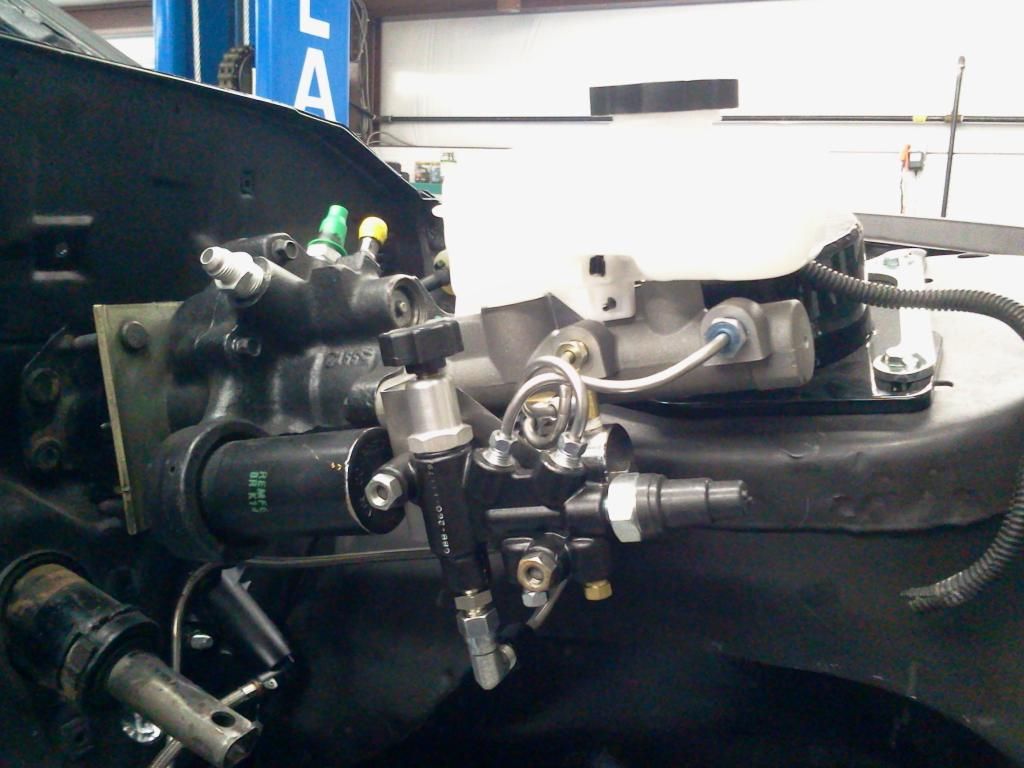
My next task was to play with the hydroboost install. I made a bracket that holds it tight to the firewall, but the pedal will bottom out on the housing before depressing, it also causes the master cylinder (unless I can find a really short one) to hit the strut tower. I've gone ahead and mocked it up using the stock bracket that was riveted to the vacuum booster. I'm not as pleased with how it looks, but it fits really nicely. I've also fabbed a bracket for the adjustable combination valve and the line lock.
I made the hole for the clutch and I've made some more progress on the fuel lines, although I keep kinking the 1/2 feed line...I'm going to have to go with a heavier wall tube and start over. You can see the bracket at the base of the firewall that will have the bulkhead fittings for the transition from hard lines to soft lines.
Other small victories include the installation of the Kenne Bell boost-a-pump unit in a nice tucked-away area near where the spare used to go. I also ordered a fabricated 9 inch housing and the third member and axles are on the way. The 10-bolt in the pictures is for sale to anyone locally that's interested. Hopefully I'm nearing the point where the rate of progress will increase. I need more forward steps and fewer backward...
Last edited by tomsaddy; May 23, 2020 at 12:30 PM.
Reason: fixed photobucket pictures
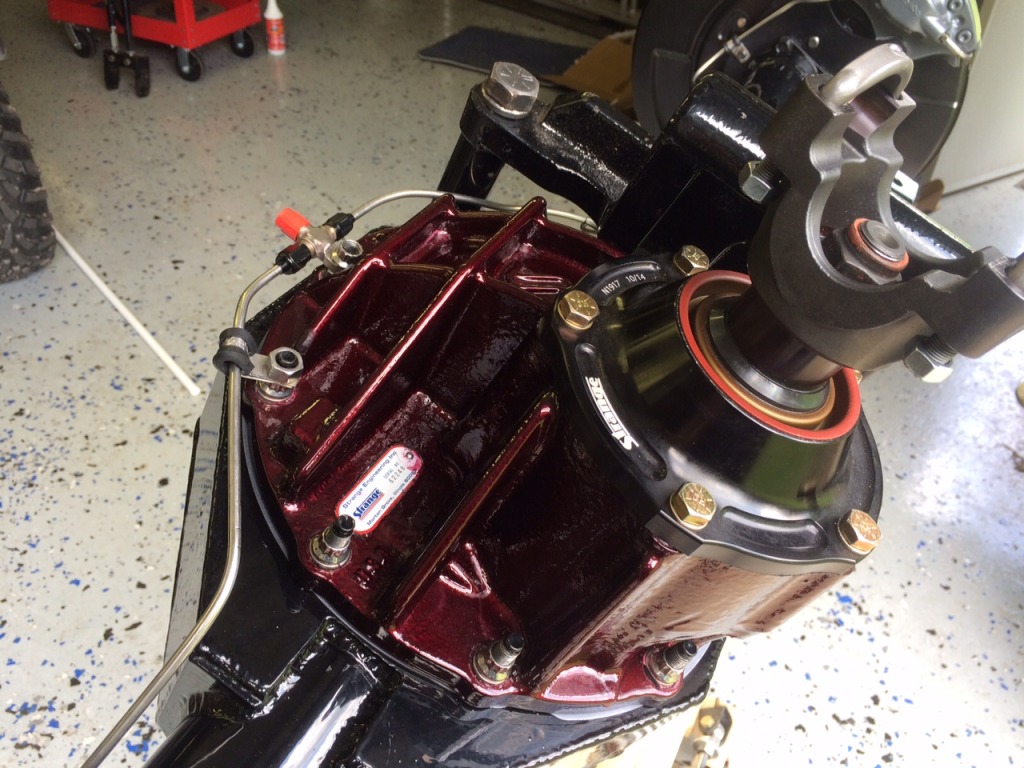
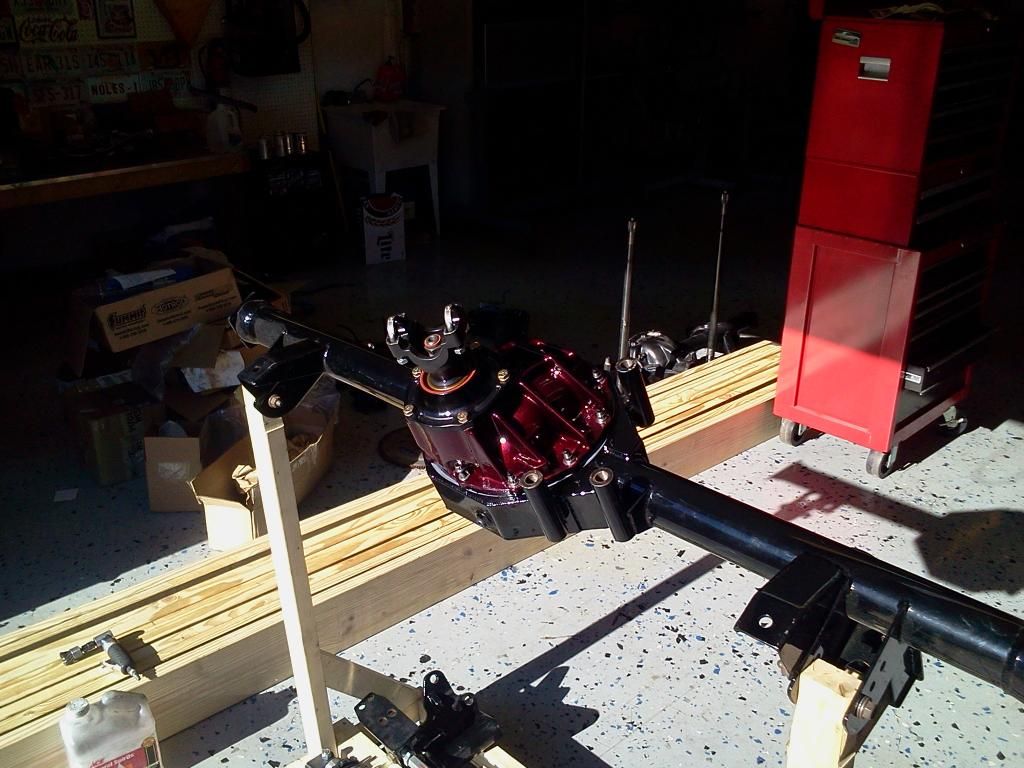
I made a bit of progress in the last few weeks. I think I decided on an accent color and painted the new Strange 3rd Member House of Kolor Brandywine Pearl. I then got it installed in the fabricated housing.
I also made a little progress on the accessories. I originally wanted Corvette accessories to keep everything tucked in tight to the engine, but I forgot about the cam phaser on the LC9. I'm going to have to go with the truck offset. This meant 1.5" spacers on the electric water pump and an adapter bracket for the power steering. 3/4" spacers for the alternator should do the trick with the stock LS1 bracket. I tried an off-the-shelf bracket for the Sanden AC compressor, but it caused the compressor to hit the k-member, so I'm going to have to make a custom bracket that runs the AC off the front set of ribs. This will probably also mean an additional idler or two, we'll see.
The hydroboost and master cylinder install are coming along. I went with a 4th gen master cylinder. The line lock is tucked in underneath it and the adjustable prop valve along side.
Last edited by tomsaddy; May 23, 2020 at 12:33 PM.
Reason: fixed photobucket pictures
More baby steps over the last few months. I think I got the accessories sorted out (but I'll need to do a little machine work on the brackets to get everything finalized). I'm working on getting the intercoolers mounted, and it looks like I'll need to reverse the end cap on one of them so I got it cut off. Now I just need to spend a little time practicing my aluminum welding before I re-attach it.
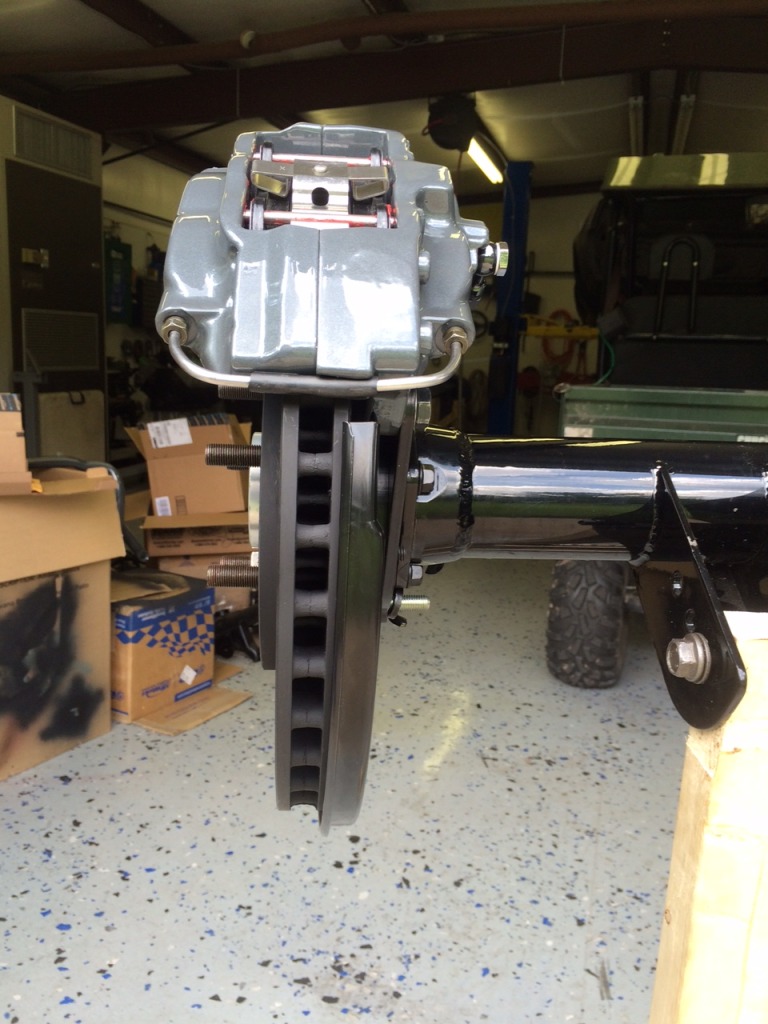
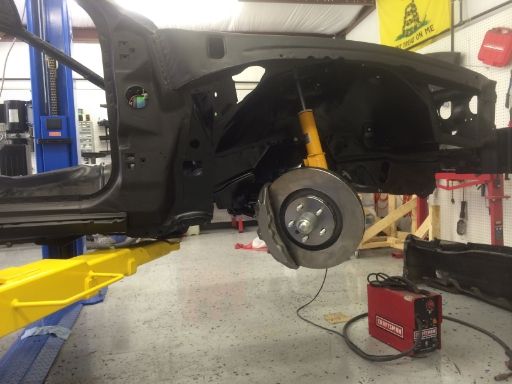
I sent a bunch of parts off to the powdercoater and when they return, I'll be able to finish assembling the rear brakes.
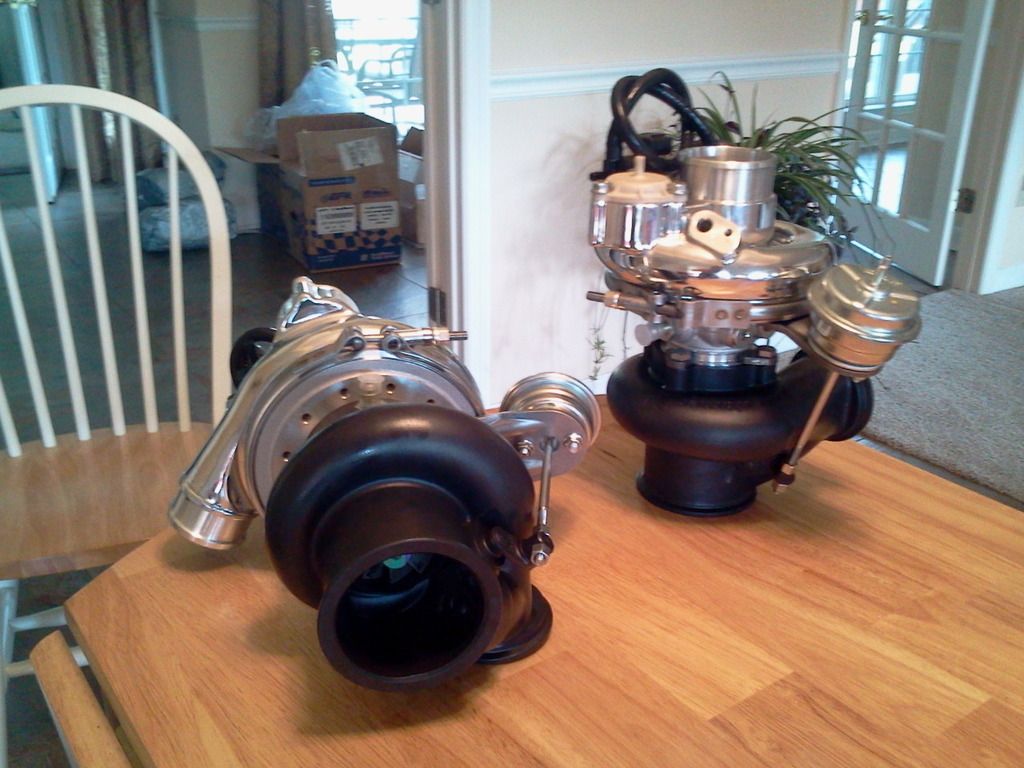
The big news: look what arrived this week - a pair of Borg Warner EFR 7163 Turbos!
Last edited by tomsaddy; May 23, 2020 at 12:35 PM.
Reason: fixed photobucket pictures
I installed the same prop valve. Why did you go with the 4th gen master?
Originally Posted by tomsaddy
I made a bit of progress in the last few weeks. I think I decided on an accent color and painted the new Strange 3rd Member House of Kolor Brandywine Pearl. I then got it installed in the fabricated housing.
I also made a little progress on the accessories. I originally wanted Corvette accessories to keep everything tucked in tight to the engine, but I forgot about the cam phaser on the LC9. I'm going to have to go with the truck offset. This meant 1.5" spacers on the electric water pump and an adapter bracket for the power steering. 3/4" spacers for the alternator should do the trick with the stock LS1 bracket. I tried an off-the-shelf bracket for the Sanden AC compressor, but it caused the compressor to hit the k-member, so I'm going to have to make a custom bracket that runs the AC off the front set of ribs. This will probably also mean an additional idler or two, we'll see.
The hydroboost and master cylinder install are coming along. I went with a 4th gen master cylinder. The line lock is tucked in underneath it and the adjustable prop valve along side.
I installed the same prop valve. Why did you go with the 4th gen master?
I wanted something with a 1" bore and it bolted right up to the Astro hydraboost. It's also a bit smaller than the 3rd gen master and I wanted to keep as much room as possible for the turbo routing.
More baby steps over the last few months. I think I got the accessories sorted out (but I'll need to do a little machine work on the brackets to get everything finalized). I'm working on getting the intercoolers mounted, and it looks like I'll need to reverse the end cap on one of them so I got it cut off. Now I just need to spend a little time practicing my aluminum welding before I re-attach it.
I sent a bunch of parts off to the powdercoater and when they return, I'll be able to finish assembling the rear brakes.
The big news: look what arrived this week - a pair of Borg Warner EFR 7163 Turbos!
I'll take just ONE of those for my Focus. That is the line of turbos that I would put on the Focus if I were interested in upgrading the stocker.
I think I figured out where the intercoolers are going to go. I'm thinking of using small round HID foglamps so that there's still enough area around them to duct air in and up through these.
The driver's side intercooler is setup the same way.
Last edited by tomsaddy; May 23, 2020 at 12:37 PM.
Reason: fixed photobucket pictures
A couple of things stand out in this build as being things that I REALLY want to do when I build again.
Aside from the awesome job you did restoring the body and all haha.
I REALLY want to tuck my fuel and heater lines. I would love to have bulkhead fittings in the engine bay and just daisy softlines over to the motor. It would clean things up a ton.
I love your intercooler idea. After riding around in my cousins twin turbo 5.0...my next build is going to be a turbo build. No question haha. Will you run fans on the intercoolers or just duct alone?
Finally...even with all the work I put into making the factory 4th gen a/c system work, I would MUCH rather run a vintage air unit. Anxious to see how the rest of that install goes, as well as how that motor ends up working with the turbos feeding it.
AWESOME job man! Great attention to detail. Im drooling over that shop!
Thanks for the compliments. As for the intercoolers, I'm going to start with the ducts alone and see where that gets me. I'm not sure if I'm going to like the look of little foglights in the front openings, but the openings look to be perfectly located to feed the intercoolers. Fans would be a pretty simple add-on later if necessary.
The VintageAir unit has a ton of advantages from a packaging and controls standpoint, but I'm also anxious to see how well it performs. Everything is so much smaller than the stock components, I'm hoping that works as well. I really like the fact that I can get a digital controller and just select temperature and infinitely variable vent configurations from an iPad. (Have I mentioned yet that I want to install a small iPad in the dash to control an InfinityBox power distribution system, along with gauges, navigation and audio?)
I figure the smaller A/C set ups would probably do ok in our cars. We dont have much interior volume to cool off haha. Not like a van or a sedan. Although our rear windows cause a pretty wicked greenhouse effect haha.
The iPad idea sounds great! I installed an Android tablet in the dash of my subaru. It doesnt control anything car related, but it is AMAZING for nav, music, engine diagnostics, etc. I always wanted to build a car pc and have it control some functions, but in the end, the tablet was quicker, cheaper and way easier haha. I want a small form PC in my TA. Ditch the head unit because its too complicated to mess with while driving that car. And have HP Tuners installed. All-in-one infotainment and tuning solution haha.
I installed the rear-end in the car. No real problems, the Spohn torque arm bolted up nice to the transmission cross-member. I did have to shave a little off of the panhard rod bushings, because for some reason the rear-end side is 1.75 wide while the end of the PHR is 1.875 from bushing face to bushing face.
I went to install the wheels so I could adjust the PHR when I realized that the wheel contacted the brake caliper with about an inch to go before mating to the rotor. I'm using C6 "Gumby" wheels for the fit test. With the stock 4th gen rear they test fit really nice (after I cut out about 1" from the inside of the wheel well). Now I can't even get them to bolt up. These wheels are 19x10, with a 79mm offset. When I fit them earlier, they were about an inch inside of the wheel well, so I could probably do a 1" spacer and get them to fit, but I had always planned on 19x12 wheels for the final version and I don't think the stock C6 Grandsport wheels (19x12, 59mm offset) will clear the caliper. If I use those with a spacer, they'll stick out. I should have kept with a stock width rear instead of the 4th gen width, then adding spacers would have solved the problem. Anybody have any suggestions?
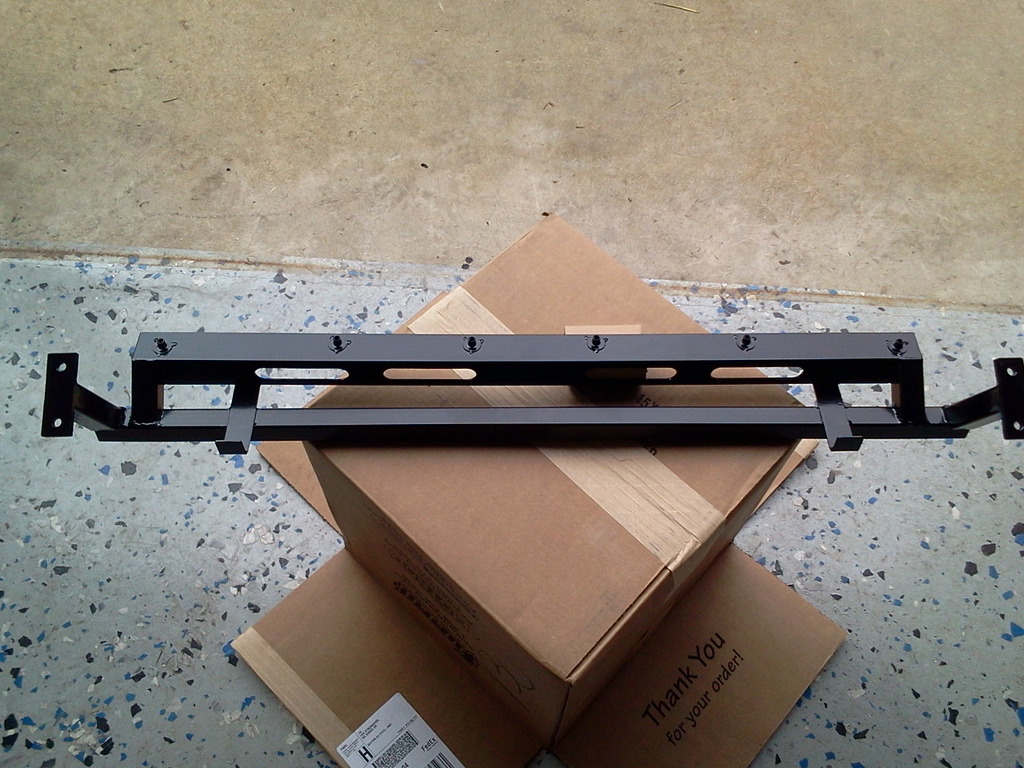
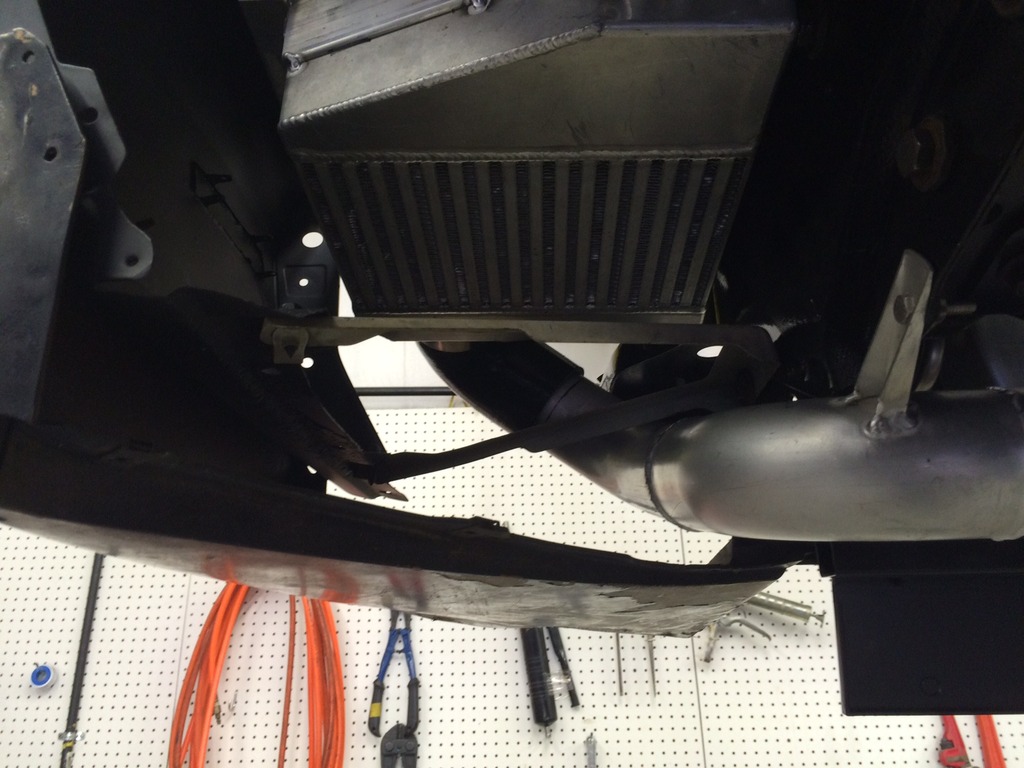
Back in the "forward progress" department -- I mocked up the radiator install. It's a Griffin combo unit with dual SPAL puller fans. It's a couple inches taller than the stock radiator, so I had to cut out the lower core support. I fabricated a square tube support with legs on the end that bolt up into the subframes. I still need to fab up a hold down, but at least its in place so I can get back to the turbo installations.
I'm into the detail work now and it's slow going. I got the pedals mounted, which required a couple of custom brackets to make the Corvette DBW pedal work.
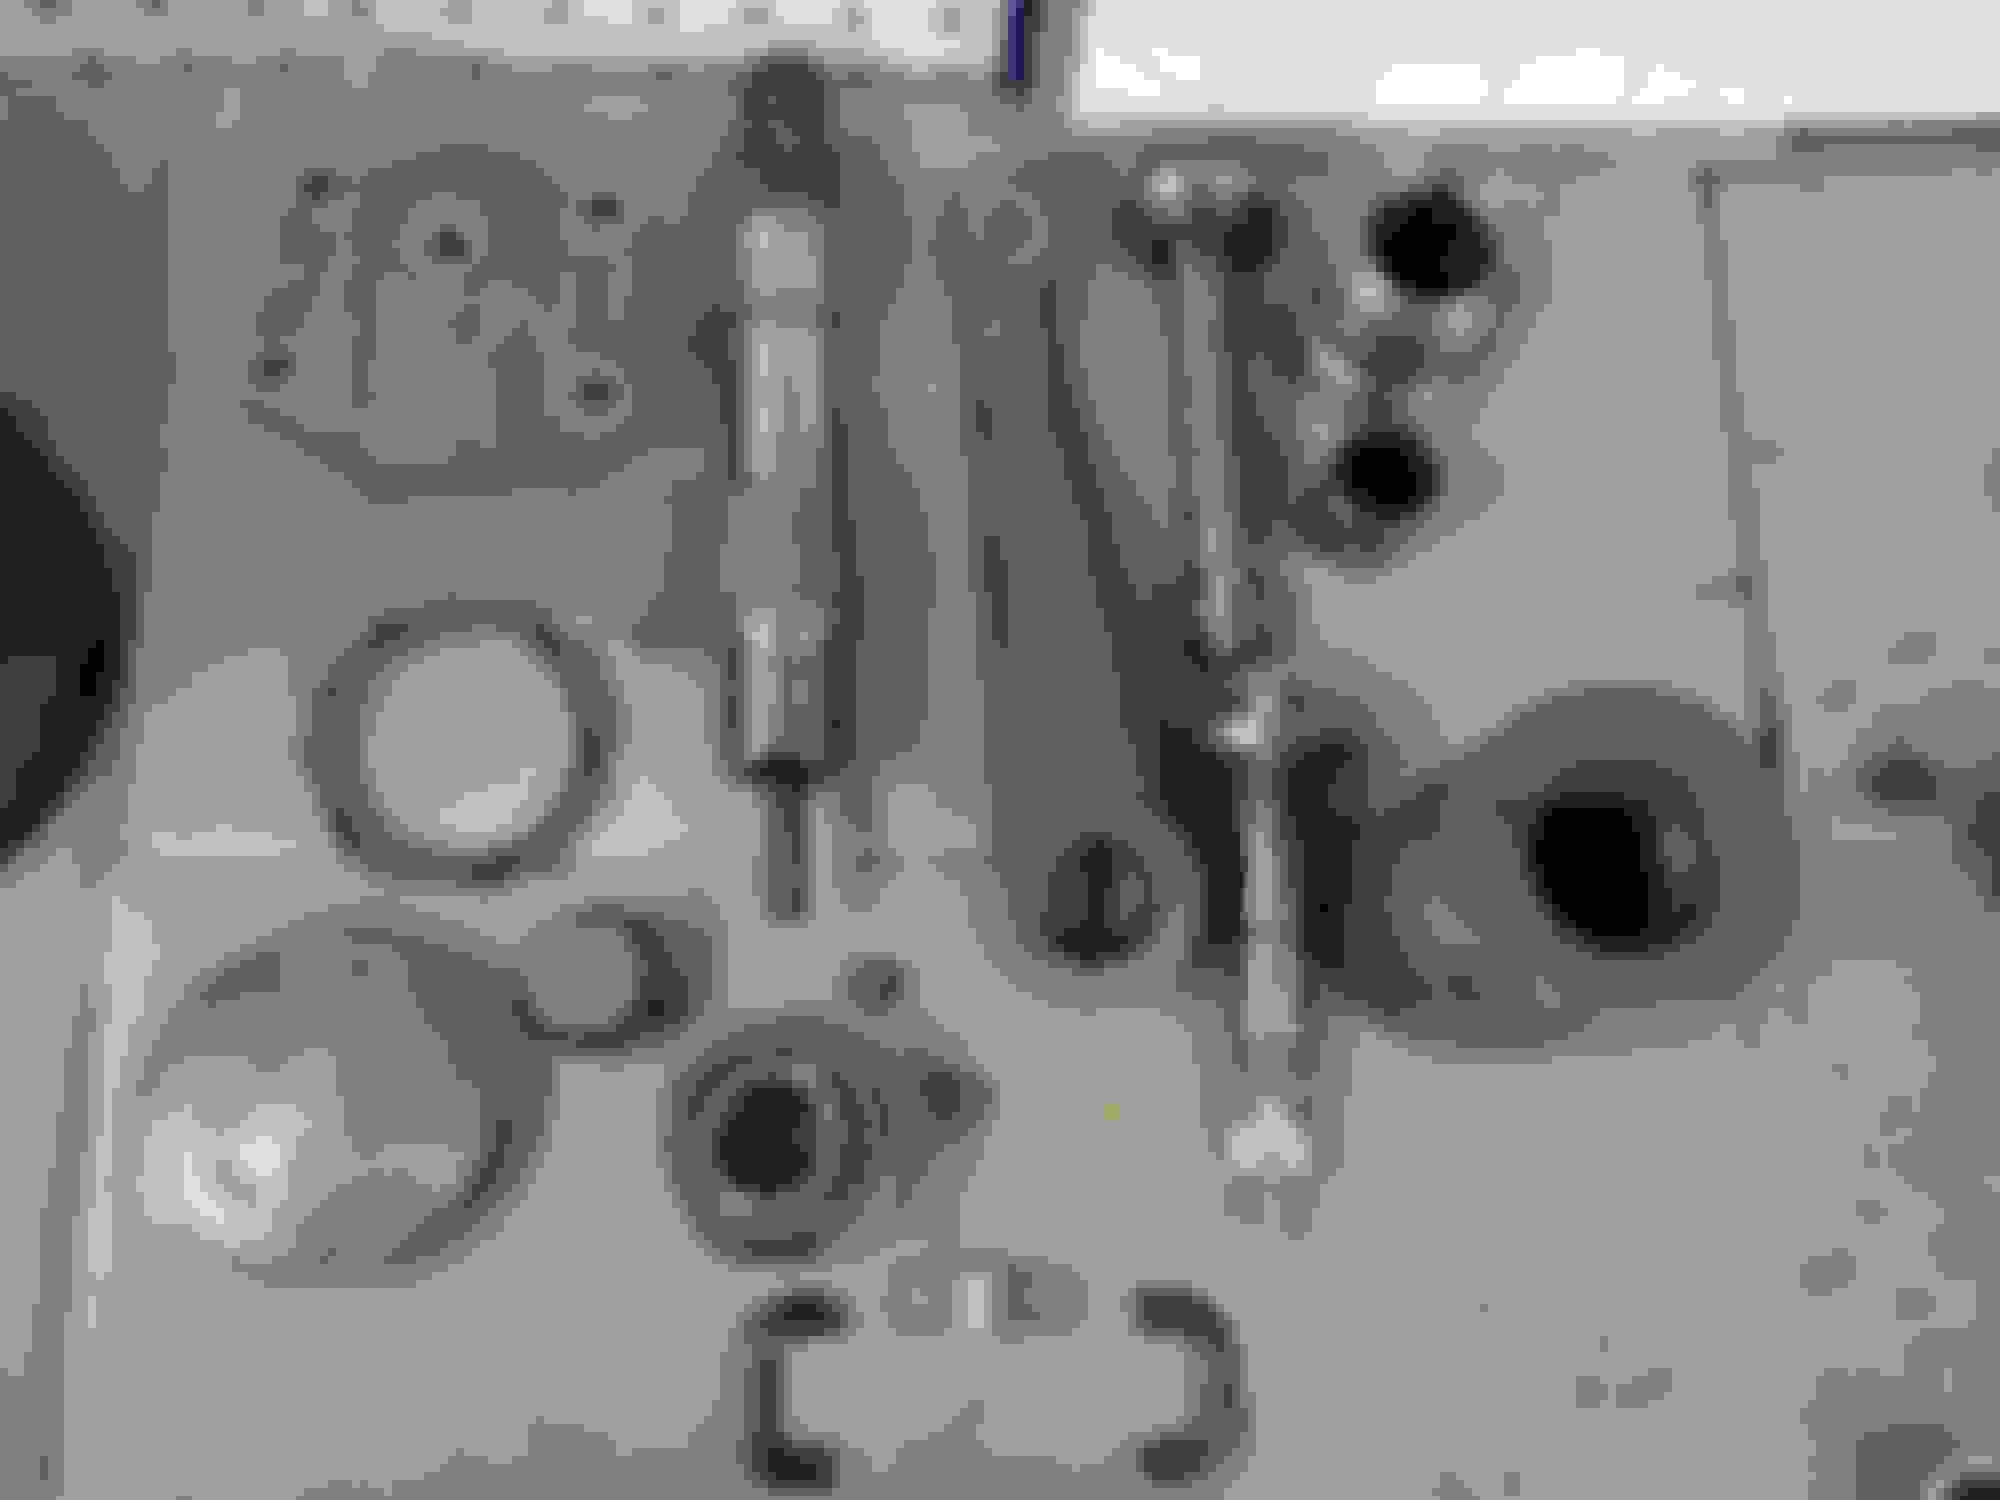
I also rebuilt the steering column...who knew there were so many parts inside.
I'm planning on push button start from the iPad, so I don't need the key cylinder. I shaved off the right side of the column and it looks like it was never there.
Last edited by tomsaddy; May 23, 2020 at 12:39 PM.
Reason: fixed photobucket pictures
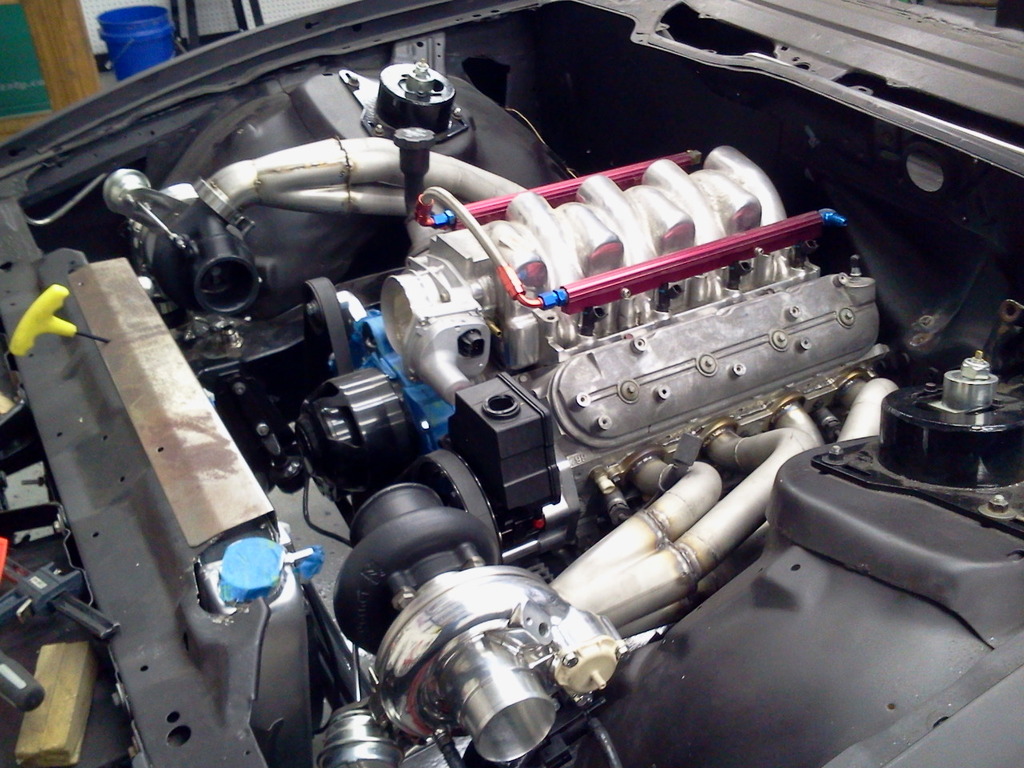
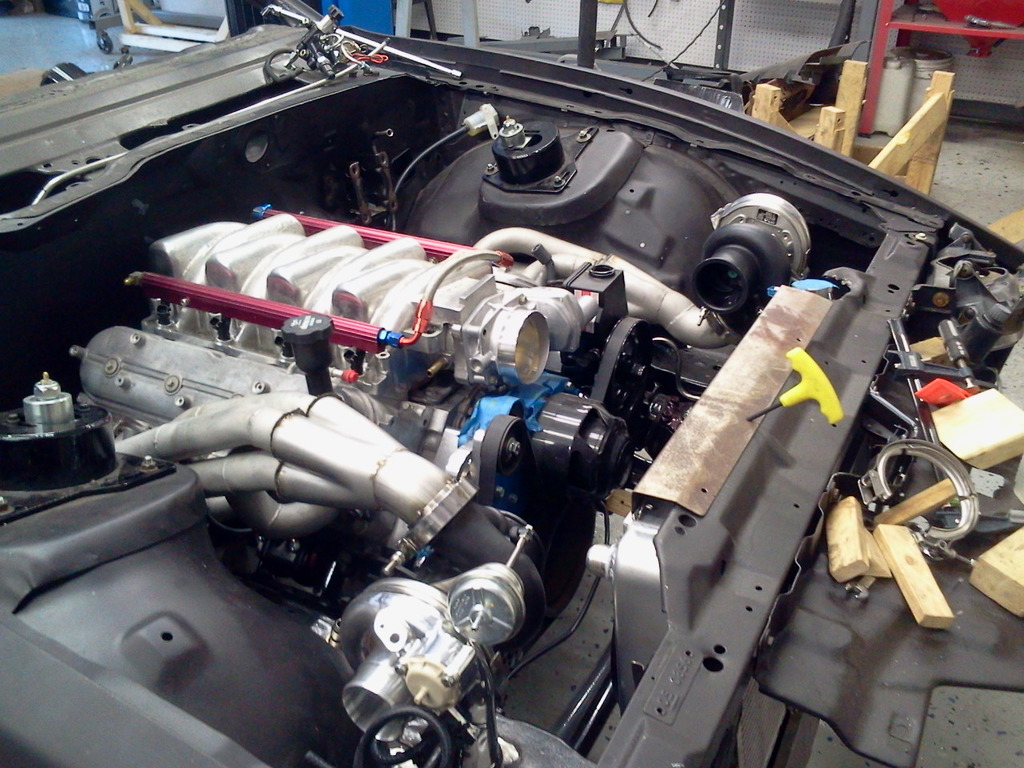
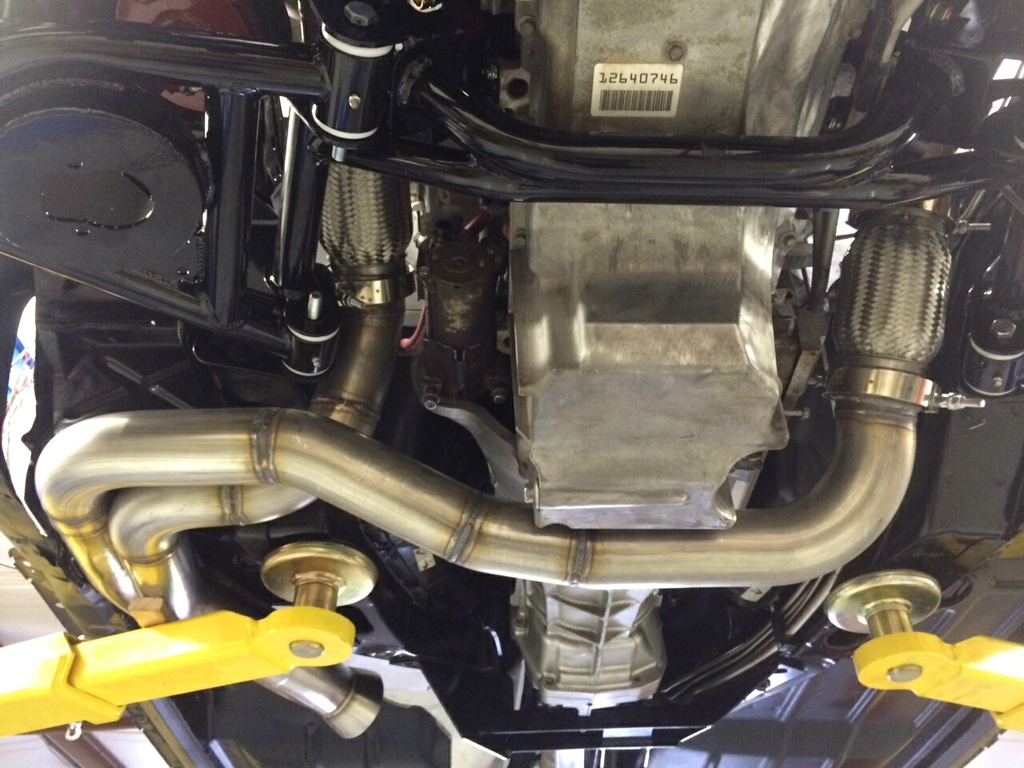
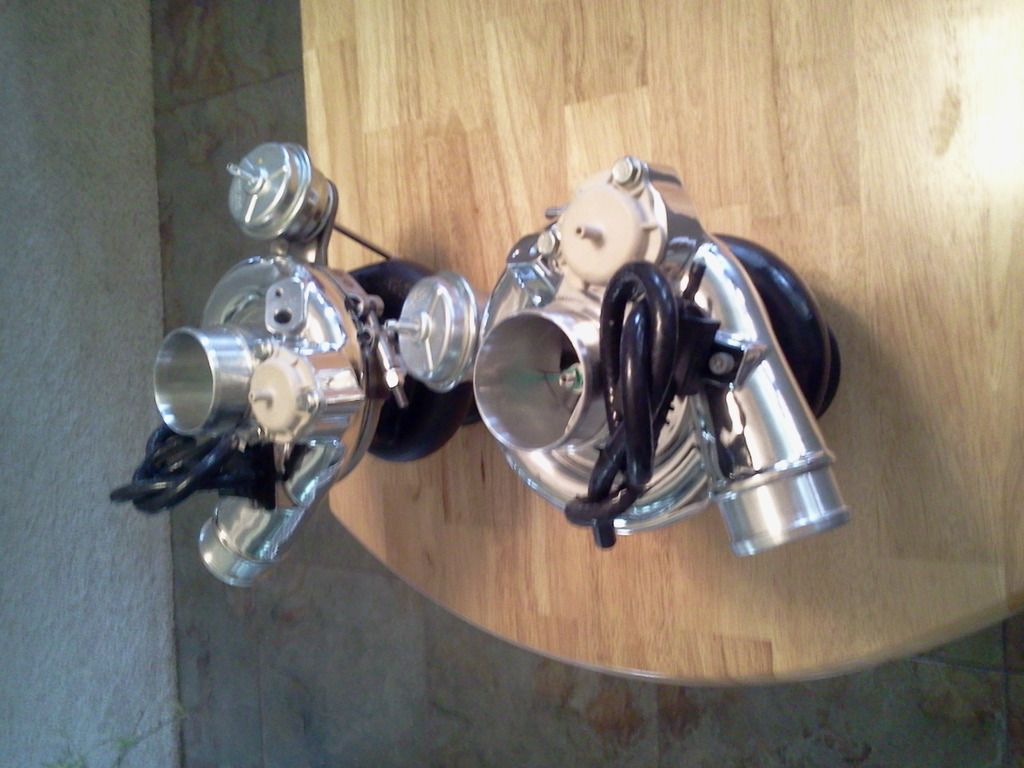
I'm almost done with the headers. The driver's side is done, just some final welding on the passenger's side. I tried to mount the turbos symmetrically, but this was the best I could do.
Push start from iPad sounds sweet just trying to figure out how ur connecting this????
There's a company called InfinityBox (they were called Isis Power before that moniker became what it is) that makes a solid state power controller that can be controlled with external devices. It won't exactly be simple but it should be possible.
Http://infinity.com
I did the final welding on the passenger side header yesterday and I'm glad to say those are done (except for ceramic coating). I ordered the bends for the downpipes. It looks the the routing will be fairly difficult, especially if I want to keep room for a 4" intake pipe.
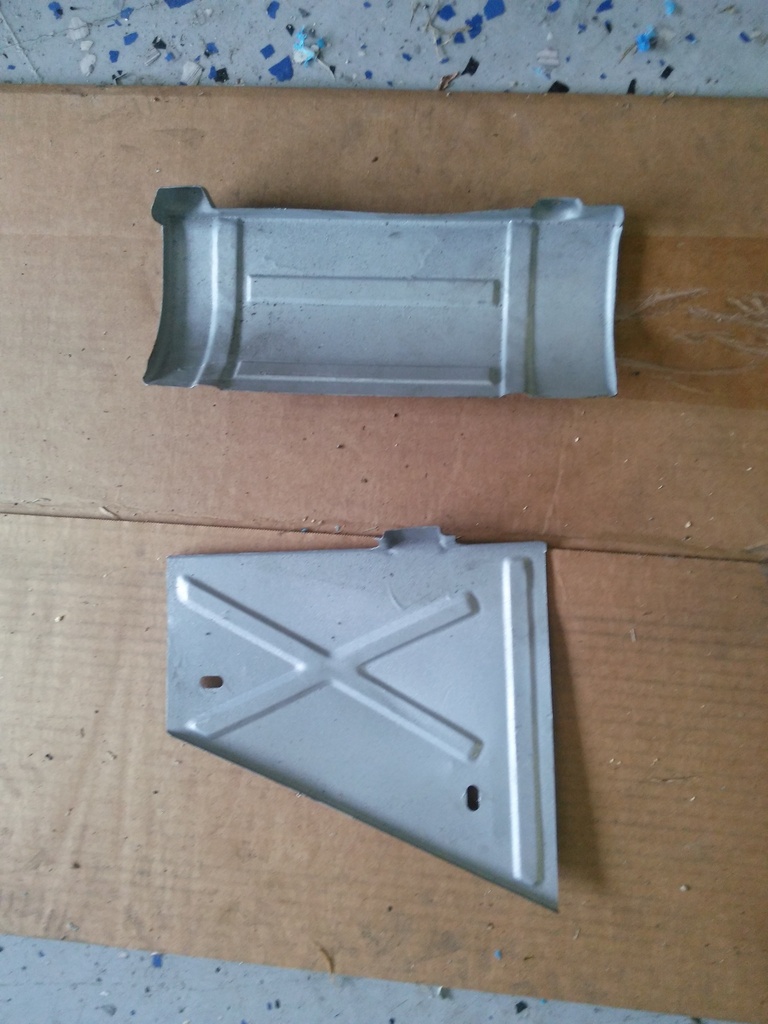
Here is the first of what I'm sure will be many "where does this go?" questions. I already installed the exhaust heat shields, but I found these in the shed. They don't match anything I already installed. I have parts from multiple vehicles, so these could just be extra (assuming GM used two different heat shield designs). Can anybody help?
The last one I had was an 82, they could be from that one. I'll sell them cheap if anyone wants them.
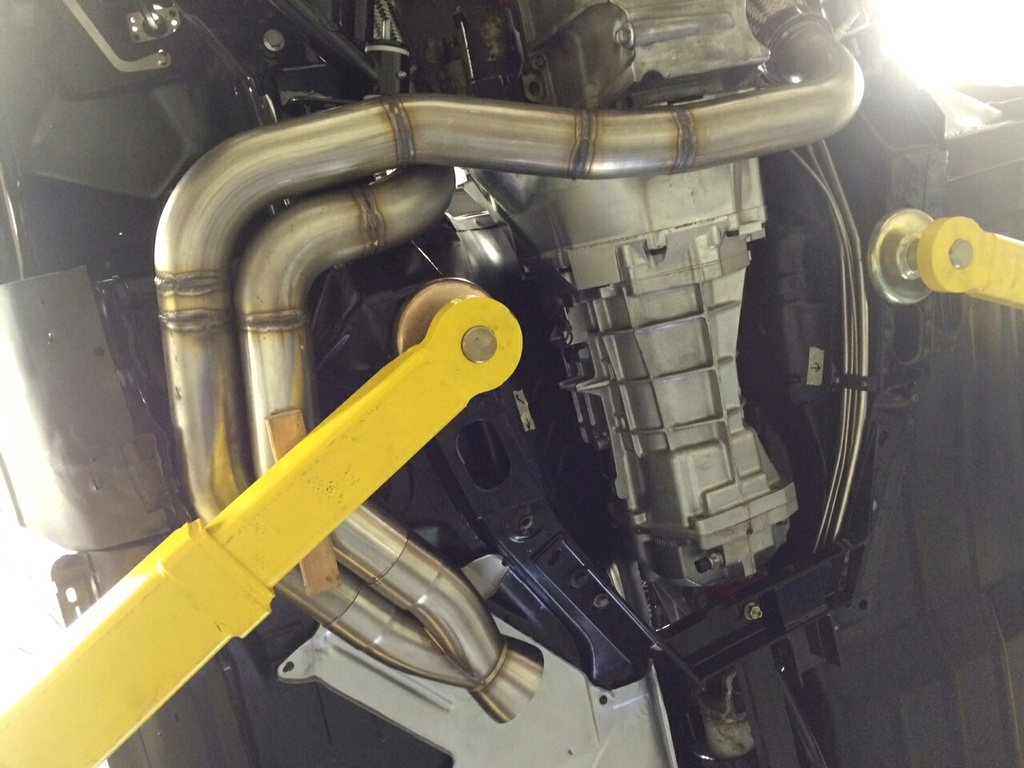
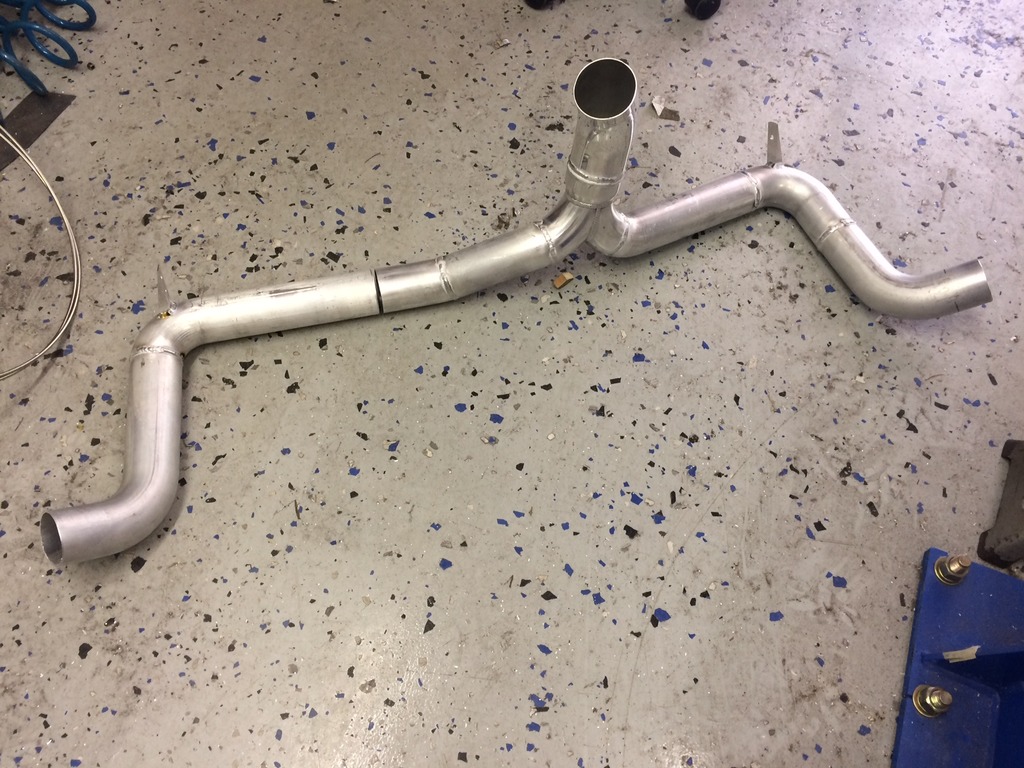
The hot side of the turbo install is pretty much done. 3" stainless downpipes into a 4" intermediate pipe. It was a tight fit but I think it will be ok. I ordered parts for the intake and I'll get started on that this weekend.
It's been a while, so here's a quick update.
The intake has been driving me crazy. I originally wanted the 3.5 or 4.0 inch inlet to split into two 2.5 inch lines over the top of the core support. I knew it would be tight so I hacked up the top core support a bit, only to realize that it will never happen. I ordered an elbow to run it vertically between the radiator and water pump, but I don't really like the fit, so I cut off the rest of the upper core support and tried again...only to realize that it will never happen without also butchering the hood, which I refuse to do. So once my custom lower core support comes back from powerboat, I'll run the intake between the radiator and water pump.
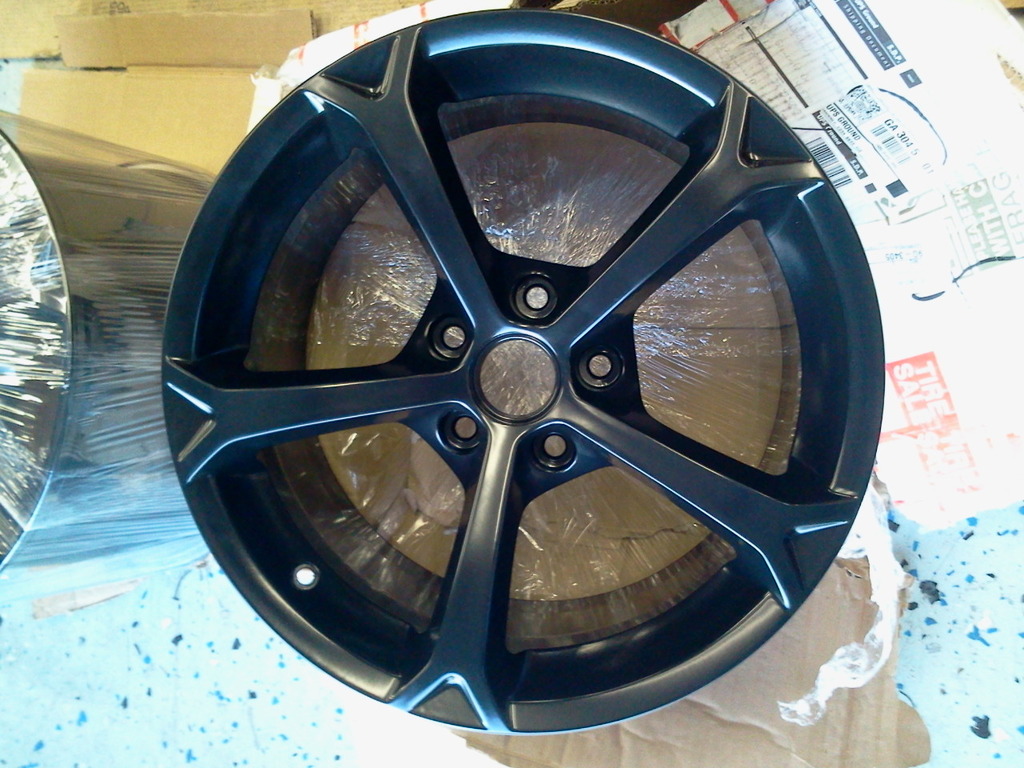
I finally got my wheels: C6 Grand Sports. The backs fit pretty tight, and I'll have to put tires on before I know if they'll stick out. I have too much spacer on the fronts...the wheels clear with on a 1/8" spacer, but they're in too far...I'll probably need about one inch.
The chrome was nice, but I'm having them powder coated satin black.
I also had a small victory with the fuel system. When I originally bought the 4th gen tank, I planned to use it with the stock 1987 gauge, so I swapped out the resistor card for a 0-90 ohm one. After I got the tank all buttoned up and installed, I decided to get away from the stock gauges and read everything from the OBDII. With a E38 ECM, this means a 240-30 ohm sender. I'm not sure if they make any resistor cards in this range that will swap in, so I found the original 4th gen card (about 50-250 ohm) and I twisted the arm on the float around 180 degrees. Now it reads about 250 empty and about 50 full. Hopefully this will be close enough that I can calibrate it the rest of the way in the programming.
Last edited by tomsaddy; Dec 21, 2015 at 08:06 AM.
It's been a while, so here's a quick update.
The intake has been driving me crazy. I originally wanted the 3.5 or 4.0 inch inlet to split into two 2.5 inch lines over the top of the core support. I knew it would be tight so I hacked up the top core support a bit, only to realize that it will never happen. I ordered an elbow to run it vertically between the radiator and water pump, but I don't really like the fit, so I cut off the rest of the upper core support and tried again...only to realize that it will never happen without also butchering the hood, which I refuse to do. So once my custom lower core support comes back from powerboat, I'll run the intake between the radiator and water pump.
I finally got my wheels: C6 Grand Sports. The backs fit pretty tight, and I'll have to put tires on before I know if they'll stick out. I have too much spacer on the fronts...the wheels clear with on a 1/8" spacer, but they're in too far...I'll probably need about one inch.
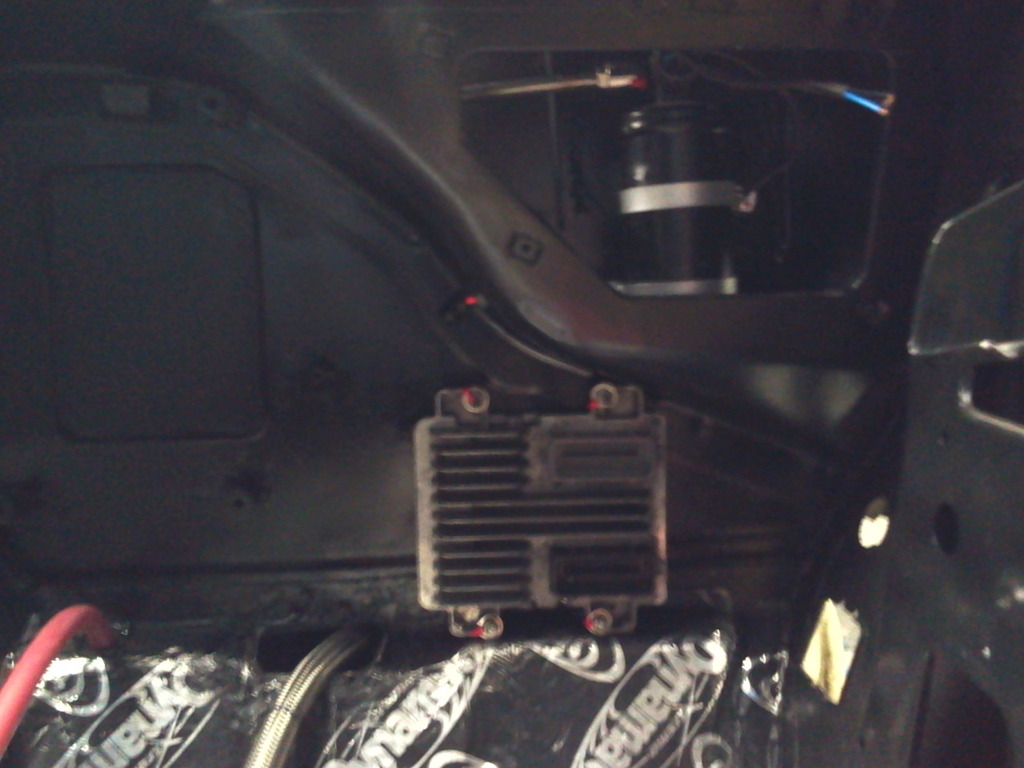
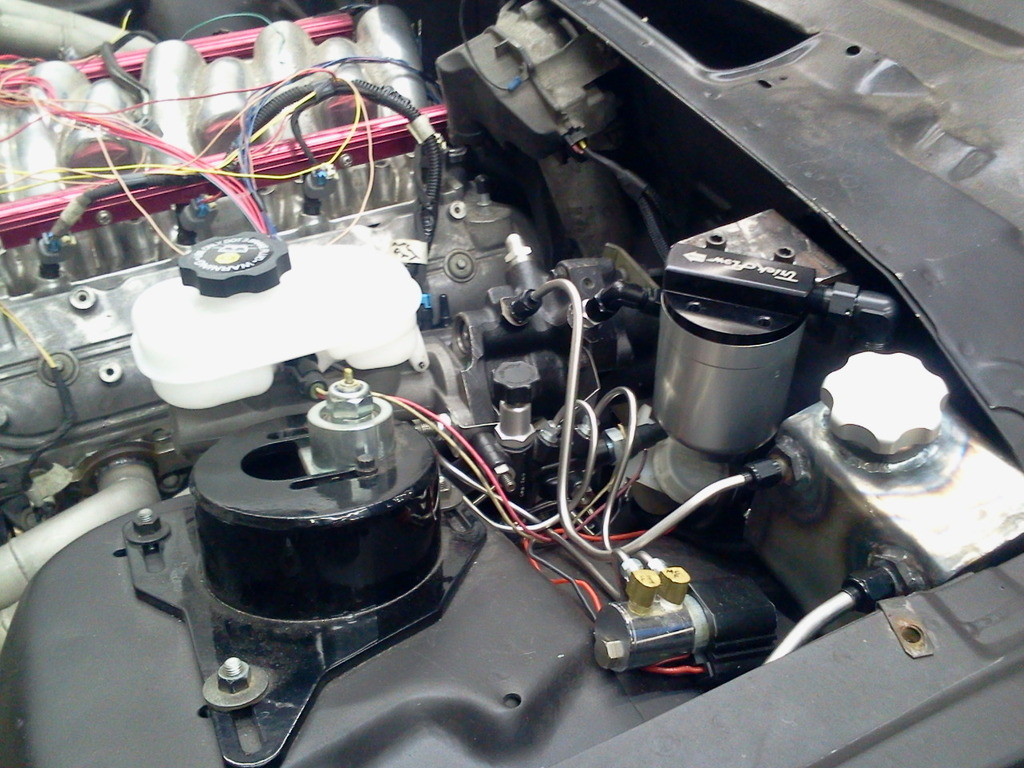
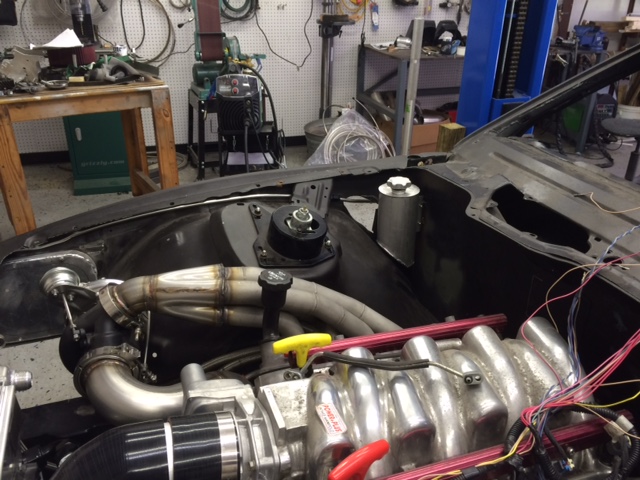
Got the ECM and AC drier permanently mounted (I hope).
I'm still messing with the heater lines. I planned to run them through the frame rail, but the water pump is so close that I have trouble getting a hose between the fittings. More to come on that.
I got the wheels back from powdercoat, along with the custom lower core support that I made. I also got a new box of fittings and hoses so I can finish the fluid lines up front.
I'll see if I can get some more pictures up soon. I got the lines bent up for the oil feed to the turbo, and finished the compressor to condenser a/c line. I discovered when doing the oil lines that the driver's side turbo was too high and the oil fitting would have hit the hood. I had to cut the hot side tubes and refit to bring the turbo down an inch or so.
I had to use a remote power steering fluid reservoir in order to have clearance to the driver's side downpipe, so I fabricated one from steel, bolted it to the firewall and ran stainless lines to it. The water pump clashed with the timing cover by about 0.020" when using 1.5" spacers so I switched to 1.75" spacers and need to decide if I want to machine them down a little to maximize clearance in front of the motor. I've abandoned the idea of running the heater lines through the subframe since the water pump connections are too close to the subframe to use a proper hose.
I've been having a hard time figuring out the intake tubing. I cut out the top of the core support, thinking I could go over the top, but there's no way. With the smaller wp spacers, I could fit between the radiator and so pulley (barely), but not with the 1.75 spacers. I think I can run it down toward the driver's side, but I need to order some more couplers and play around with it.
My original prop valve installation ended up too close to the headers so I reworked it to the other side of the master cylinder. I also added a canister style fuel filter that I'll mount to the firewall. I'm still trying to find a final location for the coolant overflow and oil catch can.
I'm thinking of running a -10 or -12 line from the back of each valve cover to a catch can. I plan to draw vacuum in the can with a line to a venturi in the exhaust, and another line to the intake, both with checkvalves. My thought is that the intake would draw vacuum at low manifold pressure and the exhaust would draw (or at least be ambient) under boost. Anybody have any thoughts?
I've been drawing up wiring diagrams and trying to figure out what to run from the infinitybox, what to wire up directly, and where to use ecm controls. The E38 ecm will pulse-width control the cooling fans based on coolant temp and a/c pressure, so I think I'm going to go that route. I think the infinitybox has pulse-width outputs so I might try to use that to pulse-width control the water pump and fuel pump (with an added relay to switch fuel pump power over to the boost-a-pump once it hits 100% duty cycle). I need to work out the sensor inputs for all that to work.
Here is the revised brake component install, the power steering reservoir and the fuel filter. I have to check hood clearance and may need to drop the filter down a little.
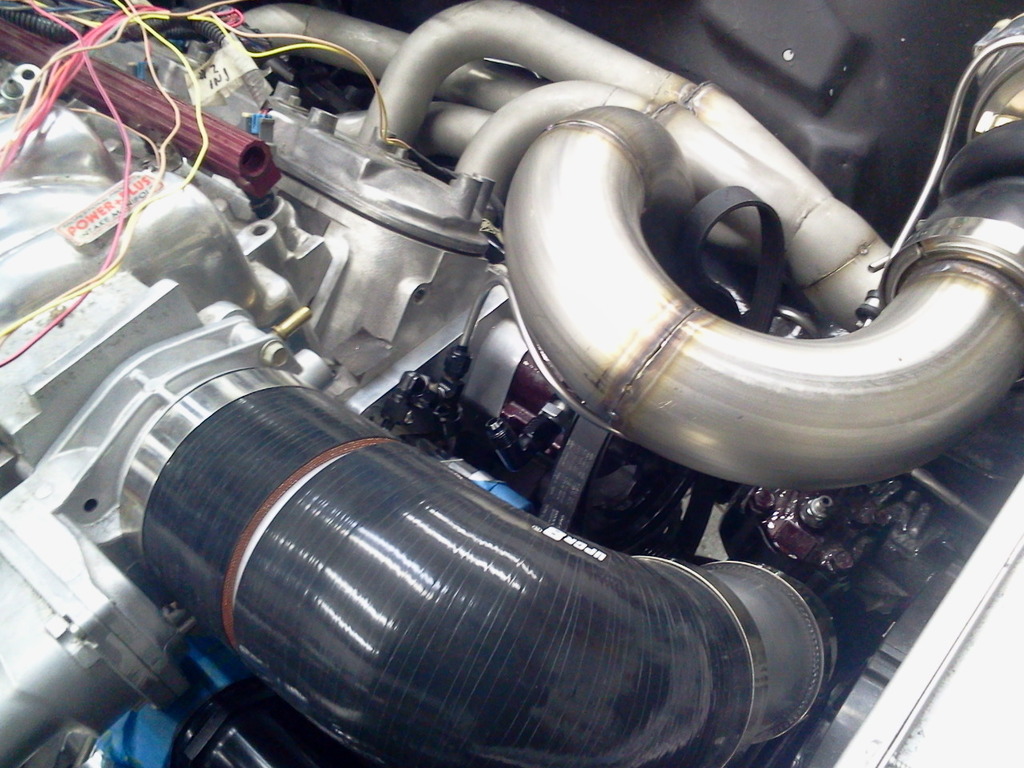
Here you can see the y-fitting for the turbo oil feed. The line comes from an Improved Racing oil cooler adapter that mounts above the oil filter which also directs oil to the oil cooler once it hits 215 degs. It also shows the intake and MAF housing.
I finally got the heater hoses sorted out. I wanted to hide them in the subframe but it didn't work out. The smaller hose is the suction line for the a/c.
Last edited by tomsaddy; May 23, 2020 at 12:41 PM.
Reason: fixed photobucket pictures
Not much progress. We went on vacation last week and the weather has been warming up so I've been working on the yard a lot. Bought the iPad mini for the center console and can't wait to start getting the electrical stuff started. I also hope to buy tires soon and get it down off the lift.
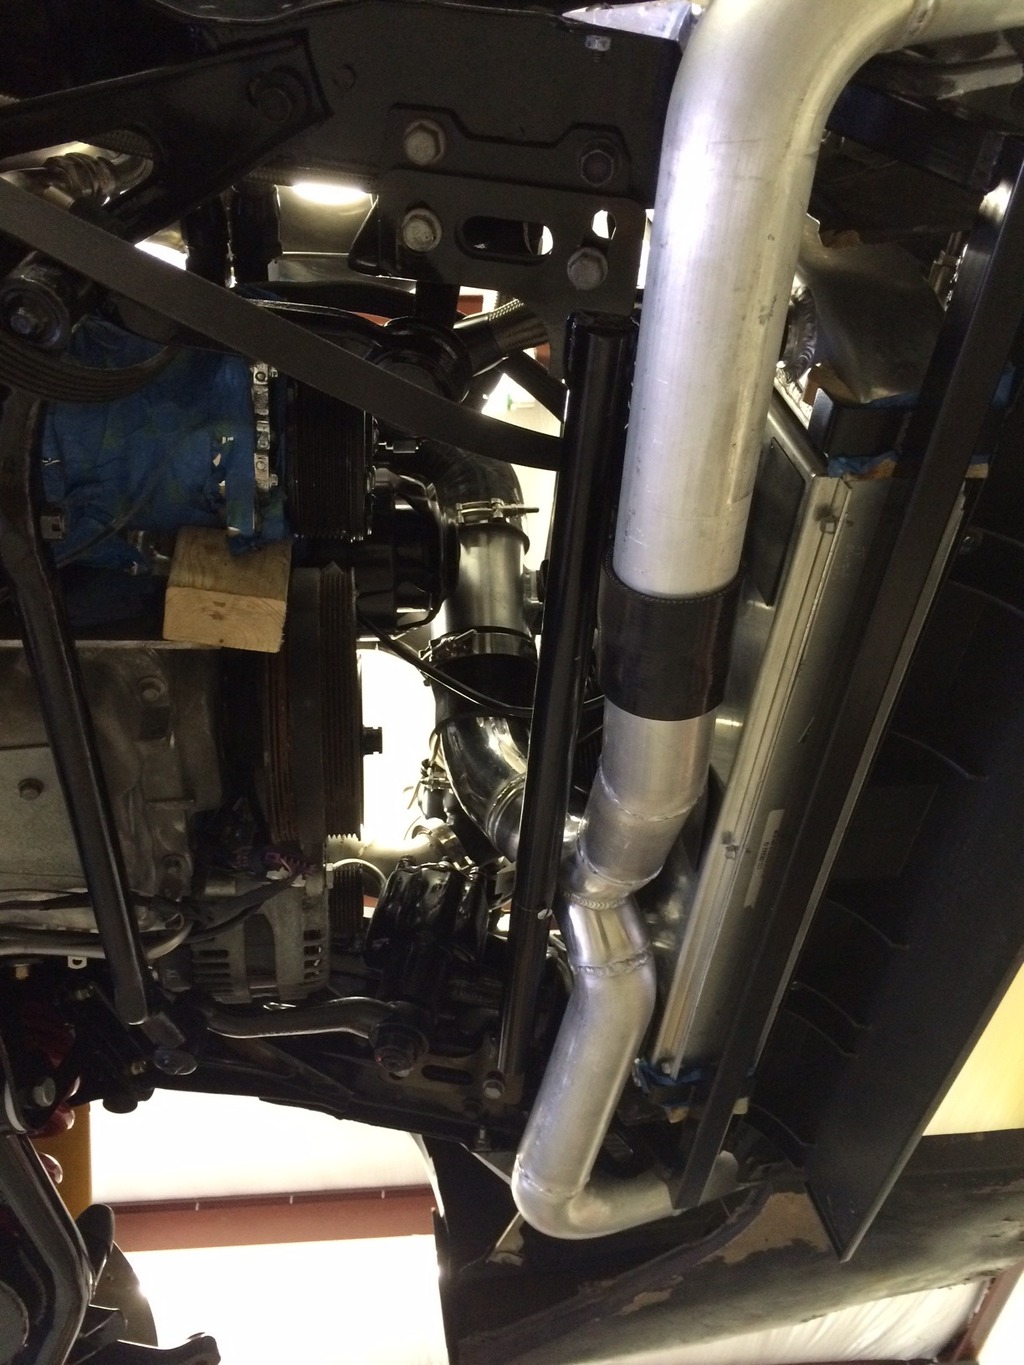
Finally back to working on the car a little. I remade the AC line from condenser to accumulator (the last one didn't work with the air cleaner setup). You can see the 3/8 stainless line in the pic below, running along the upper rail. I also got started on a coolant overflow tank. Aluminum tubes are on the way so I can finish up the inlet tubes.
Last edited by tomsaddy; Apr 24, 2016 at 08:21 AM.
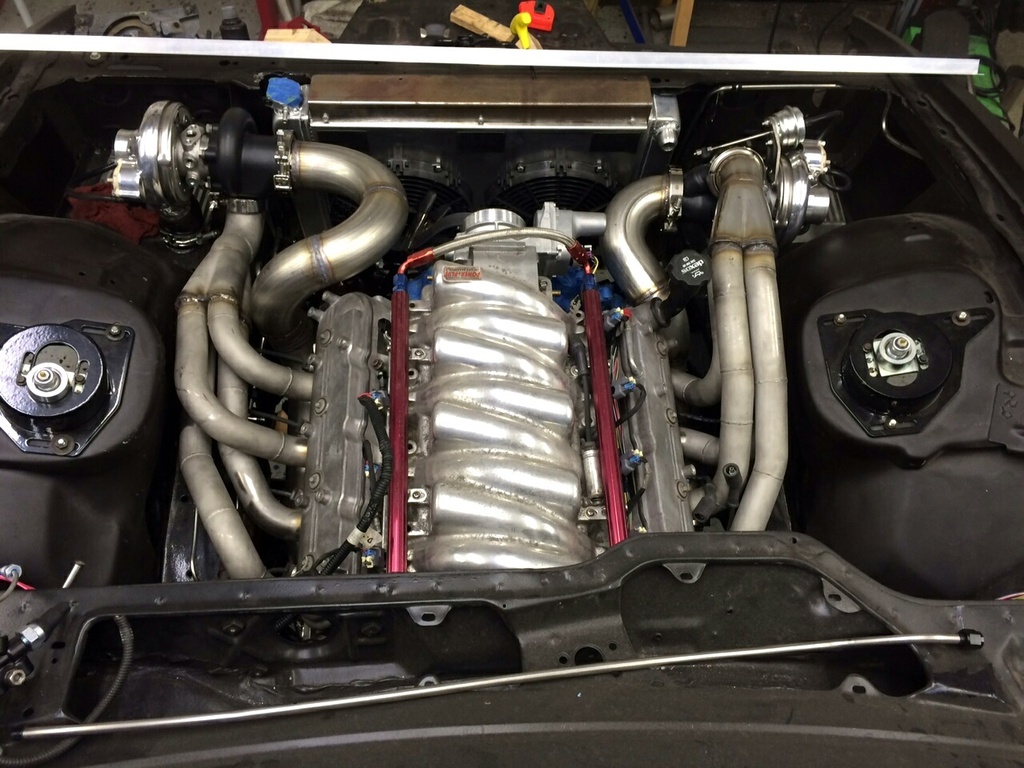
Finished the cold side. 2.5 inch aluminium from the intercoolers, merged to 3.0", then to a 3.5" MAF housing. It then transitions to the 4.0" (102mm) throttle body. It was a real tight fit between the wonder bar and the radiator, but it fits.


 That is the line of turbos that I would put on the Focus if I were interested in upgrading the stocker.