When you click on links to various merchants on this site and make a purchase, this can result in this site earning a commission. Affiliate programs and affiliations include, but are not limited to, the eBay Partner Network.
So I didn't see an introduction thread, if I missed it I apologize. I'm a middle aged car guy in the midwest (IN) who as a teenager read every issue of Hot Rod and Car Craft magazines I could get my hands on. I took shop class in high school and loved working on cars. After high school I worked as an assistant mechanic at a small car lot for awhile.
My senior year I owned a 1987 Firebird with a 305 4bbl and 700R4. I loved that car, but had to sell it a few years later when I was going to college and lost my job. I always wanted to track it down, but could not find anything with the VIN on it. The next owner was a friend of my sister, but they no longer had the VIN or remembered who they sold it to (It has been over 20 years ago, so I can't blame them).
So fast forward to earlier this year where I saw a 1991 base model for sale for $850. I made the three hour trip with my wife pulling a rented U-haul car trailer and brought it home. Now that summer projects are over I have been spending a lot of time working on the car. I'm calling it the Negative One as I am converting it from a 1991 with ground effects to a 1990 Base/Formula look.
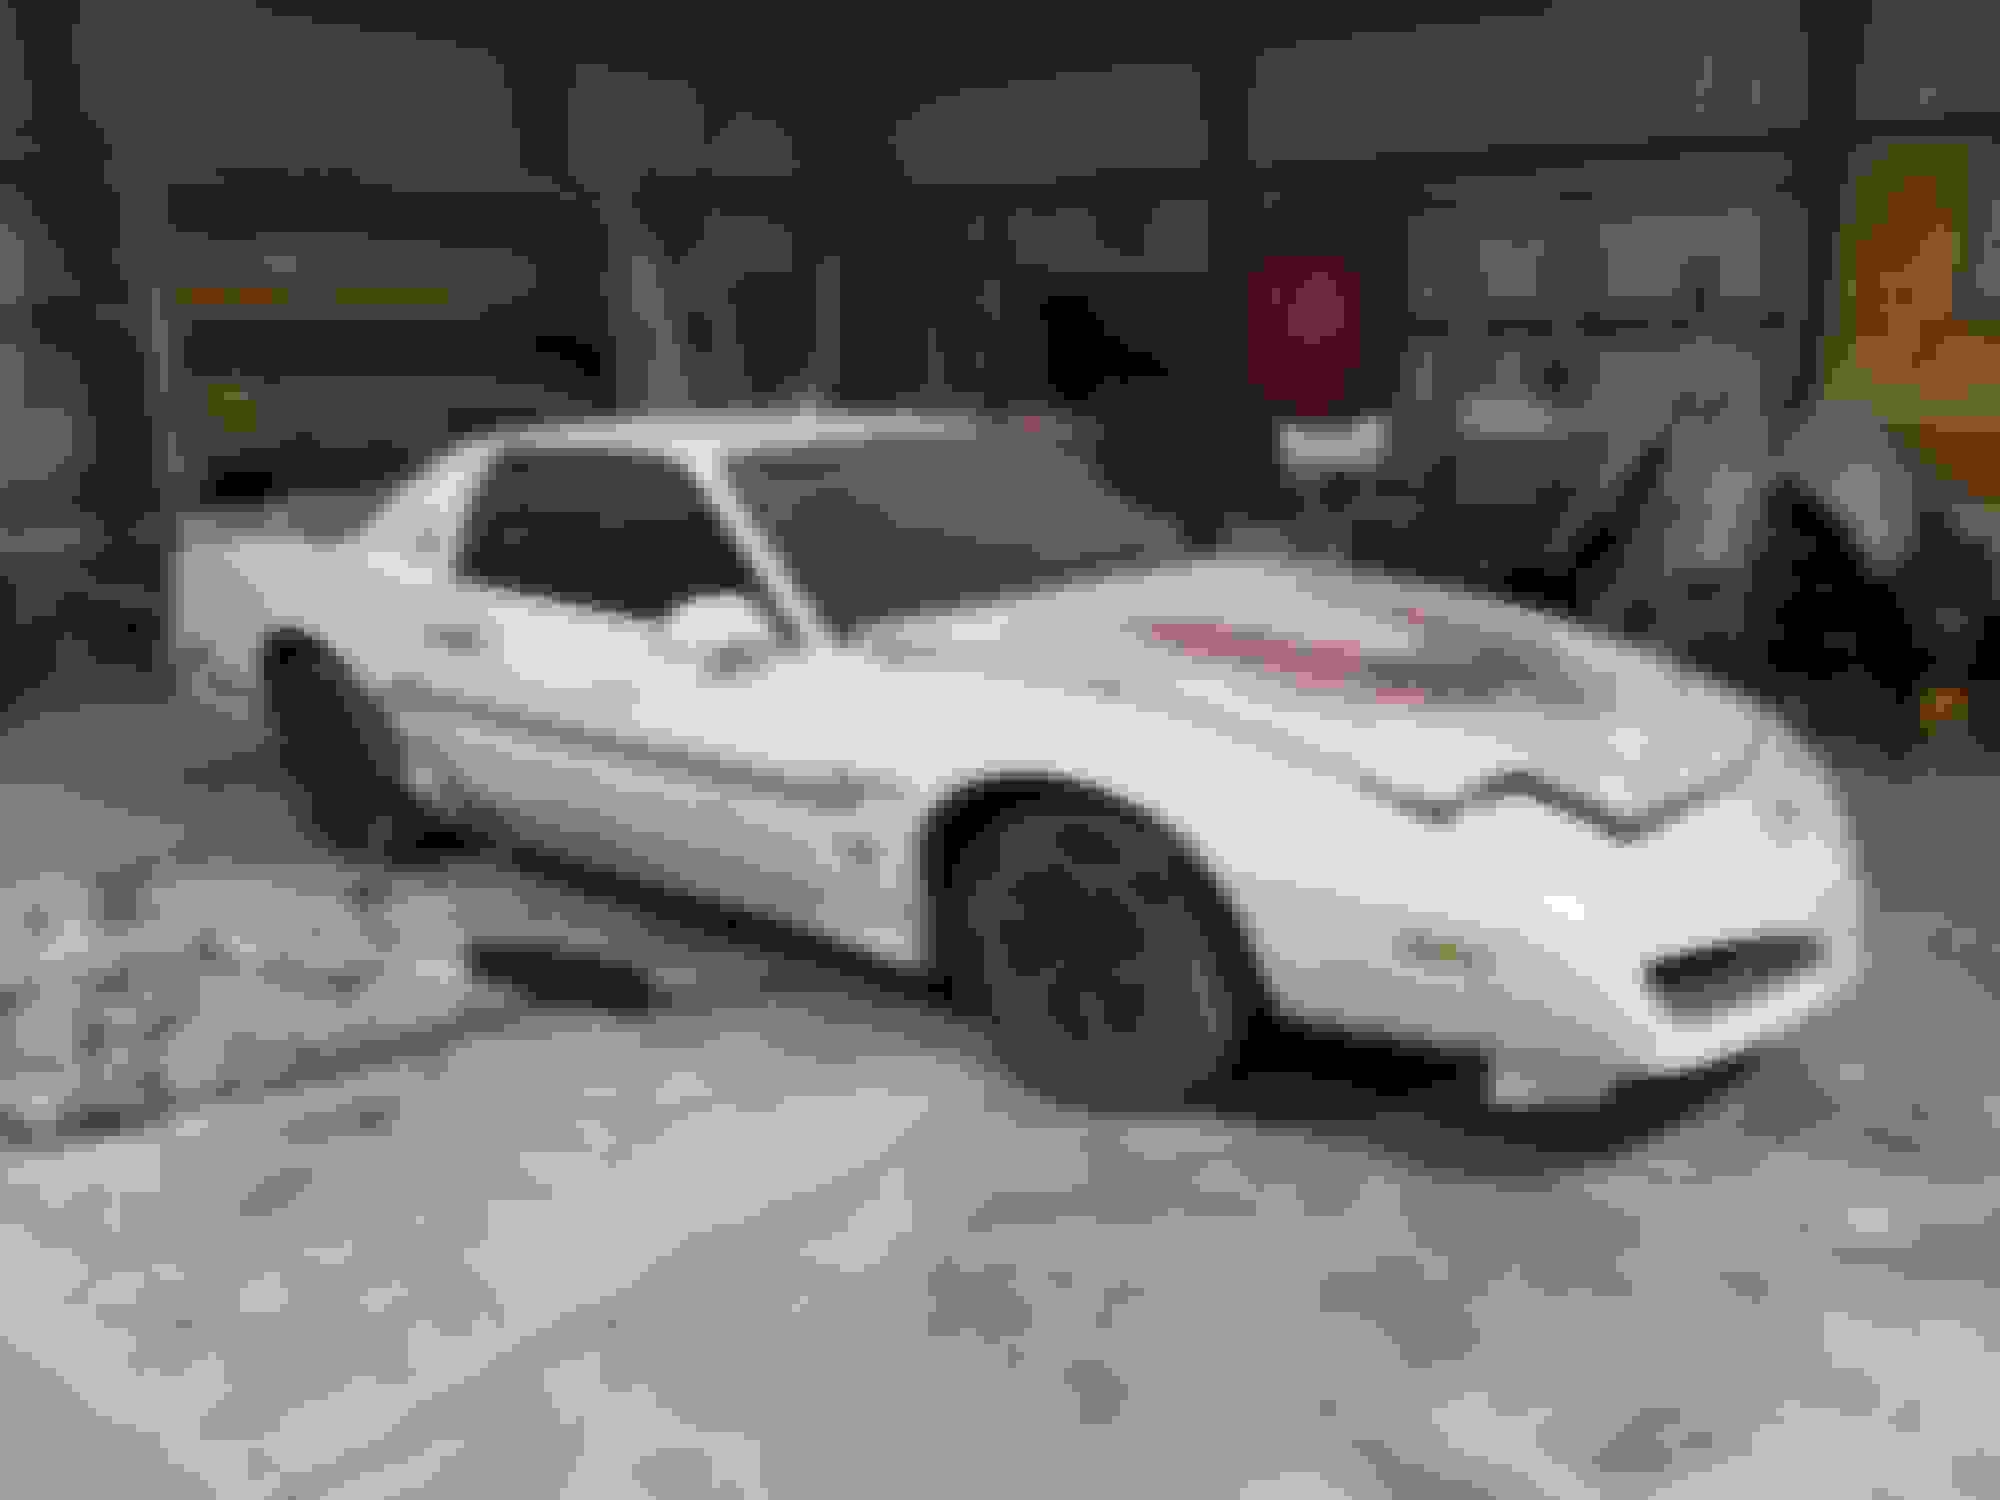
This is what I'm starting with. Crappy paint job and decals, broken and missing ground effects, and a small fuel leak. The plan is to remove the ground effects, convert to the 85-90 bumpers, fix the rust, add subframe connectors, and transplant a LS, T-56 Magnum, and Strange Engineering S60. I have already removed the ground effects and interior and will be putting in the subframe connectors as well as fixing the rust here soon.I have everything for the S60 sitting in pieces waiting for me to get off my *** and put it together.
If there is enough interest (as in if anyone at all is interested) I will turn this into a build thread and regularly update it as I am working on the car.
Anyway, thanks for letting me be a part of this great site dedicated to some great cars.
Ground effects and mounts are gone. Front and rear bumper covers removed.
I've laid out the "new" fenders. The bottoms of the original fenders were crushed by a floor jack prior to my purchase. The ground effects hid the damage, so I will be recreating the hole where the fenders bolt to the unibody.
I noticed the difference right away when I installed my connectors. Tightened up the body and the feel in the corners is noticeable.
Unfortunately, this one was not running when I bought it and it's been 25 years since I've driven one, so I will have no recent frame of reference. I've heard they make a big difference. I will end up adding a wonder bar to the front subframe as well.
Three of the most important tools I've used on the disassembly. Snack size bags for screws, bolts, and other fasteners. Black sharpee to label what they go to and masking tape for attaching them to the part. Also, I use the masking tape to label electrical connections.
My two candidates for the LS swap. The left one is a 6.0 (I didn't paint it that color) and the right one is a 5.3 (4.8, but I have a 5.3/6.0 crank for it).
Looks like a real solid car to start with. Interesting project for sure! Do those SF connectors install actually through and into the floor pans?
Yeah, they're the Jegs bolt on connectors, but I will also be welding them in multiple spots before it is done. I also have Heidt's inner subframe connectors that I will be doing the same thing, bolting and welding them.
Ground effects and mounts are gone. Front and rear bumper covers removed.
I've laid out the "new" fenders. The bottoms of the original fenders were crushed by a floor jack prior to my purchase. The ground effects hid the damage, so I will be recreating the hole where the fenders bolt to the unibody.
I need to get the front clip off my 87 GTA so I can adjust the headlight, it sits to low and catches the front edge when it opens. Any tips or things to look out for?
So I didn't see an introduction thread, if I missed it I apologize. I'm a middle aged car guy in the midwest (IN) who as a teenager read every issue of Hot Rod and Car Craft magazines I could get my hands on. I took shop class in high school and loved working on cars. After high school I worked as an assistant mechanic at a small car lot for awhile.
My senior year I owned a 1987 Firebird with a 305 4bbl and 700R4. I loved that car, but had to sell it a few years later when I was going to college and lost my job. I always wanted to track it down, but could not find anything with the VIN on it. The next owner was a friend of my sister, but they no longer had the VIN or remembered who they sold it to (It has been over 20 years ago, so I can't blame them).
So fast forward to earlier this year where I saw a 1991 base model for sale for $850. I made the three hour trip with my wife pulling a rented U-haul car trailer and brought it home. Now that summer projects are over I have been spending a lot of time working on the car. I'm calling it the Negative One as I am converting it from a 1991 with ground effects to a 1990 Base/Formula look.
This is what I'm starting with. Crappy paint job and decals, broken and missing ground effects, and a small fuel leak. The plan is to remove the ground effects, convert to the 85-90 bumpers, fix the rust, add subframe connectors, and transplant a LS, T-56 Magnum, and Strange Engineering S60. I have already removed the ground effects and interior and will be putting in the subframe connectors as well as fixing the rust here soon.I have everything for the S60 sitting in pieces waiting for me to get off my *** and put it together.
If there is enough interest (as in if anyone at all is interested) I will turn this into a build thread and regularly update it as I am working on the car.
Anyway, thanks for letting me be a part of this great site dedicated to some great cars.
Originally Posted by rhyno91
Yeah, they're the Jegs bolt on connectors, but I will also be welding them in multiple spots before it is done. I also have Heidt's inner subframe connectors that I will be doing the same thing, bolting and welding them.
Welcome aboard! You sure haven't wasted any time digging into the car, looks like a great candidate! I just got back my old 1989 with plans to do things not too dissimilar!
I'm looking forward to seeing those subframe connectors installed. I had thought about getting a weld in set, but watching some online tear out the floorpan to install the Detroit Speed ones, I discounted the possibility.
I need to get the front clip off my 87 GTA so I can adjust the headlight, it sits to low and catches the front edge when it opens. Any tips or things to look out for?
Start from the bottom of the bumper by popping
out the retaining clips, I'd then remove the nuts inside the front of the fenders, and finally take out the top bolts. The bumper cover should come off pretty easy after that. The worst part for me was laying on my back to remove the bolts inside the front of the fender. At least that's how I did it.
Welcome aboard! You sure haven't wasted any time digging into the car, looks like a great candidate! I just got back my old 1989 with plans to do things not too dissimilar!
I'm looking forward to seeing those subframe connectors installed. I had thought about getting a weld in set, but watching some online tear out the floorpan to install the Detroit Speed ones, I discounted the possibility.
Keep up the good work!
Thank you, today I removed the fuel lines and I am in the process of removing the fuel tank, then I will get back to the subframe connectors and patching the floor pans.
Welcome aboard rhyno91! Looks like a great car to start with. You certainly got it at a good price.
Thank you. When I saw it listed, I immediately contacted the guy and said I would give him the exact amountt he was asking and would be there Saturday morning with a trailer.
Start from the bottom of the bumper by popping
out the retaining clips, I'd then remove the nuts inside the front of the fenders, and finally take out the top bolts. The bumper cover should come off pretty easy after that. The worst part for me was laying on my back to remove the bolts inside the front of the fender. At least that's how I did it.
I believe the forum owner has the site configured to count posts in certain sub-forms, and not in others. This is not an uncommon tactic to prevent those who seek a high post count from clutter up the forum with lots of useless threads. My guess would be that this Detailing & Appearance sub-forum is one area where posts don't count toward your total.
I believe the forum owner has the site configured to count posts in certain sub-forms, and not in others. This is not an uncommon tactic to prevent those who seek a high post count from clutter up the forum with lots of useless threads. My guess would be that this Detailing & Appearance sub-forum is one area where posts don't count toward your total.
Interesting, thanks for the clarification. This thread is where I will probably do 99% of my posting, so I guess my count will stay low.
I removed the fuel and brake lines this week. I also removed the fuel tank. Since I will be doing a fair amount of welding under the car, I prefer not to explode. I plan to switch to a 4th gen plastic tank when I begin reassembly.
I didn't take any pictures of the tank removal, just did a lot of swearing. I had to cut the bolt off where the upper panhard bar bolts to the bracket above the lower panhard bar. It had gotten so corroded it fused with the bushing.
Fortunately, the upper panhard bar was the same from 82-02, so a replacement is cheap on ebay. I have considered getting an aftermarket bar with the drop bracket to run a larger exhaust, but I am unsure what it may do to the suspension geometry.
I have been fighting with the Heidts inner subframe connectors. They require a lot of hammering to get a decent fit. I'm honestly a little unimpressed with their construction. Not durability wise, they are really solid, but the fit leaves much to be desired. The Jegs outer connectors fit great.
I will get some more pictures up this weekend.
I have considered getting an aftermarket bar with the drop bracket to run a larger exhaust, but I am unsure what it may do to the suspension geometry.
The upper pan hard rod support should stay straight other wise the curved aftermarket pieces are more of a spring, with that said I do run the UMI piece, as with their other parts it�s a well made part, I do wish they would offer a straight bar though.
Originally Posted by rhyno91
I have been fighting with the Heidts inner subframe connectors. They require a lot of hammering to get a decent fit. I'm honestly a little unimpressed with their construction. Not durability wise, they are really solid, but the fit leaves much to be desired. The Jegs outer connectors fit great.
I will get some more pictures up this weekend.
Ive got the bolt in�s, probably took me a week and a half of working on these almost every night to where I was satisfied with the fitment, a lot of massaging with a 4 pound sledge of the frame rails, body and SFC�s, I just contributed it fitting them to a 30 year old car. I have though about installing the JEGS as well in the future.
The upper pan hard rod support should stay straight other wise the curved aftermarket pieces are more of a spring, with that said I do run the UMI piece, as with their other parts it�s a well made part, I do wish they would offer a straight bar though.
Ive got the bolt in�s, probably took me a week and a half of working on these almost every night to where I was satisfied with the fitment, a lot of massaging with a 4 pound sledge of the frame rails, body and SFC�s, I just contributed it fitting them to a 30 year old car. I have though about installing the JEGS as well in the future.
Thanks. I have the bolt in Heidts as well. I plan to weld them if I ever get them in. My car is a V6 hard top, so I doubt the chassis flexed much over the years. The passenger side was terrible. I've had to hammer on it and use a die grinder to get a decent fit. I am in the process of drilling a new bolt hole as the rear hole on the front mount looks like It will be too close to the bottom of the subframe.
I don't regret getting them as I think tthey will really stiffen things up, I'm just surprised at the overall fit. Maybe they intentionally make them a little loose to fit cars that have seen more flex.
Welcome to TGO and great saving that car from something worse. Looking forward to the build.
Are the Heidts the same as what TDS sells? The tubular that hug the floor boards. If so, im surprised they dont fit better. My friend put Lons (TDS) on his vert and they went on pretty hassle free.
Welcome to TGO and great saving that car from something worse. Looking forward to the build.
Are the Heidts the same as what TDS sells? The tubular that hug the floor boards. If so, im surprised they dont fit better. My friend put Lons (TDS) on his vert and they went on pretty hassle free.
Thank you! They probably are the same. The tubes actually follow the contours of the floor pans well, just the brackets are very loose and somewhat angled. Maybe they do that to compensate for cars that have seen some chassis flex. I don't regret buying them and will definitely use them, I'm just a little dissapointed with the fit. I will take some pics tomorrow and post them.
So I had to work Saturday and as a result did not get a lot done on the car. I got the inner subframe connectors mocked up and now only have the front of the passenger side outer connector to mount. I'm not bolting them all the way down yet as I still need to clean up the rust and patch the holes. I will also prime and paint all the underbody areas around the connectors except where I plan to weld them.
I am also almost done cleaning off all the carpet adhesive. I spent quite awhile with a scraper and the heat gun working on it and following up with steel wool and Goof Off. I need to finish cleaning up the passenger floor board and then I will work on the adhesive in the trunk area.
I had to cut a lot of rust and damaged metal out of the driver's side. Fortunately, the passenger side is not nearly as rusty, I just have to patch a couple of spots. I did break down and order new rocker panels from Classic Industries as I will otherwise spend far too long trying to fabricate patches. So far, so good.
Theyre not that bad, the sfc. They fit as well as I've seen. My friend had minor issues getting the ends to fit on fully.
I remember mine being roughly the same 20 years ago.
All four connectors are now mocked up. I will be taking them down to paint the areas they cover before finally bolting them into place and then welding them.
Close up of all I had to cut away to get the passenger side connector to fit up. The rocker panel on this side was a rusted mess that had been crushed by a poorly placed floor jack.
JUST TO BE CLEAR.....the poorly placed floor jack was done by the previous owners. I've always jacked cars up by the A-arms and axles if I had any question about other spots. At least now I will have the option of placing a jack under the subframe connectors should the need ever arise.
Fitment looks good, surprised how well the Jegs fit. Hope those classic pieces fit as well as they look. Are those OER brand?
I had to do a little bending on the passenger side Jegs connector, but it fit pretty well. The rockers aren't listed as OER on the website or the invocie, so I am not sure. I will definitely update how they fit up as I go.
I wire brushed and cleaned some hard to reach areas. I then painted them with Rustoleum Rusty Metal Primer. I'll probably double tap it with Eastwood before I seal it up.
I also cleaned up and painted a few areas with Chassis Saver. Primarily where the subframe connectors will make unaccessable once they are bolted and welded in.