Started my T5 swap today...Goodbye 700R4!
 09-04-2010, 09:00 PM
#1
Started my T5 swap today...Goodbye 700R4!
I got a late start on my auto to 5spd swap today. Finally got the car on stands at about 4:30 and began removing everything. Took me a while to get the tranny bellhousing bolts out, they were just in an awkward position. Tried to save the cooler lines but wound up just cutting them to get 'em out of the way; no biggie. Wound up dropping the trans with the fluid in it; just put the driveshaft back in before dropping it down and then emptied it later. The fluid was BROWN. I'm giving the trans to my boss who will be rebuilding it before it goes into his '48 Chevy truck behind... get this... a 2.3 Liter Cummins diesel engine.
Tomorrow I think I'll put the flywheel, clutch, pressure plate and bellhousing on and then start on my pedal swap. It really seems like it should be fairly straight forward from here on.
I took some pics of the progress but then left the camera at the shop so they'll have to wait until tomorrow.
....more to come....
 09-04-2010, 09:03 PM
#2
Member
iTrader: (4)

Join Date: Aug 2009
Location: Underhill,vt
Posts: 160
Likes: 0
Received 1 Like
on
1 Post
Car: 98 camaro ss, 98 grand cherokee 5sp
Engine: 5.7 ls1, 4.0 sixxer
Transmission: T56, ax15 swapped
Axle/Gears: 3.42, 3.73
Re: Started my T5 swap today...Goodbye 700R4!
yeah t-5!! it will go smooth as long as you have the right mount, crossmember, flywheel correct to engine year, ( ie pre 86 and post 86) and starter. you need a flywheel and starter for the t-5 specifically
09-04-2010, 09:05 PM
#3
Junior Member
iTrader: (1)

Join Date: Jun 2010
Location: Ohio
Posts: 23
Likes: 0
Received 0 Likes
on
0 Posts
Car: 1985 Camaro Z28
Engine: 355
Transmission: 700r4
Axle/Gears: 7.5 with 4.11 gears
Re: Started my T5 swap today...Goodbye 700R4!
i started swaping mine out today also, i'm pretty tired of the auto, all i have to do is put the peddles in and the clutch stuff in. i'll be happy to drive my car again. i think putting the peddles in will be the roughest part of the whole swap
09-04-2010, 09:17 PM
#4
Re: Started my T5 swap today...Goodbye 700R4!
As for the crossmember, its the same for 700 and T5.
I bought a starter with the transmission because I was told its the T5 starter; however I took out my old one and its smaller than the one I bought! I guess I'll reuse my original one and keep the other as a backup.
i started swaping mine out today also, i'm pretty tired of the auto, all i have to do is put the peddles in and the clutch stuff in. i'll be happy to drive my car again. i think putting the peddles in will be the roughest part of the whole swap
Definitely not looking forward to the pedal swap. Not only does cutting the hole not look fun, but my car has a keyless entry system wired in and the underside of the steering column looks like a rats nest of wires. Previous owners...
")
Last edited by Dante93GTZ; 09-04-2010 at 09:21 PM.
09-05-2010, 06:22 PM
#5
Re: Started my T5 swap today...Goodbye 700R4!
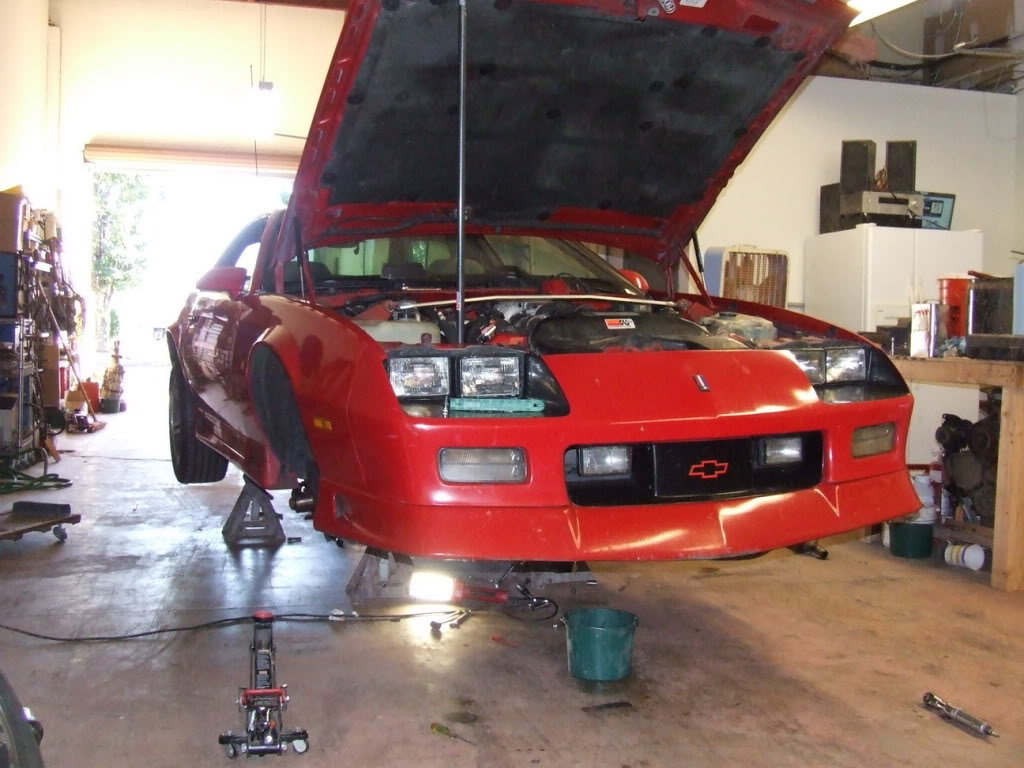
The car as she sits currently....
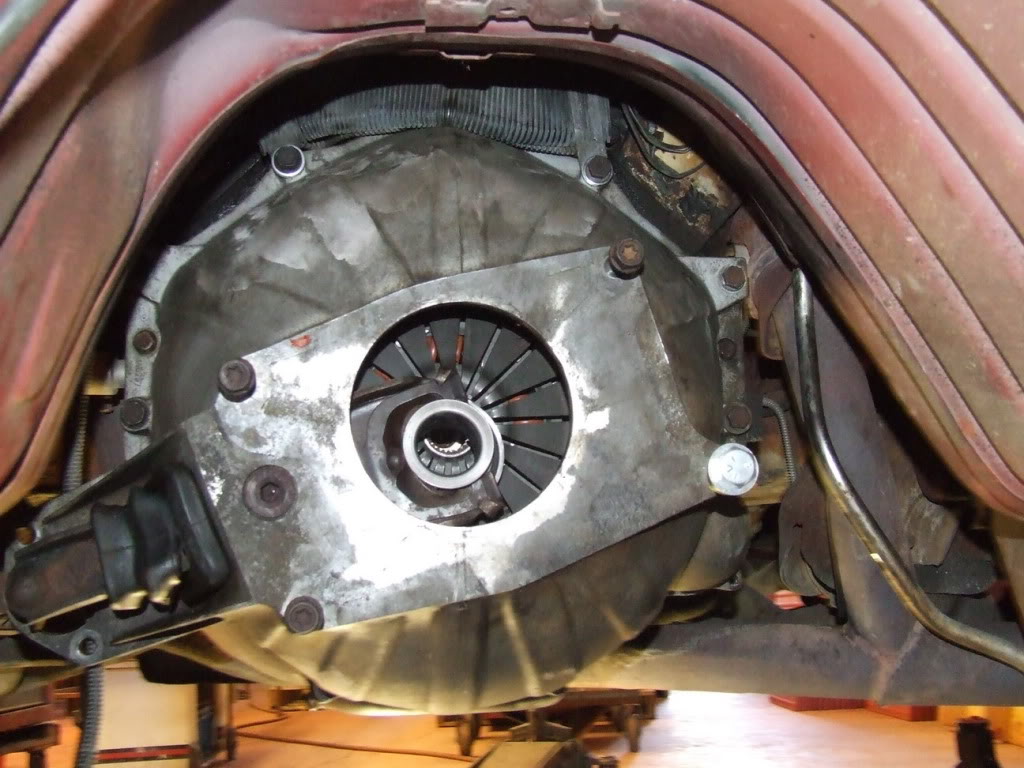
Well, I started earlier today and got the flywheel, clutch disc, pressure plate, fork/throwout bearing, and bellhousing on. I found that there was one of the 4 tranny-to-bellhousing bolts that was stripped so I had to drill and retap it a size bigger.
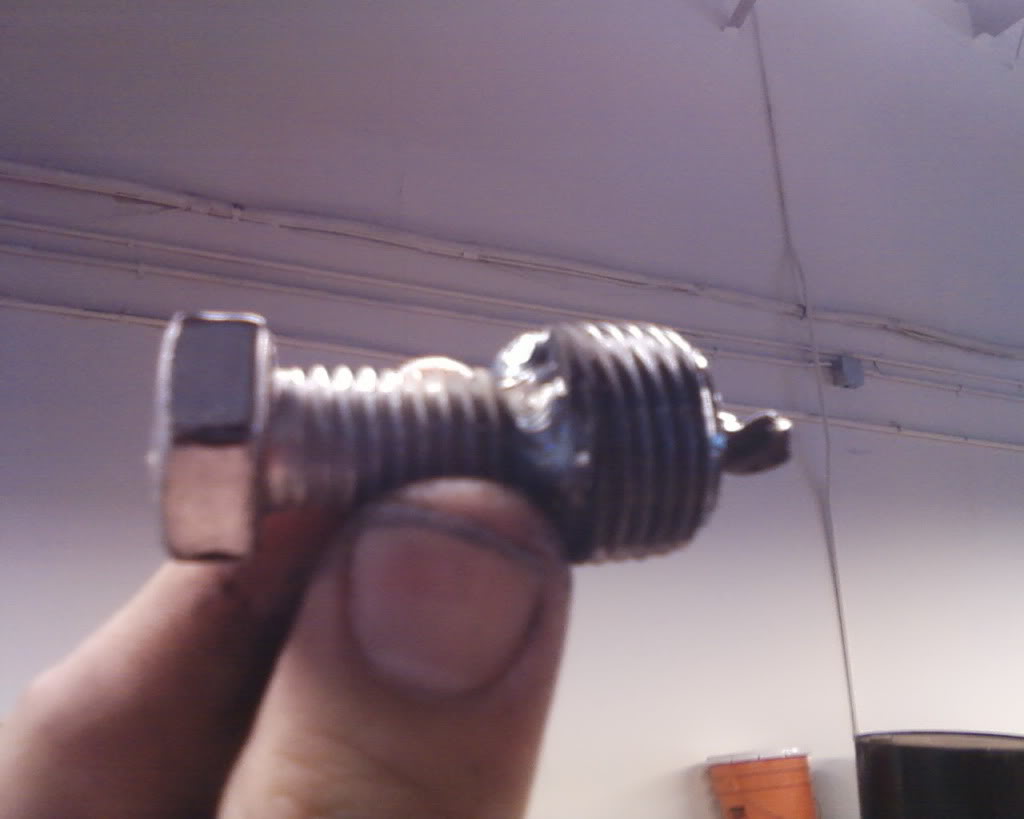
I also found out that it would appear I had the smaller starter to begin with. Both my original one and the one I bought for the swap are basically the same:
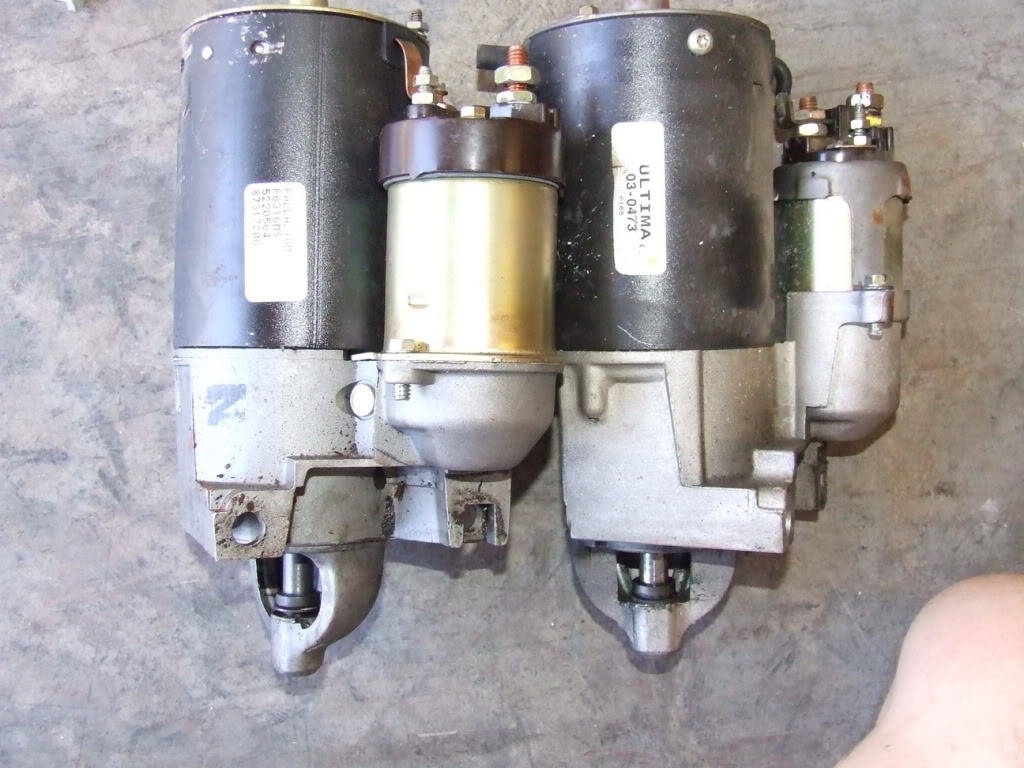
I used the one on the right and everything bolted up fine so I'm gonna guess its the correct one.
I took the pedal assembly out and didn't get much further - My friend was supposed to come help with this step and he couldn't make it, sooooo....
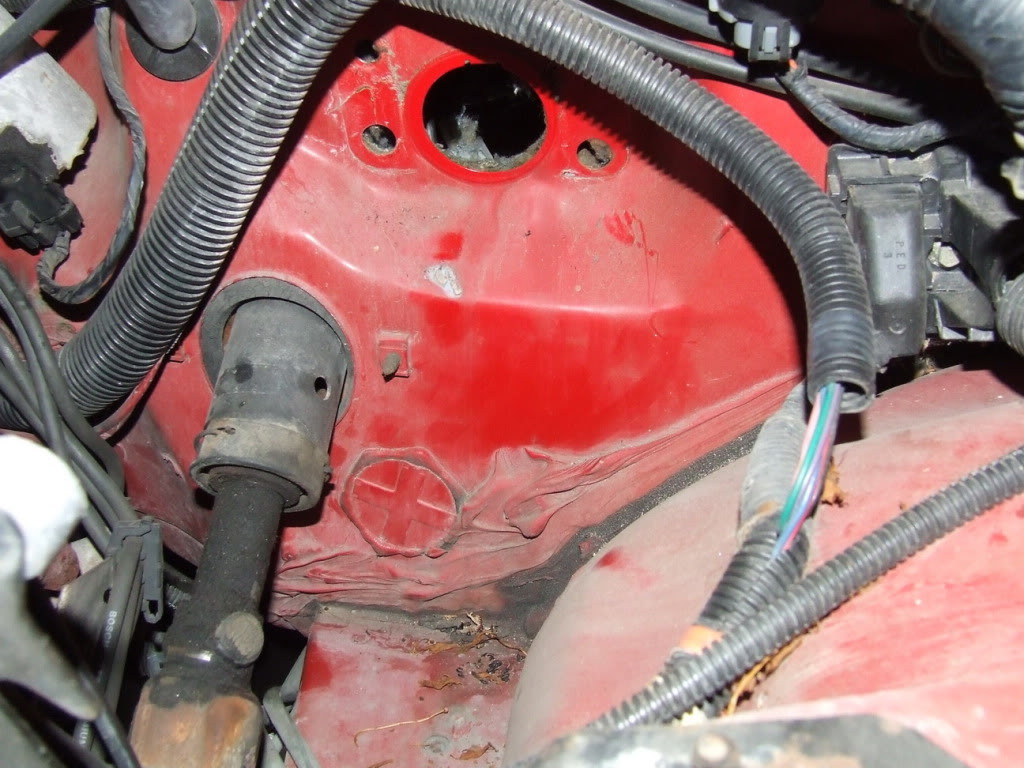
Oh yeah, see what I mean by previous owner's rats nest??

I found no knockout or anything to make the master cylinder hole cutting any easier. I'm still waiting on a little help here as I don't feel comfortable making the cut:
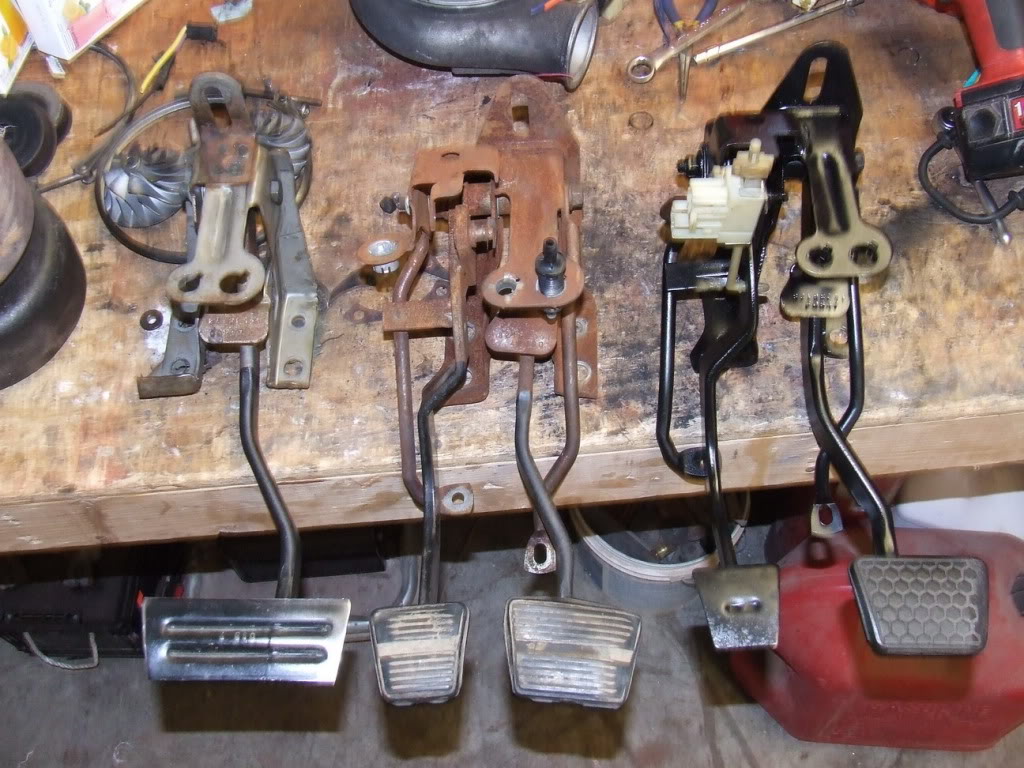
In my waiting for help; I studied the pedals; I have 2 sets of 5spd pedals; one is from an '85 Z28 and the other is out of a '91 Z28 vert. They look identical with the exception of the clutch master cylinder attachment point; The '91 is a tad smaller; I'm going to try and fabricate a sleeve for the attachment tab so that there is no play on the master cylinder. We'll see. I also had finished giving my '91 pedals a coat of paint. I had sandblasted them a few weeks ago; they started out as ugly as the '85 pedals. Makes me wonder why anyone trying to sell a set on Ebay wouldn't take the time to make 'em look better?!?
Anyway, I've got to do a couple things before I can get the T5 itself in:
- Drill/retap the upper torque arm mount hole - I discovered that its stripped
- Weld/Fix the torque arm mount; its got a tear in it
- Get the upper fill plug out; its stripped

Thats all for now; hopefully I get a chance to do a little more maybe tomorrow. *fingers crossed*
Well, I started earlier today and got the flywheel, clutch disc, pressure plate, fork/throwout bearing, and bellhousing on. I found that there was one of the 4 tranny-to-bellhousing bolts that was stripped so I had to drill and retap it a size bigger.
I also found out that it would appear I had the smaller starter to begin with. Both my original one and the one I bought for the swap are basically the same:
I used the one on the right and everything bolted up fine so I'm gonna guess its the correct one.
I took the pedal assembly out and didn't get much further - My friend was supposed to come help with this step and he couldn't make it, sooooo....
Oh yeah, see what I mean by previous owner's rats nest??
I found no knockout or anything to make the master cylinder hole cutting any easier. I'm still waiting on a little help here as I don't feel comfortable making the cut:
In my waiting for help; I studied the pedals; I have 2 sets of 5spd pedals; one is from an '85 Z28 and the other is out of a '91 Z28 vert. They look identical with the exception of the clutch master cylinder attachment point; The '91 is a tad smaller; I'm going to try and fabricate a sleeve for the attachment tab so that there is no play on the master cylinder. We'll see. I also had finished giving my '91 pedals a coat of paint. I had sandblasted them a few weeks ago; they started out as ugly as the '85 pedals. Makes me wonder why anyone trying to sell a set on Ebay wouldn't take the time to make 'em look better?!?
Anyway, I've got to do a couple things before I can get the T5 itself in:
- Drill/retap the upper torque arm mount hole - I discovered that its stripped
- Weld/Fix the torque arm mount; its got a tear in it
- Get the upper fill plug out; its stripped
Thats all for now; hopefully I get a chance to do a little more maybe tomorrow. *fingers crossed*
The following users liked this post:
TTOP350 (04-28-2024)
09-05-2010, 08:23 PM
#6
Member

Join Date: Mar 2010
Location: Toronto, Ontario
Posts: 399
Likes: 0
Received 1 Like
on
1 Post
Car: 88 (SOLD) & 90 Iroc convertibles
Engine: 5.0 TPI, 5.0 TPI
Transmission: 5 speed & auto
Axle/Gears: 3.08 & 2.73
Re: Started my T5 swap today...Goodbye 700R4!
looks straight forward to install.......might just try doing a swap on my 90 vert
would like to see pics of the pedal install to see how difficult it might be
Looks good!
would like to see pics of the pedal install to see how difficult it might be
Looks good!
09-05-2010, 09:46 PM
#7
Re: Started my T5 swap today...Goodbye 700R4!
As for the pedal swap; I can take pics but all the wiring really makes it hard to get good pics. Is there a specific pic/angle you need? I'm really not sure yet how I'm going to get everything aligned properly - That's where my boss comes into the picture; he's always good at makin' stuff work properly and doesn't get insanely stressed out when wrenchin'.

Trending Topics
09-07-2010, 02:29 PM
#8
Re: Started my T5 swap today...Goodbye 700R4!
Didn't get much accomplished today. I fought with the damn fill plug and lost majorly. I tried everything I could think of and couldn't get it out - Lost an easy-out in the effort - broke off in the plug... Just freakin' awesome.
I located the hole for the shifter and made about a 1.5" holesaw cut - When I actually get the trans mounted permanently, I'm just going to cut the floor as far back as needed; no more.
I had to weld back my torque arm mount; which was torn. Got it all looking really nice and then found out my ES bushing is the wrong one.
I'm just gonna leave it alone until I can get a hand to finish. I'm getting too pissed with the small stuff.
09-07-2010, 03:21 PM
#9
Supreme Member
iTrader: (1)
Join Date: Feb 2000
Location: Norfolk, VA. USA
Posts: 7,964
Likes: 0
Received 3 Likes
on
3 Posts
Car: 86 Trans Am, 88 Formula
Engine: 95LT4, 305TPI
Transmission: T56, T5
Re: Started my T5 swap today...Goodbye 700R4!
Don't forget to put a pilot bushing into the hole in the crank.
 09-08-2010, 09:38 AM
#11
Re: Started my T5 swap today...Goodbye 700R4!
Finally got the damn fill plug out - It was a BITCH. Broke an easy out off inside it too.
My boss welded a 1/2" bolt onto it and then we applied some heat and out she came:
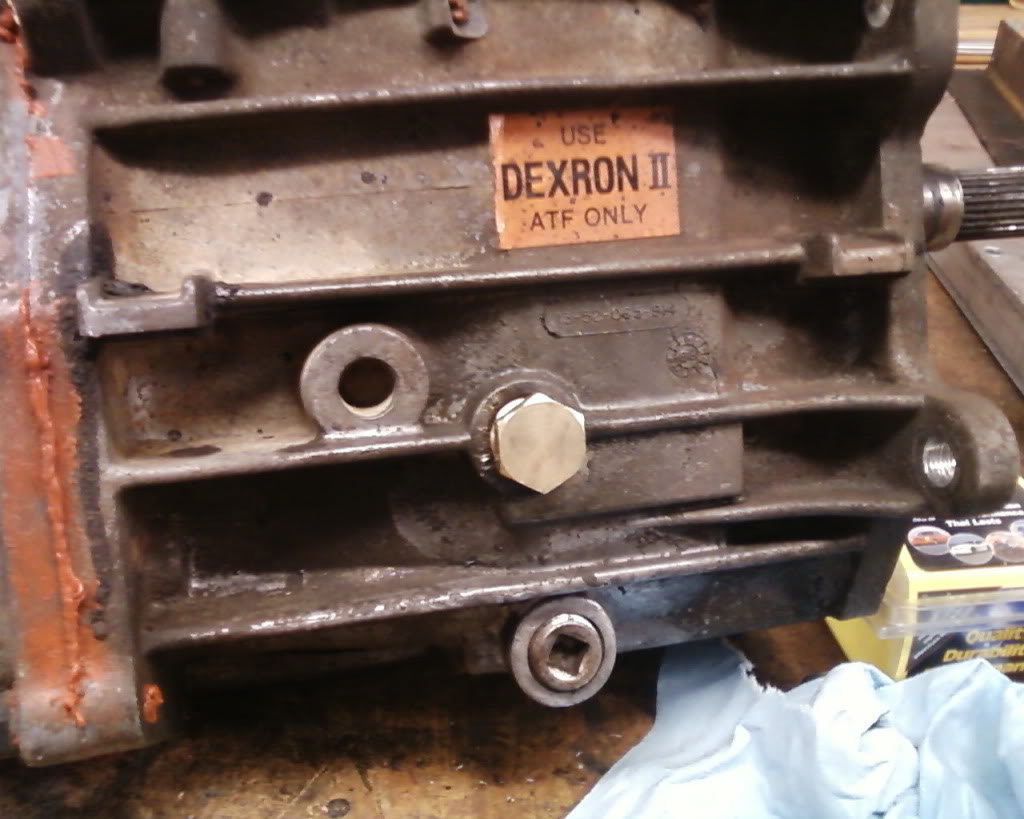
Hopefully we'll get this damn thing in now.
My boss welded a 1/2" bolt onto it and then we applied some heat and out she came:
Hopefully we'll get this damn thing in now.
 09-09-2010, 07:10 AM
#13
Re: Started my T5 swap today...Goodbye 700R4!
Well, I finally finished up the initial work. MY PICTURES ARE ON MY PHONE RIGHT NOW - I'LL ADD THEM TO THIS THREAD LATER TODAY.
I got the trans in and cut my shifter hole - I cut in so there's only about 1/2" all the way around it. I don't seem to have any issues of it hitting under accel/decel, so I think I'm good - I just didn't want this huge gaping hole in my floor.

Also got the pedals installed and the master cyl in - Honestly, I really freaked myself out here for nothing. Here's the way I did it:
First, I located the pedals by installing the top bolt (under the dash), then a single bolt on the brake booster. I pushed the two master cylinder brackets (on the pedal assembly) against the firewall and used a template (you could use the gasket too) and once the two bracket/arms were in position with the template holes, I made a small drillshot through each one.
Then I removed the brake booster (leaving the pedal assembly hanging by the top bolt on the dash).
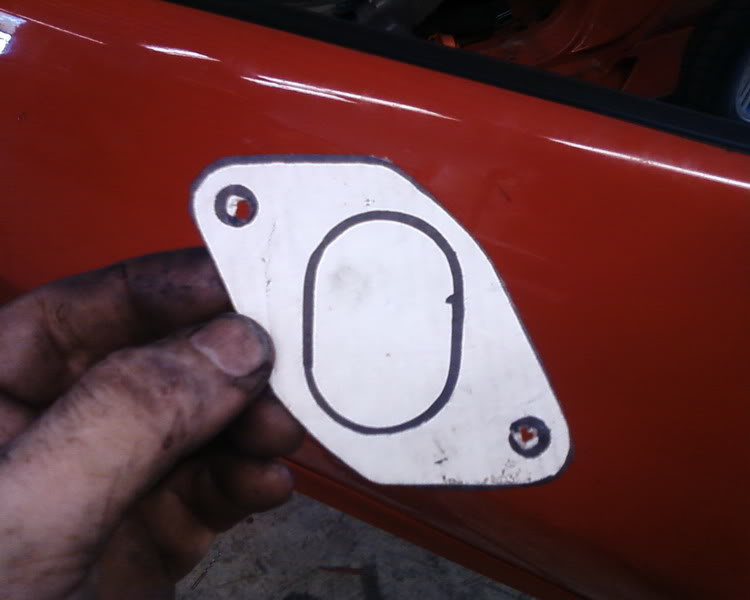
I then drilled them out from the engine side just big enough to get the master cylinder U-bolt through. Once the holes were drilled, I used the gasket on the engine side of the firewall and lined it up with my two bolt holes. I traced the inside of the gasket to mark my oval hole.
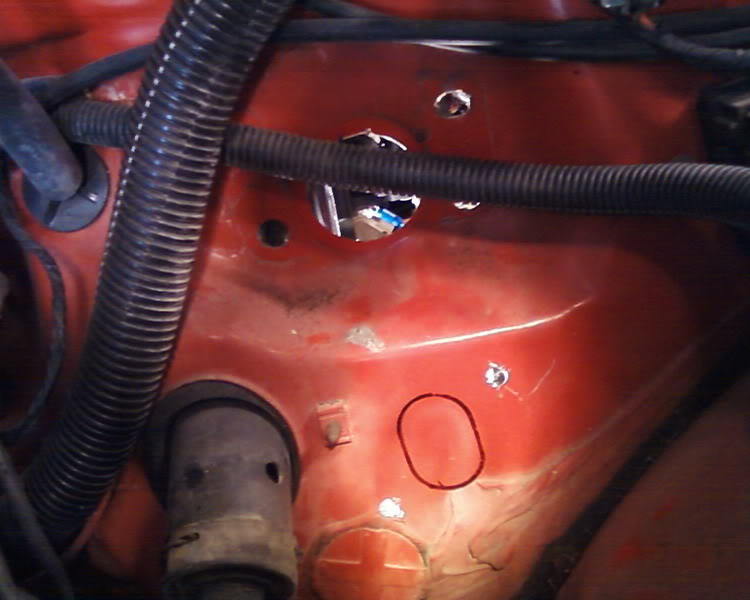
^^ Looks crooked; its not, its the camera angle. ^^
Then I simply used a hole saw that was the right size and cut the top of the oval out. I then used a small air saw (very small sawzall) to cut the excess and then a dye grinder to smooth it out.
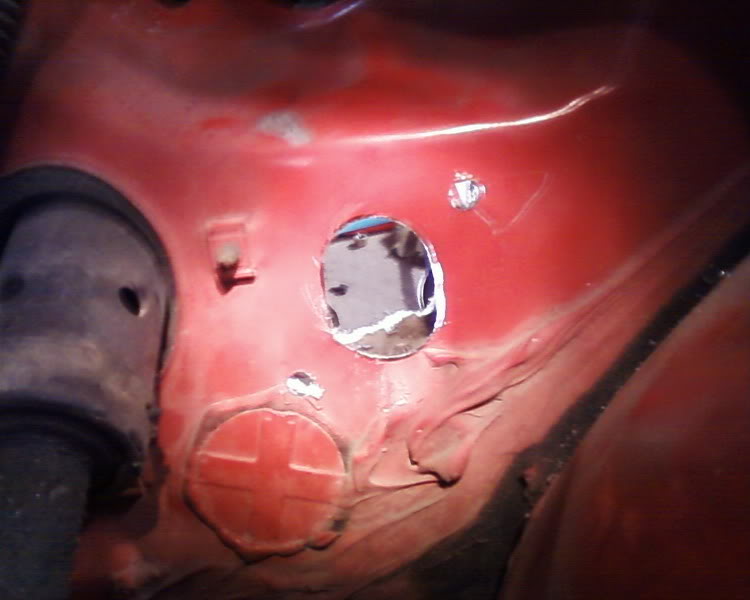
^^ Before I smoothed it all out ^^
I've not seen others do this but I used some primer around the exposed metal for the master cylinder and the shifter cutout.
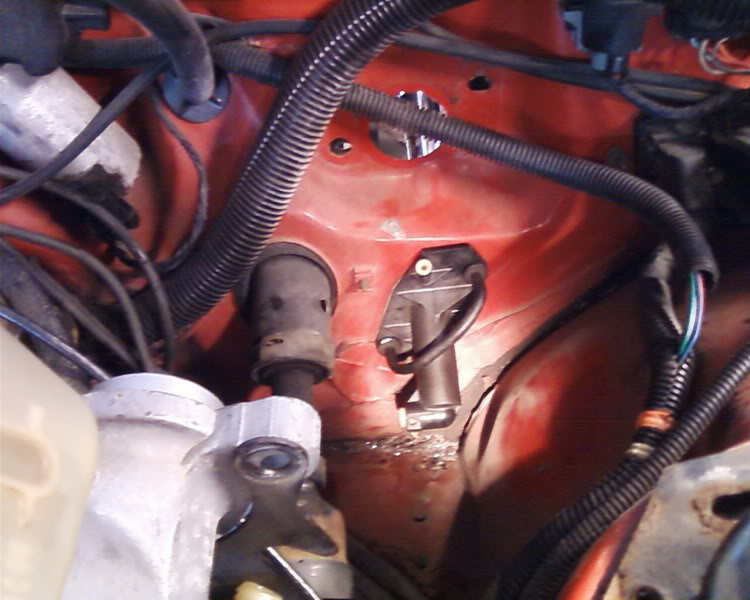
To remount the pedals I started out by loosely bolting in the master cylinder with the U-bolt (I had already installed my lines on it since I was basically READY and since it would be harder with the booster in the way). It was snug, but not tight. Since the U-bolt connects to the arms on the pedals, it kept everything in place. I then put the brake booster back in place and tightened everything back up. I had to loosen the U-bolt nut closest to the passenger side and move the arm out of the way to get the two booster nuts tight, then put it back in place. Snug it all down and you're done! I did this by myself and didn't have any alignment issues with anything. Oh, and don't forget your switches on your pedals. The only two I'll be using are my brake light switch (swapped from the orig. pedals) and the switch on the clutch that has the slide rod on it.
It worked REALLY well, considering having read other people's horror stories about needing extra people to hold things in place.
Moving on; the slave cylinder was a piece-o-cake. Bleeding the system took much longer than I expected; I must have pumped the pedal for a good 20 minutes. I did pumped the pedal until all of the bubbles had come through the reservoir (and they sure did, like a million of 'em).
After making sure everything else was buttoned up and getting this odds and ends in like driveshaft, torque arm, putting the dist. cap back on, etc, we fired it up. Oh yes, since I'll be wiring my clutch pedal switch up later on, we just temp'd the starter switch by using a paperclip to jump the two biggest wires on the old shifter wire connector (purple and tan/yellow).
It initially wouldn't shift into gear. I wasn't getting enough clutch fork movement. The hydraulics were fine so we started pointing to the pivot ball of the fork itself - The ball was in all the way. We took it out and found that it was pretty badly worn. I verified I could get a new one from Vintage Auto and we 'modified' this one for temporary. We ground the extra material off the head that prevented it from going any further in and sunk it about 1/4" further in. I now had good clutch fork movement and could shift into gear.
It was a temp fix and the car will not be driven this way; I just needed a way to verify that it was a pivot ball / fork issue before I spent the money on those parts. I'll order the parts on Friday so hopefully I'll have 'em next week.
So that's where I'm at for now. All in all, if I had to do this again it would go A LOT quicker. My fears over drilling holes in the firewall quickly vanished after I'd cut the holes - I honestly psyched myself out thinking it was going to be sooo much harder than it was.
I did a test drive around the block and though I really didn't get on it (brand new clutch), I did notice that my 2.73 gears just aren't going to cut it with this swap. The car moves nice and its not like it struggles, but it definitely felt faster with the automatic (at least as far as when it downshifted when you stepped on it). I'll be getting some 3.42s at some point.
I got the trans in and cut my shifter hole - I cut in so there's only about 1/2" all the way around it. I don't seem to have any issues of it hitting under accel/decel, so I think I'm good - I just didn't want this huge gaping hole in my floor.
Also got the pedals installed and the master cyl in - Honestly, I really freaked myself out here for nothing. Here's the way I did it:
First, I located the pedals by installing the top bolt (under the dash), then a single bolt on the brake booster. I pushed the two master cylinder brackets (on the pedal assembly) against the firewall and used a template (you could use the gasket too) and once the two bracket/arms were in position with the template holes, I made a small drillshot through each one.
Then I removed the brake booster (leaving the pedal assembly hanging by the top bolt on the dash).
I then drilled them out from the engine side just big enough to get the master cylinder U-bolt through. Once the holes were drilled, I used the gasket on the engine side of the firewall and lined it up with my two bolt holes. I traced the inside of the gasket to mark my oval hole.
^^ Looks crooked; its not, its the camera angle. ^^
Then I simply used a hole saw that was the right size and cut the top of the oval out. I then used a small air saw (very small sawzall) to cut the excess and then a dye grinder to smooth it out.
^^ Before I smoothed it all out ^^
I've not seen others do this but I used some primer around the exposed metal for the master cylinder and the shifter cutout.
To remount the pedals I started out by loosely bolting in the master cylinder with the U-bolt (I had already installed my lines on it since I was basically READY and since it would be harder with the booster in the way). It was snug, but not tight. Since the U-bolt connects to the arms on the pedals, it kept everything in place. I then put the brake booster back in place and tightened everything back up. I had to loosen the U-bolt nut closest to the passenger side and move the arm out of the way to get the two booster nuts tight, then put it back in place. Snug it all down and you're done! I did this by myself and didn't have any alignment issues with anything. Oh, and don't forget your switches on your pedals. The only two I'll be using are my brake light switch (swapped from the orig. pedals) and the switch on the clutch that has the slide rod on it.
It worked REALLY well, considering having read other people's horror stories about needing extra people to hold things in place.
Moving on; the slave cylinder was a piece-o-cake. Bleeding the system took much longer than I expected; I must have pumped the pedal for a good 20 minutes. I did pumped the pedal until all of the bubbles had come through the reservoir (and they sure did, like a million of 'em).
After making sure everything else was buttoned up and getting this odds and ends in like driveshaft, torque arm, putting the dist. cap back on, etc, we fired it up. Oh yes, since I'll be wiring my clutch pedal switch up later on, we just temp'd the starter switch by using a paperclip to jump the two biggest wires on the old shifter wire connector (purple and tan/yellow).
It initially wouldn't shift into gear. I wasn't getting enough clutch fork movement. The hydraulics were fine so we started pointing to the pivot ball of the fork itself - The ball was in all the way. We took it out and found that it was pretty badly worn. I verified I could get a new one from Vintage Auto and we 'modified' this one for temporary. We ground the extra material off the head that prevented it from going any further in and sunk it about 1/4" further in. I now had good clutch fork movement and could shift into gear.
It was a temp fix and the car will not be driven this way; I just needed a way to verify that it was a pivot ball / fork issue before I spent the money on those parts. I'll order the parts on Friday so hopefully I'll have 'em next week.
So that's where I'm at for now. All in all, if I had to do this again it would go A LOT quicker. My fears over drilling holes in the firewall quickly vanished after I'd cut the holes - I honestly psyched myself out thinking it was going to be sooo much harder than it was.
I did a test drive around the block and though I really didn't get on it (brand new clutch), I did notice that my 2.73 gears just aren't going to cut it with this swap. The car moves nice and its not like it struggles, but it definitely felt faster with the automatic (at least as far as when it downshifted when you stepped on it). I'll be getting some 3.42s at some point.
Last edited by Dante93GTZ; 09-09-2010 at 09:26 AM.
09-09-2010, 11:01 AM
#15
Junior Member

Join Date: Sep 2010
Posts: 59
Likes: 0
Received 0 Likes
on
0 Posts
Re: Started my T5 swap today...Goodbye 700R4!
did you notice any problems with the engine being tuned for an automatic? I would think the idle would be too high but I could be wrong. Its just something thats been nagging me because I want to do this with an L98 f body.
09-09-2010, 11:39 AM
#16
Re: Started my T5 swap today...Goodbye 700R4!
Idle was fine, although I did notice that after going for a few minutes and then stopping, it will just die. Something about the TCC stuff trying to work I guess.... not really sure. But aside from that, it idles perfectly.
Hopefully the computer is capable of learning and learns that it no longer has a slushbox attached to it.
Hopefully the computer is capable of learning and learns that it no longer has a slushbox attached to it.
09-09-2010, 11:55 AM
#17
Member
Join Date: Jul 2010
Location: MI
Posts: 109
Likes: 0
Received 0 Likes
on
0 Posts
Car: 85 Trans AM
Engine: Chevy 355
Transmission: T-5
Axle/Gears: 3.73
Re: Started my T5 swap today...Goodbye 700R4!
The swap is looking good!
Quick question,do you remember the size you needed to remove the torque arm?
Quick question,do you remember the size you needed to remove the torque arm?
09-09-2010, 12:45 PM
#18
Re: Started my T5 swap today...Goodbye 700R4!
On another note:
I did do some checking on the pivot ball and the fork, etc. I found that the pivot ball IS available from Vintage Auto with p/n 14036058. The fork is no longer available OEM; The fork boot is available from Vintage with p/n 14075724.
Just an FYI for those (like me) that need it!
09-09-2010, 02:07 PM
#19
Junior Member
Join Date: Sep 2010
Posts: 59
Likes: 0
Received 0 Likes
on
0 Posts
Re: Started my T5 swap today...Goodbye 700R4!
Idle was fine, although I did notice that after going for a few minutes and then stopping, it will just die. Something about the TCC stuff trying to work I guess.... not really sure. But aside from that, it idles perfectly.
Hopefully the computer is capable of learning and learns that it no longer has a slushbox attached to it.
Hopefully the computer is capable of learning and learns that it no longer has a slushbox attached to it.
 let us know if the computer learns or not because the stalling thing isn't something that gets mentioned in any of the T-5 swap articles I've read. One thing I did find is that the newer third gens use a speed sensor to determine idle, I think its called VSS and the car might have it if the speedo is electric. Not totally sure though.
09-09-2010, 02:10 PM
let us know if the computer learns or not because the stalling thing isn't something that gets mentioned in any of the T-5 swap articles I've read. One thing I did find is that the newer third gens use a speed sensor to determine idle, I think its called VSS and the car might have it if the speedo is electric. Not totally sure though.
09-09-2010, 02:10 PM
#20
Re: Started my T5 swap today...Goodbye 700R4!
Interesting let us know if the computer learns or not because the stalling thing isn't something that gets mentioned in any of the T-5 swap articles I've read. One thing I did find is that the newer third gens use a speed sensor to determine idle, I think its called VSS and the car might have it if the speedo is electric. Not totally sure though.
let us know if the computer learns or not because the stalling thing isn't something that gets mentioned in any of the T-5 swap articles I've read. One thing I did find is that the newer third gens use a speed sensor to determine idle, I think its called VSS and the car might have it if the speedo is electric. Not totally sure though.I can confirm though, the idle is 100% normal/fine, no issues at all.
09-09-2010, 02:25 PM
#21
Junior Member
Join Date: Sep 2010
Posts: 59
Likes: 0
Received 0 Likes
on
0 Posts
Re: Started my T5 swap today...Goodbye 700R4!
THAT could be it! The VSS connector on the T5 is different than the VSS on my 700R4 so I haven't hooked it back up yet; that may be it; although it wouldn't explain why the car shuts off only after being driven for a few miles; because the VSS wouldn't even know the car is moving with it being plugged in, right? Maybe its because the computer is getting info from the TPS but the VSS doesn't see the car moving....
I can confirm though, the idle is 100% normal/fine, no issues at all.
I can confirm though, the idle is 100% normal/fine, no issues at all.
 09-09-2010, 09:13 PM
#22
Supreme Member
iTrader: (1)
Join Date: Feb 2000
Location: Norfolk, VA. USA
Posts: 7,964
Likes: 0
Received 3 Likes
on
3 Posts
Car: 86 Trans Am, 88 Formula
Engine: 95LT4, 305TPI
Transmission: T56, T5
Re: Started my T5 swap today...Goodbye 700R4!
ECM will be fine once you get the VSS hooked up. I ran the Auto Prom for 2 years before burning a manual prom for the car and it ran fine with either prom.
09-10-2010, 06:25 AM
#23
Re: Started my T5 swap today...Goodbye 700R4!
Good to know - Since the trans came from an '89 car and my car is a '91, it looks like I'll have to spend the $100 for a 4000 VSS instead of the 2000 VSS that came with the trans... bummer.
09-12-2010, 04:52 PM
#24
Junior Member
iTrader: (1)
Join Date: Jun 2010
Location: Ohio
Posts: 23
Likes: 0
Received 0 Likes
on
0 Posts
Car: 1985 Camaro Z28
Engine: 355
Transmission: 700r4
Axle/Gears: 7.5 with 4.11 gears
Re: Started my T5 swap today...Goodbye 700R4!
I'm happy my car is an older one and doesn't have all the electronic stuff on it. I've been having trouble getting mine bled out. I drove it about 15 miles and my clutch stopped working. when I checked the fluid it was completly empty, hopefully it just still had air in it.
09-13-2010, 07:08 PM
#25
Re: Started my T5 swap today...Goodbye 700R4!
I'm happy my car is an older one and doesn't have all the electronic stuff on it. I've been having trouble getting mine bled out. I drove it about 15 miles and my clutch stopped working. when I checked the fluid it was completly empty, hopefully it just still had air in it.
09-16-2010, 08:39 AM
#26
Junior Member
iTrader: (1)
Join Date: Jun 2010
Location: Ohio
Posts: 23
Likes: 0
Received 0 Likes
on
0 Posts
Car: 1985 Camaro Z28
Engine: 355
Transmission: 700r4
Axle/Gears: 7.5 with 4.11 gears
Re: Started my T5 swap today...Goodbye 700R4!
I did the swap I originally had a 700 and I put a transgo shift kit in it and it messed up. I gave up on it and put a 5 speed in it. I've bleed it out twice now and it keeps messing up. I think the fluid is getting hot since the line runs about 2 inches from my headers. I'm going to try to wraping the line with header wrap and blead it out again. I may wrap my header also. I drove it yesterday and it did acted like it got air in the system again after driving it through town. I pumped it back up and it worked ok.
04-28-2024, 11:47 AM
#27
Junior Member

Join Date: Apr 2024
Posts: 3
Likes: 0
Received 0 Likes
on
0 Posts
Re: Started my T5 swap today...Goodbye 700R4!
I got a late start on my auto to 5spd swap today. Finally got the car on stands at about 4:30 and began removing everything. Took me a while to get the tranny bellhousing bolts out, they were just in an awkward position. Tried to save the cooler lines but wound up just cutting them to get 'em out of the way; no biggie. Wound up dropping the trans with the fluid in it; just put the driveshaft back in before dropping it down and then emptied it later. The fluid was BROWN. I'm giving the trans to my boss who will be rebuilding it before it goes into his '48 Chevy truck behind... get this... a 2.3 Liter Cummins diesel engine.
Tomorrow I think I'll put the flywheel, clutch, pressure plate and bellhousing on and then start on my pedal swap. It really seems like it should be fairly straight forward from here on.
I took some pics of the progress but then left the camera at the shop so they'll have to wait until tomorrow.
....more to come....
Tomorrow I think I'll put the flywheel, clutch, pressure plate and bellhousing on and then start on my pedal swap. It really seems like it should be fairly straight forward from here on.
I took some pics of the progress but then left the camera at the shop so they'll have to wait until tomorrow.
....more to come....

Thread
Thread Starter
Forum
Replies
Last Post
RedLeader289
Tech / General Engine
10
05-28-2019 01:47 PM
bigjay89gta
Engine/Drivetrain/Suspension Parts for Sale
12
10-15-2015 08:04 AM