
Panhard Relocation Bracket


Thread Starter
Banned
Joined: Jan 2005
Posts: 1,238
Likes: 0
From: Yes I'm Dean
Car: Agood2.8,
Engine: V6rsr,
Transmission: Afrikingoodtime
Panhard Relocation Bracket
I finally bit the bullet and got around to installing a panhard relocation bracket from Jegs. Have to say it is well made. It is designed for bolt-on, but I welded it in place. For added security, I left the center pin bolt in place in case of something ever cracking under the leverage. At least this way nothing would completely "come apart" in case of it breaking for some ungodly reason.
I knew the car had needed this for a few years now and haveto say it has performed to my expectations. I first installed it in the lowest mount hole to see how dramatically the car would change or react. It was in deed too drastic of a change an the nose became slighly heavy to steer. This car as stood turned into a corner like a jet fighter. It was very response, and very unforgiving for a novice driver having to brake suddenly and unload the rear. The lowest setting accually completely cured my brake bias due to eliminately some rear to front weight transfer that was causing the rears to lock much too soon, but the steering has suffered.
Now I rechecked things, and moved it back up one mounting notch (3rd hole down picture below). After just test driving it a second time, it feels a little better balanced giving a slight front response back, but not enough. I still need to go up one more notch to only the second hole down and the steering balance and weight transfer will be perfect. This is increasing the rear brake bias with every notch up (it was perfect on the bottom hole) so I will have to move it to the second adjustment hole and still add the Wilwood prop valve to reduce the rear bias. I am truely impressed how much noticiable each hole position change is for a tuning tool.
This was well worth it.

Supreme Member
Joined: Jul 2000
Posts: 1,787
Likes: 20
From: Tomball, TX
Car: 89 TTA
Engine: Turbo 3.8
Transmission: 200R4
Glad to hear it was a worthwild purchase, Dean. You should post this on the aftermarket product review board as well. 
Just a question though, why do you think the rear brake bias was perfect on the bottom hole?
Just a question though, why do you think the rear brake bias was perfect on the bottom hole?
Supreme Member
Joined: Jan 2005
Posts: 1,699
Likes: 3
From: Amsterdam , NY
Car: 1985 Trans Am
Engine: vee eight
Transmission: auto
Axle/Gears: 4.10 gears
is this product someone like me who doesnt race but like to drive the car hard a little, I have the aftermarket lcas, panhard , control arm relocators, would this be a worthwile mod for me , or will i not even notice it .


Joined: Jan 2000
Posts: 659
Likes: 10
From: Clifton, NJ
Car: '88 Formula
Engine: 350 TPI
Transmission: T-5... in need of slight rebuild
I wouldn't say it's needed for a street driven car, but one of those nice to have things. If I ever lower my panhard rod I might go with the Jegs version or the Unbalanced one here, http://www.unbalancedengineering.com/Camaro/
The Unbalanced version lowers both ends of the rod and requires welding. It has an additional support on the axle side to keep the bracket in place better. It comes with no holes drilled in it so you can make sure the bar is level at ride height.
Also when lowering the panhard bar (if lowered enough) might require stiffer springs, swaybar, or shocks, maybe a combination, to balance out the car.
Thread Starter
Banned
Joined: Jan 2005
Posts: 1,238
Likes: 0
From: Yes I'm Dean
Car: Agood2.8,
Engine: V6rsr,
Transmission: Afrikingoodtime
Originally posted by soulbounder
Just a question though, why do you think the rear brake bias was perfect on the bottom hole?
Just a question though, why do you think the rear brake bias was perfect on the bottom hole?
here goes:
Take a pencil and hold it level (horizonal). The sharp end represents the front roll center, the eraser represents the rear roll center of a car. This would be equal roll center heights front and rear making the roll axis parallel to the ground.
Now under braking, the weight transfer rear-to-front in essence would transfer directly down the pencil (or roll axis) parallel. The back of the pencil will not angle up or down because the braking force from rear to front remains level so the weight transfer in exerted parallel keeping constant tire contact pressure to the ground.
Now take that pencil and lower the front of it lower than the rear say 1 inch for understandable reference. Now pretend when you press the brakes hard and the front is slowing, The angle down starting position of the pencil will cause the rear section to lift and angle even more. This is what happens when the brakes are applied and the nose dives, feels like the rear goes up in the air and unloads. This causes the weight to lift off the rear tires and they will skid easier.
Now lower the rear roll center too much and the weight tranfer front to rear is increased causing the rear to plant and the nose of the car to lift and wash out/not turn.
Supreme Member
Joined: Mar 2001
Posts: 6,577
Likes: 0
From: Portland, OR www.cascadecrew.org
Car: 1990 Camaro RS
Engine: Juiced 5.0 TBI - 300rwhp
Transmission: T5
Axle/Gears: 3.42 Eaton Posi, 10 Bolt
Dean,
How far did you actualy lower the rear roll height?
Do you think you will need to raise the rear spring to compensate for the lowered RC? and where is your front roll height at?
--John
How far did you actualy lower the rear roll height?
Do you think you will need to raise the rear spring to compensate for the lowered RC? and where is your front roll height at?
--John
Trending Topics
Thread Starter
Banned
Joined: Jan 2005
Posts: 1,238
Likes: 0
From: Yes I'm Dean
Car: Agood2.8,
Engine: V6rsr,
Transmission: Afrikingoodtime
I lowered the rear roll center 2" at lowest mount point. Right now it is sitting at 1 1/2" lower and it is still a tad too low. When I get a chance I'll move up one more notch so it is sitting only 1" lower.
Car is lowered about 2.5" from stock height should be so I am down 1 1/4" alone right there in the rear making a total of 2 1/4" lower than stock with it in the second hole down.
I have an idea, but have neveer seen a model of the front roll centers on these cars and where exactly they drop when the nose is dropped 2.5". I imagine it is near ground level or just a tab higher with the front suspension geometry. doesn't matter thought, I just am cglad this rear adjustment gives me the range to balance the front and rear, hence why I dropped it all the way at first to see if the car went understeer steering resistence and it did ( in otherwords, I slowed my steering response and raise steering effort in the wheel too much. This car still does not wash out though becauise the ose it too light and turns easy). So now I am raising it slowly until balanced and good feeling for my person likes.
John, Since I have the V6, I can get away with a much stiffer rear suspension than you V8 guys because my less motor weight will not sway the front as hard over rotating and lifting the inner rear wheel. I am running Spohn's 34mm/25mm solid bar combo and a progressive rear spring that is in the neigborhood of 160-225 rate ( I believe they started life as 135-210 rate, and I have trimmed a portion of the softer progessive part of the coils) with progressive increase and the Koni bumpstops I use will even take that higher when kinked over and squated in a corner or a compression corner like a high bank.
So there was no need to stiffen my rear suspension. I knew it was on the stiffer side and knew it would soften slightly with the roll center lowering someday. I had a 23mm bar I tried for kicks and the car had cornered better with it, but was still unloading INTO the corner until steady. I kept the 25 on there after that knowing I would drop the rear roll center and have finally got around to it a few years later than expected. But I am setting the car up for a little So. Calif challage thus local guys are gathering for fun at an autoX course so I figured I'd finally get off my butt and get this thing truely dialed like I have always planned. This car has always still cornered fantastic, but time to make it 100%perfect for that day and complete what I have intended all along.
I have curtailed the problem in the past with the other brake setup having a better initial bit than the front quating the rear first as the brakes were applied, The new system I can not accomplish that without adding the prop valve. I have played with pad compounds alittle on it and got it better, but suffered brake noise in the process with the Wilwood racing pads at street temps. Since I need to get the rear pressure down and dial the car again, I figured I'd get this bracket (as I always just planned to fab myself until this came along a few months back- made things easy now) and set the rear roll center down with the larger 25mm bar where I intended it to be with spring and bar choice, then finalise the brake dial in.
The car stopped like it had never before with the lowest mount position- Holly crap is all I can say with a BF smile.
Last edited by RTFC; May 23, 2005 at 10:03 AM.
Supreme Member
Joined: Mar 2001
Posts: 6,577
Likes: 0
From: Portland, OR www.cascadecrew.org
Car: 1990 Camaro RS
Engine: Juiced 5.0 TBI - 300rwhp
Transmission: T5
Axle/Gears: 3.42 Eaton Posi, 10 Bolt
Thansk Dean.
I have been thinking about this mod for some time, but need to get some spring rates taken care of first (and an easy way to change them....I need to call G-C), thus my interest in if you changed your spring rates at all.
I have been thinking about this mod for some time, but need to get some spring rates taken care of first (and an easy way to change them....I need to call G-C), thus my interest in if you changed your spring rates at all.

Member
Joined: Jan 2004
Posts: 348
Likes: 0
From: Buffalo, NY
Car: 89 WS6
Engine: 305 TPI
Transmission: T5
Axle/Gears: 10 bolt T2R w/ 3:23
Dean
I also have been looking at this mod for a while. If you can stomach going to the FRRAX website I started a long thread about this and along the way someone posted the correct way to figure out the front roll center on our cars. A friend of mine that is an engineer and 3rd gen RR guy told me that a one inch drop will just about put the front roll center on the ground. I was also looking at at the previously mentioned unbalanced engineering vesion so that I could lower both sides. Am I correct that the one you installed only adjusts one side and you will end up close to level when you are done?
I also have been looking at this mod for a while. If you can stomach going to the FRRAX website I started a long thread about this and along the way someone posted the correct way to figure out the front roll center on our cars. A friend of mine that is an engineer and 3rd gen RR guy told me that a one inch drop will just about put the front roll center on the ground. I was also looking at at the previously mentioned unbalanced engineering vesion so that I could lower both sides. Am I correct that the one you installed only adjusts one side and you will end up close to level when you are done?

Joined: Jun 2001
Posts: 8,028
Likes: 93
From: DC Metro Area
Car: 87TA 87Form 71Mach1 93FleetWB 04Cum
Nice, looks like you beat me to it, I made up a new bracket and welded it on to my moser rear, but I don�t have it in the car yet.
I�m curious, you�ve reported that it lowered the rear roll center about 2� at the lowest point. Since the roll center is the middle of the bar, moving the pivot down 4� will lower the roll center 2�, so judging from the pictures I�m guessing that the lowest point is about 4� down from the original point and the holes are spaced a little less then 1� apart? My bracket is almost as long as the relocation bracket on that side but I haven�t drilled it yet, so I haven�t decided on the actual pivot locations and spacing, but it looks like I�ll be able to go a little lower then the jegster bracket.
How does the jegs piece get stabilized? It really looks like it�s just not much more then a welded, 3 sided box that fits in the pocket, and for that matter, out of fairly thin (1/8� maybe) steel. After talking to jason at unbalanced (he said that from what he�s seen he�d be surprised if the jegs one was stiff enough) I�ve been debating whether I really want to add a small, diagonal brace from the inside of mine to the axle tube but if what I�m seeing in the pics is the case then I�m thinking that it�s unnecessary. I�m guessing that you can�t use a stock PHR bushing or spacer width with the jegs unit?
Have you considered running the jegs part in the lowest pivot and getting a stiffer sway bar, and possibly stiffer springs/shocks? Seems like that would be the solution to your �heavy steering� (push?) and allow you to run a more balanced, f/r spring package.
Any thoughts of lowering the body side pivot? I welded up a longer PHR brace that actually fits into the original PHR pivot and then a bracket that bolts through that location and the original location with a new pivot about 1.5� and 2.5� below the stock one, but I�m not sure that it�s necessary and don�t know if I�m going to run it. (was playing with a plasma cutter and some scrap steel and next thing you know�)
Thread Starter
Banned
Joined: Jan 2005
Posts: 1,238
Likes: 0
From: Yes I'm Dean
Car: Agood2.8,
Engine: V6rsr,
Transmission: Afrikingoodtime
Souseless, I looked at the FFRAX wbsite and went back about 3 months but saw nothing on the subject. Maybe I missed it. Got the link?
When the car sits stagnant ride height with suspension fully loaded, the axle side bolt head is 2 1/8" higher off the ground than the chassis side bolt head on each side of the panhard mounts.
So once I get around to getting that axle mount in the second hole down position, it will be level at stagnant height. I do not need the other side dropped at all because the car is so low.
Regardless of where the front roll cneter sits, the car is balanced within the adjustmemt peramiters. If I go to coilovers and raise the front roll center slightly with the balljoint shim, I will have to probably go back up to 1 hole down or even the original setting.
If I shim the balljoint right now I will lower the front of the car another 1/2" and I don't want that unless I pull it down and try and shim the coil spring also- its a daily driver, not a racecar. Close enough for now. Next time it need maintinace or repair, I will have to pull the front suspension down, I will then do this. Right now I have too many other things in life on my plate that take priority over this little hobby. I am just getting things done here lately from a grudge match going on locally. Figured I'd throw some more money at this car and get a few things done that have bugged me alittle - the grudge gave me a little incentive to mess around with it a little more, otherwise, its the wife's car.
Thread Starter
Banned
Joined: Jan 2005
Posts: 1,238
Likes: 0
From: Yes I'm Dean
Car: Agood2.8,
Engine: V6rsr,
Transmission: Afrikingoodtime
Crossfire, forget what Jason may have told you about his, this Jegs unit is very strong and well made. It will never bend or break. Do weld it on though and not jsut bolt it like they recommend it sold as- that I agree would be scary relying on bolt-ons with such crucial leverage point.
If I felt in any way that this Jegs unit was weak after getting it, it would have gone back. It is a great design and an easy fit. I welded it inside and out and there is absolutely no need at all for additional plate bracing to it.
The hole spacing is 1" increments
Here's a better angle maybe. I should have snapped a picture of the bracket before I installed it to show how it is slotted and slipfits onto the current axle mount- again, a great design. This picture shows the welded beads on top and down the side where the slipfit joints welds both the old and new together as a doulbe walled weld.
Joined: Jun 2001
Posts: 8,028
Likes: 93
From: DC Metro Area
Car: 87TA 87Form 71Mach1 93FleetWB 04Cum
The gap between the original hole and the first new one looks to be a little bigger then the rest, so I�m guessing that the lowest hole is more then 4� lower then the stock location?
Looking at the original moser bracket I�m not sure that I�m seeing what is supposed to keep that thing from pivoting with only a bolt holding it. is it made of some 1/8� like it looks or is it 3/16� like the rest of the rear suspension brackets? I�m starting to think that what I built was overkill�
Looking at the original moser bracket I�m not sure that I�m seeing what is supposed to keep that thing from pivoting with only a bolt holding it. is it made of some 1/8� like it looks or is it 3/16� like the rest of the rear suspension brackets? I�m starting to think that what I built was overkill�
Thread Starter
Banned
Joined: Jan 2005
Posts: 1,238
Likes: 0
From: Yes I'm Dean
Car: Agood2.8,
Engine: V6rsr,
Transmission: Afrikingoodtime
You are correct, there is about a 1 1/2" gap btween the first and second of the five holes, the its 1" increments.
What you are not seeing in the bolt-on mounting is I DID NOT drill the top and backside holes and insert the two other positioning bolts required for bolt-on mounting. I left them off and I welded everything inside and out.
What you are not seeing in the bolt-on mounting is I DID NOT drill the top and backside holes and insert the two other positioning bolts required for bolt-on mounting. I left them off and I welded everything inside and out.
Thread Starter
Banned
Joined: Jan 2005
Posts: 1,238
Likes: 0
From: Yes I'm Dean
Car: Agood2.8,
Engine: V6rsr,
Transmission: Afrikingoodtime
Here's where you are suppose to drill and mount the other two bolts they provide for bolt-on(red circles). The yellow lines show where I welded on the bracket. Dotted lines are hidden welds on the backside and underneath. My welded look much better than my yellow lines")
That top bolt does not need to be in there since I welded it. I just like cheap insurance untill I put it through its paces and make sure my welds hold. Never know when you may get some bad wire or something, sh*t happens and I err on the cautious side until tested.
That top bolt does not need to be in there since I welded it. I just like cheap insurance untill I put it through its paces and make sure my welds hold. Never know when you may get some bad wire or something, sh*t happens and I err on the cautious side until tested.
Last edited by RTFC; May 24, 2005 at 01:16 AM.
Joined: Jun 2001
Posts: 8,028
Likes: 93
From: DC Metro Area
Car: 87TA 87Form 71Mach1 93FleetWB 04Cum
Got it� thanks.
Any signs of flexing? I�m starting to think that my braket is WAY overkill� I may end up cutting some lightening holes.
How much is your car lowered that you don�t think that you need to do anything body side? I�m thinking of running the springs from my �83 TA which probably drop the car about the same as the eibach sportlines but are much stiffer.
Any thoughts on leaving it in the lower pivot and stiffening the rear suspension?
Joined: Jun 2001
Posts: 8,028
Likes: 93
From: DC Metro Area
Car: 87TA 87Form 71Mach1 93FleetWB 04Cum
I just noticed something else� progressive rear springs??? Really? I�m surprised, why?
They tend to be nice on the street for the average driver but I hate the vagueness that they give when entering a turn. My formula currently has some trimmed Pro Kit front springs and some OEM WS6 rear springs that have been cut down to be about 200# specific rate and I think that combination works MUCH MUCH better then the progressive rears that the eibachs come with.
They tend to be nice on the street for the average driver but I hate the vagueness that they give when entering a turn. My formula currently has some trimmed Pro Kit front springs and some OEM WS6 rear springs that have been cut down to be about 200# specific rate and I think that combination works MUCH MUCH better then the progressive rears that the eibachs come with.
Thread Starter
Banned
Joined: Jan 2005
Posts: 1,238
Likes: 0
From: Yes I'm Dean
Car: Agood2.8,
Engine: V6rsr,
Transmission: Afrikingoodtime
This car is dropped about 2.5" from stock from what I have been told in comparison to others. Be so long, I can't remember. The front rims are factory 16's on 245/50-16's and they tuck under the fender. Hard to see in the picture because it is dark there, but the tire tread is higher up inside the fender, no gap at all.
(Edit: for got to add this picxture- Look to next post)
(I just saw your next post before I finished this, was about to get to the rear stiffness and progressive springs)
Well, they are cut progressive springs. They started out life as a 1" drop rear progressive spring with a rate of about 135- 210. I have cut about 1 1/2-2 coils off of the lighter prgressive rate protion of the springs so it has increase the stagnant hight rate to about 160-175. The spring helps induce squat and promotes my roll understeer effect I have so vigorously setup on the rear with the geometry in a corner. I also have Koni "shaft style" bumpstops underneasth the Koni Yellows dust sheilds that progressively increase the rate as they make contact upping the rear rate. this car is very stiff even with progressive springs. It does not unload as easily rear to front because of the progressive springs. They soften as they release and do not force the *** end up into the air when unloaded.
I figure the combined rate of the springs and the koni Bumpstops puts the rate at about 225- 250 when sitting hard into a corner. at the squat height trough the corner, the bumpstops are making contact. Note that these are nbot your everyday hard rubber bumpstops, they are soft to increasing hard progressive bumpstops designed for this very use. The start off at something like 30lbs the first 3/8" and then progress up to about 200lbs in an 1 1/4" compression. I have listed the actual rates here in the past, I'll have to find them because I can't remember the exact rates
Last edited by RTFC; May 24, 2005 at 02:07 AM.
Thread Starter
Banned
Joined: Jan 2005
Posts: 1,238
Likes: 0
From: Yes I'm Dean
Car: Agood2.8,
Engine: V6rsr,
Transmission: Afrikingoodtime
We are getting alot of pictures on this post, (sorry bout that, but its the best way to discribe things)..
..but, here is the next area of weakness I will adress in my free time sometime in the future. I did this scketch a while ago and have had intentions of doing this bracing. Just another thing I have not gotten to yet. Notice the old suspension and brakes, this picture is about 3 years old.
..but, here is the next area of weakness I will adress in my free time sometime in the future. I did this scketch a while ago and have had intentions of doing this bracing. Just another thing I have not gotten to yet. Notice the old suspension and brakes, this picture is about 3 years old.
Thread Starter
Banned
Joined: Jan 2005
Posts: 1,238
Likes: 0
From: Yes I'm Dean
Car: Agood2.8,
Engine: V6rsr,
Transmission: Afrikingoodtime
And here is the info on the Koni shaft style bumpstops
----------------------
The best one on the market is Koni # 70-34-53-000-0. Its 2 5/32" long and will compress 1 1/4" to a compressed height of 1 1/32". Heres the progress spring rate increase as it snubs (this will progressively increase your spring rate as it motions towards bottoming out-not a harsh impact like the stock rubber bumpstops.
compress........rate increase
1/8".................30 lbs
1/4".................45
3/8".................60
1/2".................70
5/8".................85
3/4".................100
7/8".................110
1"....................145
1 1/8"..............195
1 1/4"..............260
stock units will only compress aprox 1/4" and immediately increase rate to 300 Lbs- very harsh.
Last edited by RTFC; May 24, 2005 at 02:09 AM.
Joined: Jun 2001
Posts: 8,028
Likes: 93
From: DC Metro Area
Car: 87TA 87Form 71Mach1 93FleetWB 04Cum
That looks like it�s very close to what my �83 TA sat like in the front, how much room do you have before the control arms contact? I was at the point that I had to run the shorter, very stiff poly bump stops to keep the rear section of the control arm from contacting the k-member and still have some suspension travel.
The rear looks like it sits slightly higher then my �83 (parked next to my formula with the pro kit springs and the rear isolators removed, the 87 looked like a 4x4), but it�s hard to tell because I had taller rear tires that filled the bit of fender gap above the tire, they started to tuck in like the fronts.
Koni bumpstops� yea, they used to be called sylasto or something like that, there�s a very good discussion of how they�re different then other bump stops and how to use them as a serious tuning aid in one of C Smith�s books, I�m pretty sure that it was in �Engineer to win.� How much travel do you get before you contact it?
I�ll have to think about this some more in the morning� right now the stiffer, progressive rate springs make more sense then they should for me not to have tried it when I was playing with them, right now they�re just thrown in a corner of the garage so if I can�t figure out what my original objection to them was I may give them another try. Right now, it seems like you�re using them to compromise between the nice anti squat characteristics of the LCA relo brackets and their inherent turn in problems, the softer spring rate allows them�. Huh, yea, I�ll have to think about this with some sleep.
WRT to reinforcing the PHR body side mount� I had that done on the �83, but it was out of necessity, I actually managed to twist it up and rip out some of the spot welds autoxing it. The extended PHR brace and extension bracket that I cut out on a whim actually doubles up the sides and nestles in the pocket formed by the bent edges of the original factory piece reenforcing it nicely� I�ve been debating making the end of the brace with a sort of pocket so that it and the PHR could actually mount to the same bolt location.
Thread Starter
Banned
Joined: Jan 2005
Posts: 1,238
Likes: 0
From: Yes I'm Dean
Car: Agood2.8,
Engine: V6rsr,
Transmission: Afrikingoodtime
I have 800lb springs and koni yellows up front on a very lightweight nosed V6. I do not ground out. At the very worst, I travel 1 1/2" max on the front suspension.
The rear has 3 1/16" distance betwwen the body of the shock and grounding out. The bumstop is 2 5/32" tall so I have 29/32" before contact. At one inch suspension travel in the rear I would have 3/32" contact and an overall guess of a combined rate of about 225. At max travel of 1 1/2" I would sit more like 300. So agasin, I do not ground out front or rear. I have an average normal suspension travel of 1 inch on all 4 corners with a 1 1/2" max under extreme bumps like railroad crossings, potholes, etc. You cannot do what I have don on a V8 car unless you have about 1100lb front springs. Also, I do not use my LCA relocators for antisquat, I use them to correctly position the LCA angle where I want it to induce roll unsteer in a corner. the lean of the car makes the inside one straight(longest point of geometry) and the outside one archs upward under lean and squat to pull the axle forward on that side as much as possible. my LCA's are also as short as I can adjust them without stuffing the yoke into the trans so as to further increase the geometry arch upward and promote the shortening of the outside arm to pull the axle forward.
I think you now can see and appreciate that this entire car is calculated, not just bolted together. I do know my sh*t
Here, this shows the car with many undercarraige shots to look at. http://www.cardomain.com/memberpage/518752/1
Last edited by RTFC; May 24, 2005 at 03:12 AM.
Member
Joined: Jan 2004
Posts: 348
Likes: 0
From: Buffalo, NY
Car: 89 WS6
Engine: 305 TPI
Transmission: T5
Axle/Gears: 10 bolt T2R w/ 3:23
I have been looking for that link for the front roll center but I have not found it yet. I will make this my mission tonight.
Supreme Member
Joined: Mar 2001
Posts: 6,577
Likes: 0
From: Portland, OR www.cascadecrew.org
Car: 1990 Camaro RS
Engine: Juiced 5.0 TBI - 300rwhp
Transmission: T5
Axle/Gears: 3.42 Eaton Posi, 10 Bolt
front roll center is pretty easy, hardest part is accuratly measuring everything
its the percidiclure from the upper struts, where that crosses the plane of the A-arm. draw a line from that point, back to the center of the contact patch. where line line intersects the same line on the other side, is the front roll center.
its the percidiclure from the upper struts, where that crosses the plane of the A-arm. draw a line from that point, back to the center of the contact patch. where line line intersects the same line on the other side, is the front roll center.

Supreme Member

Joined: Apr 2002
Posts: 2,972
Likes: 0
From: Cincinnati
Do you think that jegs bracket would work well with this BMR kit. I was wanting to get this bmr kit but figured it would throw the geometry on a lowered car off even more this jegs bracket might correct it. What do you think.

Last edited by Spdfrk1990; May 27, 2005 at 05:18 AM.
Member
Joined: Jan 2004
Posts: 348
Likes: 0
From: Buffalo, NY
Car: 89 WS6
Engine: 305 TPI
Transmission: T5
Axle/Gears: 10 bolt T2R w/ 3:23
Dewey
Let me see if I uderstand you correctly. form a 90 from the upper strut mount and run the line to the horizontal line between the A arm bushings. or is it the line that passes though the center of the A arm on the same side as the strut that the previously mentioned line is coming from? My second guess must be the correct one. From that point we run a line to the center of the contact patch. I had to draw it out to get it but I think I have it now. The addition of caster/camber plates must then lower the front roll center, is that right?
Let me see if I uderstand you correctly. form a 90 from the upper strut mount and run the line to the horizontal line between the A arm bushings. or is it the line that passes though the center of the A arm on the same side as the strut that the previously mentioned line is coming from? My second guess must be the correct one. From that point we run a line to the center of the contact patch. I had to draw it out to get it but I think I have it now. The addition of caster/camber plates must then lower the front roll center, is that right?
Supreme Member
Joined: Mar 2001
Posts: 6,577
Likes: 0
From: Portland, OR www.cascadecrew.org
Car: 1990 Camaro RS
Engine: Juiced 5.0 TBI - 300rwhp
Transmission: T5
Axle/Gears: 3.42 Eaton Posi, 10 Bolt
ok, here is a really bad scetch. hopefully you get the idea. The front center is where the two orange lines intersect.
Thread Starter
Banned
Joined: Jan 2005
Posts: 1,238
Likes: 0
From: Yes I'm Dean
Car: Agood2.8,
Engine: V6rsr,
Transmission: Afrikingoodtime
here's an old sketch I made sevveral months back showing the basic format on finding the roll center. What i ment above is not how to do it, I ment I have yet to see any real measured specs of the chassis to give a proper analysis of the exact roll hieght from calculated strut point heights and widths, etc. It can not really be done with a tape measure unless the motor was out of the car to get all of the significant geometry points.
It really doesn't matter where the front is, just drive the car and adjust it till the car feels good with the sopings and bars you have, otherwise, try soime new combos and redail it again. Its just nice having the panhard relocation bracket as another tuning tool. I always preach to everyone to buy as amny adjustable parameters as possible and learn how they will help you, if not, then they can also hurt you if not adjusted correctly.
It really doesn't matter where the front is, just drive the car and adjust it till the car feels good with the sopings and bars you have, otherwise, try soime new combos and redail it again. Its just nice having the panhard relocation bracket as another tuning tool. I always preach to everyone to buy as amny adjustable parameters as possible and learn how they will help you, if not, then they can also hurt you if not adjusted correctly.
Member
Joined: Jan 2004
Posts: 348
Likes: 0
From: Buffalo, NY
Car: 89 WS6
Engine: 305 TPI
Transmission: T5
Axle/Gears: 10 bolt T2R w/ 3:23
Dewey, my sketch looked prety much like yours and I even used my daughters crayons (purple and red) lol.
I think that i can calculate the roll center for multiple ride heights from this info. I need to put in a water heater and drink beer this weekend but after these tasks I will give it a shot.
I think that i can calculate the roll center for multiple ride heights from this info. I need to put in a water heater and drink beer this weekend but after these tasks I will give it a shot.
Supreme Member
Joined: Mar 2001
Posts: 6,577
Likes: 0
From: Portland, OR www.cascadecrew.org
Car: 1990 Camaro RS
Engine: Juiced 5.0 TBI - 300rwhp
Transmission: T5
Axle/Gears: 3.42 Eaton Posi, 10 Bolt
yeah, I don't suggested drinking and trying to figure some of this stuff.
Ask me how my friend ended up with +6* on his pinion angle.

Ask me how my friend ended up with +6* on his pinion angle.
Senior Member
Joined: Apr 2001
Posts: 976
Likes: 1
Re: Panhard Relocation Bracket
Originally posted by RTFC
I finally bit the bullet and got around to installing a panhard relocation bracket from Jegs. Have to say it is well made. It is designed for bolt-on, but I welded it in place. .....
I finally bit the bullet and got around to installing a panhard relocation bracket from Jegs. Have to say it is well made. It is designed for bolt-on, but I welded it in place. .....
Thread Starter
Banned
Joined: Jan 2005
Posts: 1,238
Likes: 0
From: Yes I'm Dean
Car: Agood2.8,
Engine: V6rsr,
Transmission: Afrikingoodtime
Hey Dr Gordon,
How's that car coming along, You end up doing anything exoticwith the brakes like Brembo's or such?
Here's the link to Jeg's and the panhard relocator.
http://www.jegs.com/cgi-bin/ncommerc...06&prmenbr=361
Dean
How's that car coming along, You end up doing anything exoticwith the brakes like Brembo's or such?
Here's the link to Jeg's and the panhard relocator.
http://www.jegs.com/cgi-bin/ncommerc...06&prmenbr=361
Dean
Senior Member
Joined: Apr 2001
Posts: 976
Likes: 1
Originally posted by RTFC
Hey Dr Gordon,
How's that car coming along, You end up doing anything exoticwith the brakes like Brembo's or such?
Here's the link to Jeg's and the panhard relocator.
http://www.jegs.com/cgi-bin/ncommerc...06&prmenbr=361
Dean
Hey Dr Gordon,
How's that car coming along, You end up doing anything exoticwith the brakes like Brembo's or such?
Here's the link to Jeg's and the panhard relocator.
http://www.jegs.com/cgi-bin/ncommerc...06&prmenbr=361
Dean
Hopefully things will progress in the near future :-) I'll drop you an email to update you soon.
Last edited by Dr G; May 31, 2005 at 10:03 AM.
Supreme Member
Joined: Mar 2001
Posts: 6,577
Likes: 0
From: Portland, OR www.cascadecrew.org
Car: 1990 Camaro RS
Engine: Juiced 5.0 TBI - 300rwhp
Transmission: T5
Axle/Gears: 3.42 Eaton Posi, 10 Bolt
DrG.
Where are you getting your AP calipers from. If you know of a good vendor with good prices on AP stuff, I would be interested.
<--- planning to go exoctic one of these days with some serious brakes.
Where are you getting your AP calipers from. If you know of a good vendor with good prices on AP stuff, I would be interested.
<--- planning to go exoctic one of these days with some serious brakes.
Senior Member
Joined: Apr 2001
Posts: 976
Likes: 1
Originally posted by Dewey316
DrG.
Where are you getting your AP calipers from. If you know of a good vendor with good prices on AP stuff, I would be interested.
<--- planning to go exoctic one of these days with some serious brakes.
DrG.
Where are you getting your AP calipers from. If you know of a good vendor with good prices on AP stuff, I would be interested.
<--- planning to go exoctic one of these days with some serious brakes.

Supreme Member
iTrader: (2)
Joined: Aug 2001
Posts: 1,081
Likes: 3
From: Peoria, IL USA
Car: 91 GTA
Engine: 377ci
Transmission: T56
Axle/Gears: QP Ford 9" 3.70s
This is a pretty interesting thread! One of the better suspension dialogs I have sean in a long time. I also have been contemplating the jegs piece, when I saw it had first come out.
I would like to have an open dialog so please do not take any of my questions as a flame or criticism. I am a little confused on how changing your panhard bars orientation effects your linear braking, UNLESS you were having issues with the axle shifting to one side as the rear of the car unloaded. I am under the impression that the most dramatic changes to your linear breaking will come from changing how your car applies force to the CG during longitudenal weight transfer (ie,torque arm and LCA angles).
My reasons for contemplating the bracket were to help bring the panhard bar closer to level with the rear axle. This should help to center up your roll axis in the rear of the car and help alevieate any ill effects of the axle moving side ot side as the panhard bar traverses through its movement. So if you were to put a compass at the pivot point of the panhard and draw a circle having a radius of the length of the panhard, it should show you the path rear axle will take in relation to the chassis.
I am also curious as to how the front roll center is determined in the drawings above. I agree the drawings are correct, but I am having a hard time picturing what the upper pin joint for the kingpin would be when a strut is used. If we had a double A- arm suspension those pictures would make much more sense to me.
Once again I would like to state I am not challenging anybody's knowledge, I honestly would like to know more about my car, I have done setups on F500 cars and formula SAE cars, but I have never taken the time to sit down and really analyse the chassis dynamics of my own car. It sounds like you guys have!
Joined: Jun 2001
Posts: 8,028
Likes: 93
From: DC Metro Area
Car: 87TA 87Form 71Mach1 93FleetWB 04Cum
I am a little confused on how changing your panhard bars orientation effects your linear braking, UNLESS you were having issues with the axle shifting to one side as the rear of the car unloaded. I am under the impression that the most dramatic changes to your linear breaking will come from changing how your car applies force to the CG during longitudenal weight transfer (ie,torque arm and LCA angles).
the IC is the imaginary point around which the suspension links act. The RC is the point around which the body trys to rotate around. Lowered with stock geometry the front RC drops way down while the rear RC drops only half the amount of the suspension drop. You end up with a front RC proportionately MUCH lower then the rear, and the rear tries to rotate around a point significantly higher then what would be well balanced which the argument here is that results in too much weight transfer to the front. (I don�t agree 100% with that, but I also haven�t driven an adjustable setup yet so�. In theory at least, the force of an acceleration is exerted on an equivalent lever arm drawn from the CG to the RC, so the farther it is from the CG the more the chassis reacts to forces exerted on it. This is why you need stiffer springs/sway bars with a RC proportionately lower to the CG)
My reasons for contemplating the bracket were to help bring the panhard bar closer to level with the rear axle. This should help to center up your roll axis in the rear of the car and help alevieate any ill effects of the axle moving side ot side as the panhard bar traverses through its movement.
I would argue that that is not really a great reason to do it. Like I�ve suggested in some of the �adjustable PHR� threads, you�d be surprised at exactly how little a significant amount of rear suspension travel effects axle placement.
Because the PHR mounts to the body on one side and the axle on the other side, it will naturally effect wheel loading in turns (one way the PHR will push down on the axle mount side of the axle, the other it will pull up), but this force is also mostly insignificant when you�re talking about a PHR as long as ours is (check out some of the circle track and other race car suspensions, you�ll see PHR�s half the length of ours or even shorter and they use the mounting locations and these effects to tune for track conditions).
I am also curious as to how the front roll center is determined in the drawings above. I agree the drawings are correct, but I am having a hard time picturing what the upper pin joint for the kingpin would be when a strut is used. If we had a double A- arm suspension those pictures would make much more sense to me.
In Kinematics a sliding link (roughly the equivalent of what the top of the strut is doing) is the equivalent of a suspension arm mounted perpendicular to the direction that the link slides and mounted at that point. So a strut front suspension acts just like an SLA suspension with the upper arm always being perpendicular to the strut rod where it goes through the upper strut mount.
Once again I would like to state I am not challenging anybody's knowledge, I honestly would like to know more about my car, I have done setups on F500 cars and formula SAE cars, but I have never taken the time to sit down and really analyse the chassis dynamics of my own car. It sounds like you guys have!
Supreme Member
iTrader: (2)
Joined: Aug 2001
Posts: 1,081
Likes: 3
From: Peoria, IL USA
Car: 91 GTA
Engine: 377ci
Transmission: T56
Axle/Gears: QP Ford 9" 3.70s
the IC is the imaginary point around which the suspension links act. The RC is the point around which the body trys to rotate around. Lowered with stock
I do not think you can take the IC and RC created by the PHR and directly relate it to the CG, IC, and RC of the vehicle in the longitudenal direction.
when you�re talking about a PHR as long as ours is (check out some of the circle track and other race car suspensions, you�ll see PHR�s half the length of ours or even shorter and they use the mounting locations and these effects to tune for track conditions).
I autocross a fair amount and honestly at this point my car feels good but when I do have problems I have a hard time telling whether it is my driving skills or my set up.
I would argue that that is not really a great reason to do it. Like I�ve suggested in some of the �adjustable PHR� threads, you�d be surprised at exactly how little a significant amount of rear suspension travel effects axle placement.
There is a big distinction (in my opinion) between an adjustable PHR and the bracket. the adjustable will aloow a person to center the axle, but not change the geometry/movement of the rear axle. If you can line the PHR up with the axle, you can ensure that the axle shifts to the same side during full droop and full compression. If you begin at a point higher or lower than the centerline of the axle, you may cause aconditon where the axle shifts a different direction in droop than it does in compression, which in my opinion may cause some adverse handling affects.
Thread Starter
Banned
Joined: Jan 2005
Posts: 1,238
Likes: 0
From: Yes I'm Dean
Car: Agood2.8,
Engine: V6rsr,
Transmission: Afrikingoodtime
Originally posted by DAVECS1
I would like to have an open dialog so please do not take any of my questions as a flame or criticism. I am a little confused on how changing your panhard bars orientation effects your linear braking, UNLESS you were having issues with the axle shifting to one side as the rear of the car unloaded. I am under the impression that the most dramatic changes to your linear breaking will come from changing how your car applies force to the CG during longitudenal weight transfer (ie,torque arm and LCA angles).
I would like to have an open dialog so please do not take any of my questions as a flame or criticism. I am a little confused on how changing your panhard bars orientation effects your linear braking, UNLESS you were having issues with the axle shifting to one side as the rear of the car unloaded. I am under the impression that the most dramatic changes to your linear breaking will come from changing how your car applies force to the CG during longitudenal weight transfer (ie,torque arm and LCA angles).
Originally posted by DAVECS1
I am also curious as to how the front roll center is determined in the drawings above. I agree the drawings are correct, but I am having a hard time picturing what the upper pin joint for the kingpin would be when a strut is used. If we had a double A- arm suspension those pictures would make much more sense to me.
I am also curious as to how the front roll center is determined in the drawings above. I agree the drawings are correct, but I am having a hard time picturing what the upper pin joint for the kingpin would be when a strut is used. If we had a double A- arm suspension those pictures would make much more sense to me.

Supreme Member
Joined: Sep 2003
Posts: 1,408
Likes: 2
From: Western Maryland
Car: 82z28
Engine: 406
Transmission: th350
Axle/Gears: 3.23
I finally decided to order my bracket..no just to find someone that feels like welding it in. here are some uninstalled pics.
They now include a brace that they recommend for "severe duty" as in autocross, or road race applications. I have understand that dean was satisfied with his without the brace, but I plan on running the brace for added assurance.


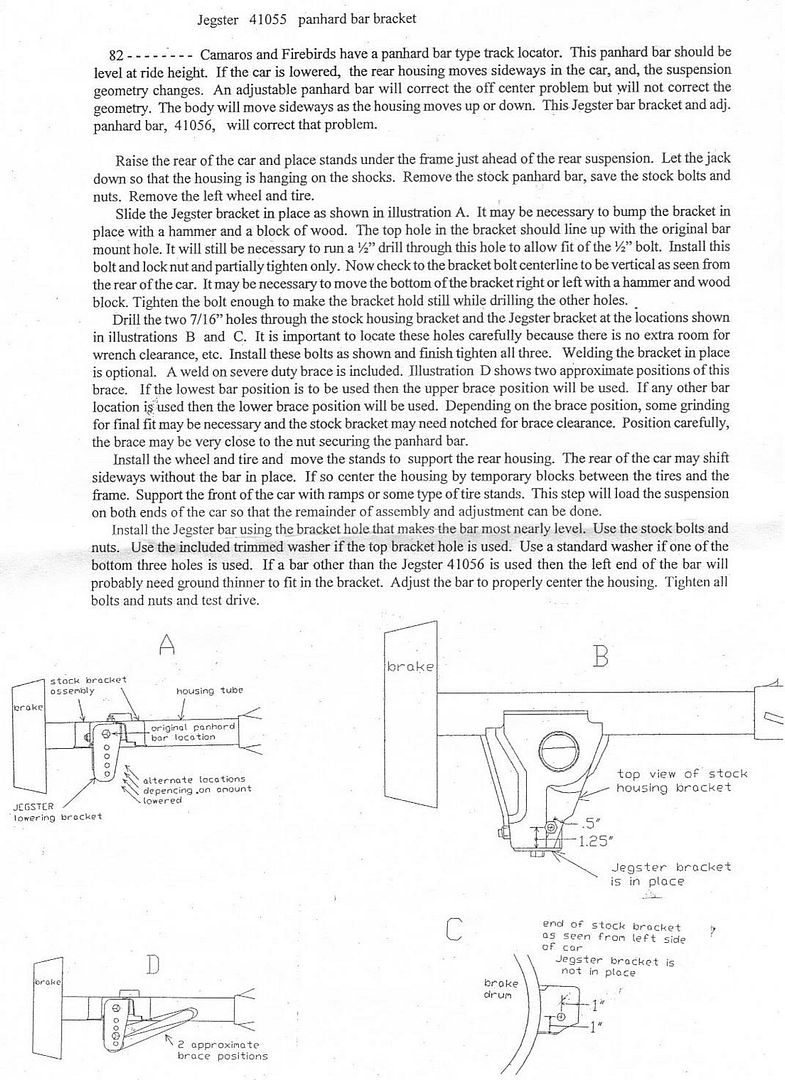
They now include a brace that they recommend for "severe duty" as in autocross, or road race applications. I have understand that dean was satisfied with his without the brace, but I plan on running the brace for added assurance.
Joined: Jun 2001
Posts: 8,028
Likes: 93
From: DC Metro Area
Car: 87TA 87Form 71Mach1 93FleetWB 04Cum
Are there any diagrams/instructions that come with it? I�ve been saying from the first day that he posted his pics of the jegs relocation setup that it needs a brace� I�d like to see how they intend that you run it.
My bracket is actually an extension of the stock pocket and has a section that goes over to the LCA bracket making everything super rigid, but originally I considered running some sort of brace, I just couldn�t figure out how to do it that it didn�t look tacky.
My bracket is actually an extension of the stock pocket and has a section that goes over to the LCA bracket making everything super rigid, but originally I considered running some sort of brace, I just couldn�t figure out how to do it that it didn�t look tacky.

Thread
Thread Starter
Forum
Replies
Last Post