

My Dart "Little M" 409 Build….

Thread Starter
Supreme Member
iTrader: (4)
Joined: Oct 1999
Posts: 4,211
Likes: 3
From: GO PACK GO
Car: 83Z28 HO
Engine: Magnacharged Dart Little M 408
Transmission: G Force 5 speed
Axle/Gears: Moser 9" w/Detroit Trutrac
My Dart "Little M" 409 Build….
Well, I think I have finally gotten to the point at which I need to start a new thread for my engine build. I've always actually called my engine a "408" although it comes out to be closer to 409….don't ask…
I made a lot of the decisions and a bunch of details about this upcoming build can be found in this thread:
https://www.thirdgen.org/forums/tech...edelbrock.html
I figure this will be a good spot to start a new thread since I'm beginning to tear down my existing 400 block. I don't anticipate to see any significant damage to this engine as it seemed to run just fine prior to me pulling it.
This all began with me wanting to swap out the 200cc Dart Iron Eagle heads I currently have for a nice set of aluminum heads. Then I got to thinking about the general condition of my existing block…it's an ex dirt track motor that had been ridden hard in it's past and over bored .040" already. As far as I can tell, it was probably decked long ago for another set-up and the deck surface was in pretty rough shape…I also have an issue that all SBC 400 blocks seem to have…small cracks from every steam hole that extended to water jackets. Most people say it's not a big issue, but I just don't like it from a reliability standpoint.
…That's where the new Dart Little M block comes in. Found it on sale for close to 600 bucks off the regular price, and it has billet steel main caps…I couldn't resist. Add to the fact it has priority oiling, expanded water jackets for better cooling (no steam holes required for heads/block) and much thicker cylinder walls for better ring sealing, added rigidity and less distortion.
The heads I decided on are AFR 195's, with optional stronger springs. I do run a small Magnuson roots blower on it also. And that's non-intercooled boost BTW. Max output for this blower on a 400 cube motor using the smallest drive pulley they sell is 8 PSI boost. I tried it once at 8 PSI, but it seemed a lot tougher to tune so I went back down to 6 PSI.
So- my current set-up is in my sig….I chassis dyoned a while back with 3 pounds of boost (big pulley) and managed a peak of 389 RWHP and 495 ft. lbs. of RWtorque. Max RPM for this engine is 6K RPM's. No need to push it further since power drops off shortly after 5400 anyways. That might change with the new setup, maybe not…
The only things I had changed since I first dynoed the car, is I lost the TES shorty headers in favor of Dyno Don's 1-3/4" primary tube shorty headers. I also went with a slightly smaller drive pulley on the blower and I now have 6 PSI of boost.
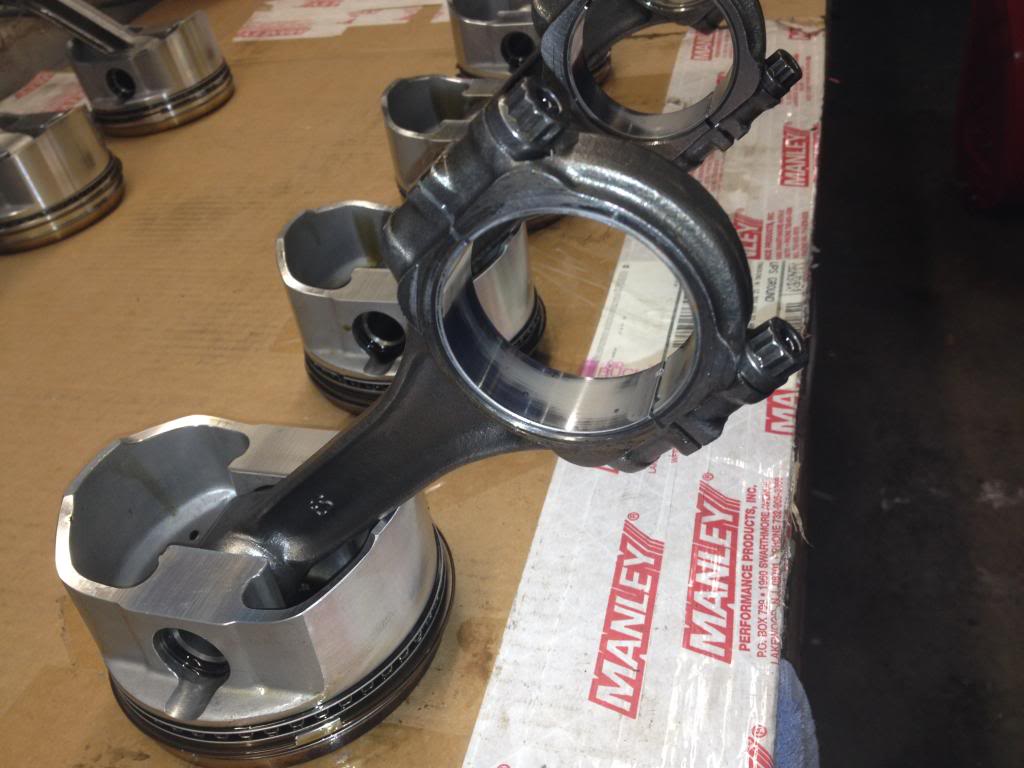
All my forged internals will be re-used in the new block along with my current cam and retro-roller setup. Since I just bought the set of 4.165" forged SRP pistons not long ago, I'm reusing those too and having the new block bored out to accommodate. And -Of course, I'll buying all new gaskets, new set of Total Seal TSI Gapless rings and switching from 1.5 ratio roller tipped Comp rockers to a set of Harland 1.6 ratio full roller rockers.
I'll post up more as this progresses….
I made a lot of the decisions and a bunch of details about this upcoming build can be found in this thread:
https://www.thirdgen.org/forums/tech...edelbrock.html
I figure this will be a good spot to start a new thread since I'm beginning to tear down my existing 400 block. I don't anticipate to see any significant damage to this engine as it seemed to run just fine prior to me pulling it.
This all began with me wanting to swap out the 200cc Dart Iron Eagle heads I currently have for a nice set of aluminum heads. Then I got to thinking about the general condition of my existing block…it's an ex dirt track motor that had been ridden hard in it's past and over bored .040" already. As far as I can tell, it was probably decked long ago for another set-up and the deck surface was in pretty rough shape…I also have an issue that all SBC 400 blocks seem to have…small cracks from every steam hole that extended to water jackets. Most people say it's not a big issue, but I just don't like it from a reliability standpoint.
…That's where the new Dart Little M block comes in. Found it on sale for close to 600 bucks off the regular price, and it has billet steel main caps…I couldn't resist. Add to the fact it has priority oiling, expanded water jackets for better cooling (no steam holes required for heads/block) and much thicker cylinder walls for better ring sealing, added rigidity and less distortion.
The heads I decided on are AFR 195's, with optional stronger springs. I do run a small Magnuson roots blower on it also. And that's non-intercooled boost BTW. Max output for this blower on a 400 cube motor using the smallest drive pulley they sell is 8 PSI boost. I tried it once at 8 PSI, but it seemed a lot tougher to tune so I went back down to 6 PSI.
So- my current set-up is in my sig….I chassis dyoned a while back with 3 pounds of boost (big pulley) and managed a peak of 389 RWHP and 495 ft. lbs. of RWtorque. Max RPM for this engine is 6K RPM's. No need to push it further since power drops off shortly after 5400 anyways. That might change with the new setup, maybe not…
The only things I had changed since I first dynoed the car, is I lost the TES shorty headers in favor of Dyno Don's 1-3/4" primary tube shorty headers. I also went with a slightly smaller drive pulley on the blower and I now have 6 PSI of boost.
All my forged internals will be re-used in the new block along with my current cam and retro-roller setup. Since I just bought the set of 4.165" forged SRP pistons not long ago, I'm reusing those too and having the new block bored out to accommodate. And -Of course, I'll buying all new gaskets, new set of Total Seal TSI Gapless rings and switching from 1.5 ratio roller tipped Comp rockers to a set of Harland 1.6 ratio full roller rockers.
I'll post up more as this progresses….


Member

Joined: May 2006
Posts: 160
Likes: 1
From: Cape Fair,Missouri
Car: 1991 Trans Am GTA Drag Radial Car
Engine: F-2 Procharged 18* 434 sbc on Alky
Transmission: Powerglide,Neal Chance Converter
Axle/Gears: Moser 9" Ford 3.50's,35 spline axle
Re: My Dart "Little M" 409 Build….
This is gonna be a fantastic street bulid!!! 
Thread Starter
Supreme Member
iTrader: (4)
Joined: Oct 1999
Posts: 4,211
Likes: 3
From: GO PACK GO
Car: 83Z28 HO
Engine: Magnacharged Dart Little M 408
Transmission: G Force 5 speed
Axle/Gears: Moser 9" w/Detroit Trutrac
Re: My Dart "Little M" 409 Build….
Sounds good.This should be a good teaching thread in the vein of a "how to".Make sure you post plenty of pictures.
Sub'd
This is gonna be a fantastic street bulid!!!
Try to be nice guys! I have it torn down to the rotating assembly already. Everything is looking pretty pristine to me so far!!
 Heads, lifters, cam, push rods…all look great! I'll post pics later...
 Thread Starter
Supreme Member
iTrader: (4)
Joined: Oct 1999
Posts: 4,211
Likes: 3
From: GO PACK GO
Car: 83Z28 HO
Engine: Magnacharged Dart Little M 408
Transmission: G Force 5 speed
Axle/Gears: Moser 9" w/Detroit Trutrac
Re: My Dart "Little M" 409 Build….
Allright - quite a few pics of the tear down. I got the entire engine tore down in about 2-1/2 hours. I've done this a few times!
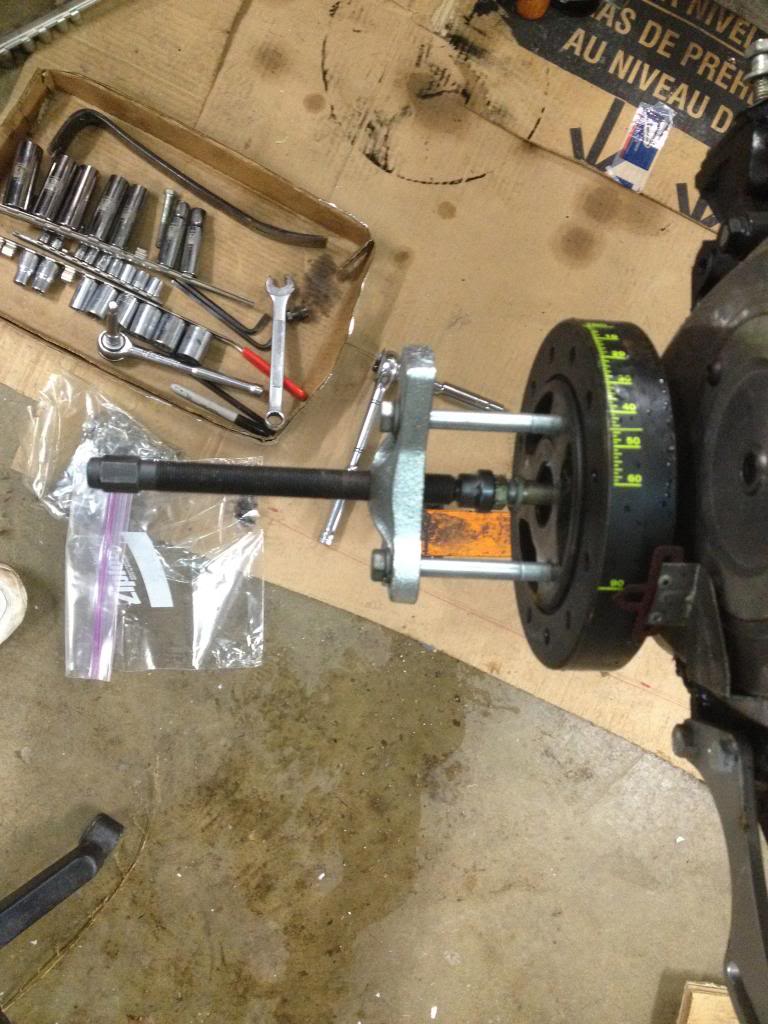
If you don't have a steering wheel/Harmonic Balancer puller - get one! I've used this same one for about 20 years probably 10 times! Make sure you install your balancer bolt and press on that…never on the end of the crank shaft…unless you enjoy screwing up your threads!!
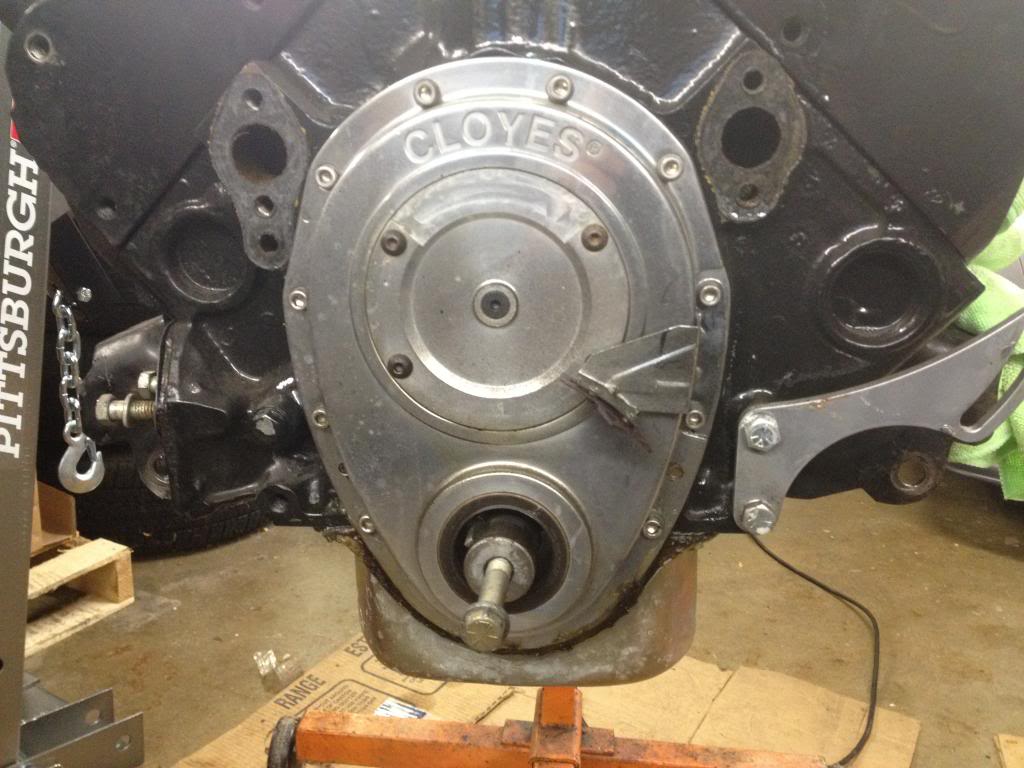
Nothing special, but this is the type of timing cover you need when running a retro-roller setup. It has an adjustable thrust button to set the axial clearance on the cam. There's a few different brands out there…the timing chain and gears will be re-used…tight as the day it was installed, no real signs of any wear...
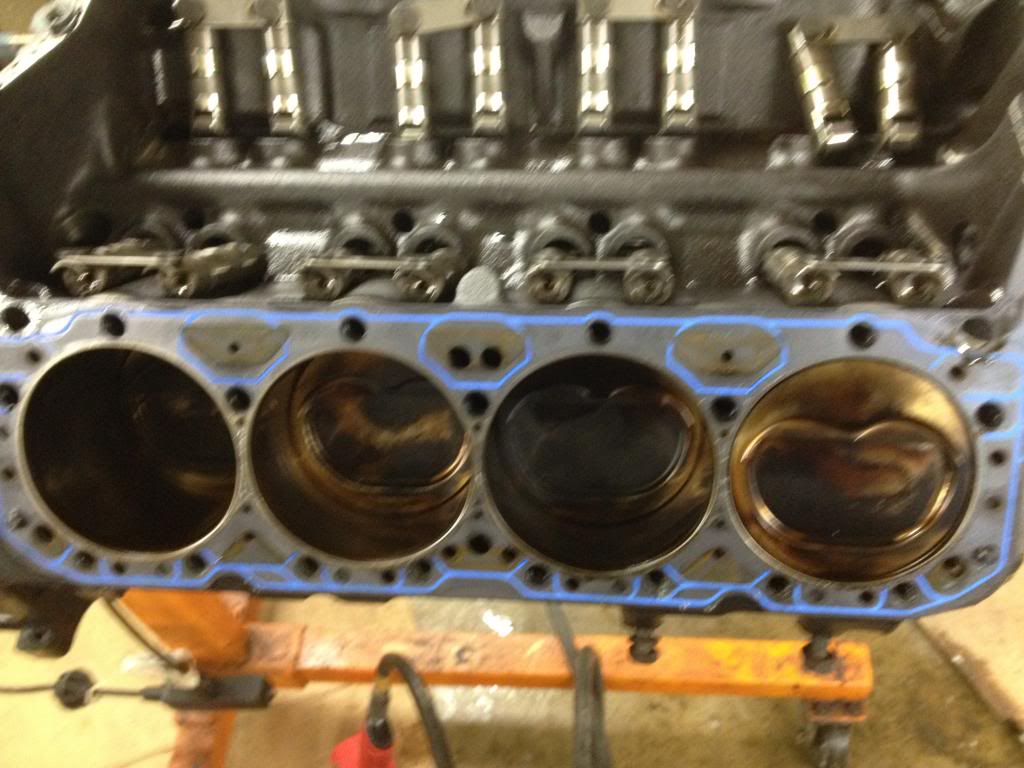
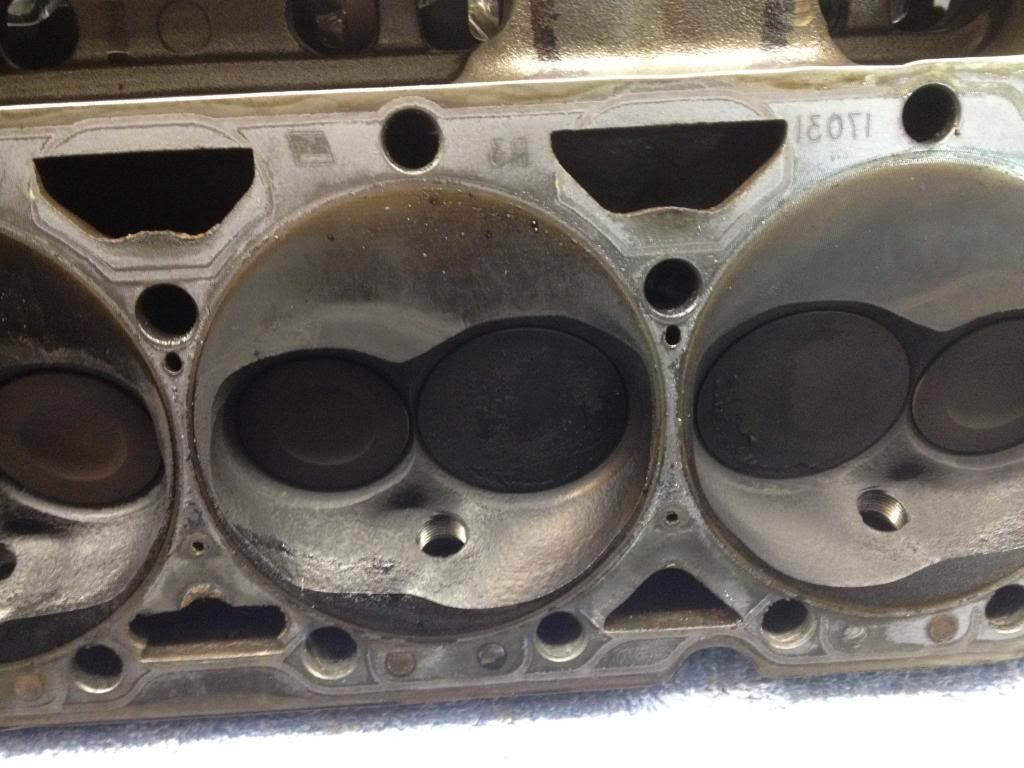
Below is a pic of one of the heads removed and the link bar lifters sitting in the oil galley. All the lifters looked great with minimal scuffing, all rollers turn very freely. Pistons and engine bores looked amazing…the more I tore into this, the more I wonder why I'm tearing it down…..too late to stop now!
If you don't have a steering wheel/Harmonic Balancer puller - get one! I've used this same one for about 20 years probably 10 times! Make sure you install your balancer bolt and press on that…never on the end of the crank shaft…unless you enjoy screwing up your threads!!

Nothing special, but this is the type of timing cover you need when running a retro-roller setup. It has an adjustable thrust button to set the axial clearance on the cam. There's a few different brands out there…the timing chain and gears will be re-used…tight as the day it was installed, no real signs of any wear...

Below is a pic of one of the heads removed and the link bar lifters sitting in the oil galley. All the lifters looked great with minimal scuffing, all rollers turn very freely. Pistons and engine bores looked amazing…the more I tore into this, the more I wonder why I'm tearing it down…..too late to stop now!

Thread Starter
Supreme Member
iTrader: (4)
Joined: Oct 1999
Posts: 4,211
Likes: 3
From: GO PACK GO
Car: 83Z28 HO
Engine: Magnacharged Dart Little M 408
Transmission: G Force 5 speed
Axle/Gears: Moser 9" w/Detroit Trutrac
Re: My Dart "Little M" 409 Build….
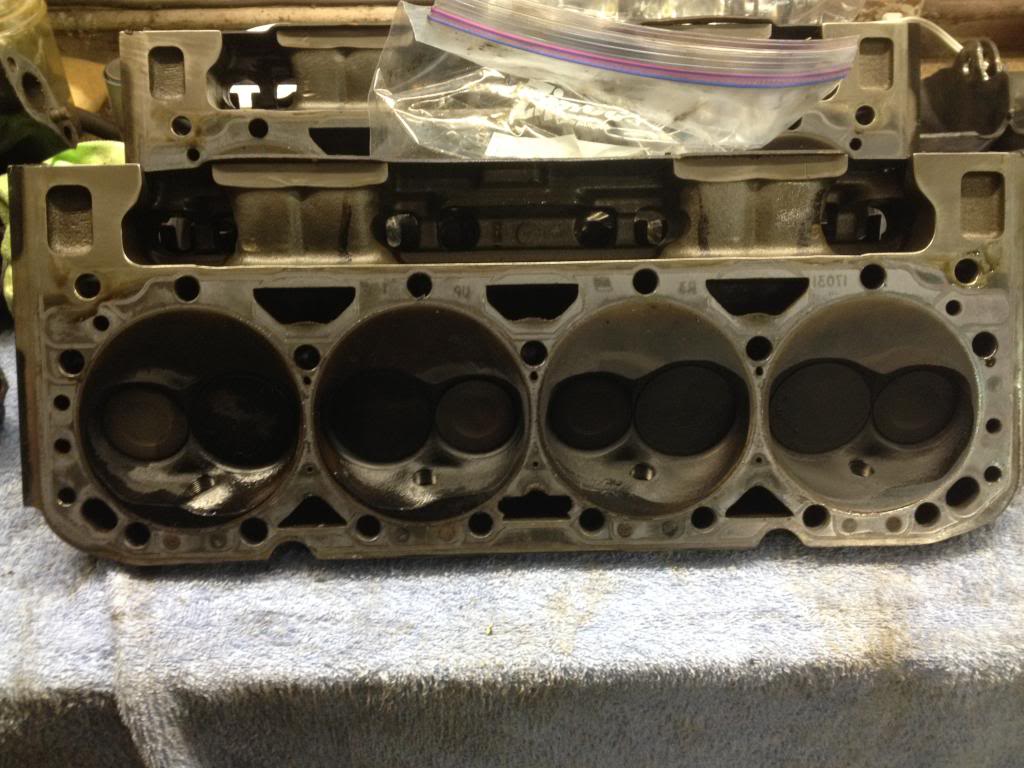
Both heads are in great shape!! Going to put them up for sale assembled with springs and roller tipped rockers. I'll even throw in the head bolts!
Closer pic…again, sorry - it's just a crappy I-Phone after all…
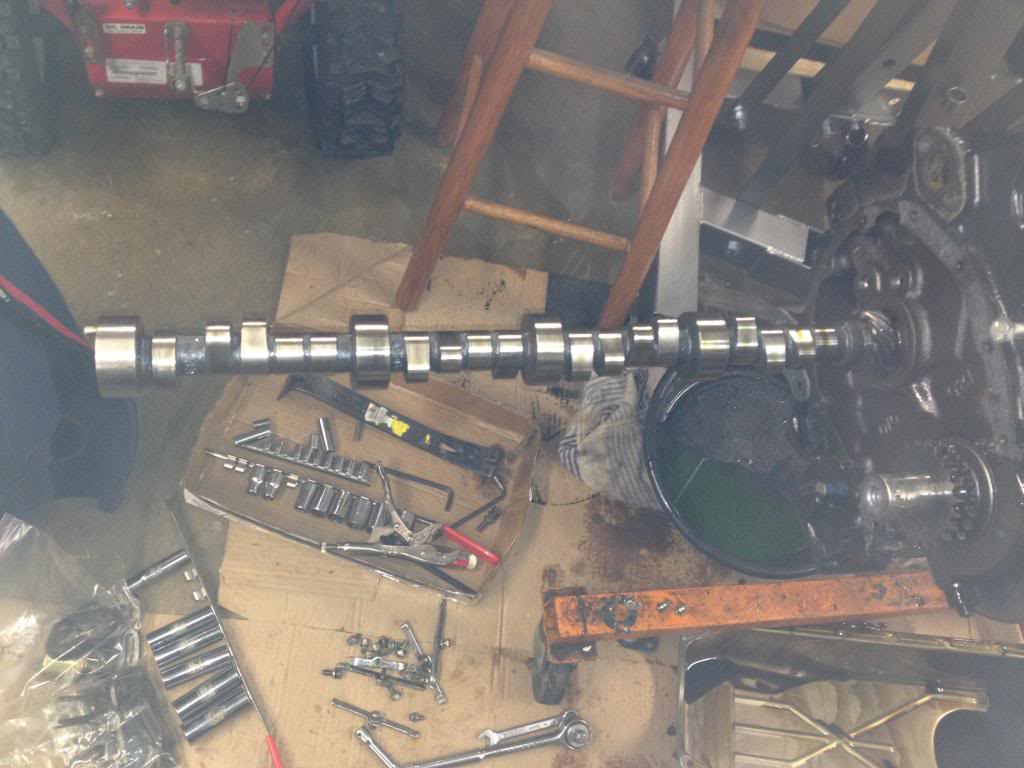
Cam also like new, being re-used…

Closer pic…again, sorry - it's just a crappy I-Phone after all…

Cam also like new, being re-used…

Trending Topics
Thread Starter
Supreme Member
iTrader: (4)
Joined: Oct 1999
Posts: 4,211
Likes: 3
From: GO PACK GO
Car: 83Z28 HO
Engine: Magnacharged Dart Little M 408
Transmission: G Force 5 speed
Axle/Gears: Moser 9" w/Detroit Trutrac
Re: My Dart "Little M" 409 Build….
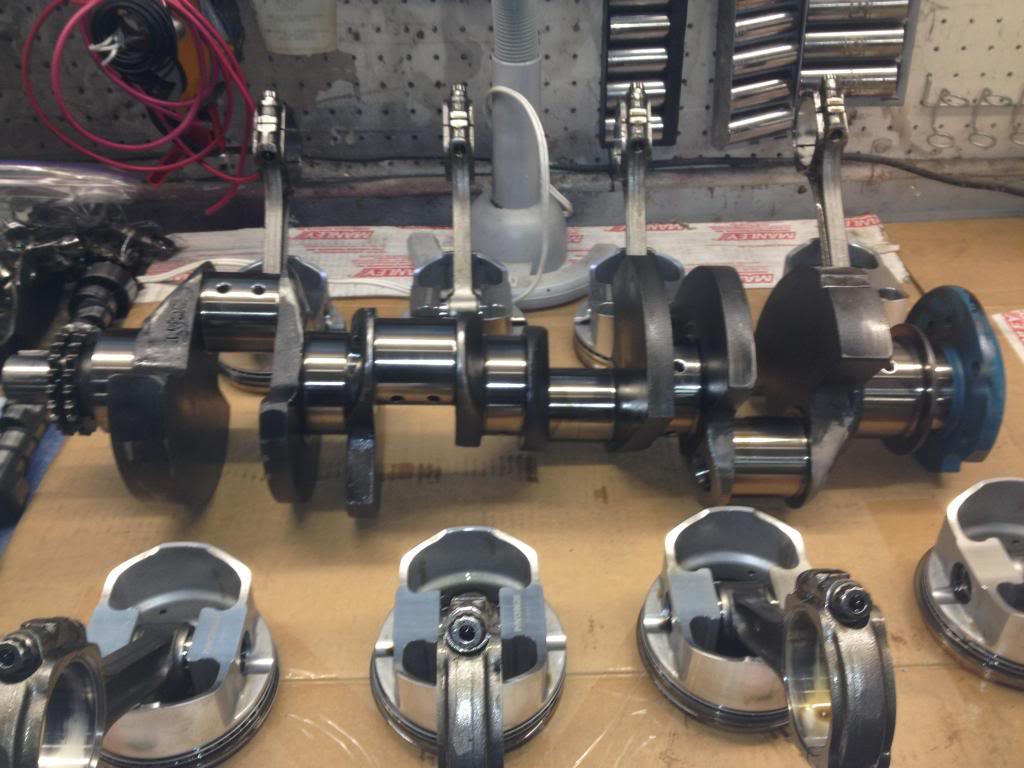
Crankshaft as found…no issues.
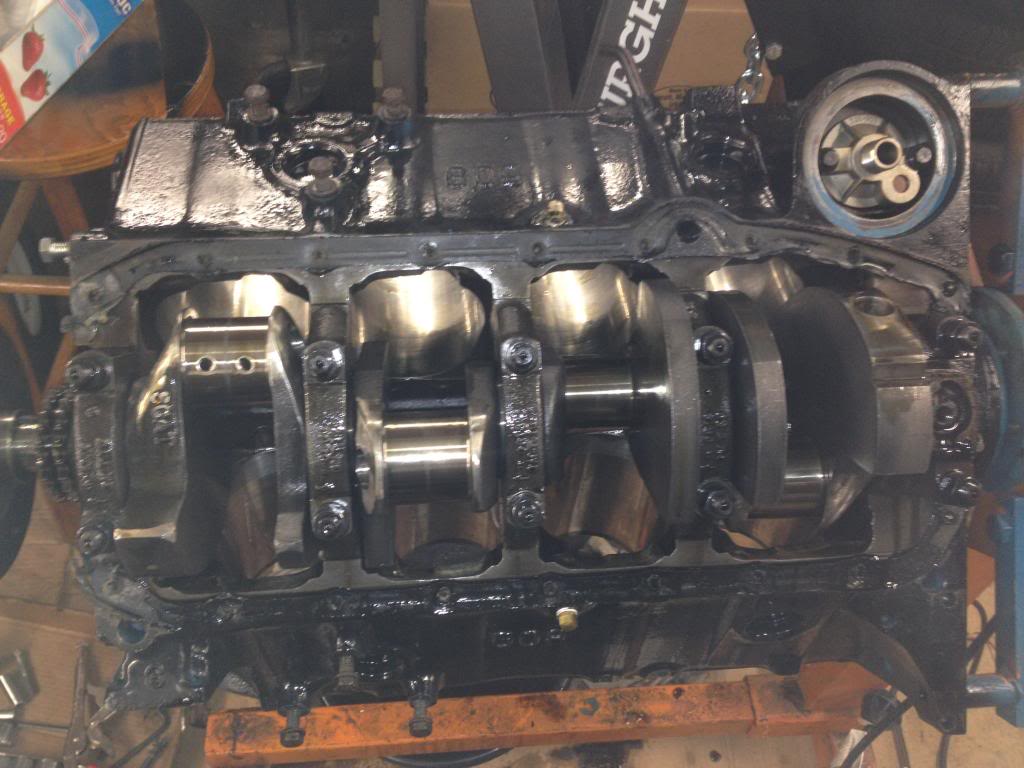
Pistons and rods all good. Heck, pistons still mostly shiney! Normal bearing wear (yes I'm replacing all bearings!
Here's the oil pan that's given me more issues than anything else….NEVER buy this pan if you're doing a 400 swap into a Thirdgen if you plan to run shorty headers…you can see the honest attempt to make it work…it still didn't.


Pistons and rods all good. Heck, pistons still mostly shiney! Normal bearing wear (yes I'm replacing all bearings!

Here's the oil pan that's given me more issues than anything else….NEVER buy this pan if you're doing a 400 swap into a Thirdgen if you plan to run shorty headers…you can see the honest attempt to make it work…it still didn't.

Thread Starter
Supreme Member
iTrader: (4)
Joined: Oct 1999
Posts: 4,211
Likes: 3
From: GO PACK GO
Car: 83Z28 HO
Engine: Magnacharged Dart Little M 408
Transmission: G Force 5 speed
Axle/Gears: Moser 9" w/Detroit Trutrac
Re: My Dart "Little M" 409 Build….
So - I'm ready to send my new block and old rotating assembly to the machine shop now! They need the crank/pistons/rods to ensure they deck the block properly and to ensure the bearing bores for the crank in the new block are machined properly for new standard bearings.
I did discover that I have gapless top rings and conventional second rings….I thought it was the other way around….go figure…
I did discover that I have gapless top rings and conventional second rings….I thought it was the other way around….go figure…

Thread Starter
Supreme Member
iTrader: (4)
Joined: Oct 1999
Posts: 4,211
Likes: 3
From: GO PACK GO
Car: 83Z28 HO
Engine: Magnacharged Dart Little M 408
Transmission: G Force 5 speed
Axle/Gears: Moser 9" w/Detroit Trutrac
Re: My Dart "Little M" 409 Build….
I have a lot in the car over the last 10 plus years - it takes time to toss your money away!
-Just so everyone knows what I have going into this engine build - I won't go into what I have in the rest of the car:
-Dart "Little M" block, over bored to 4.165", decked to .005"
-Scat forged crank, 3.75" stroke, internal balanced
-5.7 Eagle SIR rods, floating pins
-SRP forged inverted dome pistons (+21cc)
-Total Seal Gapless rings
-Clevite Tri-metal bearings
-Cloyes DR timing chain with Cloyes aluminum thrust button cover
-Comp NX276HR retro-roller cam cut on a small base circle
-Crane retro-roller hydraulic lifters
-Comp hardened PR's
-Harland Sharp original full roller rockers, 1.6" ratio
-AFR 195 heads, 75cc combustion chambers and upgraded stiffer springs
-Magnuson MP-122 roots blower set on "stun" at 6 psi boost
-750 Speed Demon carb
-I'll need to adjust my sig a little...
Joined: Mar 2004
Posts: 1,643
Likes: 50
From: Manitoba
Car: '91 GTA
Engine: 421sbc
Transmission: Powerglide
Axle/Gears: Ford 9" with 3.89
Re: My Dart "Little M" 409 Build….
Do you know the part number of the springs you upgraded too?
PAC springs from afr?
PAC springs from afr?
Thread Starter
Supreme Member
iTrader: (4)
Joined: Oct 1999
Posts: 4,211
Likes: 3
From: GO PACK GO
Car: 83Z28 HO
Engine: Magnacharged Dart Little M 408
Transmission: G Force 5 speed
Axle/Gears: Moser 9" w/Detroit Trutrac
Joined: Mar 2004
Posts: 1,643
Likes: 50
From: Manitoba
Car: '91 GTA
Engine: 421sbc
Transmission: Powerglide
Axle/Gears: Ford 9" with 3.89
Re: My Dart "Little M" 409 Build….
Do yourself a favour and upgrade your springs.
That's the ones that I have on my AFR195 eliminators.
I'm upgrading to the 8017's.
The 8020 are limited to .550 lift and 6100 - 6300rpm with 125lbs on the seat.
I found they were binding with my xfi 280 cam and limiting the top end rpm.
The 8017's can go to .600 lift and 6300-6500rpm with 145lbs on the seat.
Link to AFR's spring specs
http://www.airflowresearch.com/valve_spec.php
Although those springs *would* work for your cam, think down the road if want to upgrade like I'm doing. Your cam is .520 lift and 6000rpm. Pretty close to the limit of 8020's.
Member
Joined: May 2006
Posts: 160
Likes: 1
From: Cape Fair,Missouri
Car: 1991 Trans Am GTA Drag Radial Car
Engine: F-2 Procharged 18* 434 sbc on Alky
Transmission: Powerglide,Neal Chance Converter
Axle/Gears: Moser 9" Ford 3.50's,35 spline axle
Re: My Dart "Little M" 409 Build….
Are you sure the 8020's are what you have? They are a flat tappet spring made by Pioneer, if you ordered them with a spring upgrade, they should be either the 8017's or 8019's, both are great for roller setups....and both are PAC springs
Brian
Brian
Joined: Sep 2003
Posts: 25,896
Likes: 430
From: Pittsburgh PA
Car: 89 Iroc-z
Engine: 555 BBC Turbo
Transmission: TH400
Axle/Gears: MWC 9” 3.00
Re: My Dart "Little M" 409 Build….
I thought most 195's came with 8017's and the upgrade was the 8019's? Thats what i had. I agree the other springs are junk, 125 lbs seat is light for a boosted hyd roller
Thread Starter
Supreme Member
iTrader: (4)
Joined: Oct 1999
Posts: 4,211
Likes: 3
From: GO PACK GO
Car: 83Z28 HO
Engine: Magnacharged Dart Little M 408
Transmission: G Force 5 speed
Axle/Gears: Moser 9" w/Detroit Trutrac
Re: My Dart "Little M" 409 Build….
I went back to my last thread because as I read your post I had to verify... my reply above didn't sound right...cut and pasted from there:
I really tried looking up the spring pressure for AFR's optional springs 8605, but it's not on their website. I found some other thread that says the actual part number is 8019 which is on AFRs site:
*AFR-8019
1.270 OD 155# @1.810 Premium Grade Chrome Silicon 1.080 428 650 7000-7200 RPM
Hydraulic Roller
Red Stripe .645 ID 412# @ 1.210 PAC Racing Springs
*AFR-8019
1.270 OD 155# @1.810 Premium Grade Chrome Silicon 1.080 428 650 7000-7200 RPM
Hydraulic Roller
Red Stripe .645 ID 412# @ 1.210 PAC Racing Springs
Joined: Mar 2004
Posts: 1,643
Likes: 50
From: Manitoba
Car: '91 GTA
Engine: 421sbc
Transmission: Powerglide
Axle/Gears: Ford 9" with 3.89
Re: My Dart "Little M" 409 Build….
My afr 195's when I bought them new in 2005 came with the 8020's.
A couple years later they switched to the 8017's
A couple years later they switched to the 8017's

Thread Starter
Supreme Member
iTrader: (4)
Joined: Oct 1999
Posts: 4,211
Likes: 3
From: GO PACK GO
Car: 83Z28 HO
Engine: Magnacharged Dart Little M 408
Transmission: G Force 5 speed
Axle/Gears: Moser 9" w/Detroit Trutrac
Re: My Dart "Little M" 409 Build….
An Update:
I dropped off the block, crank, rods/pistons off at the machine shop along with a pair of lifters and timing chain about a week ago. They need the basic rotating assembly to determine the exact deck height they'll need to machine the block deck at.
They also needed a set of lifters to ensure the top of the lifter bosses in the block won't need to be "notched" so the link bars will clear. The block came with the needed dowels and specially coated cam bearings, which they'll also install.
It just so happens that they are machining another Dart Little M block along with mine for another customer!
I opted to just order much of the other needed parts through them…such as head gaskets, roller rockers, and all the other assembly parts. He can get dealer prices which are cheaper than what I can get them at…and of course, he'll add a few bucks since he has to make a few bucks. But when all said and done, I'll save a few more dollars.
He offered to just go ahead and assemble the short block….I normally do that myself. But….I got to thinking…I don't have a ring filer, my old ring compressor is broke…I'd need to buy those things to set this up properly…plus he'll only charge me 300 bucks in addition to the machining costs to assemble it.
SO - I think I'll let them go ahead and assemble the short block….again, normally I'd do it myself but for 300 bucks….it seems like a decent deal to me!
They are fairly busy since racing season is right around the corner, but it gives me time to do some detailing in the engine bay. I want this to be the last engine change in this car for a long time to come, so it may as well look nice sitting in there!
Joined: Sep 1999
Posts: 1,496
Likes: 60
From: Danville, IN
Car: 1991 Camaro Z28
Engine: LS1
Transmission: 4L60E
Axle/Gears: Strange 12 Bolt, 3.42
Re: My Dart "Little M" 409 Build….
Good call on getting the parts through the machine shop, sometimes it can save a lot of hassle if you get any wrong or defective parts. I hate dealing with that stuff. And you can't beat the price on $300 for assembling the short block. I would have done the same thing.
Thread Starter
Supreme Member
iTrader: (4)
Joined: Oct 1999
Posts: 4,211
Likes: 3
From: GO PACK GO
Car: 83Z28 HO
Engine: Magnacharged Dart Little M 408
Transmission: G Force 5 speed
Axle/Gears: Moser 9" w/Detroit Trutrac
Re: My Dart "Little M" 409 Build….
What was weird is the head gaskets...he could get them 20 bucks cheaper....FOR EACH ONE!!!
BTW, glad to see you subscribed jbenge!
. I have a good group of experienced guys looking over my shoulder on this build...it's most welcome!If everything comes together in time, you guys might see me on this year's Hot Rod Power Tour! But I need to feel confident I won't break.
If for some reason it doesn't come together in time, no biggie - I'll just take the Challenger instead.
Joined: Sep 1999
Posts: 1,496
Likes: 60
From: Danville, IN
Car: 1991 Camaro Z28
Engine: LS1
Transmission: 4L60E
Axle/Gears: Strange 12 Bolt, 3.42
Re: My Dart "Little M" 409 Build….
I may do part of the power tour this year in the 91 assuming I don't have any major issues with the drivetrain swap. The Norwalk to Crown Point leg is fairly close to home for me. Hope to see you there.
Last edited by jbenge; Feb 2, 2014 at 01:14 PM.
Member
Joined: May 2006
Posts: 160
Likes: 1
From: Cape Fair,Missouri
Car: 1991 Trans Am GTA Drag Radial Car
Engine: F-2 Procharged 18* 434 sbc on Alky
Transmission: Powerglide,Neal Chance Converter
Axle/Gears: Moser 9" Ford 3.50's,35 spline axle
Re: My Dart "Little M" 409 Build….
AWESOME!! 
Brian
Brian
Supreme Member
Joined: Jul 2011
Posts: 2,529
Likes: 0
Re: My Dart "Little M" 409 Build….
Now that I have been setting in the cheap seats reading this thread,once you have a tune on this,I should be seeing you post time slips like in the 10.xx's.
And as always:

Or another way of looking at it:

And as always:
Or another way of looking at it:
Thread Starter
Supreme Member
iTrader: (4)
Joined: Oct 1999
Posts: 4,211
Likes: 3
From: GO PACK GO
Car: 83Z28 HO
Engine: Magnacharged Dart Little M 408
Transmission: G Force 5 speed
Axle/Gears: Moser 9" w/Detroit Trutrac
10's !?!?!....
I kinda doubt I'd be pulling THAT kind of time! Especially not with me driving it! Lol..
Honestly even as it was....and it was no slouch...I figured I could pull twelves maybe.
But- I've never raced it on the track yet. But I do plan to scope out a "test-n-tune" day this next summer after I have it dialed in as good as possible on the chassis dyno....just to be sure the A/F is set right..
Thread Starter
Supreme Member
iTrader: (4)
Joined: Oct 1999
Posts: 4,211
Likes: 3
From: GO PACK GO
Car: 83Z28 HO
Engine: Magnacharged Dart Little M 408
Transmission: G Force 5 speed
Axle/Gears: Moser 9" w/Detroit Trutrac
OH....and I'll post up pics when I get my stuff back from the machine shop....unless you want to see more pics of these beautiful AFR heads!!
They're a work of art I tell 'ya!
They're a work of art I tell 'ya!
Member
Joined: May 2006
Posts: 160
Likes: 1
From: Cape Fair,Missouri
Car: 1991 Trans Am GTA Drag Radial Car
Engine: F-2 Procharged 18* 434 sbc on Alky
Transmission: Powerglide,Neal Chance Converter
Axle/Gears: Moser 9" Ford 3.50's,35 spline axle
Re: My Dart "Little M" 409 Build….
More pics is always good!! ....
I would say with good traction and just fair driving.....it will make enough steam to run somewhere in the 11's pretty easy......but traction and launch RPM will be the key with a standard transmission....It is safe to say that it will be a monster on the street with that 5-speed!!
One thing you may think about doing Confuzed, while it is apart, is having your machine shop add you a second keyway in the crank and balancer. It will make it more reliable down the road, we have been through all of it already, and have twisted the keys out of single key setups even with our street stuff. It doesn't cost that much to have done, and it's easy while it's apart, and you'll never have to worry about it down the road. I especially recommend it with a standard transmission, and here is why.... with a standard transmission when you stomp it open and it comes up on full boost it has all that load on the crank key in one direction, because the supercharger is driven off the crank of coarse, and when you go to shift each gear, the load on the key suddenly changes direction, because the moment the clutch is slammed in, it takes the load off it, and when it gets to the next gear, the moments the clutch is released again, it immediately applies the load on the key back in the other direction. That's hard on crank keys, it tends to "work" the keys,and most of the time, a single key will fail eventually.
Adding another key 180* from factory key is the solution. Most people think the SBC crank snout fails and breaks off due to its size, but in reality, it is either the key that twist off,or it bust the keyway out in the balancer, and that let's the balancer spin and **** sideways on the snout, and that's what breaks the snouts off 90% of the time. We run a BBC snout with dual keys on our drag radial car, but all of our street stuff have SBC snouts with dual keys added, even dad's truck with the Magnuson. Trust me, we have twisted our share of keys and broke one crank snout off before going to dual keys... never another problem in that area. Hope it's some helpful info, just thought I would throw it out there for you to think about while it is apart!
Brian
....I would say with good traction and just fair driving.....it will make enough steam to run somewhere in the 11's pretty easy......but traction and launch RPM will be the key with a standard transmission....It is safe to say that it will be a monster on the street with that 5-speed!!
One thing you may think about doing Confuzed, while it is apart, is having your machine shop add you a second keyway in the crank and balancer. It will make it more reliable down the road, we have been through all of it already, and have twisted the keys out of single key setups even with our street stuff. It doesn't cost that much to have done, and it's easy while it's apart, and you'll never have to worry about it down the road. I especially recommend it with a standard transmission, and here is why.... with a standard transmission when you stomp it open and it comes up on full boost it has all that load on the crank key in one direction, because the supercharger is driven off the crank of coarse, and when you go to shift each gear, the load on the key suddenly changes direction, because the moment the clutch is slammed in, it takes the load off it, and when it gets to the next gear, the moments the clutch is released again, it immediately applies the load on the key back in the other direction. That's hard on crank keys, it tends to "work" the keys,and most of the time, a single key will fail eventually.
Adding another key 180* from factory key is the solution. Most people think the SBC crank snout fails and breaks off due to its size, but in reality, it is either the key that twist off,or it bust the keyway out in the balancer, and that let's the balancer spin and **** sideways on the snout, and that's what breaks the snouts off 90% of the time. We run a BBC snout with dual keys on our drag radial car, but all of our street stuff have SBC snouts with dual keys added, even dad's truck with the Magnuson. Trust me, we have twisted our share of keys and broke one crank snout off before going to dual keys... never another problem in that area. Hope it's some helpful info, just thought I would throw it out there for you to think about while it is apart!
Brian
Last edited by Procharged GTA; Feb 13, 2014 at 11:52 PM.
Thread Starter
Supreme Member
iTrader: (4)
Joined: Oct 1999
Posts: 4,211
Likes: 3
From: GO PACK GO
Car: 83Z28 HO
Engine: Magnacharged Dart Little M 408
Transmission: G Force 5 speed
Axle/Gears: Moser 9" w/Detroit Trutrac
Re: My Dart "Little M" 409 Build….
More pics is always good!! ....
I would say with good traction and just fair driving.....it will make enough steam to run somewhere in the 11's pretty easy......but traction and launch RPM will be the key with a standard transmission....It is safe to say that it will be a monster on the street with that 5-speed!!
One thing you may think about doing Confuzed, while it is apart, is having your machine shop add you a second keyway in the crank and balancer. It will make it more reliable down the road, we have been through all of it already, and have twisted the keys out of single key setups even with our street stuff. It doesn't cost that much to have done, and it's easy while it's apart, and you'll never have to worry about it down the road. I especially recommend it with a standard transmission, and here is why.... with a standard transmission when you stomp it open and it comes up on full boost it has all that load on the crank key in one direction, because the supercharger is driven off the crank of coarse, and when you go to shift each gear, the load on the key suddenly changes direction, because the moment the clutch is slammed in, it takes the load off it, and when it gets to the next gear, the moments the clutch is released again, it immediately applies the load on the key back in the other direction. That's hard on crank keys, it tends to "work" the keys,and most of the time, a single key will fail eventually.
Adding another key 180* from factory key is the solution. Most people think the SBC crank snout fails and breaks off due to its size, but in reality, it is either the key that twist off,or it bust the keyway out in the balancer, and that let's the balancer spin and **** sideways on the snout, and that's what breaks the snouts off 90% of the time. We run a BBC snout with dual keys on our drag radial car, but all of our street stuff have SBC snouts with dual keys added, even dad's truck with the Magnuson. Trust me, we have twisted our share of keys and broke one crank snout off before going to dual keys... never another problem in that area. Hope it's some helpful info, just thought I would throw it out there for you to think about while it is apart!
Brian
....I would say with good traction and just fair driving.....it will make enough steam to run somewhere in the 11's pretty easy......but traction and launch RPM will be the key with a standard transmission....It is safe to say that it will be a monster on the street with that 5-speed!!
One thing you may think about doing Confuzed, while it is apart, is having your machine shop add you a second keyway in the crank and balancer. It will make it more reliable down the road, we have been through all of it already, and have twisted the keys out of single key setups even with our street stuff. It doesn't cost that much to have done, and it's easy while it's apart, and you'll never have to worry about it down the road. I especially recommend it with a standard transmission, and here is why.... with a standard transmission when you stomp it open and it comes up on full boost it has all that load on the crank key in one direction, because the supercharger is driven off the crank of coarse, and when you go to shift each gear, the load on the key suddenly changes direction, because the moment the clutch is slammed in, it takes the load off it, and when it gets to the next gear, the moments the clutch is released again, it immediately applies the load on the key back in the other direction. That's hard on crank keys, it tends to "work" the keys,and most of the time, a single key will fail eventually.
Adding another key 180* from factory key is the solution. Most people think the SBC crank snout fails and breaks off due to its size, but in reality, it is either the key that twist off,or it bust the keyway out in the balancer, and that let's the balancer spin and **** sideways on the snout, and that's what breaks the snouts off 90% of the time. We run a BBC snout with dual keys on our drag radial car, but all of our street stuff have SBC snouts with dual keys added, even dad's truck with the Magnuson. Trust me, we have twisted our share of keys and broke one crank snout off before going to dual keys... never another problem in that area. Hope it's some helpful info, just thought I would throw it out there for you to think about while it is apart!
Brian
As soon as I saw your post this morning, you got me thinking seriously about getting the extra keyway cut. When I dropped off my crank at the shop I had already told them to check the existing keyway real close and replace the key if needed.
I've had the block at the shop for 2 weeks now, so I called them to see how far they were along with the block and everything and to ask about cutting an extra keyway 180 out from the stock location. They don't have the right equipment to cut a keyway properly so they'd need to send the crank out.
It's not all that cheap though….nearly 100 bucks for just the crank alone. BUT - my Professional Products balancer doesn't have a second keyway cut in it…it's a 6.75" diameter, and just glancing through the usual Jeg's and Summit web sites - I'm not seeing any reasonably priced ones with two keyways already cut.
Guy at the shop tells me he has one on a big block he has, and the balancer alone was 500 bucks!!
Don't get me wrong, I'm not trying to cheap out here….but on the other hand I'm not trying to break the bank either!

So I called them back and asked them to give me the price to cut the extra keyway on both the crank and my existing balancer….so of course, it's around double the price…close to 200 bucks. SO - looks like I'll be going that route unless I can find another "reasonably" priced new balancer with two slots already cut….not looking good though...:go crazy:
Thanks for the suggestion though…I had actually thought about it from the git-go, but after hearing you've stripped single keys out….200 bucks might be cheap insurance….looks like I'll be dropping off my balancer at the shop.
EDIT: Well, I dropped off my balancer at the shop, and of course the machinist guy was out to lunch…
He did call me later and told me he found a new balancer - I forget the brand - for 299 bucks that had 2 keyway slots. I'm just going to stick with getting an additional slot machined in my existing balancer. I just can't justify buying an expensive balancer that won't add even 1/10th of a HP…or even look or work any better.
Last edited by Confuzed1; Feb 14, 2014 at 02:07 PM.
Member
Joined: May 2006
Posts: 160
Likes: 1
From: Cape Fair,Missouri
Car: 1991 Trans Am GTA Drag Radial Car
Engine: F-2 Procharged 18* 434 sbc on Alky
Transmission: Powerglide,Neal Chance Converter
Axle/Gears: Moser 9" Ford 3.50's,35 spline axle
Re: My Dart "Little M" 409 Build….
Hi Confused, I would definitely consider having that done, you don't need a $500 or even a new $299 balancer, It will be fine just having your crank cut and your balancer broached for the second key. $200 does sound a little high, i think we payed something like $75 to have the crank cut, and $50 for the balancer,but since he has to send them off, it may not be all that bad. Even $200 bucks is worth it while it's apart, than have something happen to it later down the road and possibly ruin your $700 forged crankshaft and balancer. I know the cost of things adds up in a hurry....i just hate to see ya put such a nice combination together and something like a sheared keyway tear up your nice build, and we know from decades of experience what most weak points are in supercharger applications, sometimes they can be just small things like the crank keys, and can cause catastrophic failure, so I just try to pass the experience on to everyone else. It takes out the trial and error, and cost less money to fix the weak points up front, than it does to find out what the weak points are down the road when it takes out other good parts with it when it fails. The joy of Hot Rodding..... but in the end, there is nothing better than having a combination that makes a ton of power along with being bulletproof......
Brian
but in the end, there is nothing better than having a combination that makes a ton of power along with being bulletproof......Brian
Thread Starter
Supreme Member
iTrader: (4)
Joined: Oct 1999
Posts: 4,211
Likes: 3
From: GO PACK GO
Car: 83Z28 HO
Engine: Magnacharged Dart Little M 408
Transmission: G Force 5 speed
Axle/Gears: Moser 9" w/Detroit Trutrac
Re: My Dart "Little M" 409 Build….
Brian -
Read the message above a little closer….keyway/broach are getting done!! Just don't tell me I should use a solid gold oil pan to prevent internal corrosion, I might have to decline on that one!
BTW, nothing's "Bullet-proof" where I'm from…I can bend and dent an anvil if ya give me a few minutes!
I've been meaning to ask you….what's your Dad using for a t-stat housing? I'm considering going with the Weiand one since it kind looks like it'll clear the blower snout…but it's designed for a Weiand 144 so I'm not sure….I do know the cheapest I've found one for is 113 bucks! It's this one here:
http://www.summitracing.com/parts/wnd-6200/overview/
I currently use a swivel 90 degree one, but putting the rad hose on is a tight fit to say the least! It works, but not how I want it.
-Jeff
Member
Joined: May 2006
Posts: 160
Likes: 1
From: Cape Fair,Missouri
Car: 1991 Trans Am GTA Drag Radial Car
Engine: F-2 Procharged 18* 434 sbc on Alky
Transmission: Powerglide,Neal Chance Converter
Axle/Gears: Moser 9" Ford 3.50's,35 spline axle
Re: My Dart "Little M" 409 Build….
Haha!! I promise I won't recommend a gold oil pan Really, nothing can be completely bulletproof...any mechanical parts can fail, all a person can do is do the best they can at inspecting and assembling. I can't remember for sure about dad's thermostat housing, I will try and get a picture for you...... i know it's not the high dollar Weiand housing....i think it may be just one of those chrome factory replacements, but I will find out for sure for you and get you some pictures. I do know the bracket that bolts to the front of the intake that helps support the blower snout had to be slightly clearanced on the drivers side for the radiator hose, but nothing big
Brian
Really, nothing can be completely bulletproof...any mechanical parts can fail, all a person can do is do the best they can at inspecting and assembling. I can't remember for sure about dad's thermostat housing, I will try and get a picture for you...... i know it's not the high dollar Weiand housing....i think it may be just one of those chrome factory replacements, but I will find out for sure for you and get you some pictures. I do know the bracket that bolts to the front of the intake that helps support the blower snout had to be slightly clearanced on the drivers side for the radiator hose, but nothing bigBrian
Thread Starter
Supreme Member
iTrader: (4)
Joined: Oct 1999
Posts: 4,211
Likes: 3
From: GO PACK GO
Car: 83Z28 HO
Engine: Magnacharged Dart Little M 408
Transmission: G Force 5 speed
Axle/Gears: Moser 9" w/Detroit Trutrac
Re: My Dart "Little M" 409 Build….
Haha!! I promise I won't recommend a gold oil pan Really, nothing can be completely bulletproof...any mechanical parts can fail, all a person can do is do the best they can at inspecting and assembling. I can't remember for sure about dad's thermostat housing, I will try and get a picture for you...... i know it's not the high dollar Weiand housing....i think it may be just one of those chrome factory replacements, but I will find out for sure for you and get you some pictures. I do know the bracket that bolts to the front of the intake that helps support the blower snout had to be slightly clearanced on the drivers side for the radiator hose, but nothing big
Brian
Really, nothing can be completely bulletproof...any mechanical parts can fail, all a person can do is do the best they can at inspecting and assembling. I can't remember for sure about dad's thermostat housing, I will try and get a picture for you...... i know it's not the high dollar Weiand housing....i think it may be just one of those chrome factory replacements, but I will find out for sure for you and get you some pictures. I do know the bracket that bolts to the front of the intake that helps support the blower snout had to be slightly clearanced on the drivers side for the radiator hose, but nothing bigBrian


Member
Joined: May 2006
Posts: 160
Likes: 1
From: Cape Fair,Missouri
Car: 1991 Trans Am GTA Drag Radial Car
Engine: F-2 Procharged 18* 434 sbc on Alky
Transmission: Powerglide,Neal Chance Converter
Axle/Gears: Moser 9" Ford 3.50's,35 spline axle
Re: My Dart "Little M" 409 Build….
It looks like he is using the same thermostat housing as you have been.... i took some pictures earlier, but for some reason it keeps failing when I try to upload them here....but if you could PM your number I can text them to you..... let me know
Brian
Brian
Thread Starter
Supreme Member
iTrader: (4)
Joined: Oct 1999
Posts: 4,211
Likes: 3
From: GO PACK GO
Car: 83Z28 HO
Engine: Magnacharged Dart Little M 408
Transmission: G Force 5 speed
Axle/Gears: Moser 9" w/Detroit Trutrac
Re: My Dart "Little M" 409 Build….
Yep - the t-stat housing your Dad is running is just as bad as mine is..  But it's a nice looking setup! I wish I had got the polished blower!!
If you look in the pic above, you can see the hose cover I put on so the hose is somewhat protected where it runs under the blower snout. I may just roll the dice and buy the Weiand t-stat housing and see if it'll work better than what I have now. Probably be the most expensive housing I'll ever buy!
On another note, I got to digging around in the AFR box the heads came in, and I found these 2-piece pushrod guide plates….I'm not digging them at all. Anyone used these things? Do they work well? -I'm tempted to just reuse the Comp plates I have on my old Dart heads...
But it's a nice looking setup! I wish I had got the polished blower!! If you look in the pic above, you can see the hose cover I put on so the hose is somewhat protected where it runs under the blower snout. I may just roll the dice and buy the Weiand t-stat housing and see if it'll work better than what I have now. Probably be the most expensive housing I'll ever buy!
On another note, I got to digging around in the AFR box the heads came in, and I found these 2-piece pushrod guide plates….I'm not digging them at all. Anyone used these things? Do they work well? -I'm tempted to just reuse the Comp plates I have on my old Dart heads...
Thread Starter
Supreme Member
iTrader: (4)
Joined: Oct 1999
Posts: 4,211
Likes: 3
From: GO PACK GO
Car: 83Z28 HO
Engine: Magnacharged Dart Little M 408
Transmission: G Force 5 speed
Axle/Gears: Moser 9" w/Detroit Trutrac
Re: My Dart "Little M" 409 Build….
On another note, I got to digging around in the AFR box the heads came in, and I found these 2-piece pushrod guide plates….I'm not digging them at all. Anyone used these things? Do they work well? -I'm tempted to just reuse the Comp plates I have on my old Dart heads...
BTW, I'm all signed up for the 2014 Power Tour this year! Hotel/Motel rooms reserved….So barring any emergencies - it's happening!
What took me by surprise is the wife is going with! So…now I REALLY don't know which car I'm taking. I mean, the Z28 is a beast, but lacks any real creature comforts whatsoever…not even cup holders….but it does have T-tops…. Where as the Challenger not only has cup holders, but GPS, A/C, lumbar…everything! I got this feeling the wife will insist we take that one…but I know the Z28 will be a bigger hit at the car shows…just glad I have the good fortune to even choose..
My machine shop calls me up, and asks me if I happened to drop off a crank shaft!
 …you bet I did!! It's a Scat forged, so I hope you find it!! They just called me back and said it was found….geeezz….
They're sending it out to get the additional keyway cut.
On another note, I decided to re-curve my timing on the Mallory Unilite distributor I have. For you guys that have dealt with those things, you know what a PITA installing springs in the Mallory is.
I did find out that I thought i had the thing limited to only give me 16 degrees total advance….but it wasn't even set close! I found it set to give me almost unlimited advance! I'm lucky I didn't detonate the thing into oblivion!
So now it's REALLY set up to limit mechanical advance to 16 degrees, and I have springs in it now to begin advance at 1200 rpm's, and all in by 3000 rpm's….
I'm doing what I can in the garage, but it's pretty difficult to keep it heated in there. Temps have been in the teens around here, and the wood burner can only do so much…now they're predicting another 4-7" of snow today...
Member
Joined: May 2006
Posts: 160
Likes: 1
From: Cape Fair,Missouri
Car: 1991 Trans Am GTA Drag Radial Car
Engine: F-2 Procharged 18* 434 sbc on Alky
Transmission: Powerglide,Neal Chance Converter
Axle/Gears: Moser 9" Ford 3.50's,35 spline axle
Re: My Dart "Little M" 409 Build….
I believe the AFR guide plates will work just fine....they should be #6103 I think. They make them adjustable so you can get the rocker perfectly centered over the valve tip. Dad has an older set of AFR 195's(non-Eliminators) on his car with the D1SC Procharger, and they have 1 piece guide plates, but we did notice the rockers didn't set exactly centered on the valves on some of them, something to do with the valve spacing being a hair different than stock, but not enough to require special valvetrain parts. I believe the newer Eliminator stuff went to the 2 - piece guide plates so you have adjustability to get the rocker more centered over the valve. You will be fine using those......
On another note..... I'm glad you found and Fixed your timing advance, that is super critical. I know what you mean when you talk about that Mallary distributor with the weights and springs being in the bottom of it, I run the 42 Series Mallory in my own car, a 1978 Trans Am with a 461 stroker (pontiac 400 stroked to 461 C.I.) and I like the distributor, but it would be a pain to adjust the timing curve.....i don't have to worry about it, because I run mine locked out at 36* and use the start retard in my Mallory HyFire 685 to pull 20* out when cranking.
If you set your distributor up for 16* of mechanical, I would set intial timing at 18* for a total of 34*(16* mechanical + 18* intial = 34* total timing, (Roots Supercharged engines love ALOT of intial timing!).....then I would start out conservitive by taking out 1* per pound of boost, so if it pumps 6 lbs boost, it will pull timing down to a pump gas safe 28* under boost. You may find that the sweet spot will be around 30* under boost, if that's the case, you would only have to pull .75* per lb, for a total of 29.5* at 6 lbs. of boost. I would use whatever spring combination it takes to get it all in by around 2600 RPM, the faster you can get the timing in it without it detonating, the more responsive it's going to be,2600 RPM is a good number for these small roots superchargers......And while crusing you will have your vacuum advance on top of the 34* to help with gas mileage and smooth cruising. If it were mine, I would limit the vacuum advance to only add around 10*.....so you would have 34* timing + 10* vacuum advance for a total of 44* of "cruise" timing. If you have to much vacuum advance, you will start to feel the car surge at cruise, its telling you it doesnt want that much cruise advance, and you will have to limit the amount down until the sure goes away. Hope this helps!
Brian
Last edited by Procharged GTA; Feb 19, 2014 at 09:11 AM.
Thread Starter
Supreme Member
iTrader: (4)
Joined: Oct 1999
Posts: 4,211
Likes: 3
From: GO PACK GO
Car: 83Z28 HO
Engine: Magnacharged Dart Little M 408
Transmission: G Force 5 speed
Axle/Gears: Moser 9" w/Detroit Trutrac
Re: My Dart "Little M" 409 Build….
What I didn't mention as far as the timing goes, is that I did have the mechanical set to begin at 1200 and end at 2800....I only changed it to end at 3000 because of the detonation I was experiencing before, and I thought it was too aggressive. BUT - now that I think more about it, that very well could of been because it wasn't limited at all. It was advancing even further after 2800, and until I took the thing apart I didn't realize it. Hmmm....
Now you have me thinking about switching back to slightly lighter springs, because I know you're right...it likes a lot of initial advance (18-21 degrees) plus whatever to add up to around 34 to 36 total mechanical....I've always had the vacuum canister set up to add 10 additional, so I wasn't too far off with what you said above!
Good to hear those guide plates will work OK...I've just never used those before, but I'll try them.
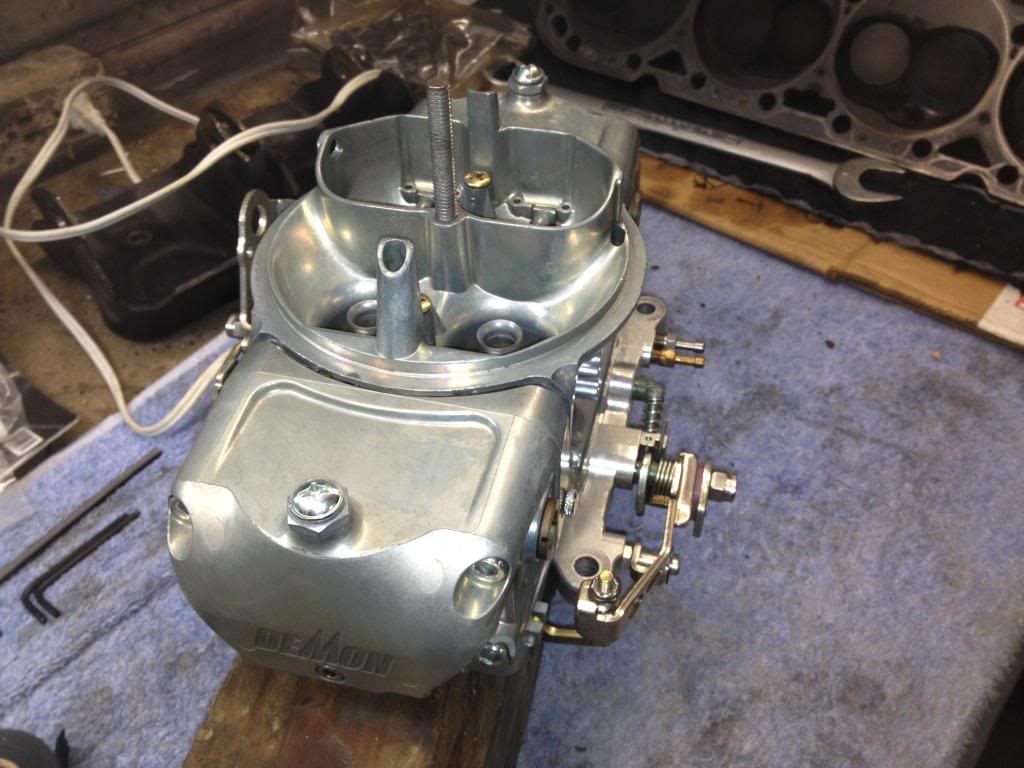
I've also been rebuilding a "new to me" 750 Speed Demon carb I got on fleabay a while ago. It's taking place of the Speed Demon 650 I had on it previously. It supposedly sat on a show truck it's entire life, and. I kinda think it's true....it looks darn near new!! And it's an older one that I found out doesn't have the "idle-ease" feature....I never really used that. feature anyway.
I did re-use my baseplate from the 650 since it is ported for roots blowers to intake reference the power valve. A good thing to have on the street IMO. I'll post up a few pics of it.
Now you have me thinking about switching back to slightly lighter springs, because I know you're right...it likes a lot of initial advance (18-21 degrees) plus whatever to add up to around 34 to 36 total mechanical....I've always had the vacuum canister set up to add 10 additional, so I wasn't too far off with what you said above!
Good to hear those guide plates will work OK...I've just never used those before, but I'll try them.
I've also been rebuilding a "new to me" 750 Speed Demon carb I got on fleabay a while ago. It's taking place of the Speed Demon 650 I had on it previously. It supposedly sat on a show truck it's entire life, and. I kinda think it's true....it looks darn near new!! And it's an older one that I found out doesn't have the "idle-ease" feature....I never really used that. feature anyway.
I did re-use my baseplate from the 650 since it is ported for roots blowers to intake reference the power valve. A good thing to have on the street IMO. I'll post up a few pics of it.
Thread Starter
Supreme Member
iTrader: (4)
Joined: Oct 1999
Posts: 4,211
Likes: 3
From: GO PACK GO
Car: 83Z28 HO
Engine: Magnacharged Dart Little M 408
Transmission: G Force 5 speed
Axle/Gears: Moser 9" w/Detroit Trutrac
Re: My Dart "Little M" 409 Build….
Here you can see the difference from the standard carb baseplate vs. the intake referenced base plate for the power valve. Note the baseplate on the left has an additional port on the front to hook a vacuum hose to. That hose runs from "true" intake vacuum under the blower to that port.
-Also, the baseplate on the right doesn't have the "idle-ease" feature (the adjustment in the center of the plate)…normally theres a hole drilled in where the air cleaner hold-down stud screws in to allow adjustment (to allow additional air) …the older style 750 carb I'm using doesn't have that hole…so I shut that adjustment, and it's hidden under the air horn of the "new" 750 now…unless I drill a hole to access it.
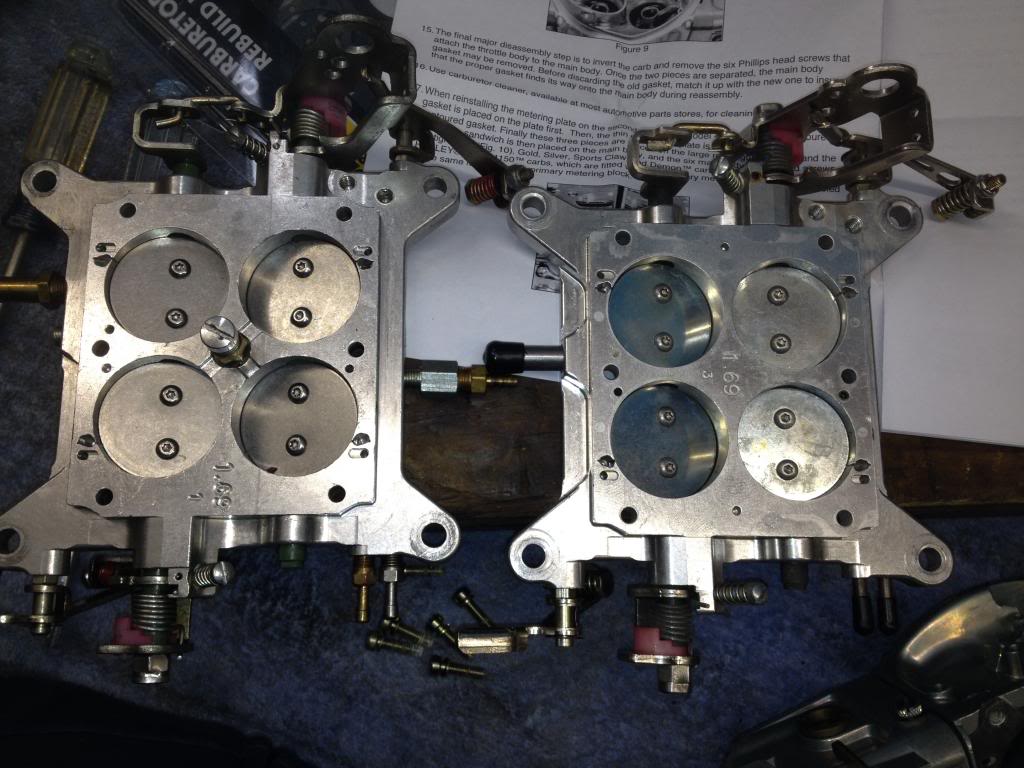
And a couple shots of the "new to me" carb…it really looks like new, but it's old! Totally rebuilt and good to go…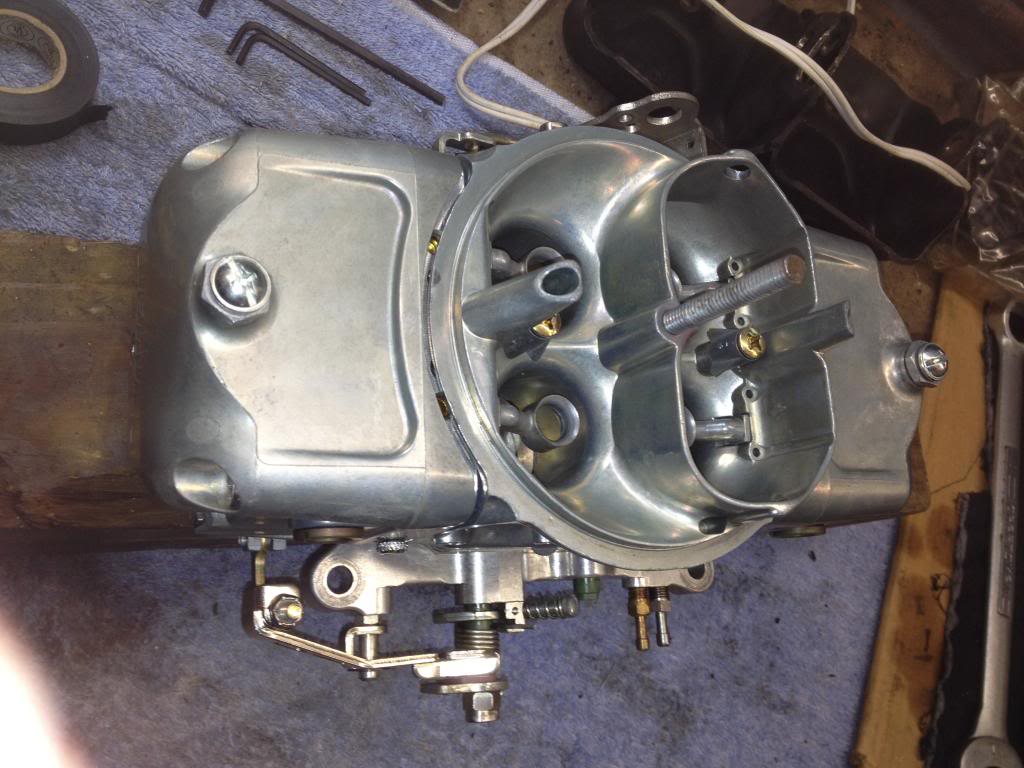


Thread Starter
Supreme Member
iTrader: (4)
Joined: Oct 1999
Posts: 4,211
Likes: 3
From: GO PACK GO
Car: 83Z28 HO
Engine: Magnacharged Dart Little M 408
Transmission: G Force 5 speed
Axle/Gears: Moser 9" w/Detroit Trutrac
Re: My Dart "Little M" 409 Build….
BTW, I decided to just go ahead and use this MSD 6BTM PN 6462….unbelievable that they are still selling those for nearly the same cost as the Programmable 6AL-2!!
I've never had it on the car since I got it. It's pretty similar to the universal MSD with boost retard I've been running except that this one has the multi-spark also built in….and it's not a nice programmable one like the MSD 6AL-2 that Procharged has....
I've read the instructions on the 6AL-2, and it seems like an awesome way to control timing curves based on launch, rev and boost. There's a good chance I'll end up getting one later on….
I am going to go back into the distributor and speed up the curve just a little.
Thread Starter
Supreme Member
iTrader: (4)
Joined: Oct 1999
Posts: 4,211
Likes: 3
From: GO PACK GO
Car: 83Z28 HO
Engine: Magnacharged Dart Little M 408
Transmission: G Force 5 speed
Axle/Gears: Moser 9" w/Detroit Trutrac
Re: My Dart "Little M" 409 Build….
Machine shop called today…they asked me if I had the cam card for the cam I dropped off to them. So I brought it to them, and the owner showed me the build so far….looking nice!!
They were file fitting the gapless rings (standard 2nd ring) and he then pointed out the slight slack in the timing chain. Indeed it does have more slack than I'd like to see on a fresh build. Kinda weird since I know this chain only has MAYBE 10K on it tops, and it seemed so much tighter when it was installed in the OEM block. It's a Cloyes "true roller" chain. I just told him to replace it….nothing but mo' money….$$ I suppose a billet gears and chain would be better - but a bunch mo' money! So I'll stick with a replacement chain…
Short story long, they should have the short block built in the next couple of days. Of course, due to my work schedule I can't do anything with it for the next couple of weeks…figures...
Thread Starter
Supreme Member
iTrader: (4)
Joined: Oct 1999
Posts: 4,211
Likes: 3
From: GO PACK GO
Car: 83Z28 HO
Engine: Magnacharged Dart Little M 408
Transmission: G Force 5 speed
Axle/Gears: Moser 9" w/Detroit Trutrac
Re: My Dart "Little M" 409 Build….
It's back!!!
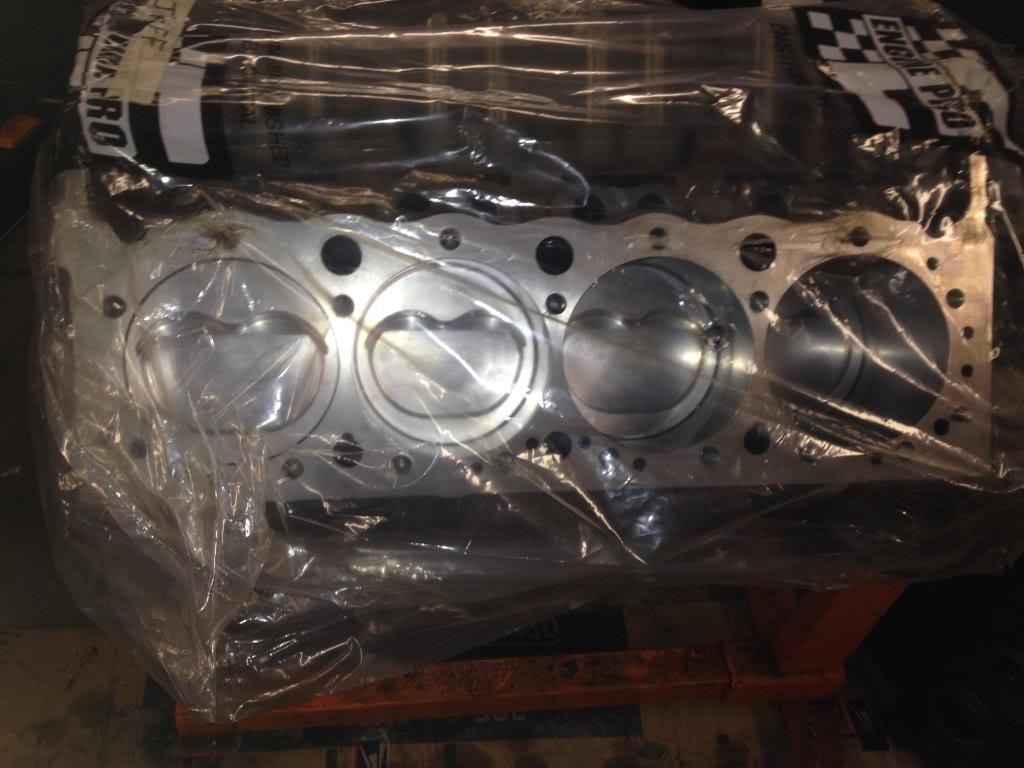
And a few other new things!
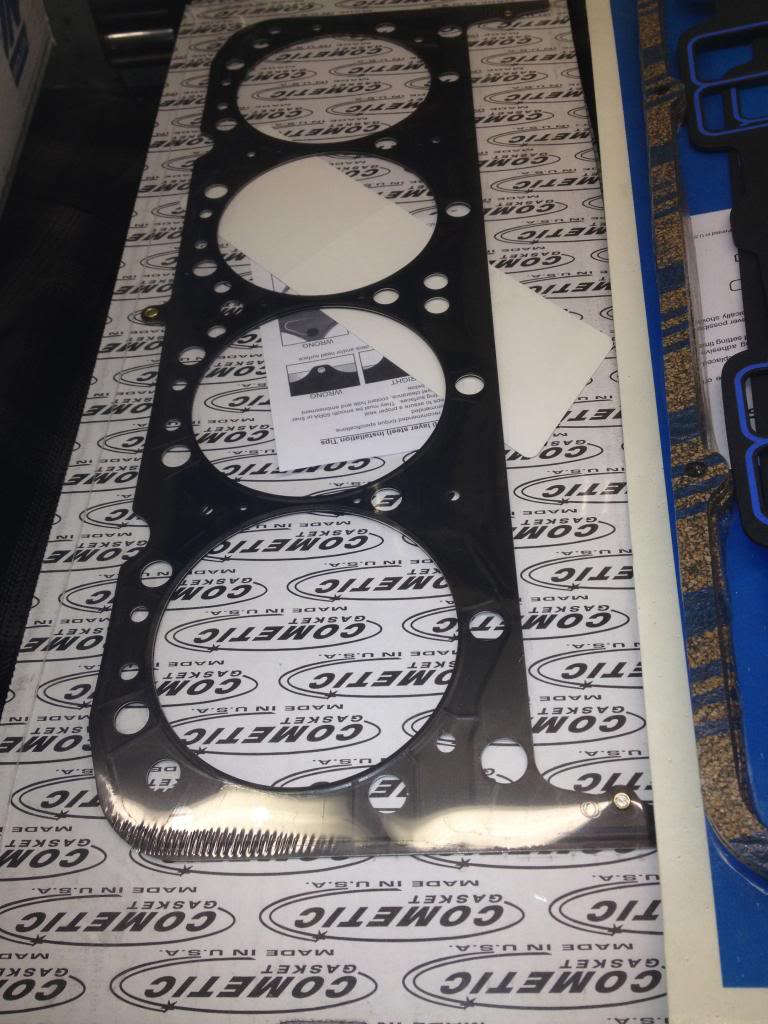
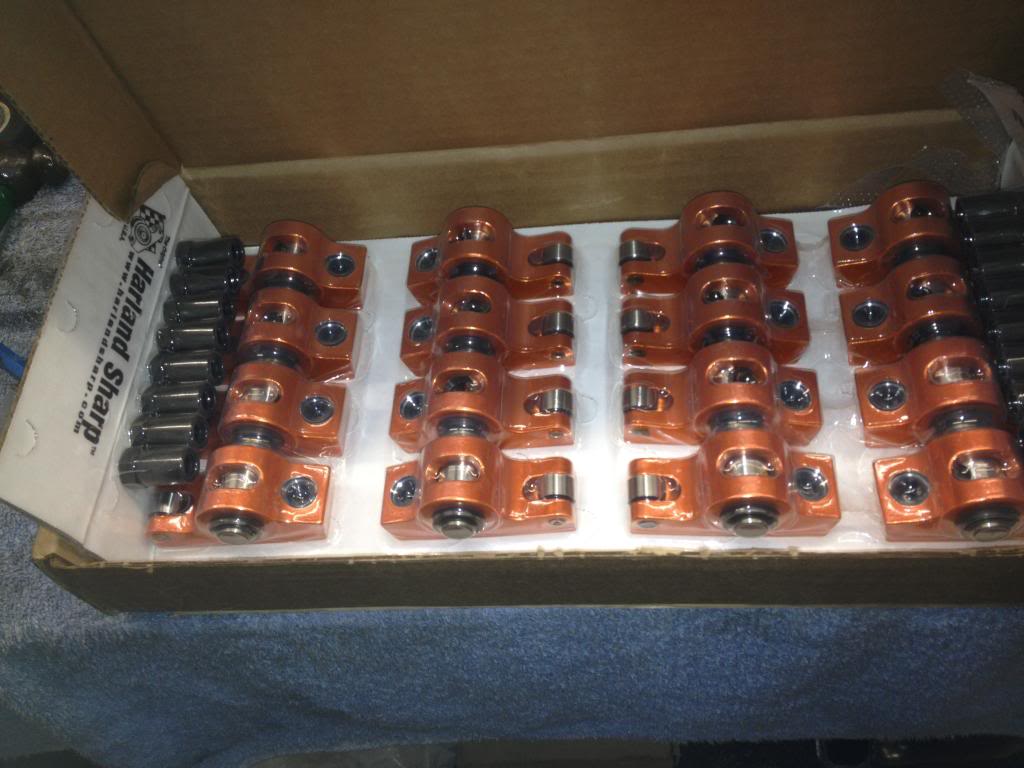
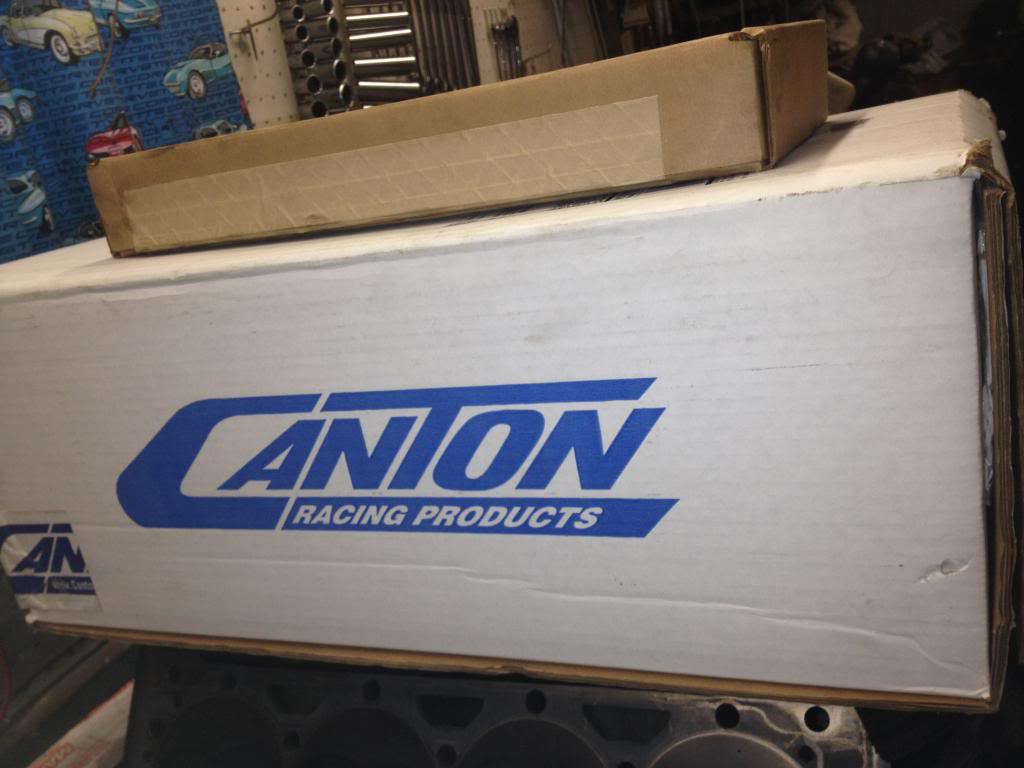

And a few other new things!


Member
Joined: May 2006
Posts: 160
Likes: 1
From: Cape Fair,Missouri
Car: 1991 Trans Am GTA Drag Radial Car
Engine: F-2 Procharged 18* 434 sbc on Alky
Transmission: Powerglide,Neal Chance Converter
Axle/Gears: Moser 9" Ford 3.50's,35 spline axle
Re: My Dart "Little M" 409 Build….
Awesome!!! Nice collection of parts.... Great choice of head gaskets for a blown street application!! I was acually gonna go over the head gaskets with you also when it came time.....but no need for that..As they are exactly what I would have recommended....
Brian
Brian
Thread Starter
Supreme Member
iTrader: (4)
Joined: Oct 1999
Posts: 4,211
Likes: 3
From: GO PACK GO
Car: 83Z28 HO
Engine: Magnacharged Dart Little M 408
Transmission: G Force 5 speed
Axle/Gears: Moser 9" w/Detroit Trutrac
Re: My Dart "Little M" 409 Build….
Awesome!!! Nice collection of parts.... Great choice of head gaskets for a blown street application!! I was acually gonna go over the head gaskets with you also when it came time.....but no need for that..As they are exactly what I would have recommended....
Brian
Brian
The shop actually recommend the head gaskets. Up to this point, I had always ran the Fel-Pro 400 composite marine gaskets. I suppose I used them because I was worried about the deck surface not being smooth enough to run MLS type gaskets....but that shouldn't be an issue now.
The shop I went to does good work, but I ended up spending almost a grand more than I thought it would cost. So many additional charges for fitting the gapless rings, labor hours for cleaning parts etc....
Again, I normally just get the machine work done on the block and do the whole assembly myself. But with my work schedule the way it is, and trying to get this together before warm weathers here...it's only 12 degrees outside right now...
Member
Joined: May 2006
Posts: 160
Likes: 1
From: Cape Fair,Missouri
Car: 1991 Trans Am GTA Drag Radial Car
Engine: F-2 Procharged 18* 434 sbc on Alky
Transmission: Powerglide,Neal Chance Converter
Axle/Gears: Moser 9" Ford 3.50's,35 spline axle
Re: My Dart "Little M" 409 Build….
I understand completely! We have 8" snow on the ground here right now....it's 16* outside....we have been crazy busy with snow plowing last couple days... we do all of our own assembly on everything also....engine/transmissions/rearends and so on...my dad specializes in Engines and Automatic transmissions as he has done it for 40 years now.....i understand being busy with work....sometimes it doesn't allow for any spare time to assemble yourself.....
As for the crank/balancer....Most of the time, the keyway that is added will be a 1/4" key, while the factory key will remain a 3/16". The bigger 1/4" key adds strength, but 2- 3/16" keys would be fine too....you would just have to always make sure to have the engine at top dead center, and install the balancer at "0".....because with 2 keys of the same size, it would be possible for someone who didn't realize it to install the balancer 180* out..... It's great to see how this is progressing along.....it won't be long now!
Brian
Joined: Dec 2000
Posts: 1,954
Likes: 68
From: NC
Car: 1987 Iroc
Engine: 357 Single plane and a Ysi vortech
Transmission: T56
Axle/Gears: 3.50 9"
Re: My Dart "Little M" 409 Build….
Nice build.
I will do a little M 408 if my 357 ever goes.
I will do a little M 408 if my 357 ever goes.

Member
Joined: Jan 2014
Posts: 170
Likes: 0
Joined: Sep 2003
Posts: 25,896
Likes: 430
From: Pittsburgh PA
Car: 89 Iroc-z
Engine: 555 BBC Turbo
Transmission: TH400
Axle/Gears: MWC 9” 3.00
Re: My Dart "Little M" 409 Build….
I thought the small water holes were there for a design reason, as in keeping higher pressure there to further avoid boiling of fluid and improve heat transfer? I thought about opening mine up but declined since i read so many opinions for each case, and so far no issues. It runs warmer in warm air but its a turbo motor with alot of heat sources underhood.
Thread Starter
Supreme Member
iTrader: (4)
Joined: Oct 1999
Posts: 4,211
Likes: 3
From: GO PACK GO
Car: 83Z28 HO
Engine: Magnacharged Dart Little M 408
Transmission: G Force 5 speed
Axle/Gears: Moser 9" w/Detroit Trutrac
Are we talking about steam holes?? Dart's literature says not required on their little M blocks...
I'm not aware of any other cooling holes that don't line up with head gaskets I've used in the past.
I'm not aware of any other cooling holes that don't line up with head gaskets I've used in the past.
Joined: Sep 2003
Posts: 25,896
Likes: 430
From: Pittsburgh PA
Car: 89 Iroc-z
Engine: 555 BBC Turbo
Transmission: TH400
Axle/Gears: MWC 9” 3.00
Re: My Dart "Little M" 409 Build….
No the coolant passages. You'll see the gasket lays over coolant passages, the gasket side has tiny holes maybe 1/8-1/4" diameter when coolant passage is size of a nickel or quarter lol some say to port match it some say leave it alone that restriction is there for a reason. I dont know which is correct but leaving alone worked ok for me. Dont know if larger holes works any better
